
CR615 - Radio SALORA - Free user manual and instructions
Find the device manual for free CR615 SALORA in PDF.

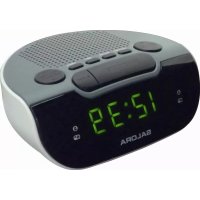
| Product type | AM/FM clock radio |
| Brand | Salora |
| Model | CR615 |
| Main power supply | AC 230V~50 Hz |
| Backup power supply | 1 9V battery (6LR61 or equivalent) for settings backup |
| Frequency ranges | AM: 530-1600 kHz, FM: 88-108 MHz |
| Functions | Radio, radio alarm, sound alarm, snooze, sleep, dimmer, LED display |
| Display type | LED |
| Alarm | Radio or sound signal with hour/minute settings |
| Snooze | 9 minutes |
| Sleep | Programmable from 1 minute to 1 hour 59 minutes |
| Dimmer | 2 positions: High and Low |
| FM antenna | Extendable wire antenna at the back |
| AM antenna | Internal directional antenna (orientation of the device) |
| Cleaning | Soft slightly damp cloth; avoid solvents like alcohol, gasoline |
| Warnings | Do not obstruct ventilation; keep away from liquids and flames; replace battery with same type |
Frequently Asked Questions - CR615 SALORA
User questions about CR615 SALORA
0 question about this device. Answer the ones you know or ask your own.
Ask a new question about this device
Download the instructions for your Radio in PDF format for free! Find your manual CR615 - SALORA and take your electronic device back in hand. On this page are published all the documents necessary for the use of your device. CR615 by SALORA.
USER MANUAL CR615 SALORA
Please read these instructions before use and retain for future reference.
LOCATION OF CONTROLS

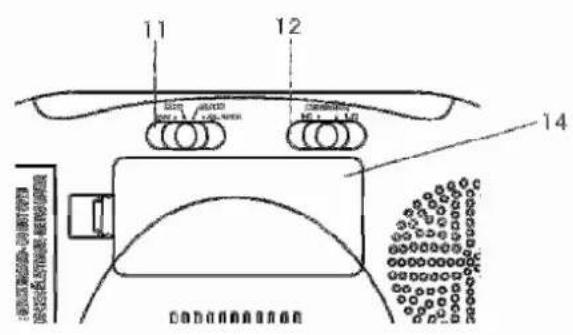
- LED Display
- Volume Control
- Tuning Control
- Band Selector
- Snooze Button
- Alarm Set Button
- Time Set Button
-
Sleep Set Button
-
Minute Set Button
- Hour Set Button
- Function Selector
- Dimmer Selector
- FM Antenna
- Battery Door
- Mains Lead
- Auto Indicator
REAL TIME SETTING
- Set the Function Selector (11) to"OFF". Connect the mains lead to the power supply. The clock display will flash on and off indicating a power interruption and that the displayed time is incorrect.
- To set the correct time, press the Time Set Button (7) and Hour Set Button (10), or Minute Set Button (9), together, until the correct time is displayed.
- Open the Battery Door (14) on the back of the unit and put in a 6LR61 (or equivalent) 9-volt battery (battery not included). The purpose of this battery is to store the information relating to alarm time and to keep the clock functioning in the event of disconnection from the mains supply or power interruption. Should this occur, the clock would continue to keep time, but will not display.
Note: The clock accuracy will decrease due to the voltage drop of the backup battery. If no backup battery is installed or the power interruption is prolonged, you will need to set the clock again.
PLEASE NOTE: When operating from battery only, the clock will only remain accurate for a short
EN
period of time. It is important that the mains supply is restored as soon as possible.
ALARM TIME SETTING
- Press the Alarm Set Button (6) and simultaneously press the Hour Set Button (10) or Minute Set Button (9) as appropriate until the required alarm time is reached.
- To double check the alarm time, simply press the Alarm Set Button (6) then the display will show the pre-set alarm time.
DIMMER CONTROL
Switch the Dimmer Selector (12) to High or Low position as required.
RADIO OPERATION
For AM reception, this unit uses an internal directional aerial, rotate the unit for best reception. For FM reception, the wire FM Antenna (13) on the back of the unit should be fully unwound.
- Set the Function Selector (11) to the "ON" position.
- Set the Band Selector (4) to the required waveband.
- Use the Tuning Control (3) to select the desired station.
- Adjust the Volume Control (2) to the desired listening level.
- To turn off the radio, set the Function Selector (11) to "OFF". If the radio does not switch off this may be caused by inadvertent operation of the Sleep Set Button (8). To cancel this, press the Snooze Button (5) once.
WAKE TO RADIO
Having selected your desired station and adjusted the desired listening level, proceed as follows:
- Follow the instructions for "ALARM TIME SETTING" above.
- When the desired alarm time has been selected, set the Function Selector (11) to the "AUTO" position.
- The radio will switch on automatically at the pre-set alarm time.
- The alarm can be temporarily stopped for 9 minutes by pressing the Snooze Button (5) once.
- Depress the Alarm Set Button (6) to turn off the radio. The alarm will activate again after 24 hours unless the Function Selector (11) is set to "OFF".
WAKE TO BUZZER
- Follow the instructions for "ALARM TIME SETTING" above.
- When the desired alarm time has been selected, set the Function Selector (11) to the "ALARM" position.
- The alarm tone will switch on automatically at the pre-set alarm time.
- The alarm can be temporarily stopped for 9 minutes by pressing the Snooze Button (5) once.
- Depress the Alarm Set Button (6) to turn off the buzzer. The alarm will activate again after 24 hours unless the Function Selector (11) is set to "OFF".
SLEEP TO RADIO
The radio can be set to switch off automatically after a period of time from 1 minute to 1 hour 59 minutes, by following this procedure:-
Set the FUNCTION Selector (11) to "OFF" position or, if the Alarm is to be activated, the "AUTO" position or "ALARM" position. Then depress the Sleep Set Button (8) and the Minute Set Button (9), or Hour Set Button (10) until the display shows the exact sleep time you wish the radio to continue to play before switch off. To switch off the radio before the end of the registered sleep time period, simply press the Snooze Button (5) once.
CLEANING
Clean the cabinet with a soft cloth moistened with water or mild detergent. Do not use solvents such as alcohol, benzene or thinner, as they may damage the cabinet finish. Make sure to disconnect the mains lead from the supply before cleaning.
CAUTION
- Ensure minimum distances around the apparatus for sufficient ventilation. The ventilation should not be impeded by covering the ventilation openings with items, such as newspapers, table-cloths, curtains, etc.
- No naked flame sources, such as lighted candles, should be placed on the apparatus.
- It shall not be exposed to dripping or splashing and that no objects filled with liquids, such as vases, shall be placed on the apparatus.
- Do not place the product in closed bookcases or racks without proper ventilation.
- Where the mains plug is used as the disconnect device, the disconnect device shall remain readily operable.
- Attention should be drawn to the environmental aspects of battery disposal.
- The use of apparatus in moderate climates.
- Danger of explosion if battery is incorrectly replaced. Replace only with the same or equivalent type.
- Batteries (battery pack or battery installed) shall not be exposed to excessive heat such as sunshine, fire or the like.
- The location of the rating label is affixed on the bottom surface of appliance.
SPECIFICATION
Power Source: AC 230V~50Hz
Frequency Range: AM 530 - 1600 KHz
FM 88-108 MHz
We reserve the right to modify product design and/or specifications without prior notice.
Brand : SALORA
Model : CR615
Category : Radio