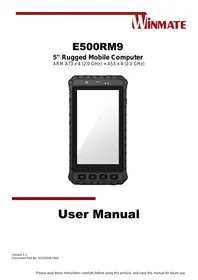
E500RM9 - Rugged laptop Winmate - Free user manual and instructions
Find the device manual for free E500RM9 Winmate in PDF.


User questions about E500RM9 Winmate
0 question about this device. Answer the ones you know or ask your own.
Ask a new question about this device
Download the instructions for your Rugged laptop in PDF format for free! Find your manual E500RM9 - Winmate and take your electronic device back in hand. On this page are published all the documents necessary for the use of your device. E500RM9 by Winmate.
USER MANUAL E500RM9 Winmate
Chapter 1: Read Me First 4
1.1 Advisory Conventions 4
1.2 Safety Information 5
1.3 Handling and Maintenance 7
1.4 Declaration of Conformity (DoC) 8
1.5 Copyright Notice 10
1.6 Trademark Acknowledgement 10
1.7 Disclaimer 10
Chapter 2: Getting Started 11
2.1 Introduction 11
2.2 Unpacking 11
2.3 Description of Parts 12
2.4 First-Time Operation 13
2.4.1 Inserting Battery Pack 13
2.4.2 Installing SIM and MicroSD Card 14
2.4.3 Connecting to Power Supply 14
2.4.4 Charging the Battery 14
2.5 Turning On and Off the Device 15
2.5.1 Turning On 15
2.5.2 Turning Off 15
2.6 Resetting to Factory Defaults 16
Chapter 3: Using the Device 17
3.1 Using the Touch Screen 17
3.2 Waking Up the Phone 17
3.3 Using the Home Screen 18
3.3.1 Personalizing Home Screen 18
3.3.2 Viewing other parts of the Home Screen 20
3.4 Status and Notification Icons 21
3.5 Using the On-Screen Keyboard 21
3.5.1 Entering Text 22
3.5.2 Editing Text 23
3.6 Display Settings 24
3.7 Audio Profile Settings 25
3.7.1 Sound Settings 25
3.7.2 Adjusting Volume 25
3.8 Language and Keyboard Settings 26
3.9 Using the Phone 28
3.9.1 To Make a Phone Call 28
3.9.2 To Make a Phone Call Using Contact List 28
3.9.3 Answering or Declining Calls 29
3.10 Messaging 29
3.10.1 Sending Text Messages 29
3.10.2 Opening and Responding to Text Messages 30
3.11 About Phone 30
Chapter 4: Winmate Kiosk Manager 31
4.1 Lock Applications 31
4.2 Change Password 33
4.3 Unlock Applications Launcher 34
4.4 White List App 35
Chapter 5: Networks and Wireless Devices 37
5.1 Connecting to Mobile Networks 37
5.2 Connecting to WLAN Networks 37
5.2.1 Turning on WLAN and Connecting to WLAN Networks 37
5.2.2 Adding WLAN Network 38
5.3 Connecting to BT Devices 39
5.3.1 Turning BT On or Off 39
5.3.2 Connecting the BT Device 39
5.3.3 Disconnecting BT Device 40
5.4 Connecting to Computer via USB 40
5.4.1 USB Computer Connection 40
5.4.2 USB Debugging Settings 41
Chapter 6: Using Camera 44
6.1 Capturing Photos or Video 44
6.1.1 Opening Camera 44
6.1.2 Taking Pictures 44
6.1.3 Switching Between Front and Rear Cameras 44
6.1.4 Viewing pictures 45
6.1.5 Shooting Videos 45
6.2 The Gallery 45
Chapter 7: Battery Warm Swap (Optional) 46
Chapter 8: Capturing Data 47
8.1 Using NFC (Optional) 47
8.2 Using Barcode Reader (Optional) 48
8.2.1 Turn On and Off Barcode Reader 48
8.2.2 Change the Barcode Symbologies 49
8.2.3 Add Commands to the Barcode Output 49
8.2.4 Change the Barcode Reader Scan Type 50
8.2.5 Change the WDC Setting or Reset to Default 50
8.2.6 Scanning Barcodes 51
8.2.7 Scanning Tips and Considerations 51
8.3 Using Smart Card Reader (Optional) 52
8.3.1 Use Smart Card Reader 52
8.3.2 Smart Card Reader SDK 53
8.4 Using Fingerprint Scanner (Optional) 53
8.5 Docking Connector Pin Definition 53
8.6 Hand Strap Installation 54
Appendix 55
Appendix A: Basic Troubleshooting 55
Appendix B: Software Development Kit 56
Appendix C: Product Specifications 57
Appendix D: OS Image Update 58
Appendix E: OTA Update Guide 58
Chapter 1: Read Me First
1.1 Advisory Conventions
Four types of advisories are used throughout the user manual to provide helpful information or to alert you to the potential for hardware damage or personal injury. These are Notes, Important, Cautions, and Warnings. The following is an example of each type of advisory.

Note:
A note is used to emphasize helpful information

Important:
An important note indicates information that is important for you to know.

Caution A Caution alert indicates potential damage to hardware and explains how to avoid the potential problem.
Warning! An Electrical Shock Warning indicates the potential harm from electrical hazards and how to avoid the potential problem.
Do Not Disassemble, Modify, or Insert Sharp Objects Into the Battery Pack. Electrolyte leakage, generation of heat, ignition or rupture may result.
Do Not Short the Positive (+) and Negative (-) Terminals of the Battery. Generation of heat, ignition or rupture may result. When carrying or storing the device, do not place the battery pack together with articles that may contact electricity.
Do Not Apply Shocks to the Battery by Dropping It or Applying Strong Pressure to It. Electrolyte leakage, generation of heat, ignition or rupture of battery may occurs.
Do Not Charge the Battery Other Than Methods Those Specified In This Manual. If the battery is not charged using one of the specified methods, electrolyte leakage, generation of heat, ignition or rupture may result.
When the Battery Pack Has Deteriorated, Replace It with a New Battery. Continued use of a damaged battery pack may result in heat generation, ignition or battery rupture.
Do Not Expose the Battery Pack to Excessive Heat, or Extreme Heat (Near Fire, in Direct Sunlight for example) Generation of heat, ignition or rupture may result
Do Not Use the Battery Pack With Any Other Products. The battery pack is rechargeable and is only designed for this specific product. If it is used with a product other than the specified product, electrolyte leakage, generation of heat, ignition or rupture may result.
Do Not Use This Product With Battery Other Than the One Specified.
Discontinue using device immediately if you notice the battery is swelling, or looks puffy or misshapen. Do not attempt to charge or use the device. Do not handle a damaged or leaking battery. Do not let leaking battery fluid come into contact with your eyes, skin or clothing.
Do not block any ventilation openings. Do not place the product against a wall or in an enclosed space as doing so might impede the flow of cooling air.
Do not place the product near any heat sources such as radiators, warm air intakes, stoves or other heat-generating devices (including amplifiers or other heat producing equipment).
Protect the power cord from being crushed or pinched, particularly in the area of the plugs, any receptacles used, and the point of exit from the apparatus. Do not break off the ground pin of the power cord.
Do not disregard the safety that a polarized or grounded connection can provide. A polarized connection consists of two plugs, one of which is larger than the other. A grounded connection has two blades and a third one that is grounded. If the main plug provided cannot be inserted into your outlet, consult an electrician to replace your obsolete outlet.
Use only accessories specified by the manufacturer.
This product should not be used near water such as bathtubs, sinks, swimming pools, wet basement, etc.
Use only with its transport carriage, stand, tripod, console or table specified by the manufacturer or sold with the product. When using a carriage, move the carriage assembly with the product carefully to avoid damage from falling over.
Unplug this apparatus during lightning storms or when it is not being used for long periods.
Refer all servicing to qualified service personnel. A technical intervention is required when the apparatus has been damaged in any way, for example if the power cord or plug is damaged, liquid has been spilled or objects have fallen inside the unit, if the product has been exposed to rain or moisture, if it does not operate normally or if it has been dropped.
It is recommended to reboot the device when some functions are defect or inactive. If it still can't solve the problems, please contact your dealer or agent.
1.3 Handling and Maintenance

General Guideline
Guide Général
Keep the product at least 13 cm (5 inches) away from electrical appliances that can generate a strong magnetic field such as TV, refrigerator, motor, or a large audio speaker.
Do not place heavy objects on top of the tablet computer as this may damage the display.
The screen surface can be easily scratched. Use with care. Do not use paper towels to clean the display but use the included cleaning cloth. Avoid touching it with a pen or pencil.
To maximize the life of the backlight in the display, allow backlight to automatically turn off as a result of power management. Avoid using a screen saver or other software that prevents the power management from working.
Use a soft cloth moistened with water or a nonalkaline detergent to wipe the exterior of the product.
Gently wipe the display with a soft, lint-free cloth. Do not use alcohol or detergent on the product.
Use your finger or the stylus on the display. Using sharp or metallic object may cause scratches and damage the display, thereby causing errors.
Use a soft cloth to remove dirt on the display. The touchscreen surface has a special protective coating that prevents dirt from sticking to it. Not using a soft cloth may cause damage to the special protective coating on the touchscreen surface. To clean off hard to remove dirt, blow some steam on the particular area and gently wipe away using a soft cloth.
Do not use excessive force on the display. Avoid placing objects on top of the display as this may cause the glass to break.
When there is a noticeable discrepancy in the operation of the touchscreen function (your touch does not correlate to the proper location on the screen), recalibrate the touchscreen display.
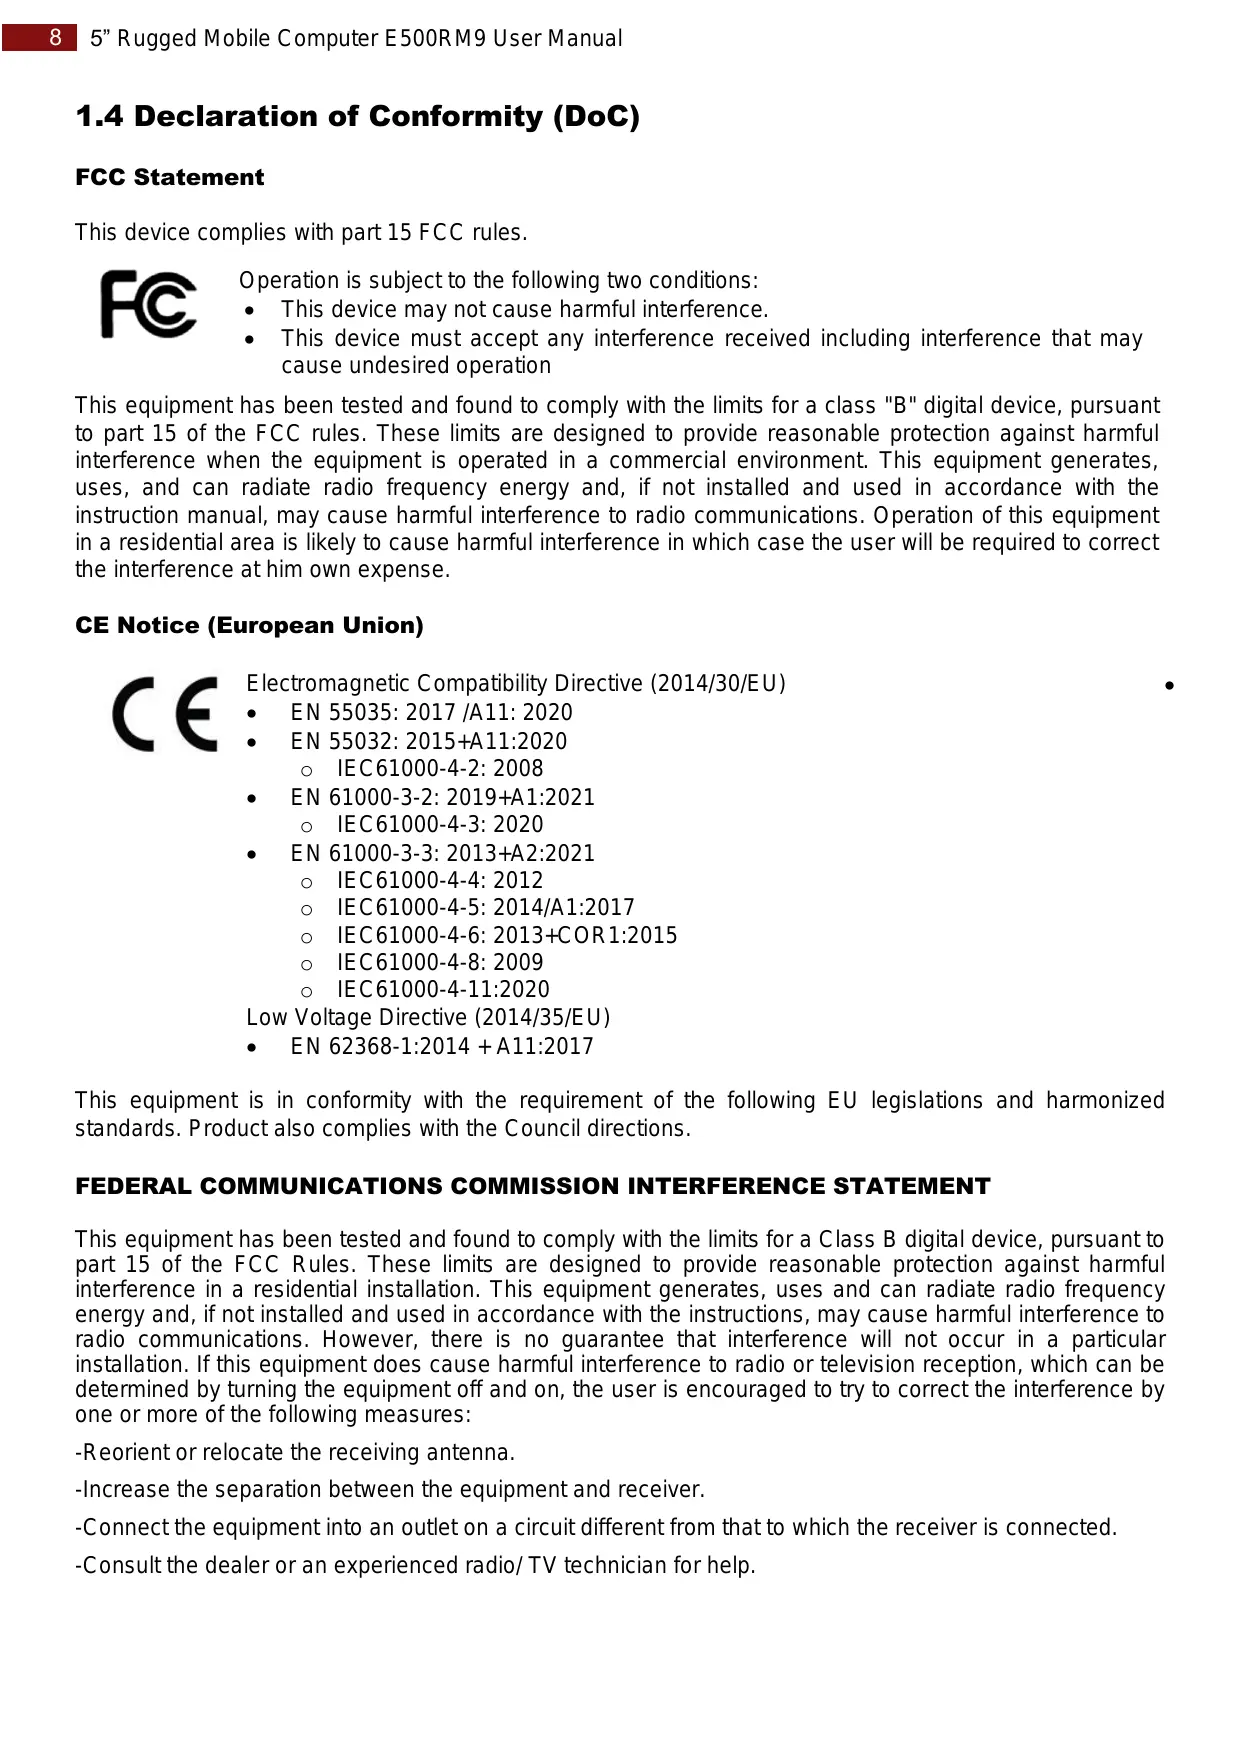
1.4 Declaration of Conformity (DoC)
FCC Statement
This device complies with part 15 FCC rules.

Operation is subject to the following two conditions:
This device may not cause harmful interference.
- This device must accept any interference received including interference that may cause undesired operation
This equipment has been tested and found to comply with the limits for a class "B" digital device, pursuant to part 15 of the FCC rules. These limits are designed to provide reasonable protection against harmful interference when the equipment is operated in a commercial environment. This equipment generates, uses, and can radiate radio frequency energy and, if not installed and used in accordance with the instruction manual, may cause harmful interference to radio communications. Operation of this equipment in a residential area is likely to cause harmful interference in which case the user will be required to correct the interference at him own expense.
CE Notice (European Union)

Electromagnetic Compatibility Directive (2014/30/EU)
EN 55035:2017/A11:2020
EN 55032: 2015+A11:2020
O IEC61000-4-2: 2008
EN 61000-3-2: 2019+A1:2021
O IEC61000-4-3:2020
EN 61000-3-3: 2013+A2:2021
O IEC61000-4-4:2012
。 IEC61000-4-5: 2014/A1:2017
。 IEC61000-4-6: 2013+COR1:2015
O IEC61000-4-8:2009
O IEC61000-4-11:2020
Low Voltage Directive (2014/35/EU)
EN 62368-1:2014 + A11:2017
This equipment is in conformity with the requirement of the following EU legislations and harmonized standards. Product also complies with the Council directions.
FEDERAL COMMUNICATIONS COMMISSION INTERFERENCE STATEMENT
This equipment has been tested and found to comply with the limits for a Class B digital device, pursuant to part 15 of the FCC Rules. These limits are designed to provide reasonable protection against harmful interference in a residential installation. This equipment generates, uses and can radiate radio frequency energy and, if not installed and used in accordance with the instructions, may cause harmful interference to radio communications. However, there is no guarantee that interference will not occur in a particular installation. If this equipment does cause harmful interference to radio or television reception, which can be determined by turning the equipment off and on, the user is encouraged to try to correct the interference by one or more of the following measures:
-Reorient or relocate the receiving antenna.
-Increase the separation between the equipment and receiver.
-Connect the equipment into an outlet on a circuit different from that to which the receiver is connected.
-Consult the dealer or an experienced radio/ TV technician for help.
CAUTION:
Any changes or modifications not expressly approved by the grantee of this device could void the user's authority to operate the equipment.
This device complies with Part 15 of the FCC Rules. Operation is subject to the following two conditions: (1) this device may not cause harmful interference, and (2) this device must accept any interference received, including interference that may cause undesired operation.
RF Exposure Information (SAR)
This device meets the government's requirements for exposure to radio waves. This device is designed and manufactured not to exceed the emission limits for exposure to radio frequency (RF) energy set by the Federal Communications Commission of the U.S. Government.
The exposure standard employs a unit of measurement known as the Specific Absorption Rate, or SAR. The SAR limit set by the FCC is 1.6W / kg . Tests for SAR are conducted using standard operating positions accepted by the FCC with the EUT transmitting at the specified power level in different channels.
The FCC has granted an Equipment Authorization for this device with all reported SAR levels evaluated as in compliance with the FCC RF exposure guidelines. SAR information on this device is on file with the FCC and can be found under the Display Grant section of www.fcc.gov after searching on FCC ID: PX9E500RM9.
Canada, Industry Canada (IC) Notices
This device contains licence-exempt transmitter(s)/receiver(s) that comply with Innovation, Science and Economic Development Canada's licence-exempt RSS(s). Operation is subject to the following two conditions:
(1) This device may not cause interference.
(2) This device must accept any interference, including interference that may cause undesired operation of the device.
Canada, vis d'Industry Canada (IC)
Radio Frequency (RF) Exposure Information
The radiated output power of the Wireless Device is below the Industry Canada (IC) radio frequency exposure limits. The Wireless Device should be used in such a manner such that the potential for human contact during normal operation is minimized.
This device has been evaluated for and shown compliant with the IC Specific Absorption Rate ("SAR") limits when operated in portable exposure conditions.
1.5 Copyright Notice
No part of this document may be reproduced, copied, translated, or transmitted in any form or by any means, electronic or mechanical, for any purpose, without the prior written permission of the original manufacturer.
1.6 Trademark Acknowledgement
Brand and product names are trademarks or registered trademarks of their respective owners.
1.7 Disclaimer
Winmate Inc. reserve the right to make changes, without notice, to any product, including circuits and/or software described or contained in this manual in order to improve design and/or performance. We assume no responsibility or liability for the use of the described product(s) conveys no license or title under any patent, copyright, or masks work rights to these products, and make no representations or warranties that these products are free from patent, copyright, or mask work right infringement, unless otherwise specified. Applications that are described in this manual are for illustration purposes only. We make no representation or guarantee that such application will be suitable for the specified use without further testing or modification.
Chapter 2: Getting Started
This chapter tells you step by step how to get the mobile computer up and running.
2.1 Introduction
Congratulations on purchasing Winmate® 5-inch Rugged Mobile Computer E500RM9.
Winmate® E500RM9 Rugged Mobile Computer is an enterprise-class Rugged Mobile Computer with powerful mobile computing solution. The E500RM9 Series Rugged Mobile Computer packs WLAN, BT, GPS, and WWAN function - all into a single device. With great multiple wireless communicate design, this product will be applicable to mobile worker, business application, and IT requirements.
Highlights
ARM A73 x 4 (2.0 GHz) + A53 x 4 (2.0 GHz)
- 5" 1280 x 720 resolution
AndroidTM 11.0
- Rated for extreme temperature use
2.2 Unpacking
Check and identify the standard supplied accessories.
Standard factory shipment list:
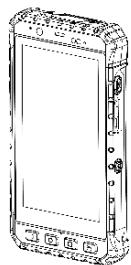
E500RM9
Varies by product specifications
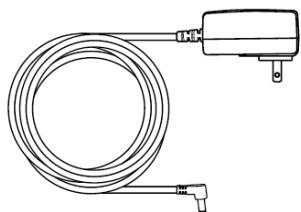
Power Plug
Varies by country
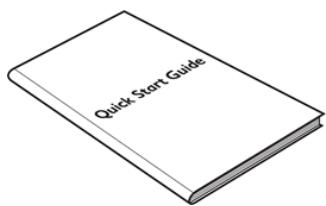
Quick Start Guide (Hardcopy)
Part No. 9152111K105B
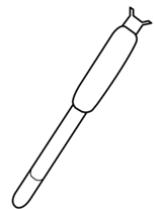
Hand Strap
Part No. 9B0000000416
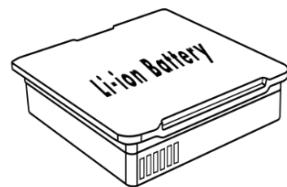
Li-ion Battery
Part No. 32000000001K
Optional Accessories:
- Charging Dock
DD-E50R-2: Part No.98TA05Z00002
MD-E50R-6: Part No. 98DP05A00001
- Battery
Part No. 98K004A0000N
3.7V 3900mAh Li-ion removable battery
- Battery Charging Dock
BD-3900-2: Part No.98K004A0000G
BD-3900-6: Part No. 98K000A0004G
- Micro SD Card
Part No.7600000000V
Dimension: 85.9 × 163.2 × 22.5 mm
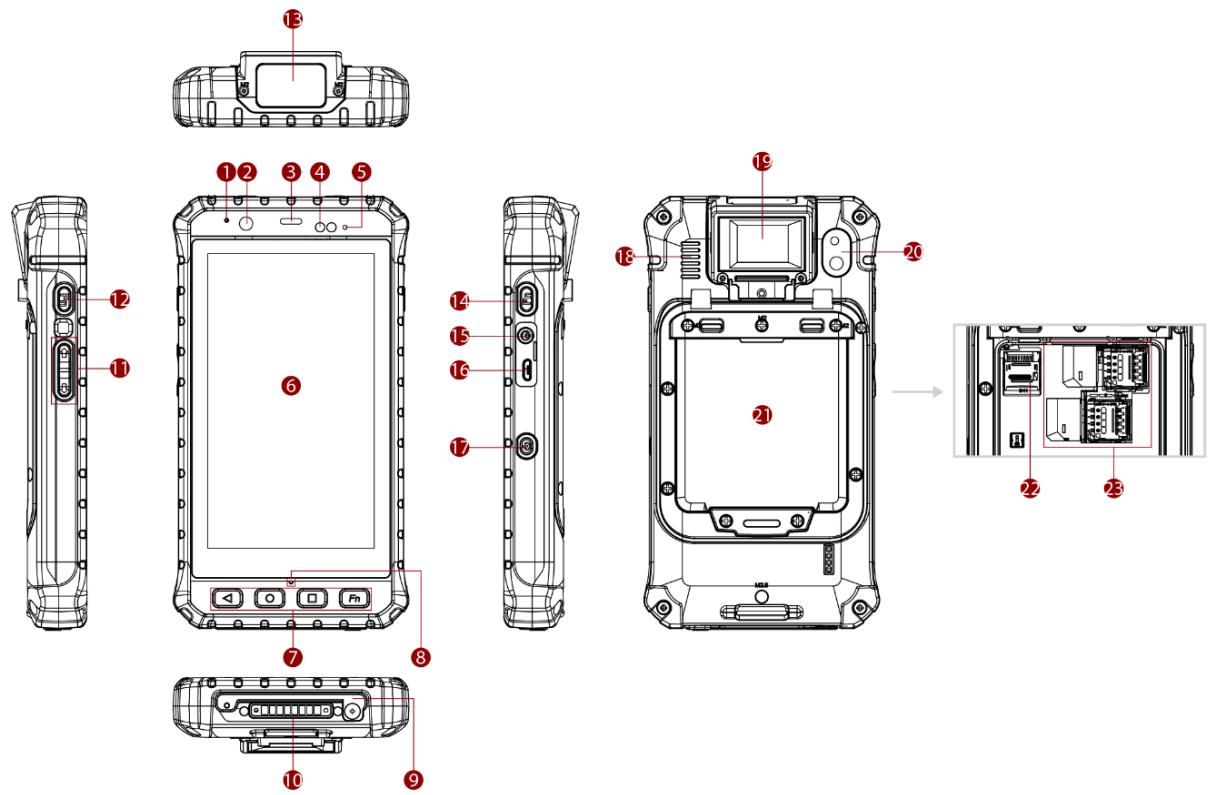
2.3 Description of Parts
| No | Item | Description | |
| 1 | Microphone | For audio recording and communication. | |
| 2 | Front Camera | 8 Megapixel Webcam | |
| 3 | Front Receiver | Use to listen during a phone conversation. | |
| 4 | Light Sensor | Detect the availability of light and automatically control the brightness of a screen backlight intensity | |
| 5 | LED Indicator | LED indicator indicates the battery power or charging status. • Red: 0~89% • Green: 90~100% • Off: the mobile computer is not charging nor properly connected. | |
| 6 | 5" Touch Screen | Display and act as one of the inputs for the mobile computer | |
| 7 | Physical Buttons | ▲ | Back to the previous utility's screen |
| ○ | Open the home screen | ||
| □ | Open the menu page | ||
| Fn | Use to trigger the barcode reader function (optional) Note: Fn key functions may be programmed according to your order. | ||
| 8 | Microphone | For audio recording and communication. | |
| 9 | Smart Card Reader (Optional) | Read card information | |
| 10 | Docking Connector | Connect to desk docking | |
| 11 | Volume Buttons | Increase and decrease volume | |
| 12 | Function Button | Use to trigger the barcode reader for E500RM9 series with barcode reader (only for products with barcode reader) | |
| 13 | Barcode Reader (Optional) | 1D/2D Barcode Reader (*or a flat cover for device without barcode) | |
| 14 | Function Button | Use to trigger the barcode reader for E500RM9 series with barcode reader (only for products with barcode reader) | |
| 15 | DC Jack | Charging the device | |
| 16 | Micro USB | For data transfer and connect to the peripheral devices | |
| No | Item | Description | |
| 17 | Power Button | Turn on/off the device | |
| 18 | Speaker | Send out the voice from the device | |
| 19 | Fingerprint reader (Optional) | Scan fingerprints | |
| 20 | Rear Camera | 13MP Autofocus Camera. | |
| 21 | Battery | 3.7V, 3900 mAh with warm swappable function (Optional) | |
| 22 | MicroSD Card Slot | Memory card reader port for SD Card | |
| 23 | SIM Card Slot | Slot to insert Micro SIM card. | |
2.4 First-Time Operation
2.4.1 Inserting Battery Pack


Warning! Discontinue using device immediately if you notice the battery is swelling, or looks puffy or misshapen. Do not attempt to charge or use the device. Do not handle a damaged or leaking battery. Do not let leaking battery fluid contact with your eyes, skin, or clothing.
Caution To keep battery health and prevent possible issues from battery over-discharged, please charge the computer built-in back-up battery once every two months.
To install the standard battery pack:
- Disconnect any cords connected to the mobile computer and turn the device over, back facing up.
- Locate the Battery Lock Latch and push it to the "Unlocked" position.
- Insert the battery with the connector-pins side first, and then lower the battery into the battery compartment. The battery will be flat against the housing once fully inserted. Slide the Battery Lock to the "Locked" position
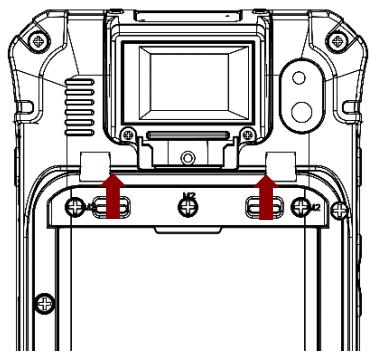
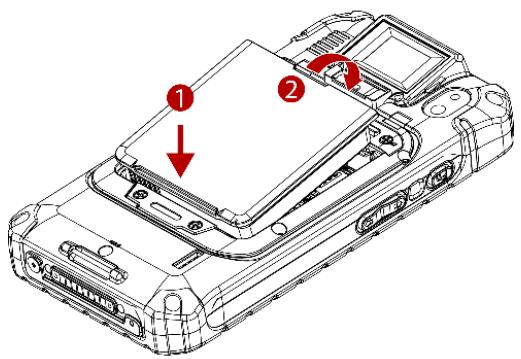
To remove the battery pack:
- Shut down the device. Disconnect any cords connected to the device.
- Turn the mobile computer over, back facing up.
- Locate the Battery Lock and slide it to the "Unlocked" position.
- Lift the battery out of the compartment.

2.4.2 Installing SIM and MicroSD Card
To install the SIM card:
- Disconnect any cords and powered off the mobile computer. Remove the battery, as described in the section Inserting Battery Pack.
- Push and lift the SIM-card slot.
- Insert the SIM card into the SIM-card slot. Chip/contact is facing down.
- Push the SIM-Card slot back to the original position.
- Put the battery back.
To install MicroSD Card:
- Remove the battery, as described in the section Inserting Battery Pack.
- Push and lift the microSD-card slot.
- Insert microSD card into slot. Chip/contact is facing down.
- Close the microSD card holder.
- Put back the battery, as described in the section Inserting Battery Pack.
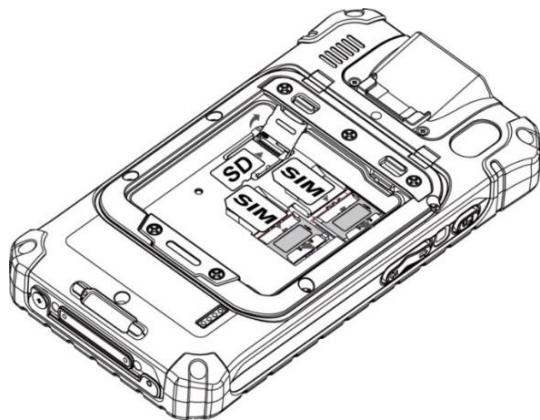
2.4.3 Connecting to Power Supply
The mobile computer operates either on external AC power or internal battery power. It is recommended to use AC power when you start up the mobile computer for the first time.

Caution Use only the AC adapter included with your device. Using other AC adapters may damage the mobile computer and the Battery.

Caution For users start up the mobile computer for the first time with internal battery power, please make sure the battery is fully charged before using.
Perform the following to connect the mobile computer to AC Power:
- Open I/O protective cover by pulling out the latch.
- Plug the power adapter into the DC Jack port of the device.
- Plug the power cord into the electrical outlet.
2.4.4 Charging the Battery
Caution

- The lithium battery used in this tablet may swell after being charged/ discharged many times, but there is no problem regarding safety.
- Continued use in such a state may result in the battery getting jammed, so please stop using the battery, and purchase a new one.
Please charge the battery before using the device for the first time. Charge the battery until the LED indicator turns solid green. To charge the E500RM9, use a cable or a docking with appropriate power supply.
| LED Status | Indicator |
| Off | The device is not charging or not properly connected |
| Solid Red | Battery charged 0~89%. |
| Solid Green | Battery charged 90~100%. |
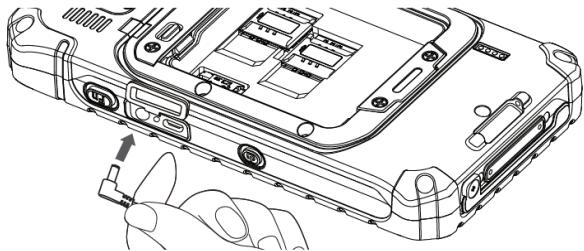
2.4.4.1 Charging the battery using DC Jack Cable
2.4.4.2 Charging the battery using Battery Charger
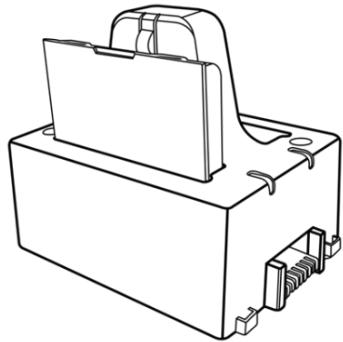
This docking provides input: 12V/36W DC in.
- Connect the power supply output connector to the input power port on the DC Jack cable.
- Remove the protective rubber and connect the DC Jack cable to the side of E500RM9. The battery charge LED indicates the battery charging status.
Connect the battery charger dock to power, insert the battery into the slot to begin charging.
2.5 Turning On and Off the Device
This section describes how to turn on/ off the device.
2.5.1 Turning On
- Press and hold the power button for 3 seconds, located on the right side of the unit.
- When the device vibrates, release the power button.
- The desktop screen is displayed.

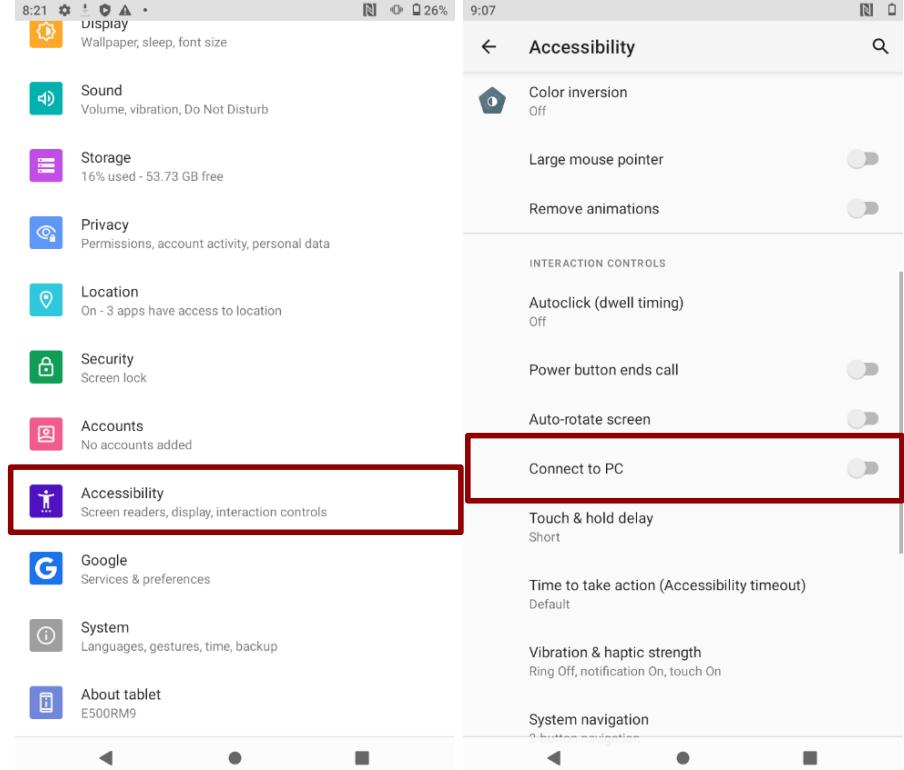
Note: For power saving purpose, please enable Connect to PC in Accessibility settings. When connected to PC external WWAN and USB on Docking will be disabled.
2.5.2 Turning Off
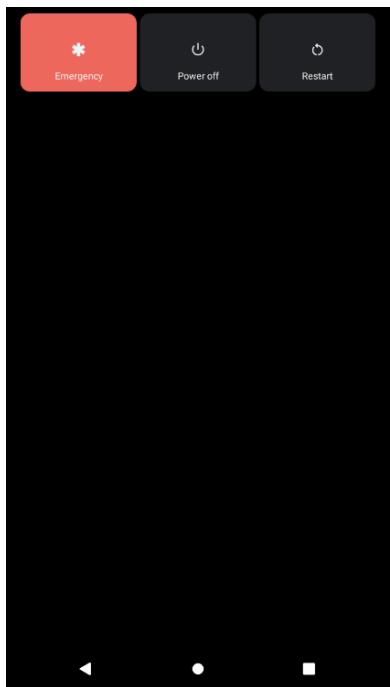
- To turn off the device, press and hold the power button until the phone options menu appears, tap the Power Off.
- User can also use the Phone options menu to put the device into emergency mode and restart.
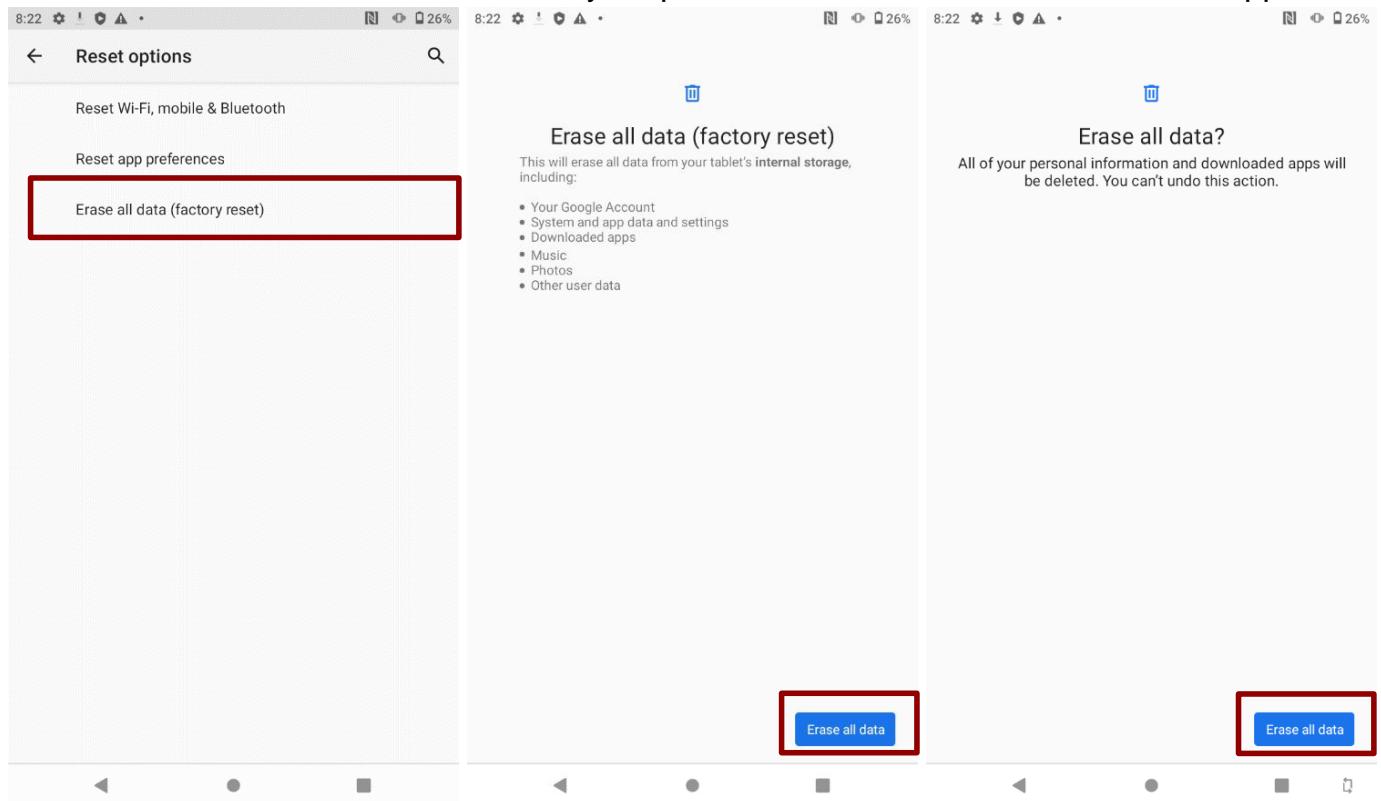
2.6 Resetting to Factory Defaults
To reset the device to factory defaults:
- Slide from the bottom side, then open Settings app.
- Tap System > Advanced > Reset options.
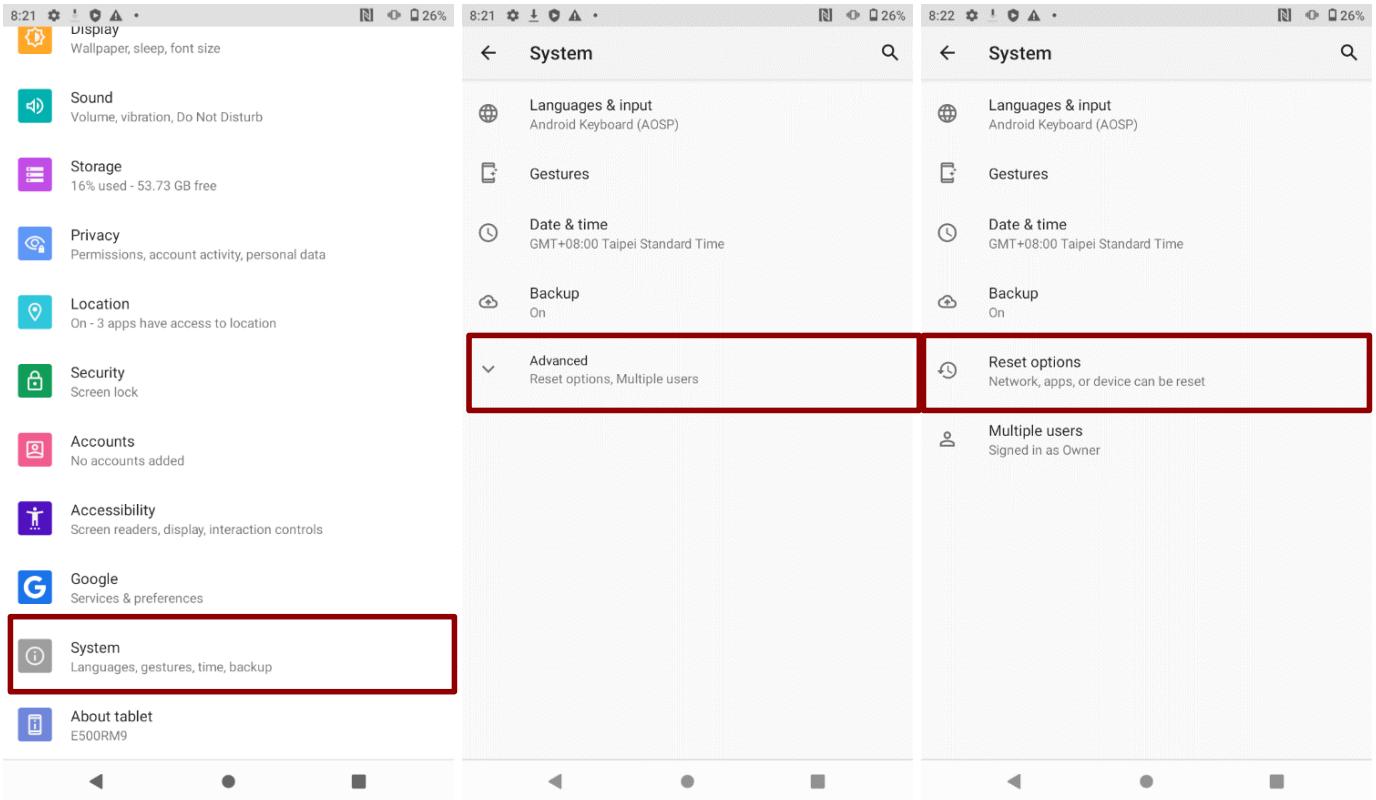
- Tap Erase all data (factory reset) to reset the tablet.
- Read all the available information and then press Erase all data to delete all the data in storage such as music or photo.
- Press Erase all data to remove all your personal information and downloaded apps.
Chapter 3: Using the Device
This chapter explains how to use the buttons, status icons, and controls of the E500RM9 mobile computer running on Android 11.0 operating system and provides instructions on entering and capturing data.
3.1 Using the Touch Screen
The touchscreen supports the core gestures for Android.
| Gesture | Action | Description |
| Tap | To select or activate something | |
| Tap & Hold | Touch and hold an item on the screen by touching it and not lifting your finger until it responds | |
| Touch, Hold & Drag | Touch and hold an item for a moment and then without lifting your finger, move your finger on the screen until you reach the target position. i.e. moving the apps around the home screen | |
| Swipe or slide | Quickly move the finger across the surface of the screen. i.e. slide a lock screen to open the lock | |
| Double-tap | Tap quickly twice on a webpage, screen, or App to zoom | |
| Scale | Place two finger on the screen and pinching them together |
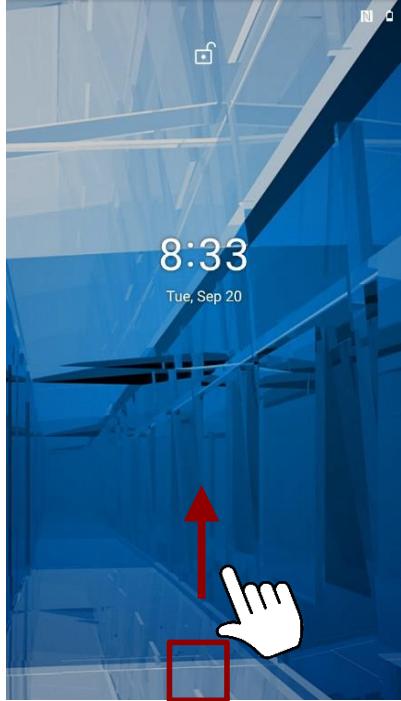
3.2 Waking Up the Phone
If you do not use the device for a while, the screen dims and then darkens to conserve the Battery. To wake up the device:
- Press the Power button on the right side of the device.
- Drag the screen upwards to unlock.
3.3 Using the Home Screen
Home screen is the starting point to access all the features on your mobile computer. It displays application icons, widgets, shortcuts, and other features. User can personalize the home screen.
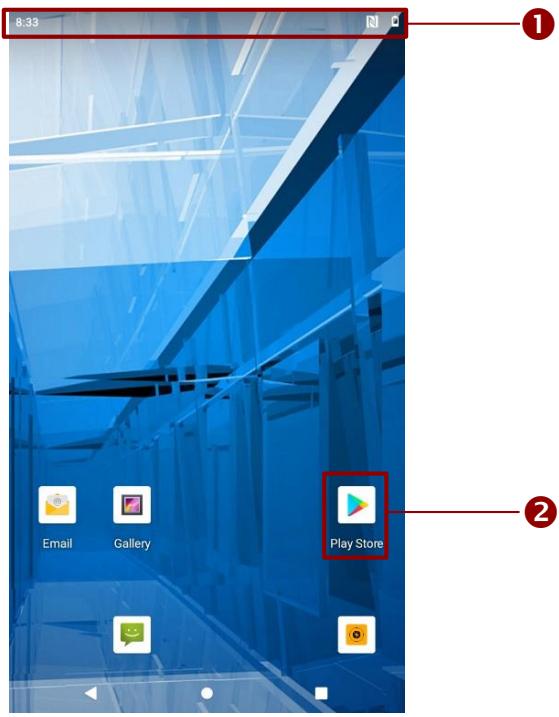
- Status Bar shows the time, signal strength, battery status, and other information. It also displays notification icons.
- Applications, user can use directly on the home screen.
3.3.1 Personalizing Home Screen
User can add application icons, shortcuts, widgets, and other items to the empty part of the Home screen, or switch the wallpaper.
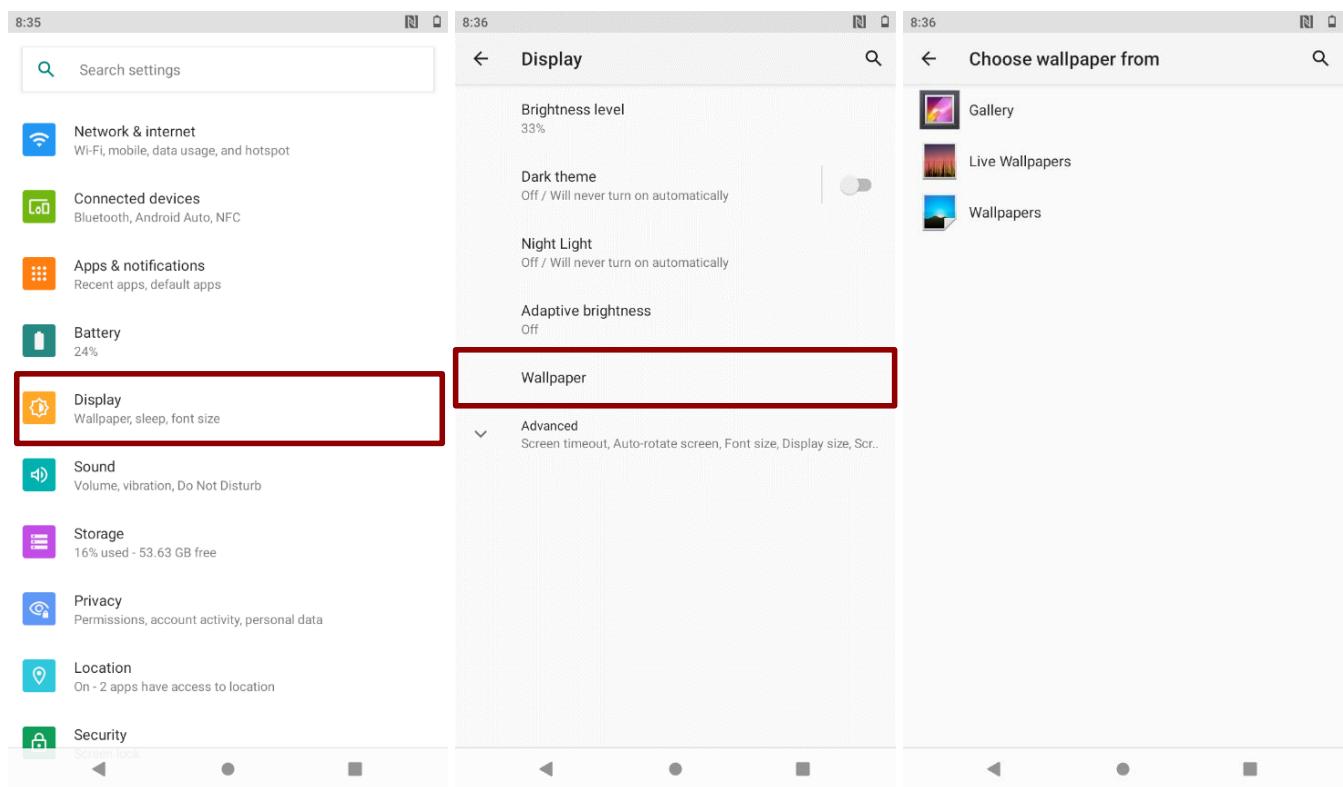
To change wallpaper on the HOME SCREEN:
- Swipe from the bottom of the main desktop, tap Settings > Display > Wallpaper.
- In the Wallpaper menu select the location of wallpaper, and then tap the type of item you want to add.
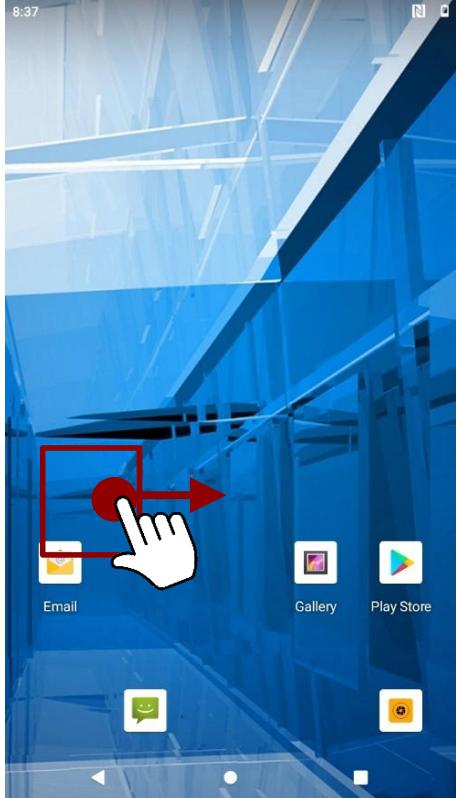
To move an item on the HOME SCREEN:
- Tap and hold the item you want to move, until it can be moved.
- Drag it to a new location on the screen.
- Place the item where you want to put it and lift your finger.
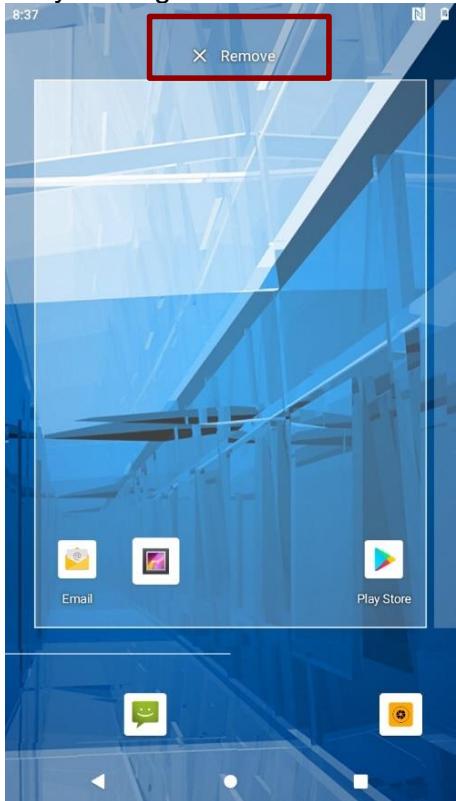
To remove items from the HOME SCREEN:
- Tap and hold the item you want to remove. The launcher icon will show Remove on the top of the screen.
- Drag the item you want to remove to the Remove icon.
- When the icon turns red, release your finger.
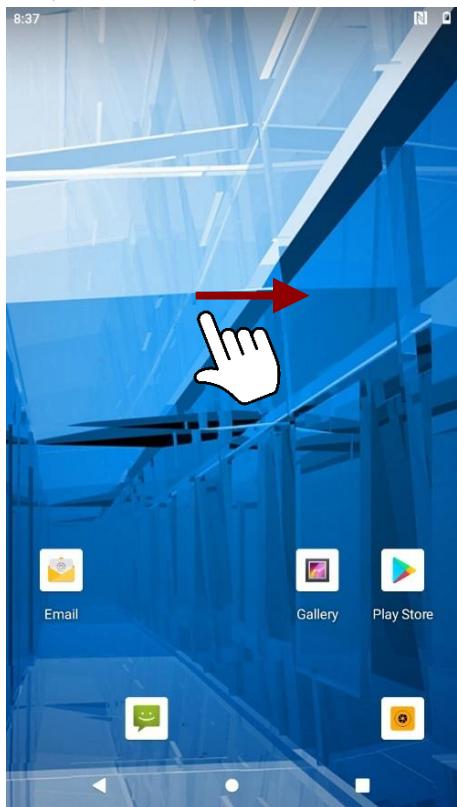
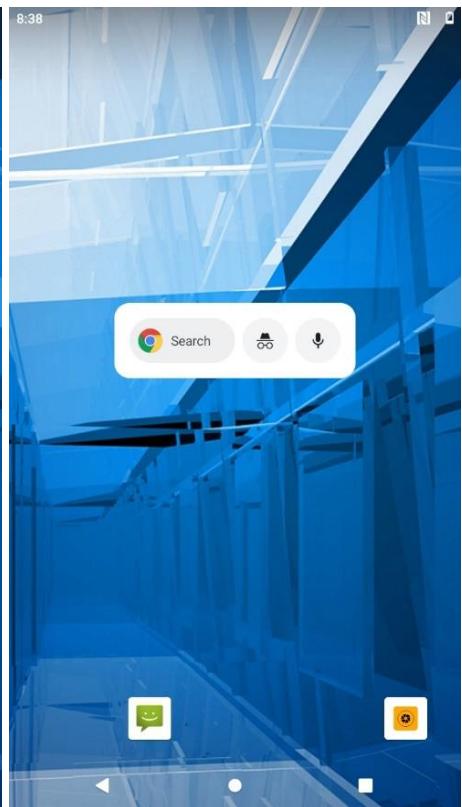
3.3.2 Viewing other parts of the Home Screen
- Slide your finger left or right across the Home screen. Extensions to the Home screen provide extra space for APPS, shortcuts, and other items.
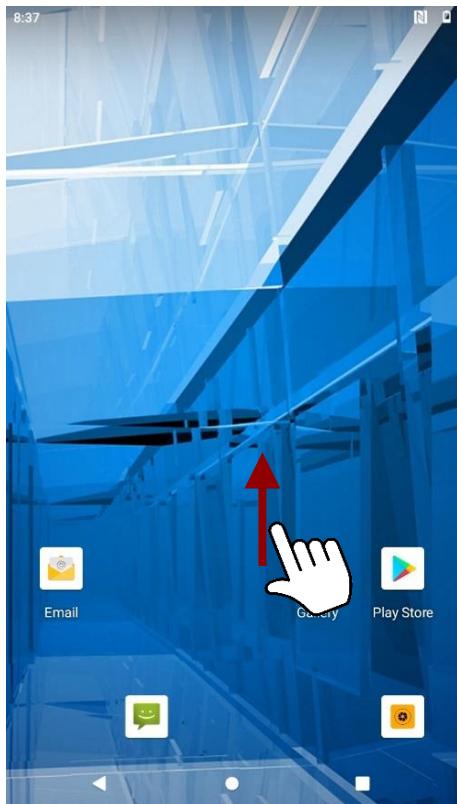
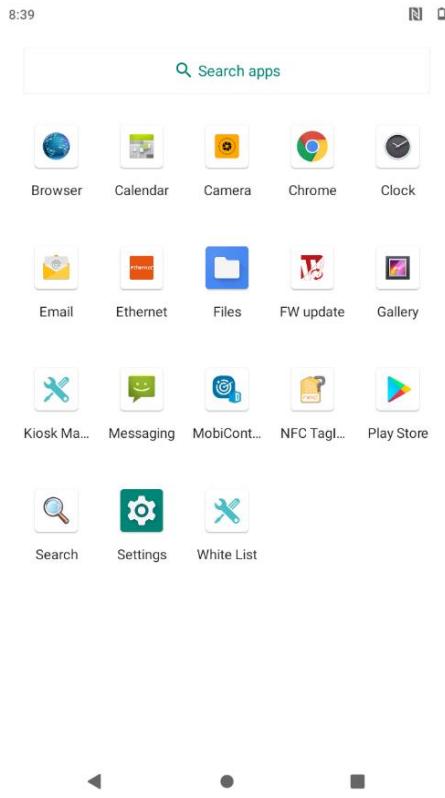
- Swipe from the bottom of the main desktop to view the entire installed Applications in the device.
3.4 Status and Notification Icons
The status bar appears at the top of every screen. On the left are notification icons along with the current time, and on the right are status icons.
3.4.1 Notification Icons
Pull down from the left top of the screen to get the notifications area. The following icons indicate that you have received notification.
| New email message | Incoming call |
| New text or multimedia message | Missed call |
| Alarm is set | Speakerphone is activated |
| Upcoming event | Phone microphone is muted |
| Data isSyncing | Downloading data |
| Problem with sign-in or sync | Phone is connected via USB cable |
| A screenshot is captured |
3.4.2 Status Icons
Pull down from the right top of the screen to get the notifications area. The following icons indicate the status of your device, for example if users are connected to a WLAN network that is not connected to the internet, the network icons are appears in white color.
Status icons that appear in the status bar are as follows:
| G | Connected to GPRS mobile network | Bluetooth is on | |
| 1X | Connected to 1xRTT mobile network | Connected to a Bluetooth device | |
| E | Connected to EDGE mobile network | ? | No SIM card installed |
| 3G | Connected to 3G mobile network | Q | Vibrate mode |
| 4G | Connected to 4G mobile network | R | Ringer is silenced |
| A | Mobile network signal strength | B | Battery is very low |
| A | Searching for a network signal | B | Battery is low |
| A | No signal | C | Battery is partially drained |
| C | Connected to a Wi-Fi network | D | Battery is full |
| Δ | Roaming | E | Battery is charging |
| → | Airplane mode | F | Receiving location data from GPS |
3.5 Using the On-Screen Keyboard
User can enter text using the On-Screen Keyboard. Some applications will launch the keyboard automatically. In others, user needs to touch a text field where user wants to enter text to launch the keyboard.
3.5.1 Entering Text
- Open a text field, in this example we used Messaging to compose a message. The On-Screen Keyboard opens.
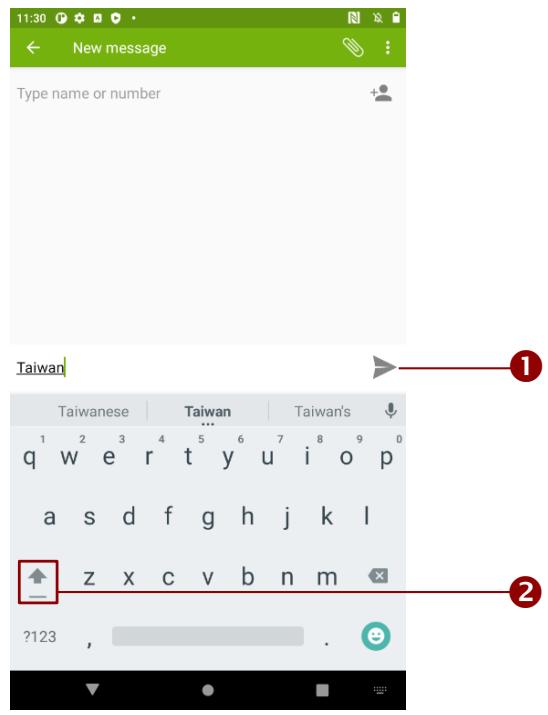
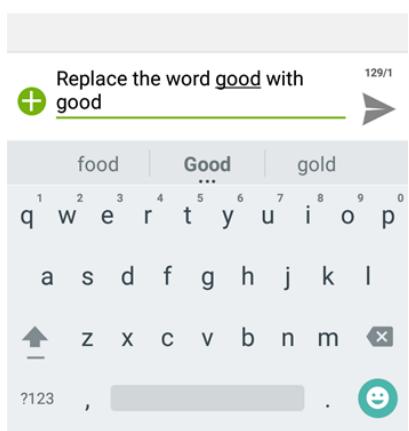
- Tap a suggestion to enter it in the place of the underlined.
- Tap once to capitalize the alphabet.

Note:
If user taps in a text field which already contains text, the insertion point is set where user tap and the cursor appears. User can drag the cursor to pick exactly where you want to add more text. User can also select a word to copy, cut, and paste it.
- Tap the delete key to erase characters to the left of the cursor.
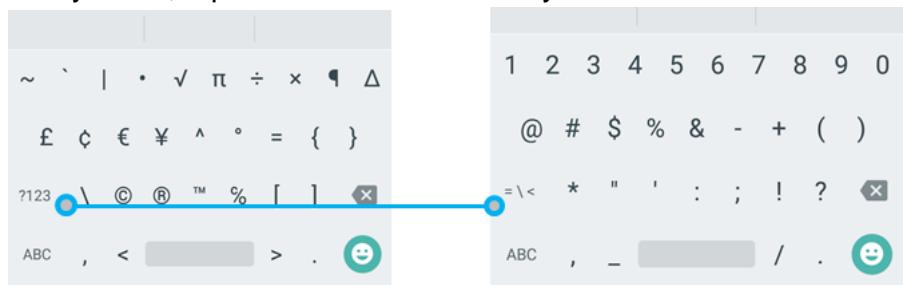
- Tap ?123 to enter numbers. Tap ABC to return to letters.
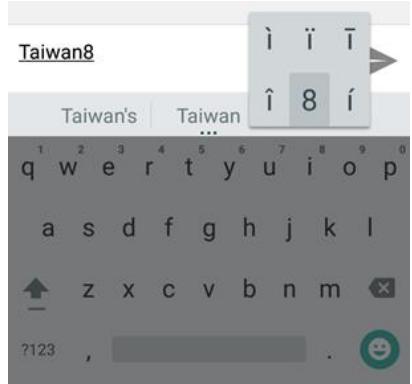
- To enter symbols and other characters, tap and hold one of the top-row keys and slide your finger up to the list of the options. Lift your finger when you find your selection.
- To view additional symbols, tap = 1 < on the numeric keyboard.
- To close the On-Screen keyboard, press the back button
3.5.2 Editing Text
To select text:
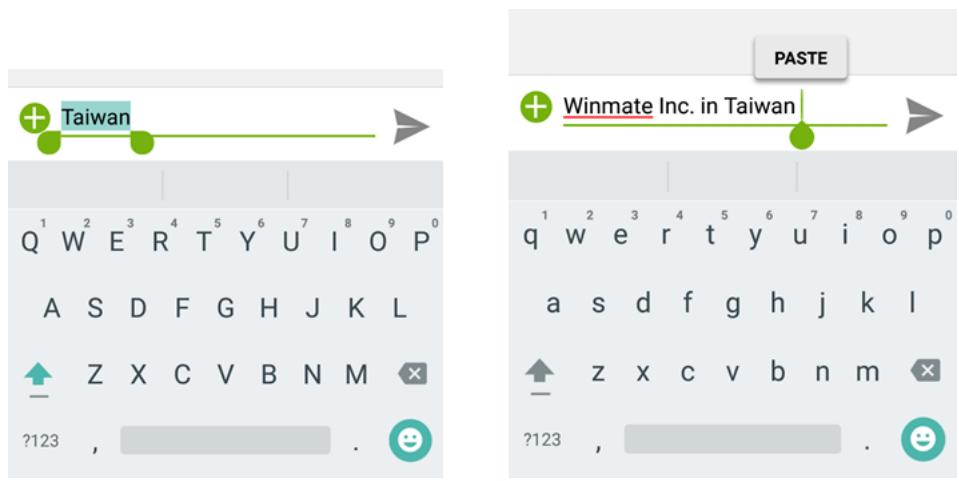
- Double-tap the text you want to select.
- Tap to select all the sentences in the menu that appears, the selected text is highlighted in blue, with a tab at each end of the selected word.
- Drag selection tab to expand or reduce the range of the selected text.
To Cut or Copy Text:
- Select the text to cut or copy, see the section above "To select text".
- Tap Cut or Copy in the Edit text menu.
- If you select Cut, the selected text is removed from the text field; it is stored in temporary area so that you can paste it into different text field.
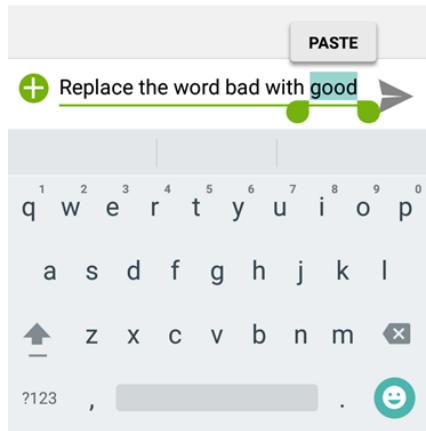
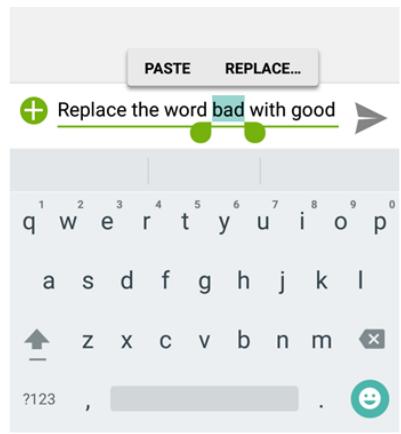
To Paste Text:
- After Cut or Copy the text, see the section above "To Cut or Copy Text".
-
Place the cursor in the text field where you want to paste the text, user can paste text that you copied from one application into a text field in any application.
-
Tap and hold into the location that you want to paste. Tap Paste in the menu that opens to replace the existing text with copied text.
3.6 Display Settings
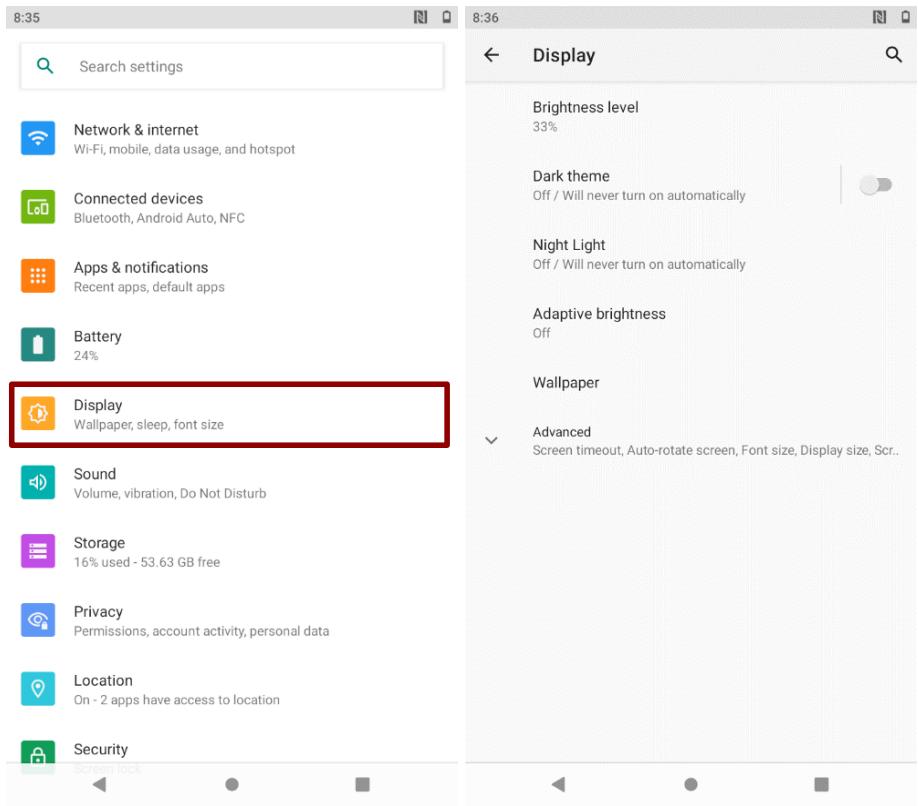
Use the display settings to configure brightness and other screen settings.
- Swipe from the bottom of the main desktop, tap Settings , and then tap Display
Display
- Brightness level – for adjusting the brightness of the screen.
Dark theme - uses black background to help keep battery alive longer on some screens.
Night light - tints your screen amber. This makes it easier to look at your screen or read in dim light. - Adaptive brightness – to optimize brightness level for available light
- Wallpaper - to select wallpaper
- Screen timeout – to set up the device's sleep mode after the specified period of inactivity
- Auto-rotate screen – for switching the orientation of the screen when user turns the device sideways or upright.
- Font size - Make the text on screen smaller or larger
- Display size - Make the items on your screen smaller or larger. Some apps on your screen may change position.
- Screen saver – to control what happens when the mobile computer is docked and/or sleeping, turn screen saver on
- Lock screen - to control all notification content

Note:
For the longest battery life between charges, use the shortest Sleep time.
3.7 Audio Profile Settings
Use the sound settings to configure how and at what volume the device rings, vibrates or alerts user in other ways when user receive a call, receive a notification or an alarm sound.
3.7.1 Sound Settings
- Swipe from the bottom of the main desktop, tap Settings , and then tap Sound
- In the Sound user can select Media volume, Call volume, ring volume, alarm volume and other sound settings.

3.7.2 Adjusting Volume
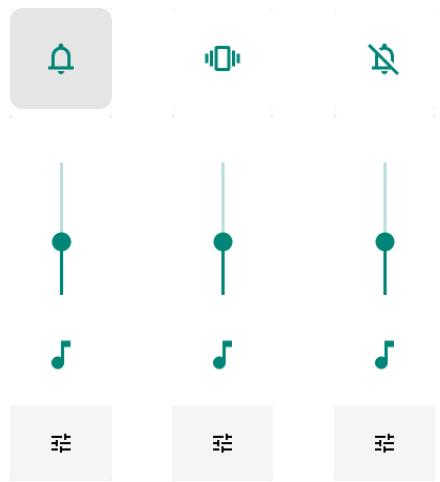
- Press the volume keys to change the ring volume (On Home screen) or front receiver volume (during a call).
- Press the volume key to set up Vibration mode.
- Press the volume key to set up Mute mode.
3.8 Language and Keyboard Settings
Use the Language & keyboard settings to select the language for the text on your device and for configuring On-Screen Keyboard, including words that you have added to its dictionary.
- Swipe from the bottom of the main desktop, and then tap Settings > System
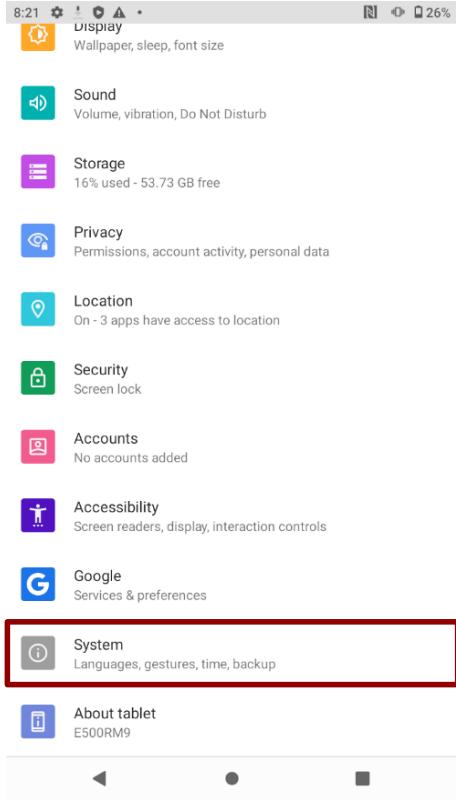
- In the System tab, select Language & Input.
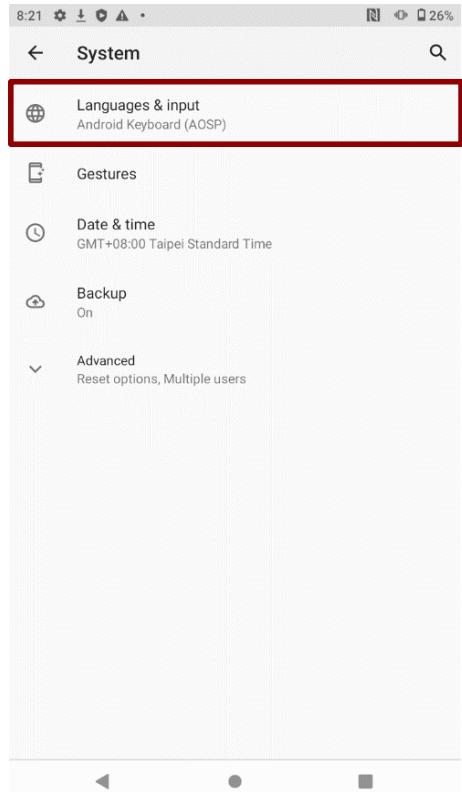
-
Language – to open the language screen, where user can select the language to use for the text on the device.
-
Click the On-screen keyboard to go to the Android Keyboard Settings (AOSP) page.
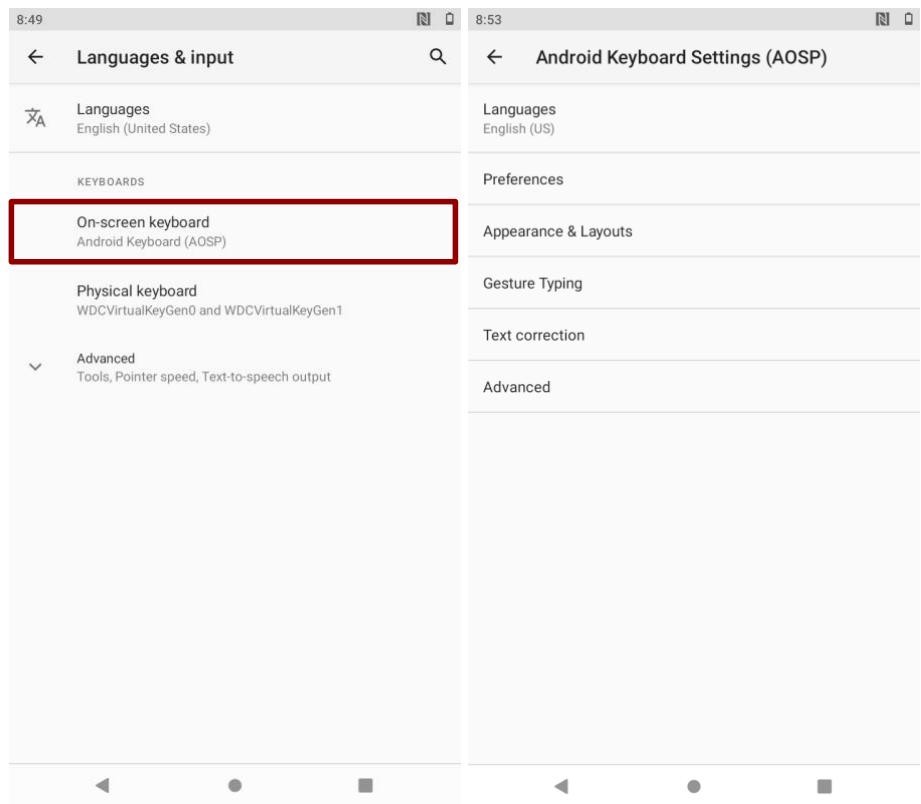
Keyboard & input methods
On-screen Keyboard - shows default Android Keyboard (AOSP).
Physical Keyboard - allows the user to apply physical keyboard settings if connected.
- Appearance & layouts
○ Theme – to select the theme of layout.
Custom input styles - user can select custom input style, such as QWERTY keyboard.
Enable split keyboard - toggle to activate split keyboard layout.
Text Correction
Personal dictionaries
Add-on dictionaries
○ Block offensive words – disable suggesting potentially offensive words
○ Auto-correction - spacebar and punctuation automatically correct mistyped words.
○ Show correction suggestions – display suggested words while typing.
Personalized suggestions - learn from your communications and typed data to improve suggestions.
o Suggest contact names - use names from Contacts for suggestions and corrections.
。 Next-word suggestion - use previous word in making suggestion.
Advanced
Keypress vibration duration
Keypress sound volume
Key long press delay
Emoji for physical keyboard
Show app icon
Changing the Keyboard Language
The current keyboard language is displayed on the Space key and user can switch languages.
- Tap and hold the space key
- Without lifting the finger, slide it to the left or right until the language you want to use appears in the center of the small window above the Space Key.
- Lift the finger to change the keyboard language.
3.9 Using the Phone
User can make a phone call by dialing a phone number; touch a number in the contact list, on the web pages or other places.
3.9.1 To Make a Phone Call
- Please make sure the SIM card is properly installed.
- Tap Phone icon on the Home screen.
- Tap the numeric keys on the screen to enter the phone number and then tap to dial the number that you have entered.
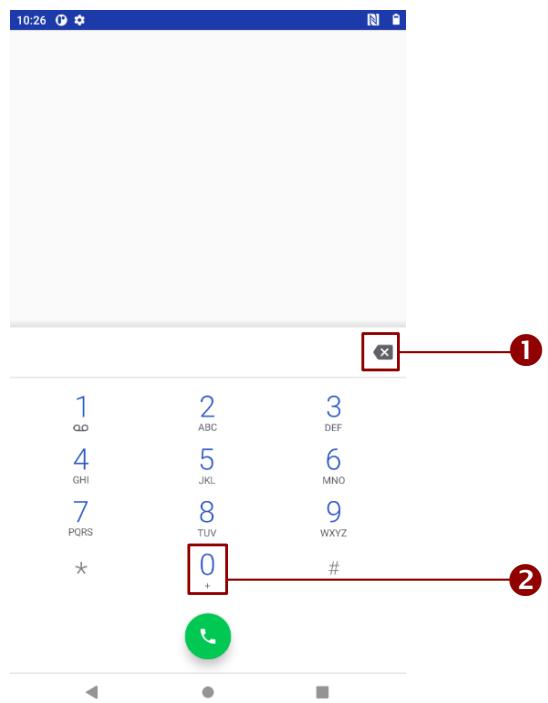
- If you enter a wrong number, tap this button to erase digits one by one. To erase the entire number, tap and hold this button.
- Tap and hold to enter ^+
3.9.2 To Make a Phone Call Using Contact List
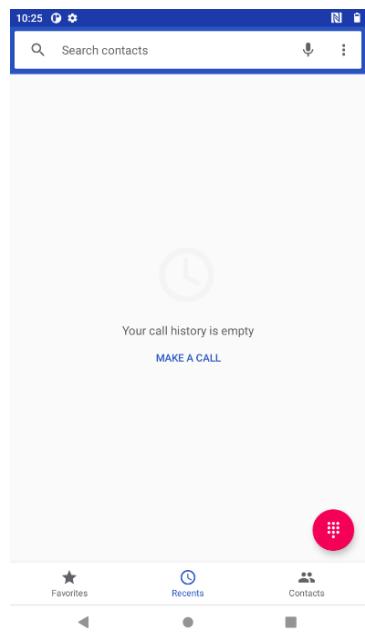
- Tap the launcher and then tap Contacts
- Tap the Phone icon at the bottom of the Home screen, and then tap Contacts.
- Select the required contact and then tap it to call.
3.9.3 Answering or Declining Calls
When user receive a phone call, the incoming call screen opens with the caller ID and any additional information about the caller that you have entered in contacts.

Tap to answer calls.
Tap to reject calls.
3.10 Messaging
3.10.1 Sending Text Messages
- Swipe from the bottom of the main desktop, and then tap
- Tap Compose new message and enter a mobile phone number in the To field. You can tap to find your contact.
- Tap the composition text box to start entering your message.
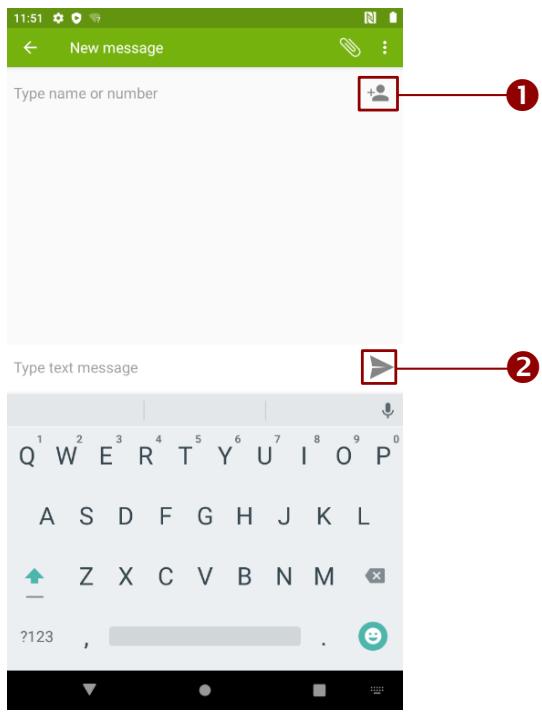
- Tap this button to open the list of contacts.
- Tap this button to send a message.
3.10.2 Opening and Responding to Text Messages
If you are working in a message window, message that you receive are display in it. Otherwise, you receive a new message notification and a new message icon appears in the status bar.
To reply a message
When user tap the new message notification, the message window opens and user can reply the message.
To forward a message
- Tap & hold a message in a message window.
- Tap Forward message in the menu that opens.
- Enter a recipient for message and edit the content if necessary.
- Tap Send.
3.11 About Phone
About Phone includes information about user's device.
System Update — provides information regarding the local or online update of your devices.
- Status — opens the status screen with a list of information about battery, network, signal strength and other details.
- Legal Information — lists details about the model number, Android Version, Baseband version etc. this information is useful if user need to work with support team.
- Model number - show the model's name of the current device.
- Android version - show the current Android operating system version.
To access the information about the phone:
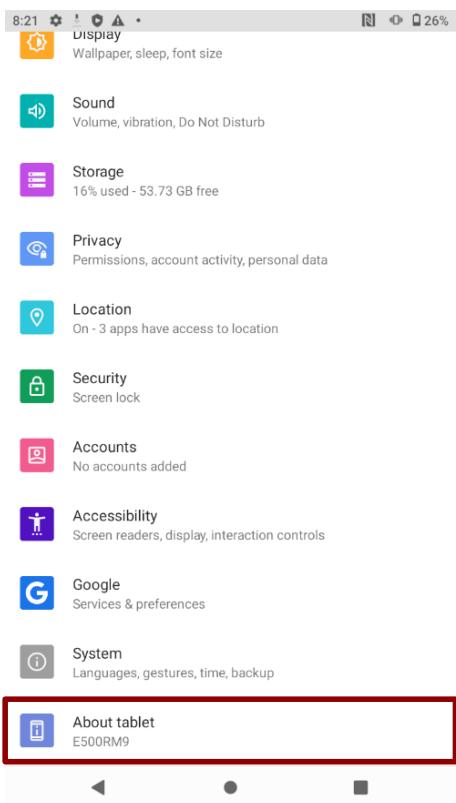
- Swipe from the bottom of the main desktop, tap Settings , tap About Phone
Chapter 4: Winmate Kiosk Manager
The E500RM9 rugged mobile computer comes with preinstalled APP named Winmate Kiosk Manager. This application lets the device manager to lock the launcher. When the launcher is locked the user can only use one application assigned by the device manager.
4.1 Lock Applications
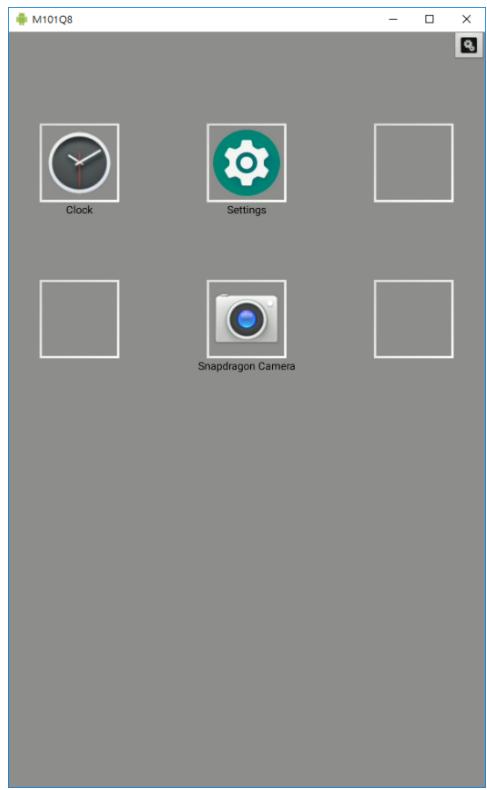
- In the main APPS window, select the Kiosk Manager. Select Kiosk Manager to start your settings, or go to Password Manager and set your own password for this APP. The default password is "password".
- Press Clear and Reset Default Home.
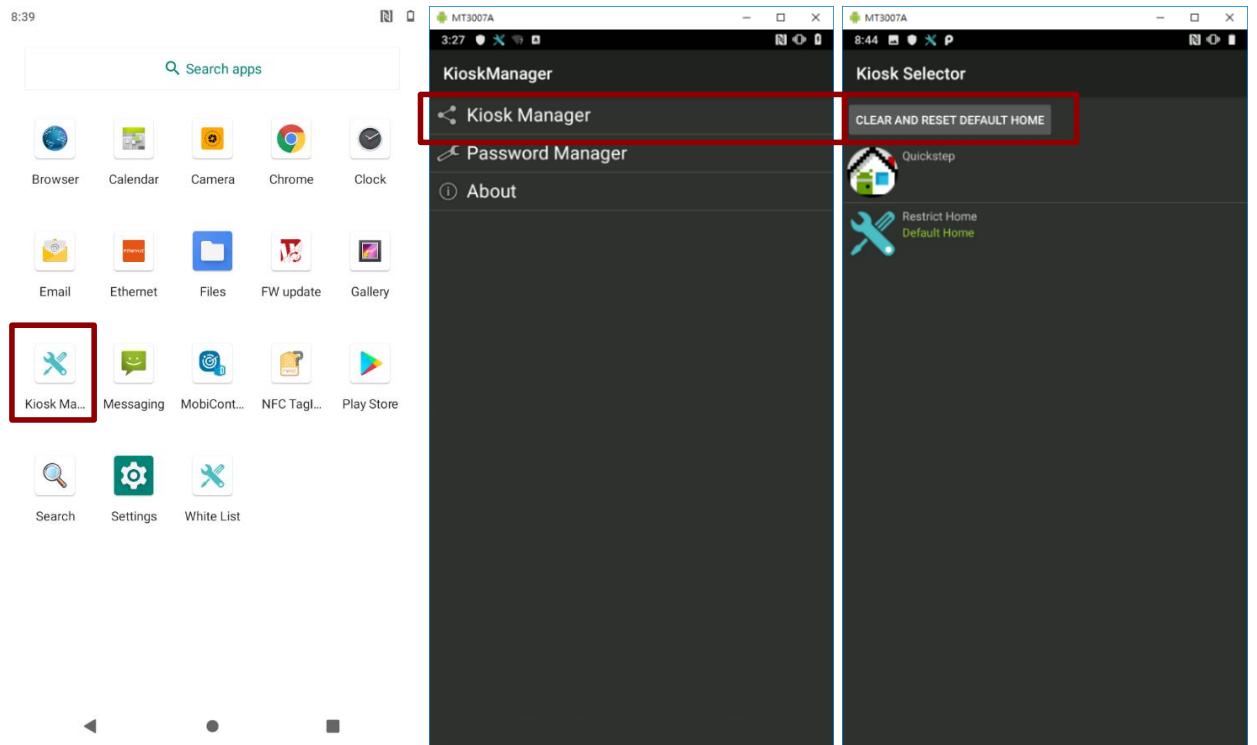
- Select Restrict Home then Always. The system will automatically be locked on selected Apps.
- Click the gear icon on the upper right corner. Then choose Change UI.
- Input the default password: password
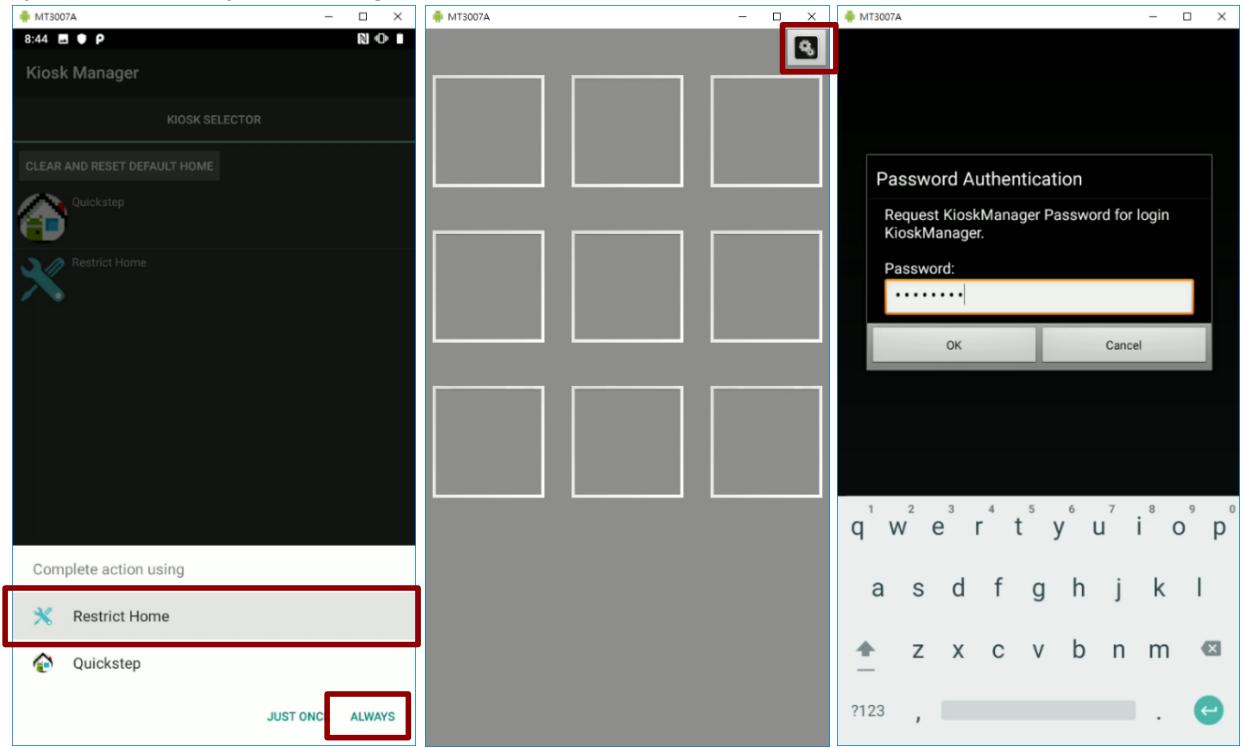
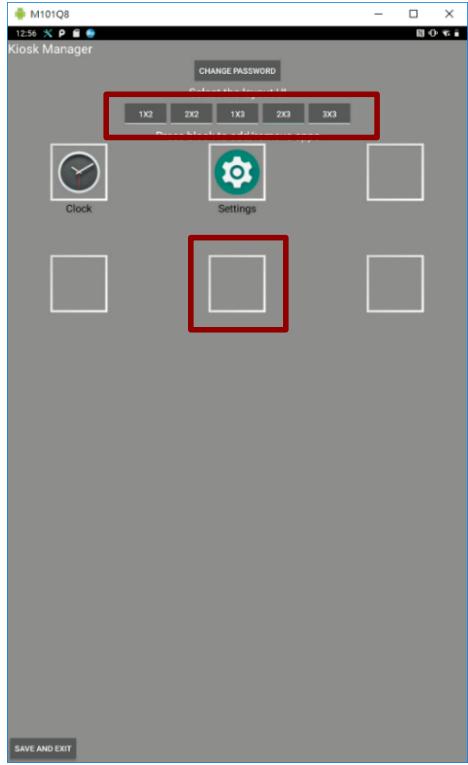
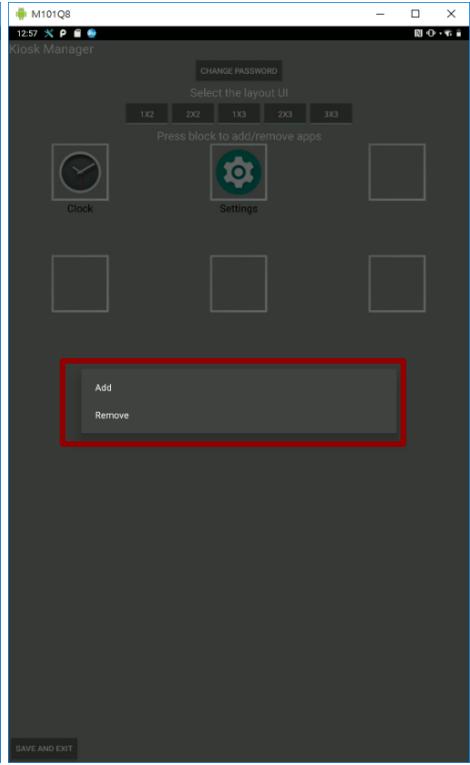
- Choose the layout UI, then press the empty slot to add/remove apps. Click Add App.
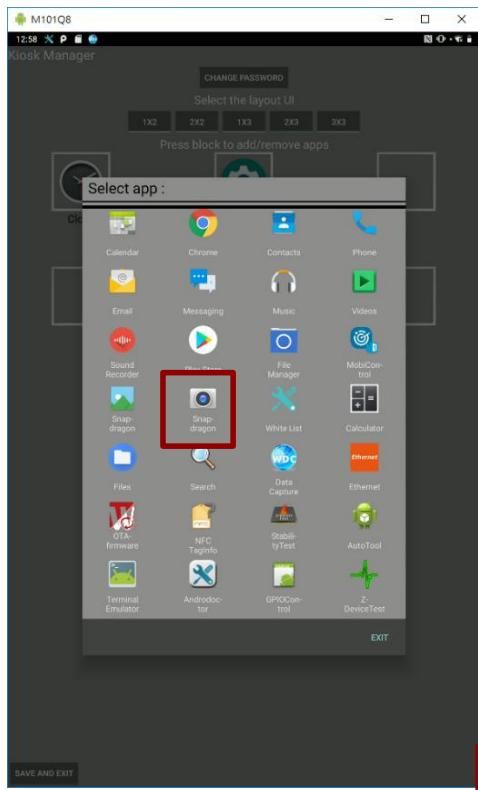
- Select applications you want to lock. For example, Camera.
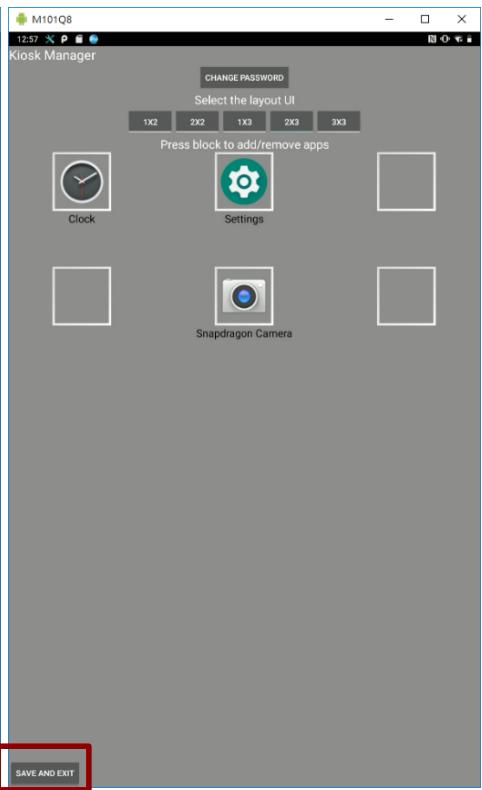
- Click SAVE AND EXIT.
4.2 Change Password
- In the UI edit page, select the CHANGE PASSWORD. Or, in the main Apps window, select the Kiosk Manager. Select Password Manager to start your settings.
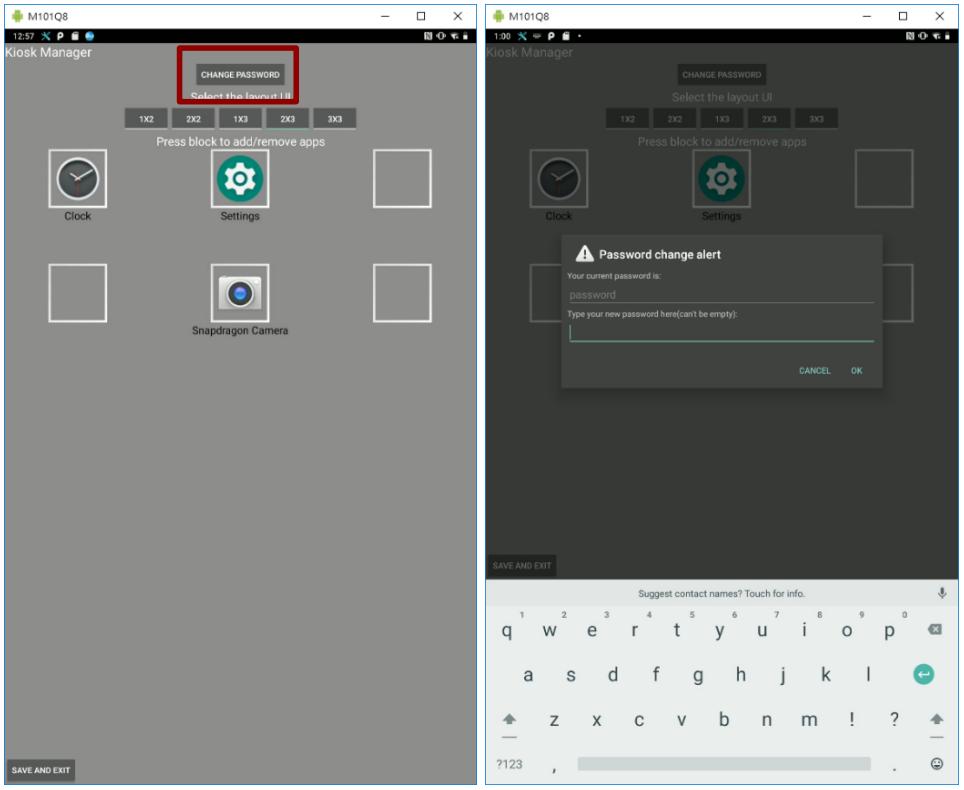
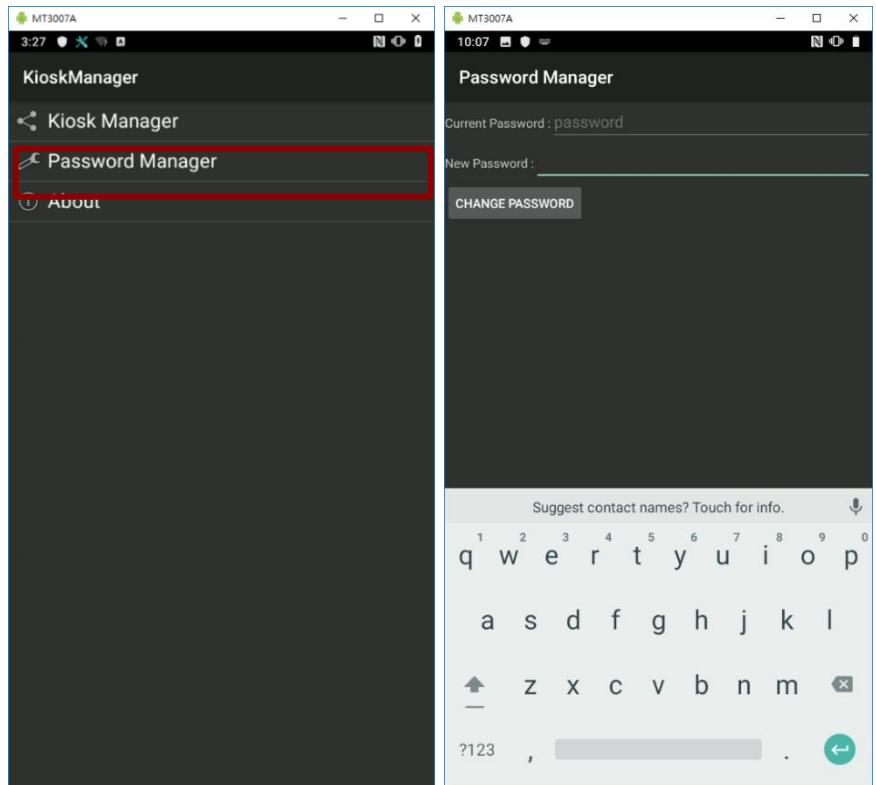
- The default password is "password". Enter a new password in New Password field, and then tap Change Password.
4.3 Unlock Applications Launcher
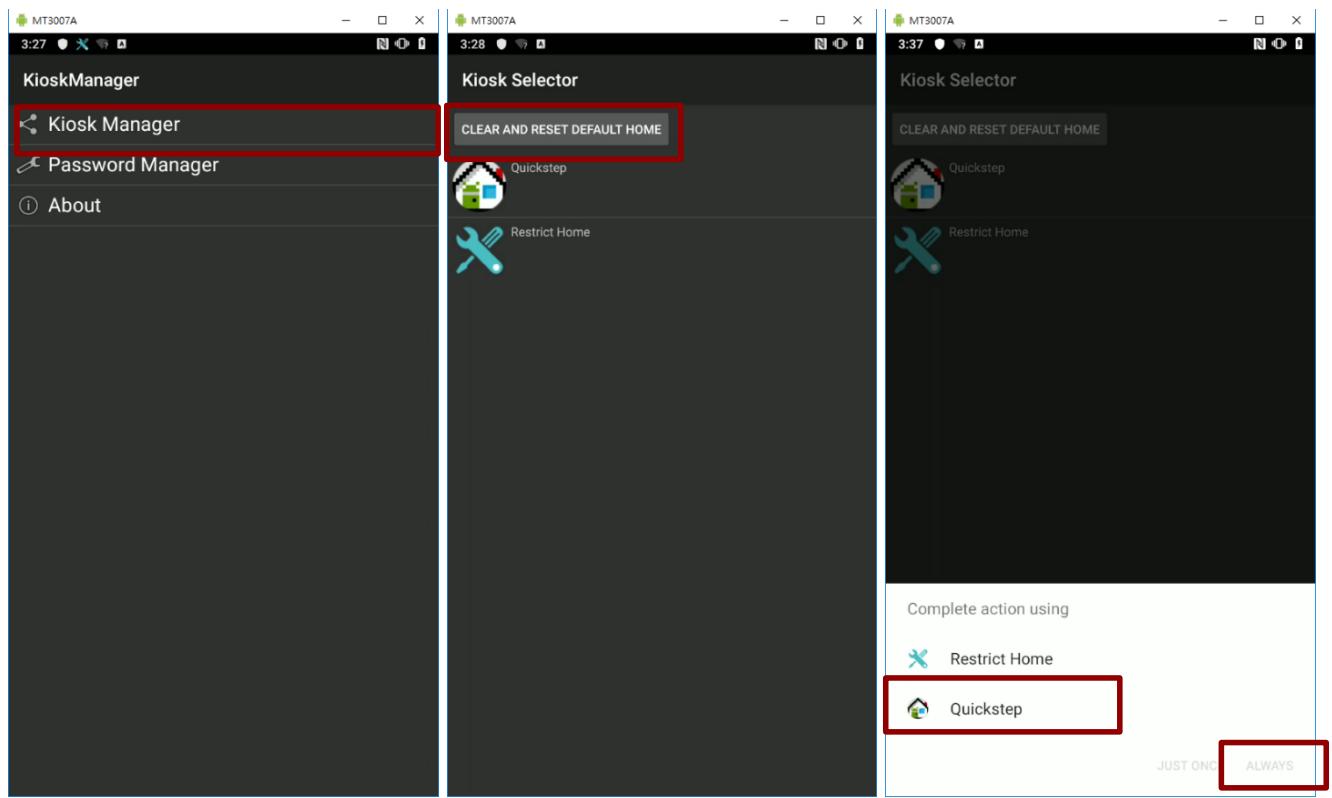
- Slide down the top bar and press Kiosk Manager icon. Enter the password to login (the default password is password). Press Ok.
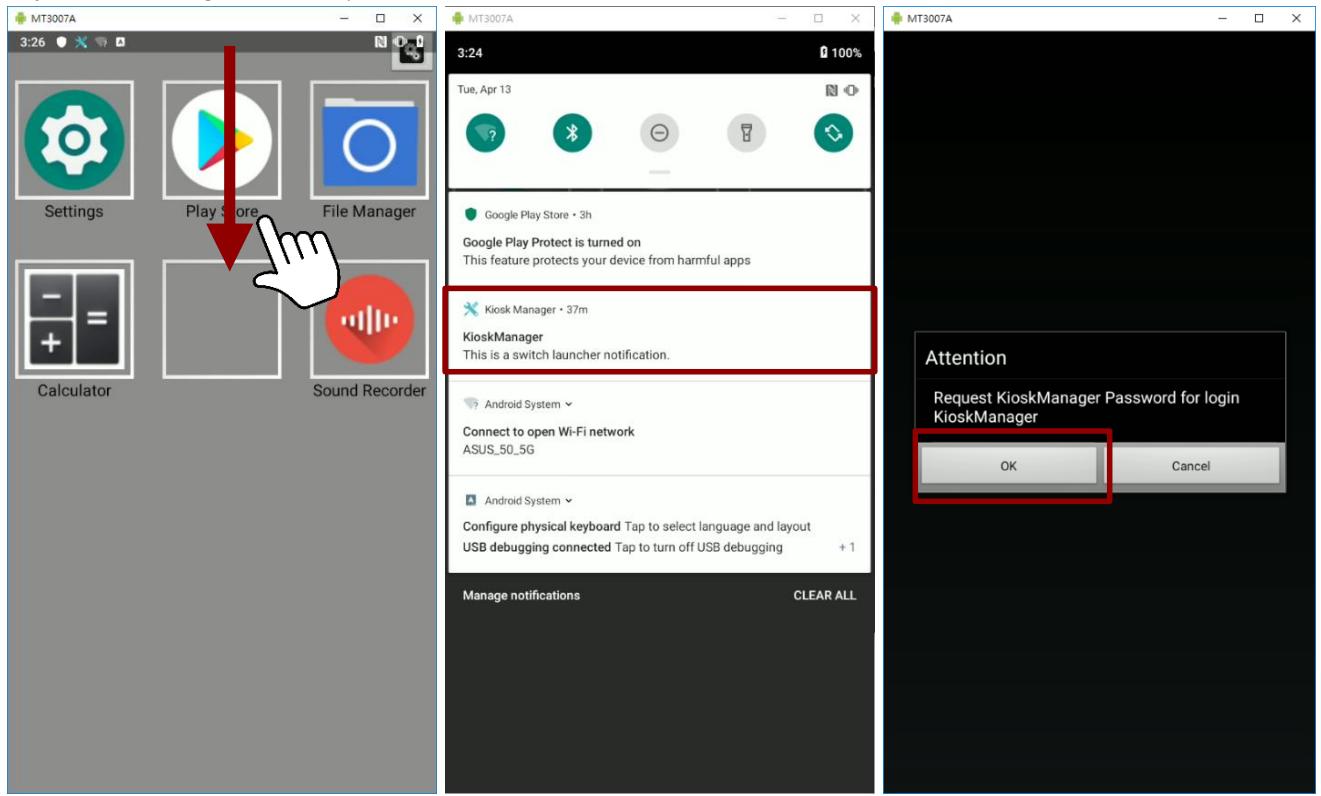
- Click Kiosk Manager, then Clear and Reset Default Home.
- Select Quickstep, and press ALWAYS.
- Restart the system and you will go back to the normal Launcher.
4.4 White List App
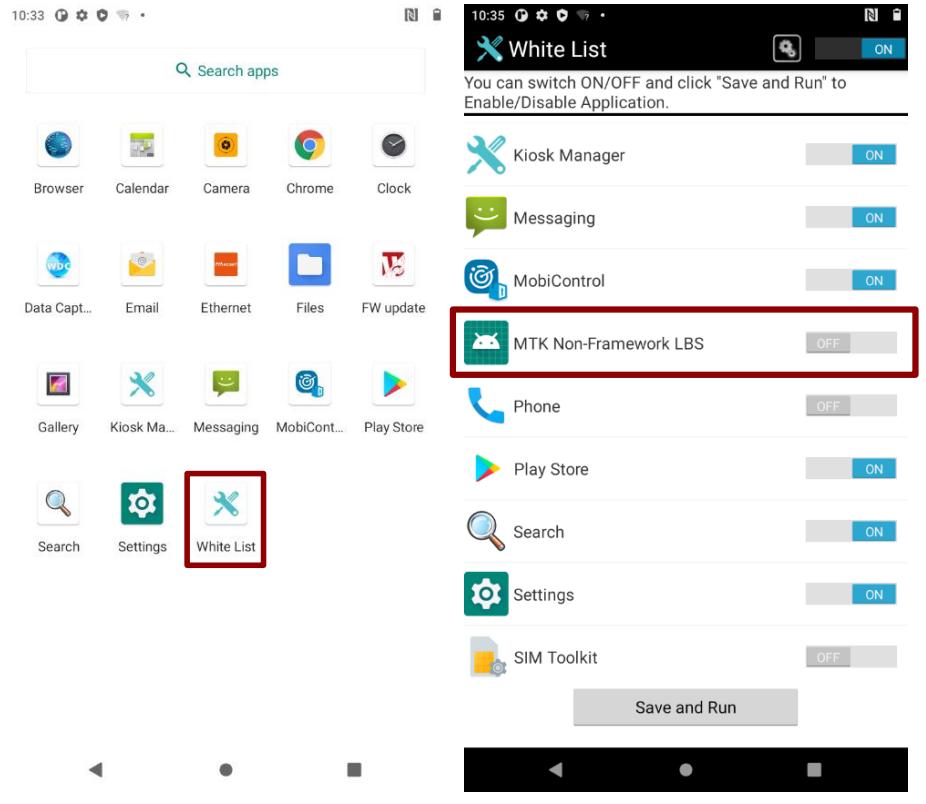
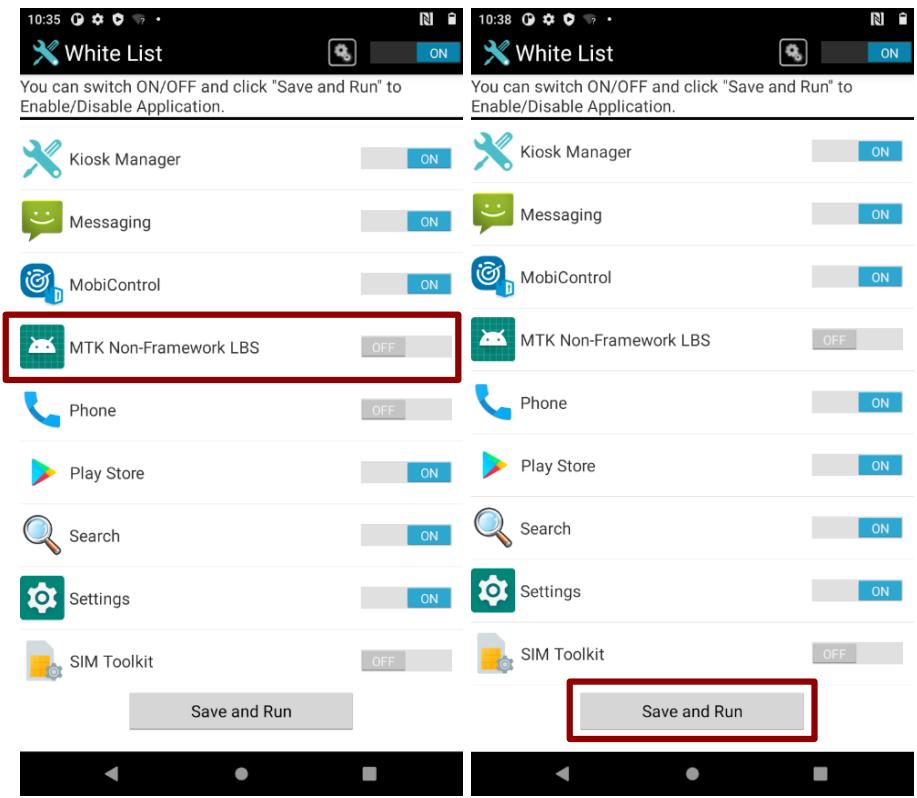
- Open the White List X
- Select an application of White List.
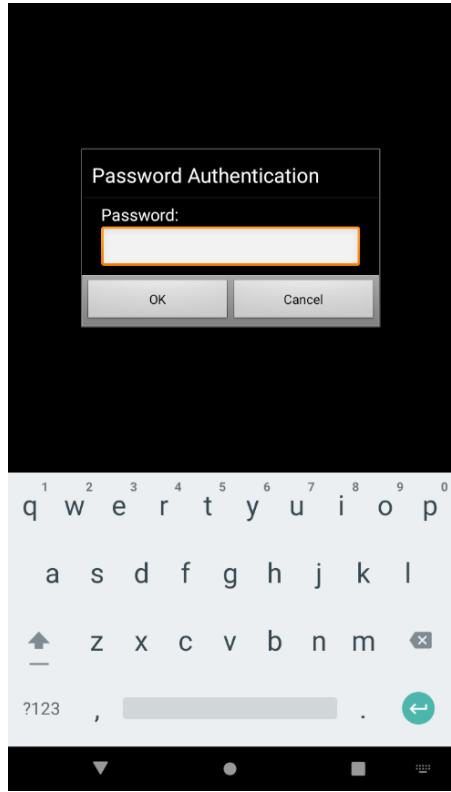
- Enter the password. The password default value is "password".
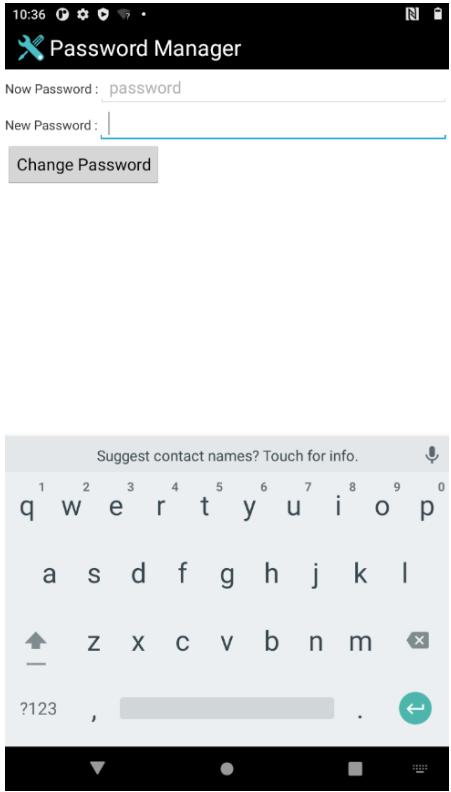
- To change the password, click the setting icon on the White List page, choose Password Manager. Input the current and new password, then click Change Password.
Disable or Enable Application:
- Click list item to switch App Status
- Click Save and Run.
Chapter 5: Networks and Wireless Devices
This chapter explains how to connect to network and peripheral devices.
5.1 Connecting to Mobile Networks
When users install a SIM card from service provider to the E500RM9, the device is configured to use the provider's networks for voice calls and for transmitting data. Different locations may have different mobile networks available. User may need to configure E500RM9 to use certain networks.

Note:
The E500RM9 supports dual SIM cards. To obtain faster networks configure the phone to 4G/LTE. To extend the life of battery user can use 2G network.
- Swipe from the bottom of the main desktop, tap Settings
- Tap Network & Internet, and then tap Mobile networks.
- Tap Mobile Data to check the network connection.

Important:
Do not change the parameters of the access point to prevent inability to access network sources.
5.2 Connecting to WLAN Networks
5.2.1 Turning on WLAN and Connecting to WLAN Networks
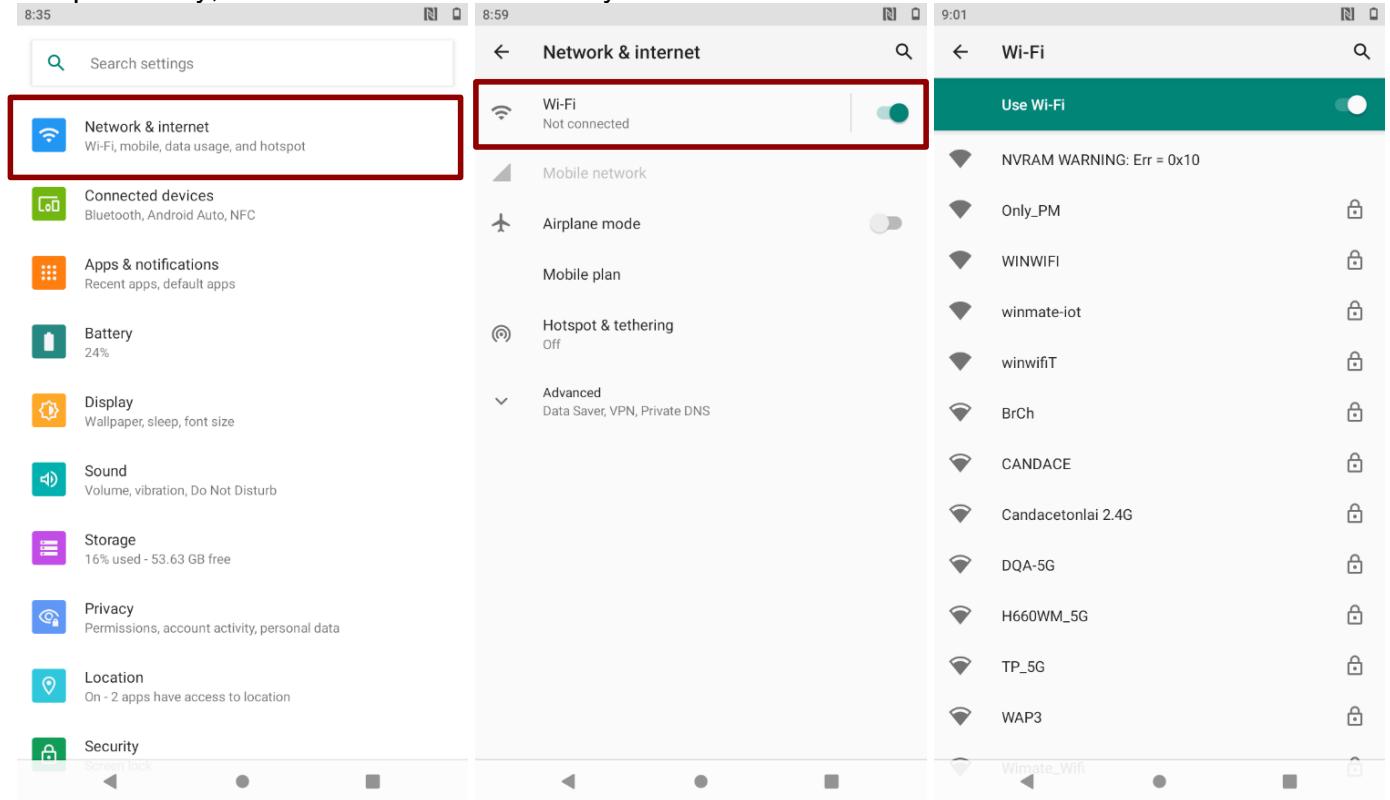
- Swipe from the bottom of the main desktop, tap Settings
- Tap Network & Internet and then toggle the on/off switch on the top-right hand side to turn on the WLAN.
- Tap Wi-Fi. The device scans for available WLAN networks and displays the list of it. Secured networks are indicated with a lock icon. If the tablet finds a network that you have connected previously, it connects to it automatically.
-
Tap a network to connect to it:
-
If the network is open, you are prompted to confirm that you want to connect it by tapping Connect.
If the network is secured, users are prompted to enter a password or other credentials. -
To check the details about the speed, security, address, and related settings, tap the WLAN name in the WLAN settings screen.
5.2.2 Adding WLAN Network
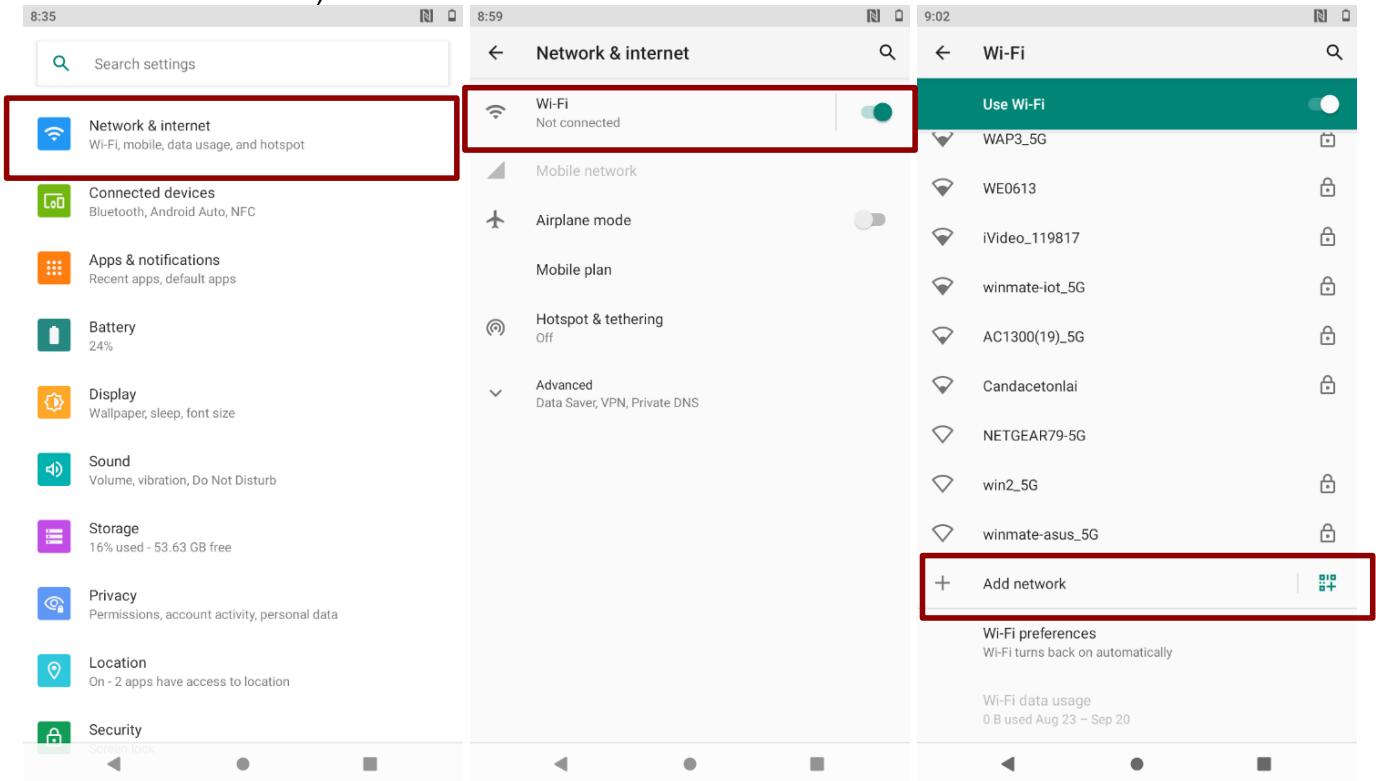
- Turn on WLAN, in the WLAN settings screen, tap + Add network (at the bottom of the list of discovered networks).
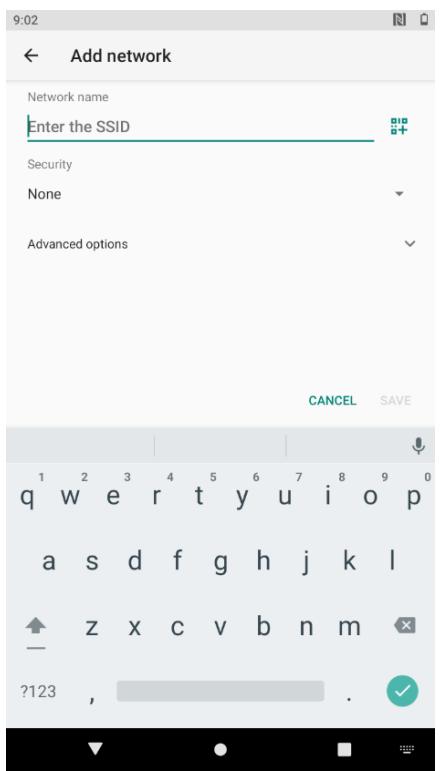
- Input the SSID (name) of the network, if the network is secured, tap the security menu and then tap the type of security deployed on the network.
- Enter any required security credentials.
- Tap Save.
5.3 Connecting to BT Devices
5.3.1 Turning BT On or Off
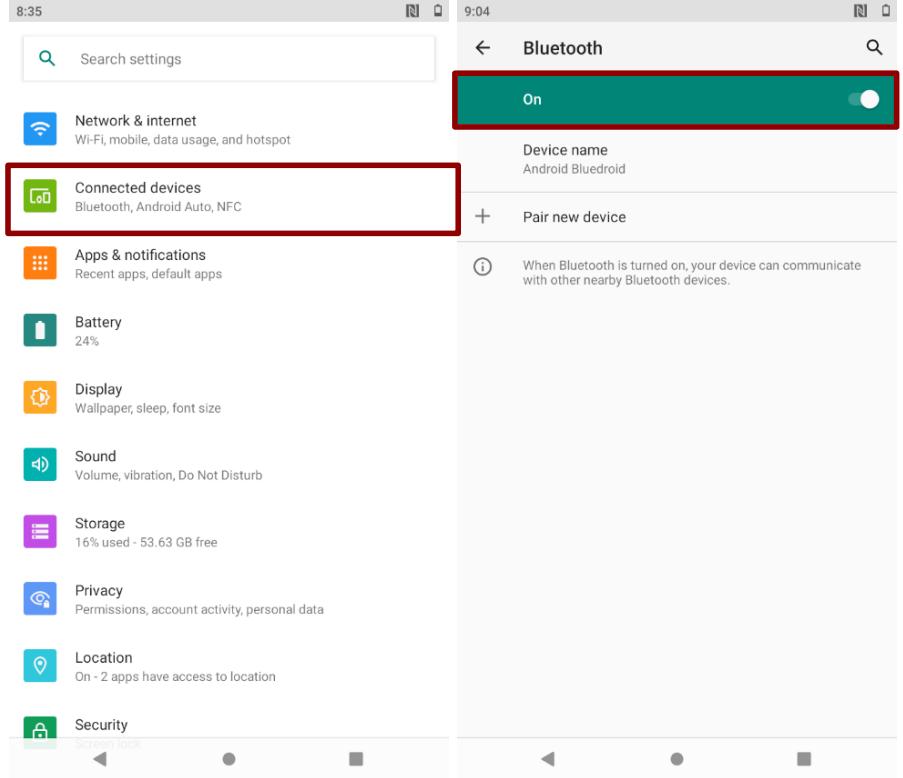
- Swipe from the bottom of the main desktop, tap Settings
- Tap Connected Devices.
- Toggle the on/off switch on the top-right hand side to turn on the BT.
5.3.2 Connecting the BT Device
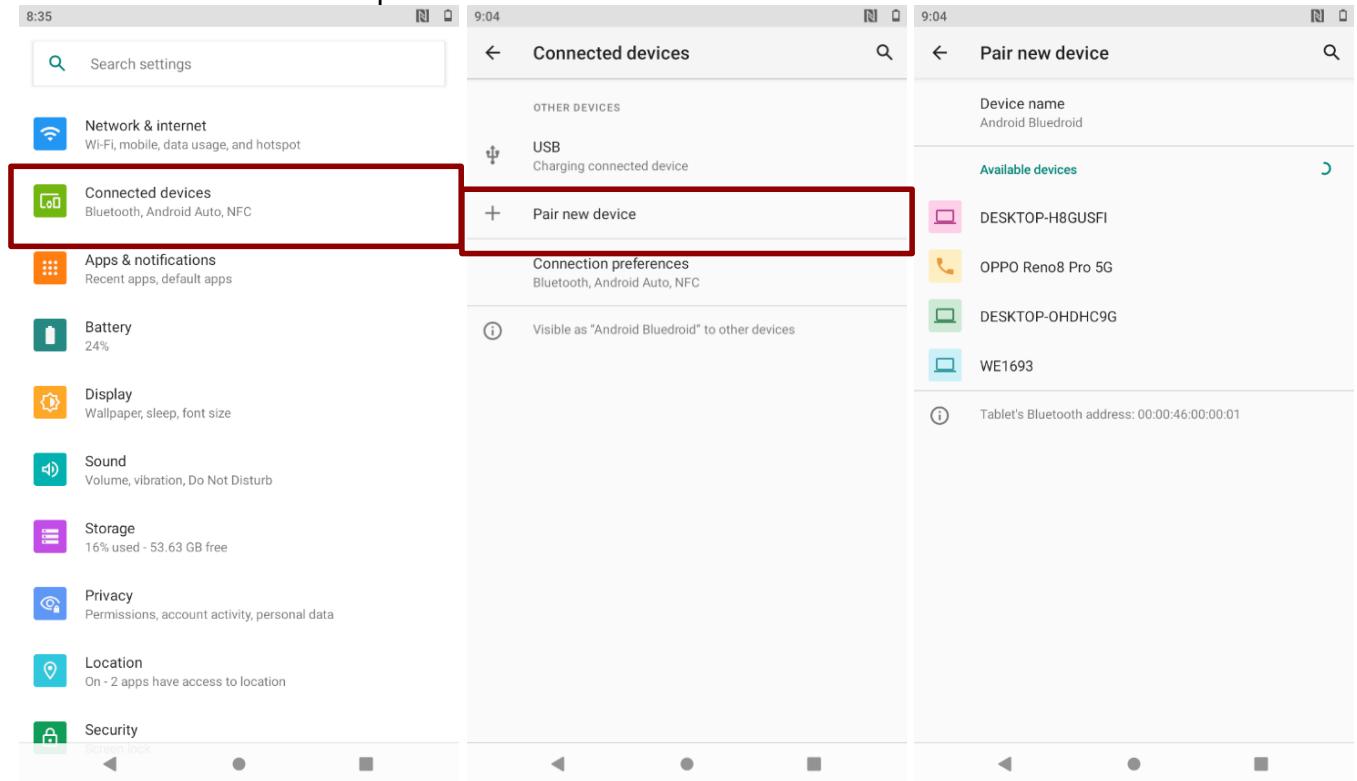
- Swipe from the bottom of the main desktop, tap Settings
- Tap Connected Devices.
-
Tap Pair new device. The system will automatically scan and display the IDs of all available BT device in range.
-
Select the device to be paired.
5.3.3 Disconnecting BT Device
- Tap the device in the BT settings screen.
- Tap FORGET to disconnect.
5.4 Connecting to Computer via USB
User can connect the mobile computer to a computer with USB cable to transfer file.
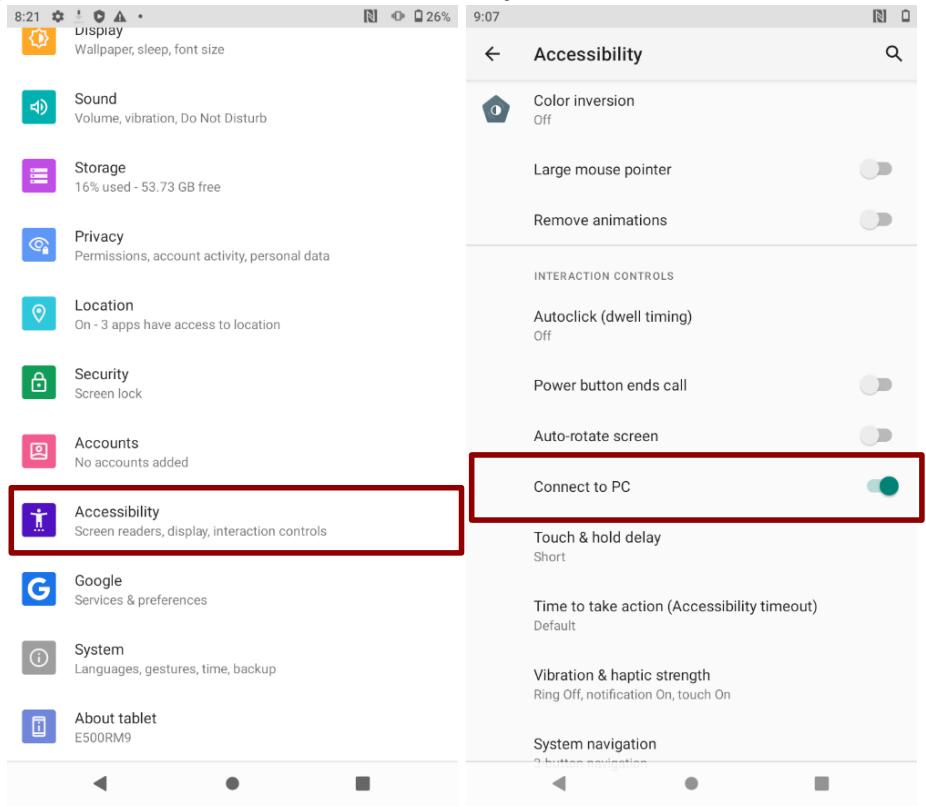
To allow device connection to PC: Click Setting > Accessibility > enable Connect to PC.

Important: When connecting your mobile computer to a computer and inserting its USB storage or SD card, user must follow the computer's instructions for connecting and disconnecting USB device, to avoid damaging or corrupting files. Notice that the E500RM9 mobile computer cannot be charged via USB.
5.4.1 USB Computer Connection
- Enter setting menu, and enter select Accessibility, and then activate Connect to PC.
| Check | Uncheck | |
| Micro USB-OTG | V | X |
| Micro USB-Host | V | V |
| Docking (USB & LAN) | X | V |
-
Connect device to the computer via USB connector.
-
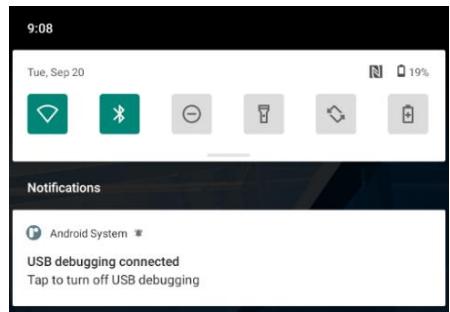
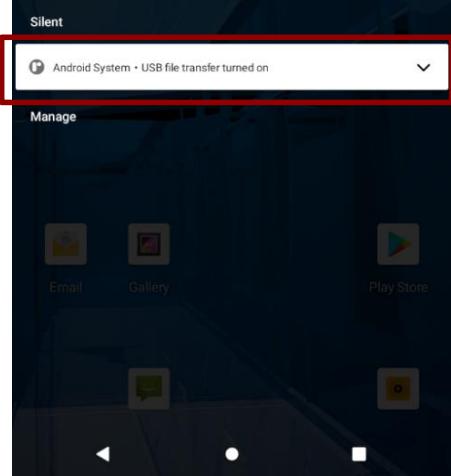
In the notifications area USB connected sign will appear.
- Pull down the notification area to open notification panel.
-
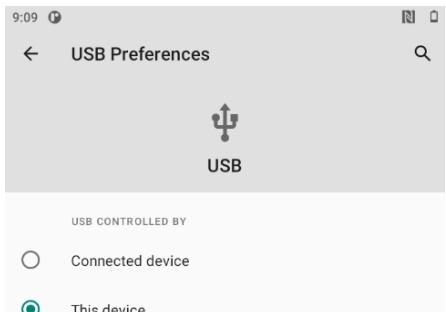
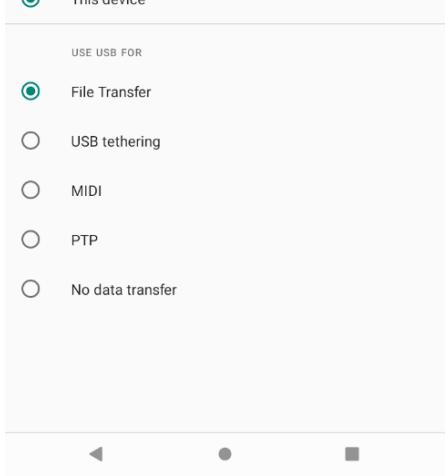
Tap the USB connection notification to choose the type of USB connection.
-
File Transfer - let user transfers files between computer and tablet.
- PTP - let users transfer photos or media files if MTP is not supported.
- MIDI - let users use device as MIDI.
- No data transfer—disable data transfer.
5.4.2 USB Debugging Settings
To open and close debugging tools permit on a computer to communicate with the device via USB Connection.
- Connect mobile computer to the computer via USB cable.
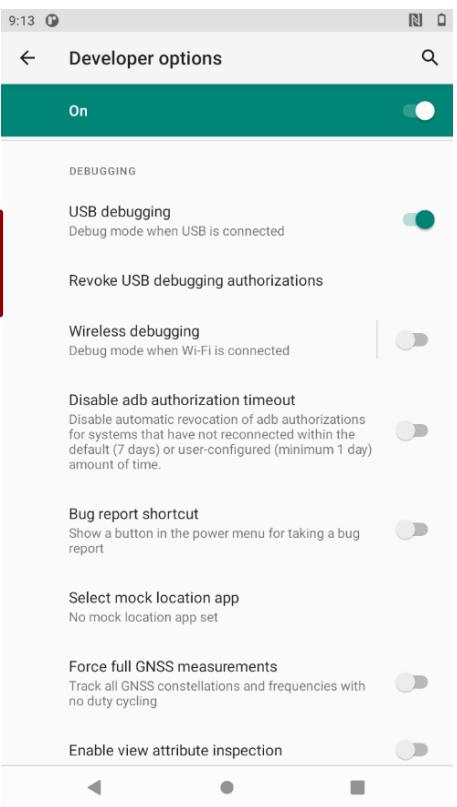
- Swipe from the bottom of the main desktop, tap Settings, tap About phone.
- Tap Build number.
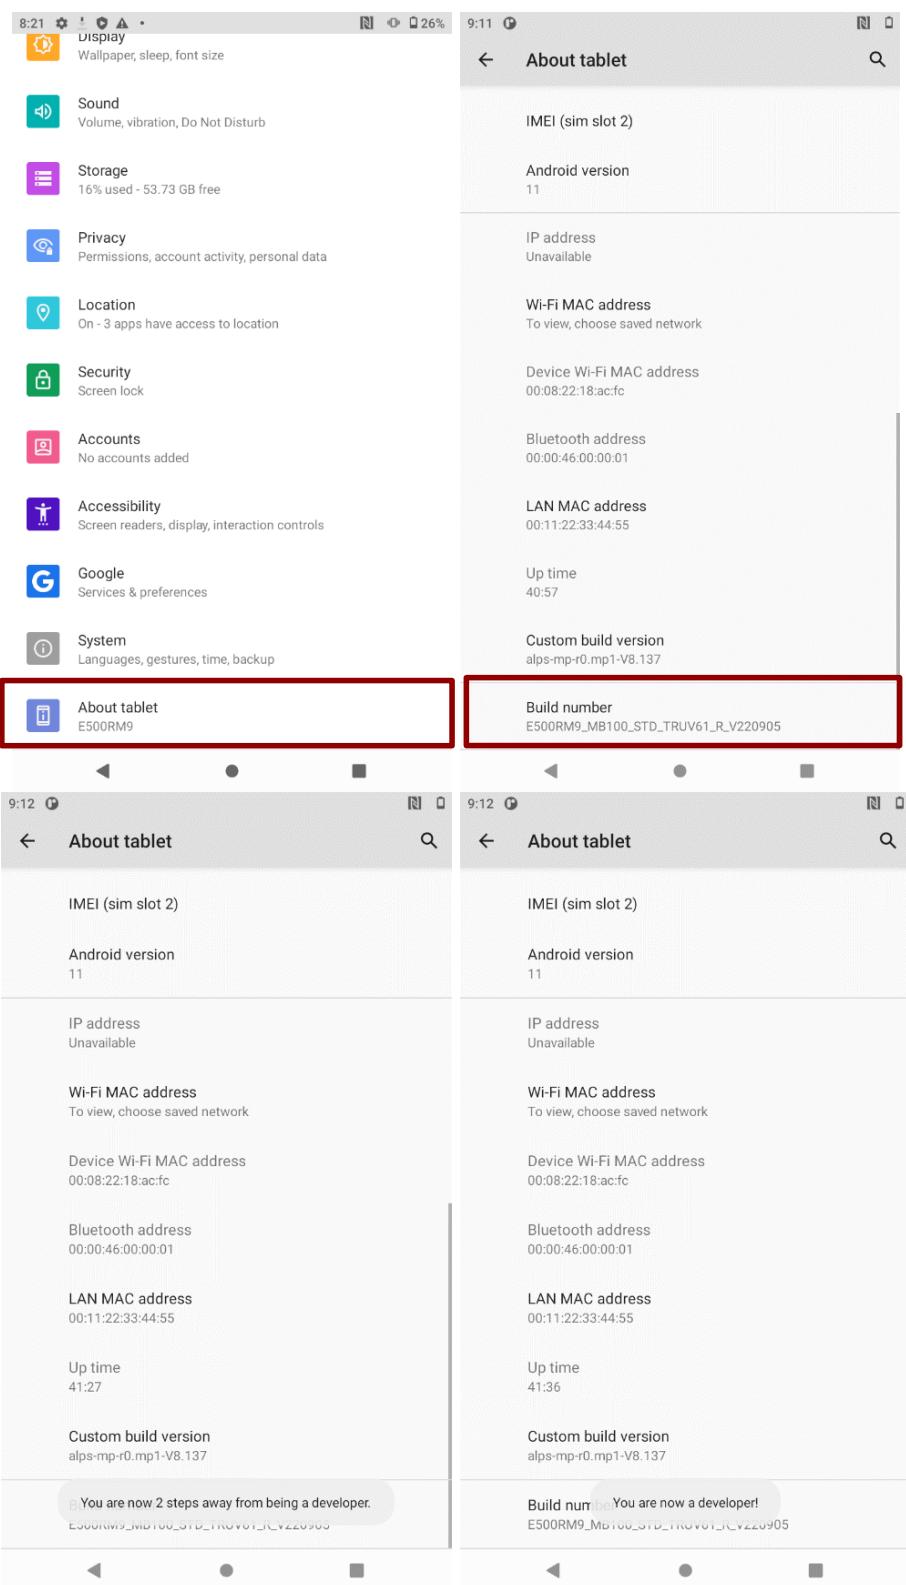
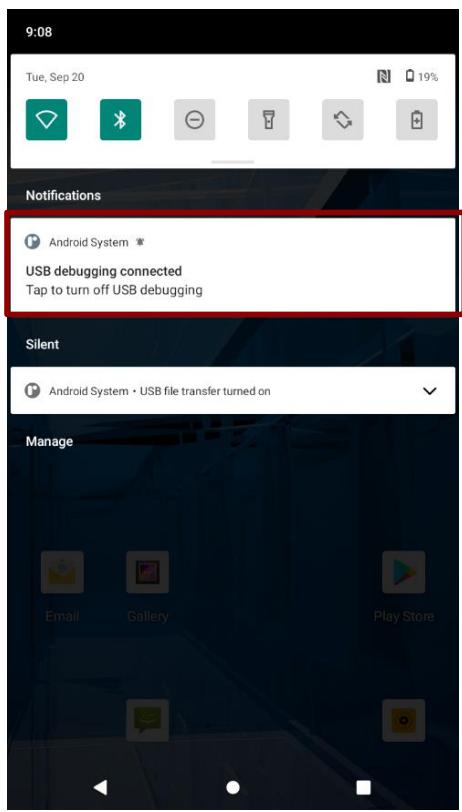
- Pull down the screen to open notification panel. Tap USB debugging connected.
- In the Developer options user can choose the action to perform.

Important: Carefully follow your computer's instructions to un-mount the USB storage or SD card. Disconnect USB device not properly can cause a loss of important data or information.
Chapter 6: Using Camera
This chapter explains how to use camera to capture photos and videos.
6.1 Capturing Photos or Video
Winmate® E500RM9 is equipped with an 13MP Camera on the rear side and an 8 MP Camera on the front side, which user can use to capture photos or video.
6.1.1 Opening Camera
- Tap the launcher and then tap Camera . Camera opens in Portrait mode, ready to take a picture or shoot a video.

Important:
Make sure the protective lens cover is clean before taking pictures. A lens covered with smudges from fingers can cause blurry pictures.
6.1.2 Taking Pictures
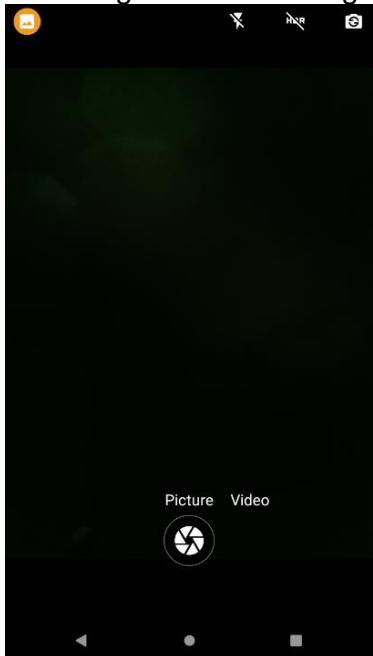
- Adjust the exposure, flash, and other necessary settings or leave it automatic.
- Tap the Shutter icon
- The camera brings the image into focus, when the image is in focus, the focus indicators in each corner will turn green and ready to capture.
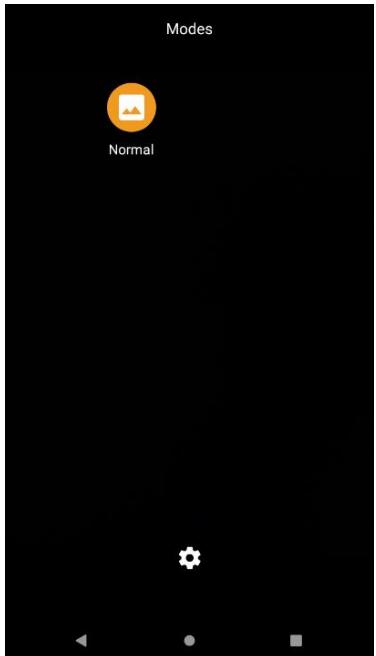
- Tap to change camera settings.
6.1.3 Switching Between Front and Rear Cameras
- Tap the On Screen Select Camera icon to switch between the rear camera and the front

- The preview switches to show the scene viewed from the camera you selected.

Note:
Not all features (such as flash) are available for the front camera.
6.1.4 Viewing pictures
- After taking a photo, a thumbnail of the picture is shown on the corner of the capture screen. Tap the thumbnail to view it.
- Tap the onscreen button:
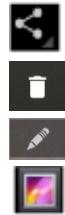
to share a photo.
to delete a photo.
to edit the photo
to view other photos and videos in the gallery.
- Swipe right or left to view more photos.
6.1.5 Shooting Videos
- Point the lens to record the scene where you want to start.
- Tap to start recording video.
- The countdown time remaining to shoot is located on the upper left; when the time left is less than a minute, the countdown turns red.
- Tap the icon again to stop shooting.
6.2 The Gallery
- Tap the launcher and then tap Gallery
- Tap a folder to view the pictures or video inside in full screen mode.
- Flick the pictures left or right to view the previous or next picture.
Chapter 7: Battery Warm Swap (Optional)
Battery warm swap is an optional feature of E500RM9 and may not be present in your device. Please check your device's specifications or contact our sales representative for more information.
To perform the battery warm swap:
- The Warm Swap Battery function takes 2 minutes after booting up. Long-press the Power Button to call out the menu.
- Go back to the previous page, and a "hotswap is not ready" screen will appear, saying it will take a few seconds.
- After "Hotswap is ready" appears, long-press the Power Button to call out the menu.
- In the opened menu on the main desktop right side, click Swap battery
- DO NOT remove the battery until hotswap mode is ready.
- When the dialog box disappears and the power LED red light flashes, you can change the battery. Follow the procedure described in section 2.4.1 Inserting Battery Pack of this User Guide to remove/ install the battery.

Note:
Every time the device is restarted, please wait for at least 2 minutes before activating the warm swap function.
Chapter 8: Capturing Data
This chapter explains how to use NFC, Barcode reader with Winmate® Data Collection application, smartcard reader, and fingerprint scanner on the E500RM9.

Note:
NFC, Barcode reader, fingerprint scanner, and smart card reader are optional features. It might not be available on your device.
8.1 Using NFC (Optional)
NFC is located on the bottom of the front panel of the device. Notice that NFC reader is either one with optional fingerprint reader.
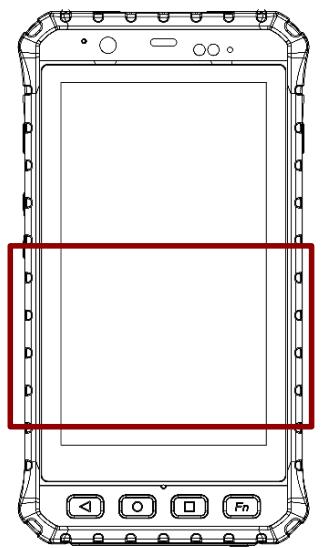
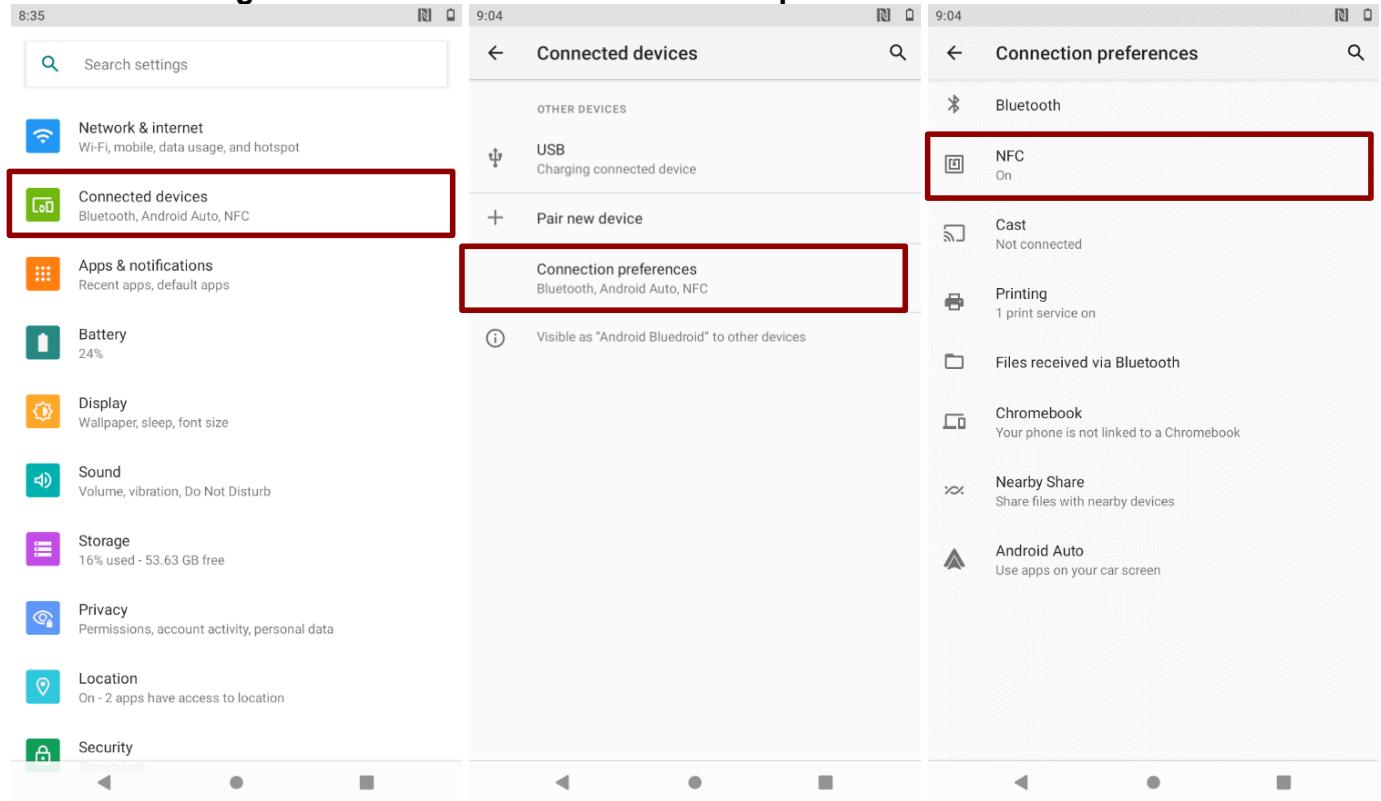
To enable NFC:
1. Go to Settings > Connected device > Connection preferences > NFC.
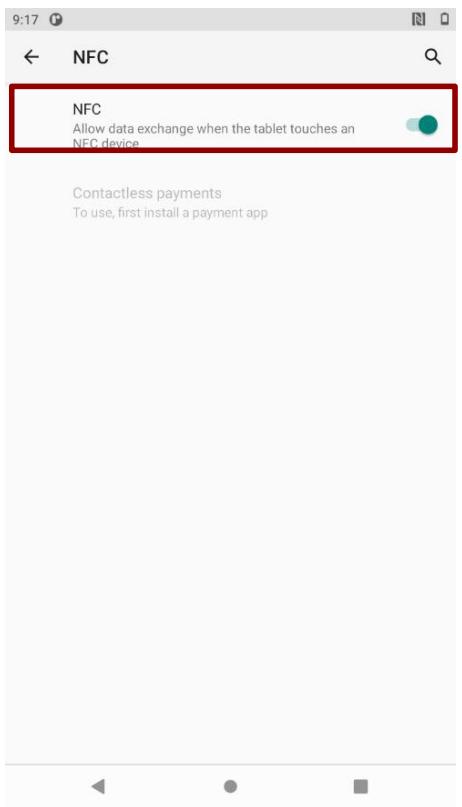
- Turn on the NFC.
8.2 Using Barcode Reader (Optional)
1D/2D Barcode Reader is an optional feature for Winmate® E500RM9 and may not be present in your device. Barcode Reader is located on the top side of the Rugged Mobile Computer.
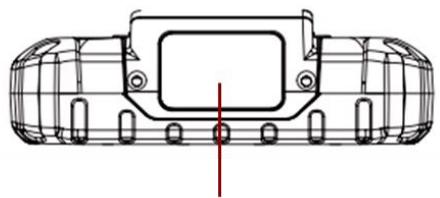
Barcode Reader
8.2.1 Turn On and Off Barcode Reader
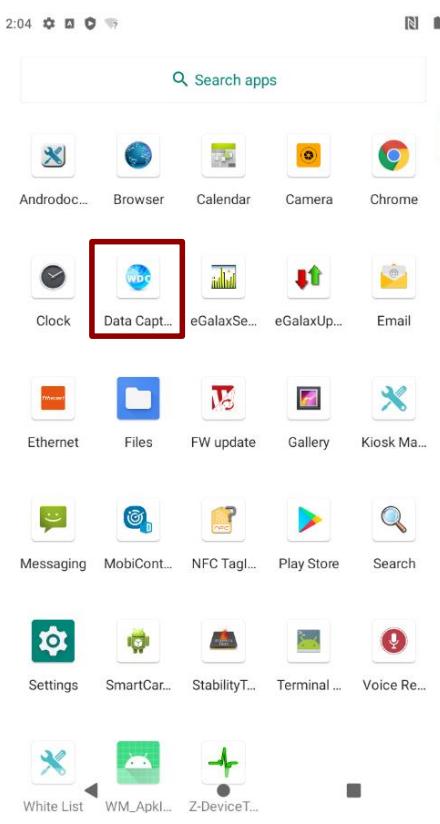
The E500RM9 with Barcode Reader comes with pre-installed software Winmate Data Collection (WDC) that allows users to turn on the readers and set up the button to trigger the scan function.
- Swipe from the bottom of the main desktop, tap Data Capture (WDC)
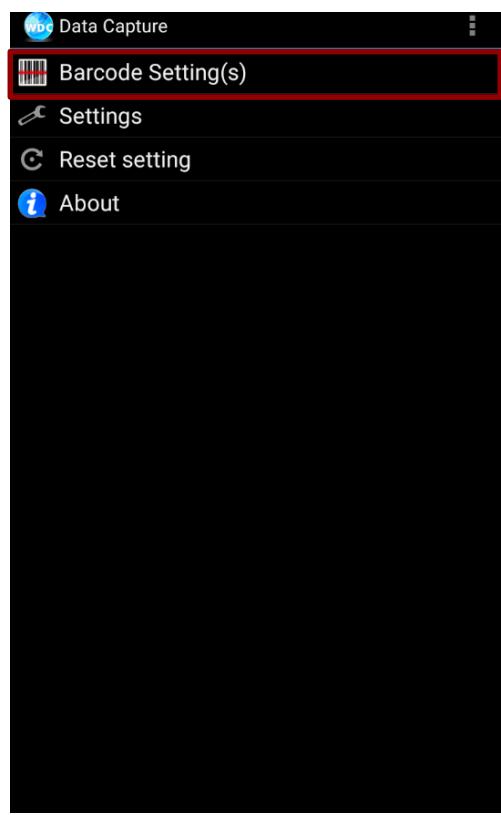
- Tap Barcode Setting(s)
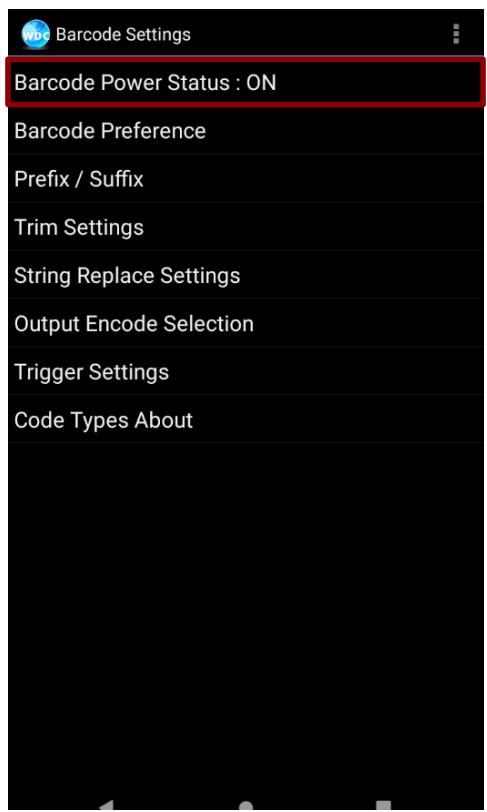
- Once the user entered the WDC application, the device will automatically turn on the Barcode Reader. Turn off the Barcode Reader by tapping Barcode Power Status: ON.
8.2.2 Change the Barcode Symbologies
- In the WDC application, tap Barcode Settings, then tap Barcode Preference.
- Change the symbologies of the barcode:
1D Symbologies
2D Symbologies
- Imager Options
- User Preference
- Disable all symbologies
8.2.3 Add Commands to the Barcode Output
- In the WDC application, tap Barcode Setting, than tap Prefix / Suffix.
- Enter special characters at the beginning (prefix) or end (suffix) of the scanned barcodes.
- Tap Set to add into the data.

The output will show the command that you entered in the prefix or the suffix;
For example, if user enters "\n" in the prefix text, the output of the barcode reader will appear on the next line of the page. And if the user enters "\n" in the suffix, the output of the barcode reader will show the barcode and change to the start of the next line for the user. Same with the command "\t" and "\b".
8.2.4 Change the Barcode Reader Scan Type
- In the WDC application, tap Barcode Settings , then Trigger Settings.
-
Select the Scan Type or select read time of the Barcode Reader.
-
Auto Scan - Barcode Reader starts auto-scanning once the user leaves the WDC application.
- Multiple Scan -After pressing the trigger button Barcode Reader starts continuously scanning and reading multiple codes within the time duration selected in Read time option.
- Auto Detect Scan - Barcode Reader keeps auto-scanning while the device is being moved.
- Continuing Scan or Single Scan (default) - After pressing the trigger button Barcode Reader can only read a single code within time duration selected in Read time option.

Note:
The options showed will be different depending on the version of Barcode Reader or Android operating system.
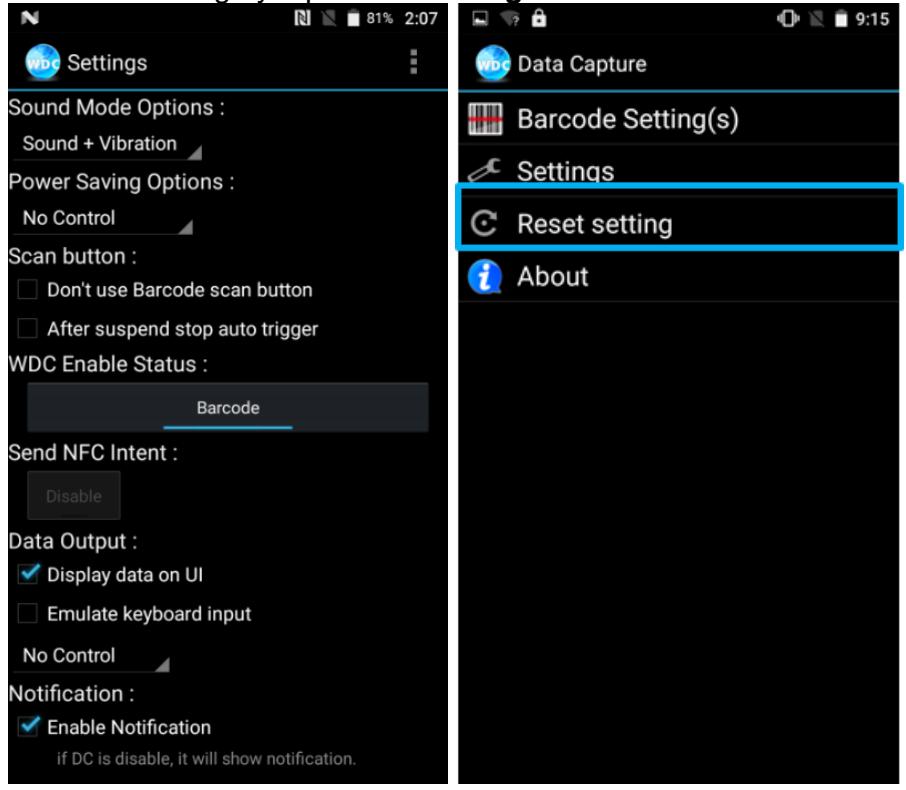
8.2.5 Change the WDC Setting or Reset to Default
- In the WDC application, tap Settings.
- Select the options to change the setting of the application.
- Or, reset to the default setting by tap Reset setting.
8.2.6 Scanning Barcodes
- Tear off protective film from the barcode.
- Open Search applications or any other text edit utilities.
- Press the function button to trigger the barcode.
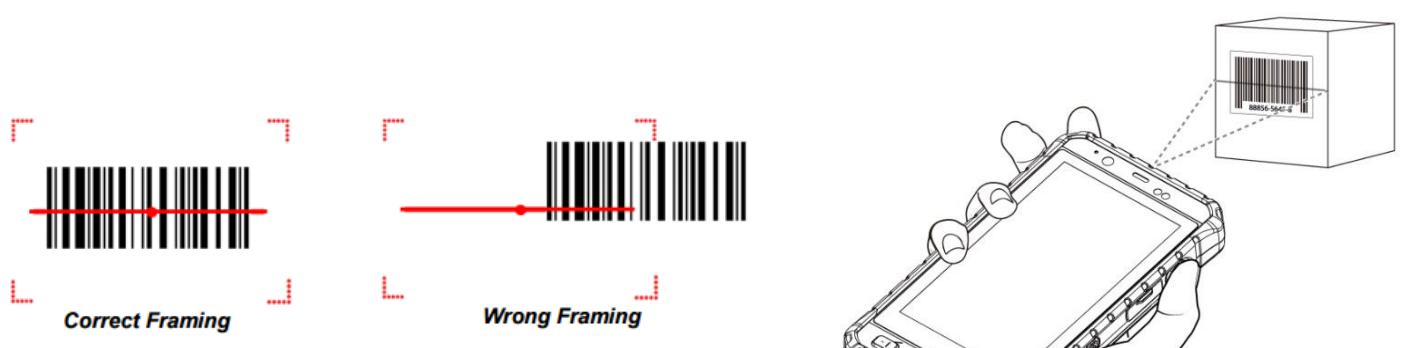
- Aim the barcode.
- Ensure the entire barcode is within the rectangular area formed by the brackets in the laser framing. Scan the following barcode to check if your reader is working properly. Results will be displayed in the selected utilities.

Code-39
WINMATE TEST
8.2.7 Scanning Tips and Considerations
8.2.7.1 Distance
Scanning device will decode perfectly over a certain working range, there are minimum and maximum distance from the barcode. To specify the appropriate working range per barcode type is through a table as follows.
| Symbology | Density | Min Distance | Max Distance |
| Code 39 | 0.100 mm | 9.5 cm | 11.5 cm |
| 0.125 mm | 8.0 cm | 14.5 cm | |
| 0.500 mm | 6.5 cm | 50 cm | |
| 1.000 mm | 9.5 cm | 75 cm | |
| EAN / UPS 100% | 0.33 mm | 6 cm | 34 cm |
| DataMatrix | 0.18 mm | 7.5 cm | 16.5 cm |
| 0.25 mm | 6.0 cm | 23.0 cm | |
| 0.38 mm | 5.5 cm | 34.5 cm | |
| PDF417 | 0.25 mm | 5.5 cm | 26 cm |
| 0.38 mm | 6.5 cm | 37 cm |
8.2.7.2 Angle
Scanning angle is important for promoting quick decodes.
| Scanning Angle | Horizontal 34.4° | 34.4° |
| Vertical | 22.2° | |
| Framing Angle | Horizontal | 30° |
| Vertical | 20° |
8.3 Using Smart Card Reader (Optional)
Smart Card Reader is located on the bottom side of the E500RM9.

8.3.1 Use Smart Card Reader
1. Enter Settings menu, select Accessibility, and then deactivate the Connect to PC.
- Launch the Smart Card APP, select List Reader, and then press open.
- Insert the Smart Card (IC face to rear) then select "Set Power" and select power on. Press Get ATR to see the information written on the card.
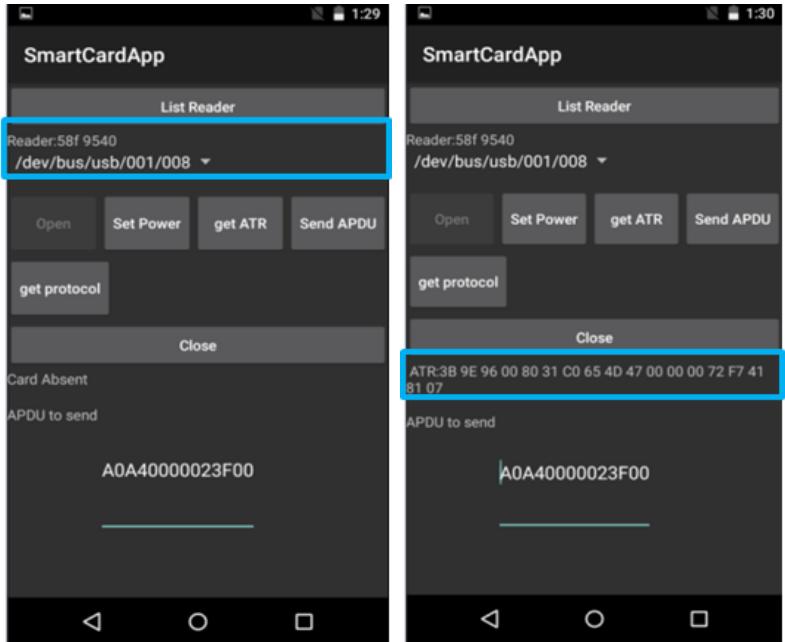
If reader information is not available, please go back to Step 1 then check and uncheck Connect to PC again.
8.3.2 Smart Card Reader SDK
You can download Smart Card Reader SDK from Winmate Download Center. For more details on Winmate's SDK refer to Appendix B.
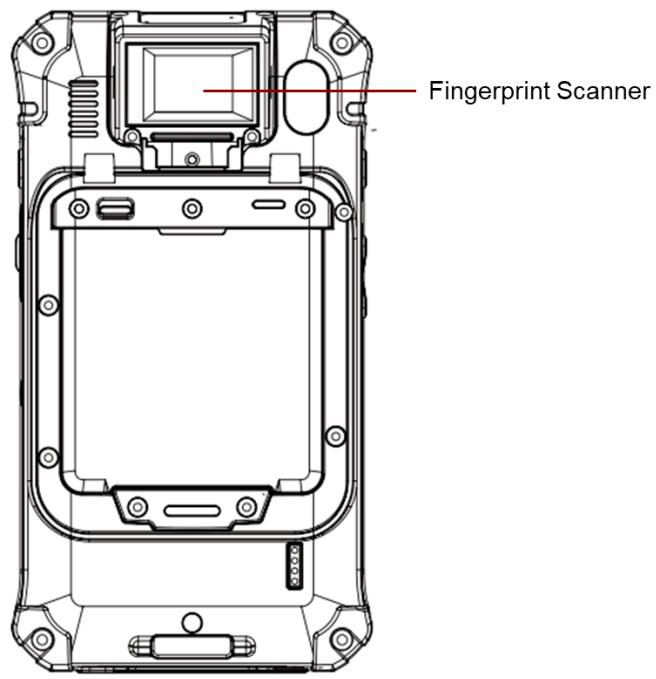
8.4 Using Fingerprint Scanner (Optional)
Fingerprint Scanner is an optional feature for E500RM9 Rugged Mobile Computer and may not be present in your device. Fingerprint Scanner is located on the top rear side of the E500RM9.
8.5 Docking Connector Pin Definition
The E500RM9 mobile computer supports one 8-pin docking connector at the bottom side. The pin definition is listed as the following table.

| Pin no. | Signal | Pin no. | Signal |
| 1 | Detect | 2 | Power |
| 3 | Power | 4 | USB + |
| 5 | USB - | 6 | GND |
| 7 | GND | 8 | Detect |
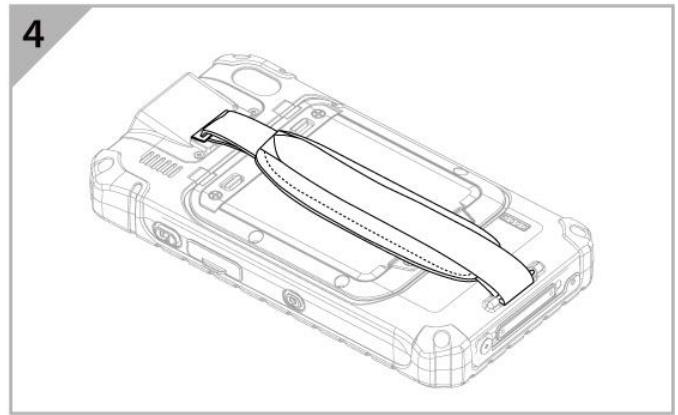
8.6 Hand Strap Installation
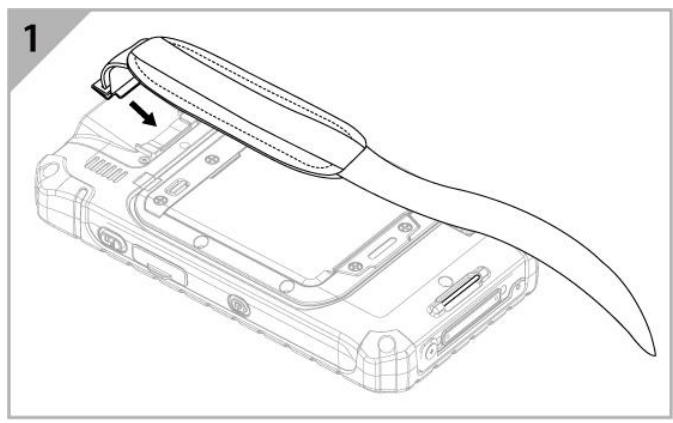
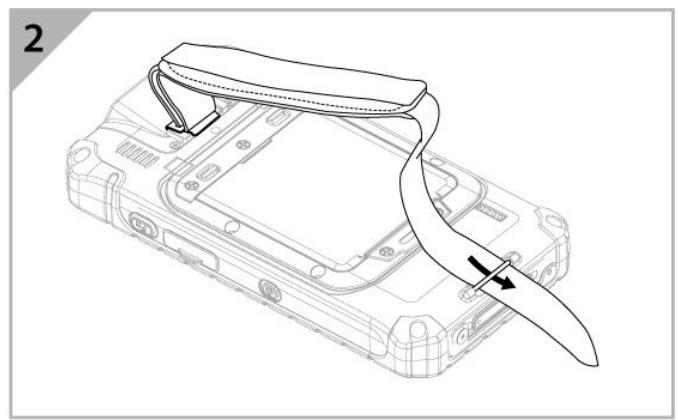
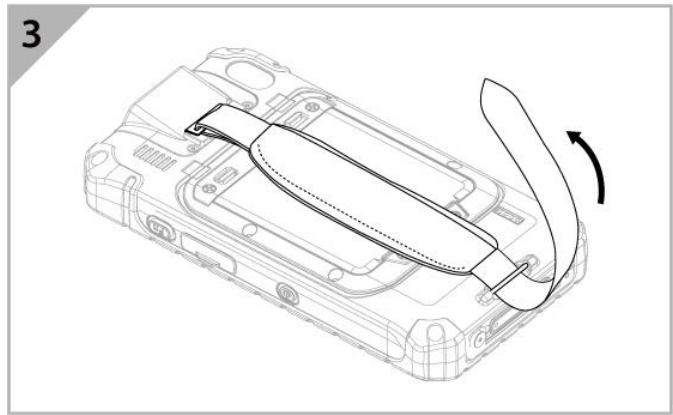
To install hand strap:
- Place the device face-down on a flat surface. Attach the hand strap plate to the upper retaining bar.
- Insert another side of the hand strap to the under bar.
- Place your hand under the hand strap to adjust the fit.
- Then fold the hand strap over and press down firmly to attach the hooks and loops, as shown at the illustration.
Appendix
Appendix A: Basic Troubleshooting
| Problem | Solution |
| The removable battery is not charging. | Make sure the AC adapter is properly connected, and that the removable battery is properly inserted. |
| Nothing appears on the screen. | The mobile computer may be in sleep mode. Press the power button to wake up the display. The brightness level may be too low. Increase brightness. |
| The screen suddenly turns blank and the power indicator goes off. | Make sure the AC adapter is properly connected. If running on battery power, the battery may be depleted, charge the battery. Make sure that LED Indicator shows red. |
| Wireless LAN signal quality is poor. | The mobile computer may be out of range. Move the device closer to the access point or another wireless LAN device associated with it. Check if your surroundings have interferences, such as microwave ovens, cordless phones. Move the device away from objects causing interference. |
| I cannot connect to another wireless LAN device. | Make sure that wireless LAN feature is powered on. Make sure that theSSID setting is the same for every wireless LAN device in the network. Restart the mobile computer. Make sure the IP address or subnet mask setting is correct. |
| I cannot connect to another device with BT. | Make sure that both devices have BT powered on (For the Mobile computer, check Settings to check if BT is powered on). Make sure that the distance between the two devices is within 10 meters and there are no walls or large obstructions between the devices. Make sure the both devices are powered on and configured to be discoverable. Make sure that both devices are compatible. |
| The GPS application cannot find my location. | Make sure that GPS is turned on in Settings. Make sure that GPS receiver and the location sensor are enabled in Control Panel. The mobile computer may be out of coverage area. Move your device outdoors or closer to a window. Check if your surroundings have interferences, such as microwave ovens, cordless phones. Move the device away from objects causing interference. |
| No sound is produced. | Adjust volume of the mobile computer by pressing on the volume rocker. If using an external audio device, make sure that the cable is properly connected. |
| I cannot project the mobile computer display to another monitor. | Make sure the VGA driver is installed. Make sure the output setting selected is correct. |
| Barcode scanner does not emit laser beam and does not seem to work. | ·Make sure the Barcode scanner device is detected, please open WDC application and check Data Capture “About”. ·If the device is not detected in WDC application under Data Capture “About”, please press Reset Setting in Data Capture. |
| Barcode Scanner emits laser beam but does not read barcode presented to it. | ·Adjust the distance between barcode scanner of the device and the barcode being scanned. ·Make sure the barcode code type is enabled in the mobile computer. To enable/disable a specific barcode code type, go through the “Barcode Scanner Configuration” section. |
| Battery leaking or swollen | ·The lithium battery used in this mobile computer may swell after being charged/ discharged many times, but there is no problem regarding safety. ·Continued use in such a state may result in the battery getting jammed, so please stop using the battery, and purchase a new one. |
Appendix B: Software Development Kit
Winmate® provides the following drivers and Software Development Kit (SDK) for E500RM9.
| Item | File Type | Description |
| 1 | E500RM9 Drivers | Android Debug Bridge (ADB) Driver / USB Driver |
| 2 | E500RM9 Flash Tool | Flash Tool |
| 3 | General SDK (WDC) | Development kit for WDC, including Barcode Reader and Fingerprint Scanner |
| 4 | Smart Card Reader SDK | E500RM9 Smart Card Reader SDK - Android Development Kit |
Download SDK from Winmate Download Center.
Winmate Download Center:
https://www.winmate.com > Support > Download Center
Appendix C: Product Specifications
| Model Name | E500RM9 | |
| Display | Size | 5 inches |
| Resolution | 1280 x 720 | |
| Brightness | 500 nits | |
| Contrast Ratio | 800:1 | |
| Viewing Angle | 80/80/80/80 | |
| Touch | Projected Capacitive Multi-Touch | |
| Bonding | Optical Bonding for Sunlight Viewability | |
| System Specification | Processor | ARM A73 x 4 (2.0 GHz) + A53 x 4 (2.0 GHz) |
| System Memory | 4 GB | |
| Storage | 64 GB | |
| Operating System | Android 11.0 | |
| WLAN | Support | |
| BT | Support | |
| GNSS | GPS / AGPS | |
| WWAN | 4G/LTE (Optional) | |
| Sensors | Ambient Light Sensor, E-Compass, Gyro, Acceleration Sensors | |
| RFID | NFC (Read / Write, Peer to Peer mode) (Optional) | |
| Smart Card Reader | ISO7816 Part 1.2.3 Smart card reader (Optional) | |
| Fingerprint Scanner | Fingerprint Reader (Optional) | |
| Camera | Front Camera | 8 MP Front Camera |
| Rear Camera | 13 MP Rear Camera with auto-focus and LED light | |
| Mechanical | Dimensions | 85.9 x 163.2 x 22.5 mm |
| Weight | 315 g | |
| IO Ports | USB Port | 1 x Micro USB OTG |
| SIM Card Slot | 2 x SIM Card Slot | |
| SD Card Slot | 1 x Micro SD Card Slot | |
| Audio | 2 x Built-in Mic 1 x Speaker 1 x Receiver | |
| Docking Connector | 1 x Docking Connector | |
| Indicator | 1 x LED Indicators (Power, Battery) | |
| Control | Buttons | 1 x Volume +/- 1 x Power button 3 x Function button 1 x Home 1 x Menu 1 x Esc |
| Power | Battery | 3.7V 3900 mAh Hot swappable function (Optional) |
| Power Rating | 5 V | |
| Adapter | 5V 2A adapter | |
| Environment | Operating temp | -10°C to 50°C (Battery mode) |
| Operating humidity | 10% to 95% RH, Non condensing | |
| Shock | MIL-STD 810H Method 516.6 Procedure I | |
| Vibration | MIL-STD 810H Method 514.8 Procedure I | |
| Drop | MIL-STD 810H Method 516.8 4 ft | |
| Security | SOTI MobiControl Compliance | |
| Data Capture | Barcode scanner | 1D/2D Barcode reader (Optional) |
NOTE:
- Accessories and Integrated Options may vary depending on your configuration. The product shown in this document is a standard model. For diagrams that contain customized or optional I/O, please contact the Winmate Sales Team for more information.
- All specifications are subject to change without prior notice.
Appendix D: OS Image Update
Winmate provide OS Image update tool. Please contact our sales representative to receive the latest OS image available for your device.
Appendix E: OTA Update Guide
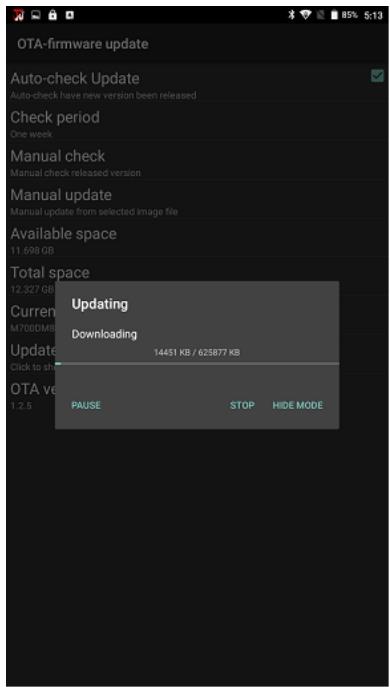
You can use online OTA Update tool to update firmware version.

Important
Battery capacity must not be lower than 30% during update.
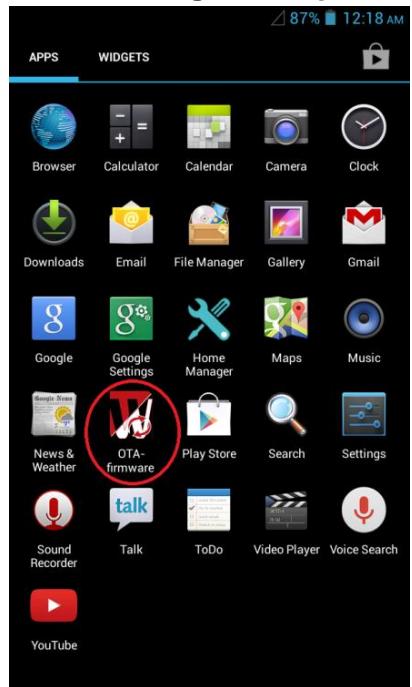
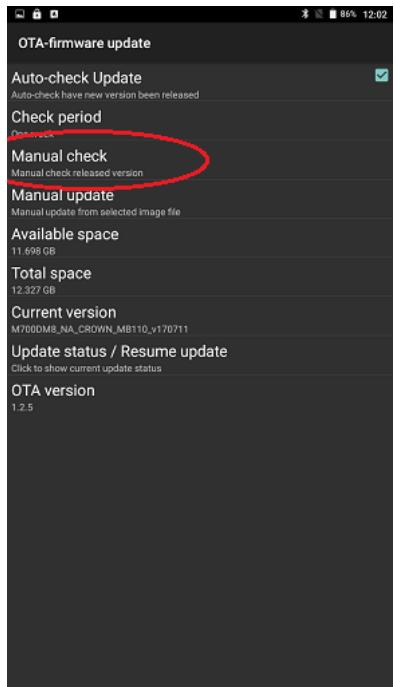
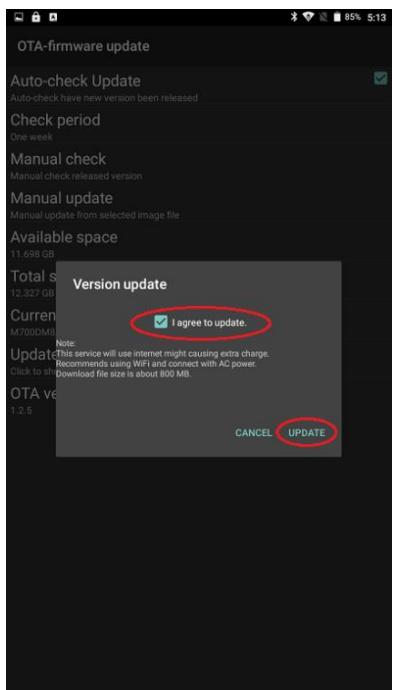
To update OTA:
- Select OTA-firmware.
- Select Manual check.
- Check I agree to update and click UPDATE.
-
Wait for download finish it will take some time.
-
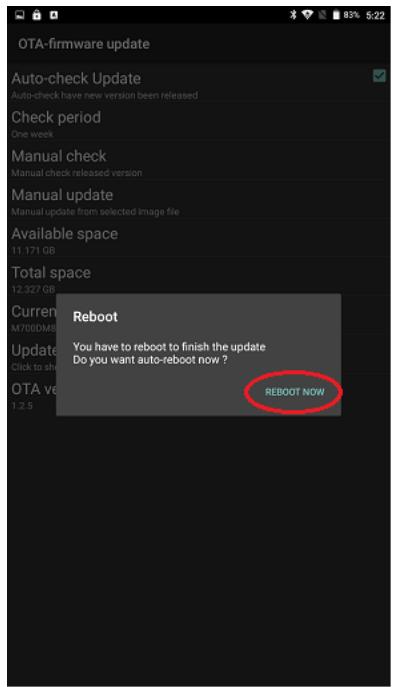
Click REBOOT NOW.
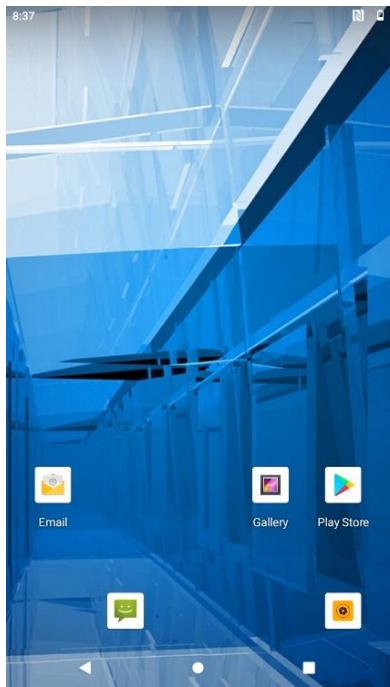
- Wait while Ota is updating.