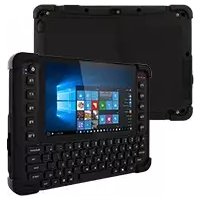
M101AD - Tablet Winmate - Free user manual and instructions
Find the device manual for free M101AD Winmate in PDF.


User questions about M101AD Winmate
0 question about this device. Answer the ones you know or ask your own.
Ask a new question about this device
Download the instructions for your Tablet in PDF format for free! Find your manual M101AD - Winmate and take your electronic device back in hand. On this page are published all the documents necessary for the use of your device. M101AD by Winmate.
USER MANUAL M101AD Winmate
natural_image
Illustration of a tablet device with front panel and control buttons (no text or symbols)User Guide
Version 1.1
Document Part No. 9152101K101Z
Contents
Chapter 1: Read Me First....3
1.1 Advisory Conventions ....3
1.2 Safety Information....4
1.3 Handling and Maintenance ....7
1.4 Declaration of Conformity (DoC)....8
1.5 Copyright Notice ....9
1.6 Trademark Acknowledgement ....9
1.7 Disclaimer....9
Chapter 2: Getting Started ....10
2.1 Introduction ...... 10
2.2 Unpacking....10
2.3 Description of Parts....11
2.4 Indicators 12
2.5 Hotkey for Specific Functions....13
2.6 First-Time Operation 13
2.6.1 Installing Battery....13
2.6.2 Charging Your Tablet 13
2.6.3 Starting the Tablet 14
Chapter 3: Setting Up Windows for the First Time ....15
3.1 Introduction ...... 15
3.2 Setting up Windows 10 IoT Enterprise....15
Chapter 4: Operating the Device ....18
4.1 HotTab Introduction ...... 18
4.2 Shortcuts....19
4.3 Using Camera....19
4.4 Built-in Devices On/Off....21
4.4.1 Using the Wireless LAN (WLAN)....21
4.4.2 Using the LAN 22
4.4.3 Using the GPS....22
4.4.4 Using the BT....22
4.4.5 Turning On/Off LED Indicators 23
4.4.6 Replacing Battery 23
4.4.7 Using the Barcode Reader ....25
4.4.8 Turn on/off the GPS External Antenna 38
4.4.9 Turn on/off the Light Sensor 38
4.4.10 Changing Touchscreen Modes....39
Chapter 5: Frequently Used Settings....41
5.1 Screen Resolution Scaling and Setting....41
5.1.1 Changing Display Scaling (Recommended)....41
5.1.2 Changing Screen Resolution....42
5.2 Using Recovery Wizard to Restore Computer ....44
5.3 Docking Connector Pin Definition ....46
5.4 COM Port Definition 46
5.5 Pairing with a Wireless BT Barcode Scanner....48
5.5.1 Setup Computer for BT Pairing....48
5.5.2 Set up the Barcode Scanner for BT Pairing....52
5.5.3 Perform BT Pairing....52
Chapter 6: Troubleshooting....54
6.1 Basic Troubleshooting....54
Appendix....56
Appendix A: Product Specifications ....56
Chapter 1: Read Me First
1.1 Advisory Conventions
Four types of advisories are used throughout the user manual to provide helpful information or alert you to the potential for hardware damage or personal injury. These are Notes, Important, Cautions, and Warnings. The following is an example of each type of advisory.

Note:
A note is used to emphasize helpful information

Important:
An important note indicates information that is important for you to know.

Caution A Caution alert indicates potential damage to hardware and explains how to avoid the potential problem.
Warning! An Electrical Shock Warning indicates the potential harm from electrical hazards and how to avoid the potential problem.
Follow and adhere to all warnings and instructions in this manual. For your safety, please read all safety and operating instructions before using the product. Keep this manual for future reference.

Do Not Short the Positive (+) and Negative (-) Terminals of the Battery. Generation of heat, ignition or rupture may result. When carrying or storing the device, do not place the battery pack together with articles that may contact electricity.
Do Not Apply Shocks to the Battery by Dropping It or Applying Strong Pressure to It. Electrolyte leakage, generation of heat, ignition or rupture of battery may occurs.
Do Not Charge the Battery Other Than Methods Those Specified In This Manual. If the battery is not charged using one of the specified methods, electrolyte leakage, generation of heat, ignition or rupture may result.
When the Battery Pack Has Deteriorated, Replace It with a New Battery. Continued use of a damaged battery pack may result in heat generation, ignition or battery rupture.
Do Not Expose the Battery Pack to Excessive Heat, or Extreme Heat (Near Fire, in Direct Sunlight for example) Generation of heat, ignition or rupture may result
Do Not Use the Battery Pack With Any Other Products. The battery pack is rechargeable and is only designed for this specific product. If it is used with a product other than the specified product, electrolyte leakage, generation of heat, ignition or rupture may result.
Do Not Use This Product With Battery Other Than the One Specified.
It is recommended to reboot the device when some functions are defect or inactive. If it still can't solve the problems please contact your dealer or agent.
Discontinue using device immediately if you notice the battery is swelling, or looks puffy or misshapen. Do not attempt to charge or use the device. Do not handle a damaged or leaking battery. Do not let leaking battery fluid come into contact with your eyes, skin or clothing.
WARNING: To avoid risk of electric shock, this equipment must only be connected to a supply main with protective earth.
Warning! Do not modify this equipment without authorization of the manufacturer.
Use a soft cloth to clean the surface.
Please follow the local national requirement to dispose unit/accessories/waste products/residues etc.
When you disconnect the AC adapter, disconnect from the socket-outlet First.
The equipment should be installed near an easily accessible outlet.
For pluggable equipment, the power outlet must be installed near the equipment and must be easily accessible.
Accessory equipment connected to the analog and digital interfaces must be in compliance with the respective nationally harmonized IEC standards (i.e. IEC 60601-1 for healthcare equipment.) Furthermore all configurations shall comply with the system standard in IEC 60601-1. Anyone who connects additional equipment to the signal input part or signal output part is configuring a healthcare system, and is therefore, responsible that the system complies with the requirements of the system standard IEC 60601-1. The unit is for exclusive interconnection with IEC 60601-1 certified equipment in the patient environment and IEC 62368-1 certified equipment outside of the patient environment.
Circuit diagrams, descriptions and component parts list will be made available only upon request when servicing is required. Please, contact the address below for related information.
WINMATE INC, 9TH FL 111-6 SHING-DE RD SAN-CHUNG TAIPEI HSIEN,241 TAIWAN.
Warning! Tablet with cradle cannot be hand-held operated, and must be used with VESA mount as a fixed equipment.
- Do not disregard the safety that a polarized or grounded connection can provide. A polarized connection consists of two plugs, one of which is larger than the other. A grounded connection has two blades and a third one that is grounded. If the main plug provided cannot be inserted into your outlet, consult an electrician to replace your obsolete outlet.
1.3 Handling and Maintenance

General Guideline Guide Général
Keep the product at least 13 cm (5 inches) away from electrical appliances that can generate a strong magnetic field such as TV, refrigerator, motor, or a large audio speaker.
Do not place heavy objects on top of the tablet computer as this may damage the display.
The screen surface can be easily scratched. Use with care. Do not use paper towels to clean the display but use the included cleaning cloth. Avoid touching it with a pen or pencil.
To maximize the life of the backlight in the display, allow backlight to automatically turn off as a result of power management. Avoid using a screen saver or other software that prevents the power management from working.
Use a soft cloth moistened with water or a non-alkaline detergent to wipe the exterior of the product.
Gently wipe the display with a soft, lint-free cloth. Do not use alcohol or detergent on the product.
Use your finger or the stylus on display. Using sharp or metallic object may cause scratches and damage the display, thereby causing errors.
Use a soft cloth to remove dirt on display. The touchscreen surface has a special protective coating that prevents dirt from sticking to it. Not using a soft cloth may cause damage to the special protective coating on the touchscreen surface. To clean off hard to remove dirt, blow some steam on the particular area and gently wipe away using a soft cloth.
Do not use excessive force on display. Avoid placing objects on top of the display as this may cause the glass to break.
When there is a noticeable discrepancy in the operation of the touchscreen function (your touch does not correlate to the proper location on the screen), recalibrate the touchscreen display.
1.4 Declaration of Conformity (DoC)
FCC Statement
This device complies with part 15 FCC rules.
Any changes or modifications not expressly approved by the party responsible for compliance could void your authority to operate the equipment.

Operation is subject to the following two conditions:
- This device may not cause harmful interference.
- This device must accept any interference received, including interference that may cause undesired operation
This equipment has been tested and found to comply with the limits for a Class B digital device, pursuant to part 15 of the FCC Rules. These limits are designed to provide reasonable protection against harmful interference in a residential installation. This equipment generates, uses and can radiate radio frequency energy and, if not installed and used in accordance with the instructions, may cause harmful interference to radio communications. However, there is no guarantee that interference will not occur in a particular installation. If this equipment does cause harmful interference to radio or television reception, which can be determined by turning the equipment off and on, the user is encouraged to try to correct the interference by one or more of the following measures:
• Reorient or relocate the receiving antenna.
- Increase the separation between the equipment and receiver.
- Connect the equipment into an outlet on a circuit different from that to which the receiver is connected.
- Consult the dealer or an experienced radio/TV technician for help.
This device complies with part 15 of the FCC Rules. Operation is subject to the following two conditions: (1) This device may not cause harmful interference, and (2) this device must accept any interference received, including interference that may cause undesired operation.
This product meets applicable national SAR limits of 1.6W/kg. This specific maximum SAR values can be found in the section of this user guide. When carrying the product or using it while worn on your body, maintain a distance of 0.0 mm from the body to ensure compliance with RF exposure requirements. Note that the product may be transmitting even if you are not surfing Internet. Body SAR: 0.86 W/kg
CE Notice (European Union)
This equipment is in conformity with the requirement of the following EU legislation and harmonized standards. The product also complies with the Council's directions.
Electromagnetic Compatibility Directive (2014/30/EU)

• EN55035: 2017+A11: 2020
○ IEC61000-4-2: 2009
○ IEC61000-4-3: 2006+A1: 2007+A2: 2010
○ IEC61000-4-4: 2012
○ IEC61000-4-5: 2014
○ IEC61000-4-6: 2014
○ IEC61000-4-8: 2010
○ IEC61000-4-11: 2004
• EN55032: 2015+A11: 2020
• EN61000-3-2:2014
• EN61000-3-3:2013
Low Voltage Directive (2014/35/EU)
• EN 62368-1:2014
IC Canadian Compliance Statement
This device complies with Industry Canada license-exempt RSSs. Operation is subject to the following two conditions:
1) This device may not cause interference, and
2) This device must accept any interference, including interference that may cause undesired operation of the device.
This EUT is compliance with SAR for general population/uncontrolled exposure limits in IC RSS-102 and had been tested in accordance with the measurement methods and procedures specified in IEEE 1528 and IEC 62209. This equipment should be installed and operated with minimum distance 0.0 mm between the radiator and your body. This device and its antenna(s) must not be co-located or operating in conjunction with any other antenna or transmitter. Body SAR: 0.86 W/kg
No part of this document may be reproduced, copied, translated, or transmitted in any form or by any means, electronic or mechanical, for any purpose, without the prior written permission of the original manufacturer.
1.6 Trademark Acknowledgement
Brand and product names are trademarks or registered trademarks of their respective owners.
1.7 Disclaimer
Winmate Inc. reserve the right to make changes, without notice, to any product, including circuits and/or software described or contained in this manual in order to improve design and/or performance. We assume no responsibility or liability for the use of the described product(s) conveys no license or title under any patent, copyright, or masks work rights to these products, and make no representations or warranties that these products are free from patent, copyright, or mask work right infringement, unless otherwise specified. Applications that are described in this manual are for illustration purposes only. We make no representation or guarantee that such application will be suitable for the specified use without further testing or modification.
Chapter 2: Getting Started
2.1 Introduction
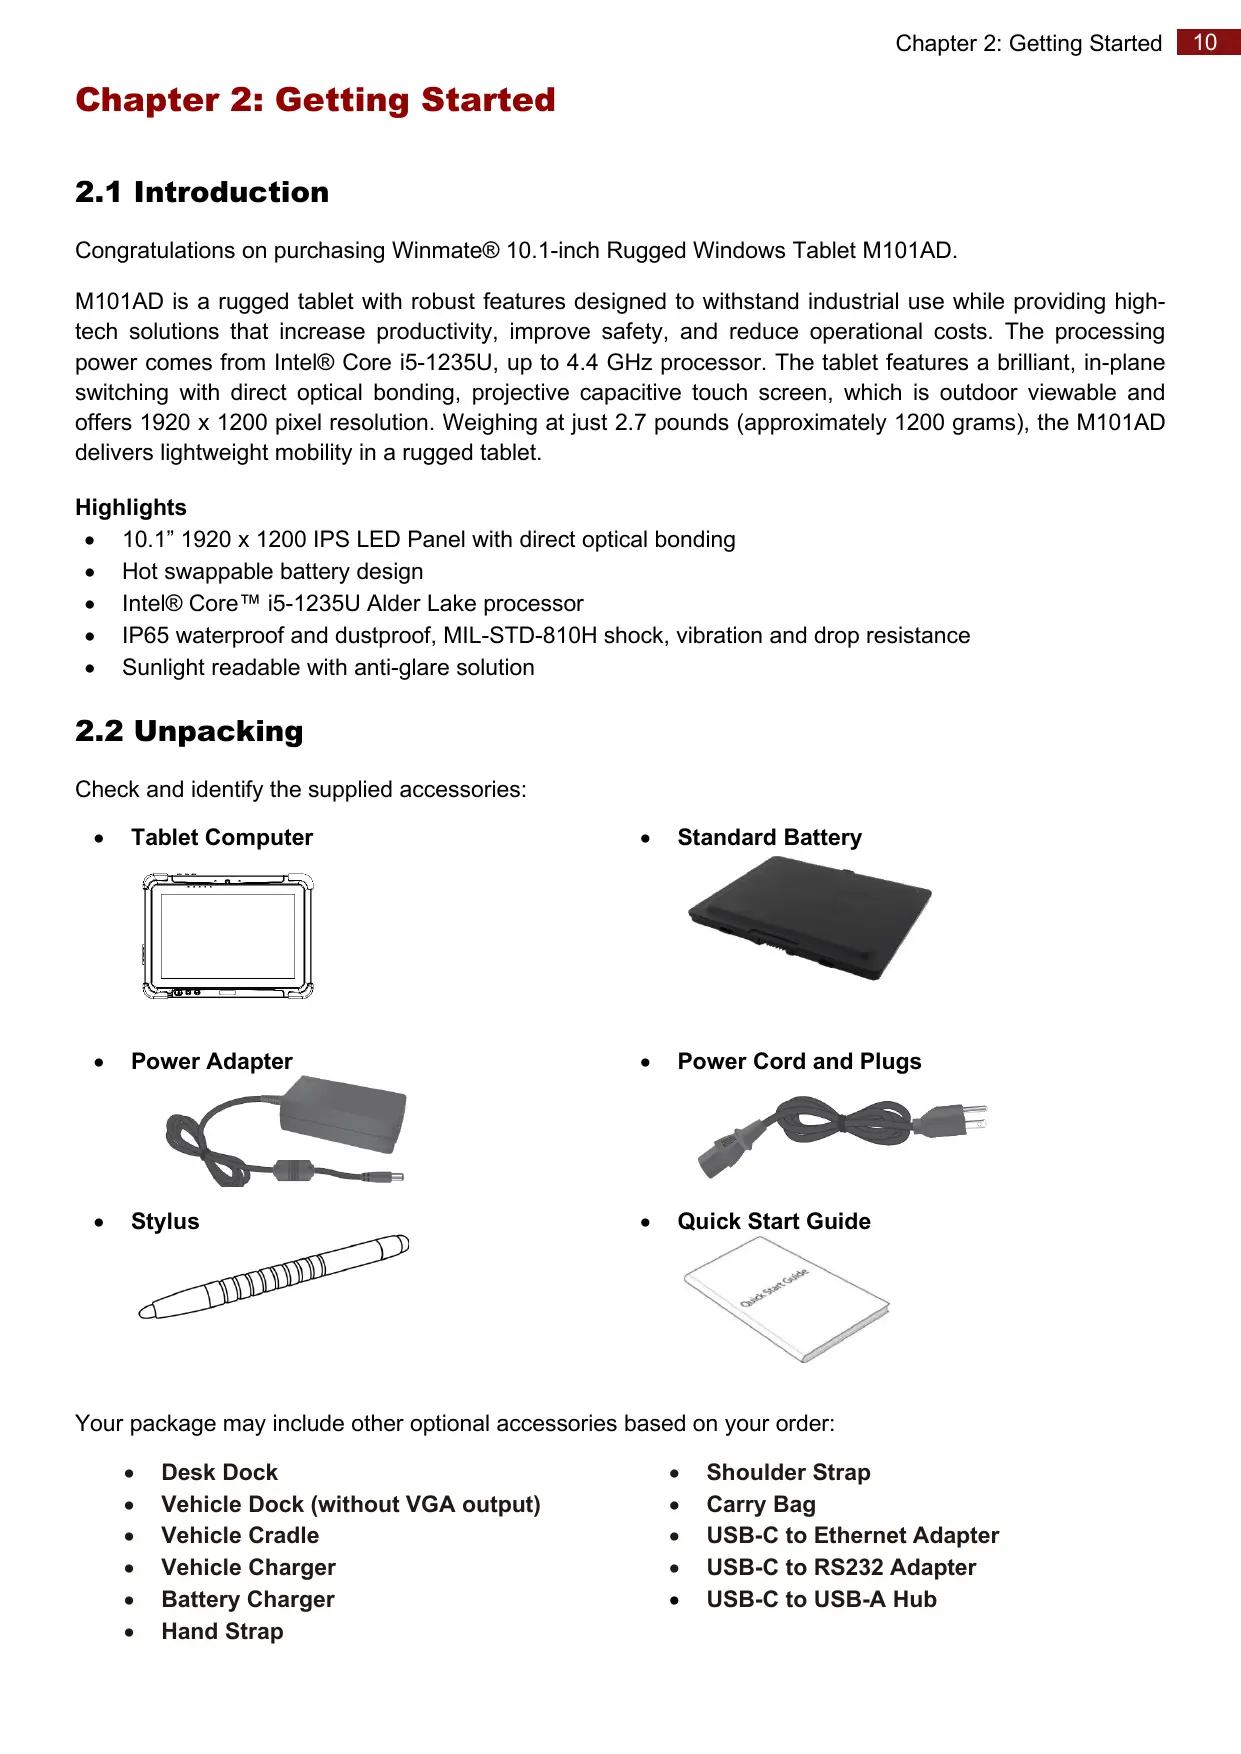
Congratulations on purchasing Winmate® 10.1-inch Rugged Windows Tablet M101AD.
M101AD is a rugged tablet with robust features designed to withstand industrial use while providing high-tech solutions that increase productivity, improve safety, and reduce operational costs. The processing power comes from Intel® Core i5-1235U, up to 4.4 GHz processor. The tablet features a brilliant, in-plane switching with direct optical bonding, projective capacitive touch screen, which is outdoor viewable and offers 1920 x 1200 pixel resolution. Weighing at just 2.7 pounds (approximately 1200 grams), the M101AD delivers lightweight mobility in a rugged tablet.
Highlights
• 10.1" 1920 x 1200 IPS LED Panel with direct optical bonding
• Hot swappable battery design
- Intel® Core™ i5-1235U Alder Lake processor
- IP65 waterproof and dustproof, MIL-STD-810H shock, vibration and drop resistance
- Sunlight readable with anti-glare solution
2.2 Unpacking
Check and identify the supplied accessories:
- Tablet Computer
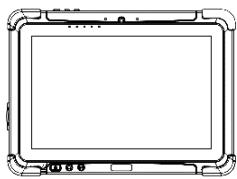
natural_image
Front view of a rectangular electronic device with no visible text or symbols- Standard Battery
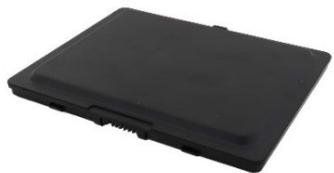
natural_image
Black rectangular electronic device with a flat top and small side connectors (no visible text or symbols)- Power Adapter
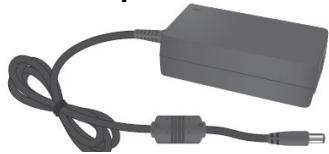
natural_image
Black rectangular electronic device with coiled cable and connector (no visible text or symbols)• Power Cord and Plugs
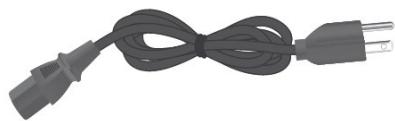
natural_image
Coiled black cable with two terminal plugs, no text or symbols visible- Stylus
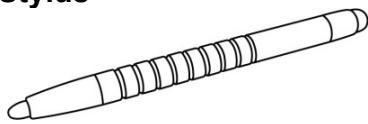
natural_image
Simple line drawing of a pen or stylus with no text or symbols- Quick Start Guide
text_image
Quick Start GuideYour package may include other optional accessories based on your order:
- Desk Dock
• Vehicle Dock (without VGA output) - Vehicle Cradle
- Vehicle Charger
- Battery Charger
-
Hand Strap
-
Shoulder Strap
- Carry Bag
• USB-C to Ethernet Adapter
• USB-C to RS232 Adapter
• USB-C to USB-A Hub
2.3 Description of Parts
Dimensions: 271.80 x 198.21 x 21 mm
Front:
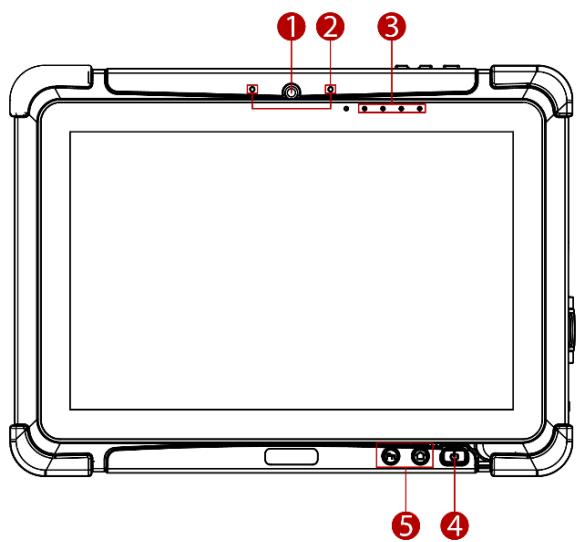
text_image
① ② ③ ④ ⑤Left:
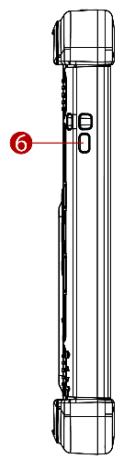
natural_image
Technical line drawing of a mechanical component with no visible text or symbolsRight:
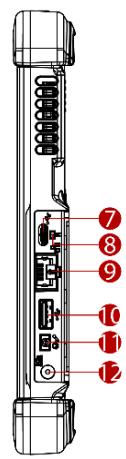
text_image
7 8 9 10 11 12| No | Item | Description |
| 1 | Front Camera | 2 Megapixel Webcam. |
| 2 | Digital Mic with noise cancellation | Use during video recordings and communications. |
| 3 | Light Sensor and LED Indicators | Show the current status of the Tablet Computer. RF communications, storage, battery status, power status. |
| 4 | Power Button | Power on/off the tablet. |
| 5 | Fn1 Button | Programmable function key configured by HotTab Utility. |
Front LED Indicator Details:
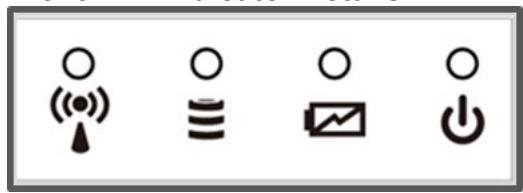
natural_image
Four black circular icons representing wireless, signal, weather, email, and power symbols (no text or labels)| No | Item | Description |
| 6 | Kensington Lock | Use to attached tablet computer around a table leg or another secure location. |
| 7 | USB 3.0 Type-C | A high-speed USB port connects to USB devices, such as a USB flash drive, mouse, keyboard, printer, etc.(Supporting Alternate Mode (ALT) or USB Power Delivery (USB-PD)). |
| 8 | Reset Button | Hardware reset button. |
| 9 | GigaLAN | Connects the LAN cable |
| 10 | USB 3.0 Type-A | USB 3.0 port connects to USB devices, such as USB flash drive, mouse, keyboard, printer, etc. |
| 11 | Power Jack | DC power input jack. |
| 12 | Mic In/Line Out | Headset or headphone can be connected (Mic is only supported with a 3.5mm 4-pin headset). |
Top and Bottom:

text_image
Technical diagram of a device with labeled ports and connectors, showing top and side views with red annotations.| No | Item | Description |
| 13 | Function Buttons | Programmable function key configured by HotTab Utility. |
| 14 | Docking Connector | Port to docking solutions such as vehicle docking to provide power and external antenna. |
Rear:
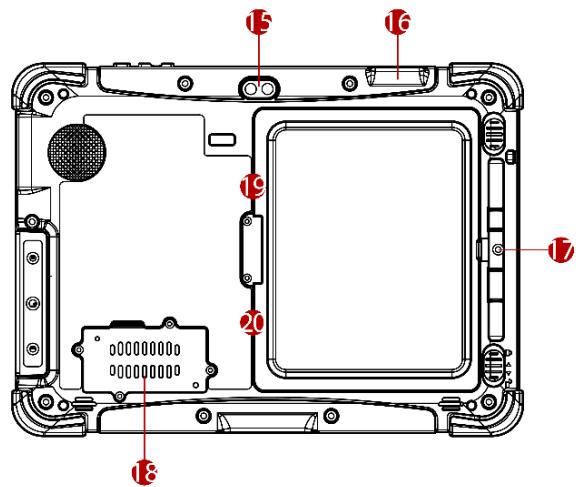
text_image
Technical diagram of a device rear panel with numbered component labels pointing to internal components.| No | Item | Description |
| 15 | Rear Camera | 8MP Autofocus Camera. Capture photos and videos. |
| 16 | Barcode Scanner | Barcode scanner for reading of 1D/2D barcode. |
| 17 | Touch Pen Slot | Pen holder slot to store touch pen. |
| 18 | LTE Module Slot | To insert LTE module |
| 19 | Micro SD Card Slot | To insert Micro SD card |
| 20 | SIM Card Slot | To insert Micro SIM card |
2.4 Indicators
| Icon | Indicator | Description |
| Power Indicator | Blue- Tablet is ONNo light- Tablet is OFF | |
| Battery Status | Orange-AC adapter is plugged in and chargingGreen-AC adapter is plugged in, the battery is fully chargedSolid Red- Low battery (<10%)Blinking Red- Battery is hot-swapped.No light- Battery is in use with more than 10% capacity | |
| Disk Activity Indicator | Green- Disk ActivityNo light- Disk Idling | |
| RF Communication | Green- One of Wi-Fi/BT/WWAN/GPS is ONNo light- Wi-Fi/BT/WWAN/GPS are all OFF |
2.5 Hotkey for Specific Functions
Physical buttons with their dedicated functions can be used to emulate commonly used keyboard keystrokes. Under a different scenario, a single physical button or a combination of physical buttons provide extra keyboard keystrokes, which are specified below:
In POST (before Windows boots up):
| Buttons | Keystroke |
| Fn1 | F6 to enter Recovery Menu |
| Fn2 | Esc to enter BIOS setup screen |
| Volume Up (+) | Up |
| Volume Down (-) | Down |
| Menu + Fn1 | Enter |
| Menu + Volume Up (+) | Right |
| Menu + Volume Down (-) | Left |
In Windows:
| Buttons | Keystroke |
| Menu | HotTab Quick Access |
| Fn1 | Default: Web Browser |
| Fn2 | Default: Camera |
| Volume UP (+) | Raise volume |
| Volume Down (-) | Lower volume. |
| Power | Power ON/ OFF |
| Volume Up (+) and Volume Down (-) | Ctrl + Alt + Del |
2.6 First-Time Operation
2.6.1 Installing Battery
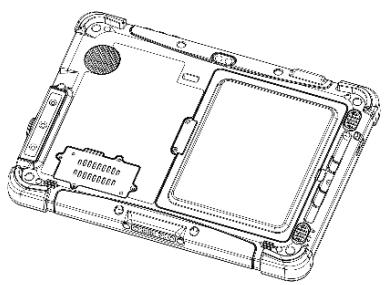
To install the standard battery pack:
- Disconnect any cords connected to the tablet computer.
- Turn the tablet over, back facing up.
- Locate the Battery Lock Latch and push it to the "Unlocked" position.
- Locate the Battery Release Slider that is spring-loaded. Pull back and hold.
- Insert the battery with the connector-pins side first, and then lower the battery into the battery compartment. Continue to hold the Battery Release Slider until the battery is fully inserted.
- Make sure the battery is completely lowered into the compartment before letting go of the Battery Release Slider. The battery will be flat against the housing once fully inserted.
natural_image
Technical line drawing of a device casing with internal components and mounting holes (no text or symbols)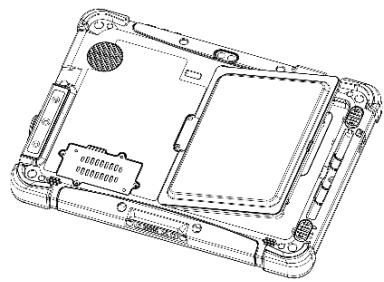
natural_image
Technical line drawing of a device casing with internal components and no visible text or symbolsTo remove the battery pack:
- Shut down the tablet (or put it into sleep mode). Disconnect any cords connected to the computer.
- Turn the tablet computer over, back facing up.
- Locate the Battery Lock Latch and push it to the "Unlocked" position.
- Locate the Battery Release Slider that is spring-loaded. Pull back and hold.
- Lift the battery out using the opening on the side of the battery compartment.
2.6.2 Charging Your Tablet
The tablet operates either on external AC power or internal battery power. It is recommended to use AC power when you start up the tablet for the first time.

Caution Use only the AC adapter included with your Tablet Computer. Using other AC adapters may damage the Tablet Computer and the Battery.
To connect a tablet to AC power:
- Open I/O protective cover by pulling out the latch.
- Plug the DC cord of the AC adapter into the power jack of the tablet computer.
- Plug the AC power cord into the AC adapter.
- Plug the AC power cord into the electrical outlet.
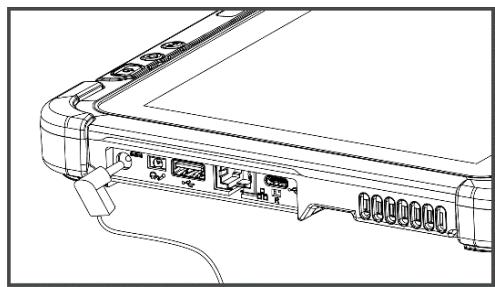
natural_image
Line drawing of a device rear panel with connectors and cables (no text or symbols)The battery LED indicator shows different battery states:
Orange - AC adapter is plugged in and the battery is charging.
Green - AC adapter is plugged in and the battery is fully charged.
Solid Red - Low battery level (<10%).
Blinking Red – Battery is being hot swapped.
No light – Battery is in use and charged (>10%).
2.6.3 Starting the Tablet

Important:
When powering on the device for the first time, please make sure there is no interruption during the Windows setting up process, for example, accidentally powering off. If it happened, please access the recovery menu by pressing Fn1 button on the front bezel to initiate the recovery process.
Press and hold the power button for 3 seconds until the blue LED power indicator light up.

Note:
Do not press the power button repeatedly.
Do not perform the following operations until the Disk Activity Indicator off
- Connecting or disconnecting the AC adapter
- Pressing the power button
- Touching the tablet buttons, screen, or external keyboard/mouse
To power off the Tablet Computer:
- Make sure you have closed any programs that are open on the Desktop. Start Screen apps don't need to be closed.
- Tap on the Settings charm.
- Tap on Power.
- Tap on Shut Down.
- Wait for Tablet Computer to power off.

Note:
The computer will forcibly be powered off if the power button is pressed and held for 6 seconds or longer.
Chapter 3: Setting Up Windows for the First Time
3.1 Introduction
The M101AD Tablet Computer operates on Windows 10 IoT Enterprise operating system.

Caution Make sure the battery is fully charged before starting the Tablet Computer for the first time with internal battery power.
- Public network: Select this location if you do not recognize all the computers on the network. (For example, you are in a coffee shop or airport or have mobile broadband) with a public network and is not trusted. Select the location where you will most often use the computer.
3.2 Setting up Windows 10 IoT Enterprise
Follow the steps below to complete the Windows 10 IoT Enterprise setup process.
- Press the power button to turn on the computer.
- First, select your country/region, your preferred app language, your preferred keyboard layout, and your time zone, then tap Next.
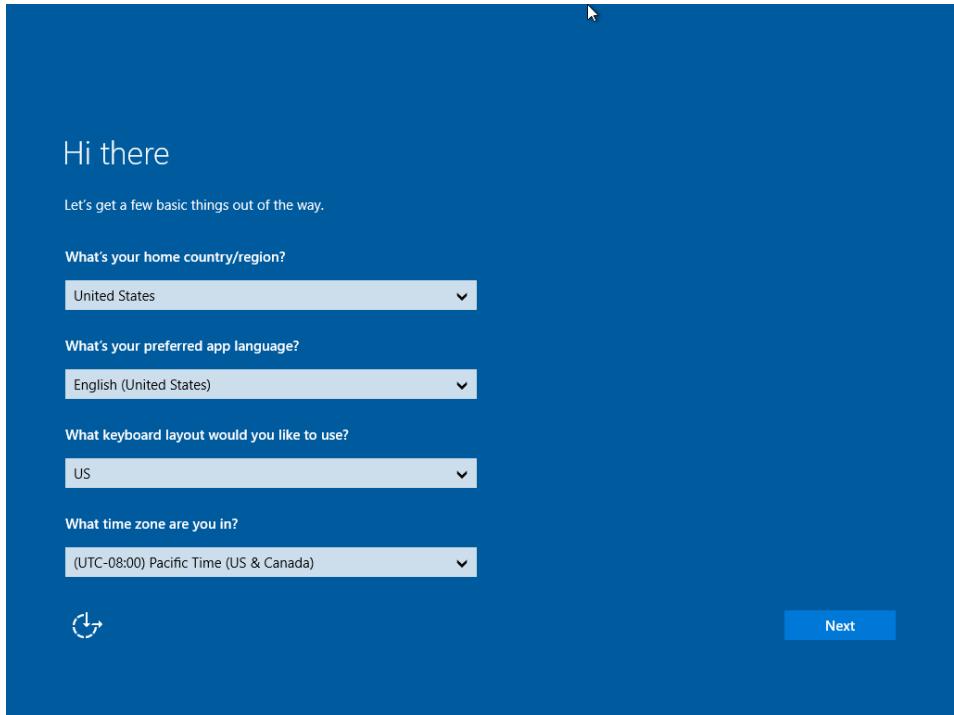
text_image
Hi there Let's get a few basic things out of the way. What's your home country/region? United States What's your preferred app language? English (United States) What keyboard layout would you like to use? US What time zone are you in? (UTC-08:00) Pacific Time (US & Canada)- On the Here's the legal stuff screen, read through the disclosures, then tap Accept.
Here's the legal stuff
Last updated [July 2015]
MICROSOFT SOFTWARE LICENSE TERMS
Thank you for choosing Microsoft!
Depending on how you obtained the Windows software, this is a license agreement between (i) you and the device manufacturer or software installer that distributes the software with your device; or (ii) you and Microsoft Corporation (or, based on where you live or if a business where your principal place of business is located, one of its affiliates) if you acquired the software from a retailer. Microsoft is the device manufacturer for devices produced by Microsoft or one of its affiliates, and Microsoft is the retailer if you acquired the software directly from Microsoft.
This agreement describes your rights and the conditions upon which you may use the Windows software. You should review the entire agreement, including any printed paper license terms that accompany the software and any linked terms, because all of the terms are important and together create this agreement that applies to you. You can review linked terms by pasting the (aka.ms/) link into a browser window.

Back
Accept
- Windows will then try to connect to a network. Tap Skip this step to continue without a wireless connection, as you can then set up the network later.
- On the Get going fast screen, click Use Express settings for the fastest setup. If you want more information, tap Learn more, or if you would like to select your personalized options, click Customize settings.
Get going fast
Change these at any time. Select Use Express settings to:
Personalize your speech, typing, and inking input by sending contacts and calendar details, along with other associated input data to Microsoft. Let Microsoft use that info to improve the suggestion and recognition platforms.
Let Windows and apps request your location, including location history, and use your advertising ID to personalize your experiences. Send Microsoft and trusted partners some location data to improve location services.
Help protect you from malicious web content and use page prediction to improve reading, speed up browsing, and make your overall experience better in Windows browsers. Your browsing data will be sent to Microsoft.
Automatically connect to suggested open hotspots and shared networks. Not all networks are secure.
Send error and diagnostic information to Microsoft.
Learn more
Customize settings

Back
Use Express settings
- To create a local account, type your User name, password, and a Password hint in the fields provided, then tap Next.
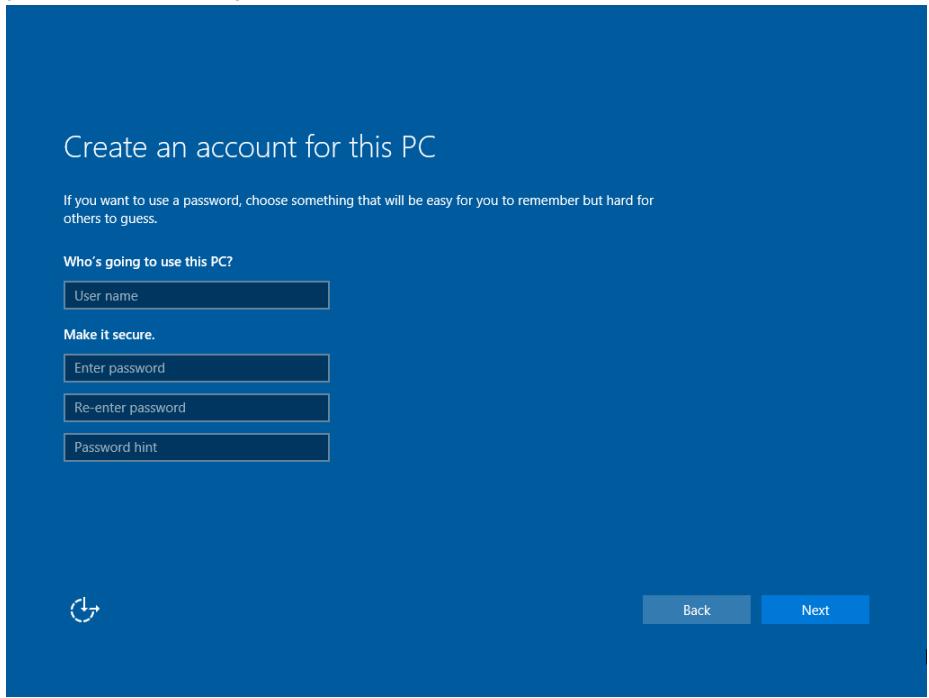
text_image
Create an account for this PC If you want to use a password, choose something that will be easy for you to remember but hard for others to guess. Who's going to use this PC? User name Make it secure. Enter password Re-enter password Password hint Back Next- The initial setup screens are complete, and the desktop is displayed.
- Read any introductory screens describing features of your computer, and tap Next upon completing each. You are now done with the initial setup process.
Chapter 4: Operating the Device

Note: Please download the Software Development Kit (SDK) from Winmate Download Center (the QR code in the cover page).
Please notice that Barcode reader is an optional module, please make sure user have ordered the module before using the SDK.
4.1 HotTab Introduction
HotTab is the utility to control all main functions of your tablet computer. When Windows starts up, HotTab starts and runs on the background. To display the HotTab interface press the ⏰ (Menu) button located on the front panel or launch the application.

(Menu) Button on the Front Panel:
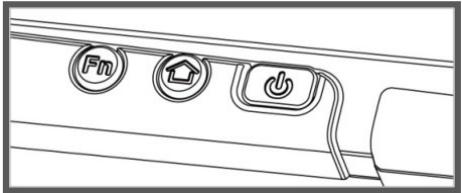
natural_image
Pure electrical circuit lines without any symbolsHotTab Icon:

The main user interface is located on the right side of the screen. There are 4 main menu options: Shortcuts, Camera, Device ON/OFF, and Settings.
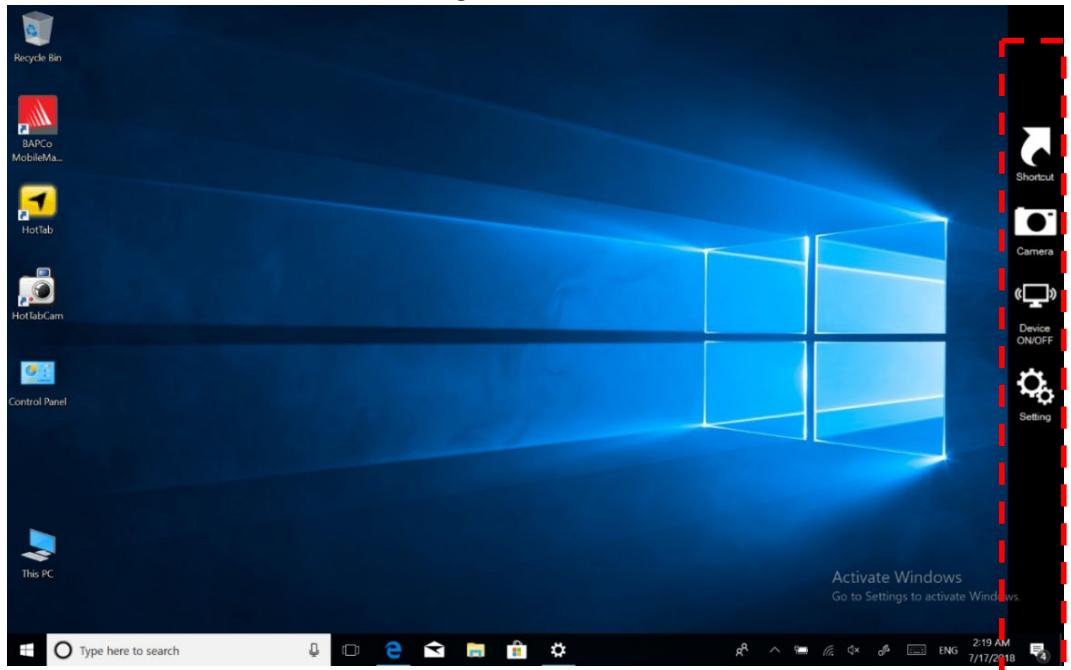
text_image
Recycle Bin BAPCo MobileMa... HotTab HotTabCam Control Panel This PC Activate Windows Go to Settings to activate Windows. Shortcut Camera Device ON/OFF Setting 2:19 AM 7/17/2018| Icon | Description |
 Shortcuts Shortcuts | Allows users to configure short cut to quickly access programs with a few tabs. |
 Camera Camera | Allows users to take a picture or record a video. Users can also adjust settings related to the camera in this menu option. |
 )Device ON/OFF )Device ON/OFF | Enables/disables tablet computer’s hardware functions. The configurable functions are WLAN, WWAN, GPS, BT, Camera, LED indicators, Barcode Reader, and GPS Antenna routing options. |
 Settings Settings | Provides users information such as PC Information, battery status, and device settings such as power management setting, and function key mappings. |
4.2 Shortcuts
HotTab Shortcuts Menu provides a user-friendly interface to configure on-screen software shortcuts and allow users to access programs quickly with a few tabs. The Shortcuts menu offers 8 empty slots to store user's desired quick access. Shortcuts can be mapped to any of the executable files (.exe) installed on the tablet.
Short Cut Menu:

text_image
Shortcuts Empty Empty Empty Empty Empty Empty Empty Empty Empty EmptyTo store a new shortcut:
- Open the HotTab utility by press the ⏻ (Menu) Button located on the front panel OR launching the HotTab Utility application.
- Tap on the Shortcuts button.
- Tap on 🔒 button of any empty slot.
- An on-screen file browser will appear.
- Browse to find the desired application to have a shortcut.
- Click "Open" to save the shortcut.
To remove a saved shortcut:
- Open the HotTab utility by press the ⏱ (Menu) Button located on the front panel OR launching the HotTab Utility application.
- Tap on the Shortcuts button.
- Tap on the ✗ button of any saved slot to remove
- The shortcut will be removed, and once again show "Empty" to indicate slot is empty.
- Tap on the button will hide the HotTab Utility Menu.
Using the HotTab shortcuts:
- Open the HotTab utility by press the ⏱ (Menu) Button located on the front panel OR launching the HotTab.
- Tap on the Shortcuts button.
- Tap on the saved shortcut items to access saved programs.
4.3 Using Camera
This HotTab menu option allows users take a picture or record a video. Before use, make sure the camera is powered on under the Devices ON/OFF menu with the following scenarios.
To open camera interface:
- Press the ⏻ (Menu) button on the front panel to open HotTab or launch the HotTab icon.
- Tap on Device ON/OFF button to check the built-in device's status.
- Check the status color of the Camera icon:
| Item | Status Color | Description |
 | Orange | The camera is enabled. |
| Camera | White | The camera is disabled. |
- If the camera is disabled (white), tap on the Camera icon to enable it (orange).
- Go back to the HotTab main menu by pressing the ⏻ (Menu) Button OR click on the back arrow on top.
- Tap on the Camera icon to open the camera menu.
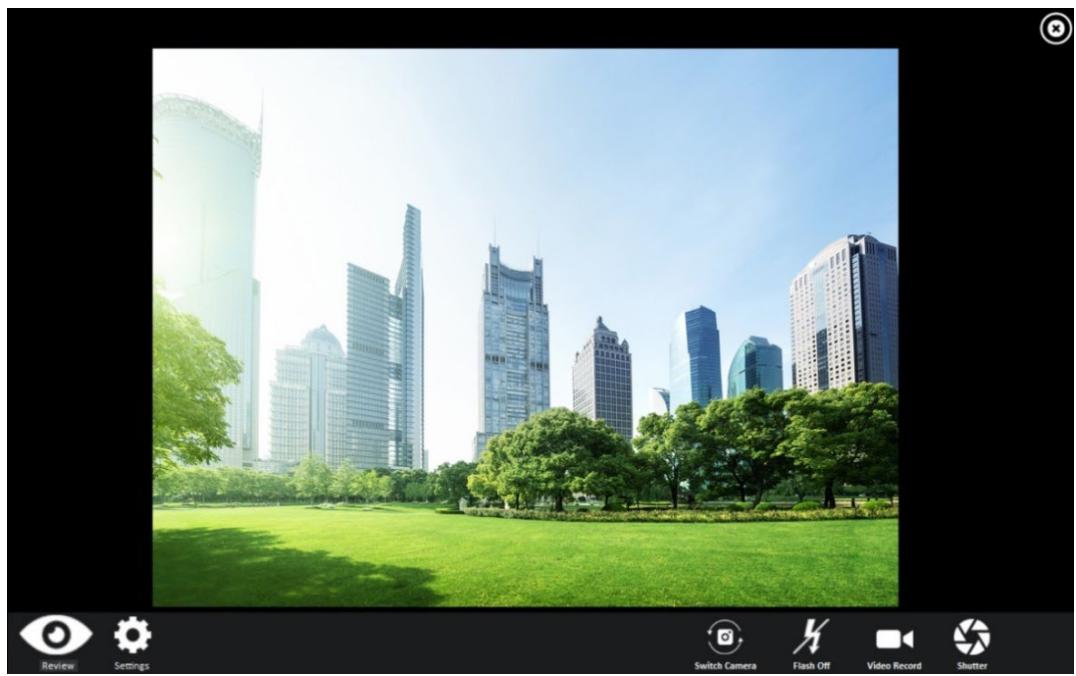
natural_image
City skyline with modern skyscrapers and green lawns in the foreground under a clear blue sky (no visible text or symbols)| No | Item | Description | |
| 1 | Review | Review | |
| 2 | Settings | Opens Camera settings page.Available Settings:Picture Save: modify/inspect saved location for pictures.Video Save Folder: modify/inspect saved location for video recordings.Picture Quality: Picture compression quality. | |
| 3 | Camera Switch | Switch between front camera or rear camera. | |
| 4 | Flash Control | Enables/ Disables LED Flash when taking picture. | |
| 5 | Video Record | Tap to Start, and press again to stop recording. | |
| 6 | Shutter Camera | Camera Shutter Button. Tap to take picture. | |
| 7 | Exit | Exits the Camera and hide HotTab Utility. | |
natural_image
City skyline with modern skyscrapers and green lawns in the foreground under a clear blue sky (no visible text or symbols)
natural_image
City skyline with modern skyscrapers and green lawns in the foreground under a clear blue sky (no visible text or symbols)
natural_image
City skyline with modern skyscrapers and green lawns in the foreground under a clear blue sky (no visible text or symbols)
natural_image
City skyline with modern skyscrapers and green lawns in the foreground under a clear blue sky (no visible text or symbols)
natural_image
City skyline with modern skyscrapers and green lawns in the foreground under a clear blue sky (no visible text or symbols)
natural_image
City skyline with modern skyscrapers and green lawns in the foreground under a clear blue sky (no visible text or symbols)
natural_image
City skyline with modern skyscrapers and green lawns in the foreground under a clear blue sky (no visible text or symbols)
natural_image
City skyline with modern skyscrapers and green lawns in the foreground under a clear blue sky (no visible text or symbols)
natural_image
Exterior view of a modern city skyline with skyscrapers and green parkland under a clear blue sky (no signage or text visible)
natural_image
City skyline with modern skyscrapers and green lawns in the foreground under a clear blue sky (no visible text or symbols)
natural_image
City skyline with modern skyscrapers and green lawns in the foreground under a clear blue sky (no visible text or symbols)
natural_image
City skyline with modern skyscrapers and green lawns in the foreground under a clear blue sky (no visible text or symbols)
natural_image
City skyline with modern skyscrapers and green lawns in the foreground under a clear blue sky (no visible text or symbols)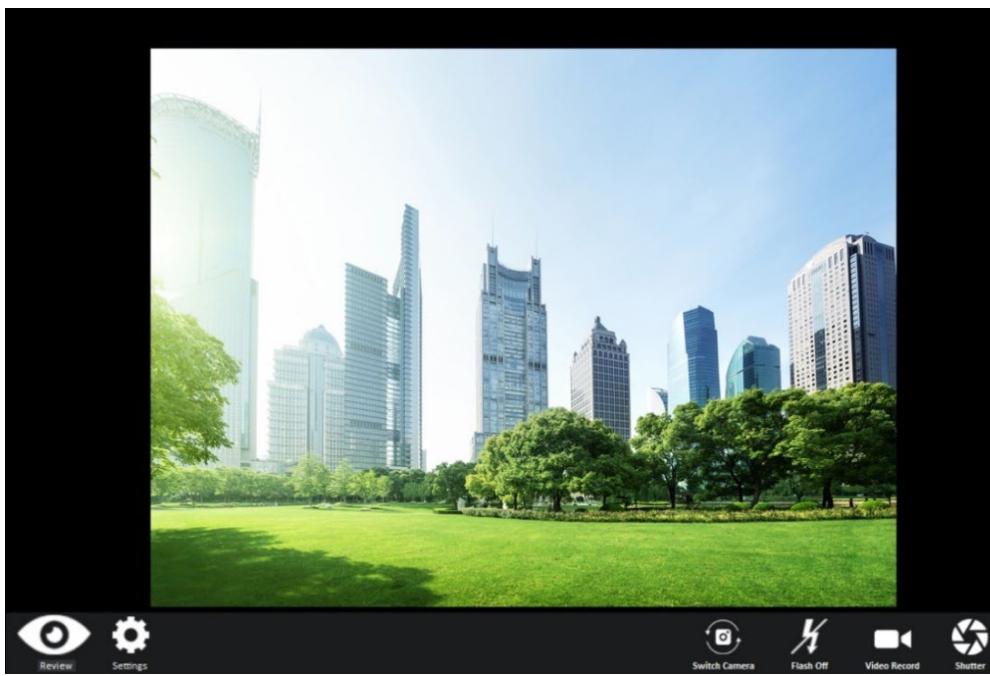
natural_image
City skyline with modern skyscrapers and green lawns in the foreground under a clear blue sky (no text or symbols visible)
natural_image
City skyline with modern skyscrapers and green lawns in the foreground under a clear blue sky (no text or symbols visible)
natural_image
City skyline with modern skyscrapers and green lawns in the foreground under a clear blue sky (no text or symbols visible)
natural_image
City skyline with modern skyscrapers and green lawns in the foreground under a clear blue sky (no visible text or symbols)
natural_image
City skyline with modern skyscrapers and green lawns in the foreground under a clear blue sky (no visible text or symbols)4.4 Built-in Devices On/Off
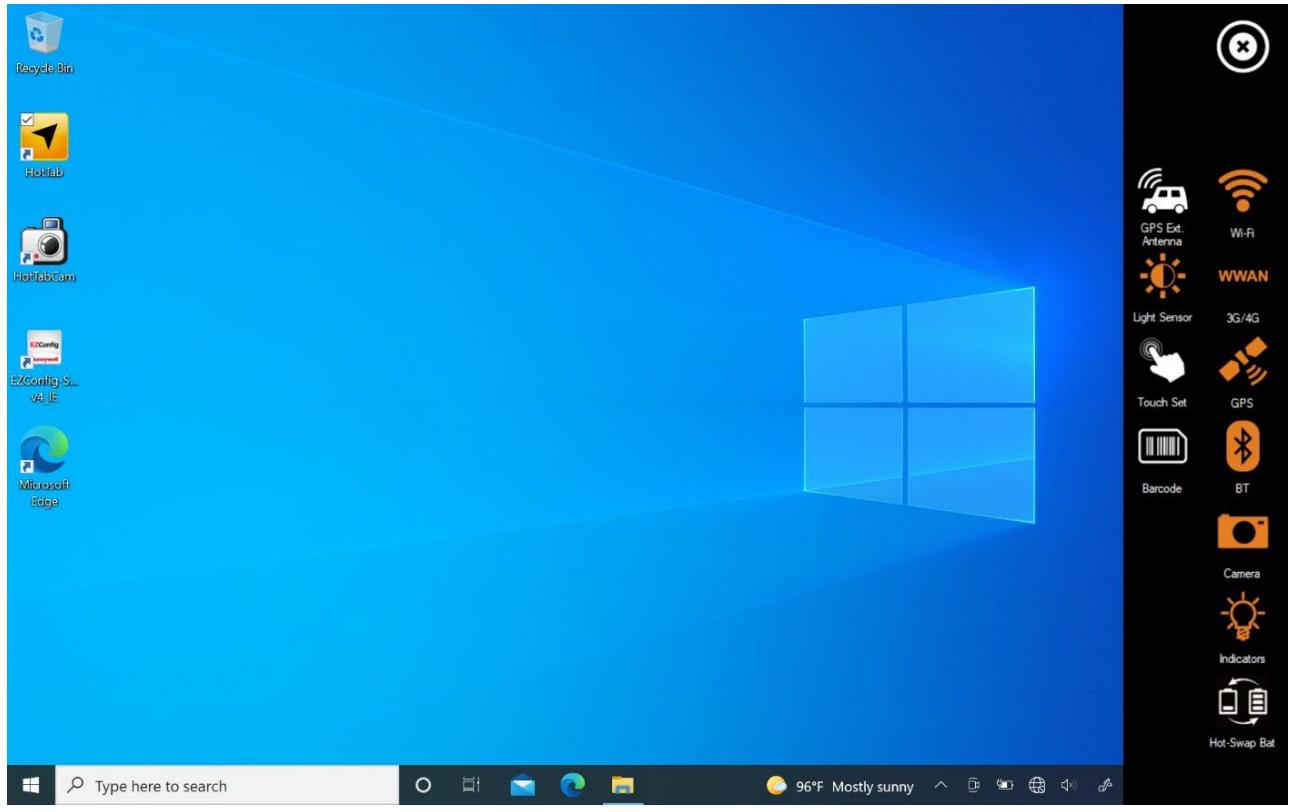
This section describes how to get quick access to set built-in devices, including turning on/off RF modules, setting up barcode reader.
text_image
Recycle Bin HotLab HotTabCam E2Config E2Config SL... v4 IF Microsoft Edge GPS Ext. Antenna Wi-Fi WWAN Light Sensor 3G/4G Touch Set GPS Barcode BT Camera Indicators Hot-Swap Bat Type here to search 96°F Mostly sunny4.4.1 Using the Wireless LAN (WLAN)
To use the wireless LAN feature to connect to the network, perform the following procedure:
- Open the HotTab by press the ⏻ (Menu) button located on the front panel or launch the HotTab application.
- Tap on the Device ON/OFF button.
- Check the status color of the Wi-Fi icon:
| Item | Status Color | Description |
| Wi-Fi | Orange | Wi-Fi is enabled. |
| White | Wi-Fi is disabled. |
- If the WLAN feature is disabled (white), tap on the Wi-Fi icon to enable it (orange).
- Click the wireless network connection status icon in the Windows notification area. A list of available wireless networks is displayed.
- Double-click a network to connect to it. Provide required authentication information if needed.
- To check the connection status, observe the wireless network connection status icon in the Windows notification area. The more bars the icon shows, the better the wireless LAN connection strength is.
- Now wireless LAN connection is set, try the connection to the network with an internet browser such as Internet Explorer.
4.4.2 Using the LAN

Important:
Do not connect the telephone cable to the LAN port.
- Turn off the tablet. Do not use sleep or hibernation mode.
- Open the IO cover.
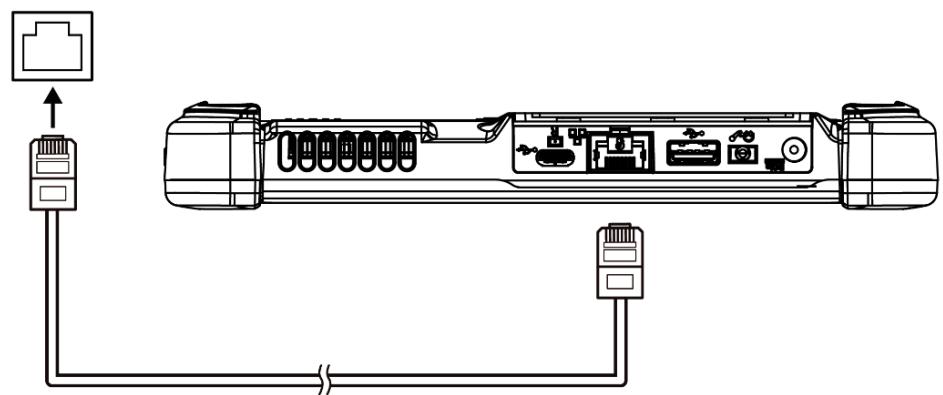
- Connect the LAN port and network system (server, HUB, etc.) using a LAN cable
- Turn on the tablet.
natural_image
Diagram of a device showing connections between two ports with an internal connector (no text or labels)4.4.3 Using the GPS
To enable the GPS:
- Open the HotTab by press the ⏰ (Menu) Button located on the front panel or launch the HotTab application.
- Tap on the Device ON/OFF button.
- Check the status color of the GPS icon:
| Item | Status Color | Description |
| GPS | Orange | GPS is enabled. |
| White | GPS is disabled. |
-
If the GPS feature is disabled (white), tap on the GPS icon to enable it (orange).
-
Now the GPS feature is ready to be used with an application utilizing the GPS.
4.4.4 Using the BT
To enable the BT:
- Open the HotTab by press the ⏻ (Menu) Button located on the front panel OR launching HotTab application.
- Tap on the Device ON/OFF button.
- Check the status color of the BT icon:
| Item | Status Color | Description |
| BT | Orange | BT is enabled. |
| White | BT is disabled. |
- If the BT feature is disabled (white), tap on the BT icon to enable it (orange).
- Click the BT icon in the Windows notification area. A contextual menu for BT is displayed.
-
To add a device, tap on Add a BT Device. Windows will search any BT device automatically
-
Choose the BT device to connect and follow the on-screen prompt to continue the pairing procedure and use the BT device.
4.4.5 Turning On/Off LED Indicators
The LED Indicators for Power Status, Battery Status, and RF Communication can be turned on/off from HotTab menu.
To enable/disable the LED indicators:
- Open the HotTab by pressing the ⏻ (Menu) Button located on the front OR launching the HotTab application.
- Tap on the Device ON/OFF button.
- Check the status color of the Indicators icon:
| Item | Status Color | Description |
| [TZSW] | Orange | LED indicator is enabled. |
| Indicators | White | LED indicator is disabled. |
- If the indicator is disabled (white), tap on the Indicators icon to enable it (orange).
4.4.6 Replacing Battery
The M101AD Tablet supports hot-swap, meaning the tablet doesn't need to be powered off to replace the main battery. To support hot-swap, there is a built-in backup battery inside the tablet that is charged together with the main battery.
Perform the following to hot-swap the batteries:
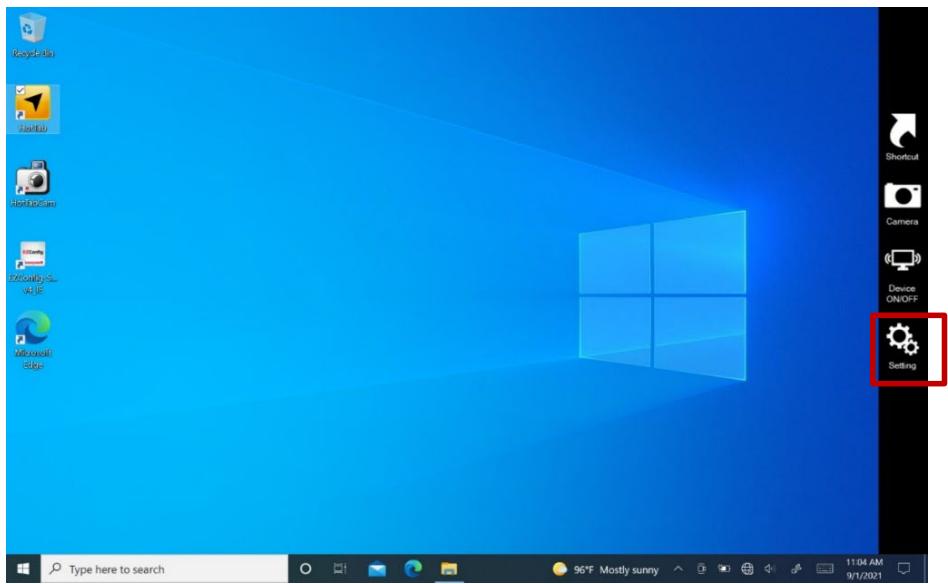
- Power on the tablet, open the HotTab icon, click Setting to check the power level of the Backup battery.
text_image
Gett-1a YanHub SetupFun EYou!y SL... & IJF Microsoft Edge Type here to search 96°F Mostly sunny 11:04 AM 9/1/2021 Setting Shortcut Camera Device ON/OFF Setting- If the Backup battery level is "Low", please charge the tablet with AC Power until the Backup battery level is "Medium" or "High", and do not remove the main battery.
-
If the Backup battery level is at "Medium" or "High", click on Device ON/OFF.
-
Check the status color of the Hot-Swap Bat icon:
| Item | Status Color | Description |
 Hot-Swap Bat Hot-Swap Bat | Orange | Hot-Swap Bat function is enabled. |
| White | Hot-Swap Bat function is disabled. |
- If the indicator is disabled (white), tap on the Hot-Swap Bat icon to enable it (orange).
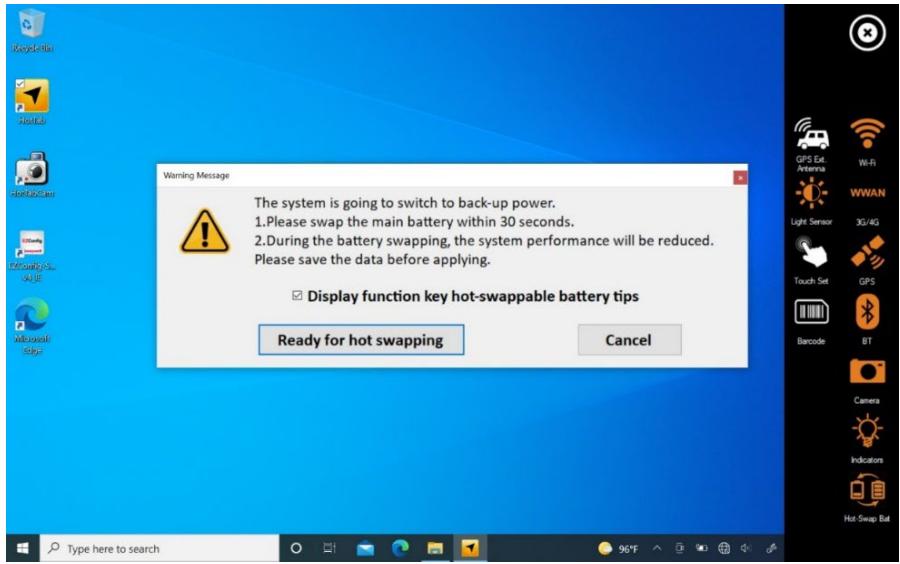
- A Warning Message dialog box will pop out. Click Ready for hot swapping before replacing the battery.
text_image
Warning Message The system is going to switch to back-up power. 1.Please swap the main battery within 30 seconds. 2.During the battery swapping, the system performance will be reduced. Please save the data before applying. Display function key hot-swappable battery tips Ready for hot swapping CancelImportant:

- The system performance and display brightness will be reduced to the minimum to support hot-swap battery. Please save the data before activating this function.
-
Hot-swapping the battery without enabling the Hot-Swap Bat function may lead to automatically shut down.
-
Insert a new fully charged battery into the battery compartment.
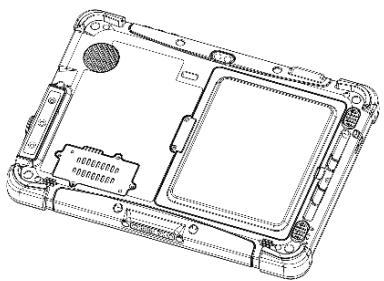
natural_image
Technical line drawing of a device casing with internal components and a label (no readable text or symbols)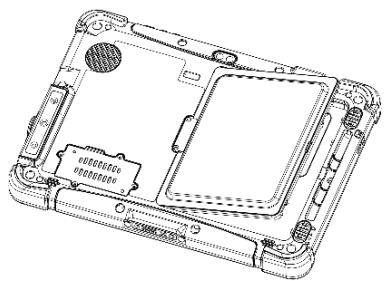
natural_image
Technical line drawing of a laptop case with visible internal components and mounting brackets (no text or symbols)- Open HotTab and click Setting to check Main battery level. If the battery level is displayed incorrect, check if the new removable battery is inserted properly.
- If the battery level is correct, continue using the tablet.

Caution Charge the built-in back-up battery every two months to keep battery health and prevent possible issues from battery over-discharge.
The 1D/2D Barcode Reader is optional for M101AD Tablet PC and is not re-workable by the end user. To use this feature, please make sure the tablet PC is built-in barcode reader before use, or contact our sales contact window for more details.
To enable the Barcode Reader:
- Open HotTab by pressing ⏱ (Menu) Button located on the front panel Or launch HotTab application.
- Tap on the Device ON/OFF button.
- Check the status color of the Barcode icon.
| Item | Status Color | Description |
| Barcode | Orange | Barcode Reader is enabled. Reading will need to be triggered manually thru Fn button. |
| White | Barcode Reader is disabled. |
-
Open the application where barcode reader will be displaying the scanned barcode.
-
Trigger the barcode reader by pressing Fn2 function key.
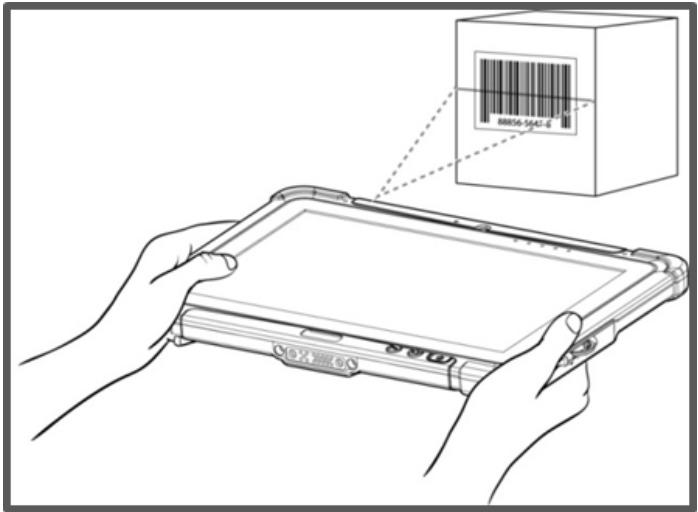
text_image
Diagram showing a hand holding a tablet device with a barcode box labeled '88856-5647-6' pointing to it.Tap Disconnect button to stop the connection with Barcode Reader.
*To recover the connection, please tap on the button again to re-connect with Barcode Reader.
4.4.7.1 Device Configuring and Setting
- Click on Windows 📋 and search for EZConfig-Scanning from the Start menu.
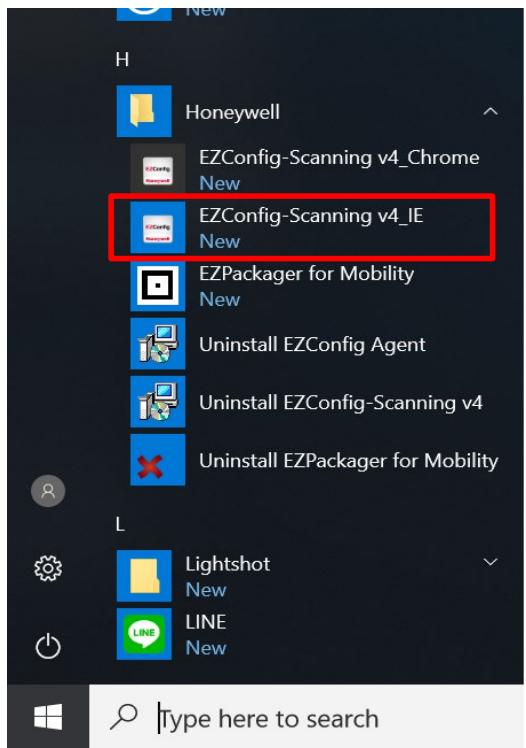
text_image
H Honeywell EZConfig-Scanning v4_Chrome New EZConfig-Scanning v4_IE New EZPackager for Mobility New Uninstall EZConfig Agent Uninstall EZConfig-Scanning v4 Uninstall EZPackager for Mobility L Lightshot New LINE New type here to search- Click on EZConfig-Scanning v4_IE and allow the blocked content if browser is blocking the content.
- Click on "Connected Device" icon and wait for system to discover the device (Honeywell N6703).
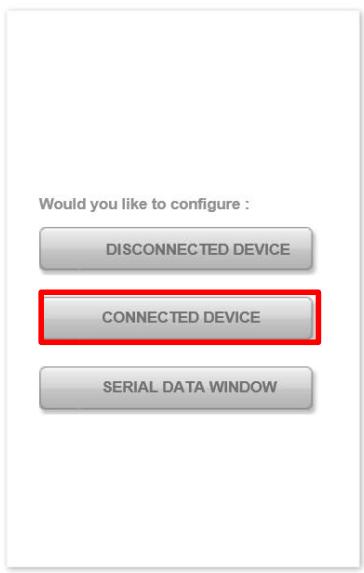
text_image
Would you like to configure : DISCONNECTED DEVICE CONNECTED DEVICE SERIAL DATA WINDOW
text_image
Honeywell E2Config E2CONFIG Product ID: 00001 Product Size: 5000 Product Color: 9999 Product Style: 3600 Product Identity: 00001 Product Security: 00001 Product Quality: 00001 Product Quality: 00001 Product Quality: 00001 Product Quality: 00001 Product Quality: 00001 Product Quality: 00001 Product Quality: 00001 Product Quality: 00001 Product Quality: 00001 Product Quality: 00001 ProductQuality Product Quality Product Quality Product Quality Product Quality Product Quality Product Quality Product Quality Product Quality Product Quality Product Quality Product Quality Product Quality Product Quality Product Quality Product Quality Product Quality Product Quality Product Quality Product Quality Product Quality Product Quality Product Quality Product Quality Product Quality Product Quality Product Quality Product Quality Product Quality Product Quality Product Quality Product Quality Product Quality Product Quality Product QualityEZConfig-Scanning provides a wide range of programming functions that can be performed on a Honeywell scanning device connected to a computer. EZConfig-Scanning allows you to change programmed parameters, create and print programming bar codes and update device firmware.

text_image
Internet Explorer restricted this webpage from running scripts or ActiveX controls. Allow blocked content- Once Honeywell N6703 is discovered please click "Configure Device" button as shown.
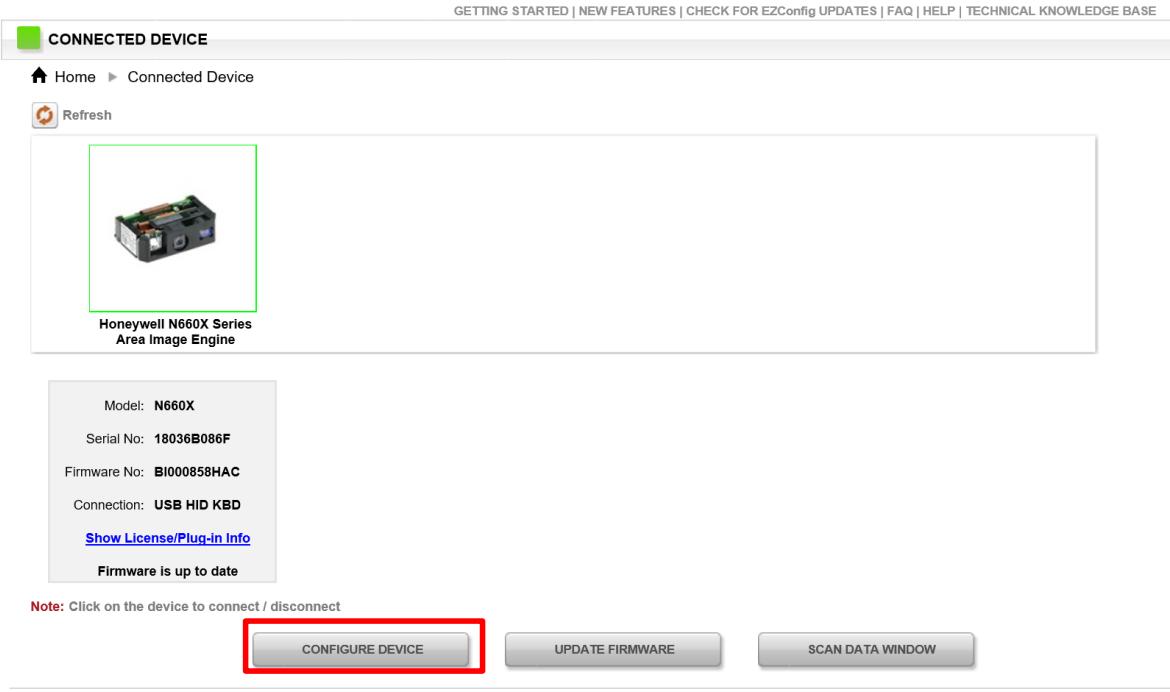
text_image
GETTING STARTED | NEW FEATURES | CHECK FOR EZConfig UPDATES | FAQ | HELP | TECHNICAL KNOWLEDGE BASE CONNECTED DEVICE Home Connected Device Refresh Honeywell N660X Series Area Image Engine Model: N660X Serial No: 18036B086F Firmware No: BI000858HAC Connection: USB HID KBD Show License/Plug-in Info Firmware is up to date Note: Click on the device to connect / disconnect CONFIGURE DEVICE UPDATE FIRMWARE SCAN DATA WINDOW4.4.7.2 Scanning mode Settings
- Click on Device Settings under the Input/Output settings section.
| Honeywell N660X Series Area Image Engine | |||||
| 1.SETTINGS | 2.SYMBOLOGIES | 3.DATA FORMATTING | 4.IMAGING | 5.SCAN DATA WINDOW | 6.COMPARE |
| Input/Output Settings | Interfaces | Licenses / Plug-ins (Apps) | | ||||
| Beeper Settings Scanning Options Device Settings | |||||
- Select the desire scanning mode from the drop-down menu shown as below.
Scanning Mode Modifiers
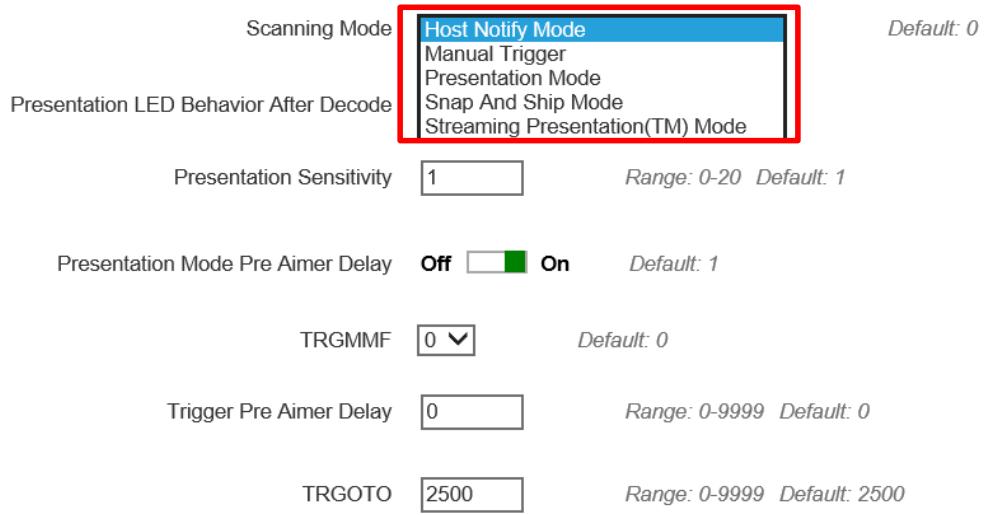
text_image
Scanning Mode Host Notify Mode Manual Trigger Presentation Mode Snap And Ship Mode Streaming Presentation(TM) Mode Presentation LED Behavior After Decode Presentation Sensitivity 1 Range: 0-20 Default: 1 Presentation Mode Pre Aimer Delay Off On Default: 1 TRGMMF 0▼ Default: 0 Trigger Pre Aimer Delay 0 Range: 0-9999 Default: 0 TRGOTO 2500 Range: 0-9999 Default: 2500- After selecting a desire scanning mode, click on the Save to Device on the side bar.
text_image
OPEN CONFIG SAVE CONFIG SAVE TO DEVICE RESET TO DEFAULT| Scanning mode | Description |
| Manual Trigger | When in manual trigger mode, the scanner scans until a bar code is read or until the trigger is released. Two modes are available, Normal and Enhanced. Normal mode offers good scan speed and the longest working ranges (depth of field). Enhanced mode will give you the highest possible scan speed but slightly less range than Normal mode. Enhanced mode is best used when you require a fast speed and don’t require a long working range. Default = Manual Trigger-Normal. |
| Presentation Mode | Presentation Mode uses ambient light and scan engine illumination to detect bar codes. When in Presentation Mode, the LEDs remain dim until a bar code is presented to the scan engine, then the aimer turns on, and the LEDs turn up to read the code. If the light level in the room is not high enough, Presentation Mode may not work properly. |
| Streaming Presentation Mode | When in Streaming Presentation mode, the scan engine’s aimer goes out after a short time, but the scan illumination remains on all the time to continuously search for bar codes. Two modes are available, Normal and Enhanced. Normal mode offers good scan speed and the longest working ranges (depth of field). Enhanced mode will give you the highest possible scan speed but slightly less range than Normal mode. Enhanced mode is best used when you require a fast scan speed and don’t require a long working range. |
| Host Notify Mode | Host Notify Mode bypasses the decoder and notifies the host that there has been a hardware trigger pull. When in Host Notify Mode, it is up to the host to initiate an Image Snap and/or an Image Ship command. It is also up to the host to switch to another trigger mode. |
| Snap and Ship Mode | Snap and Ship mode, allows you to bypass the decoder and ship an image directly to the host. In this mode, an image is taken and shipped upon each trigger pull, instead of being sent to the decoder. Snap and Ship is useful when you are using your own decoder. |

OPEN CONFIG

SAVE CONFIG

SAVE TO DEVICE

RESET TO DEFAULT
4.4.7.3 Setting the 1D/2D Barcode Scanner Symbologies
The barcode scanner is shipped with the default settings shown below. If the default setting suits the usage requirement, setting symbologies is not necessary.
Symbologies Default Settings:
| Symbologies | Default | |
| Linear | UPC-A | Enable |
| UPC-E | Enable | |
| EAN/JAN-8 | Enable | |
| EAN/JAN-13 | Enable | |
| UPC-E1 | Disable | |
| UPC-A/EAN-13 Extended Coupon Code | Disable | |
| GS1 DataBar Omni-Directinal | Enable | |
| GS1 DataBar Limited | Enable | |
| GS1 DataBar Expanded | Enable | |
| Code 39 | Enable | |
| Code 128 | Enable | |
| ISBT 128 | Disable | |
| GS1-128 | Enable | |
| Interleaved 2 of 5 | Enable | |
| Matrix 2 of 5 | Disable | |
| NEC 2/5 | Enable | |
| IATA 2/5 | Disable | |
| Code 2/5 | Disable | |
| Codabar | Enable | |
| Code 93 | Enable | |
| Code 11 | Disable | |
| MSI | Disable | |
| Telepen | Disable | |
| Trioptic Code | Disable | |
| Postal Code | Disable | |
| Planet Code | Disable | |
| Korea Psot | Disable | |
| China Post | Disable | |
| Australian Post | Disable | |
| 2D | Data Matrix | Enable |
| PDF 417 | Enable | |
| Micro PDF 417 | Enable | |
| Codablock A | Disable | |
| Codablock F | Disable | |
| Maxicode | Disable | |
| QR Code | Enable | |
| Aztec | Enable | |
| Composite Code | Disable | |
| Han Xin | Disable |
Changing the default setting of symbologies or the advanced setting
There are two methods to change the default setting of symbologies or other advanced setting:

2.SYMBOLOGIES
Method (1). Click on the Symbologies
on the top. Then you can change the symbology
to the default setting or make an advanced setting by its category. After setting, click on the Save to Device on the sidebar.
Method (2). Click on the reset to default button on the side as shown blow:

OPEN CONFIG

SAVE CONFIG

SAVE TO DEVICE

RESET TO DEFAULT
※Warning※
- The reset to default button will change all settings to default.
- N6703 could disconnect with the system after clicking the reset to default button.
If the disconnection happened, please scan the barcodes below in the following steps.
Step 1. First, please scan the USB HID barcode:
USB HID
Scan the following code to program the scan engine for USB HID.
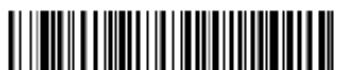
TERMID131.
USB HID
Step 2. Then please scan the USB Keyboard barcode:
USB PC or Macintosh Keyboard
Scan one of the following codes to program the scan engine for USB PC Keyboard or USB Macintosh Keyboard. Scanning these codes also adds a CR suffix.
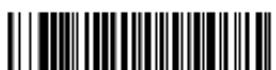
PAP124. USB Keyboard (PC)
Step 3. Please rerun EZConfig-Scanning by following 4.4.6.1 Device Configuring and Setting
4.4.8.4 Adding a Prefix or Suffix
- To add a Prefix or Suffix please click on Data Formatting icon.
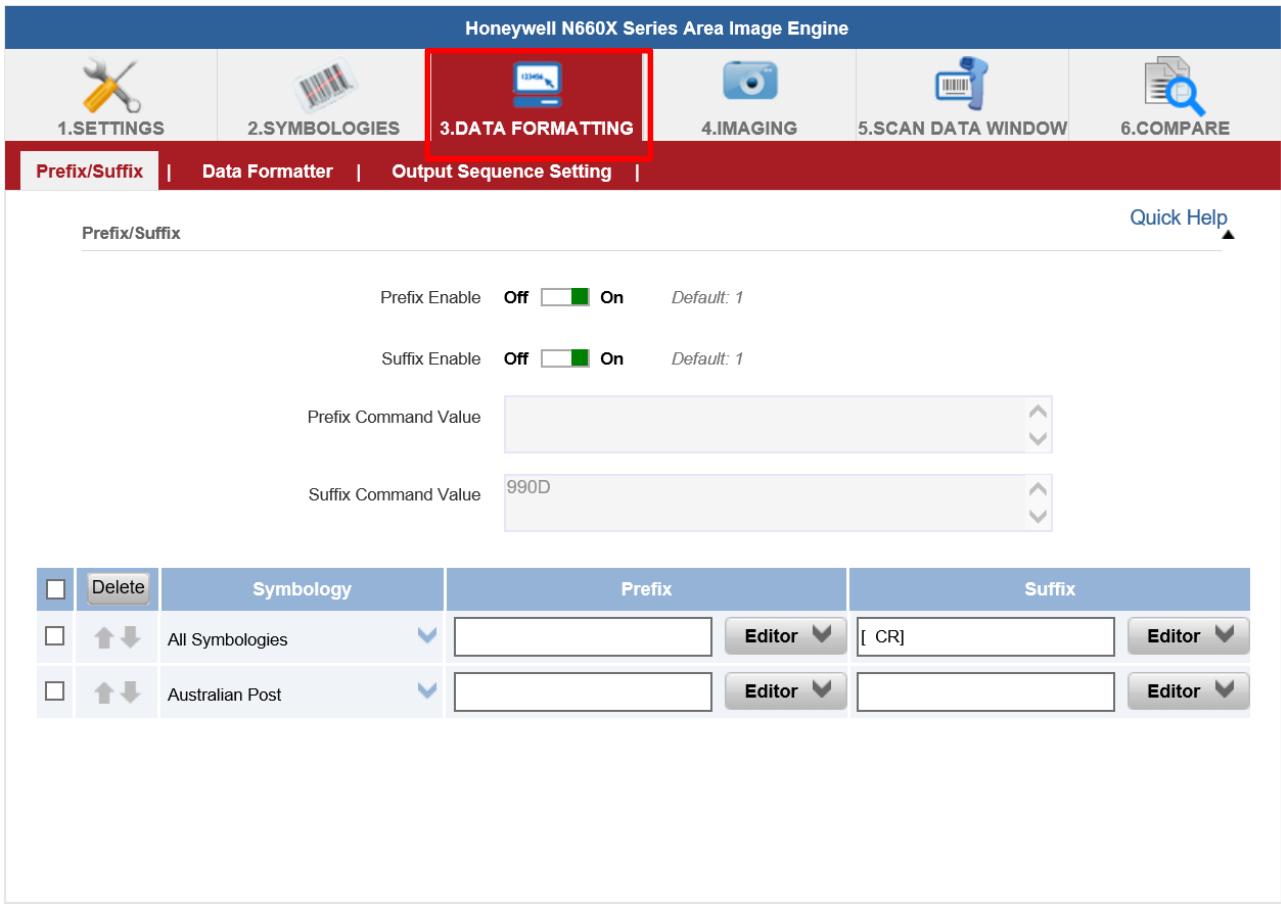
text_image
Honeywell N660X Series Area Image Engine 1.SETTINGS 2.SYMBOLLOGIES 3.DATA FORMATTING 4.IMAGING 5.SCAN DATA WINDOW 6.COMPARE Prefix/Suffix Data Formatter Output Sequence Setting Prefix/Suffix Quick Help Prefix Enable Off On Default: 1 Suffix Enable Off On Default: 1 Prefix Command Value Suffix Command Value 990D Delete Symbology Prefix Suffix All Symbologies Editor [ CR] Editor Australian Post Editor Editor- Click on the Editor button under the Prefix or Suffix section and create Prefix/Suffix value by typing in the block or select desire characters in the Control chars, Printable chars, and Extended ASCII. as shown below:
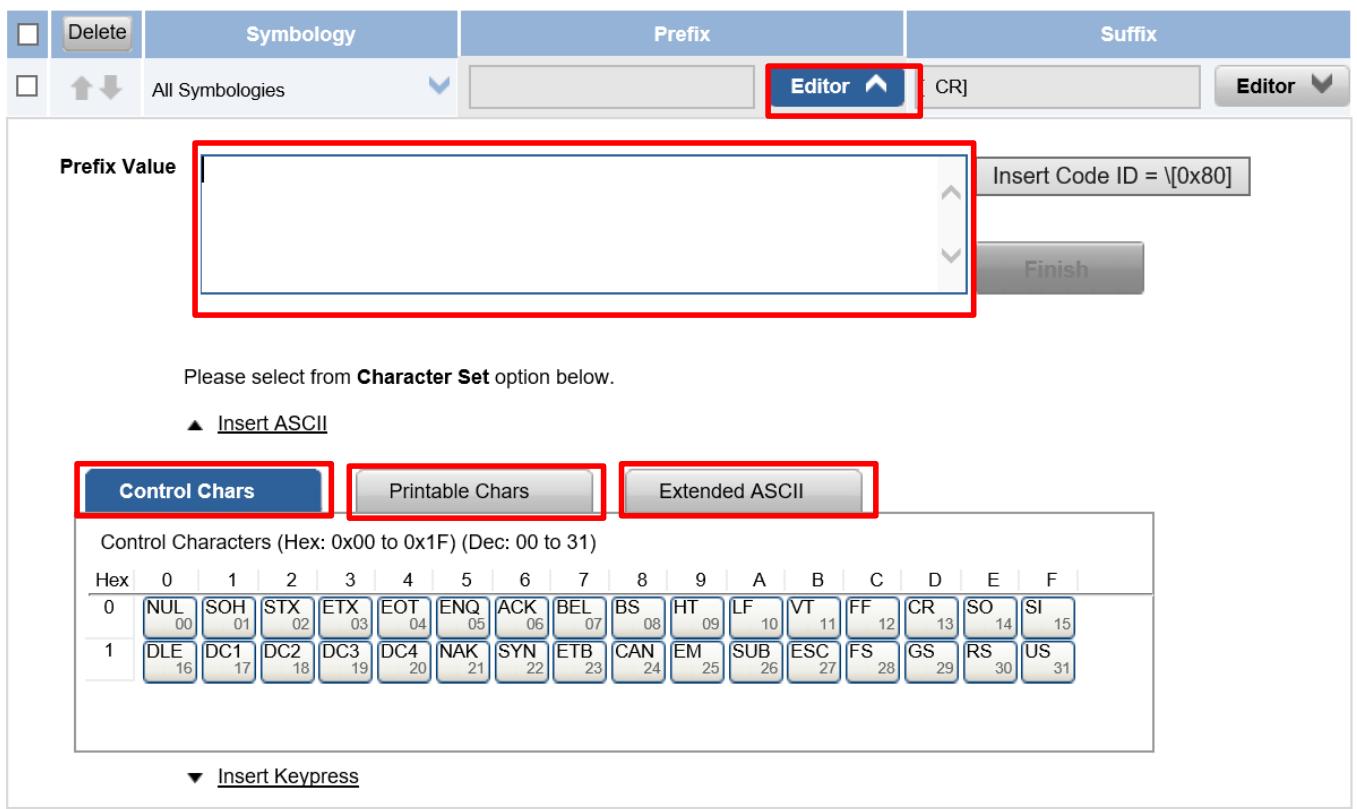
text_image
Delete Symbology Prefix Editor CR] Editor All Symbologies Prefix Value Insert Code ID = \[0x80] Finish Please select from Character Set option below. ▲ Insert ASCII Control Chars Printable Chars Extended ASCII Control Characters (Hex: 0x00 to 0x1F) (Dec: 00 to 31) Hex 0 1 2 3 4 5 6 7 8 9 A B C D E F 0 NUL SOH STX ETX EOT ENQ ACK BEL BS HT LF VT FF CR SO SI 00 01 02 03 04 05 06 07 08 09 10 11 12 13 14 15 1 DLE DC1 DC2 DC3 DC4 NAK SYN ETB CAN EM SUB ESC F$ GS RS US 16 17 18 19 20 21 22 23 24 25 26 27 28 29 30 31 ▼ Insert Keypress- When you finish creating Prefix/Suffix, please click on Save to Device on the sidebar.
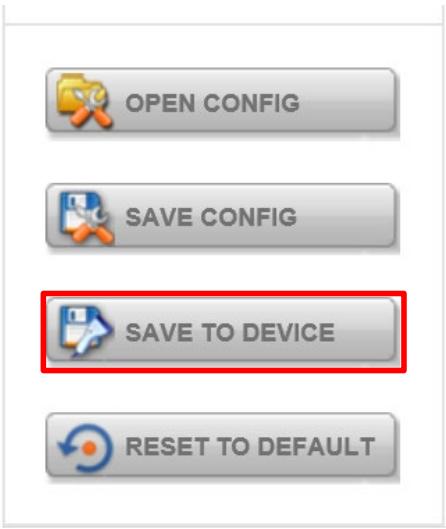
text_image
OPEN CONFIG SAVE CONFIG SAVE TO DEVICE RESET TO DEFAULT- To check the functionality of Prefix/Suffix, please click on the Scan Data Window icon on the top. Then scan a barcode to verify if the Prefix/Suffix appears correctly.
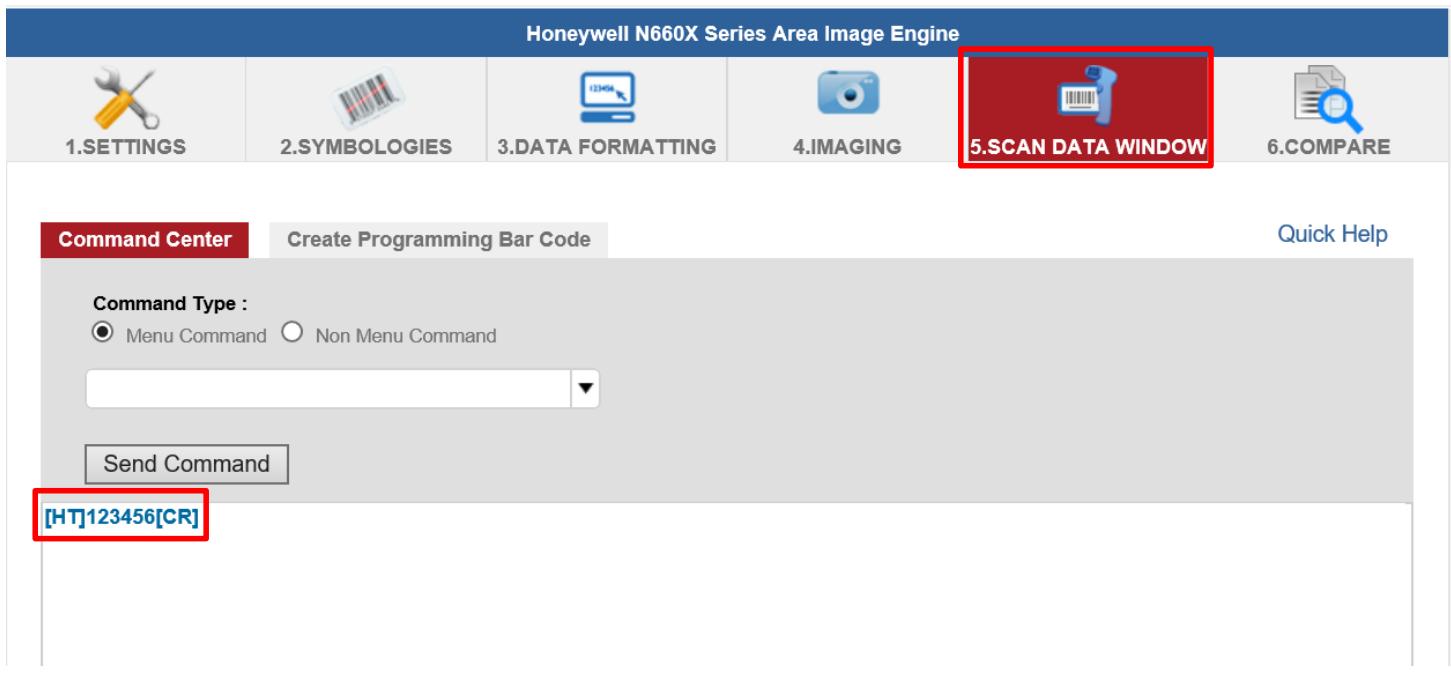
text_image
Honeywell N660X Series Area Image Engine 1.SETTINGS 2.SYMBOLOGIES 3.DATA FORMATTING 4.IMAGING 5.SCAN DATA WINDOW 6.COMPARE Command Center Create Programming Bar Code Quick Help Command Type : ● Menu Command ○ Non Menu Command Send Command [HT]123456[CR]4.4.8.5 Adjusting the Barcode Reader LED Brightness
1. Open EZConfig-Scanning V4\_IE Icon.
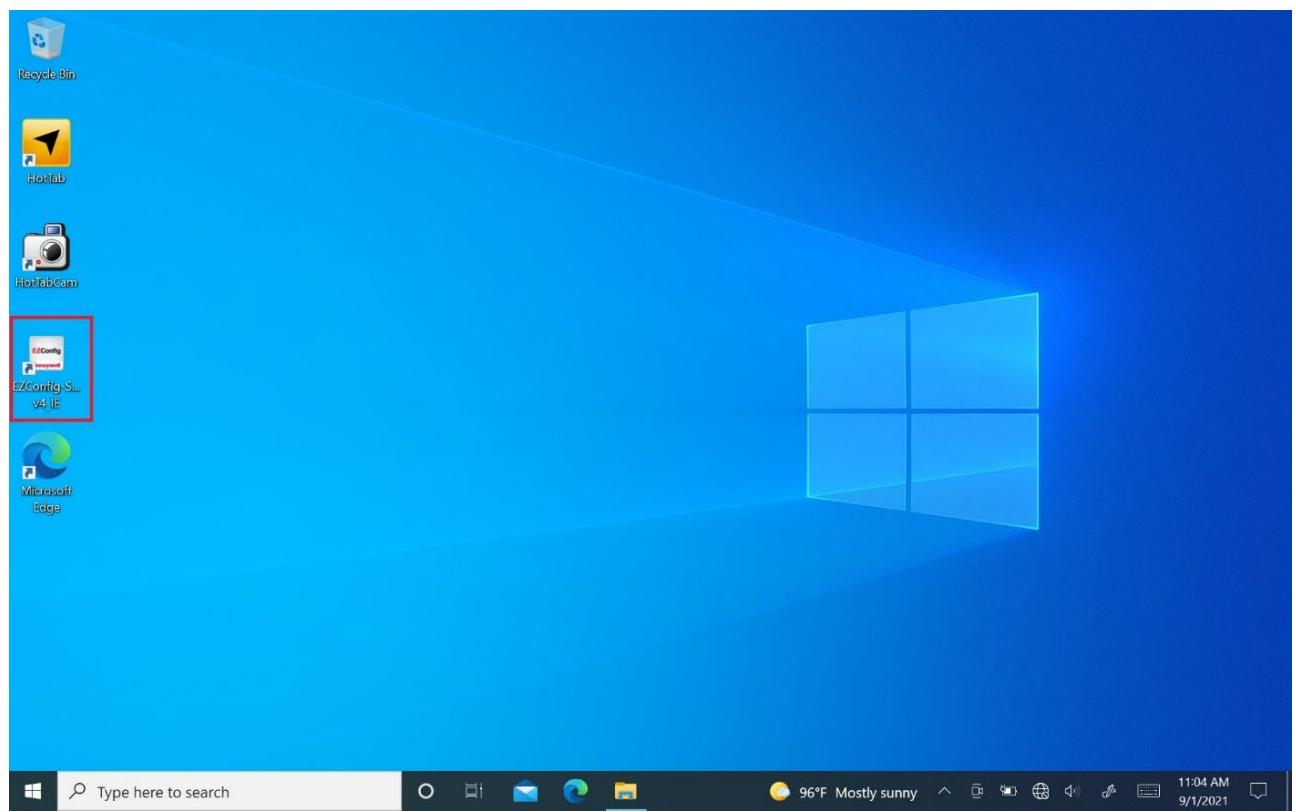
text_image
Recycle Bin HotTab HotTabCam EZConfig v4JE Microsoft Edge Type here to search 96°F Mostly sunny 11:04 AM 9/1/20212. Open Connected Device
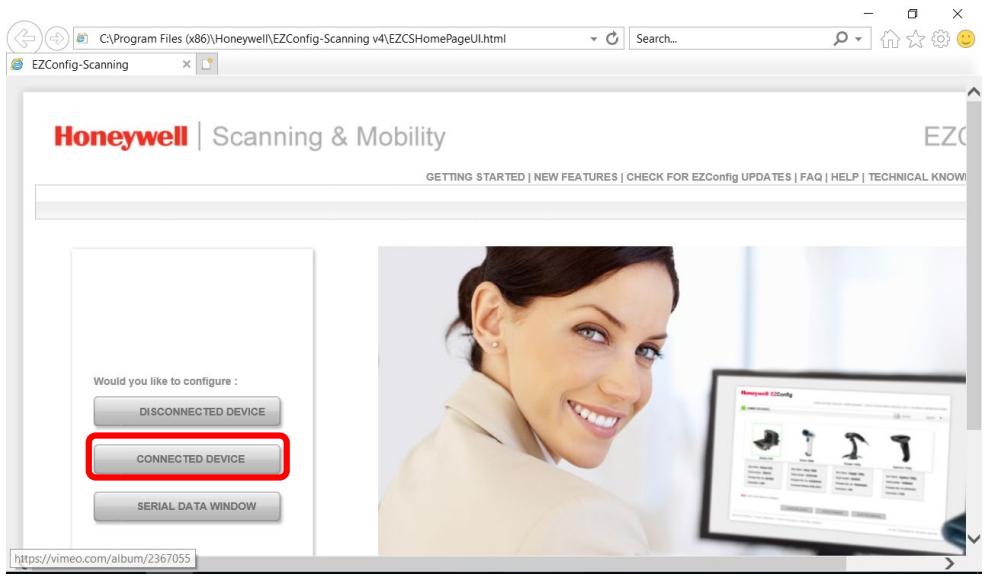
text_image
C:\Program Files (x86)\Honeywell\EZConfig-Scanning v4\EZCSHomePageUl.html EZConfig-Scanning Honeywell | Scanning & Mobility GETTING STARTED | NEW FEATURES | CHECK FOR EZConfig UPDATES | FAQ | HELP | TECHNICAL KNOW! Would you like to configure : DISCONNECTED DEVICE CONNECTED DEVICE SERIAL DATA WINDOW https://vimeo.com/album/23670553. Open Connected Device
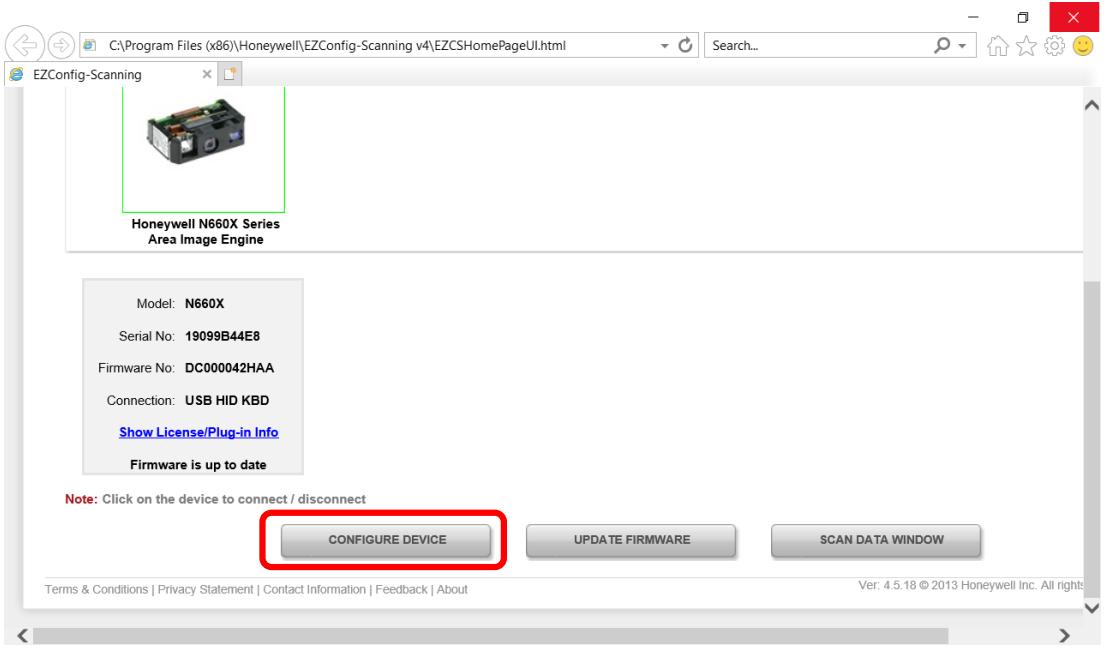
text_image
C:\Program Files (x86)\Honeywell\EZConfig-Scanning v4\EZCSHomePageUI.html EZConfig-Scanning Honeywell N660X Series Area Image Engine Model: N660X Serial No: 19099B44E8 Firmware No: DC000042HAA Connection: USB HID KBD Show License/Plug-in Info Firmware is up to date Note: Click on the device to connect / disconnect CONFIGURE DEVICE UPDATE FIRMWARE SCAN DATA WINDOW Terms & Conditions | Privacy Statement | Contact Information | Feedback | About Ver: 4.5.18 © 2013 Honeywell Inc. All rights4. Open Settings → Device Settings → LED illumination - Manual Trigger Setting change 120
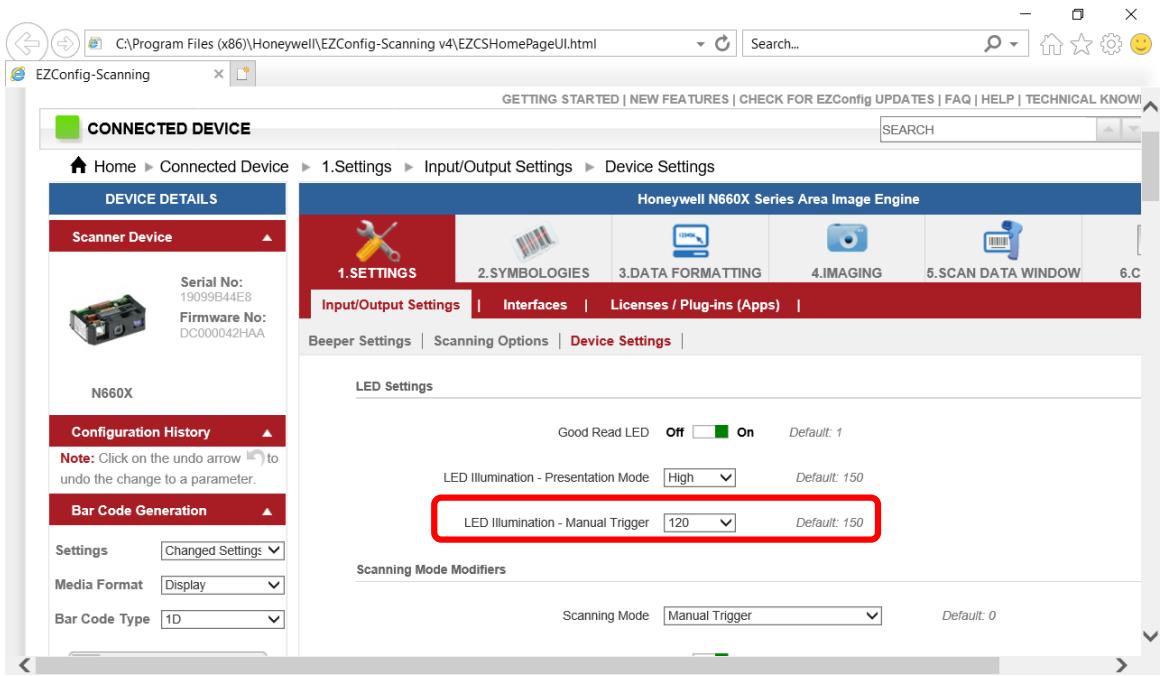
text_image
C:\Program Files (x86)\Honeywell\EZConfig-Scanning v4\EZCSHomePageUI.html EIZConfig-Scanning GETTING STARTED | NEW FEATURES | CHECK FOR EZConfig UPDATES | FAQ | HELP | TECHNICAL KNOW! CONNECTED DEVICE SEARCH Home ▶ Connected Device ▶ 1.Settings ▶ Input/Output Settings ▶ Device Settings DEVICE DETAILS Scanner Device Serial No: 19099B44E8 Firmware No: DC000042HAA N660X Configuration History Note: Click on the undo arrow to undo the change to a parameter. Bar Code Generation Settings Changed Settings Media Format Display Bar Code Type 1D Honeywell N660X Series Area Image Engine 1.SETTINGS 2.SYMBOLLOGIES 3.DATA FORMATTING 4.IMAGING 5.SCAN DATA WINDOW 6.C Input/Output Settings | Interfaces | Licenses / Plug-ins (Apps) | Beeper Settings | Scanning Options | Device Settings | LED Settings Good Read LED Off On Default: 1 LED Illumination - Presentation Mode High Default: 150 LED Illumination - Manual Trigger 120 Default: 150 Scanning Mode Modifiers Scanning Mode Manual Trigger Default: 05. Save To Device
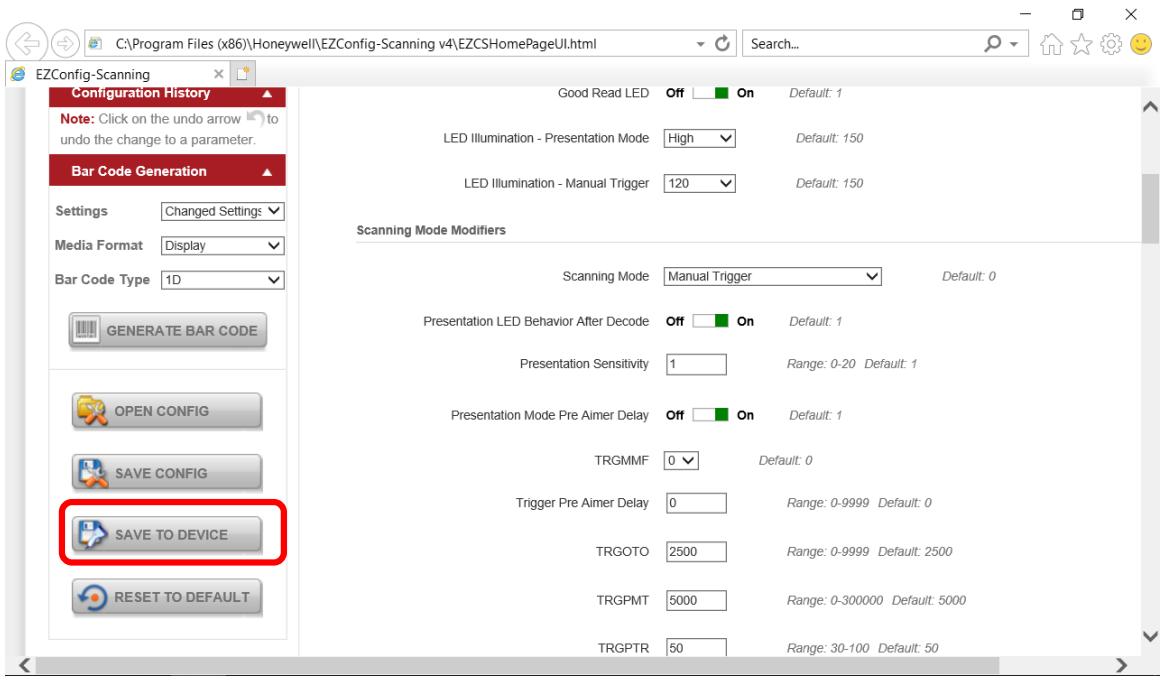
text_image
C:\Program Files (x86)\Honeywell\EZConfig-Scanning v4\EZCSHomePageUI.html Search... EZConfig-Scanning Configuration History Note: Click on the undo arrow to undo the change to a parameter. Bar Code Generation Settings Changed Settings Media Format Display Bar Code Type 1D GENERATE BAR CODE OPEN CONFIG SAVE CONFIG SAVE TO DEVICE RESET TO DEFAULT Good Read LED Off On Default: 1 LED Illumination - Presentation Mode High Default: 150 LED Illumination - Manual Trigger 120 Default: 150 Scanning Mode Modifiers Scanning Mode Manual Trigger Default: 0 Presentation LED Behavior After Decode Off On Default: 1 Presentation Sensitivity 1 Range: 0-20 Default: 1 Presentation Mode Pre Aimer Delay Off On Default: 1 TRGMMF 0 Default: 0 Trigger Pre Aimer Delay 0 Range: 0-9999 Default: 0 TRGOTO 2500 Range: 0-9999 Default: 2500 TRGPMT 5000 Range: 0-300000 Default: 5000 TRGPTR 50 Range: 30-100 Default: 506. Open HotTab Utility Icon
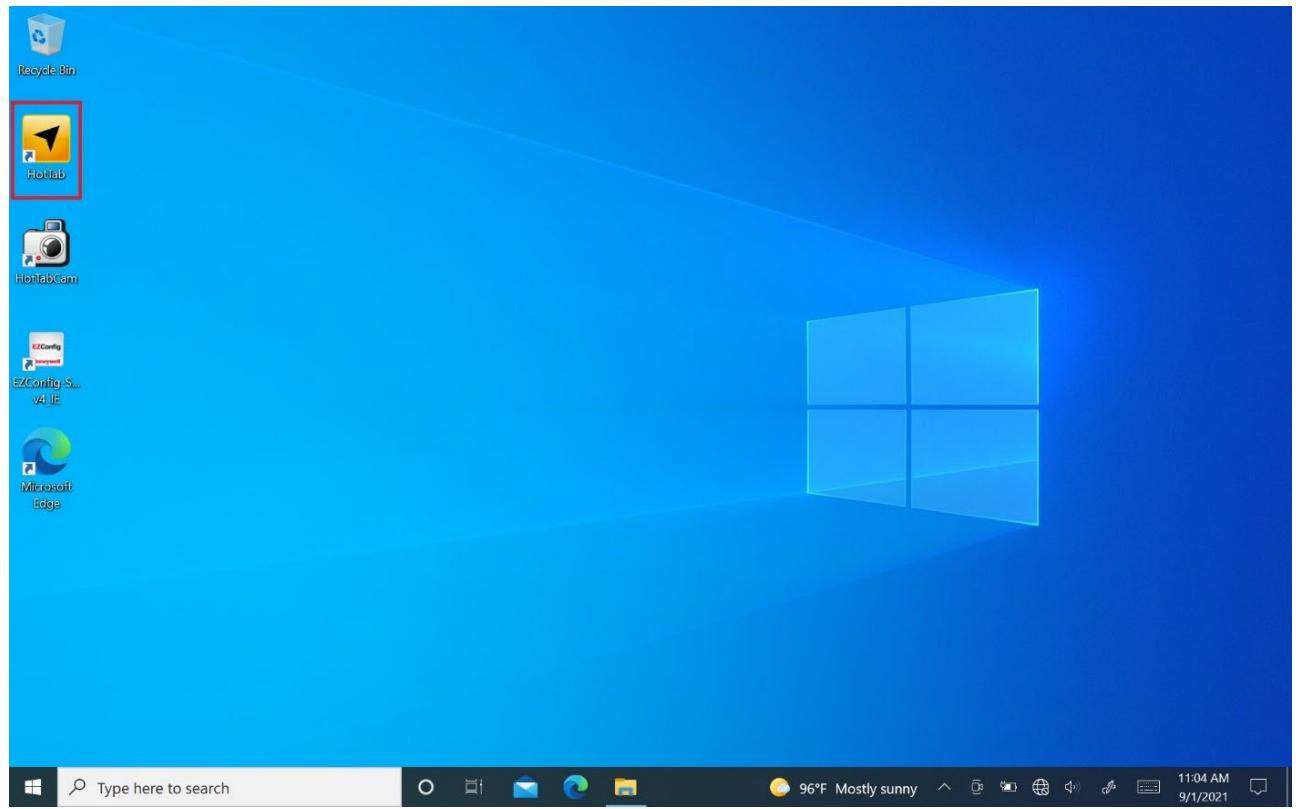
text_image
Recycle Bin HotTab HotTabCam EZConfig EZConfig S... v4 IE Microsoft Edge Type here to search 96°F Mostly sunny 11:04 AM 9/1/2021- Open the HotTab, click the Device ON/OFF, and see the Barcode indicator. If it is white, click to turn it on.
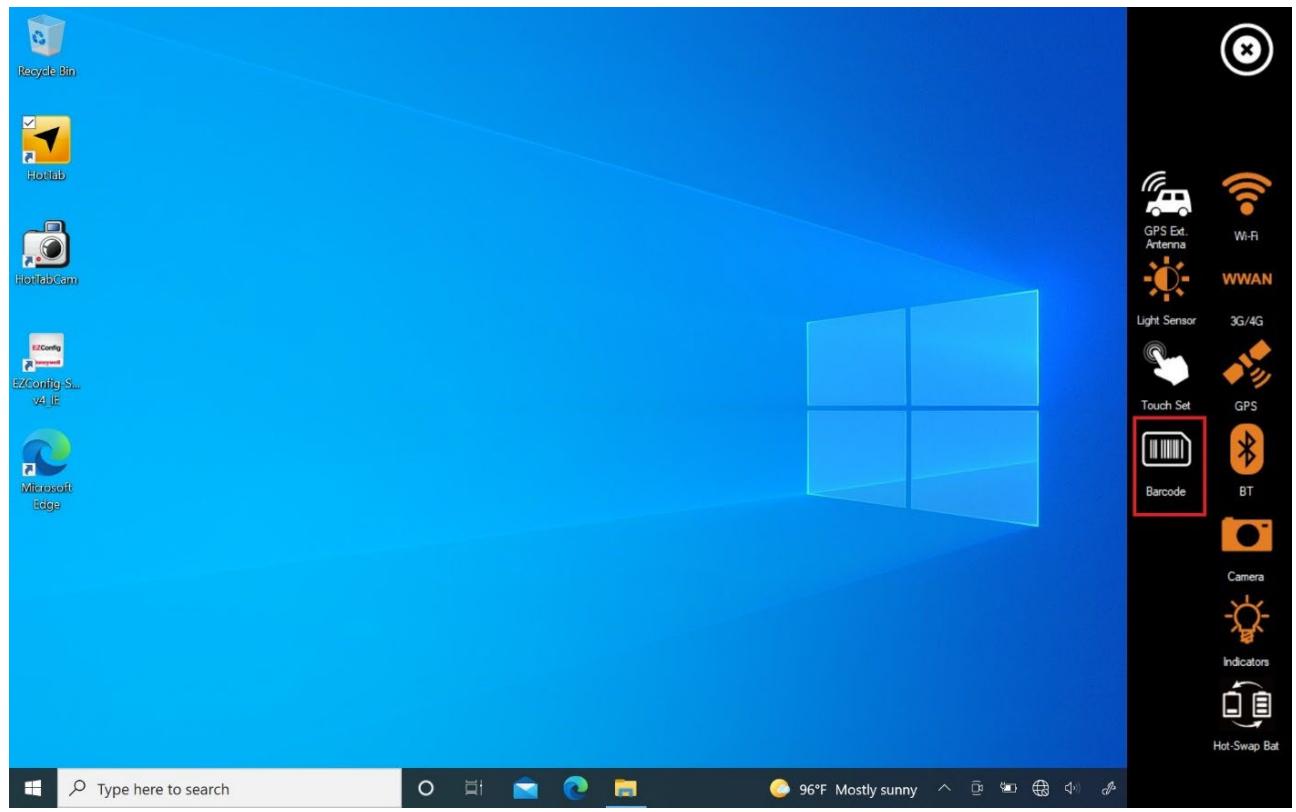
text_image
Recycle Bin HotTab HotTabCam EZConfig EZConfig S... v4 IE Microsoft Edge GPS Ext. Antenna Wi-Fi WWAN Light Sensor 3G/4G Touch Set GPS Barcode BT Camera Indicators Hot-Swap Bat Type here to search 96°F Mostly sunny- Barcode Scanner turns On when it is become orange colored.
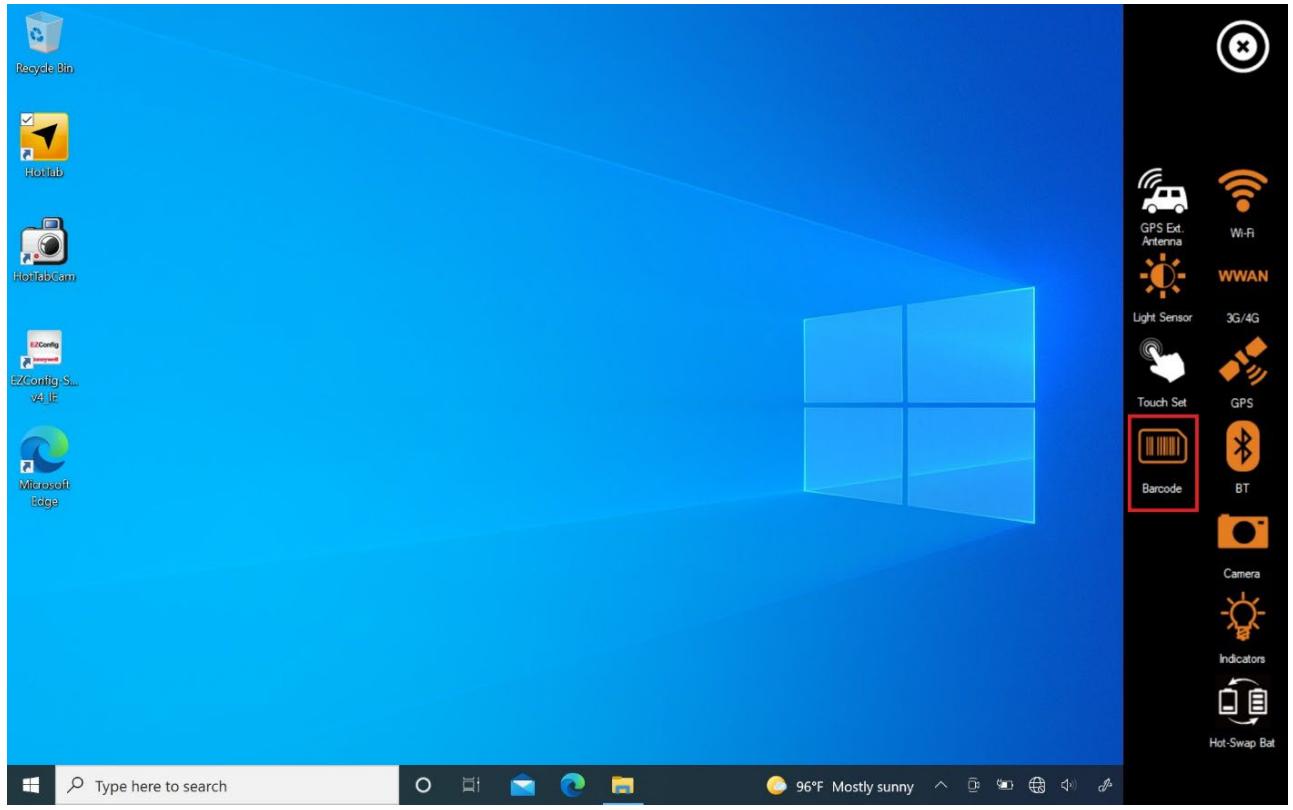
text_image
Recycle Bin HotTab HotTabCam EZConfig EZConfig S... v4 IF Microsoft Edge GPS Ext. Antenna Wi-Fi WWAN Light Sensor 3G/4G Touch Set GPS Barcode BT Camera Indicators Hot-Swap Bat Type here to search 96°F Mostly sunny9. Scanned Barcode

text_image
New Text Document - Notepad File Edit Format View Help 12345678901234567890 12345678901234567890 12345678901234567890 12345678901234567890 01234565 01234565 01234565 01234565 01234565 01234565 00712345678904 00712345678904 00712345678904 00712345678904 12345678901234567890 12345678901234567890 12345678901234567890 12345678901234567890 01234565 0123465 01234565 00712345678904 00712345678904 Windows (CRLF) Ln 24, Col 1 100%4.4.8 Turn on/off the GPS External Antenna
The vehicle dock of M101AD Tablet PC supports an external GPS antenna through a standard SMA connector. To work with an external GPS antenna, please make sure the tablet PC is well installed to the vehicle dock, and the vehicle dock has connected with an external GPS antenna.
When working with the vehicle dock connecting to the external antenna, user can switch GPS antenna from the internal one to the external one from HotTab menu.
To enable/disable the GPS Ext. Antenna:
- Open the HotTab utility by press the ⏰ (Menu) Button located on the front panel OR launching the HotTab Utility application.
- Tap on the Device ON/OFF button.
- Check the status color of the GPS Ext. Antenna icon:
| Item | Status Color | Description |
 | Orange | GPS Ext. Antenna is enabled and using external antenna if available |
| GPS Ext.Antenna | White | GPS Ext. Antenna is disabled and using built-in antenna |
- If the GPS Ext. Antenna is disabled (white), tap on the GPS Ext. Antenna icon to enable it (orange).
4.4.9 Turn on/off the Light Sensor
The Light Sensor can be turned on/off from HotTab menu. To enable/disable the Light Sensor, perform the following procedure:
- Open the HotTab utility by press the ☎ (Menu) Button located on the front panel OR launching the HotTab Utility application.
- Tap on the Device ON/OFF button.
- Check the status color of the Light Sensor icon:
| Item | Status Color | Description |
 | Orange | Light Sensor is enabled. |
| White | Light Sensor is disabled. | |
| Light Sensor |
4.4.10 Changing Touchscreen Modes
The tablet computer supports three built-in operating modes for different usage scenarios:
| Mode | Description |
 | In Hand/Rain mode, the touchscreen rejects false inputs from liquid drops. When the liquid is removed, the touchscreen accepts touch inputs from bare fingertips.Supports input by:Rubber tip passive stylusBare fingertips |
| Hand/Rain (Default) | |
 | In Stylus mode, the touchscreen supports inputs from the fine-tip passive capacitive stylus (shipped with tablet).Support input by:Fine-tip passive stylus with palm rejectionRubber tip passive stylusBare fingertips |
| Stylus | |
 | In Glove mode, the touchscreen supports inputs while the user is operating the touchscreen with gloves on.Supports input by:GloveRubber tip passive stylusBare fingertips |
| Glove |
To change touch mode:
(1) Shortly press Function Key 1 (To define the function key refer to User Manual, Chapter 4).
(2) Press ⏻ (Menu) button on the front to open HotTab, or launch HotTab Utility application.
Choose Device ON/OFF, and then click Touch Set icon. → ↗ → ↙
4.4.12.1 Switch via Built-in HotTab Utility
To switch touchscreen mode via the HotTab:
- Open HotTab utility by pressing 📋 (Menu) Button located on the front panel OR launching HotTab Utility application.
- Choose Device ON/OFF and then click on Touch Set icon →
- Under the Touch Mode, select the desired touch modes by tapping on the radio button.
- Here's also additional touch-related setting to switch the touchscreen input between mouse mode with a cursor or with multi-touch mode:
Mouse Mode: Single touch point supported, with mouse cursor shown.
Multi-touch Mode: The default setting of the touch screen supports multi-touch mode (up to 10 points)
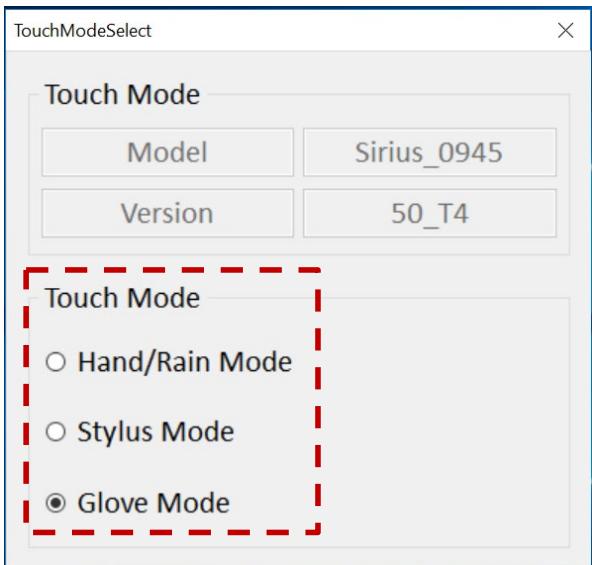
text_image
TouchModeSelect Touch Mode Model Sirius_0945 Version 50_T4 Touch Mode ○ Hand/Rain Mode ○ Stylus Mode ● Glove Mode4.4.12.2 Switch via Programmable Function Buttons:
To switch between the different touchscreen modes via the programmable function buttons, make sure the touchscreen mode switching is set to the programmable function buttons first.
- Open HotTab utility by pressing 📋 (Menu) Button located on the front panel OR launching HotTab Utility application.
- Tap on the Setting button.
- Tap on Fn1 icon.
- Tap on the Long Press icon.
- Change the Long Press function to Touch Mode as shown below:
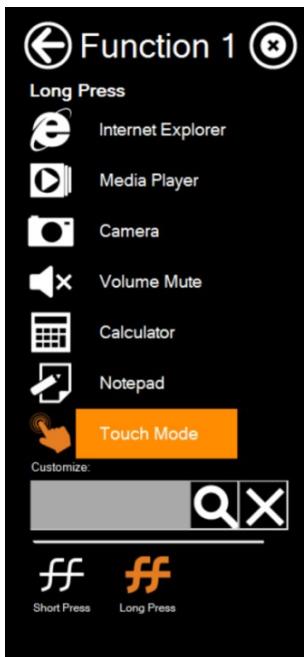
text_image
Function 1 Long Press Internet Explorer Media Player Camera Volume Mute Calculator Notepad Touch Mode Customize: Short Press Long PressOnce the touchscreen mode switching is set to the programmable function button, Long Press on Fn1 function button to cycle through the different touchscreen modes. When touchscreen mode is switched, an icon will temporarily overlay on the lower center of the screen to indicate the current touchscreen mode:
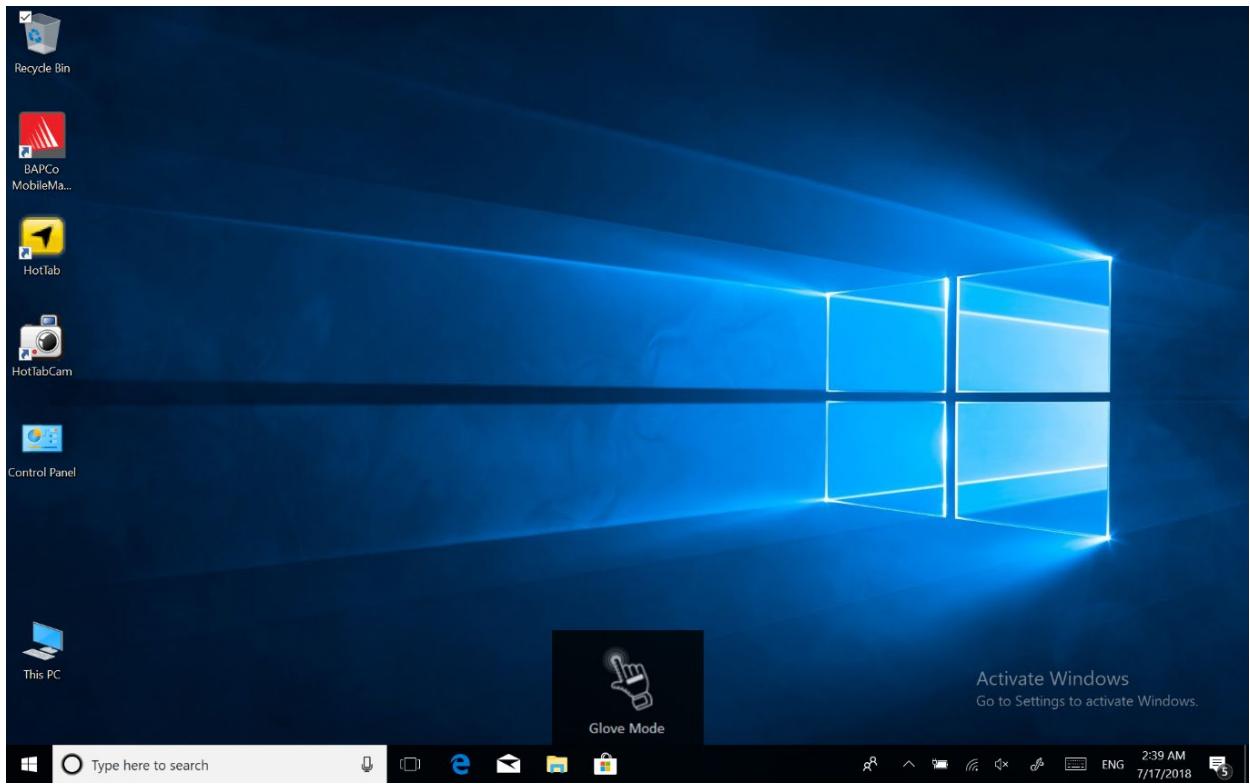
text_image
Recycle Bin BAPCo MobileMa... HotTab HotTabCam Control Panel This PC Glove Mode Activate Windows Go to Settings to activate Windows. Type here to search 2:39 AM 7/17/2018Chapter 5: Frequently Used Settings
5.1 Screen Resolution Scaling and Setting
The M101AD's 1920 x 1200 high-resolution display is perfect for viewing images, video, or other applications. However, the Windows user interface (icons, buttons, and other user interface elements) may be too small to read and operate at the default Windows settings. By changing the display scaling or the display resolution setting of the device, you can adjust the size of the text and other items on the desktop for optimal viewing. Display scaling is the recommended method because it has the effect of adjusting user interface elements without moving away from the optimal resolution setting at 1920 x 1200. This section will explain how you can adjust the built-in windows display scaling setting and resolution setting.

Note: The Tablet computer is shipped with a display scaling set at Larger - 150%. We recommend the users set the scaling to this setting for optimal text and image viewing. Before proceeding to change the scaling option, make sure any opened document is saved and close, and all running applications are closed before proceeding to change the display scaling, because this procedure requires users to log out of their account to apply display scaling change.
5.1.1 Changing Display Scaling (Recommended)
Perform the following to change the display scaling setting:
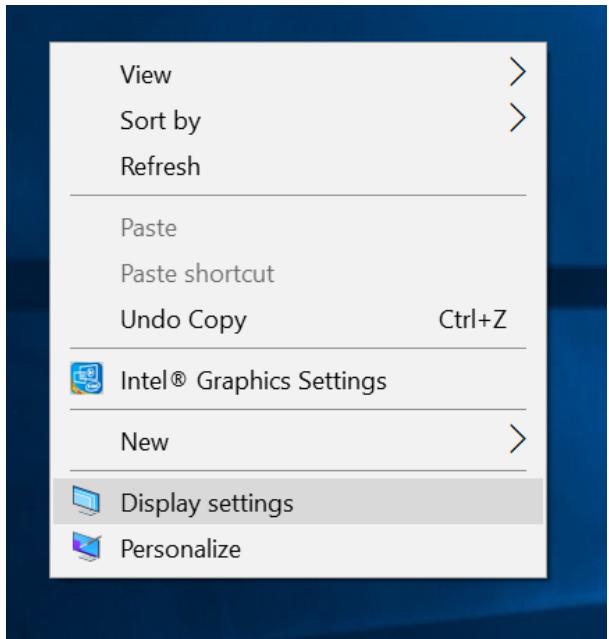
- Tap and hold anywhere on the desktop for 3 seconds and release to bring up the context menu, and select Display settings option as shown below:
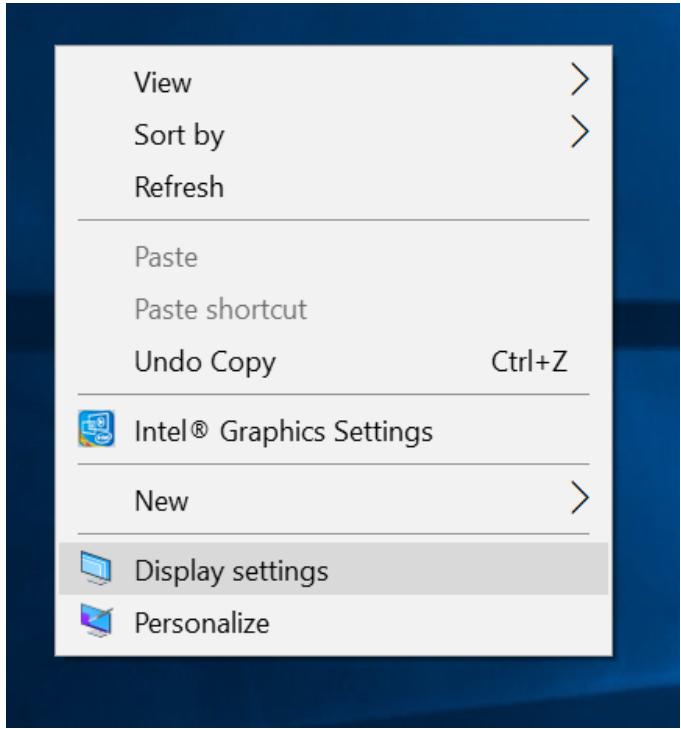
text_image
View Sort by Refresh Paste Paste shortcut Undo Copy Ctrl+Z Intel® Graphics Settings New Display settings Personalize- A Display Window will show up. Click on the drop-down option under the Scale and layout section and change the scaling option to 150% (Recommended) or any other desired display scaling.
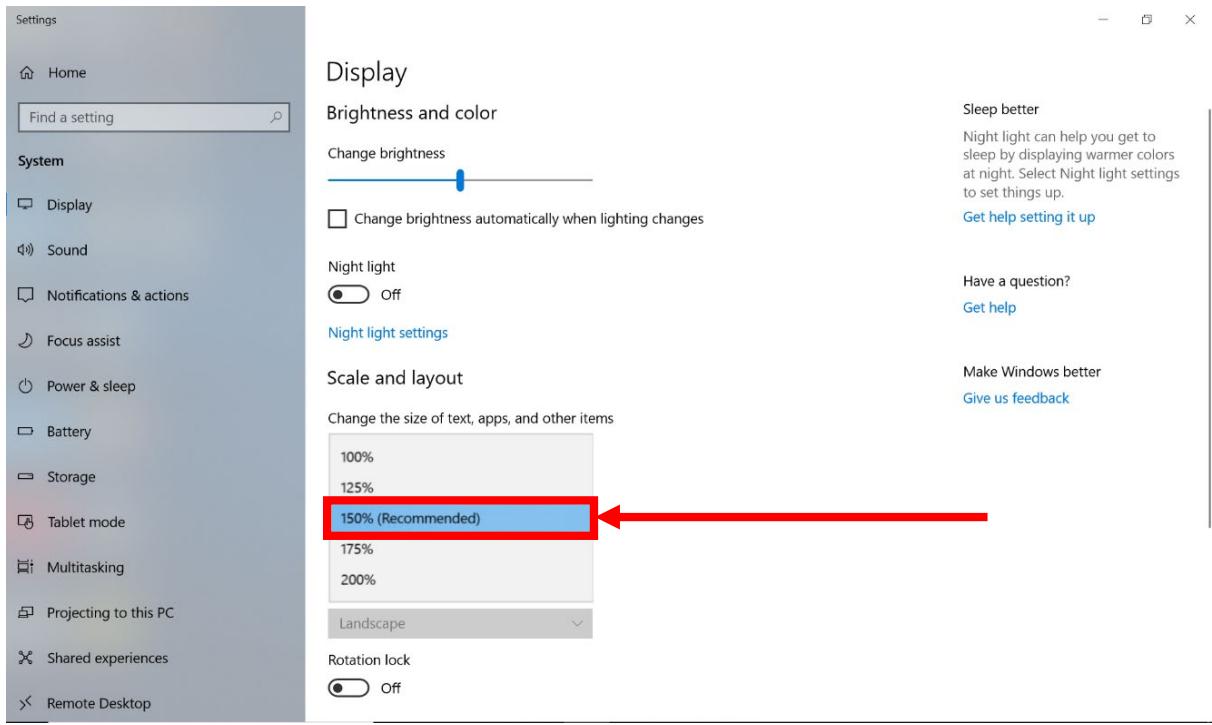
text_image
Settings Home Find a setting System Display Sound Notifications & actions Focus assist Power & sleep Battery Storage Tablet mode Multitasking Projecting to this PC Shared experiences Remote Desktop Display Brightness and color Change brightness Change brightness automatically when lighting changes Night light Off Night light settings Scale and layout Change the size of text, apps, and other items 100% 125% 150% (Recommended) 175% 200% Landscape Rotation lock Off Sleep better Night light can help you get to sleep by displaying warmer colors at night. Select Night light settings to set things up. Get help setting it up Have a question? Get help Make Windows better Give us feedback5.1.2 Changing Screen Resolution
Alternatively, instead of changing the display scaling setting, user may choose to change the overall resolution setting to make screen elements bigger.
- Tap and hold anywhere on the desktop for 3 seconds and release to bring up the context menu, and select Display settings option as shown below:
text_image
View Sort by Refresh Paste Paste shortcut Undo Copy Ctrl+Z Intel® Graphics Settings New Display settings Personalize- Click on the dropdown option next to Resolution and select the desire resolution by tapping on the scale:
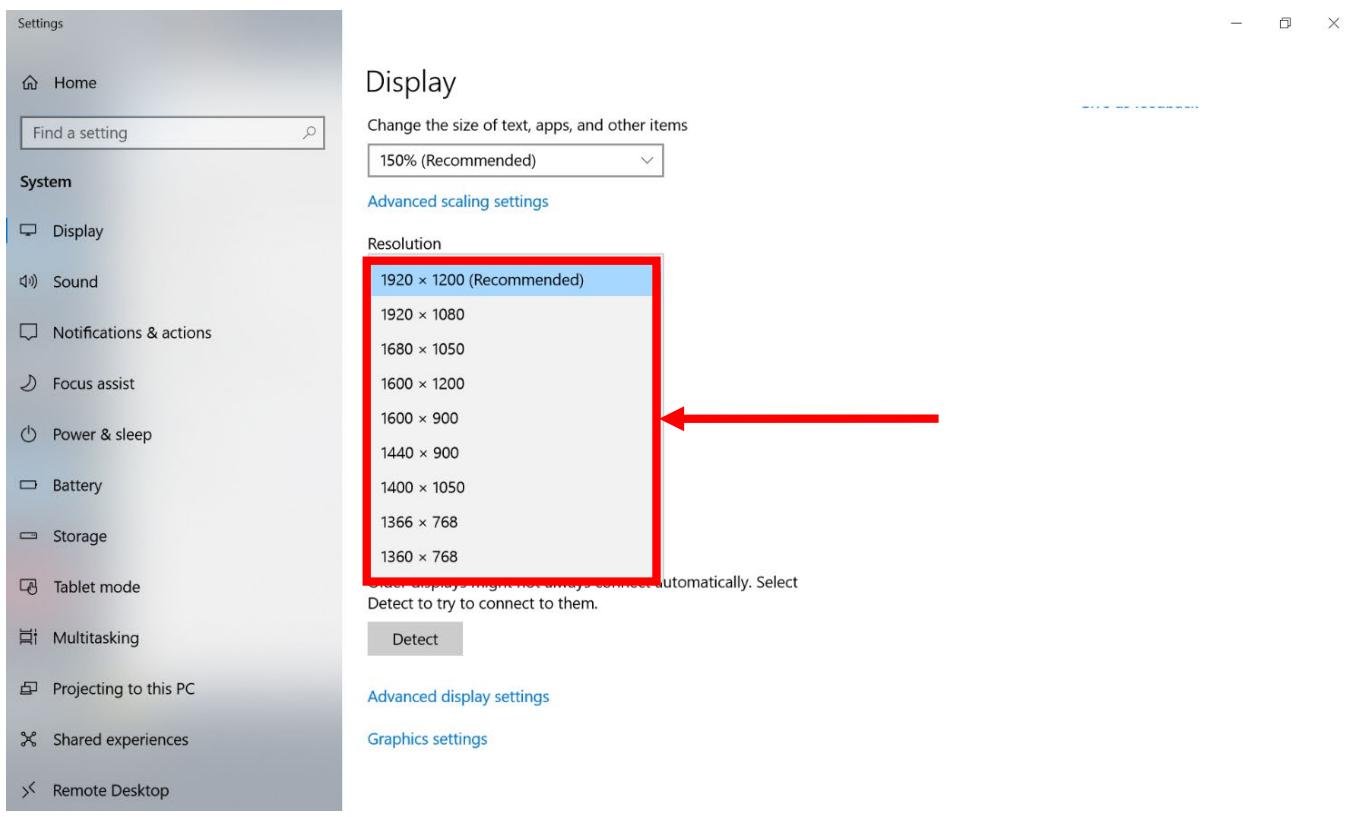
text_image
Settings Home Find a setting System Display Sound Notifications & actions Focus assist Power & sleep Battery Storage Tablet mode Multitasking Projecting to this PC Shared experiences Remote Desktop Display Change the size of text, apps, and other items 150% (Recommended) Advanced scaling settings Resolution 1920 × 1200 (Recommended) 1920 × 1080 1680 × 1050 1600 × 1200 1600 × 900 1440 × 900 1400 × 1050 1366 × 768 1360 × 768 Other display might not always connect automatically. Select Detect to try to connect to them. Detect Advanced display settings Graphics settings- Hit Apply. A Display Settings prompt will show up to ask the user if the applied resolution is usable.
- If the new resolution is the desired display setting hit Keep changes and continue to next step. If the new resolution is not desirable, hit Revert, select a different resolution to change to, and start again from Step 2.
- The user may now use the device with the new resolution setting.
5.2 Using Recovery Wizard to Restore Computer
M101AD Tablet Computer has a dedicated recovery partition stored on the tablet's hard drive to enable a quick one-key recovery process. This partition occupies about 11GB of the storage space and comes built-in to each M101AD Tablet Computer.
Warning! Before starting the recovery process, be sure to backup all user data, as all data will be lost after the recovery process.
Follow the procedure below to enable quick one-key recovery:
- Plug-in the AC adapter to the tablet computer. Make sure the tablet computer stays plugged into power source during the recovery process.
- Power on the tablet computer, and when the boot screen shows up, press the Fn1 button (Recovery Key) on the front bezel OR press F6 when using an external USB keyboard to initiate the Recovery Wizard.
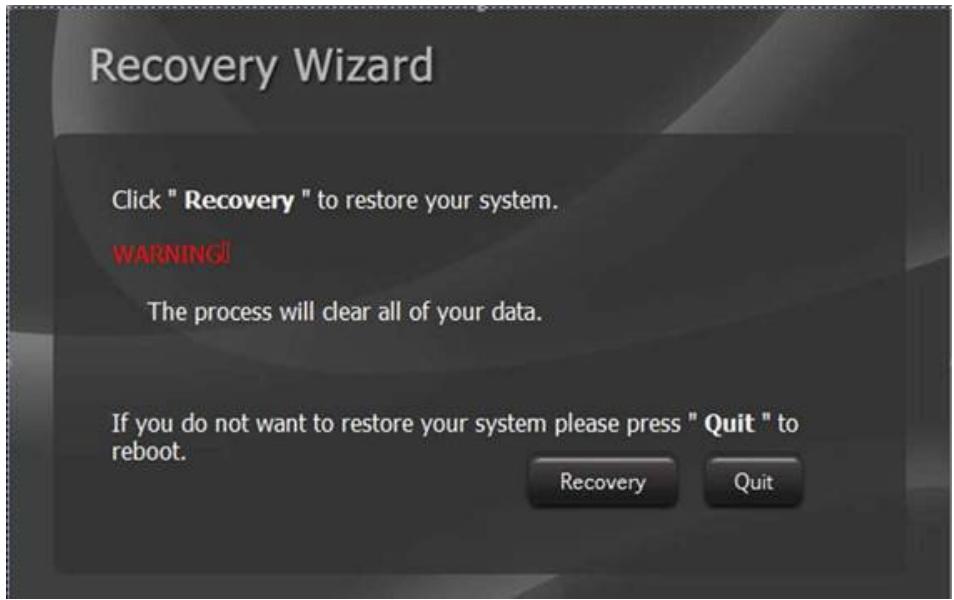
- The following screen shows the Recovery Wizard. Click on Recovery button to continue.
text_image
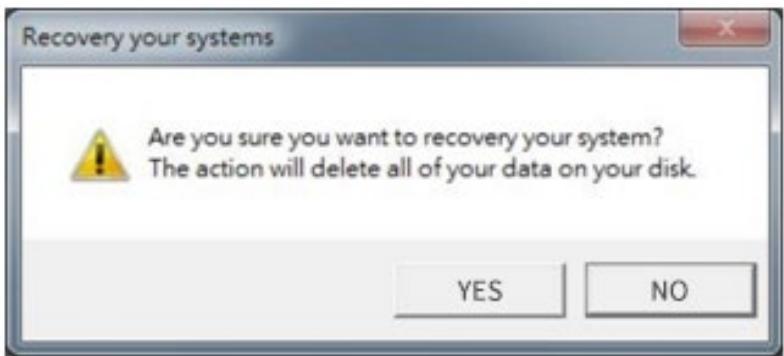
Recovery Wizard Click " Recovery " to restore your system. WARNING! The process will clear all of your data. If you do not want to restore your system please press " Quit " to reboot. Recovery Quit- A warning message about data loss will show up. Make sure data is backed up before recovery, and click on Yes to continue.
text_image
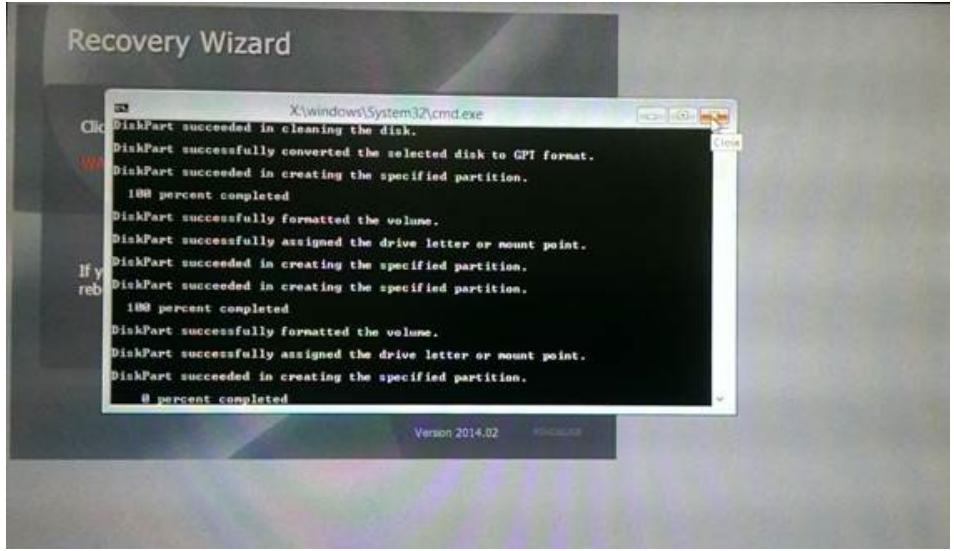
Recovery your systems Are you sure you want to recover your system? The action will delete all of your data on your disk. YES NO- Wait till the recovery process to complete. During the recovery process, a command prompt will show up to indicate the percent of the recovery process.
text_image
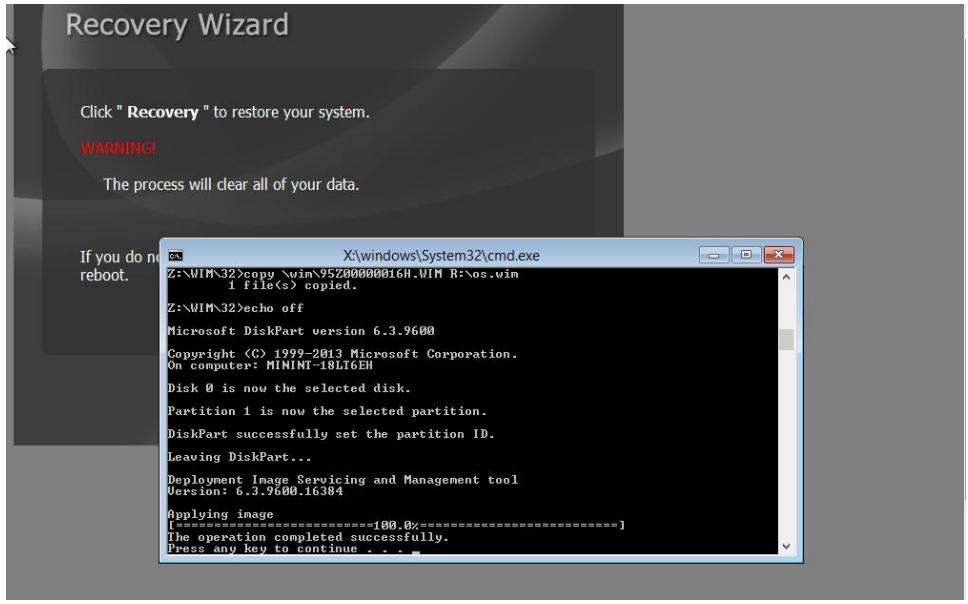
X:\windows\System32\cmd.exe DiskPart succeeded in cleaning the disk. DiskPart successfully converted the selected disk to GPI format. DiskPart succeeded in creating the specified partition. 100 percent completed DiskPart successfully formatted the volume. DiskPart successfully assigned the drive letter or mount point. DiskPart succeeded in creating the specified partition. DiskPart succeeded in creating the specified partition. 100 percent completed DiskPart successfully formatted the volume. DiskPart successfully assigned the drive letter or mount point. DiskPart succeeded in creating the specified partition. 8 percent completed Version 2014.02- After the recovery is completed, please press any key to continue, and the tablet computer will shut down automatically.
text_image
Recovery Wizard Click " Recovery " to restore your system. WARNING! The process will clear all of your data. If you do not reboot. X:\windows\System32\cmd.exe Z:\WIM\32>copy \win\9520000016H.WIM R:\os.wim 1 file(s) copied. Z:\WIM\32>echo off Microsoft DiskPart version 6.3.9600 Copyright (C) 1999-2013 Microsoft Corporation. On computer: MININT-18LT6EH Disk 0 is now the selected disk. Partition 1 is now the selected partition. DiskPart successfully set the partition ID. Leaving DiskPart... Deployment Image Servicing and Management tool Version: 6.3.9600.16384 Applying image [====================100.0×={====================}] The operation completed successfully. Press any key to continue . . .5.3 Docking Connector Pin Definition
M101AD tablet computer supports one 19-pin docking connector at the bottom side. The pin definition is listed in the following table.
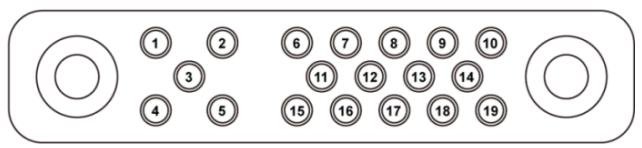
text_image
1 2 3 4 5 6 7 8 9 10 11 12 13 14 15 16 17 18 19| 19 Pin Docking Connector | |||
| Pin No. | Description | Pin No. | Description |
| 1 | RF_GND | 11 | NC |
| 2 | DOCK_DET# | 12 | NC |
| 3 | GPS ANT | 13 | GND |
| 4 | RF_GND | 14 | Power |
| 5 | RF_GND | 15 | USB+ |
| 6 | NC | 16 | USB- |
| 7 | NC | 17 | GND |
| 8 | DETECT+ | 18 | GND |
| 9 | Power | 19 | DETECT- |
| 10 | Power | ||
5.4 COM Port Definition
M101AD tablet computer uses HotTab utility for built-in peripherals control. All the COM port numbers have been defined in the OS image coming with the package.
| COM Port | Device |
| COM 1 | Reserved |
| COM 2 | Reserved |
| COM 3 | Optional |
| COM 4 | BT Auto Pairing |
| COM 9 | GPS |
| COM 11 | RS232 at Docking (optional) |
For some special applications, a user might re-install OS and lose the COM port settings. To make sure the features work properly with HotTab utility, please follow the procedure below to re-define the COM port numbers:
- Go to Device Manager, right click on the COM number that needs to be changed, and tap on Properties to open the setting page.
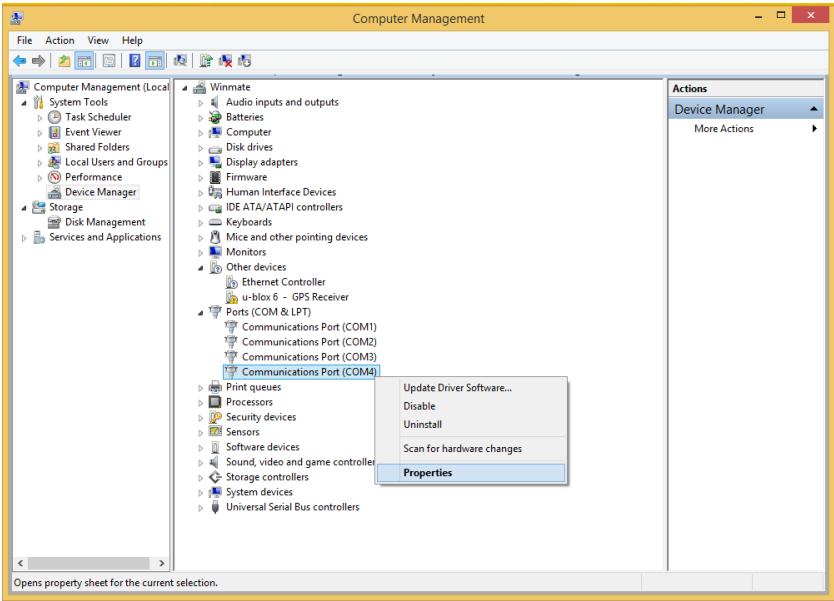
text_image
Computer Management File Action View Help Computer Management (Local System Tools Task Scheduler Event Viewer Shared Folders Local Users and Groups Performance Device Manager Storage Disk Management Services and Applications Winmate Audio inputs and outputs Batteries Computer Disk drives Display adapters Firmware Human Interface Devices IDE ATA/ATAPI controllers Keyboards Mice and other pointing devices Monitors Other devices Ethernet Controller u-blox 6 - GPS Receiver Ports (COM & LPT) Communications Port (COM1) Communications Port (COM2) Communications Port (COM3) Communications Port (COM4) Print queues Processors Security devices Sensors Software devices Sound, video and game controller Storage controllers System devices Universal Serial Bus controllers Actions Device Manager More Actions Update Driver Software... Disable Uninstall Scan for hardware changes Properties Opens property sheet for the current selection.- Tap on the Port Setting tab and click on the Advanced button.
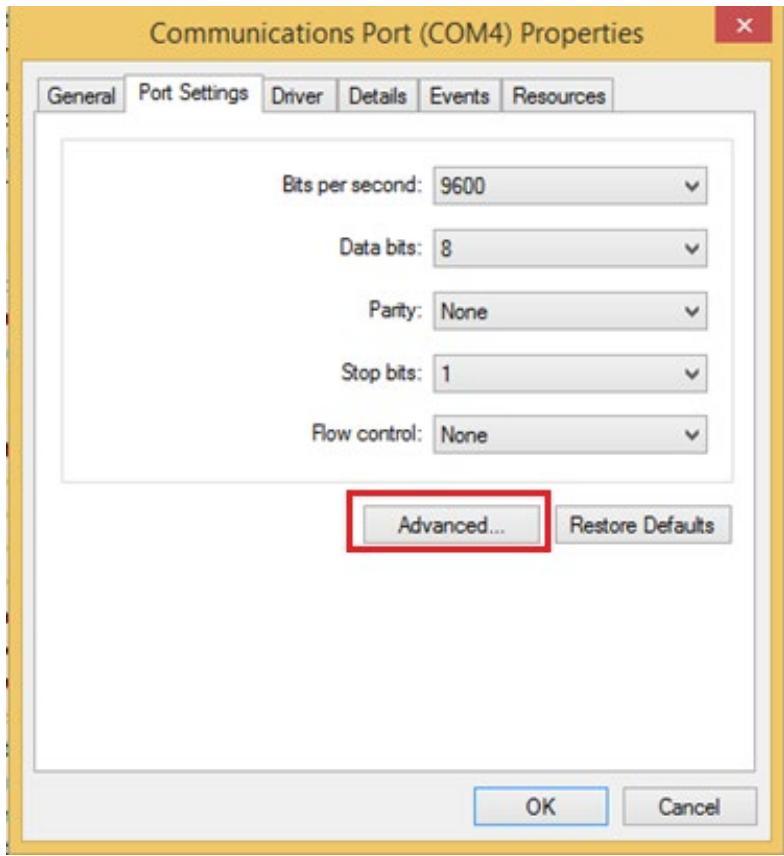
text_image
Communications Port (COM4) Properties General Port Settings Driver Details Events Resources Bits per second: 9600 Data bits: 8 Parity: None Stop bits: 1 Flow control: None Advanced... Restore Defaults OK Cancel- Tap on the drop-down list, choose the correct COM Port Number (refer to the COM Port Definition Table), and click OK.
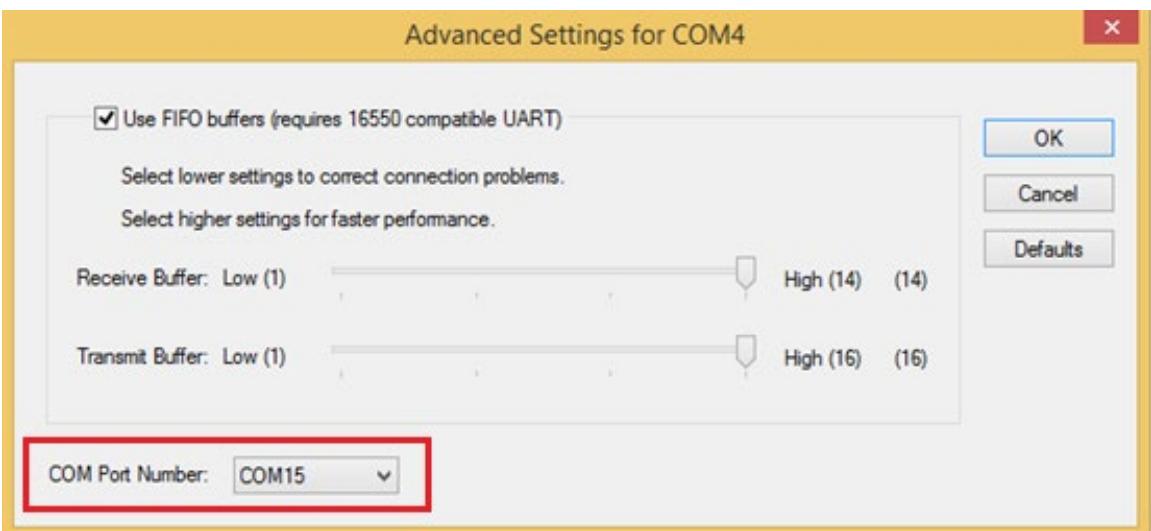
text_image
Advanced Settings for COM4 ✓ Use FIFO buffers (requires 16550 compatible UART) Select lower settings to correct connection problems. Select higher settings for faster performance. Receive Buffer: Low (1) High (14) (14) Transmit Buffer: Low (1) High (16) (16) COM Port Number: COM15 ✓ OK Cancel Defaults- Double-check Device Manager to make sure the COM Port number has been re-defined successfully, and then restart the system.
5.5 Pairing with a Wireless BT Barcode Scanner
The computer is affixed with a BT MAC (Media Access Control) address barcode label that enables wireless BT Barcode Scanner to quickly establish BT connection with the computer. It is encoded with leading characters to instruct the wireless BT barcode scanner to initial BT Serial Port Profile pairing request.
5.5.1 Setup Computer for BT Pairing
To start the pairing process, first, perform the following steps to ensure the computer is properly set up for pairing:
- Locate the BT icon in the Notification Area
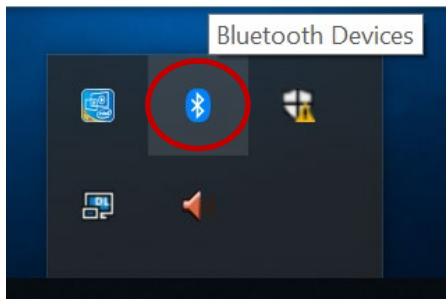
text_image
Bluetooth Devices- Bring up the Contextual Menu by performing a long press on the icon with touchscreen or right-click on the icon with a mouse and select Open Settings.
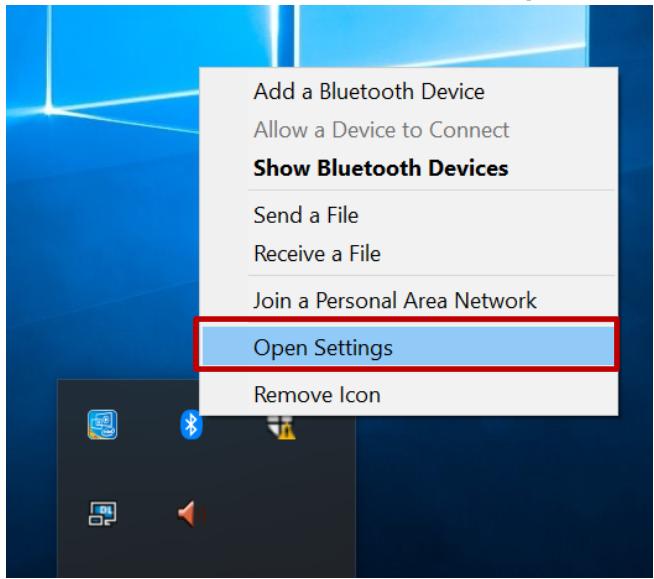
text_image
Add a Bluetooth Device Allow a Device to Connect Show Bluetooth Devices Send a File Receive a File Join a Personal Area Network Open Settings Remove Icon- Once the BT & other devices Menu appears, click More BT options under Related settings section as shown below.

Bluetooth & other devices

Add Bluetooth or other device
Bluetooth

On
Now discoverable as "DESKTOP-RGO2EAR"
Mouse, keyboard, & pen

eGalaxTouch EXC3160-0945-07.00.00.00

USB Optical Mouse
Other devices

DESKTOP-V6ETPDF Paired

Intel(R) Wireless Bluetooth(R)

R7000P (Gateway) Not connected

ST_SENSOR_HUB
Turn on Bluetooth even faster
To turn on Bluetooth without
opening Settings, open action
center, and then select the
Bluetooth icon. Do the same to turn
it off when you want.
Get more info about Bluetooth
Related settings
Devices and printers
Sound settings
Display settings
More Bluetooth options
Send or receive files via Bluetooth
Have a question?
Get help
Make Windows better
Give us feedback
- Go to the Options tab, and make sure that in the Discovery section, the computer is set to Allow BT devices to find this computer, as shown below:
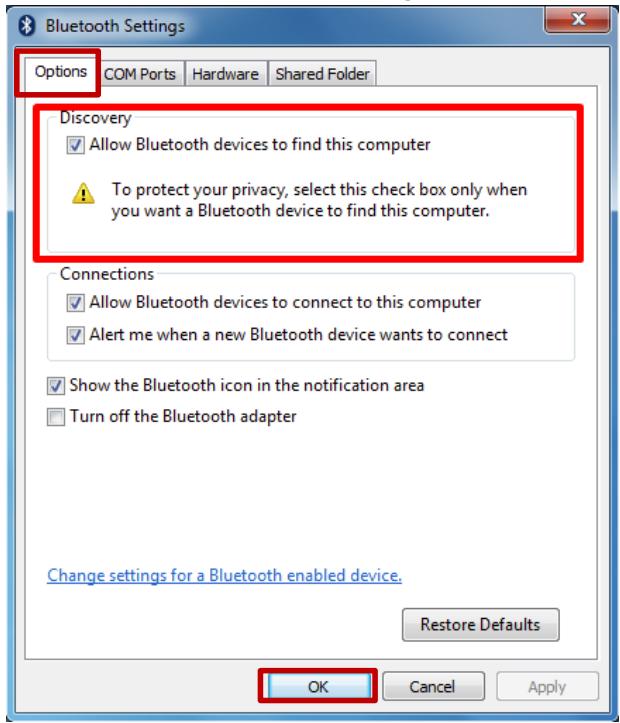
text_image
Bluetooth Settings Options COM Ports Hardware Shared Folder Discovery ✓ Allow Bluetooth devices to find this computer ⚠️ To protect your privacy, select this check box only when you want a Bluetooth device to find this computer. Connections ✓ Allow Bluetooth devices to connect to this computer ✓ Alert me when a new Bluetooth device wants to connect ✓ Show the Bluetooth icon in the notification area □ Turn off the Bluetooth adapter Change settings for a Bluetooth enabled device. Restore Defaults OK Cancel ApplyClick OK to continue.
- In the BT Settings menu, go to COM Ports tab. COM port has to be set up for the wireless BT Barcode Scanner to communicate via the BT Serial Port Profile. Click on the Add... button.
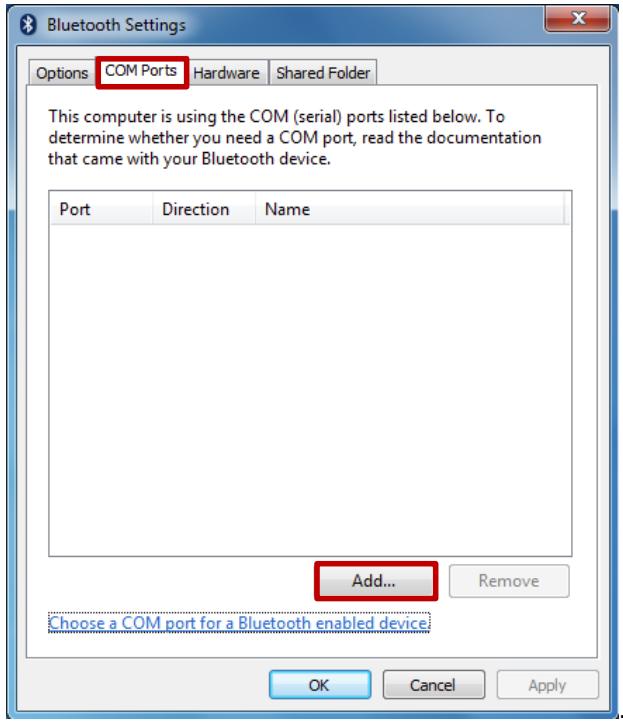
text_image
Bluetooth Settings Options COM Ports Hardware Shared Folder This computer is using the COM (serial) ports listed below. To determine whether you need a COM port, read the documentation that came with your Bluetooth device. Port Direction Name Add... Remove Choose a COM port for a Bluetooth enabled device OK Cancel Apply- You are in Add COM Port window. Choose Incoming (device initiates the connection), and click OK.
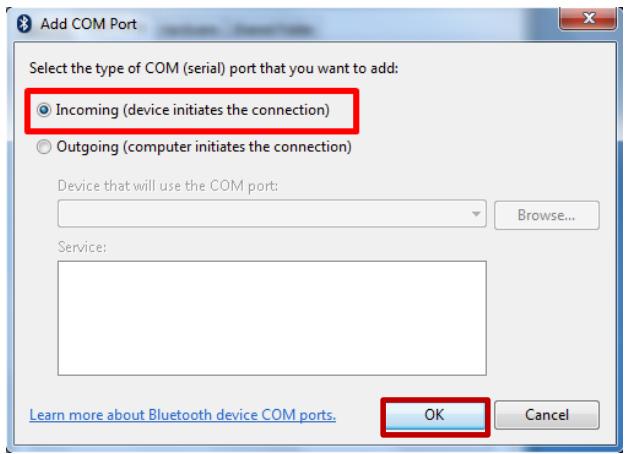
text_image
Add COM Port Select the type of COM (serial) port that you want to add: Incoming (device initiates the connection) Outgoing (computer initiates the connection) Device that will use the COM port: Browse... Service: OK Cancel Learn more about Bluetooth device COM ports.- The computer will automatically assign COM Port to the BT connection. In the screenshot below, COM4 is allocated.
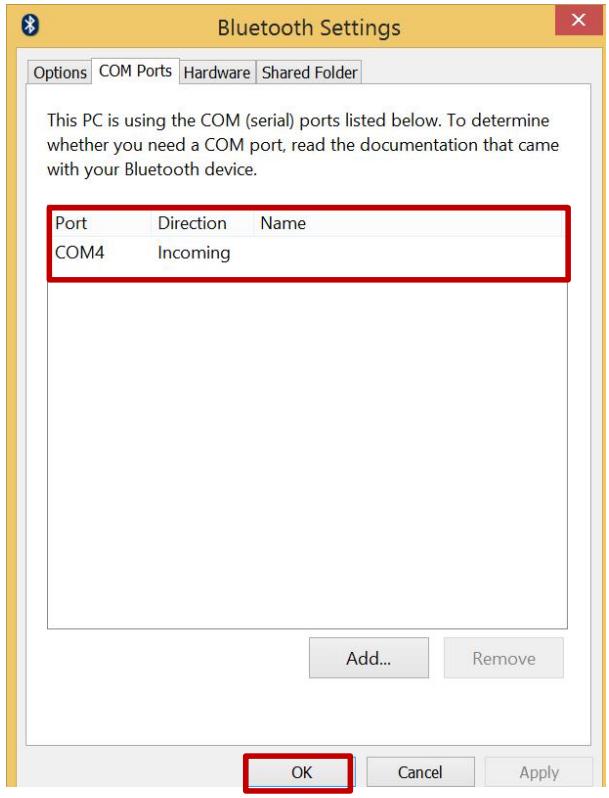
text_image
Bluetooth Settings Options COM Ports Hardware Shared Folder This PC is using the COM (serial) ports listed below. To determine whether you need a COM port, read the documentation that came with your Bluetooth device. Port Direction Name COM4 Incoming Add... Remove OK Cancel ApplyClick OK to continue.
- Next, the user has to configure the application to accept the scanned data from the wireless BT Barcode Scanner. The application has to be configured to accept the same COM Port that has been assigned for the BT Serial Port Profile in the previous step.

Important: Make sure the application stays open while pairing.
- Now the computer is ready for the pairing process to start.
5.5.2 Set up the Barcode Scanner for BT Pairing

Important: The wireless BT Barcode Scanner has to be configured as BT Serial Port Profile Master device to establish connection via BT MAC address barcode label. For a more detailed instruction, please refer to the User Guide for the wireless BT Barcode Scanner you are using for paring.
Now the Barcode Scanner is ready for the pairing process to start.
5.5.3 Perform BT Pairing
After you finish setting up both the Computer and Barcode Scanner, you are ready to start pairing.
- Open a program that is used for paring.
- Perform scanning procedures. A BT notification window pop-up on the right-hand side of the desktop. Left-click on the mouse to enter Add a device menu.
- Locate the BT icon ✉ in the Notification Area.
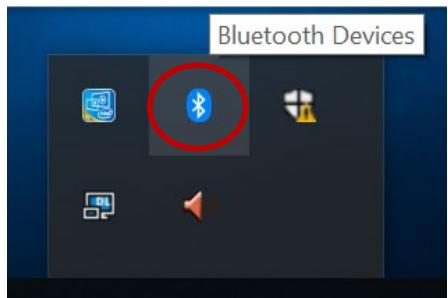
text_image
Bluetooth Devices- Click Add BT Device.
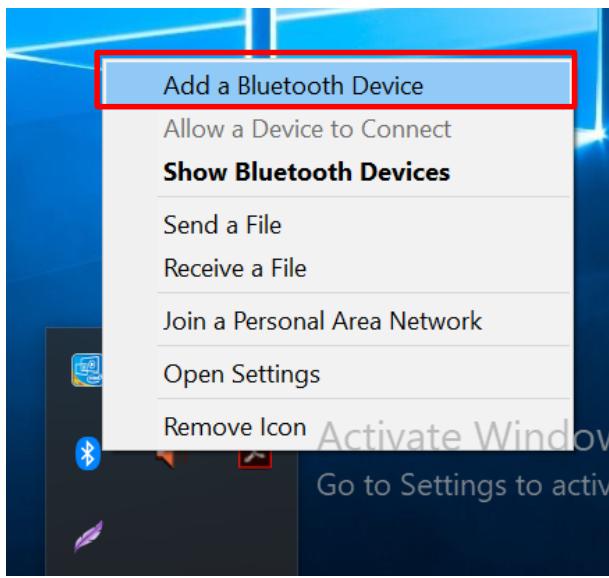
text_image
Add a Bluetooth Device Allow a Device to Connect Show Bluetooth Devices Send a File Receive a File Join a Personal Area Network Open Settings Remove Icon- In Add a BT Device window, click Next to connect the Barcode Scanner to the Computer.
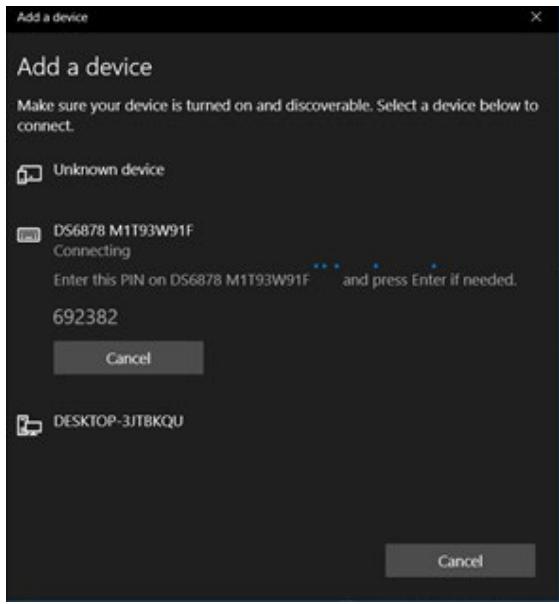
text_image
Add a device Add a device Make sure your device is turned on and discoverable. Select a device below to connect. Unknown device DS6878 M1T93W91F Connecting Enter this PIN on DS6878 M1T93W91F and press Enter if needed. 692382 Cancel DESKTOP-3JTBKQU CancelTo ensure that BT Device is successfully paired to the computer, follow the steps below:
- Locate the BT icon in the Notification Area. Select Show BT Devices.
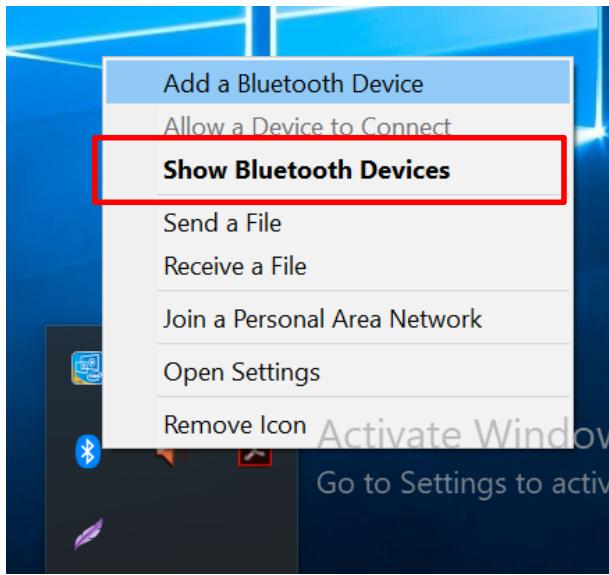
text_image
Add a Bluetooth Device Allow a Device to Connect Show Bluetooth Devices Send a File Receive a File Join a Personal Area Network Open Settings Remove IconYou can access this menu in the Control Panel:
Windows → Control Panel → Devices and Printers → BT Devices
- Make sure your device is connected to the computer.
Chapter 6: Troubleshooting
6.1 Basic Troubleshooting
| Problem | Solution |
| The removable battery is not charging. | Make sure the AC adapter is properly connected, and that the removable battery is properly inserted. |
| Nothing appears on the screen. | The tablet computer may be in sleep mode. Press the power button to wake up the display.The brightness level may be too low. Increase brightness. |
| The screen suddenly turns blank and the power indicator goes off. | Make sure that LED indicator is not powered off in HotTab.Make sure the AC adapter is properly connected.If running on battery power, the battery may be depleted, charge the battery. |
| Wireless LAN signal quality is poor. | The tablet computer may be out of range. Move the tablet computer closer to the access point or another wireless LAN device associated with it.Check if your surroundings have interferences, such as microwave ovens, cordless phones. Move the tablet computer away from objects causing interference. |
| I cannot connect to another wireless LAN device. | Make sure that wireless LAN feature is powered on.Make sure that the Service Set Identifier (SSID) setting is the same for every wireless LAN device in the network.Restart the tablet computerMake sure the IP address or subnet mask setting is correct. |
| I cannot connect to another device with BT. | Make sure that both devices have BT powered on (For the Tablet Computer, check HotTab to see if BT is powered on).Make sure that the distance between the two devices is within 10 meters and there are no walls or large obstructions between the devices.Make sure the both devices are powered on and configured to be discoverable.Make sure that both devices are compatible. |
| The GPS application cannot find my location. | Make sure that GPS is powered on in HotTab.Make sure that GPS receiver and the location sensor are enabled in Control Panel.The tablet computer may be out of coverage area. Move your tablet computer outdoors or closer to a window.Check if your surroundings have interferences, such as microwave ovens, cordless phones. Move the tablet computer away from objects causing interference. |
| No sound is produced. | Adjust the volume of the tablet computer by pressing on the volume rocker.If using an external audio device, make sure that the cable is properly connected. |
| I cannot project the tablet computer display to another monitor. | Make sure the VGA driver is installed.Make sure the output setting selected is correct. |
| Barcode scanner does not emit laser beam and does not seem to work. | Make sure the Barcode scanner device is enabled in HotTab utility.Make sure under Windows, the Barcode Reader is set to COM 15 port, so that HotTab can trigger the Barcode Reader hardware. |
| Barcode Scanner emits laser beam but does not read barcode presented to it. | Adjust the distance between the barcode scanner of the device and the barcode being scanned.Make sure the barcode code type is enabled in the tablet. To enable/disable a specific barcode code type, go through the “Barcode Scanner Configuration” section. |
| I am having GPS accuracy issue | When utilizing the GPS function, we recommend disabling the Barcode Reader in HotTab to reduce interference. |
| Battery leaking or swollen | The lithium battery used in this tablet may swell after being charged/ discharged many times, but there is no problem regarding safety.Continued use in such a state may result in the battery getting jammed, so please stop using the battery, and purchase a new one. |
Appendix
Appendix A: Product Specifications
| Model Name | M101AD | |
| Display | Size | 10.1 inches |
| Resolution | 1920x1200 | |
| Brightness | 800 nits | |
| Contrast Ratio | 800:1 | |
| Viewing Angle | 85,85,85,85 | |
| Touch | Projected Capacitive Multi-Touch | |
| Bonding | Optical Bonding for Sunlight Viewability | |
| Viewability | Anti-Glare touch treatment | |
| System Specification | Processor | Intel® CoreTM i5-1235U Alder Lake, up to 4.4 GHz |
| System Memory | 8GB DDR5 SDRAM (up to 32 GB) | |
| Storage | 256GB M.2 NVMe SSD (Options up to 2 TB), Additional storage available with micro SDXC card slot (Optional) | |
| Security | Trusted Platform Module (TPM) 2.0 | |
| Operating System | Windows 10 IoT Enterprise LTSC (64 bit) | |
| WLAN | Support | |
| BT | Support | |
| GNSS | GPS, GLONASS | |
| Sensors | Light sensor/ G-sensor / Gyro | |
| Camera | Front Camera | 2MP Front Camera |
| Rear Camera | 8MP Rear Camera with auto-focus and LED light | |
| Mechanical | Dimensions | 271.5 x 198.2 x 23.3 mm (10.7 x 7.8 x 0.9 inches) |
| Weight | 1.2kg (2.65 lbs) with standard battery | |
| Cooling System | Fan design | |
| I/O Ports | USB Port | 1 x USB 3.0 (Type A), 1 x USB 3.0 (Type C support Power Delivery 20V In and ALT mode) |
| Audio | 1 x Audio combo 3.5mm audio combo jack Dual Digital Mic with Noise Cancellation Dual Speaker | |
| SD Card Slot | 1 x Micro SDXC slot | |
| SIM Card Slot | 1 x Micro SIM card slot | |
| Indicator | 4x LED Indicator for Power, Battery, HDD, RF status | |
| Docking Connector | 1 x 19-pin docking connector | |
| Environment | Operating Humidity | 10% to 90% RH, non-condensing |
| Operating Temperature | -20°C to 60°C | |
| Storage Temperature | -30°C to 70°C (-22°F to 158°F) | |
| Shock | MIL-STD-810H Method 516.8 Procedure I | |
| Vibration | MIL-STD-810H Method 514.8 Procedure I | |
| Drop | MIL-STD-810H Method 516.8, 4 ft | |
| IP Rating | IP65 certified, dustproof and waterproof | |
| EMC | MIL-STD-461G CE101, CE102, RE101, RE102, CS118 (Default) MIL-STD-461G CS101, CS114, CS115, CS116, RS101,RS103 (Optional) | |
| Certification | Certification | CE, FCC |
| Security Function | SOTI MobiControl | SOTI MobiControl Compliance |
| Kensington Lock | Support | |
| Control | Button | 1 x Power, 1 x Home2 x Volume key2 x Programmable function Keys |
| Power | Battery | Hot-swappable 11.55V, typ. 4588 mAh Li-Polymer Battery (3S2P) |
| Battery Operating Time | Standard. Battery: 8 hours | |
| Power Rating | 19V DC | |
| Adapter | 100-240V, 50-60Hz / 19V DC | |
| Barcode Scanner | Barcode Scanner | 1D/2D barcode reader (Optional) |
| Accessory | Standard | Adapter and Power CordCapacitive StylusStandard Battery |
| Optional | Desk DockVehicle Dock (without VGA output)Vehicle CradleVehicle ChargerBattery ChargerHand StrapShoulder StrapCarry Bag | |
NOTE:
- Accessories and Integrated Options may vary depending on your configuration. The product shown in this document is a standard model. For diagrams that contain customized or optional I/O, please contact the Winmate Sales Team for more information.
- All specifications are subject to change without prior notice.