
MO183 - Baby monitor MAXI-COSI - Free user manual and instructions
Find the device manual for free MO183 MAXI-COSI in PDF.
| Product type | Baby monitor with 360° camera |
| Brand | Maxi-Cosi |
| Model | MO183 |
| Monitor power supply | DC 5V ±10%, 1A (USB-C port) |
| Parent unit power supply | Rechargeable battery via USB-C |
| Connectivity | Dual-band 2.4/5 GHz Wi-Fi and direct link with parent unit |
| Range (parent unit) | Up to 200 m outdoors (500 ft) |
| Main functions | Sound detection, CryAssist, night vision, digital zoom (1x, 2x, 4x), two-way communication, lullabies and soothing sounds |
| Recording | On MicroSD card (4 to 128 GB) |
| Status indicators | Solid red/blue or flashing (according to mode) |
| Wall mounting | Wall mount included, mounting on drywall or stud (anchors provided) |
| Box contents | 1 monitor, 1 parent unit, 1 wall mount, 1 angle adjustment wedge, 2 USB cables, 1 power adapter, 5 cable management clips, 7 screws, 7 anchors, 1 reset tool, 1 manual |
| Microphone | Built-in (audio capture and two-way conversation) |
| Speaker | Built-in (plays lullabies and communication) |
| Pairing | Via pairing button or Connected Family app |
| Mobile app | Connected Family (iOS/Android) |
| Reset | Reset tool included (hold for 5 seconds) |
| Care and cleaning | Wipe with a soft, dry cloth, do not use abrasive products |
| Installation safety | Keep the monitor at least 0.9 m from the crib, secure the cable with the provided clips |
| Repairability | Removable MicroSD card, reset possible via tool |
Frequently Asked Questions - MO183 MAXI-COSI
User questions about MO183 MAXI-COSI
0 question about this device. Answer the ones you know or ask your own.
Ask a new question about this device
Download the instructions for your Baby monitor in PDF format for free! Find your manual MO183 - MAXI-COSI and take your electronic device back in hand. On this page are published all the documents necessary for the use of your device. MO183 by MAXI-COSI.
USER MANUAL MO183 MAXI-COSI
(US and Canada only, carrier fees may apply)
maxicosi.com/connected-support

1-800-544-1108

connected@maxicosi.com
©203Dorel Juvenile Group, Inc. (800) 951-4113 www.maxicosi.com. Styles, colors, and labeling may vary. Les styles, les couleurs et l'étiquetage peuvent varier. Los estilos, colores et eyetuido queollen varie. Made in China. Fabricé en Chile. Heicho en China. Distributed by (distribue par/distribuito por) Dorel Juvenile Group, Inc., 2525 State St., Columbus, IN 47201-7494. Dorel Juvenile Canada, 2333 Argentina Road, Suite 110, Mississauga, ON LSN 2X7. Representante exclusivo en Chile: DOREL JUENCAA CHILE S.A. Av. del Parque 4161, oficina 602 A, Huechuraba, Santiago, Chile - Fono: 56 2 24971500 - www.infant.cl - www.dorel.cl. Importado y distribuito en Perú por: COMEXA COMERCIALIZADORA EXTERJERA S.A. SUCURSAL DEL PERU - Los Libertadores 455, San Isidro, Lima 27, Lima, Peru RUC 20431062870 - Fono: 4413029 - www.infant.com.pe. En Centro América, Caribe y Ecuador por: Best Brands Group S.A.-Av. Balboa, Bay Mall Plaza, Planta Baja, local 9, Panama - Fono: (507) 300 2884. En Colombia por: Baby Universe S.A.S.- Via 40 No. 77-29, Barranquilla, Colombia - Fono: (575) 353 1110 Importador: DGIM, S.A. DE.C.V. Gabriel Mancera No. 1041 Col. Del Valle, Benito Juarez C.P. 03100 Mexico, Ciudad de Mexico R.F.C. DIG140305GN Tel. (55) 67199202 10/23 4358-8445A boy

MAXI·COSI®
See Pro
360^ Baby Monitor
Keep these instructions for future reference.
Install the App
Installes application
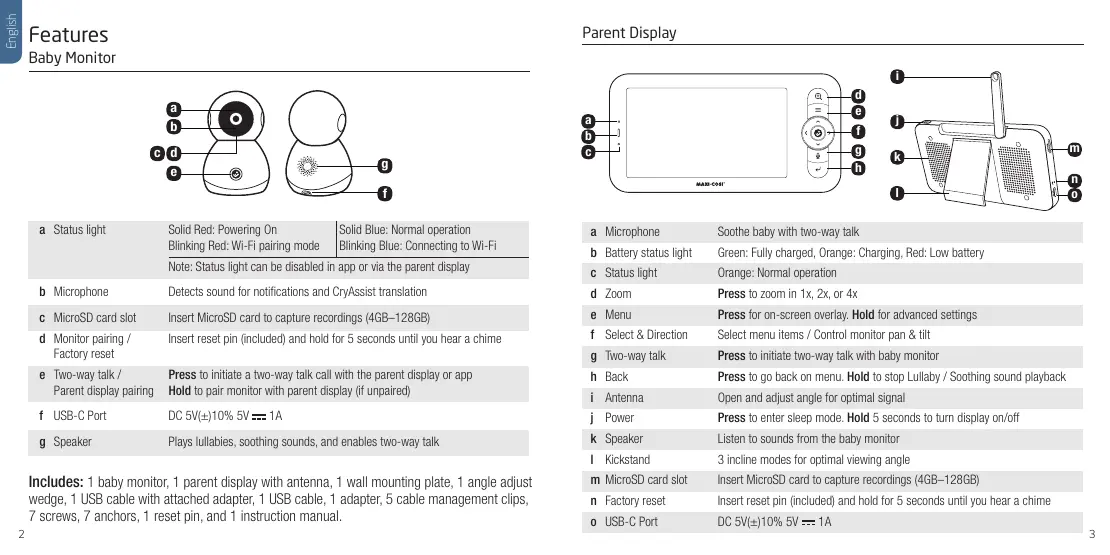
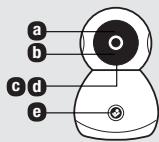
| a Status light | Solid Red: Powering On Blinking Red: Wi-Fi pairing mode | Solid Blue: Normal operation Blinking Blue: Connecting to Wi-Fi |
| Note: Status light can be disabled in app or via the parent display | ||
| b Microphone | Detects sound for notifications and CryAssist translation | |
| c MicroSD card slot | Insert MicroSD card to capture recordings (4GB-128GB) | |
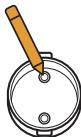
| d Monitor pairing / Factory reset | Insert reset pin (included) and hold for 5 seconds until you hear a chime | |
| e Two-way talk / Parent display pairing | Press to initiate a two-way talk call with the parent display or app Hold to pair monitor with parent display (if unpaired) | |
| f USB-C Port | DC 5V(±)10% 5V --- 1A | |
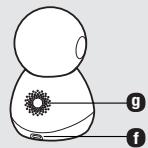
| g Speaker | Plays lullabies, soothing sounds, and enables two-way talk | |
Includes: 1 baby monitor, 1 parent display with antenna, 1 wall mounting plate, 1 angle adjust wedge, 1 USB cable with attached adapter, 1 USB cable, 1 adapter, 5 cable management clips, 7 screws, 7 anchors, 1 reset pin, and 1 instruction manual.
Parent Display
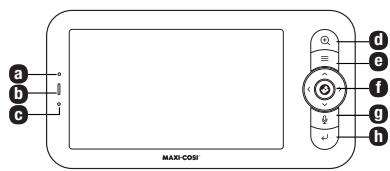
a Microphone Soothe baby with two-way talk
b Battery status light Green: Fully charged, Orange: Charging, Red: Low battery
c Status light Orange: Normal operation
d Zoom Press to zoom in 1x, 2x, or 4x
e Menu Press for on-screen overlay. Hold for advanced settings
f Select & Direction Select menu items / Control monitor pan & tilt
g Two-way talk Press to initiate two-way talk with baby monitor
h Back Press to go back on menu. Hold to stop Lullaby / Soothing sound playback
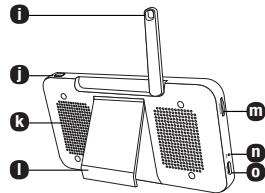
i Antenna Open and adjust angle for optimal signal
j Power Press to enter sleep mode. Hold 5 seconds to turn display on/off
k Speaker Listen to sounds from the baby monitor
Kickstand 3 incline modes for optimal viewing angle
m MicroSD card slot Insert MicroSD card to capture recordings (4GB-128GB)
n Factory reset Insert reset pin (included) and hold for 5 seconds until you hear a chime
0 USB-C Port DC 5V(±)10% 5V = 1A
Smartphone Setup
- Download the Connected Family App. Ensure that your smartphone is connected to your home's Wi-Fi network.
- To use the USB cable with attached adapter: Plug adapter into a wall outlet then insert the USB-C end into the back of the baby monitor.
- The monitor head will rotate to calibrate. The status LED will turn red, then blue. To enter pairing mode, insert reset pin to monitor pairing button 0 and hold for 5 seconds until you hear a chime. When the status LED is blinking red, the device is in pairing mode.
- In the app, tap + , then select See Pro Baby Monitor to begin pairing your device.
- Follow step-by-step instructions to complete pairing.
- Once successfully paired, the status LED will turn solid blue.
- In the Connected Family App, Tap to learn more, including how to wall mount your product. You can also enable CryAssist, share access, configure notifications, adjust the status LED and more.
Wi-Fi Connectivity for Smartphones
Connecting to this baby monitor via your smartphone requires a 2.4 GHz, 5.0 GHz, or dual-band home network. Certain shared networks such as those in hotels may not function. We recommend a connection with network speeds of 2 Mbps or greater at the location the device will be installed. Your internet service provider can verify the quality of your internet connection.
Parent Display Setup
Power on the baby monitor and the parent display, and they will automatically connect. If the connection fails, please follow the steps below to pair. Pairing must be completed at close range. Ensure that the baby monitor and parent display are no more than 500' (200m) apart during pairing.
Pairing your baby monitor and parent display:
- Press the Menu button on the parent display, and select > Baby Monitor.
- Select Baby Monitor 1 or Baby Monitor 2 to pair.
- Press and hold the baby monitor pairing button until you hear the chime.
- Press the button on the parent display screen to start pairing.
- (Optional) For Baby Monitor 2, repeat Step 2-Step 4 above.
Unpairing your baby monitor and parent display:
- Press Menu button on the parent display, and select > Baby Monitor.
- Select Baby Monitor 1 or Baby Monitor 2 to unpair.
- Press and hold the button to unpair the devices.
Note: CryAssist requires an internet connection and must be setup in app.
Wall mounting your baby monitor
Tools required for mounting (not included): Phillips head screwdriver, hammer, drill with 3/16" size bit, and pencil.
Before wall mounting, ensure optimal placement of the baby monitor by viewing the monitor within the app or on the parent display. The following instructions are for securely mounting to a drywall surface.
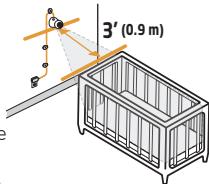
- Examine the room and determine the optimal placement on the wall. Mark this location with a pencil. IMPORTANT: Ensure that the baby monitor is at least 3 ft (0.9 m) away from the crib.
- Place the included wall mount onto the wall at the marked location, ensuring the arrow is pointing upwards. Using a pencil, make a mark through the two screw holes. Put the wall mount to the side for later use.
- Using a 3/16" drill bit, drill a hole 1.0'' (2.54 cm) deep on the pencil marks. DO NOT drill through the wall mount holes.
- Insert drywall anchor into the hole. If necessary, lightly tap with a hammer until the drywall anchor is flush with the wall surface. Note: If mounting to a wall stud, drywall anchors are not required.
- Align the holes of the wall mount with the drywall anchors and using a screwdriver, hand tighten a screw into each of the drywall anchors. DO NOT overtighten.

- Locate the hole underneath the base of the monitor and place it on the wall mount.
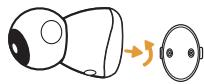
- Applying light pressure to the base, twist the monitor counterclockwise until the Maxi-Cosi logo is facing down. DO NOT pull on the monitor head.
a. To remove the monitor from the wall, push up on the base until it releases from the mount. NEVER leave the monitor hanging on the wall mount without clicking in place.
- Before proceeding to the next step. Ensure that the viewing angle is to your liking by verifying the app. Rotate and tilt the monitor as needed.
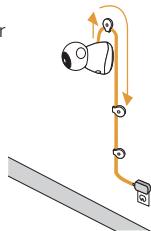
- Wall clips: Use the included wall clips to secure the cord at least 3 ft (0.9 m) away from the crib:
a. Repeat steps 3 and 4 to install the wall anchors into the drywall. Ensure that wall anchors are placed 2 ft (0.61m) apart.
b. Place cord into the wall clips, leaving a little slack.
c. Align wall clip hole to wall anchor. Close the top cover to secure the cord in place.
d. Ensure holes of the provided wall clips are aligned with the wall anchors and insert provided screw. Using a screwdriver, hand tighten a screw into each wall clip.
\section*{Caracteristiques}
Moniteur pour bébé
aVoyant d'etat