
Mico Plus - Baby Products MAXI-COSI - Free user manual and instructions
Find the device manual for free Mico Plus MAXI-COSI in PDF.


| Product Type | Infant Car Seat |
| Brand | Maxi-Cosi |
| Model | Mico Plus |
| Weight Capacity | 4 to 22 lb (1.8 to 10 kg) |
| Height Limit | Up to 32 inches (81 cm) |
| Product Weight | 9.5 lb (4.3 kg) |
| Dimensions (L x W x H) | 27 x 17 x 22 inches (68.6 x 43.2 x 55.9 cm) |
| Harness Type | 5-point harness |
| Installation Method | Vehicle seat belt or base (sold separately) |
| Base Compatibility | Maxi-Cosi EasyBase or FamilyFix bases |
| Carrier Use | Yes, removable carrier with handle |
| Sun Canopy | Retractable sun canopy |
| Head Support | Adjustable headrest |
| Insert Pads | Removable infant insert for newborns |
| Safety Standards | FMVSS 213, ECE R44/04, or R129 (depending on region) |
| Expiration | 6 years from date of manufacture |
| Cleaning | Seat pad removable and machine washable (gentle cycle) |
| Certification Label Location | On the side of the seat shell |
| Warranty | 1 year limited warranty |
| Country of Origin | China |
Frequently Asked Questions - Mico Plus MAXI-COSI
User questions about Mico Plus MAXI-COSI
0 question about this device. Answer the ones you know or ask your own.
Ask a new question about this device
Download the instructions for your Baby Products in PDF format for free! Find your manual Mico Plus - MAXI-COSI and take your electronic device back in hand. On this page are published all the documents necessary for the use of your device. Mico Plus by MAXI-COSI.
USER MANUAL Mico Plus MAXI-COSI
natural_image
Simple icon of a boat with a sail, no text or symbols presentBaby Capsule
To be used only in rearward facing position until the infant's shoulders reach marker (approx. 6 months of age.)
IMPORTANT: KEEP THIS BOOKLET IN THE PLACE PROVIDED ON THE CHILD RESTRAINT.
Table of Contents
Warranty Information 3
Warnings 4
Components list 8
Vehicle information 12
Location of anchor fitting 12
Anchorage fitment check 13
Upper anchorage installation 14
Seat to vehicle positioning 17
Vehicle seat location requirements 18
Angle configuration for the seat 19
Operation and adjustment 20
Shoulder height marker 20
Preparing infant seat to fit your child 21
Removing child from child restraint 29
Adjusting handle 30
Installation 31
Preparing to install base with vehicle belts 32
Installing base with vehicle belts 33
Two-piece top tether strap fitment 35
Removing seat and detaching top tether strap 37
Storing tether loop 38
Storing instruction manual 39
Lower connectors installation 40
Preparing to install base with lower connectors 41
Installing base with lower connectors 42
Aircraft Installation 44
Covers and accessories 49
Canopy use 50
Care and cleaning 52
Remove seat cover for cleaning 52
Cleaning buckle 54
General maintenance 56
The next seat for your child 57
Guarantee 59

MAXI·COSI®

Dear customer,
Congratulations on the purchase of your brand new Maxi-Cosi car seat, we hope you and your little one will have plenty of hours of fun together!
Our car seats are so good, we've put them under a Lifetime Warranty – so you can enjoy them for years to come. Don't forget to register within three months after purchase. Go to our website for full terms and conditions.
In the event of a car accident, your Maxi-Cosi child restraint may have unseen damage from crash forces. The Maxi-Cosi Accident Exchange Service offers new for old Maxi-Cosi child restraint replacement in the even of a serious accident (where a police report is required), giving you peace of mind knowing your child is correctly protected.
Need assistance?
Call our Customer Service Centre: 1300 809 526 Monday to Friday (8:30am-5:00pm AEST) or send an email: customerservice@dorel.com.au
www.maxi-cosi.com.au maxi-cosi.australia

WARNINGS
Read and follow all of the installation instructions for maximum protection. If you have any questions regarding the installation or use of this restraint, please contact Dorel Australia or agent, or a child restraint fitting station authorised by the relevant transport authority, or in New Zealand, to consult the agent for the vehicle.
GENERAL
- To be used only in a rearward-facing position until the infant's shoulders reach the shoulder height marker (approximately 6 months of age). Continue to use this infant restraint until the child reaches this limit. Infants are at risk of serious injury if they face forward too early.
- Use the restraint exactly as shown in the instructions.
- Supervision of children is needed because they may be able to undo the buckles.
• DO NOT LEAVE CHILDREN UNATTENDED IN THE CAR. - Do not alter or modify this restraint.
• Repairs must only be done by the manufacturer or agent. - Do not allow the restraint to come into contact with polishes, oils, bleach and other chemicals.
- Destroy the restraint if it has been in a severe crash, even if no damage is visible.
• DO NOT USE THIS RESTRAINT WITHOUT THE COVER. - To ensure infant's back is evenly supported, do not put more than one nappy on the baby and make sure the nappy is not thickly folded at the back.
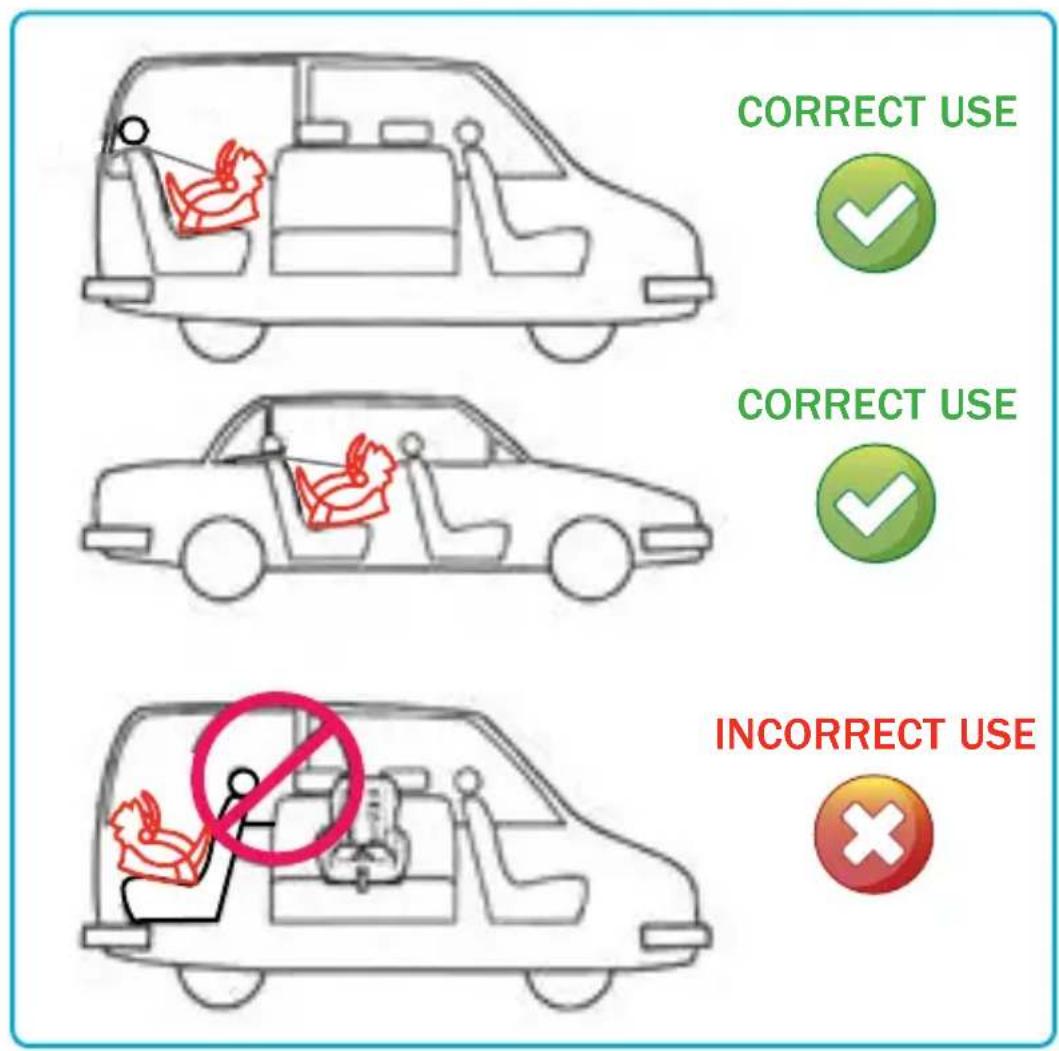
• DO NOT USE A REAR-FACING CHILD RESTRAINT WHERE AN AIRBAG IS FITTED IN FRONT OF THE SEATING POSITION.
• Fit the restraint firmly to the car seat.
• Fit the harness firmly to the child.

WARNINGS
- A loose restraint or harness is dangerous.
- Do not harness an infant wrapped in a blanket or swaddled. Any blanket or wrap must only be placed over the harness and infant.
- Care and attention should always be given to ventilation and shading of the child.
- Seatbelt extenders are not recommended to be used if the seatbelt is not long enough to secure the child restraint. If seatbelts are too short then advice should be sought from a child restraint fitter and their recommendations be considered before using a seatbelt extender.
- Always secure the loose end of the top tether strap. Do not use the child restraint where this strap may fall into a split in the seat back or off the side of the seat.
• ALWAYS ATTACH HOOK AND REMOVE SLACK. - THIS RESTRAINT IS NOT SUITABLE FOR USE WHERE THE TOP TETHER STRAP MAY FALL INTO A SPLIT IN THE SEAT BACK OR OFF THE SIDE OF THE SEAT.
- THIS RESTRAINT MUST BE ATTACHED TO A CHILD RESTRAINT UPPER ANCHORAGE POINT IN THE CAR. REFER TO CAR OWNER'S HANDBOOK FOR LOCATION OF UPPER ANCHORAGE POINTS. REFER TO A CHILD RESTRAINT FITTING STATION IF NO UPPER ANCHORAGE POINTS ARE IN THE MOTOR CAR.
- Always check the measurements between the front of the seat back of the rear seat and all front seats in the car in which the child restraint is intended to be used, to ensure that the space is sufficient.
• TO BE USED WITH A LAP-SASH/LAP-ONLY SEATBELT IN THE FRONT/BACK OF MOST CARS WITH FORWARD FACING SEATS.

WARNINGS
- The use of child restraints in the front seat may be restricted for children of specific ages by local legislation. Please check with your local legislation regarding any restriction for child restraint. If a car has two or more rows of seats, children under four must not travel in the front seat. If all seats, other than the front seats, are being used by children under seven years, children aged between four and six years (inclusive) may travel in the front seat, provided they use an approved child restraint or booster seat.
- Use of aftermarket accessories (i.e. items not provided in the box with the child restraint), can reduce the safety provided by the child restraint and may cause injury or death. For approved aftermarket accessories please refer to page 12.
- Please contact Dorel Australia Customer Service with any questions or concerns (see page 3 for contact details).

WARNINGS
For model MAP 2013LA (lower connectors) please note the following additional warnings:
• TO BE USED WITH A LAP-SASH / LAP-ONLY SEATBELT OR ISOFIX LOW ANCHORAGES IN THE FRONT / BACK OF MOST CARS WITH FORWARD FACING SEATS.
IMPORTANT:
- Do not attach the lower attachment connectors of two separate child restraints to the same ISOFIX low anchorages in your car.
• Always attach the top tether strap to the child restraint upper anchorage in your car. - Child restraint lower attachment connectors and the ISOFIX low anchorages in your car are designed to withstand only those loads imposed by a correctly fitted child restraint.

WARNING
For model MAP 2013A please note the following additional warning:
- This child restraint is not approved for use with any connectors that connect to the car's ISOFIX low anchorages.
Components list

- Carry handle
- Canopy
- Instruction manual storage (under the upholstery)
- Level to Ground Indicator (x2)
- Lower connector strap (if fitted)
-
Lower connectors (x2, if fitted)
-
Tension adjuster (x2, if fitted)
- Harness tightening strap
- Harness release lever (under upholstery)
- Stroller release buttons (x2)
- Magnetic harness holders (x2)
- Air protect cell (x2)
Components list

- Canopy window
- Storage pocket
- Seat release lever (behind storage pocket)
- Seat shell
- Base adjustment handle (2 positions)
- Handle adjustment buttons (x2, 3 positions)
-
Canopy zip pull
-
Loop tether strap
- Top tether metal connector
- Top tether attachment hook
- Top tether adjuster
- Anchor kit
Components list
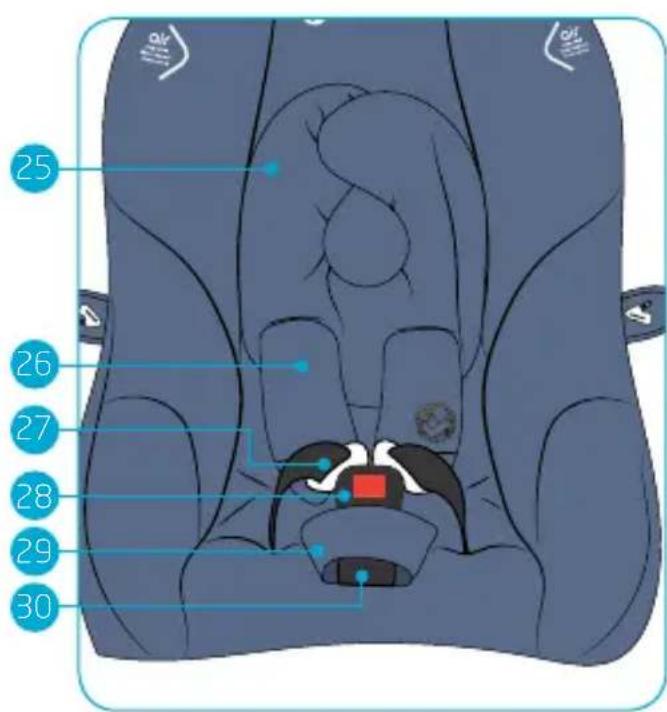
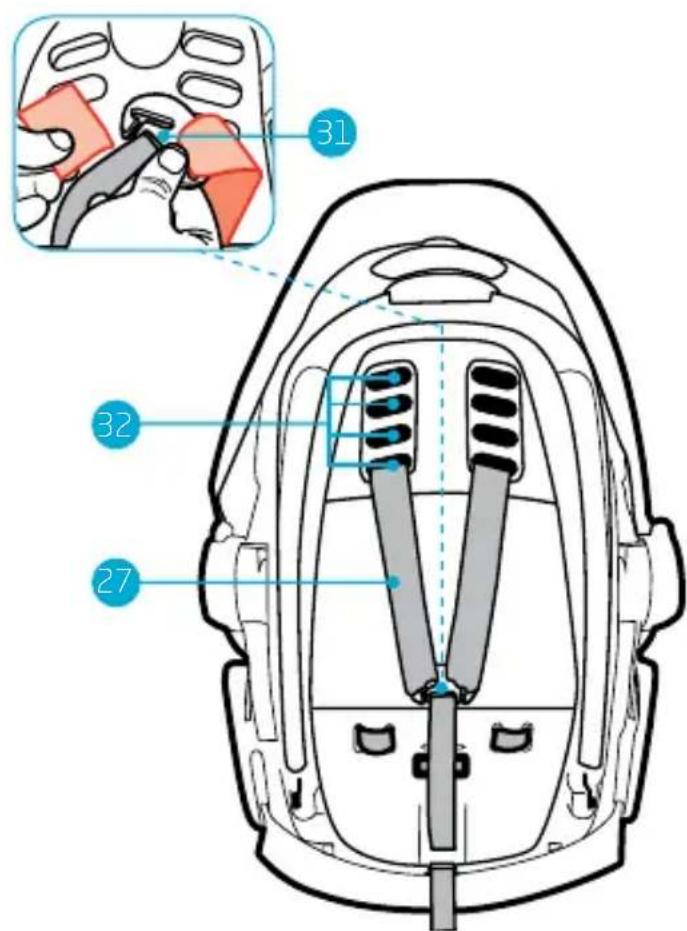
- Infant head insert
- Harness covers (x2)
- Harness straps (x2)
- Buckle
- Buckle cover
-
Buckle strap
-
Splitter plate
- Harness slots (x8)
Components list
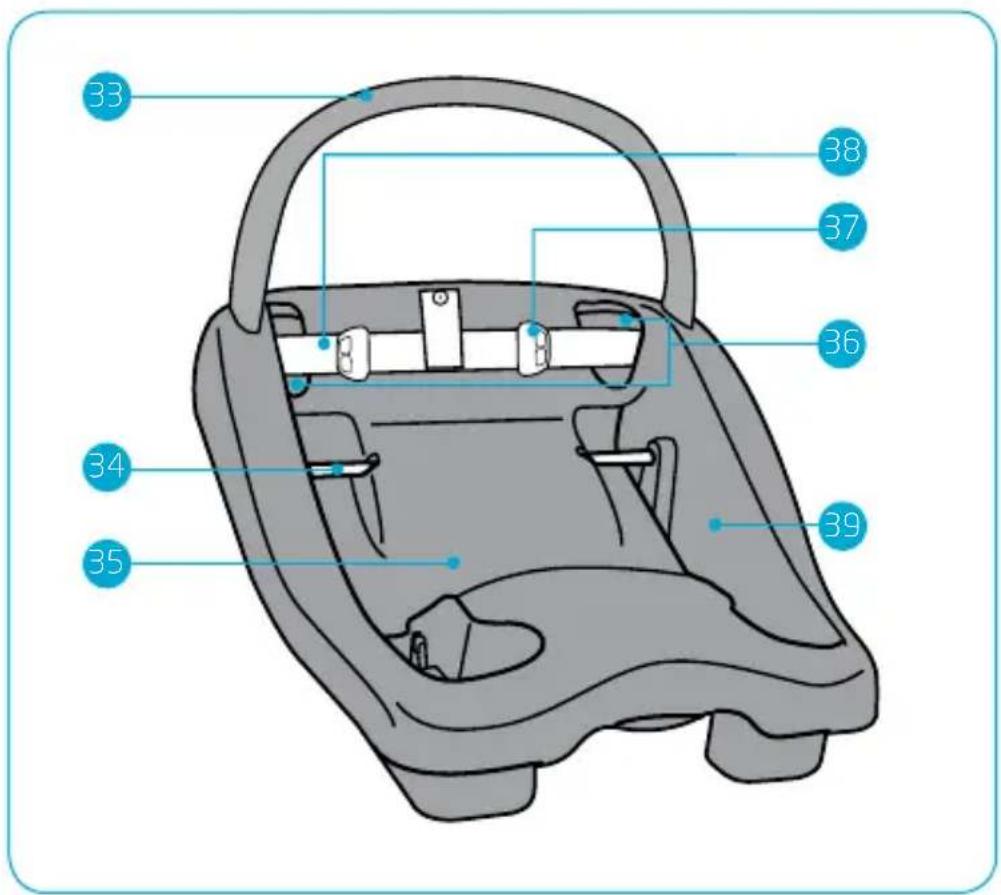
- Stabilising bar
- Locking bar
- Base
-
Base belt path opening (x2)
-
Tension indicators (x2, if fitted)
- Connector strap (if fitted)
- ISOGO lower connector storage point (located under base x2)
Vehicle information
Location of anchor fitting
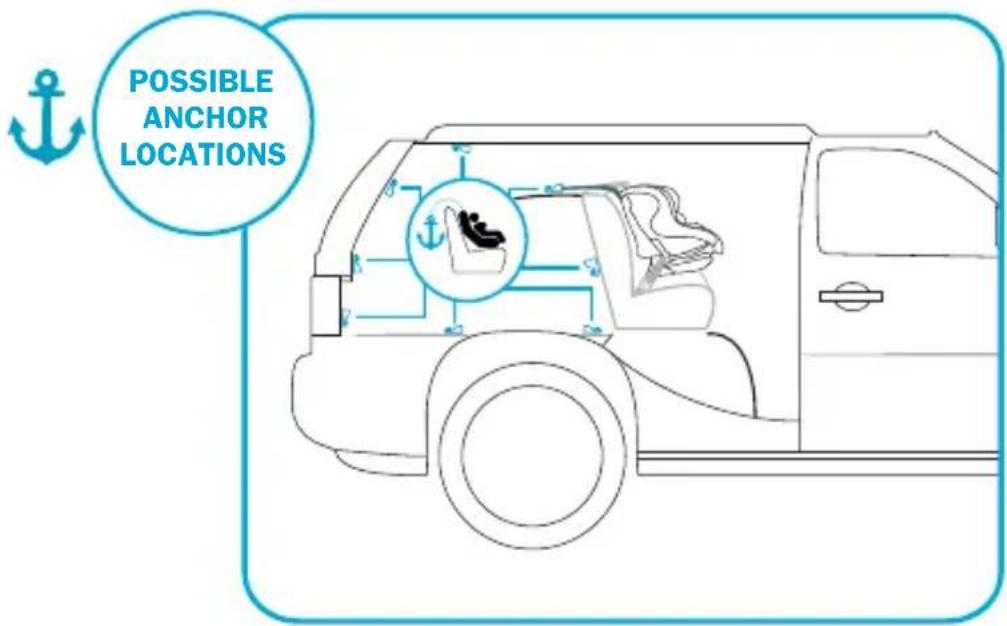
NOTE :
- The anchor point can be found in different locations in different cars. The illustration above shows possible locations of anchor points. Sometimes it is on the parcel shelf in sedans, and on the floor area in station wagons, vans and hatchbacks. Make sure that you do not confuse the luggage hook in the back of a station wagon with anchor points. Refer to your owner's manual.
- An extension strap may be needed for vehicles without a fixed parcel shelf. Extension straps and extra fittings are available from various stores.
| Extension straps 300mm ref no. 014398 Extension straps 600mm ref no. 014399 |
| Anchor bolt kit ref no. 014400 Locking clip ref no. 014401 |
Vehicle information
Anchorage fitment check
Child restraints must be used correctly to provide proper protection for your child. The anchorage system on child restraint must be used in the correct way.
| INSTALLATION | CORRECT Make sure there is no slack in the top strap and the attachment clip is upright in the anchorage fitting. | I NCOR The clip must not lie flat on the anchorage fitting. |
| Figure 1. Anchorage in vertical panel at rear of vehicle | ||
| Figure 2. Floor mounted anchorages |
Vehicle information
Upper anchorage installation
FOR CARS FITTED WITH A CHILD RESTRAINT UPPER ANCHORAGE POINT
Locate the upper anchorage point behind the rear seating position (consult the car owner's handbook for the location of the upper anchorage point).
Remove the thread plug from the parcel shelf/floor/roof and install the attachment bolt as shown in Figure 1.
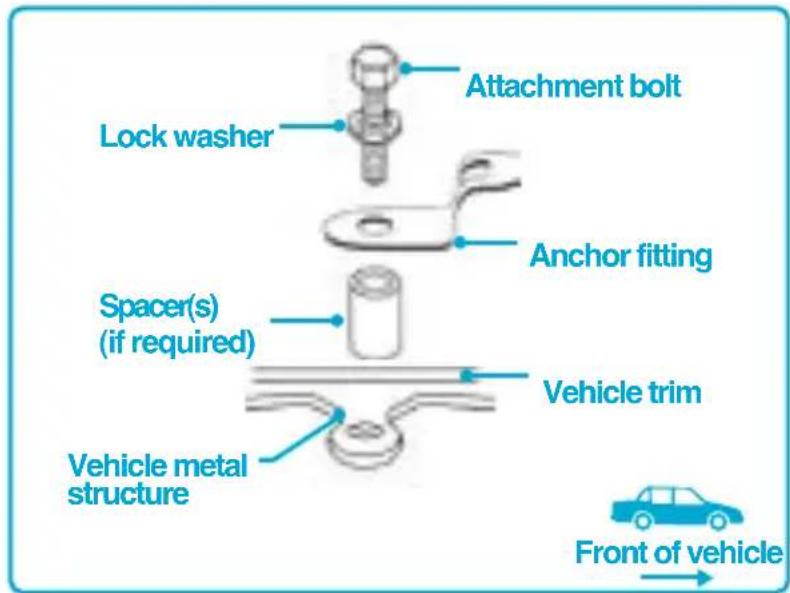
Figure 1
CAUTION: DO NOT OVERTIGHTEN THE ATTACHMENT BOLT. MAXIMUM TORQUE 20 Nm.
Vehicle information
Upper anchorage installation for sedans only
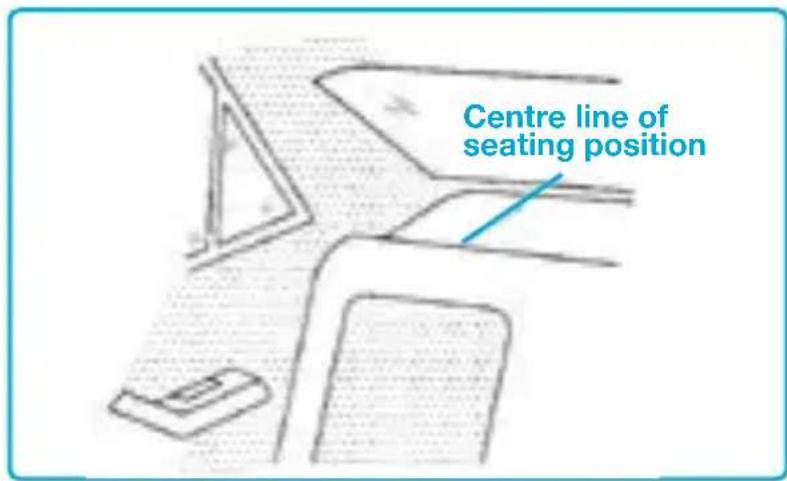
Figure 2
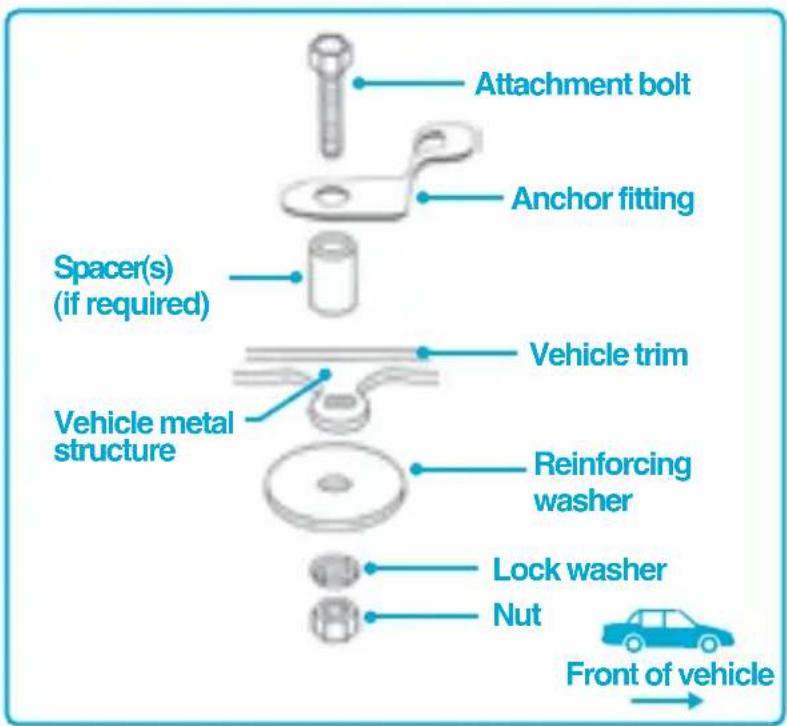
Figure 3
Vehicle information
Upper anchorage fitting installation
For sedans only
Drill a 9mm diameter hole in the parcel shelf on the centre-line of the seating position as shown in Figure 2 (as shown on page 15). Install the anchor bolt as shown in Figure 3 (as shown on page 15). It is recommended that this installation be carried out by a child restraint fitting station or licenced motor mechanic.
For vehicles other than sedans
In Australia, consult your nearest child restraint fitting station or traffic authority for vehicle inspection to find the best, correct position for the placement of the upper anchorage point, and for the correct attachment bolt length and use of spacers. In New Zealand, consult the agent for the vehicle.

WARNINGS
CHILD RESTRAINTS MUST NOT BE ATTACHED TO UNSOUND METAL OR TO WOOD, OR SYNTHETIC STRUCTURES. WHEN DRILLING THE 9mm HOLE DO NOT DRILL THROUGH FUEL LINES, FUEL TANKS, ELECTRICAL WIRING, OR RADIO SPEAKERS. WEBBING STRAPS MUST BE PROTECTED FROM SHARP CORNERS AND EDGES.
THE ANCHOR FITTING MUST BE USED ONLY AS DESCRIBED ABOVE. IT MUST NOT BE HOOKED ONTO ANY OTHER OBJECT.
Vehicle information
Seat to vehicle positioning
Vehicle information
Vehicle seat location requirements
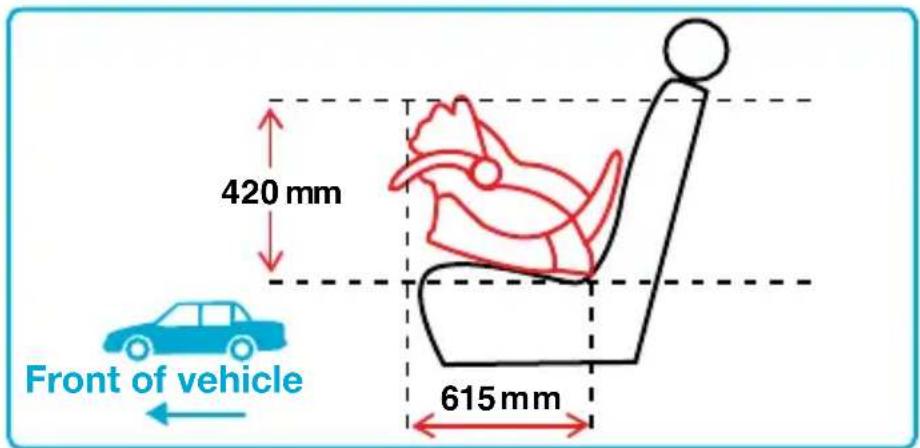
Some seating positions in your vehicle may NOT be safe for this safety seat. Some vehicles do not have any seating positions that can be used safely with the seat. If you are not sure where to place the infant seat in your vehicle, consult your vehicle's owner's handbook.
Vehicle seat location requirements:
Children are safer when properly restrained in rear vehicle seating positions. Whenever possible, secure the infant seat in the centre position of the seat directly behind the front seats.

WARNING
- IMPROPER PLACEMENT OF THE SAFETY SEAT INCREASES THE RISK OF SERIOUS INJURY OR DEATH.
NOTE: Check the measurements between the front of the seat back of the rear seat and all front seats in the car in which the child restraint is intended to be used, to ensure that the space is sufficient.
Vehicle information
Angle configuration for the seat
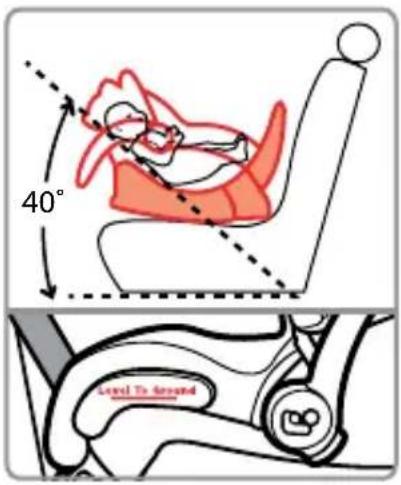
- Position seat ensuring that the angle is no greater than 40^ from horizontal plane. This position is necessary for the even distribution of forces during possible impact.
- Angular adjustment is achieved by adjusting the base. Make sure the line indicator is level to ground (refer to page 21).

WARNINGS
- DO NOT install convertible child restraints excessively reclined, ensure the angle is no greater than 40^ .
- DO NOT adjust harness or tether strap hardware such that it sits too close to the occupant.
- Ensure that correct seatbelt path is used and that the restraint is installed in the correct direction for rearward-facing application. Refer to page 31.
- DO NOT wrap baby in a blanket or swaddled as infant can be ejected and killed in an accident.
- Ensure the harness fits the baby firmly.
- Ensure that any blanket or other covering may only be placed over the harness after the harness is adjusted firmly.
- The infant's legs and arms are not to be bound or wrapped together.
• Always adjust the height of the shoulder straps as the child grows.
Operation and adjustment
Shoulder height marker
natural_image
Illustration of a baby in a car seat with red arrows indicating pressure or force vectors (no text or symbols)LABEL 1
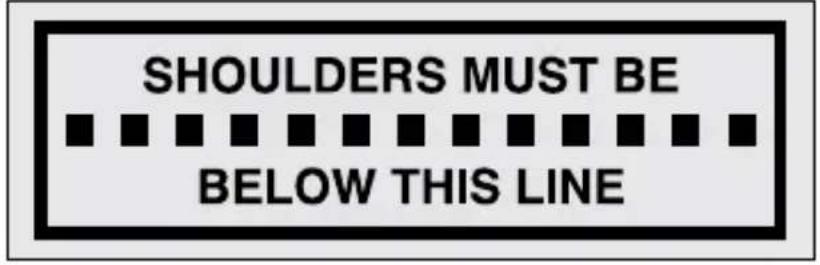
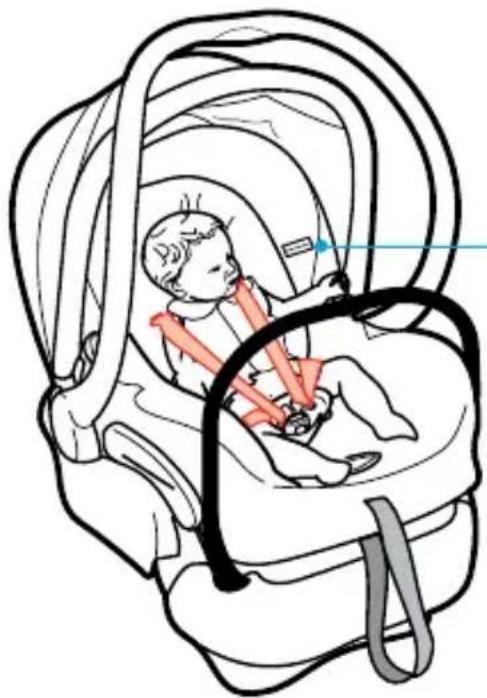
The child restraint is not suitable for the child when the child's shoulders are above the shoulder height maker.

WARNINGS
- To be used only in a rearward-facing position until the infant's shoulders reach the shoulder height marker (approximately 6 months of age).
- Continue to use this infant restraint until the child reaches this limit. Infants are at risk of serious injury if they face forward too early. For information regarding the next seat for your child, refer to page 57.
- The child restraint is not suitable for the child when the child's shoulders are above the shoulder height marker.
NOTE: If the baby's neck muscles are unable to support their head, then the child should remain rear facing.
Operation and adjustment
Preparing infant seat to fit your child

NOTE: You MUST make these adjustments before you install the child restraint in the vehicle.
- Place the child restraint in the car and see if seat is level to ground.

natural_image
Illustration of a human head with arrows indicating pressure or movement (no text or symbols)- If the base needs adjusting, remove the seat from the base by squeezing the seat release lever, then lift the seat up and off the base.

natural_image
Illustration of a baby car seat with red directional arrows indicating movement or force (no text or symbols)- Squeeze the base adjustment handle and either lift or lower front of base to the desired position.
Operation and adjustment
Preparing infant seat to fit your child (cont'd)

natural_image
Illustration of a car seatbelt with a hand adjusting the seatbelt and a red arrow indicating motion (no text or symbols)- Align the slots on the side of child restraint with the locking bars in the base.
- Push down firmly on the carrying handle and front of the child restraint will lock to the base.
LISTEN FOR CLICK.

natural_image
Medical illustration showing a hand performing a catheter insertion into a patient's seat, with red arrows indicating force direction (no text or symbols present)- To loosen harness, push down and hold on the harness release lever (under flap - see page 8).
- Pull on one harness strap or both harness straps simultaneously while pressing down on the harness release lever.
natural_image
Anatomical illustration of a human head with a red arrow indicating a specific anatomical feature (no text or labels present)
natural_image
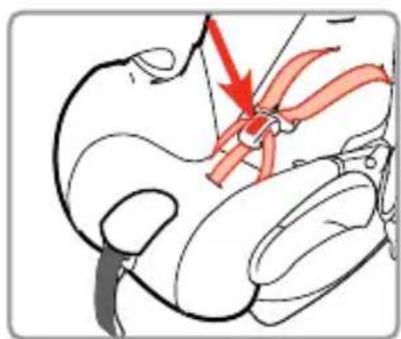
Illustration of a person climbing a rope, no text or symbols present- Press red button to undo buckle.
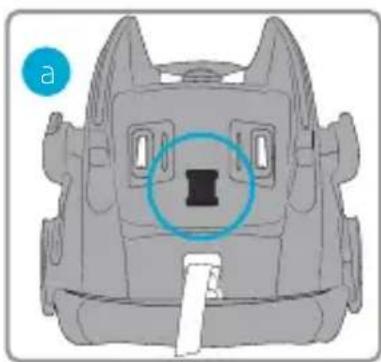
• Pull buckle tongues out. - Stretch belt tongues to magnetic holders on the left and right side of the capsule, to snap them into place (figure a).
Operation and adjustment
Preparing infant seat to fit your child (cont'd)
natural_image
Illustration of a person lying in a car seat with a blue and red line indicating motion or movement (no text or symbols)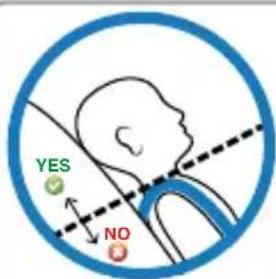
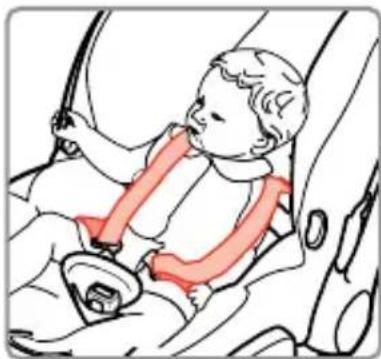
Check harness height. The shoulder straps must be in the slots which are nearest to the child's shoulders, but not lower than the child's shoulders.
natural_image
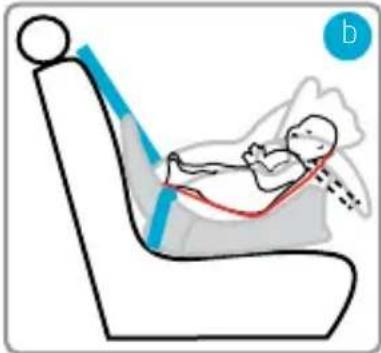
Illustration of a baby wearing a red safety belt inside a car seat (no text or symbols)- Child should be in rearward position as shown in figure b.
- Place the child's bottom and back flat against the child restraint. This will increase comfort and allow the harness straps to be properly tightened.
- To change the harness height, determine which set of harness slots works best for your child and adjust if needed.
- Always adjust the height of the shoulder straps as the child grows.
natural_image
Diagram showing two gray rectangular shapes with red arrows pointing outward from a black curved line, no text or symbols present.Operation and adjustment
Preparing infant seat to fit your child (cont'd)

natural_image
Illustration of a hand pressing down on a car seatbelt with a red mark indicating the grip (no text or symbols present)- If harness adjustment is required, locate splitter plate at rear of seat.

natural_image
Illustration of hands using a tool to adjust or install a component, with no visible text or symbols.- Remove harness straps from splitter plate at rear of seat.
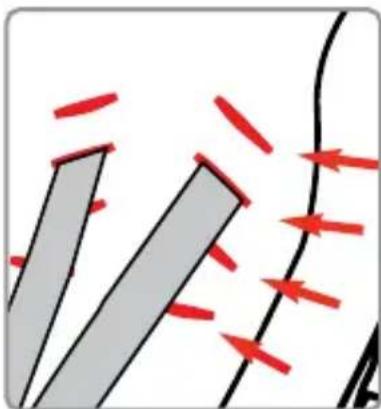
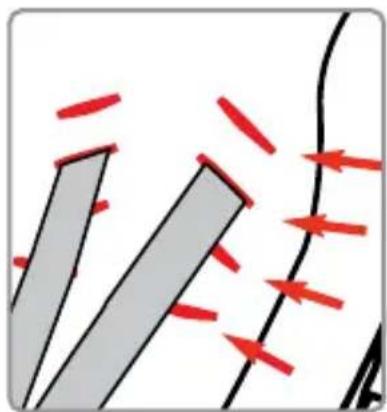
- Pull harness through the harness slots from the front.
natural_image
Diagram showing two gray bars with red arrows pointing outward from a black line, no text or symbols present- Re-thread harness into new harness guide locations.
NOTE: Do NOT use shoulder straps of unequal heights. Straps must be threaded through the same slot level for the trim and seat.
Operation and adjustment
Preparing infant seat to fit your child (cont'd)

natural_image
Illustration of a hand using a tool to adjust or install a component, with no visible text or symbols.- Refit harness to splitter plate.
NOTE: Make sure harness is securely on and there are no twists.
- Place child in the restraint and position harness straps over the child's shoulders.
natural_image
Front view of a vehicle head panel with a highlighted internal component (no text or symbols)Crotch buckle adjustment
- The carrier is supplied with the buckle length in it's shortened state, which is suitable for smaller children.
- To extend, flip carrier over to expose the underside and subsequent straps. They should appear as shown in figures a and b.

natural_image
Simple line drawing of a train interior with windows and a red box (no text or symbols)Operation and adjustment
Preparing infant seat to fit your child (cont'd)

natural_image
Illustration of a hand inserting a plug into a seatbelt, with a red arrow indicating the insertion direction (no text or symbols present)- From under the upholstery, turn and slide buckle's metal retainer back through the shell, extending the buckle's length.

natural_image
Diagram of a car interior with a red arrow pointing to a button, no text or symbols present- The metal retainer should now intersect with the under surface of the shell (as show in figure c).
- From other side, pull on buckle to check to make sure buckle's metal retainer is correctly inserted through the trim and shell.

NOTE: It is recommended the buckle be extended when the child's shoulder's reach harness slots, 3 or 4 as show in figure d.
Operation and adjustment
Preparing infant seat to fit your child (cont'd)

natural_image
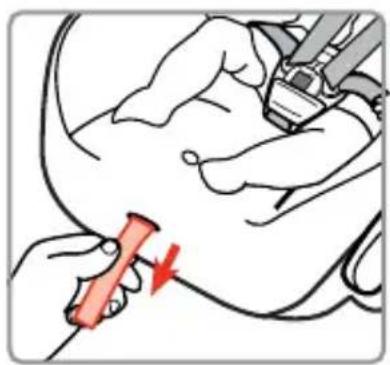
Illustration of a baby wearing a red seatbelt and belt, seated inside a car (no text or symbols)- To tighten the harness, fasten buckle and listen for the click when the second tongue goes in.
NOTE: When using the buckle please note that you will not hear a click when the first tongue goes in, it is only on the second tongue.
natural_image
Illustration of a medical procedure showing a hand holding a needle inserted into a patient's abdomen, with no visible text or symbols.- Pull the adjustment strap at the front of the seat until the harness belt lies firmly against the child.

WARNING
• DO NOT LEAVE CHILDREN UNATTENDED IN THE CAR.
Operation and adjustment
Preparing infant seat to fit your child (cont'd)
natural_image
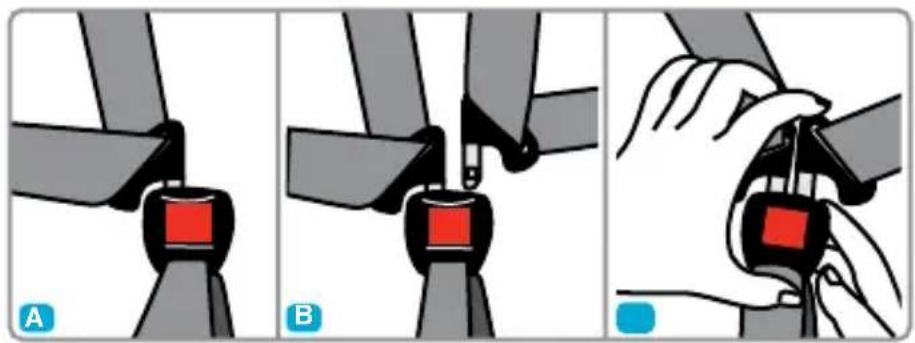
Three-step diagram showing a hand fastening a red button on a seatbelt, labeled A, B, and C (no text or symbols present)A Insert one buckle tongue as shown above.
B Insert the second buckle tongue as illustrated above.
C Press both tongues simultaneously. Listen for click.
NOTE: Remember to always pull up on the harness straps to make sure buckle is locked. Click will sound when both clips are engaged.
Operation and adjustment
Preparing infant seat to fit your child (cont'd)
NOTE: A firm strap should not allow any slack. It lies in a relatively straight line without sagging. It does not press on the child's flesh or push the child's body into an unnatural position.

natural_image
Illustration of hands using a tool to adjust or install a component, no text or symbols present- The end of the harness adjustment strap has a loop. Slide one side of the loop onto one tab and the other end on the other tab.
- Replace the trim cover over the front of the shell.
natural_image
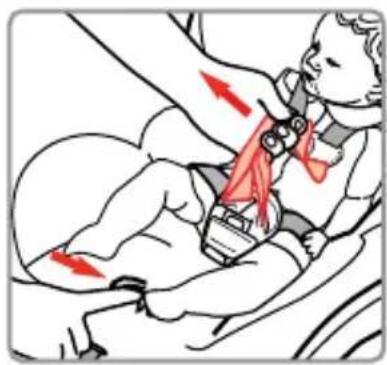
Illustration of a baby wearing a seatbelt with red arrows indicating pressure or force (no text or symbols)Removing child from child restraint
- To loosen, push down on the harness release lever (under flap on the front of child restraint), while pulling on both harness straps above the buckle.

natural_image
Illustration of hands adjusting a seatbelt with a red square button (no text or symbols)- To unbuckle, press red button on buckle to release the buckle tongues.
- Stretch belt tongues to magnetic holders on the left and right side of the capsule, to snap them into place.
Operation and adjustment
Adjusting handle

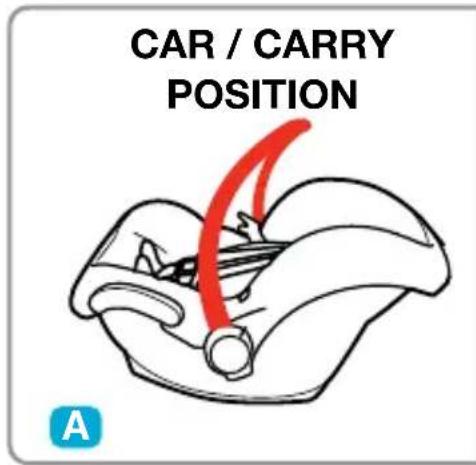
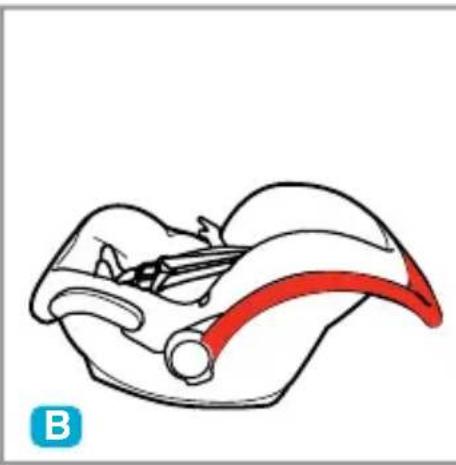
- The carrying handle has 3 positions. To adjust handle, press both adjustment levers on each side of handle. Rotate up or down to desired location.
- Release levers. Listen for click.
• Make sure both sides are locked into place.
natural_image
Anatomical illustration of a human ear with a red highlighted area, labeled 'B' in the corner (no text or symbols on the diagram itself)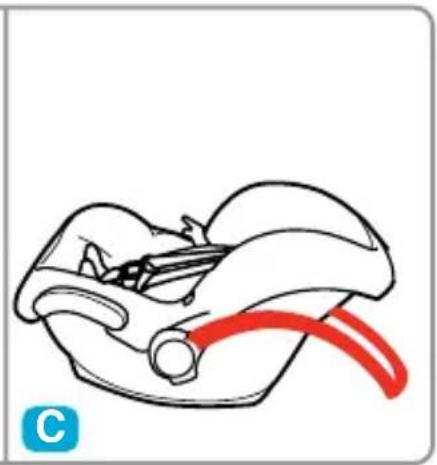
natural_image
Line drawing of a car seat with a red ribbon cable (no text or symbols)
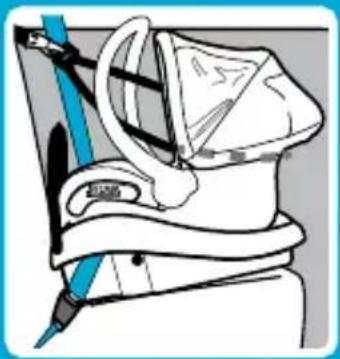
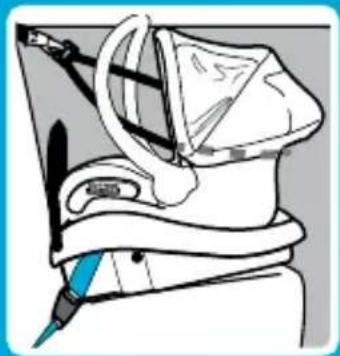
REARWARD FACING BELT PATH
REARWARD-FACING (Newborn to 6 months)
OPTION 1
LAP SASH BELT PATH
natural_image
Illustration of a medical device with a blue tool inserted, no visible text or symbols
natural_image
Abstract circular graphic with white fan-like shape and black background (no text or symbols)OPTION 2
LAP BELT PATH
natural_image
Illustration of a medical device with a bag and cap, no visible text or symbols
natural_image
Simple icon of a white wrist strap with a black handle, enclosed in a white circle on a black background (no text or symbols)NOTE: There is an option to install seat using a seatbelt with an accessory locking clip. Please see instructions provided with locking cliup for installation.
Installation
Lap sash and lap base installation


PREPARING TO INSTALL BASE WITH VEHICLE BELTS

WARNINGS
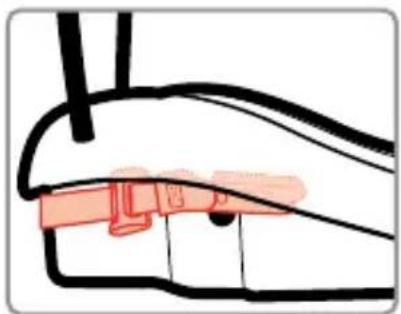
- Do not use the lower connectors along with the vehicle lap or lap/shoulder belt. Store lower connector strap when using the vehicle belts.
- Check the vehicle belt before each use. Use only if the belt is tightened properly and securely.
- Failure to follow these warnings can result in serious injury or death.
- Failure to securely attach child restraint to base can result in serious injury or death.

- Using level to ground line as a guide, select the base recline which is best suited for your vehicle. Refer to page 21 for base adjustment.
natural_image
Anatomical illustration of a human head and neck with a highlighted surgical instrument (no text or labels)IF FITTED WITH LOWER CONNECTORS:
- You MUST store the lower connector strap when using the vehicle seat belts. Store strap by connecting the lower connectors to side of base as shown.
Installation
Lap sash and lap base installation


INSTALLING BASE WITH VEHICLE BELTS
natural_image
Line drawing of a baby car seat with blue markers indicating points of interest (no text or symbols)
REARWARD FACING BELT PATH
natural_image
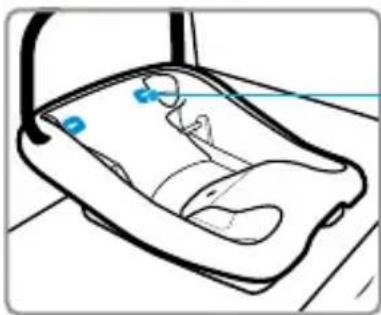
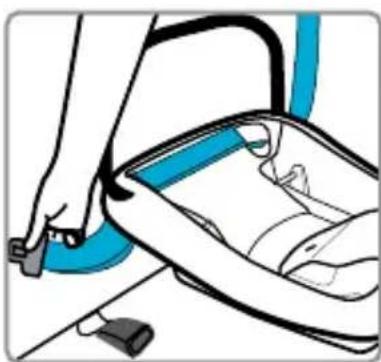
Illustration of a hand using a blue tool to lift a car seatbelt (no text or symbols visible)- Install base facing backwards, with the stabilising bar against the back of the car seat.
- Thread the vehicle lap or lap/shoulder belt combination through belt path as shown.
- Thread the vehicle lap or lap/shoulder belt combination through belt path as shown.
- Buckle vehicle belt. Push down firmly on the base and pull up on the belt to tighten. Pull up on shoulder strap to remove any slack.

natural_image
Illustration of a person using a blue tool to lift a seatbelt (no text or symbols visible)Installation
Lap sash and lap base installation
natural_image
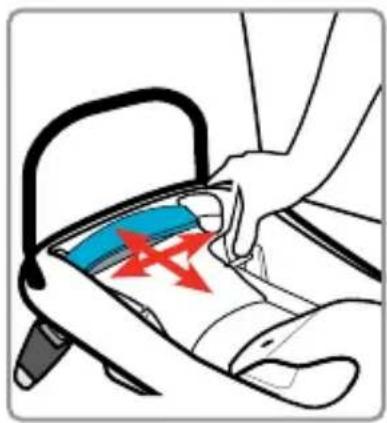
Illustration of a person performing CPR on a car seat with red arrows indicating pressure point (no text or symbols)- With weakest hand at belt path, tilt and push the base forward and back, and from side to side.
- If the seat belts do not loosen, your child restraint should be secure.
NOTE: Some movement from front to back or from side to side is acceptable.
natural_image
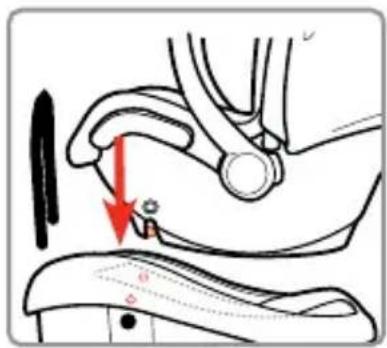
Medical illustration showing a hand holding a device with a red arrow pointing to a small object, no text or symbols present.- With child secured in child restraint, attach to base.
- Align the slots on the side of child restraint with the locking bars in the base.
- Push down firmly on the carrying handle and the front of the child restraint to lock child restraint to base. You will hear a click when it is locked.
- Pull up on child restraint's front two corners to make sure the front of the child restraint is locked to the base.

TOP TETHER INSTALLATION
REARWARD-FACING (Newborn to 6 months)

natural_image
Illustration of a medical device with blue and red safety belt (no text or symbols)Installation
Two-piece top tether strap fitment

natural_image
Line drawing of a helmet with red motion lines indicating airflow or movement (no text or symbols)- Attach the hook to anchor in vehicle.
- Adjust tether strap to remove slack in strap (Pull on free end of webbing to tighten).
• Make sure the base is not lifted from the car seat.

natural_image
Line drawing of a car seatbelt with red safety belt and seatbelt (no text or symbols)NOTE: Do not use canopy extension feature during vehicle operation or when top tether is in use.
CAUTION: CHILDREN CAN BE INJURED OR RESTRAINTS AND TOP TETHER STRAP DAMAGED BY UNSECURED CARGO IN A COLLISION. SECURE OR REMOVE HAZARDOUS CARGO BEFORE USING THIS CHILD RESTRAINT.

WARNINGS
- Always secure the loose end of the top tether strap to prevent it hanging out of the car or being accessible by the child.
- When not in use, fold hanging tether strap and place in the storage pocket provided.
Installation
Removing seat and detaching top tether strap

natural_image
Illustration of a black cable with attached fasteners (no text or symbols)- Loosen the top tether strap using the adjuster and unhook the top tether strap from the loop section.
- Leave the tether attached to the anchor point in car.
natural_image
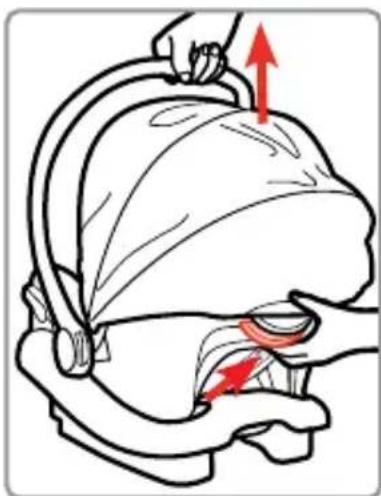
Illustration of a human head with a hand holding a medical device, showing anatomical positioning and red arrows indicating force or movement (no text or symbols present)- From the back of the child restraint, slide the base release handle up the back of the child restraint and lift the restraint out of the base.
NOTE: When not in use, fold top tether strap and place in the storage pocket provided.
Installation
Storing tether strap
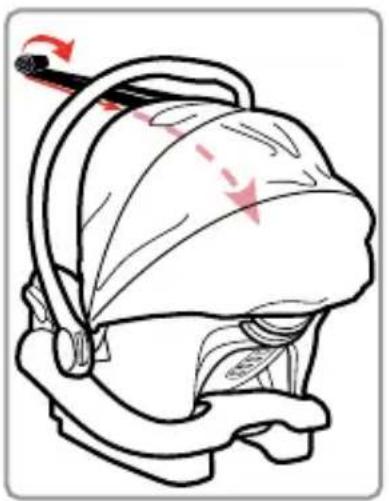
natural_image
Illustration of a person wearing a helmet with motion arrows indicating movement (no text or symbols)- After detaching the top tether strap, roll the loop tether strap back towards the child restraint, and store it in the storage pocket located at the rear of the shell.
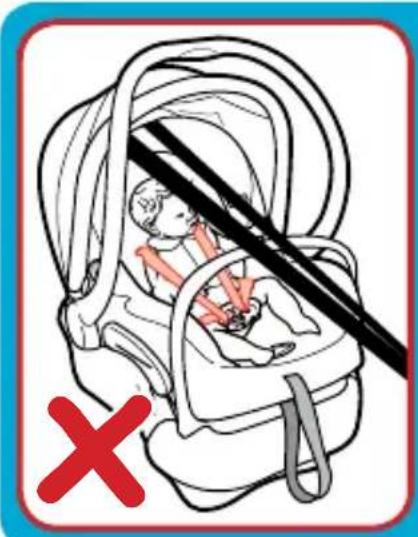

natural_image
Illustration of a baby in a car seat with a diagonal cord, no text or symbols presentWhen removing the loop tether strap from the storage pocket, DO NOT pull the strap directly across the child restraint. Instead, be sure to evenly spread the loop tether around the side, in line with the shoulder height markers.
Installation
Storing instruction manual

natural_image
Line drawing of a mechanical component with red arrows indicating parts (no text or symbols)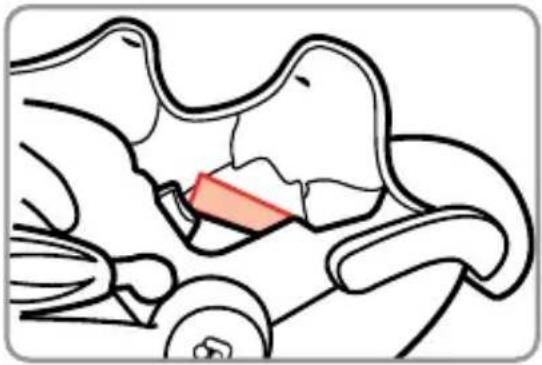
natural_image
Anatomical illustration of a human head and neck with a highlighted red area (no text or labels)- Unhook the cover form the two pins moulded onto the seat as shown, then repeat for alternative side.
- Unfold the trim from the front of the capsule, folding it towards the back, exposing the buckle strap.
- Place instruction manual in the plastic pocket provided. Then slide both under the trim in front of the buckle.
- Re-attach the trim in reverse order once instruction manual is stored.
Lower connectors installation
(if fitted)

natural_image
Line drawing of a car seat with a helmet and seatbelt, no text or symbols presentLOOK FOR THESE SYMBOLS FOR ATTACHMENT IN VEHICLE

ISOFIX

WARNINGS
- Never place a child rear-facing in a seating position with an active frontal airbag. This can result in serious injury or death.
- This child restraint must always face the rear of the vehicle when installed.
Lower connectors installation
(if fitted)

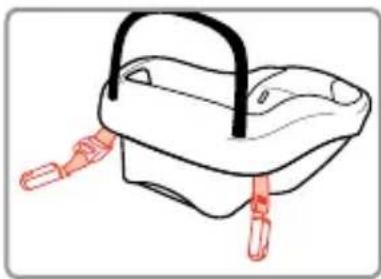
PREPARING TO INSTALL BASE WITH LOWER CONNECTORS
natural_image
Line drawing of a handbag with attached straps (no text or symbols)- Unhook lower connectors on both the right and left side of the base by pressing the red release button on each connector.

natural_image
Medical illustration showing a hand placement on a car wheel (no text or symbols present)- Using level to ground line as a guide, select the base recline which is best suited for your vehicle. Refer to page 21 for base adjustment.
Lower connectors installation
(if fitted)

PREPARING TO INSTALL BASE WITH LOWER CONNECTORS
See your vehicle owner's manual for information on designated lower connector positions, anchor locations and anchor weights.

WARNINGS
- Do not use the lower connectors along with the vehicle lap or lap/shoulder belt.
- Check lower connector strap before each use. Use only if the strap can be tightened properly and securely.
- Failure to follow these warnings can result in serious injury or death.

natural_image
Illustration of a baby washing machine with a hand holding the tray (no text or symbols)- Centre the base between the vehicle anchors in the chosen seating position.
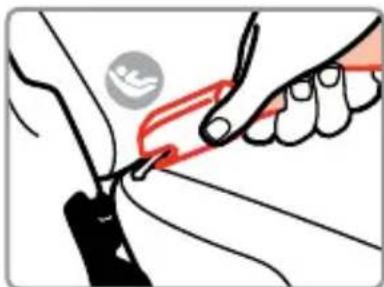
natural_image
Illustration of a hand holding a tool with a red outline, showing a close-up of the tool (no text or symbols present)- Fasten one lower connector to the anchor in the vehicle seat located in the recess of the upholstery. Repeat for the other side of base.
Lower connectors installation
(if fitted)
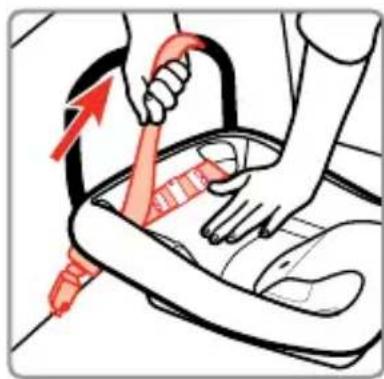
natural_image
Illustration of a person using a tool to lift or lift a cup, with no visible text or symbols- Push down firmly on the base and pull up on the free end of belt to tighten. The tension indicator will display green when tight.
- Grasp the base at the belt path with one hand. Push and pull the base from side to side, forward and back. The base should be locked into a firm, snug fit with little movement.

NOTE: Some movement from front to back or from side to side is acceptable.
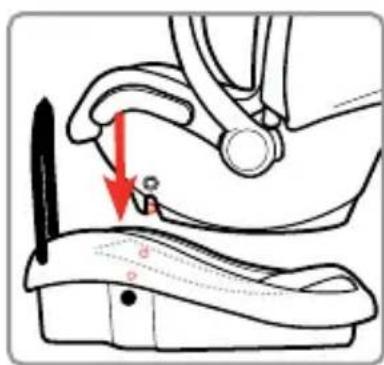
- With child secured in child restraint, attach to base.
- Align the slots on the side of child restraint with the locking bars in the base.
- Push down firmly on the carrying handle and the front of the child restraint to lock child restraint to base. You will hear a click when it is locked.
- Pull up on child restraint's front two corners to make sure the front of the child restraint is locked to the base.
- Attach top tether strap (page 35).
natural_image
Illustration of a car seatbelt buckle with a red arrow indicating a point of interest (no text or symbols present)
AIRCRAFT INSTALLATION

natural_image
Green airplane icon inside a rounded square frame (no text or symbols)This Child Restraint System meets the standards for use in aircraft as recommended by the Civil Aviation Safety Authority of Australia and Civil Aviation Authority of New Zealand.
Only to be used on aircraft with permission of the aircraft operator, pilot and crew.
SUITABLE FOR REAR FACING USE
The top tether strap is not required to be used onboard aircraft and should be stowed securely.
This compliance label represents the products suitability for installation into an aircraft using a rearward facing position.
Aircraft installation
Notes before install

Please note before installation
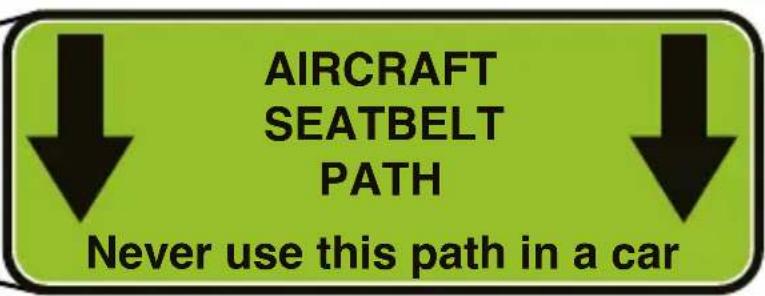
- Never use this belt path in a car.
- Child restraint must be used in accordance with the air craft procedures and any directions from crew.
- Inform air craft operator that a child restraint intends to be used as they may not be suitable for specific air crafts.
- The infant carrier may not fit in smaller air crafts.
- If the use of carrier is intended for the use in countries other than AUS and NZS, consult with local authorities, car hire companies, car insurance companies etc. for advice. The child restraint may not be acceptable for use in all cars.
- Infant carrier to be installed without base. It is recommended it be checked in with baggage (for use after flight).
- The child restraint's top tether strap is not required when used on board an air craft.
- Do not use this restraint with an aircraft seat belt that contain air bags. The aircraft operator may replace them.
Aircraft installation
Fitting the carrier to the aircraft seat

As the top tether is not required in this installation process, please refer to page 38 for instructions on how to store your top tether strap.
natural_image
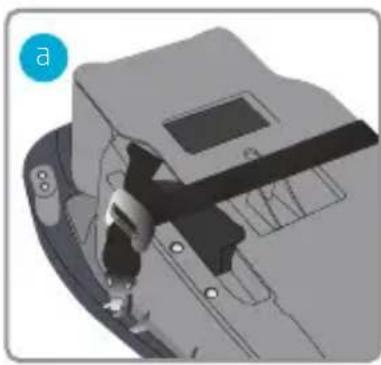
Illustration of a person operating a machine with control panel and buttons (no text or symbols)- Remove top tether extension from car and clip each end onto the ISOGO lower connector storage points as shown in (figure a).
- Tighten top tether strap (as detailed on page 36) so that the connecting strap is firm to the base.
- Tighten ISOGO lower connectors (as detailed on page 43) until the belt path is exhausted.
- Position the carrier rearward facing. Ensure the carrier is aligned centrally with the seat position. Folding the arm rests upwards could facilitate the installation of your carrier.
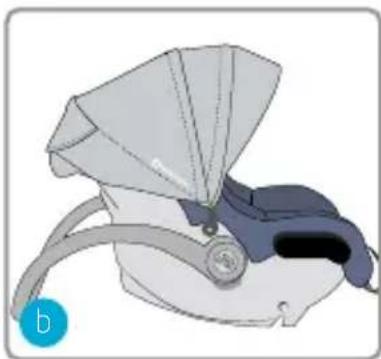
- Pull back cover on the side (figure b). to reveal AIRCRAFT SEATBELT PATH label marked in green.

Note: Never use this path in a car.
Aircraft installation
Fitting the carrier to the aircraft seat

natural_image
Illustration of a medical or laboratory device with a funnel and tubing (no text or symbols)- Ensure handle is placed in the "non-rocking" position (figure b). Refer to page 30 for a detailed explanation regarding this function.
- Lengthen the lap belt to full capacity (it may be necessary to use an extension strap to better position the aircraft buckle). Make sure the belts are not twisted.

natural_image
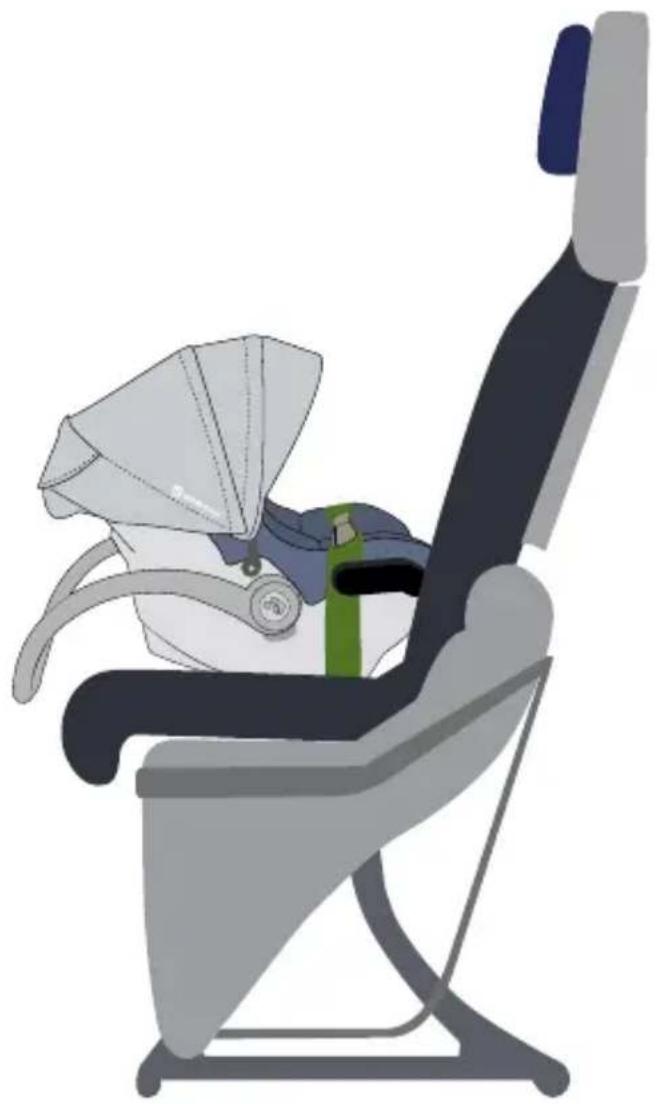
Illustration of a baby seatbelt with red and green arrows indicating movement or force (no text or symbols)- Feed the lap belt into the AIRCRAFT REARWARD-FACING BELT PATH ensuring the lap part is threaded through the belt path as shown (figure c). on each side. Engage lap belt buckle and tongue.

natural_image
Illustration of a blue car seatbelt with a green belt and red arrow indicating direction (no text or symbols)- To fasten belt and secure capsule, press down on the carrier firmly and pull aircraft belt strap to tighten. Ensure the capsule is fastened correctly and firmly.
Aircraft installation
Fitting the carrier to the air craft seat

natural_image
Illustration of a passenger seatbelt seat with a bag partially inserted, no text or symbols presentImage represents final state of installation
Covers and accessories

natural_image
Anatomical illustration of a human head with two red arrows indicating specific muscle or vascular structures (no text or labels present)NOTE: Before fitting covers, remove harness from splitter plate (see page 24).

natural_image
Simple line drawing of two red cone shapes on a curved surface, no text or symbols present- Thread harness straps through the harness pads.
- Place infant head insert over harness slots, aligned with the appropriate slot for your child's shoulder height (see page 23).
- Fit end of infant head insert through band on other side, securing the loop.
- Thread harness straps through slots on infant head insert, and continue through harness slots on capsule.
- Thread harness buckle through buckle cover, ensuring that the largest side is facing the child's crotch.
- Tuck end of buckle cover in through buckle slot, securing the cover in place.
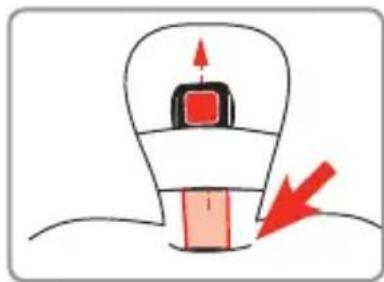
natural_image
Simple line drawing of a light bulb with a red square on top and a red arrow pointing downward (no text or symbols)NOTE: Refit splitter plate before continuing (see page 25).
Canopy use
Installation and removal of canopy
natural_image
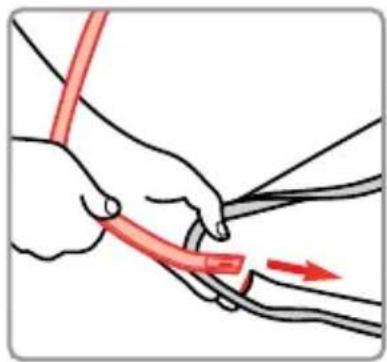
Illustration of a hand holding a red cable with a red arrow indicating direction (no text or symbols)- The canopy hoop has an angle that will make the canopy lean forward when installed. Make sure when you thread the canopy hoop, the angle is correct.
- Thread plastic strip completely through channel on the front edge of canopy
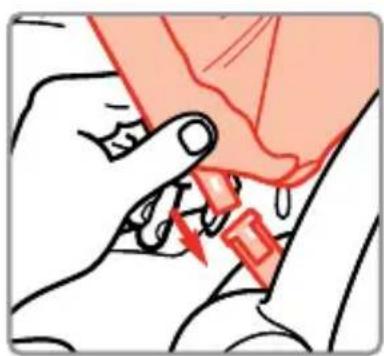
- Snap each plastic strip end to each canopy post.
• Fit back of canopy over back of shell. - Thread canopy hoop through canopy elastic loop.
- Stretch canopy loops over canopy posts.
natural_image
Illustration of a hand using a red tool to press down a small object, no text or symbols present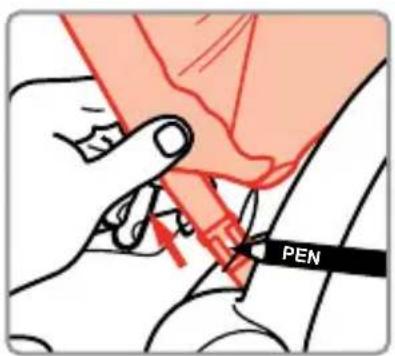
- To remove canopy: Use a pen or any pointed object to push the small tab as illustrated and simultaneously pull the plastic strip.
Canopy use
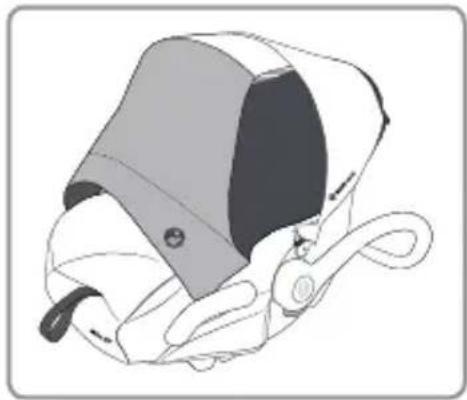
Canopy hood extension

- Unzip canopy to full extent.
- Pull forward canopy extension visor towards the front of the capsule until the magnet fasteners snap into place (figure a).
- For increased airflow, raise the canopy window at rear of capsule (figure b).
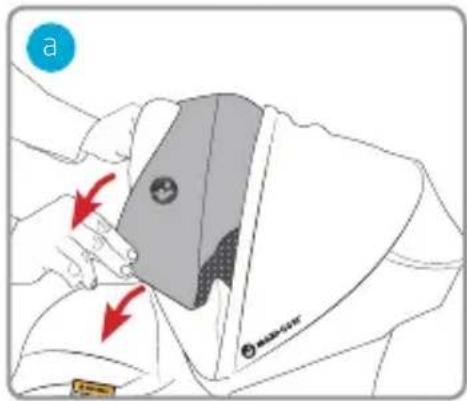
NOTE: Canopy extension MUST not be used when vehicle is in operation.
natural_image
Technical line drawing of a mechanical device with no visible text or symbols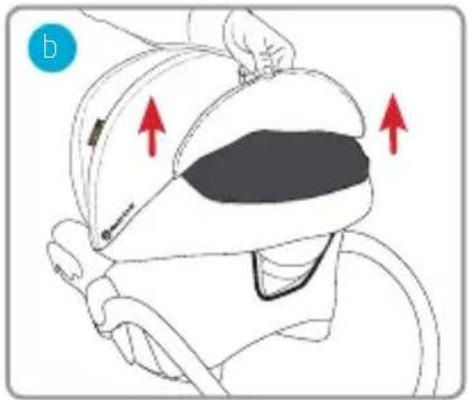
natural_image
Illustration of a person wearing a cap with red arrows indicating movement or force (no text or symbols)Care and cleaning
Remove seat cover for cleaning

natural_image
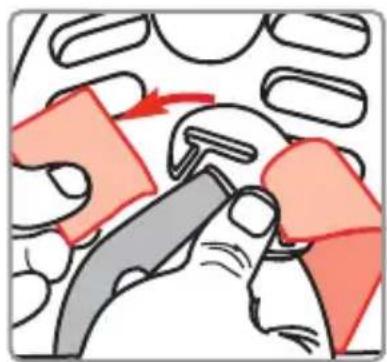
Illustration of a person's seatbelt with red arrows indicating pressure or movement (no text or symbols)- Push down and hold on the on the harness release lever (under flap - see page 8).
- Pull on one harness strap or both harness straps simultaneously.
natural_image
Illustration of hands using a tool to adjust or install a component, with no visible text or symbols.- Remove harness straps from splitter plate at rear of seat.
natural_image
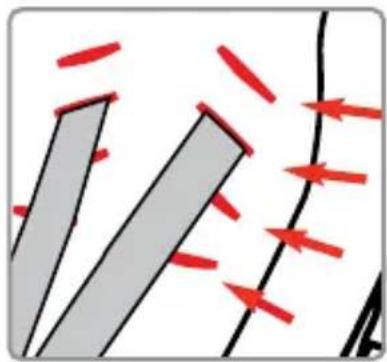
Diagram showing two gray rectangular shapes with red arrows pointing outward from a black curved line (no text or symbols)- From the front, pull harness straps out of the shell and trim. Remove the shoulder pads and insert.
Care and cleaning
Remove seat cover for cleaning
natural_image
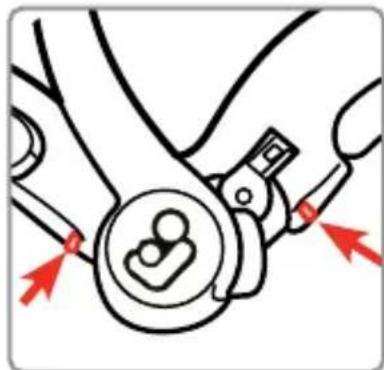
Mechanical component diagram showing a valve assembly with red arrows indicating direction (no text or symbols)- Unhook the cover form the two pins moulded onto the seat as shown. Repeat for alternative side.
natural_image
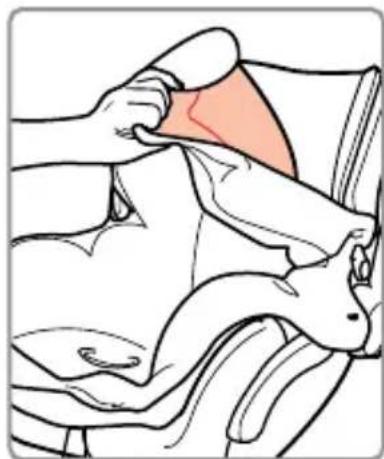
Medical illustration showing a hand performing a procedure on a patient's abdomen (no text or labels)- Unfold the trim from the back of the capsule, folding it towards the front, peeling it away until completely removed.
VERY IMPORTANT:
Only replace the cover with a manufacturer's supplied replacement cover with identical shoulder height markers or a replacement cover meeting AS/NZ 8005.
Care and cleaning
Cleaning buckle
natural_image
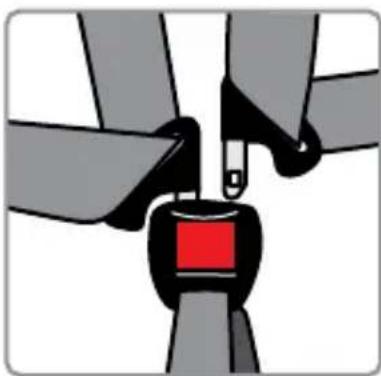
Close-up of a mechanical buckle assembly with a red belt buckle (no text or symbols visible)- Push red button to release the buckle.
- From under seat shell, turn and slide buckle's metal retainer up through the shell and trim, removing the buckle.
NOTE: For cleaning instructions, see page 55.

natural_image
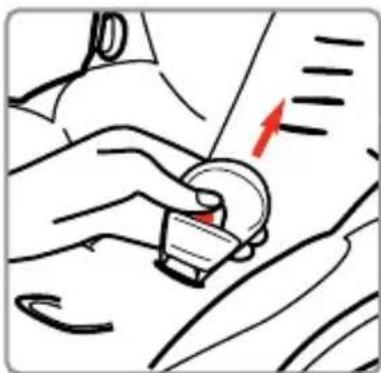
Diagram of a hand using a tool to adjust a component, with a red arrow indicating the direction (no text or symbols present)- To assemble, ensure that the red button on the buckle is facing out. Push metal retainer clip through trim and shell.
natural_image
Illustration of a hand using a belt switch to adjust a car seatbelt, with no visible text or symbols.- From other side, pull on buckle to check to make sure buckle's metal retainer is correctly inserted through the trim and shell.
Care and cleaning
Cleaning buckle
Follow the manufacturer's instructions at all times. Before removal, ensure you have carefully noted the way which the various parts are attached to the seat so as to facilitate reassembly.
Your child restraint is equipped with a buckle designed to give your child maximum protection during proper use. When working properly, your buckle should always fasten with an audible click.
If sticky liquids (such as baby food, fruit juice, etc.) get into the buckle it may become sluggish and you may not hear a click.
The buckle should be cleaned by following the steps below.
CLEANING BUCKLES
- Place the buckle unit under running water (40 degrees Celsius). Let the water flow through the mouth of the buckle for one minute.
- Immediately latch and unlatch the tongues into the buckle several times until a strong audible click is heard.
- Do not oil any part of the buckle.
- Allow buckle to dry.
- If the buckle does not work, contact Dorel Australia Customer Service on 1300 809 526
Care and cleaning
General maintenance
- All other surface should be cleaned with a mild soap and water.
- Never clean with ammonia or bleach based, or spirit-type cleaners.
- Clean the frame with a damp cloth.
- Do not use the restraint without the cover.
- Check the webbing for fraying.
- Ensure there are no cracks in moulding or the plastic moulding.
- Check the Harness Adjuster is operating and is clamping the webbing.
- If any part of the restraint is cracked or broken, seek repair immediately or replace the child restraint.
The next seat for your child

natural_image
3D rendered model of a car comfort seat assembly (no text or symbols visible)OPTION 1: TYPE A4/B CONVERTIBLE CAR SEAT
To be used only in a rearward-facing position until the infant's shoulders reach the lower shoulder height marker (approximately 12 months of age) or reach the middle height marker (approximately 2-3 years of age).
Then to be used in a forward-facing position until the child's shoulders reach the upper shoulder height marker (approximately 4 years of age).
Notes
Guarantee
Dorel Australia Pty Ltd warrants your new product to be free from defects in materials and workmanship for 10 years on the seat & 3 years on the trim, from the date of purchase, provided that the product is used in accordance with accompanying recommendations or instructions where provided. The benefit of this warranty is in addition to your rights under the Australian Consumer Law and to other rights and remedies of the consumer under a law in relation to the goods or services to which the warranty relates.
Dorel Australia Pty Ltd will provide you with your choice of a refund, repair, or exchange (where possible) for this product if it becomes defective within the warranty period. Dorel Australia Pty Ltd will bear the reasonable expense of claiming the warranty. This warranty will no longer apply where the defect is a result of alteration, accident, misuse, abuse, or neglect.
Please retain your receipt as proof of purchase and contact our Customer Service team on Ph: 1300 809 526 or alternatively, via our website at www.dorel.com.au for any difficulties with your product. Warranty claims and claims for expense incurred in returning this product can be addressed to our Consumer Service team at 655-685 Somerville Road, Sunshine West, VIC, 3020. Hours: 8:30 am to 5:00 pm, Monday to Friday.
For New Zealand please contact Customer Service Centre, 14 Sir William Avenue, East Tamaki, Auckland, 2013. Auckland: (09) 2741040 NZ wide: 0800 628 000 (Toll Free). Hours: 8:00 am - 5:00 pm, Monday to Friday.
Our goods come with guarantees that cannot be excluded under the Australian Consumer Law. You are entitled to a replacement or refund for a major failure and compensation for any other reasonably foreseeable loss or damage. You are also entitled to have the goods repaired or replaced if the goods fail to be of acceptable quality and the failure does not amount to a major failure. IMPORTANT: KEEP THIS INSTRUCTION MANUAL IN THE POCKET PROVIDED ON THE HEADREST.

Dear Customer,
Don't forget to register your product within 3 months of purchase for the Lifetime Warranty offer.*
Please visit to register now.
www.maxi-cosi.com.au

natural_image
Black cursor arrow icon on blue background (no text or symbols)© 2017 Dorel Australia, Pty Ltd. All Rights Reserved.
MAP 2013A, MAP 2013LA #017767 08/2017
* Terms and conditions apply.
Please visit our website to find out more.

MAXI·COSI®
- Baby Capsule
- Table of Contents
- MAXI·COSI®
- Need assistance?
- WARNINGS
- GENERAL
- IMPORTANT:
- WARNING
- Components list
- Vehicle information
- NOTE :
- FOR CARS FITTED WITH A CHILD RESTRAINT UPPER ANCHORAGE POINT
- For sedans only
- For vehicles other than sedans
- Seat to vehicle positioning
- Vehicle seat location requirements:
- Operation and adjustment
- LISTEN FOR CLICK.
- Crotch buckle adjustment
- REARWARD FACING BELT PATH
- Installation
- PREPARING TO INSTALL BASE WITH VEHICLE BELTS
- IF FITTED WITH LOWER CONNECTORS:
- INSTALLING BASE WITH VEHICLE BELTS
- TOP TETHER INSTALLATION
- REARWARD-FACING (Newborn to 6 months)
- Lower connectors installation
- LOOK FOR THESE SYMBOLS FOR ATTACHMENT IN VEHICLE
- PREPARING TO INSTALL BASE WITH LOWER CONNECTORS
- AIRCRAFT INSTALLATION
- SUITABLE FOR REAR FACING USE
- Please note before installation
- Covers and accessories
- Canopy use
- Care and cleaning
- VERY IMPORTANT:
- CLEANING BUCKLES
- The next seat for your child
- OPTION 1: TYPE A4/B CONVERTIBLE CAR SEAT
- Notes
- Guarantee
Brand : MAXI-COSI
Model : Mico Plus
Category : Baby Products