
AP-N515 - Access Point FS - Free user manual and instructions
Find the device manual for free AP-N515 FS in PDF.
| Product Type | Indoor Access Point |
| Brand | FS |
| Model | AP-N515 |
| Power Supply | DC 54V port or PoE IEEE 802.3af/at/bt (via LAN1/5G/PoE port) |
| Ports | 1x 5G SFP (1G/2.5G/5G), 1x LAN2/IoT (48V/12.95W), 1x LAN1/5G/PoE, 1x Console RJ45, 1x USB, 1x Power 54V DC |
| Reset Button | Press < 2s: restart; > 3s: factory reset |
| LED Indicators | Green (initializing), Red (offline), Slow blinking red (CAPWAP tunnel interrupted), Fast blinking red (AP locating), Blue (normal, no client), Blinking blue (client connected), Fast blinking blue (upgrading) |
| Operating Modes | FIT AP, FAT AP, Cloud (default FIT) |
| Configuration | Web interface (192.168.1.1, credentials admin/admin) or serial console (9600 baud, 8 data bits, no parity, 1 stop bit) |
| Installation | Ceiling or wall with included mounting bracket; requires drilling 4 holes Ø6.5 mm spaced 53 mm apart |
| Included Accessories | Mounting bracket, screws (x4), anchors (x4), security key |
| Maintenance | Turn off power before cleaning; do not use liquid or damp cloth; do not open the case while powered on |
| Safety | Install in a ventilated place, away from dust, storms, and strong electric fields; avoid high temperatures |
| RF Exposure | Minimum distance of 20 cm between device and body; indoor use only for 5150-5250 MHz band |
| Warranty | 3-year limited warranty against hardware and manufacturing defects; returns accepted within 30 days |
| Online Support | Downloads: fs.com/fr/products_support.html ; Help Center: fs.com/fr/service/fs_support.html |
| Compliance | EU Directives 2014/30/EU, 2014/35/EU, 2014/53/EU, 2011/65/EU; Innovation, Science and Economic Development Canada (RSS) |
Frequently Asked Questions - AP-N515 FS
User questions about AP-N515 FS
0 question about this device. Answer the ones you know or ask your own.
Ask a new question about this device
Download the instructions for your Access Point in PDF format for free! Find your manual AP-N515 - FS and take your electronic device back in hand. On this page are published all the documents necessary for the use of your device. AP-N515 by FS.
USER MANUAL AP-N515 FS
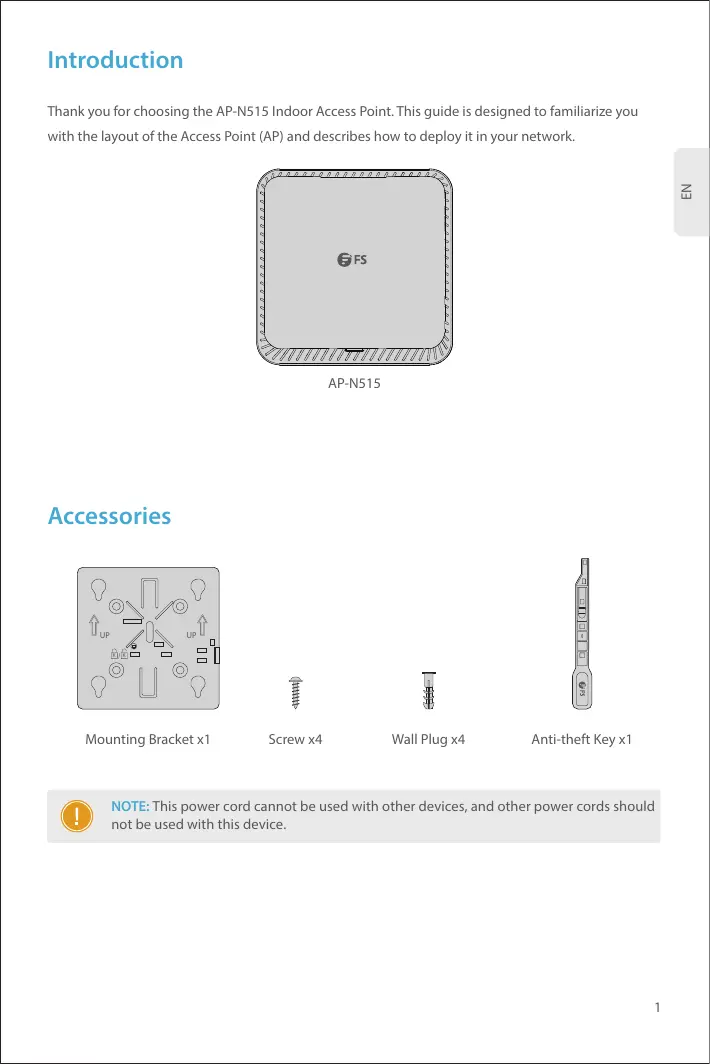
Thank you for choosing the AP-N515 Indoor Access Point. This guide is designed to familiarize you with the layout of the Access Point (AP) and describes how to deploy it in your network.
AP-N515
Accessories
Mounting Bracket x1

Screw x4

Wall Plug x4

Anti-theft Key x1

NOTE: This power cord cannot be used with other devices, and other power cords should not be used with this device.
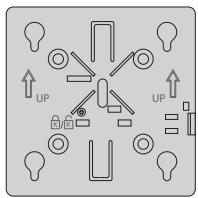
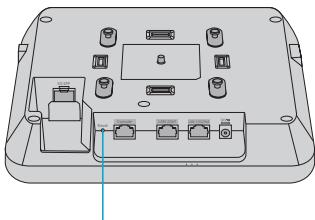
Ports
| Ports | Description |
| 5G SFP | SFP ports for 1G/2.5G/5G connection |
| Console | An RJ45 console port for serial management |
| LAN2/IoT | · Downlinked to service port for wired Ethernet connection and service data transmission · Supports power supply to the IoT module (48V/12.95W) |
| LAN1/5G/PoE | · Uplinked to service port for wired Ethernet connection and service data transmission · Supports IEEE 802.3af/at/bt-compliant PoE |
| Power | A 54V DC power port |
| USB | A port for USB connection |
| Anti-theft Lock Hole | A port for the anti-theft key connection |
Button
Reset
| Button | Description |
| Reset | Restart: Press it for less than 2s. |
| Restore to Factory Default Settings: Press and hold for more than three seconds. |
LED
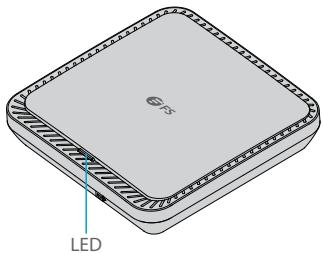
| State | Frequency | Description |
| Off | N/A | The AP is not receiving power, or it is powered on but the LED is disabled by the software. |
| Solid Green | N/A | Main program initialization in progress. |
| Solid Red | N/A | The system is running properly, but the uplink service port is link-down. |
| Slow Blinking Red | On for 3 seconds Off for 1 second | In FIT AP mode, the establishment of a CAPWAP tunnel between the AP and AC times out. |
| Fast Blinking Red | On for 0.2 seconds Off for 0.2 seconds | In FIT AP mode, the LED is used for locating the specific AP. |
| Solid Blue | N/A | Normal operation, but no wireless client is associated with the AP. |
| Blinking Blue | On for 1 second Off for 1 second | Normal operation and at least one wireless client is associated with the AP. |
| Fast Blinking Blue | On for 0.2 seconds Off for 0.2 seconds | In Fit AP or Airware Cloud AP mode, the software system is being upgraded. |
Installation Requirements
Before the installation, make sure that you have the following:
Phillips screwdriver.
An Ethernet cable, a fiber optical cable and a console cable for connecting network devices.
Site Environment
Install the device in a well-ventilated place.
Install the device indoors.
- Keep the device away from high-voltage power cables.
- Do not expose the device in a thunderstorm or strong electric field.
- Keep the device clean and dust-free.
- Do not expose the device to the high-temperature environment.
Safety Precautions
- Do not power on the device during the installation.
Cut off the power before cleaning the device. - Do not wash the device with liquid. Do not wipe the device with a damp cloth.
- Do not open the enclosure when the device is working.
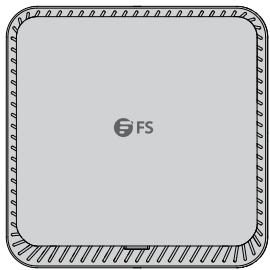
Mounting the Access Point
Securing the AP (Optional)
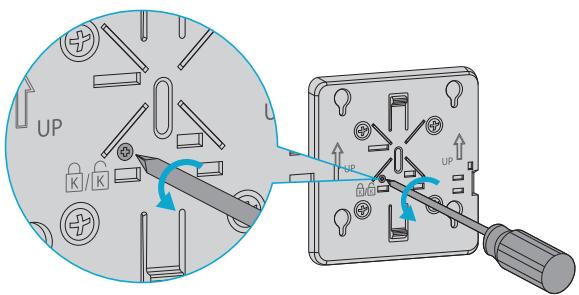
Remove the screw on the mounting bracket to enable the hidden lock.
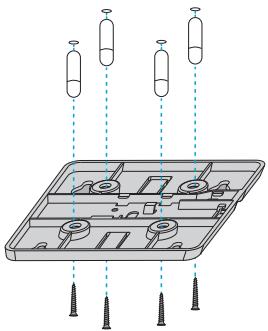
- Drill four 6.5mm diameter holes on the ceiling, spaced 53mm apart.
- Hammer the wall plugs into the holes, and then secure the mounting bracket onto the ceiling with screws.
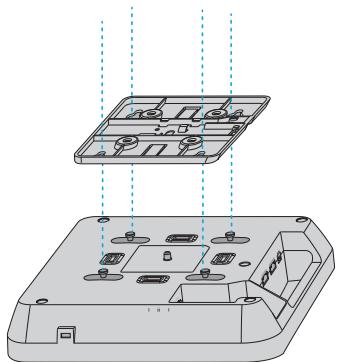
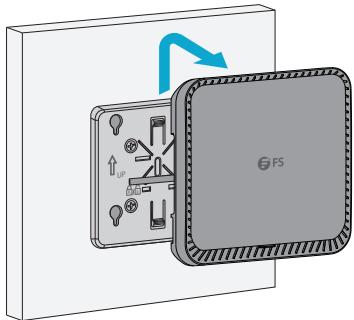
- Align the buckle on the back of the AP with the hole on the mounting bracket.
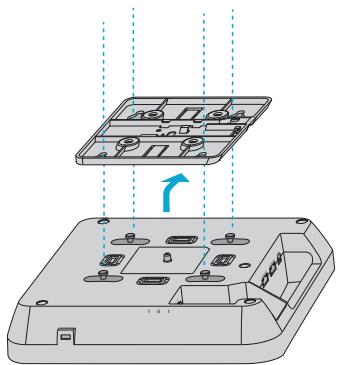
- Slide the AP onto the mounting bracket in the reverse direction against the arrow on the bracket until it clicks into place.

NOTE: 1. The AP supports wall mounting and ceiling mounting and the installation steps are similar. Here the ceiling mounting is taken as an example.
- Install the Ethernet cable before mounting the AP onto the bracket.
- Do not forcibly push the AP into the slots.
- After installation, verify that the AP is securely fastened.
Installing the Optical Module
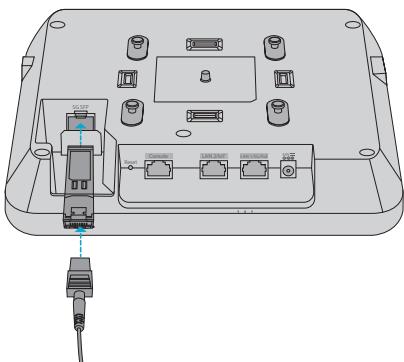
Insert the SFP module into the AP and then insert the fiber optic cable into the module.
Connecting the PoE Power Supply
Connecting the PoE Switch
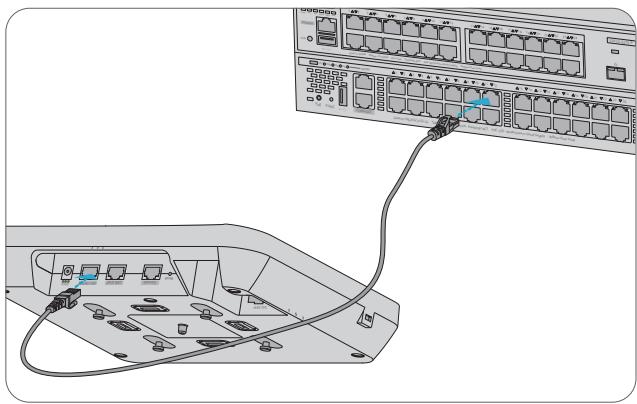
Connect the LAN1/5G/PoE port of the AP to a PoE switch with an Ethernet cable.
Connecting the PoE Injector

Connect the PoE port of the AP to the local power source using the power cord, power injector and Ethernet cable.

NOTE: When connecting a PC to an AP console port, ensure that both the PC and PoE switch are well-grounded.
Removing the AP
Removing the Wall-Mount AP
Hold the AP in your hands and push it upward in the LAN port direction.
Removing the Ceiling-Mount AP
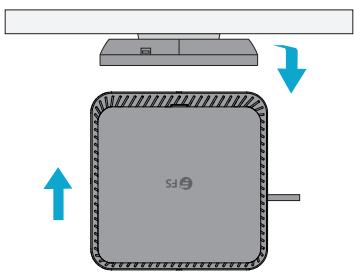
Hold the AP in your hands, and try to push it in each of the four directions (only one direction will be suitable for pulling out the AP).
Configuring the Access Point
Configuring the AP via the Web-based Interface
Step 1: Connect the computer to the business port of the AP via the network cable.
Step 2: Set the IP address of the computer to 192.168.1.x ("x" is any number from 2 to 254).
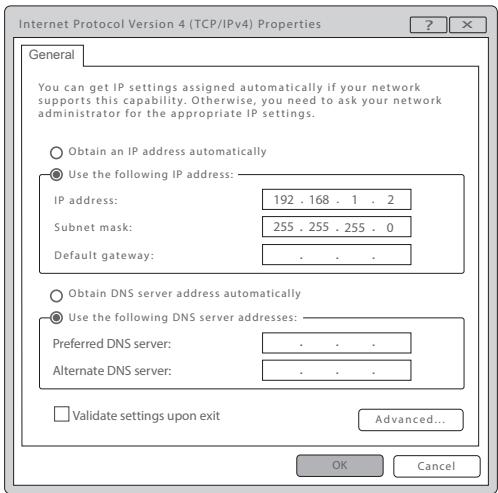
Step 3: Open a browser, type "http://192.168.1.1" and enter the default username and password, admin/admin.
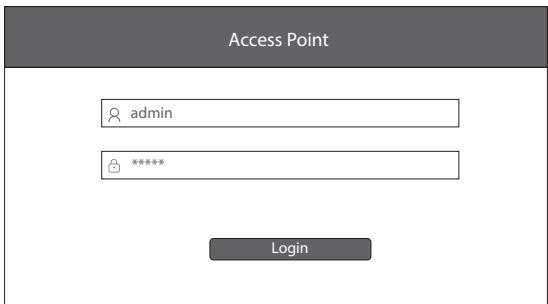
Step 4: Click "Login" to display the web-based configuration page.
Step 5: Click System Mode Switch to switch the FIT/FAT/Cloud working mode.
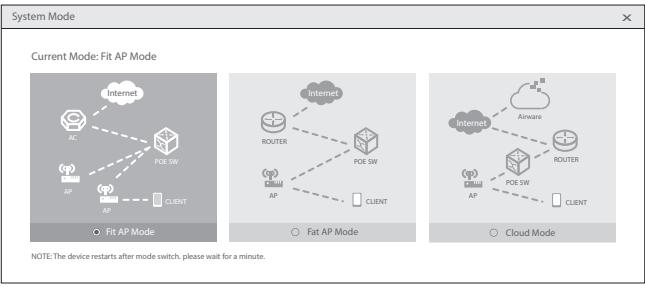

NOTE: The AP works in Fit AP Mode by default.
Configuring the AP via the Console Port (FAT AP Mode)
Step 1: Connect a computer to the AP's console port via the console cable.
Step 2: Start the terminal simulation software such as HyperTerminal on the computer.
Step 3: Set the parameters of the HyperTerminal: Baud rate to 9600, Data bits to 8, Parity to None and Stop bits to 1.

Step 4: Click Connect to enter. And enter the default password, admin.
Troubleshooting
LED Does Not Light Up After the AP Is Powered On
- If the PoE power supply is used, verify that the power source is at least IEEE 802.11af compliant. And check if the cable is properly connected.
- If a power adapter is used, verify that the power adapter is connected to an active power outlet. And check if the power adapter works properly.
Ethernet Port Is Not Working After the Ethernet Port Is Connected
Verify that the device at the other end of the Ethernet cable is working properly. And check if the Ethernet cable is capable of providing the required data rate and is properly connected.
Wireless Client Cannot Find the AP
- Verify that the power supply works properly.
- Verify that the Ethernet port is properly connected.
- Verify that the AP is correctly configured.
- Move the client device to adjust the distance between the client and the AP.
Online Resources
- Download https://www.fs.com/products_support.html
Help Center https://www.fs.com/service/fs_support.html - Contact Us https://www.fs.com/contact_us.html
Product Warranty
FS ensures our customers that for any damage or faulty items due to our workmanship, we will offer a free return within 30 days from the day you receive your goods. This excludes any custom-made items or tailored solutions.

Warranty: The product enjoys a 3-year limited warranty against defects in materials or workmanship. For more details about the warranty, please check at https://www.fs.com/policies/warranty.html

Return: If you want to return the item(s), information on how to return can be found at https://www.fs.com/policies/day_return_policy.html
Einführung

Anti-Diebstahl-Schlüssel x1

- Slide the AP onto the mounting bracket in the reverse direction against the arrow on the bracket until it clicks into place.

https://www.fs.com/jp/products_support.html
丶儿P七夕一
https://www.fs.com/jp/service/fs_support.html
お問い合わせ
https://www.fs.com/jp/contact_us.html
製品保證
Regulatory, Compliance, and Safety Information Information relative a la conforite et a la securite https://www.fs.com/products/179641.html
FCC
FCCID:2A2PW162394
Note: This equipment has been tested and found to comply with the limits for a Class B digital device, pursuant to part 15 of the FCC Rules. These limits are designed to provide reasonable protection against harmful interference in a residential installation. This equipment generates, uses and can radiate radio frequency energy and, if not installed and used in accordance with the instructions, may cause harmful interference to radio communications. However, there is no guarantee that interference will not occur in a particular installation. If this equipment does cause harmful interference to radio or television reception, which can be determined by turning the equipment off and on, the user is encouraged to try to correct the interference by one or more of the following measures:
—Reorient or relocate the receiving antenna.
—Increase the separation between the equipment and receiver.
—Connect the equipment into an outlet on a circuit different from that to which the receiver is connected.
—Consult the dealer or an experienced radio/TV technician for help.
This device complies with part 15 of the FCC Rules. Operation is subject to the following two conditions:
(1) This device may not cause harmful interference, and
(2) this device must accept any interference received, including interference that may cause undesired operation.
CAUTION:
Any changes or modifications not expressly approved by the party responsible for compliance could void the user's authority to operate the equipment.
FCC Radiation Exposure Statement:
This device complies with FCC radiation exposure limits set forth for an uncontrolled environment and it also complies with Part 15 of the FCC RF Rules. This equipment must be installed and operated in accordance with provided instructions and the antenna(s) used for this transmitter must be installed to provide a separation distance of at least 20cm from all persons and must not be co-located or operating in conjunction with any other antenna or transmitter. End-users and installers must be provided with antenna installation instructions and consider removing the no-collocation statement.
CE
FS.COM GmbH hereby declares that this device is in compliance with the Directive 2014/30/EU, 2014/35/EU, 2014/53/EU, 2011/65/EU and (EU)2015/863. A copy of the EU Declaration of Conformity is available at
www.fs.com/company/quality_control.html.
www.fs.com/de/company/quality_control.html.
Hereby, FS.COM Innovation Ltd declares that this device is in compliance with the Directive SI 2016 No. 1091, SI 2016 No. 1101, SI 2017 No. 1206 and SI 2012 NO. 3032.
FS.COM INNOVATION LTD
Unit 8, Urban Express Park, Union Way, Aston, Birmingham, B6 7FH, United Kingdom
IMDA
Complies with IMDA Standards DA108759
Telec
W52/W53は屋内使用限定
ISED
IC:29598-162394
CANICES-003(B)/NMB-003(B)
English: This device contains licence-exempt transmitter(s)/receiver(s) that comply with Innovation, Science and Economic Development Canada's licence-exempt RSS(s). Operation is subject to the following two conditions:
(1) This device may not cause interference.
(2) This device must accept any interference, including interference that may cause undesired operation of the device.
The digital apparatus complies with Canadian CAN ICES-003(B)/NMB-003(B).
The device meets the exemption from the routine evaluation limits in section 2.5 of RSS 102 and compliance with RSS-102 RF exposure, users can obtain Canadian information on RF exposure and compliance.
This transmitter must not be co-located or operating in conjunction with any other antenna or transmitter. This equipment should be installed and operated with a minimum distance of 20 centimeters between the radiator and your body.
the device for operation in the band 5150-5250 MHz is only for indoor use to reduce the potential for harmful interference to co-channel mobile satellite systems
Waste Electrical and Electronic Equipment (WEEE)
This appliance is labelled in accordance with European Directive 2012/19/EU concerning waste electrical and electronic equipment (WEEE). The Directive determines the framework for the return and recycling of used appliances as applicable throughout the European Union. This label is applied to various products to indicate that the product is not to be thrown away, but rather reclaimed upon end of life per this Directive.
To avoid the potential effects on the environment and human health as a result of the presence of hazardous substances in electrical and electronic equipment, end users of electrical and electronic equipment should understand the meaning of the crossed-out wheeled bin symbol. Do not dispose of WEEE as unsorted municipal waste and have to collect such WEEE separately.
