USER MANUAL ALDEA - ETC01-13 : 1300W ETC01-15 : 1500W HEALLUX
- This appliance can be used by children aged from 8 years and above and persons with reduced physical, sensory or mental capabilities or lack of experience and knowledge if they have been given supervision or instruction concerning use of the appliance in a safe way and understand the hazards involved. Children shall not play with the appliance. Cleaning and user maintenance shall not be made by children without supervision.
Children of less than 3 years should be kept away unless continuously supervised.
- Children aged from 3 years and less than 8 years shall only switch on/off the appliance provided that it has been placed or installed in its intended normal operating position and they have been given supervision or instruction concerning use of the appliance in a safe way and understand the hazards involved. Children aged from 3 years and less than 8 years shall not plug in, regulate and clean the appliance or perform user maintenance.
- CAUTION - Some parts of this product can become very hot and cause burns. Particular attention has to be given where children and vulnerable people are present.
- If the supply cord is damaged, it must be replaced by the manufacturer, its service agent or similarly qualified persons in order to avoid a hazard.
- CAUTION: In order to avoid a hazard due to inadvertent resetting of the thermal cutout, this appliance must not be supplied through an external switching device, such
as a timer, or connected to a circuit that is regularly switched on and off by the utility.
- The heater must not be located immediately below a socket-outlet.
- The heater must not be located directly in front of a socket outlet.
- Means for disconnection having a contact separation in all poles must be incorporated in the fixed wiring in accordance with the wiring rules.
- For correct installation on the wall, thanks to refer to 'Installation on wall' part.
- Fixed heaters are to be installed so that switches and other controls cannot be touched by a person in the bath or shower.
- Connect the two conductors and the pilot wire of the supply cord to a connection box in respecting the following polarities:
Live: Brown
- Neutral: Blue
- Pilot wire: Black
- WARNING: In order to avoid overheating, do not cover the heater.

Warning: this product shall be installed in the volume 2 or hors volume only according to the national wiring rules (For France NF C 15-100)
WARNING: In order to avoid a hazard for very young children, this appliance should be installed so that the
lowest heated rail is at least 600 mm above the floor.
Note: The below drawing is for reference only.
We suggest you to contact a professional electrician for assistance.
In the case as of buildings room, a room receiving a bath or a shower and socket-outlets lower or equal to 32 ~A the circuit corresponding must be protected by a device with differential residual current (RCD) lower or equal to 30 ~mA .
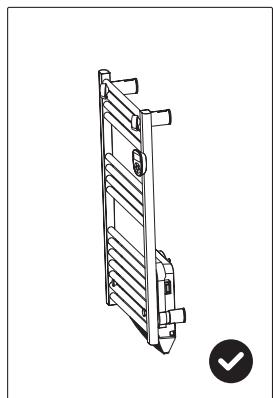
1) Drill holes on the wall according to the instruction inside the box. Warning: Be sure to keep the safety distances as shown on the above drawing.
2) Fit the fasten tube in the hole and fit the bracket on the wall with screws
3) Hang the unit on the bracket gently, after ensuring the unit is right fixed, turn the lock in the bracket as picture show.
Warning: Before using the heater, make sure it's mounted tightly on the wall.
III. INSTRUCTIONS FOR USE
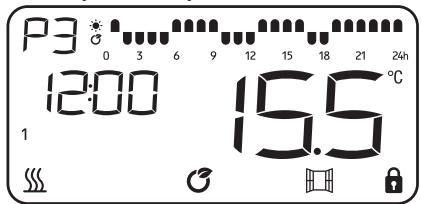
1) Control panel and screen.
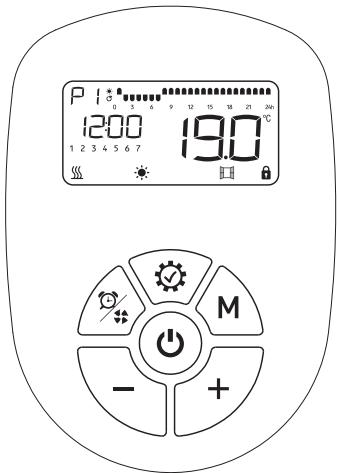

Power on /stand by
+ Increasing; Keep pressing for quick increasing; Forward the hour in 24 hour program setting.
Decreasing; Keep pressing for quick decreasing; Backward the hour in 24 hour program setting.
M Select mode or program M
Setting / OK
Quick timer setting / turbo on/off
2) Quick start
Press to turn on the screen, the equipment will work under COMFORT
mode, press to set the desired temperature.

3)Clock setting:
For first using of program, the clock will required setting before use the P1/P2/P3, only when the clock setting is finished, the program can work.
When in clock setting, the hour will twinkle first, press +/- to set the right time (0-23) and press to get into minute setting, press +/- to set the right time (0-59) and press to get into date setting, press +/- to set the date from 1-7, press to finish the date setting.
Clock modification: Long press 3 seconds to modify the clock.
4) Function setting:
-
Press to choose the mode or the program;
-
Press ( + - ) to choose the temperature.

Comfort mode: Setting temp. from 5^ to 35^

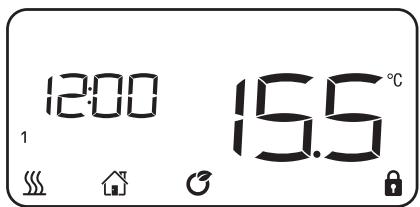
- ECO mode: Setting temp. from 1.5^ to 31.5^ ; 3.5^ less than comfort mode, when you set up the temp. of comfort mode.

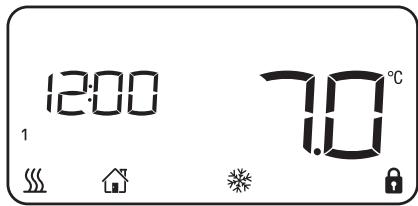
Anti-frost mode: Setting 7^ for room temp; Cannot change the temp.
- Program modification:
It's with factory presetting of the program P1P2P3, this program can get modified according to the requirement of customer.
Press M to choose the program, only when the program get selected, press to modify the program.
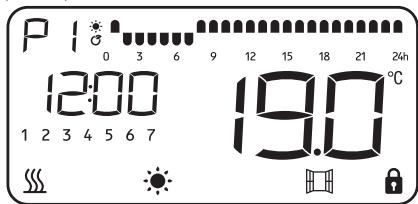
When you're in P, press once, LOGO and the fist hour LOGO 0 start to twinkle. Use M to choose the mode for each hour and use
to move the twinkle hour LOGO till finish 24 hour mode setting. Press

to confirm the 24 hour setting and quit the setting status.
When you're in P2, press OK once, P2 LOGO and the fist hour LOGO

start to twinkle. Use M to choose the mode for each hour and use

to move the twinkle hour LOGO till finish 24 hour mode setting.
Press to confirm the 24 hour setting and turn from working days program
12345 to weekend program 67 setting. When finish the setting press

to confirm and quit.
When you're in P3, press once, P3 LOGO and the fist hour LOGO

start to twinkle. Use M to choose the mode for each hour and use
0

to move the twinkle hour LOGO U till finish 24 hours mode setting. Press

to confirm the 24 hour setting and turn from Monday program to Tuesday
program setting. When finish 7 days setting press (√) to confirm and quit.

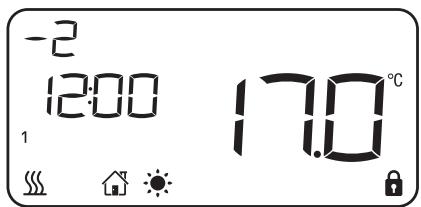
means comfort mode;

means ECO mode;

means Anti-frost mode;
NOTE: the block against the clock will twinkle when the block against the program is working.
5) Program factory presetting:
P: Same program from Monday to Sunday, custom can modify the program.
P2: Same program from Monday to Friday and same program from Saturday to Sunday.
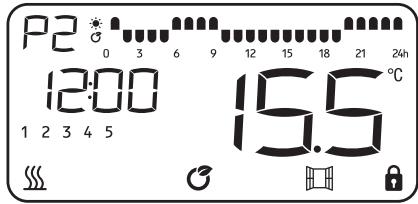
Working day
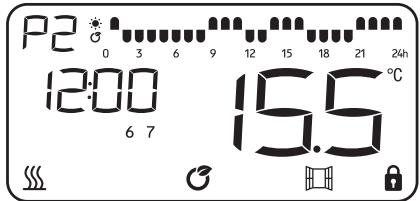
Weekend
P3: Can set different program for each day.
Factory presetting is with same program from Monday to Friday, same program from Saturday to Sunday.
Working day
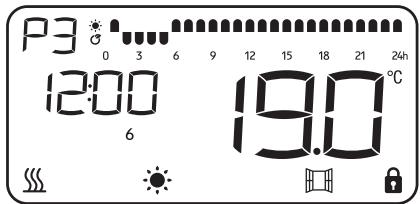
Weekend
6) Pilot mode:
In this mode, the heater will be controlled by pilot wire. Client can only change the temperature and open-window on/off.
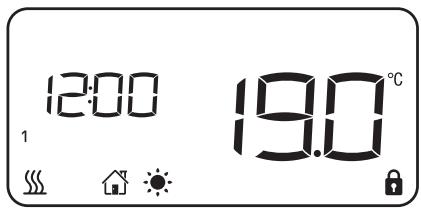
Comfort
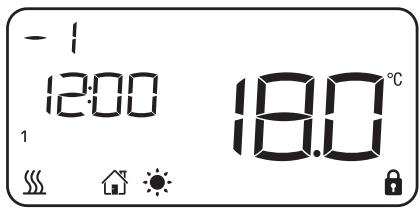
Comfort -1
Comfort -2
ECO
Anti-frost
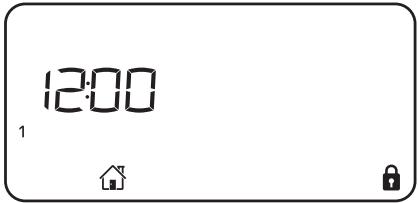
Stand-by
NOTE: When in Comfort-1 or Comfort-2, the temperature can't get set.
7) Windows detector function:
Press M and choose the open window mode and LOGO start to twinkling. Press + to choose ON or OFF and press to confirm and quit.


After 30 seconds no operation, the program will confirm automatically and quit.
If temperature goes down, heater will stop working and the window logo is twinkling. When the function is active, a drop in temperature by 2^ C in less than 2 minutes, the heater will stop working and the window logo
Press one time, the heater will go back to former running program, then the windows logo stop twinkling. (Press two times the heater will be on stand by mode)
8) Screen lock
Press together unlock or lock the keyboard.
9) Quick timer setting & Heating with turbo function
Press once will set 2 hours timer off. Each press is stand for 2 hours more, set
2 to 8 hours timer off as a circle. When the quick timer is working, time display will change to timer clock as below:
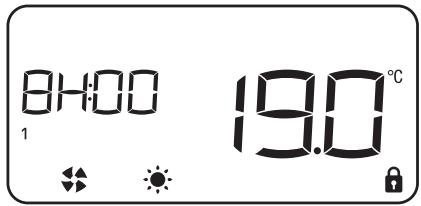
Press 3 seconds to turn on or off the heating with turbo function. When heating with turbo function is on, there is LOGO on the screen. will be showed only when the unit is heating.
IV. CLEANING & MAINTENANCE
- Switch off from the power supply before cleaning.
- Using a soft, moist cloth, with or without a mild soap solution, carefully clean the exterior surface of the product.
- CAUTION: Allow the product to completely cool before handling or cleaning it.
- Do not allow water or other liquids to run into the interior of the product, as this could create a fire and/or electrical hazard.
- We also recommend the periodic cleaning of this appliance by lightly running a vacuum cleaner nozzle over the guards to remove any dust or dirt that may have accumulated inside or on the unit.
- CAUTION: Do not use harsh detergents, chemical cleaners or solvents as they may damage the surface finish of the plastic components.

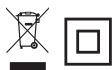
This marking indicates that this product should not be disposed with other household wastes throughout the EU. To prevent possible harm to the environment or human health from uncontrolled waste disposal, recycle it responsibly to promote the sustainable reuse of material resources. To return your used device, please use the return and collection systems or contact the retailer where the product was purchased. They can take this product for environmental safe recycling.
ETC01-13
230V~50Hz
1300W


IP24


ETC01-15
230V~50Hz
1500W


IP24
| Model identifier(s): ETC01-13 | | |
| Item | Symbol | Value | Unit | Item | Unit |
| Heat output | Type of heat input, for electric storage local space heaters only (select one) |
| Nominal heat output | Pnom | 1.3 | kW | Manual heat charge control, with integrated thermostat | [no] |
| Minimum heat output (indicative) | Pmin | 0 | kW | Manual heat charge control with room and/or outdoor temperature feedback | [no] |
| Maximum continuous heat output | Pmax,c | 1.3 | kW | Electronic heat charge control with room and/or outdoor temperature feedback | [no] |
| Auxiliary electricity consumption | | | | Fan assisted heat output | [no] |
| At nominal heat output | elmax | 0 | kW | Type of heat output/room temperature control (select one) |
| At minimum heat output | elmin | 0 | kW | Single stage heat output and no room temperature control | [no] |
| In standby mode | elsb | 0,000 | kW | Two or more manual stages, no room temperature control | [no] |
| With mechanic thermostat room temperature control | [no] |
| Model identifier(s): ETC01-15 | With electronic room temperature control | [no] |
| Item | Symbol | Value | Unit | Electronic room temperature control plus day timer | [no] |
| Heat output | Electronic room temperature control plus week timer | [yes] |
| Nominal heat output | Pnom | 1.4 | kW | Other control options (multiple selections possible) |
| Minimum heat output (indicative) | Pmin | 0 | kW | Room temperature control, with presence detection | [no] |
| Maximum continuous heat output | Pmax,c | 1.4 | kW | Room temperature control, with open window detection | [yes] |
| Auxiliary electricity consumption | | | | With distance control option | [no] |
| At nominal heat output | elmax | 0 | kW | With adaptive start control | [no] |
| At minimum heat output | elmin | 0 | kW | With working time limitation | [no] |
| In standby mode | elsb | 0,000 | kW | With black bulb sensor | [no] |
| Contact details | Importé par : HEALLUX SAS31 Rue De Metz N°46 - 31 000 Toulouse - France |