
CNX 1090 - Pool Robot ZODIAC - Free user manual and instructions
Find the device manual for free CNX 1090 ZODIAC in PDF.
| Brand | ZODIAC |
| Model | CNX 1090 |
| Product type | Automatic pool cleaner |
| Category | Pool robot |
| Dimensions (L x W x H) | 430 x 380 x 250 mm |
| Weight | 7.5 kg |
| Power supply | 230 V / 50 Hz |
| Motor power | 200 W |
| Floating cable length | 15 m |
| Filtration | Fine mesh filter cartridge |
| Movement system | Automatic cycle programming |
| Main functions | Cleaning of the bottom, walls, and waterline; debris suction |
| Maintenance | Cleaning the filter cartridge after each cycle; rinsing the robot |
| Noise level | < 65 dB(A) |
| Protection index | IPX5 |
| Safety | Automatic shutdown when leaving the water; safety transformer |
| Spare parts | Filter cartridge, brushes, floating cable, seals |
| Repairability | Repairability index: 7.4/10 |
| Warranty | 2 years |
Frequently Asked Questions - CNX 1090 ZODIAC
User questions about CNX 1090 ZODIAC
0 question about this device. Answer the ones you know or ask your own.
Ask a new question about this device
Download the instructions for your Pool Robot in PDF format for free! Find your manual CNX 1090 - ZODIAC and take your electronic device back in hand. On this page are published all the documents necessary for the use of your device. CNX 1090 by ZODIAC.
USER MANUAL CNX 1090 ZODIAC
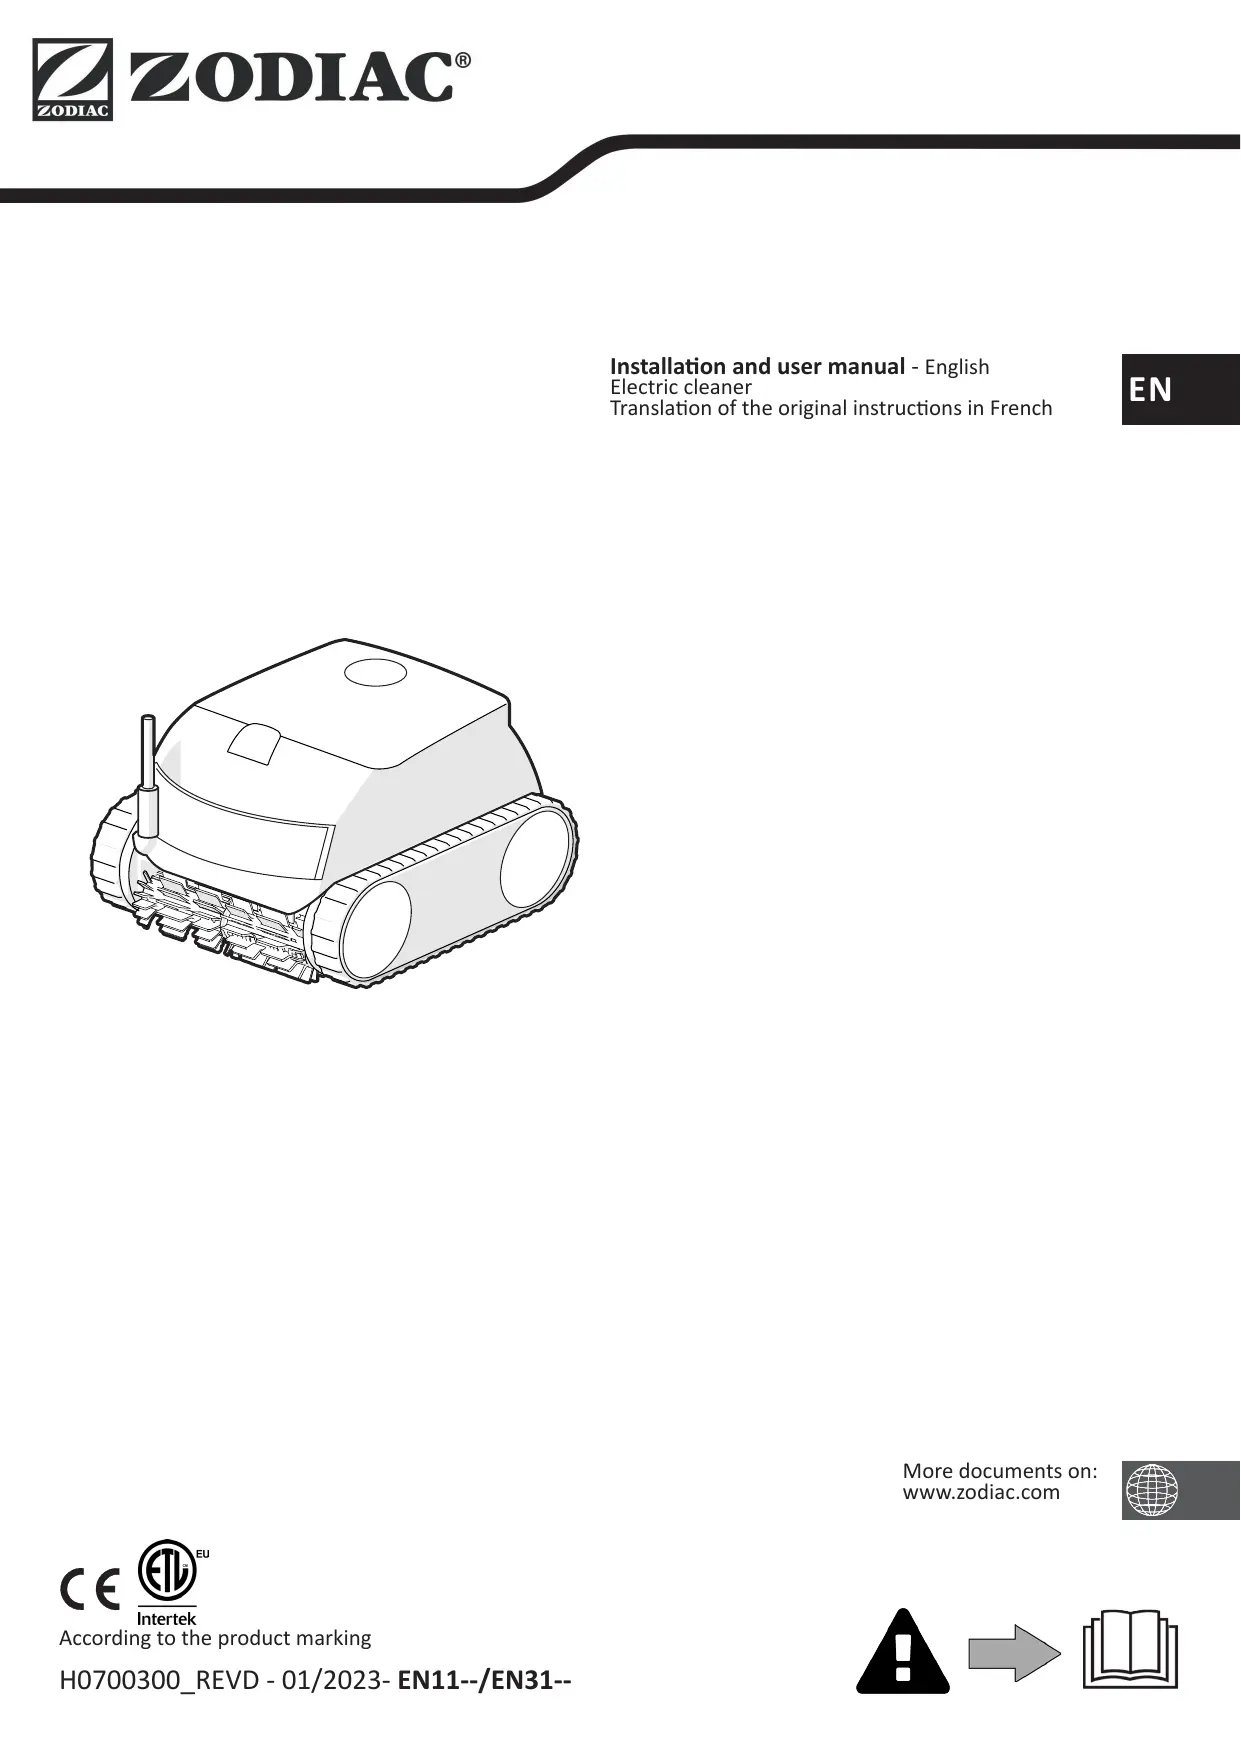
Installation and user manual - English
Electric cleaner
Translation of the original instructions in French
EN

More documents on:
www.zodiac.com

C E

Intertek
According to the product marking
H0700300_REVD - 01/2023- EN11--/EN31--


WARNING
- Before handling the appliance, it is vital that you read this installation and user manual, as well as the "Warranties" booklet delivered with the appliance. Failure to do so may result in material damage or serious or fatal injury and will void the warranty.
- Keep and pass on these documents for reference during the appliance's service life.
- The distribution or modification of this document in any way is prohibited, without prior authorisation from Zodiac®.
- Zodiac® is constantly developing its products to improve their quality. The information contained herein may therefore be modified without notice.
GENERAL WARNINGS
- Failure to respect the warnings may cause serious damage to the pool equipment or cause serious injury, even death.
- Only a person qualified in the technical fields concerned (electricity, hydraulics or refrigeration) is authorised to carry out maintenance or repair work on the appliance. The qualified technician working on the appliance must use/wear personal protective equipment (such as safety goggles and protective gloves, etc.) in order to reduce the risk of injury occurring when working on the appliance.
- Before handling the appliance, check that it is switched off and isolated.
- The appliance is intended to be used for pools and spas for a specific purpose; it must not be used for any purpose other than that for which it was designed.
- This appliance is not intended for use by individuals (including children) with impaired physical, sensorial or mental abilities, or persons lacking in knowledge and experience, unless they receive supervision or prior instructions on using the appliance from a person responsible for their safety. Children must be supervised to ensure that they do not play with the appliance.
- This appliance can be used by children under 8 and adults with impaired physical, sensory or mental capabilities, or who lack experience and knowledge, if they are correctly supervised or have been instructed in how to use the appliance safely and understand the hazards involved. User cleaning and maintenance operations must not be carried out by children without supervision.
- The appliance must be installed according to the manufacturer's instructions and in compliance with local and national standards. The installer is responsible for installing the appliance and for compliance with national installation regulations. Under no circumstances may the manufacturer be held liable in the event of failure to comply with applicable local installation standards.
- For any work other than the simple user maintenance described in this manual, the product should be referred to a qualified professional.
- If the appliance suffers a malfunction, do not try to repair it yourself; instead contact a qualified technician.
- Refer to the warranty conditions for details of the permitted water balance values for operating the appliance.
- Deactivating, eliminating or by-passing any of the safety mechanisms integrated into the appliance shall automatically void the warranty, in addition to the use of spare parts manufactured by unauthorised third-party manufacturers.
- Do not spray insecticide or any other chemical (flammable or non-flammable) in the direction of the appliance, as this may damage the body and cause a fire.
- Do not touch the fan or moving parts and do not place objects or your fingers in the vicinity of the moving parts when the appliance is in operation. Moving parts can cause serious injury or even death.
WARNING ASSOCIATED WITH ELECTRICAL APPLIANCES
- The power supply to the appliance must be protected by a dedicated 30mA Residual Current Device (RCD), complying with the standards and regulations in force in the country in which it is installed.
- Do not use any extension lead when connecting the appliance; connect the appliance directly to a suitable power supply.
- Before carrying out any operations, check that:
- The required input voltage indicated on the appliance information plate corresponds to the mains voltage;
- The mains supply is compatible with the appliance's electricity needs and is correctly grounded.
- In the event of abnormal operation or the release of odours from the appliance, turn it off immediately, unplug it from its power supply and contact a professional.
- Before servicing or performing maintenance on the appliance, check that it is powered off and completely disconnected from the power supply and that all other equipment or accessories connected to the appliance are also disconnected from the power circuit.
- Do not disconnect and reconnect the appliance to the power supply when in operation.
- Do not pull on the power cord to disconnect it from the power supply.
- If the power cord is damaged, it must be replaced by the manufacturer, an authorised representative or a repair facility only.
- Do not perform maintenance or servicing operations on the appliance with wet hands or if the appliance is wet.
- Before connecting the appliance to the power supply, check that the connection unit or socket to which the appliance will be connected is in good condition and shows no signs of damage or rust.
- In stormy weather, disconnect the appliance from the power supply to prevent it from suffering lightning damage.
SPECIFIC FEATURES APPLICABLE TO "Pool cleaners"
- To avoid possible injury or damage to the cleaner, do not operate the cleaner out of the water.
- In order to prevent possible injury, bathing is prohibited when your cleaner is in the pool.
- Do not use the cleaner during shock chlorination.
- Do not leave the cleaner unattended for an extended period.
WARNING ON THE USE OF A CLEANER IN A POOL WITH A LINER
- Before installing the cleaner, carefully inspect the pool lining. If the liner comes away or is damaged in places, or if stones, folds, roots or corrosion appear, do not install the cleaner before a qualified professional repairs or replaces the liner. The manufacturer may not be held liable in any way for damage caused to the liner.
- The surface of certain patterned liners can wear away quickly: the patterns and/or colours can become deteriorated, faded or disappear on contact with certain objects (cleaning brushes, toys, rubber rings and floats, chlorine dispensers, or cleaners). The cleaner manufacturer may not be held liable for wear to the liners or faded patterns, which are not covered by the limited warranty.
WARNING ON THE USE OF A CLEANER IN A STAINLESS STEEL POOL
- Some stainless steel pools may have very fragile surfaces. The surface of these pools might get damaged by the basic friction of debris against the surface, for example caused by the wheels, tracks or brushes of cleaners, including electrical pool cleaner. The wear or scratching of stainless steel pools are not the liability of the manufacturer of the pool cleaner and are not covered by the limited warranty.
CONTENTS

Information before using the appliance 4
1.1I Description 4
1.2 I Technical specifications and parts list 5
1.3 I Operating principle 6
1.4I Pool preparation 6

General use 7
2.1 Immersing the cleaner 7
2.2 I Attachment to the base 8
2.3 I Electricity supply connection 8
2.4 I Control box functions 9
2.5 I Starting a cleaning cycle 10
2.6 I Removing the cleaner from the water 11
2.7 I Good practices after each cleaning operation 12

Using the iAquaLinkTM app (for iQ models) 13
3.1I First-time cleaner configuration 13
3.2 I Available functions in the iAqualinkTM app 15

4 Maintenance 17
4.1 Cleaning the cleaner 17
4.2 | Cleaning the filter 17
4.3 | Cleaning the impeller 18
4.4 I Replacing the brushes 19

Troubleshooting 20
5.1 I Appliance behaviour 20
5.2 I User alerts 21
5.3 I Troubleshooting the connection to the iAquaLinkTM app 22

Tip: to make it easier to contact the retailer
Write down the retailer's contact details to help you find them more easily and fill in the "product" information on the back of the manual: the retailer will ask for this information.
1.1 Description

| RE 41 -- RE 42 -- XA 10 -- XA 20 -- 10 XA 20 XA CNX 10 -- CNX 20 -- | RE 43 -- CNX 25 -- | RE 44 -- iQ XA 30 -- iQ 30 XA iQ CNX 30 iQ OZ 44 -- iQ | RE 45 -- iQ | RE 46 -- iQ RE 47 -- iQ XA 40 -- iQ XA 50 -- iQ 40 XA iQ 50 XA iQ CNX 40 -- iQ CNX 50 -- iQ | ||
| A | Cleaner + floating cable | ✔ | ✔ | ✔ | ✔ | ✔ |
| B | Control box | ✔ | ✔ | ✔ | ✔ | ✔ |
| C | Base | ✔ | ✔ | ✔ | ✔ | |
| D | Trolley kit | + | + | + | ✔ | ✔ |
| E | Single filtration (100 μ) | ✔ | ||||
| F | Dual filtration (150/60 μ) | + | ✔ | ✔ | ✔ | ✔ |
| G | Protective cover | + | + | + | + | + |

Included

Optional extra
1.2 I Technical specifications and parts list
1.2.1 Technical specifications
| RE 41 -- RE 42 -- XA 10 -- XA 20 -- 10 XA 20 XA CNX 10 -- CNX 20 -- | RE 43 -- CNX 25 -- | RE 44 -- iQ XA 30 -- iQ 30 XA iQ CNX 30 iQ OZ 44 -- iQ | RE 45 -- iQ | RE 46 -- iQ RE 47 -- iQ XA 40 -- iQ XA 50 -- iQ 40 XA iQ 50 XA iQ CNX 40 -- iQ CNX 50 -- iQ | ||
| Control box power supply voltage | 220 - 240 VAC / 100 - 240 VAC*, 50/60Hz, Class II** | |||||
| Cleaner power supply voltage | 30 VDC | |||||
| Maximum power input | 150 W | |||||
| Cable length | 15 m | 18 m | 18 m | |||
| Filter capacity | 4 L | |||||
| Cleaner size (L x W x h) | 41 x 42 x 28 cm | |||||
| Package size (L x W x H) | 56 x 56 x 38 cm | 56 x 56 x 46 cm | ||||
| Cleaner weight (without cable) | 8 kg | |||||
| Packaged weight | 14 kg | 18 kg | ||||
| Suction width | 230 mm | |||||
| Maximum operating depth | 4 m | |||||
| Protection index | Power supply | IPX5 | ||||
| Cleaner | IPX8 | |||||
| Frequency bands | 2.400 GHz - 2.497 GHz | |||||
| Radiofrequency emission power | +19.5 dBm | |||||
- according to model
- Class II: appliance with double insulation or reinforced insulation that does not require grounding.
1.3 I Operating principle
The cleaner is independent of the filtration system and can therefore operate autonomously. It just simply needs to be connected to the mains power supply.
It finds the best route to move around and clean the areas of the pool for which it has been designed (depending on the model: floor, walls, water line or floor only). Debris is sucked in and stored in the cleaner's filter.
The cleaner can be used:
- Via the control box supplied with the cleaner,
- Or via a smartphone or a tablet compatible with the iAquaLink™ application (see "③ Using the iAquaLink™ app (for iQ models)").

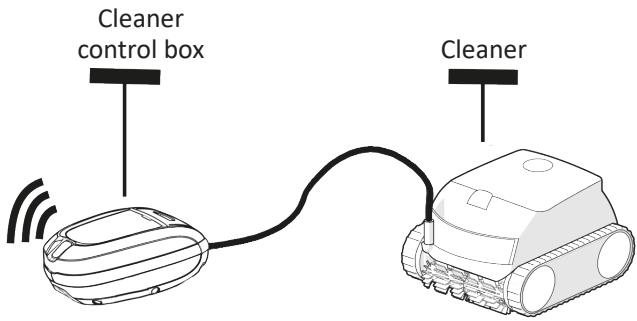
(^* Depending on the model)
A: Control box
B: Trolley*
C: Cleaner
D: Floating cable
E: Plug
F:Power cord
G: "iAquaLinkTM" remote control *
1.4 Pool preparation

-
This product is intended to be used in pools which are permanently installed. Do not use it in pools which may be dismantled. A permanent pool is built into the ground or on the ground and cannot be easily dismantled and stored.
-
The appliance must operate in pool water with the following properties:
| Water temperature | Between 10°C and 35°C |
| pH | Between 6.8 and 7.6 |
| Free chlorine | < 3 mg/l |
- When the pool is dirty, especially when commissioning, remove the largest debris using a net in order to optimise the appliance's performances.
- Remove any thermometers, toys and other objects that might damage the appliance.
2.1 Immersing the cleaner
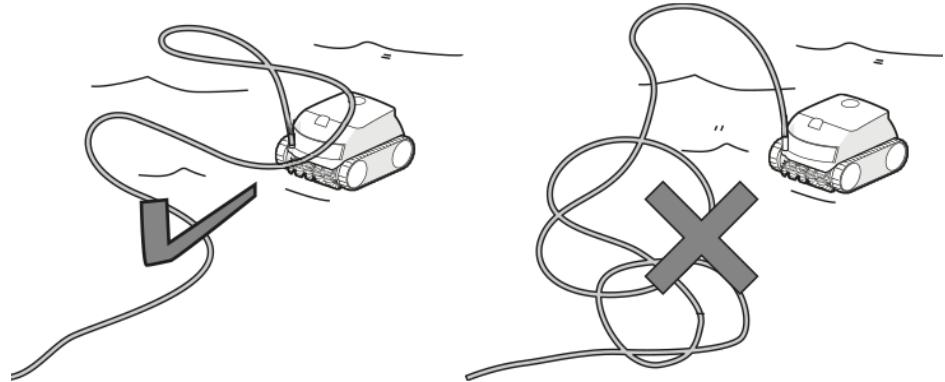
- Roll out the full length of the cable alongside the pool to avoid the cable becoming tangled during immersion (see figure 1).
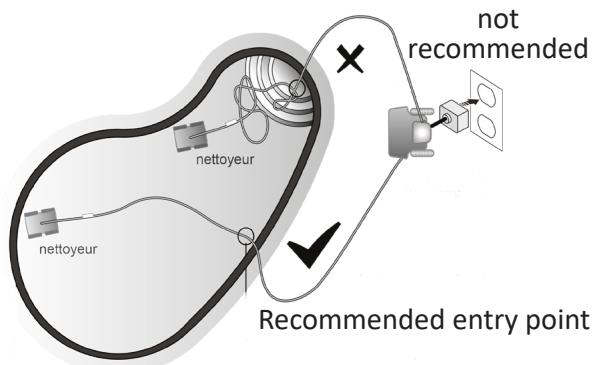
- Position yourself halfway along the length of the pool before immersing the cleaner (see figure 2). This will optimise the cleaner's movements and reduce tangling in the cable.
- Place the cleaner vertically into the water (see figure 3).
- Move it slightly in all directions so that the air contained in the cleaner escapes (see figure 4).
- Unroll enough cable into the pool to allow the cleaner to move in the whole pool. Lay the rest by the pool side (see figure ⑤).

1
2

3

4
5
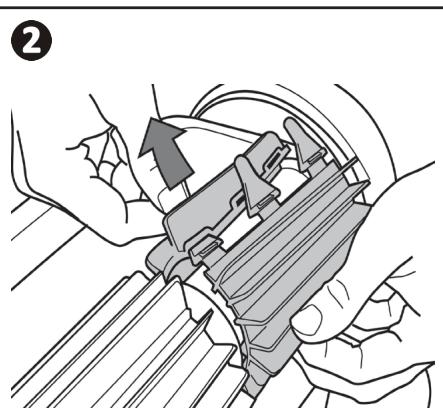
2.2 | Attachment to the base

0
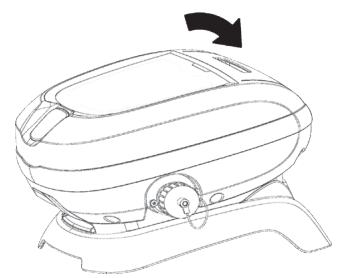
2
2.3 | Electricity supply connection

In order to avoid any risk of electrocution, fire or serious injury, please follow the instructions below:
- Use of an electrical extension is prohibited when connecting the control box.
- Make sure that the socket can be easily accessed at all times and is protected from rain or splashes.
- The control box is impervious to spray but must not be immersed in water or any other liquid. It must not be installed in a floodable area; keep it at least 3.5 metres away from the edge of the pool and avoid exposing it to direct sunlight.
-
Place the control box near the socket.
-
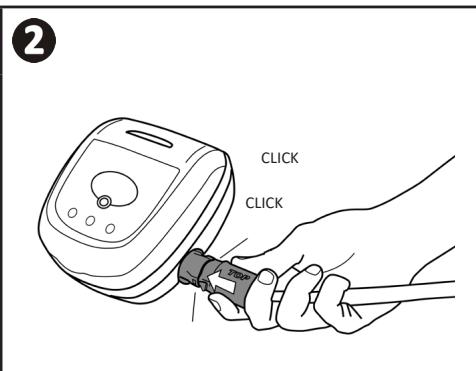
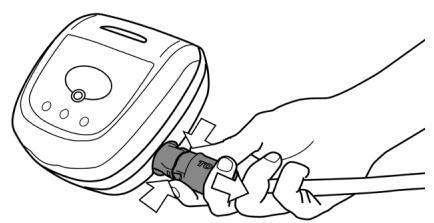
Connect the floating cable into the control box (see figure 1).
- Push the connector in until you hear 2 clicks (see figure ②). Make sure the connector is sufficiently pushed into place. If it is not, repeat the operation.
- Connect the power cord (see figure 3). Only connect the control box to a power outlet protected by a 30mA maximum residual current device (if in doubt contact a qualified technician).
- To disconnect the floating cable from the control box, pinch the 2 clips at the end of the connector and pull at the same time (see figure 4).


4
The control box is used to control the main functions or to connect the cleaner to the home Wi-Fi network (see "Using the iAquaLink™ app (for iQ models)").
| Function | |
| Keys | |
| Start/stop the cleaning cycles | |
| Change the "Surface to be cleaned" mode * | |
| Set up the iAquaLink™ connection * | |
| Lift System mode * | |
| Indicator lights | |
| "Floor only" mode activated * | |
| "Floor + walls + waterline" mode activated * | |
| Bluetooth™ connection status * | |
| Wi-Fi connection status * |
- Depending on the model

-
Do not use the appliance if the roller shutter is closed.
-
The control box switches to standby after 10 minutes. Press any key to exit standby mode. Standby mode does not stop the appliance if it is in a cleaning cycle.
2.5.1 Choice of cleaning mode
- The cleaning mode defines the surface to be cleaned and the duration of the cleaning cycle (depending on the model).
- By default, a cleaning mode "Floor + walls + water line" is pre-configured. A blue LED indicates the chosen mode.
- The cleaning cycle can be modified before the appliance starts or while it is operating. The previous cycle stops. Press

to start a new cycle. The remaining time from the previous cycle will be reset.

-
For dual-filtration models, launch several cycles without the very fine debris filter to pre-clean the pool.
-
Press MODE (depending on the model)

Surface to be cleaned

Floor only
Floor + walls + waterline
2.5.2 Launching the cleaning cycle
Press

The cleaner adapts its movement strategy to the cleaning mode, in order to optimise its level of coverage.

Tip to improve cleaning performance
At the start of the bathing season, launch several cleaning cycles in bottom only mode (after removing the large debris with a net).
Regular use of the cleaner (without exceeding 3 cycles per week) means that your pool will always be clean and the filter less clogged.

2.6 I Removing the cleaner from the water

- To prevent damaging the equipment, use only the handle to remove the appliance from the pool.
2.6.1 For models without the Lift System mode

- Wait for the cycle to end or switch off the appliance by pressing
- Bring the cleaner to the edge of the pool by gently pulling on the floating cable.
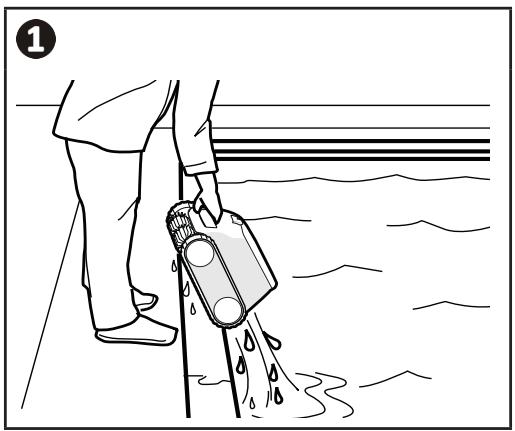
- When possible, pick up the cleaner by the handle and lift it gently out of the pool so that the water it contains drains into the pool (see figure 1).
2.6.2 For models with the Lift System mode (depending on the model)

The Lift System function was designed to facilitate removing the cleaner from the water. It may be activated at any time, during or at the end of a cleaning cycle.
- If the cleaner is facing the right wall, press and release the button. The cleaner moves towards the wall.
- If the cleaner is not facing the right wall, press and hold the button: the cleaner pivots to face the right wall. When facing the right wall, release the button. The cleaner moves towards the wall.
- The cleaner climbs the wall and stays at the waterline.
- Use the handle to take it out of the water. The cleaner expels water through a rear jet to make it lighter.

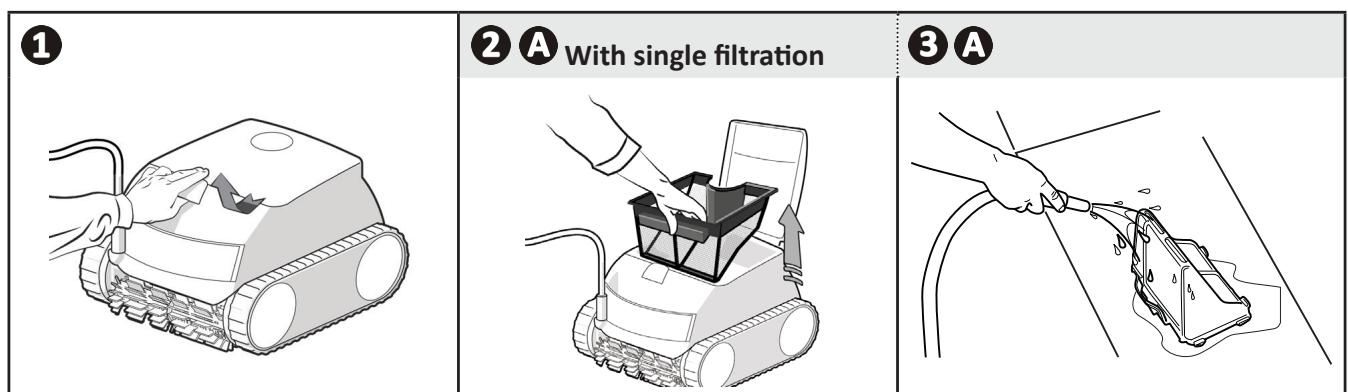
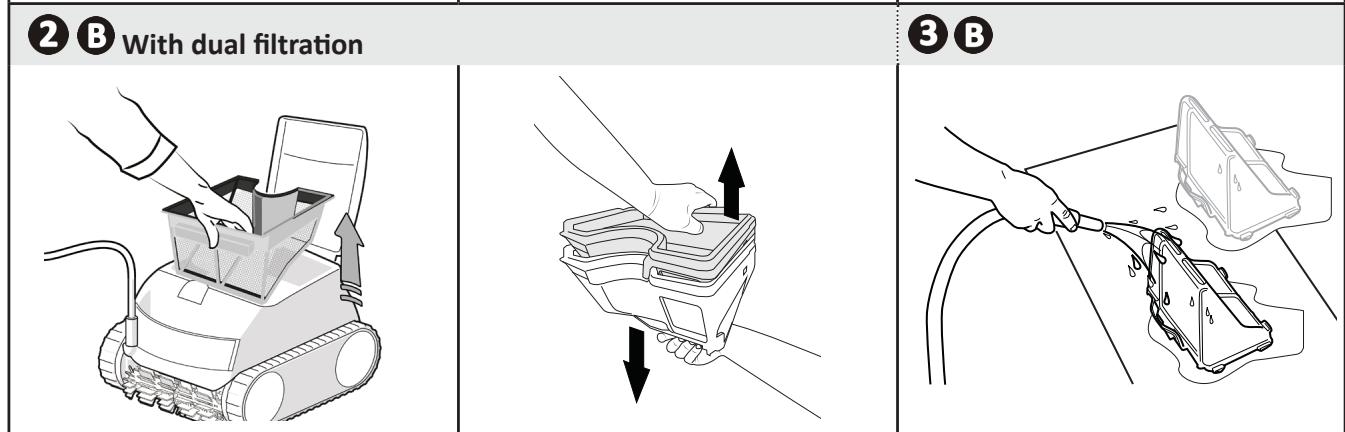
2.7 I Good practices after each cleaning operation
2.7.1 Clean the filter as soon as the appliance is out of the pool

- The cleaner's performance may be reduced if the filter is full or dirty.
- Clean the filter in clean water as soon as the appliance is removed form the pool after each cleaning cycle. Do not wait for the debris to dry.
After each cleaning cycle, follow the steps for cleaning the filter, see "4.2 I Cleaning the filter".
2.7.2 Lay out the cable to reduce tangling
The appliance's behaviour is strongly impacted by the tangling of the cable. A cable that is correctly untangled will guarantee better coverage of the pool.
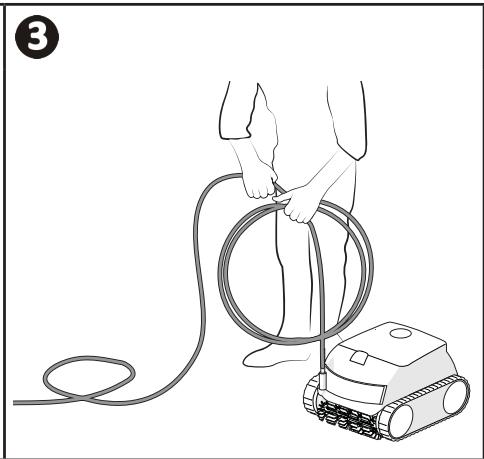
- Disconnect the cable from the control box (1),
- Untangle the cable and lay it out in the sun so that it returns to its original shape (2).
- Roll up the cable starting with the end of the cable closest to the cleaner (3).


2.7.3 Store the cleaner and cable

- Rinse the cleaner with clear water.
- Store all the elements away from sunlight, humidity and bad weather.
-
Screw the protective cap back on if you disconnect the floating cable from the control box.
-
Place the cleaner vertically at the location provided on the trolley for it to dry out quickly. Roll up the cable carefully and place it on the trolley handle (see figure 1).
- Store all elements away from direct sunlight and any splashes. A protective cover is available as an optional extra (see figure ②).

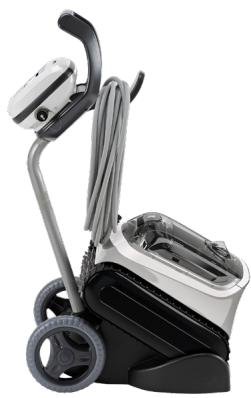


Tip: Even if you do not own a trolley, the cable must still be carefully arranged for storage. Once rolled up, the cable can be placed on a wall mount for example.

Using the iAquaLink™ app (for iQ models)

Mobile device (smartphone or tablet)

The iAquaLink™ app is available for iOS and Android systems: it provides additional functions.
Use the iAquaLink™ app to benefit from advanced functions such as troubleshooting assistance by inputting error codes and have full control over the cleaner wherever you are, at all times.
3.1 | First-time cleaner configuration

Before you install the app, you must:
- Connect the control box to a power outlet,
- Immerse the cleaner in the pool,
- Use a Wi-Fi-enabled smartphone or tablet,
- Use a Wi-Fi network with a reasonably strong signal when connecting to the cleaner's control unit: the Wi-Fi signal must be detectable at the place of use of the cleaner and the control unit. If this is not the case, a technical solution must be provided to amplify the existing signal.
-
Have your home Wi-Fi network password at the ready.
-
Download the iAquaLink™ app from the App Store (iOS) or Google Play Store (Android).
1

- Log in or register.
2
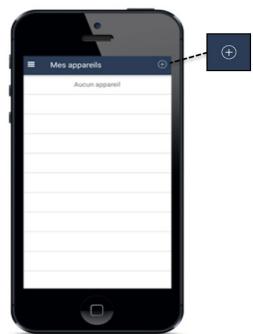
- Press the ^+ icon to add a new appliance.
3

- Select "Robotic cleaner".
- Select your model.
4
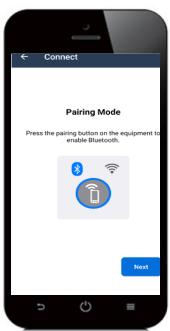
Press the control bo and start t

"button on the table BluetoothTM ring process.

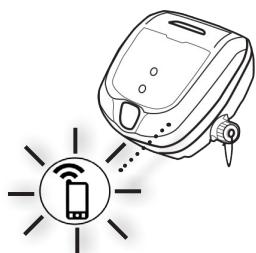
5

The LED flashes during the pairing process.
- A message is displayed on the screen to confirm that the Bluetooth™ connection has been made between the control box and the smartphone. The LED stops flashing. (*)
6
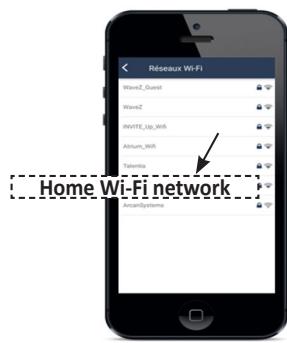
- Select the home Wi-Fi network.
7
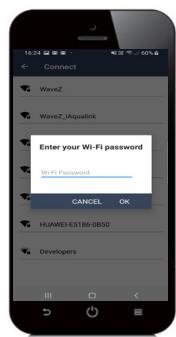
- Enter your Wi-Fi password.
8

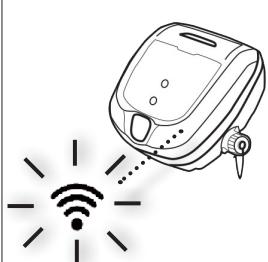
- The LED flashes during the pairing process.
- A message is displayed on the screen to confirm that the Wi-Fi connection has been made between the control box and the home router. (*)
- The LED stops flashing and the LED goes out.
9

- Choose your own name for the cleaner to easily identify it.
- From the "My Systems" page, click on the cleaner to access the control functions via the iAqualink™ app.

(*): If an error message appears or the connection still isn't made, refer to the table "5.3 I Troubleshooting the connection to the iAquaLink™ app".
3.2 I Available functions in the iAqualink™ app
| Smartphone via the iAquaLinkTM app: | RE 44 -- iQ RE 45 -- iQ XA 30 -- iQ 30 XA iQ CNX 30 -- iQ OZ 44 -- iQ | RE 46 -- iQ RE 47 -- iQ XA 40 -- iQ XA 50 -- iQ 40 XA iQ 50 XA iQ CNX 40 -- iQ CNX 50 -- iQ | |
| Remote control (Wi-Fi) | ✔ | ✔ | |
| Start the cleaning cycle | ✔ | ✔ | |
| Stop the cleaning cycle | ✔ | ✔ | |
| + - | Change the cycle time | ✔ | |
| Running 02:44 Ultra Clean Floor & Wall - High | ✔ | ✔ | |
| Monitor the progress of the cleaning cycle | ✔ | ||
| Remote control | ✔ | ||
| Lift System function: to help remove the cleaner from the pool | ✔ | ||
| Choose the pre-saved cleaning modes | ✔ | ✔ | |
| Cleaner optimisation by automatic updates | ✔ | ✔ | |
3.2.1 Programming and controlling the cleaning cycles (depending on the model)
From the application:
- Start/stop cleaning;
View the current cycle's remaining cleaning time (displayed in hours and minutes); - Increase/Reduce the cleaning time by 15-minute sequences (depending on the model);
- Choose the pre-saved cleaning modes.

- The new cleaning mode will take effect for the cleaning cycle in progress and all future cycles.
- The cleaning cycle time may vary depending on the selected settings.
3.2.2 Remote control (depending on the model)

-
Use the remote control only if you have the cleaner within view.
-
The cleaner can be controlled using your smartphone or tablet as a remote control via "Joystick mode":
- Press the icons to move the cleaner forwards and backwards and to turn left or right.

- If the cleaner is relatively slow to respond to an action requested in the app, check the Wi-Fi network signal, see "3.1 | First-time cleaner configuration".
3.2.3 "Lift System" mode (depending on the model)

-
Only activate the Lift System function if the cleaner is in view.
-
From the application, press to use the Lift System function (see §"2.6.2 For models with the Lift System mode (depending on the model)").
- Press the arrows to rotate the cleaner left or right.
- When the cleaner is facing the right wall, press the button to bring the cleaner to the wall.
3.2.4 Error messages
If an error is detected, a warning symbol will be displayed on the home screen
- Press the warning symbol to display the troubleshooting solutions, see "5.2 I User alerts".
- Press Clear Error if you think you have solved the problem, or select OK if you want to leave the cleaner in error mode and troubleshoot the problem later.v
3.2.5 Settings Menu
Some of the cleaner's settings can be modified at any time by pressing the icon at the top right.

To maintain the longest possible life of the robotic cleaner, we recommend to check all the parts of the cleaner described in chapter 4. Maintenance at least once a month.
To avoid serious injury:
- Disconnect the cleaner from the power supply.
4.1 I Cleaning the cleaner
- The appliance must be cleaned regularly using clean or slightly soapy water. Do not use solvents.
- Rinse the appliance thoroughly with clean water.
- Do not let your appliance dry in the sun by the pool.

Tip: To preserve the integrity of the cleaner and guarantee optimum performance:
- The filter and brushes should be replaced every 2 years,
- Examine the wear indicator on the tracks and replace the tracks as soon as the indicator is reached.
4.2 I Cleaning the filter

- The cleaner's performance may be reduced if the filter is full or dirty.
-
Clean the filter with clean water after each cleaning cycle.
-
If the filter is blocked, clean it with an acid solution (spirit vinegar, for example). It is recommended that you do this at least once a year, since the filter will clog if not used for several months (winterising period).

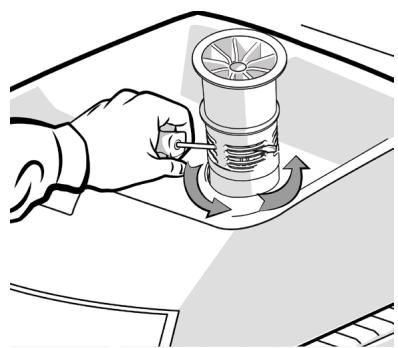
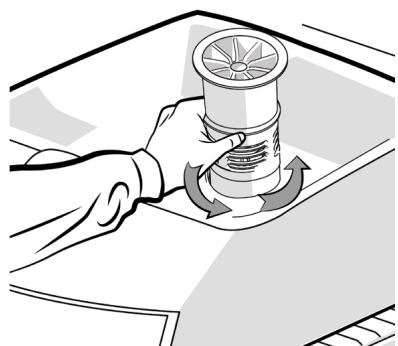
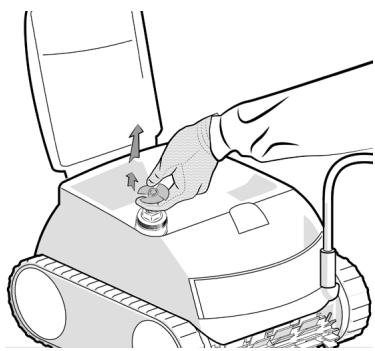
4.3 I Cleaning the impeller

To avoid serious injury:
- Disconnect the cleaner from the power supply.
- Wear gloves when maintaining the impeller

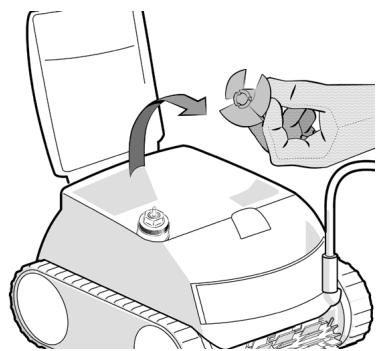
- Open the filter access hatch by lifting the lock (see figure 1).
- Remove the filter (see figure 2).
- Insert a screwdriver into the holes and maintain right pressure to loosen flow guide by turning the screwdriver in the anti-clockwise direction (upon first removal, the flow guide is securely tightened) (see figure 3).
- Once the flow guide has been loosened, unscrew it by hand (see figure 4).
- Remove the flow guide (see figure 5) by lifting it.
- Put on a pair of gloves and pull the impeller, holding it firmly to take it out (see figures 6 and 7).
- Remove any debris (leaves, stones, etc.) which may be blocking the impeller.

- Once cleaning is complete, reinsert the impeller and the filter firmly.

1

2
3
4

5
6
7
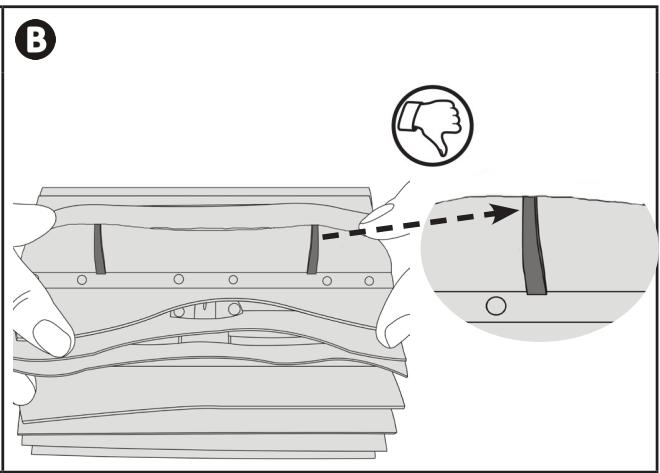
4.4 I Replacing the brushes
Are the brushes worn?
- Replace the brushes if the wear indicators are similar to example B:

Remove the worn brushes
- Remove the tabs from the holes inside which they are fastened, then remove the brushes.

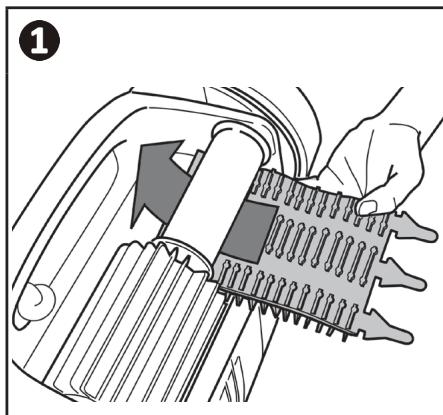
Position the new brushes.
- Fit the side without tabs under the brush holder (see figure 1).
- Roll the brush around its support, slide the tabs into the attachment holes and pull on the end of each tab until its edge passes through the slit (see figure ②).
- Cut the tabs using a pair of scissors for them to be level with the other blades (see figure 3).


-
If a problem occurs, before you contact your retailer, please carry out these few simple checks using the following tables.
-
If the problem persists, contact your retailer.

Actions to be performed by a qualified technician only.
5.1 | Appliance behaviour
| Part of the pool is not correctly cleaned | • Repeat the immersion steps (see § "2.1 Immersing the cleaner"), varying the immersion location until you find the right place in the pool. • The positioning of the cable can limit the cleaner's movement: check that enough cable is unrolled into the pool and that the rest of the cable is laid out by the pool side. • The filter is full or dirty: clean it. |
| The appliance does not stay firmly on the pool floor | • There is still air in the appliance's casing. Repeat the immersion operations (see §"2.1 Immersing the cleaner"). • The filter is full or dirty: clean it (see "4.2 I Cleaning the filter"). • If the filter remains clogged despite cleaning: replace it. • The impeller is damaged: |
| The appliance does not climb the walls or no longer climbs the pool walls as it originally did | • Check that the Floor/Walls/Waterline mode is chosen. • In Bottom/Walls/Waterline mode, the cleaner does not systematically climb the walls. The frequency varies during the cycle. The cleaner does not necessarily climb the walls at the beginning of the cycle. To be sure that the cleaner never climb the walls, it is necessary to observe the cleaner behaviour for about 20 minutes. • The filter is full or clogged: clean it with fresh water. If the filter is clogged, clean it with an acidic solution (spirit vinegar, for example). Replace the filter if necessary • The tracks are slack: contact your retailer to replace them • Clean the check valve without removing it. • Debris/objects prevent the bypass from operating: contact your retailer to clean the bypass. • Even though the water seems clear, microscopic algae are present in your pool. They are not visible to the naked eye, and they make the walls slippery and prevent the appliance from climbing. Carry out shock chlorination and slightly reduce the pH. Do not leave the appliance in the water during shock treatment. |
| The appliance does not move on start-up. | • Check that the control box's power socket is receiving a power supply. • Check that a cleaning cycle has been launched and that the lights are on. |
| The cable gets tangled | • Unroll as much cable as possible in the pool and lay the rest by the pool side. |
| The control box does not respond to any button presses. | • Unplug the power cord from the mains socket, wait 10 seconds and plug it back in again. |
- The status indicator on the control box flashes to alert the user, follow the recommended troubleshooting tips below. User alerts can also be accessed in the iAquaLink™ app (on iQ models).
| LED (Power) or LED (Start) | Display in the iAquaLinkTM app (depending on the model) | Solutions |
| 1s 1s 1s 1s | Communication | · Disconnect and reconnect the cleaner. · Check that the cable is properly connected to the control box. · Check that nothing is interfering with the cable connection area. · If this fails to solve the problem, contact your retailer for a full diagnosis. |
| 1s 1s 1s | Right traction motor Left traction motor Right traction motor consumption Left traction motor consumption | · Check that debris or the cable is not preventing the brushes or the tracks from rotating freely. · Check that nothing is interfering with the cable connection area. · Rotate each wheel by a quarter of a turn in the same direction until it rotates smoothly · If this fails to solve the problem, contact your retailer for a full diagnosis. |
| 1s 1s 1s | Cleaner out of the water | · Turn the cleaner off. · Clean the filter thoroughly. · Put it back in the water, shaking to release the air bubbles. · Restart the cycle. · If this fails to solve the problem, please contact your retailer for a full diagnosis. |
| Pump motor Pump motor consumption | · Check that no debris or hair is blocking the impeller. · Clean the filter thoroughly. · If this fails to solve the problem, contact your retailer for a full diagnosis. | |
| 1s 1s | Update failed or incomplete | · Disconnect the control box for at least 15 seconds. · Close the iAquaLinkTM app. · Connect the control box to the cleaner. · Connect the control box to the mains. · Check that the control box is correctly connected to the home Wi-Fi network (LED is lit). · On iAquaLinkTM app, select the cleaner and click on "Update". |
| Rapid flashing | Update in progress | · Wait for the update to complete. · Do not disconnect the power cable from the cleaner during an update. |
| N/A | Connection error | · Check the status of the Bluetooth/Wi-Fi LEDs on the control box and follow the steps described in the table "5.3 I Troubleshooting the connection to the iAquaLinkTM app". |
| N/A | A red dot appears in the "My systems" list | · Appliance not plugged in or not connected to the home Wi-Fi network. If the dot is red when the control box is plugged in and if the Bluetooth/Wi-Fi icons are lit up, refresh the screen (by swiping downwards). · If the dot turns green: the appliance is ready for use. |
Deleting an error code
Using the control box:
- After following the troubleshooting solutions, press any key to delete the error code (except the button).
From the iAquaLinkTM app:
- After following the troubleshooting solutions, press Clear Error.
5.3 I Troubleshooting the connection to the iAquaLink™ app
| Control box status | Possible causes | Solutions |
| · The LED is flashing. | · The version of the app used is obsolete. | · Update the app version. |
| · The control box is connected to the router but not to the cloud server (LAN connected, WEB not connected). · Incompatible 5 GHz router. | Contact your Internet service provider. · Disconnect the home Wi-Fi router for 10 seconds. Re-connect it and see whether the LEDs come back on. · Check the internet connection - the network may be down. · Replace the router. | |
| · All LEDs are off. | · Very high luminosity. | · Cover the appliance to protect it from the sun's rays and check that the light indicators turn on. |
| · Control box disconnected. | · Connect the control box (see "2.3 I Electricity supply connection"). | |
| · Power cut. | · Check that there is power to the circuit breaker. · Check that there is power to the socket by connecting another appliance to it. | |
| · Internet connection lost. | · Check the internet connection - the network may be down. | |
| · The LED is off. · The LED is lit but the Wi-Fi connection is non-existent (or spotty). The "Connection Error" message is displayed on the screen in the iAquaLink™ app. | · Internet connection lost. · Weak Wi-Fi signal*. · The control box is too far from the home Wi-Fi router. | · Check the internet connection - the network may be down. · Ensure that you have a sufficiently strong Wi-Fi signal. There are several ways to check the strength of the Wi-Fi signal: - Unplug the home Wi-Fi router, then plug it back in. - Using a laptop, go into Configuration Panel to see the status of your network connections. Check the strength of the wireless network signal on the laptop by checking the status of the control box connection. - Install the iAquaLink™ app, using a smartphone or tablet. Check the strength of the wireless network signal on the mobile device by checking the status of the control box connection. If the Wi-Fi network is weak, install a Wi-Fi extender. - Use an app dedicated to analysing the Wi-Fi connection: several are available in iOS or Android. · On initial set-up, place the cleaner's control box as close as possible to the home Wi-Fi router. Do not use an electrical extension (see "2.3 I Electricity supply connection"), then repeat the configuration steps (see "3.1 I First-time cleaner configuration"): - Once the LED lights up, plug in the control box near the pool. - If the LED does not light up, plug in the control box again as close to the house as possible. - If the LED still does not light up, install a Wi-Fi extender. |
| ·The LED is lit and the "PROG" message is displayed (depending on the model). A message is displayed in the app. ·The buttons can't be activated. ·The LED is not lit during this operation. | ·A software update is in progress. | ·Wait for the update to complete. ·Do not disconnect the power cable from the cleaner during an update. |
| *There may be several reasons for a weak Wi-Fi signal - The distance between the router (box) and the cleaner's control box, - The type of router (box), - The number of walls separating the router (box) from the cleaner's control box, - The Internet service provider, - etc... | ||