ARIA - Electric heater ROINTE - Free user manual and instructions
Find the device manual for free ARIA ROINTE in PDF.
User questions about ARIA ROINTE
0 question about this device. Answer the ones you know or ask your own.
Ask a new question about this device
Download the instructions for your Electric heater in PDF format for free! Find your manual ARIA - ROINTE and take your electronic device back in hand. On this page are published all the documents necessary for the use of your device. ARIA by ROINTE.
USER MANUAL ARIA ROINTE
INSTALLATION AND USER MANUAL
Page 24
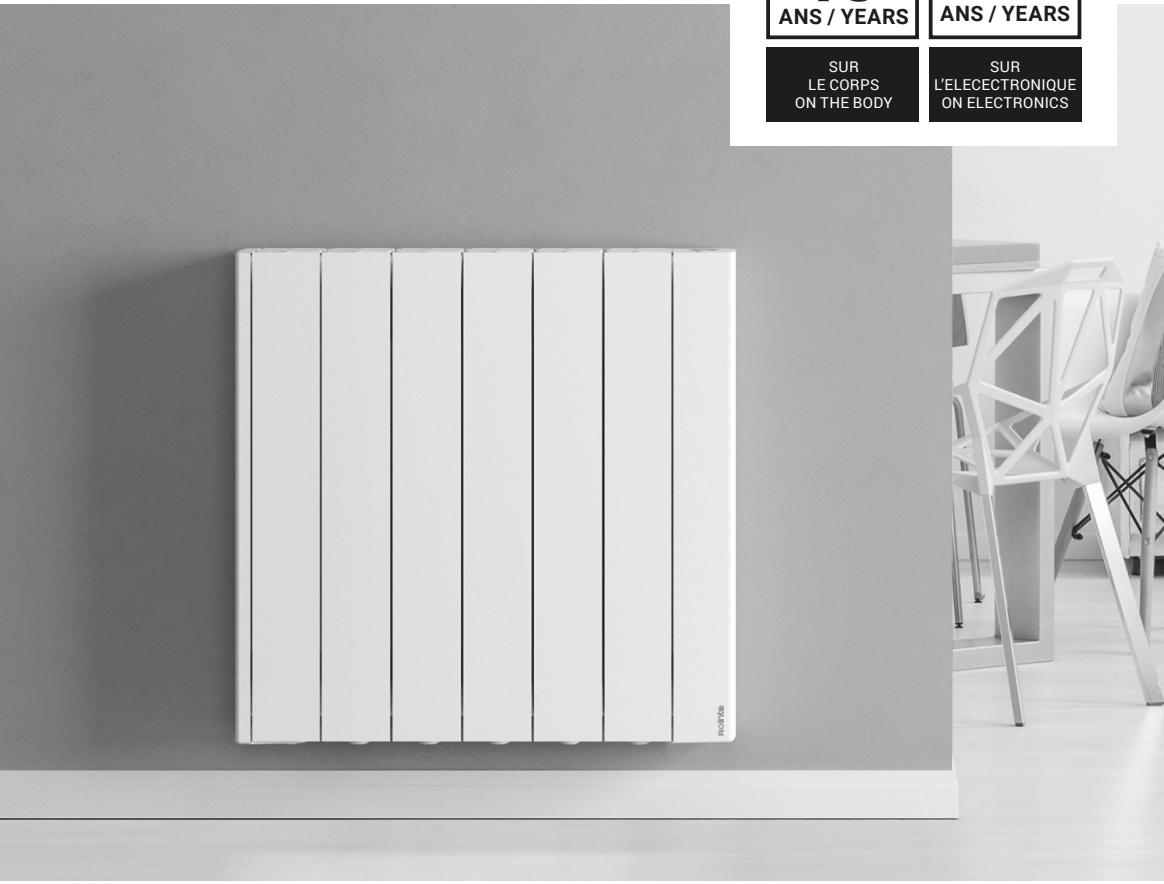
GARANTIE / GUARANTEE
10
ANS/YEARS
3
ANS/YEARS
SUR
LE CORPS
ON THE BODY
SUR
LEECECTRONIQUE
ON ELECTRONICS
SYMBOLS

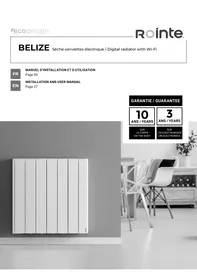
ARF0500RAD2/ ARF0750RAD2
ARF1000RAD2/ ARF1250RAD2
ARF1500RAD2/ ARF2000RAD2
4. MONITEUR & KEYPAD
DANGER. This symbol indicates a medium-high risk hazard which can result in serious injury or even death.

DO NOT COVER. Do not dry or leave clothes or towels on the radiator. Do not leave or place magazines, spray cans, volatile substances, or similar objects within 250~mm of the radiator.

HOT SURFACE. This symbol indicates that your surfaces are hot during and immediately after use. These must not be touched: danger of burns.

OBSERVE THE INSTRUCTIONS IN THE MANUAL. Please read this manual carefully before installing and using the product. Keep it for later use. Read all instructions and safety warnings. Failure to follow these can result in electric shock, fire or serious injuries.
INDEX
- GeneralWarnings 26
- Technical information 29
3.Installation 30 - Screen & Keypad 33
- Functionality and programming 34
5.1. Turn ON & OFF 34
5.2. Select the set temperature 34
5.3.Temperature control. 34
5.4.Lock/Unlockbuttonpad 34
5.5.Setting menu 35
5.5.1.Settingsubmenu 35
5.5.2. Energy submenu 37
5.5.3.Prog.mode 38
5.5.4 User mode 41
- Maintenance and cleaning 42
- European Regulation (WEEE) 2012/19/EU 42
8.Guarantee 42
9.How to register your product guarantee 45
Directive ERP Commission Regulation 46
Declaration of conformity 47
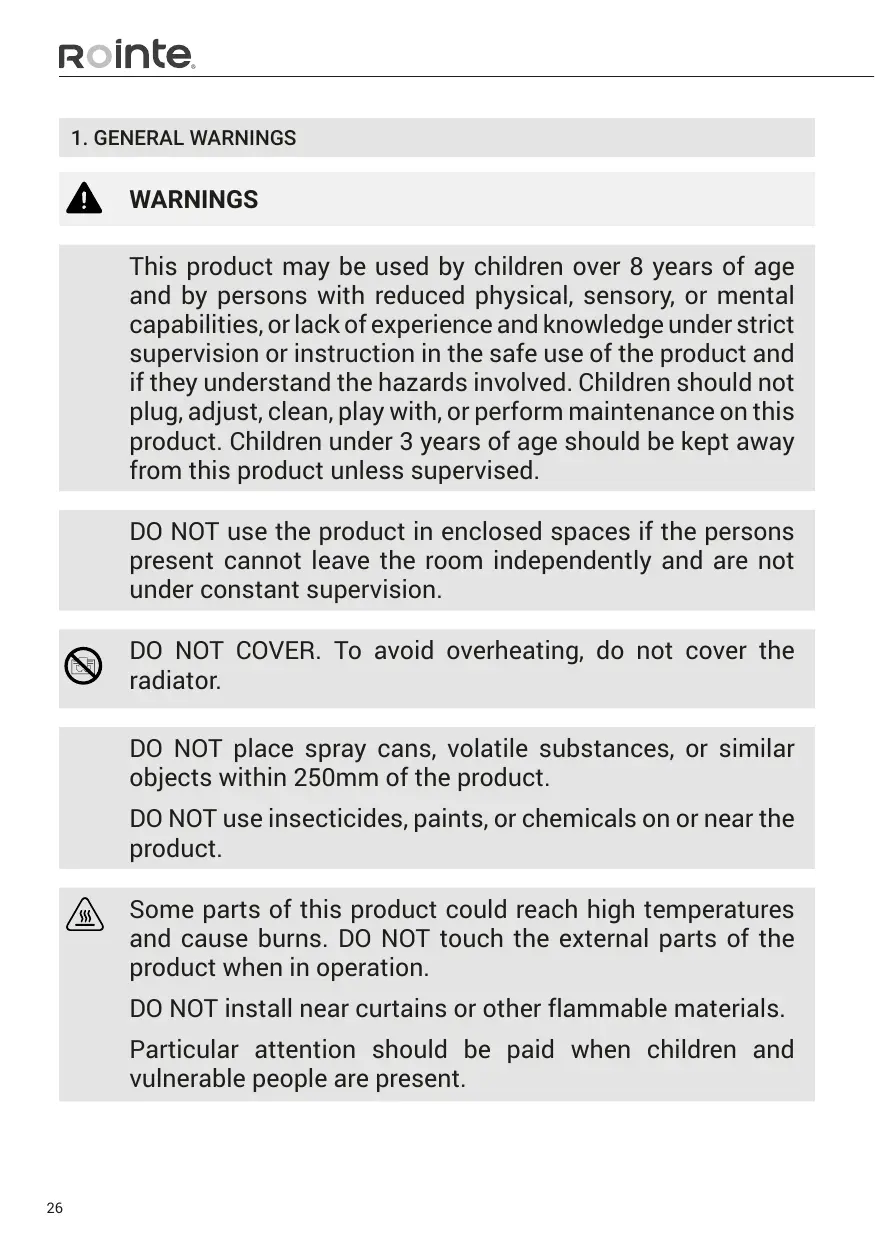
1. GENERAL WARNINGS

WARNING
This product may be used by children over 8 years of age and by persons with reduced physical, sensory, or mental capabilities, or lack of experience and knowledge under strict supervision or instruction in the safe use of the product and if they understand the hazards involved. Children should not plug, adjust, clean, play with, or perform maintenance on this product. Children under 3 years of age should be kept away from this product unless supervised.
DO NOT use the product in enclosed spaces if the persons present cannot leave the room independently and are not under constant supervision.

DO NOT COVER. To avoid overheating, do not cover the radiator.
DO NOT place spray cans, volatile substances, or similar objects within 250mm of the product.
DO NOT use insecticides, paints, or chemicals on or near the product.

Some parts of this product could reach high temperatures and cause burns. DO NOT touch the external parts of the product when in operation.
DO NOT install near curtains or other flammable materials. Particular attention should be paid when children and vulnerable people are present.
When using electrical appliances, precautions should be
taken to reduce the risk of fire, electric shock and injury.
Never insert fingers, body parts or objects inside the product.
Make sure that the voltage indicated on the product's
- technical information corresponds to the voltage output you have at your socket.
Any repair or maintenance that requires the product to be opened the product must be carried out by personnel authorised by ROINTE, who must also be notified if a leak
- is observed. Only official spare parts approved by ROINTE should be used. Please observe the current and relevant regulations when disposing of this product and it's natural stone core.
- If the power cable is damaged, it must be replaced by personnel authorised by ROINTE to prevent any damage.
To avoid the risk of suffocation, do not leave the packaging
- including bags and other items within reach of babies or children.
The product has an IP24 degree of protection and can be used in bathrooms, but not in the vicinity of bathtubs, taps, showers, water connections, toilets, swimming pools or other
masses of water. The product must never be installed where it, the switches or the control panel are within the reach of people in the water. Never use the product with wet hands. Do not place any water containers (glasses, vases, etc.) on or near the product.

IMPORTANT
Disconnect the product from the power supply and make sure the product is at room temperature before any cleaning
- or maintenance. Do not use any abrasive substances on the product, such as (but not limited to) chemicals, coarse cloths, brushes, hard bristle, or wire/steel wool.
- To disconnect the product from the power source, remove the mains plug from the socket. Do not pull on the cable.
ROINTE cannot be held responsible for incorrect sizing of
- the product unless it has been followed by an official ROINTE technical study.
Before the first start-up, or before the start of winter, or when
- the product has not been used for many days, the appliance should be cleaned (follow the steps in the "maintenance" section of this manual).
- Do not sit or lean on the product.
Temperature contrasts can generate "clicks" or noises in
- the device. This is not a fault of the product, but due to the expansion/contraction of the materials.
When disposing of the product, the requirements set out in
- the legislation for the waste treatment and recycling must be followed. See WEEE in section 8.
- TECHNICAL INFORMATION
| MODEL | ARF0500RAD2 | ARF0750RAD2 | ARF1000RAD2 | ARF1250RAD2 | ARF1500RAD2 | ARF2000RAD2 |
| Number of elements | 3 | 5 | 6 | 8 | 9 | 11 |
| DIMENSIONS, WEIGHTS & FINISHES | ||||||
| Width (mm) | 340 | 500 | 580 | 740 | 820 | 980 |
| Height (mm) | 575 | 575 | 575 | 575 | 575 | 575 |
| Depth (mm) | 95 | 95 | 95 | 95 | 95 | 95 |
| Installed depth (mm) | 118 | 118 | 118 | 118 | 118 | 118 |
| Weight (kg) | 12.5 | 18.6 | 22.5 | 28.7 | 32.3 | 39.2 |
| Finishes | White RAL 9010 | |||||
| ELECTRICAL CHARACTERISTICS | ||||||
| Nominal power (W) | 500 | 750 | 1.000 | 1.250 | 1.500 | 2.000 |
| Effective power (W) | 200 | 300 | 400 | 500 | 600 | 800 |
| Voltage (V) | 230 ~V | 230 ~V | 230 ~V | 230 ~V | 230 ~V | 230 ~V |
| Current (A) | 2,2 | 3,3 | 4,3 | 5,4 | 6,5 | 8,6 |
| SAFETY & INSTALLATION | ||||||
| Safety thermostat | ✓ | ✓ | ✓ | ✓ | ✓ | ✓ |
| Grade of protection | IP 24 | IP 24 | IP 24 | IP 24 | IP 24 | IP 24 |
| Template & Installation Kit | ✓ | ✓ | ✓ | ✓ | ✓ | ✓ |
| CLASS II | ✓ | ✓ | ✓ | ✓ | ✓ | ✓ |
| EAN code | 8435556145653 | 8435556145660 | 8435556145677 | 8435556145684 | 8435556145691 | 8435556145707 |
3. INSTALLATION
We recommend using a trusted Rointe supplier for installation of the product. Find the nearest one by calling us on 0203 321 5929 or using the locator on www.rointe.co.uk.
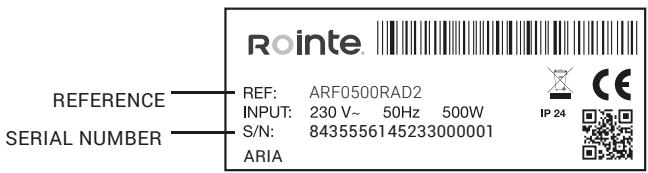
IMPORTANT: Prior to installation, please locate the metal tag located at the back of the product and note the product reference and serial number. You will need this information to register your guarantee. See section 10 for help on how to register the guarantee.
WARNING: Do not install the product directly over an electrical outlet or junction box. Do not install the product or use it outdoors. Do not install directly under a shelf. This product is designed to be installed on an interior wall using the ROINTE template, the installation kit and the fixings supplied. Do not install the product in such a way that it encounters the power cable.
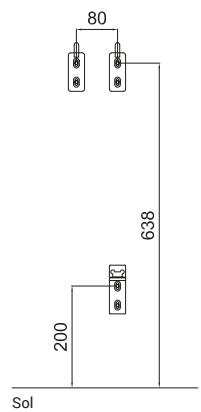
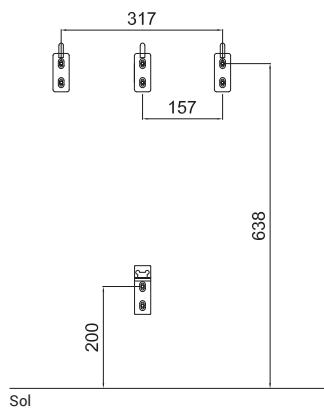
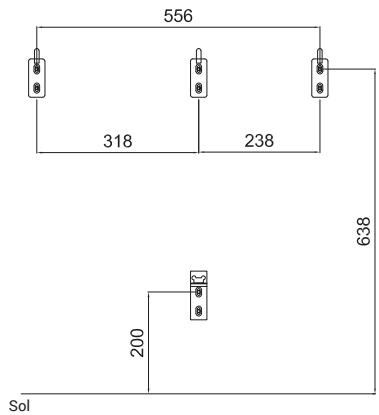
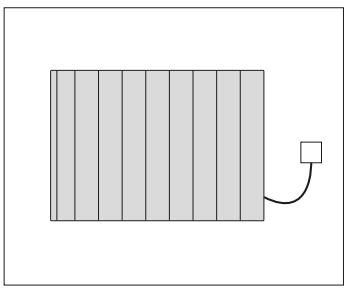
The product must be mounted on the wall in the position shown in the accompanying image using the brackets and with the fixings supplied.
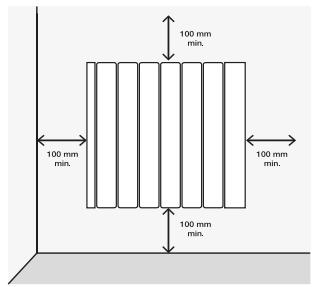
Our products transfer heat through the natural air convection. If the product is covered, this will disrupt the airflow and could cause overheating. It must be positioned in accordance with the minimum distances shown in the accompanying picture.
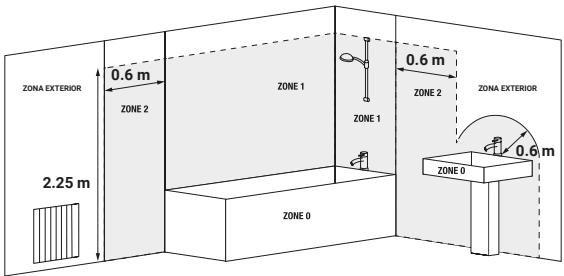
WARNING: The product has an IP24 degree of protection and can be used in bathrooms, but not in the vicinity of bathtub, taps, showers, water connections, toilets, swimming pools or other masses of water. The product can only be installed in zone 3 of the accompanying picture. The product must never be installed where it, the switches or the control panel are within the reach of people in the water. Never use the product with wet hands. Do not place any water containers (glasses, vases, etc.) on or near the product.
An installation kit is included in the product packaging. You will need a drill, a rubber mallet, a spirit level and a pencil to complete the installation.
WARNING: The weight of some of the products may be heavy. The installation may require two people.
IMPORTANT: Please follow these instructions carefully.

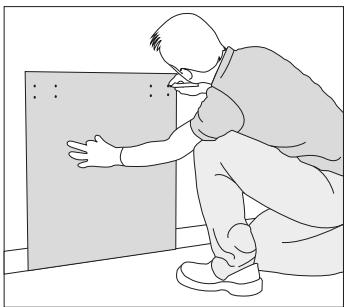
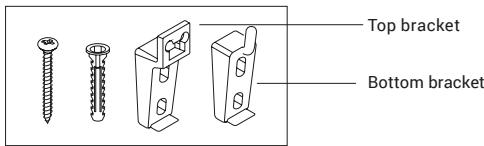
- Remove the packaging and check that the installation contains brackets, screws, rawl plugs and a cardboard template.
- Select a suitable location on the wall. Place the template on the wall and mark the holes for the brackets and screws. Observe the minimum distance requirements from the previous page.
Use the floor as a base for the template, not the skirting board.
- Remove the template and carefully drill out the marked holes.
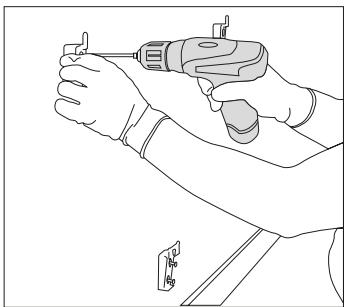
- Secure the upper brackets with the rawl plugs and screws provided. Then fix the lower bracket. To distinguish it, the lower bracket has a different design from the top ones.
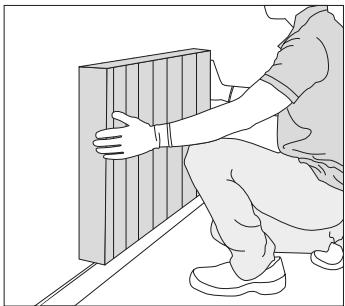
- Slide the product up and down over the fixed brackets.
- Check the straightness with a spirit level and adjust the supports accordingly if necessary.
- Connect your product to the power supply and switch it on.
- See section 5 for operating instructions.
IMPORTANT: Template measurements per model.
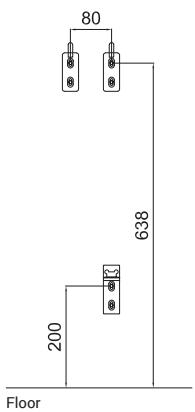
ARF0500RAD2/ ARF0750RAD2
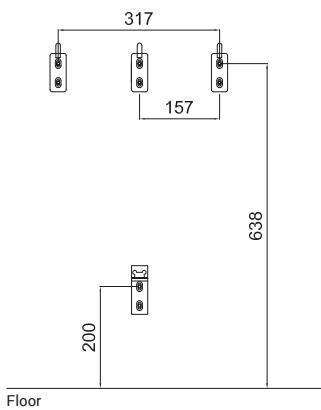
ARF1000RAD2/ ARF1250RAD2
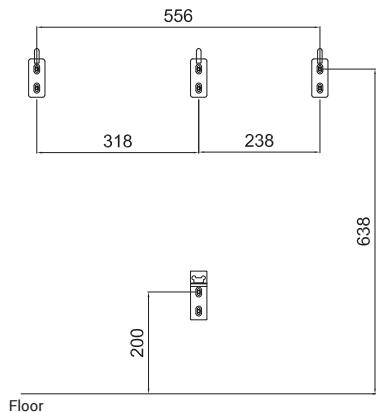
ARF1500RAD2/ ARF2000RAD2
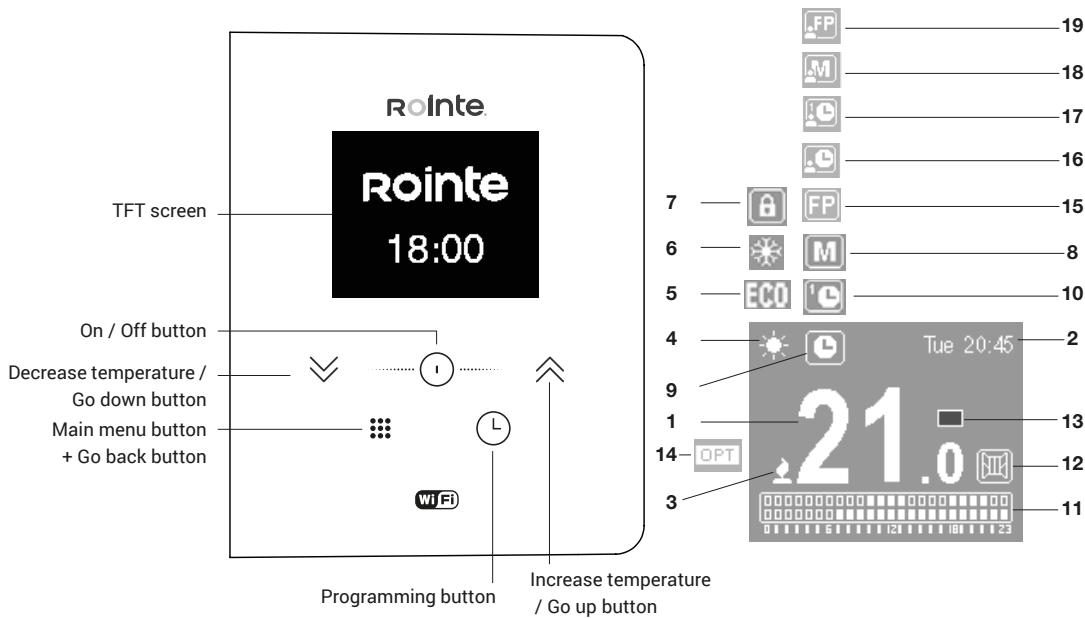
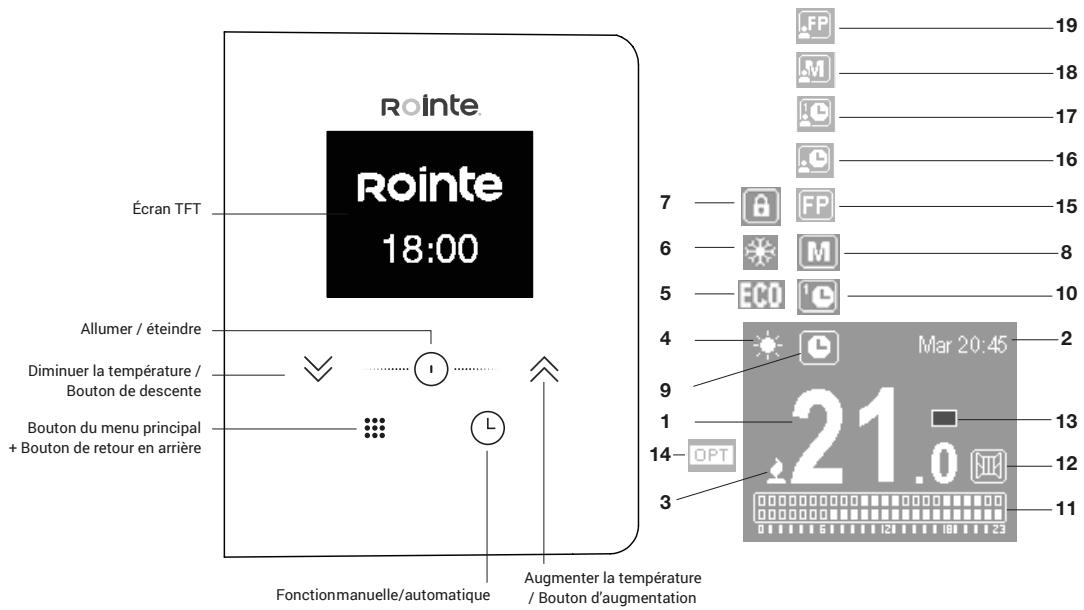
4. SCREEN & KEYPAD
| 1 | Selected temperature | 10.5 |
| 2 | Current time and day | Tue 10:45 |
| 3 | Heating element on | |
| 4 | Comfort mode | |
| 5 | Eco mode | ECO |
| 6 | Anti-Frost mode | |
| 7 | Locked buttonpad | 8 |
| 8 | Manual mode | M |
| 9 | Automatic mode | |
| 10 | Preset programs mode |
| 11 | Hourly programming | |
| 12 | Open Windows indicator | |
| 13 | Energy consumption indicator | |
| 14 | Optimizer function active | |
| 15 | Pilot wire | |
| 16 | Auto mode / User | |
| 17 | Pre-program mode / User | |
| 18 | Manual mode / User | |
| 19 | Pilot wire / User |
5. FUNCTIONALITY & PROGRAMMING
5.1. TURN ON AND OFF
To turn the product on press the button once. To turn off press the button again. When you turn the product on for the first time, it will ask you to set the date and time. Use the buttons to select the correct time and press the button to confirm. Then use the buttons to select the correct minutes and press . Use the buttons again to select the correct day and press the button to confirm.
5.2. SELECT THE SET TEMPERATURE
You can regulate the set temperature of the radiator by using the buttons. Press the button to increase the product temperature by 0.5^ or the button to decrease the temperature by 7^ . The temperature ranges for each mode are as follows:
| COMFORT | 19 - 30 °C |
| ECO | 7.5 - 18.5 °C |
| ANTI-FROST | 7 °C |
5.3. TEMPERATURE CONTROL
When the room temperature is lower than the selected temperature, the heating element is activated and the symbol appears. When the room reaches the selected temperature, the Optimizer software OPT is activated. The temperature control will perform an intelligent control, which will activate and deactivate the passage of electric current through the heating element to heat the radiator fluid.
5.4. LOCK / UNLOCK BUTTON PAD
The buttonpad can be locked using the control panel or the Rointe Lite App.
To lock / unlock the buttonpad using the product control panel, press and hold the and buttons together for 3 seconds.
The On/Off button will still work, even if the control panel is locked. Press the button for 3 seconds to switch the product on or off.
5.5. SETTINGS MENU
Press the button to access the configuration menu. The available options are: Settings, Energy and Programming mode.
| SETTINGS ENERGY PROG. MODE | Settings | Set time |
| Backlight | ||
| Language | ||
| Firmware | ||
| Energy | Open windows function | |
| Balance mode | ||
| Adaptative mode | ||
| Prog. mode | On/off | |
| Preset programs | ||
| User mode | ||
| Pilot wire (only available on request) |
Use the buttons to move between the menu options. A box will appear around the option you have selected. Press the button to enter the submenu.
5.5.1. SETTINGS SUBMENU
Press the 串 button to access the configuration menu. Then use the 串 buttons to navigate to SETTINGS. Press the 串 button to access.
| • Set the day and time To set the day or time select the CLOCK option. Use the ≅ buttons to select the correct time and press the ① button to confirm. Then use the ≅ buttons to select the correct minutes and press the ① button to confirm. Then use the ≅ buttons to select the correct day and press the ① button to confirm. | SET TIME TIME: 10:45 DAY: Mon |
| ·Adjust brightness This function allows you to adjust the brightness when the product is on or in standby. To adjust the brightness, select BACKLIGHT. With the buttons you can turn the brightness up or down. Press the按钮 to confirm. | BACKLIGHT ON: 50% STAND-BY: 50% |
| ·Language This function allows you to change the language of the product. To change the language, select LANGUAGE. Use the按钮 to select the correct one and press Ⓞ. | LANGUAGE ENGLISH ESpañOL FRANÇAIS PORTUGUES |
| ·Firmware Press the FIRMWARE option to see the current software version and the release date. | FIRMWARE VERSION: 0.1-1 DATE: 01/01/2019 |
5.5.2. ENERGY SUBMENU
Press the button to access the configuration menu. Then use the buttons to navigate to ENERGY. Press the button to access.
| · Open Windows Use the ≅ buttons to select whether you want this function On / Off and press Ⓞ to save. When activated, the logo appears on the home screen, to the right of temperature, indicating that it is active. | · OPEN WINDOWS ON OFF |
| · Balance This function resets your product to a temperature of 19°C in Manual mode. Use the ≅ buttons to select this option and press Ⓞ to confirm. The screen will show 19°C in Manual mode. | · OPEN WINDOWS BALANCE MODE ADAPTATIVE MODE USER MODE |
| · Adaptive mode This function anticipates the product start-up, so that the room temperature at the start of the selected time is equal to the set temperature at the exact time that we have established during programming. This means your product will begin heating before the time set. This ensures the temperature is at the set temperature for the start of the time selected. To indicate that the algorithm is working, the icon Ⓞ will flash. Use the ≅ buttons to select whether you want this function On / Off and press Ⓞ to save. | · ADAPTATIVE MODE ON OFF |
5.5.3.PROG.MODE
To change the status of your product from MANUAL to AUTO or vice versa, make a quick press of the button. If you want to start programming your product, make a long press of the button. To see all the options available for programming your radiator, select the option PROG. MODE in the main menu. The screen will show the following options:
| Mode From the MODE menu, select the operating mode you require: MANUAL or PROGRAMMING. Use the ≅ buttons to select manual or programming and press ⊙ to confirm. | MODE MANUAL PROGRAMMING |
| Preset heating programs From the PRE-PROGRAMS menu you can select a preset heating program to use. There are 4 available. Use ≅ to select between the different programs and press ⊙ to confirm. | PRE-PROGRAMS PRE-PROG 1 PRE-PROG 2 PRE-PROG 3 PRE-PROG 4 |
Available pre-programs
| PRE-PROGRAM 1 | ||||||||||||||||||||||||
| 0 | 1 | 2 | 3 | 4 | 5 | 6 | 7 | 8 | 9 | 10 | 11 | 12 | 13 | 14 | 15 | 16 | 17 | 18 | 19 | 20 | 21 | 22 | 23 | |
| Mon-Fri | ||||||||||||||||||||||||
| Sat-Sun | ||||||||||||||||||||||||
| PRE-PROGRAM 2 | ||||||||||||||||||||||||
| 0 | 1 | 2 | 3 | 4 | 5 | 6 | 7 | 8 | 9 | 10 | 11 | 12 | 13 | 14 | 15 | 16 | 17 | 18 | 19 | 20 | 21 | 22 | 23 | |
| Mon-Fri | ||||||||||||||||||||||||
| Sat-Sun | ||||||||||||||||||||||||
| PRÉ-PROGRAM 3 | ||||||||||||||||||||||||
| 0 | 1 | 2 | 3 | 4 | 5 | 6 | 7 | 8 | 9 | 10 | 11 | 12 | 13 | 14 | 15 | 16 | 17 | 18 | 19 | 20 | 21 | 22 | 23 | |
| Mon-Fri | ||||||||||||||||||||||||
| Sat-Sun | ||||||||||||||||||||||||
| PRE-PROGRAM 4 | ||||||||||||||||||||||||
| 0 | 1 | 2 | 3 | 4 | 5 | 6 | 7 | 8 | 9 | 10 | 11 | 12 | 13 | 14 | 15 | 16 | 17 | 18 | 19 | 20 | 21 | 22 | 23 | |
| Mon-Fri | ||||||||||||||||||||||||
| Sat-Sun | ||||||||||||||||||||||||
COMFORT
ECO
OFF
| ·User program This mode allows the user to make their own programming. There are 2 ways to start editing the programming: 1. Do a long press on the button. 2. Enter thesubmenu USER PROGRAM from the main menu. Then follow the steps below. | Tue 20:45 7.0 7.0 7.0 7.0 7.0 7.0 7.0 7.0 7.0 7.0 7.0 7.0 7.0 7.0 7.0 7.0 7.0 7.0 7.0 7.0 7.0 7.0 7.0 7.0 7.0 7.2 | |
| STEP 1 | 1. Select the COMFORT temperature: Temperature range 19 - 30 °C Use the buttons to select the desired Comfort temperature. Press to confirm. 2. Select the ECO temperature: Temperature range: 7.5 - 18.5 °C Use the buttons to select the desired Eco temperature. Press to confirm. 3. Select between ANTI-FROST or OFF: Temperature range: 7 °C / OFF Use the buttons to select the ANTI-FROST or OFF. Press to confirm. | Tue 20:45 7.0 7.0 7.0 7.0 7.0 7.0 7.0 7.0 7.0 7.0 7.0 7.0 7.0 7.0 7.0 7.0 7.0 7.0 7.0 7.0 7.0 7.0 7.2 |
| STEP 2 | Select the days to be programmed Start on Day 1 (Monday). Press the ① button to include this day in your programming. Press the ① button again to exclude. Use the ② buttons to move to the next day and repeat for all days of the week. The selected days will be highlighted by a box on the screen. Once you have reached Day 7, press the ⑧ button to advance to the next step. | Tue 10:45 28.5 |
| STEP 3 | Select the hour and mode to be programmed Start on 0h (midnight). Press the ① button to select ECO, COMFORT or ANTI-FROST/OFF for that hour. Press ⑧ to move to the next hour and repeat. • The upper right of the screen shows the hour you are programming. • The left side shows the selected days. • The bottom programming bar indicates: -Comfort mode: 2 shaded squares -ECO mode: lower shaded square -ANTI-FROST/OFF: 2 empty squares Once you reach 23:00 hours, press ① to complete the programming. | 06:00 28.5 |
| ·Fil pilot This option activates the pilot wire mode for those products that are connected to a control panel by means of a pilot wire. The product will be managed by the external pilot wire control unit to which it is connected. Use ≅ ∧ to select this option and press ⊙ to confirm. | ·Fil pilot ON OFF |
5.5.4. USER MODE
The USER mode allows the user to define a permitted temperature range.
When in this mode, the symbol corresponding to the USER mode is displayed on the screen.

| Access is gained by means of a password. The default value is 0000. The numbers are selected with the \(\text{和}\) and \(\text{和}\) buttons and confirmed with the button \(①\) . | INSERT PIN |
| If the PIN code is incorrect, the following screen is displayed and then you return to the previous screen. | WRONG PIN |
| When the PIN code is correctly entered, the following sub-menu appears, where we can activate the user function, change the PIN code, set the upper temperature limit and the lower temperature limit. | ACTIVATECHANGE PINMAXIMUN TEMP.MINIMUN TEMP. |
6. MAINTENANCE AND CLEANING
The product does not require any maintenance. We recommend cleaning the product (back, bottom of the product, etc.). Do not use abrasive substances on the product, clean it with a damp cloth and neutral pH soap and the screen with a dry cloth. Before carrying out any cleaning operation, make sure that the product is switched off and at room temperature.
7. EUROPEAN REGULATION (WEEE) 2012/19/EU
Based on the European regulation 2012/19/EU on Waste Electrical and Electronic Equipment (WEEE), these appliances cannot be thrown in the usual council bins; they must be collected selectively to optimise the recovery and recycling of the components and materials that make them up, and reduce the impact on human health and the environment. The crossdout wheelie bin symbol on a horizontal bar is marked on all ROINTE products to remind the consumer of the obligation to separate them for separate collection. The consumer should contact the local authority or the retailer for information regarding the correct disposal of their product.
8. GUARANTEE
1. Agreement
1.1. This section describes the guarantee conditions available to the buyer when purchasing a new product of the Rointe brand. These conditions include all the rights that the buyer has in accordance with current national legislation, as well as the guarantee and additional rights offered by the brand. Any incident detected in your Rointe product can be dealt with by the seller of the product or in a more agile way through the manufacturer itself.
1.2. Rointe offers you Technical Assistance from our After-Sales Service by telephone at +44 (0)203 321 5929 or email to support@rointe.co.uk, where we will indicate the steps to follow to solve the incident. You will need the product reference (located on the metal characteristics label), serial number, date of purchase and the nature of the fault when contacting us. In addition, you must have a copy of the proof of purchase of the product.
1.3. ROINTE guarantees there are no material defects of design or manufacture at the time of original purchase. ROINTE guarantees the body for 120 months (10 years) and the electrical plus electronic components for 36 months (3 years) for this product only, from the date of purchase, or delivery if later, provided it has not been modified, and in accordance with the provisions of the following stipulations.
2. Conditions
2.1. If during the guarantee period, the product under normal use, and with proper maintenance, fails to function properly and is found to be defective in design, material, or workmanship, it will be repaired or replaced at the customer's option, in accordance with the provisions of the law, and subject to the following terms and conditions:
2.1.1. The guarantee is only applicable if the original guarantee is issued by the seller and when such guarantee has been registered with Rointe correctly, including the product reference, serial number (marked on the metal label of the product), date of purchase and proof of purchase. The product guarantee can be registered on our website at www.rointe.co.uk or can be emailed to support@rointe.co.uk within 90 days of installation. ROINTE reserves the right to refuse a guarantee when this information has been removed or modified after the original product purchase.
2.1.2. The guarantee is only applicable if the product has been installed by a competent person in accordance with this installation manual and all regulations in force at the time of installation.
2.1.3. The guarantee is only applicable to those cases that refer to defects in material, design and manufacture, and in no case covers damage to the product for the following reasons:
i) Damage caused by negligence and/or misuse of the product, i.e. used for purposes other than its normal use, or by not respecting the instructions for use, maintenance and cleaning given by ROINTE, as well as by incorrect or inadequate installation or use of the product that may not comply with the technical safety standards in force.
ii) Corrosion of any part of the product caused by direct exposure to saltwater. Where the product is installed within 200m of the coast, the guarantee period for damage caused by corrosion shall be reduced by 50% .
iii) Any unauthorised modifications or repairs to the product carried out by third parties or unauthorised persons, or the opening of the product by third parties or unauthorised persons.
iv) Any accident deemed to be beyond RoinTE's control, such as (but not limited to): lightning, fire, flood, natural disasters, public disorder, atmospheric or geological phenomena, and all those of a similar nature.
v) Failures resulting from incorrect installation. In case of doubt, please contact ROINTE.
2.2. Any repair or replacement carried out as part of this guarantee service does not allow for extension periods or new guarantee periods, i.e. your guarantee will not be extended in the event that a repair or replacement of this product is carried out, but will be suspended until the product is returned repaired or a new one is delivered.
2.3. Any repair or replacement covered by this guarantee must be a functionally equivalent part. Defective parts or parts removed or replaced shall become the property of ROINTE and must be returned as such.
2.4. The product must be installed in such a way as to allow access by ROINTE technicians or authorised persons in the event that they need to access the product for repair or maintenance. The user/customer is responsible for the organisational means necessary to allow access to the products by ROINTE for repair or replacement.
2.5. ROINTE's Technical Support department will advise you if you need to purchase any parts not covered by this guarantee or outside of this guarantee.
2.6. This guarantee will not be valid if the product has been tampered with, modified and/or repaired in any way and/or by unauthorised persons. This guarantee will also not be valid if the product is not correctly installed.
2.7. This guarantee is not transferable and does not include claims for limescale or frost damage.
2.8. This guarantee does not affect the purchaser's statutory rights under applicable national legislation, nor does it affect any rights contracted with the dealer or installer that may arise in performance of the contract of sale.
2.9. ROINTE, its offices, employees, distributors and installers shall not be liable for any incidental damages arising from the infringement of any rule implied in this product, as well as for its improper or incorrect use.
2.10. Check the EULA conditions (supplied with the product for Wi-Fi connected products) for information on the legal agreement you accept when installing a ROINTE product. For product or guarantee assistance, please contact ROINTE by telephone at +44 (0)203 321 5929 or by email to support@rointe.co.uk.
9. HOW TO REGISTER YOUR PRODUCT GUARANTEE
IMPORTANT: It is important that you register your ROINTE product as part of our guarantee service, in case you wish to make a claim.
You can register your ROINTE product in the following ways:
WEB
- Go to https://rointe.com/uk/register-your-guarantee/
- Log in to your existing account or create a new account if necessary.
- Click on "My products".
- Enter your product reference (alphanumeric and in capital letters).
- Enter your serial number (26 digits located on the metal tag of your product starting with 84).
- Upload your proof of purchase, such as your invoice in PDF, JPEG or PNG format. This is not mandatory, but doing so ensures that your warranty period is accurate.
- Click on "Register".
- Congratulations! Your product is now registered.
-
Send an email to support@rointe.com with the following information:
-
Customer name
Address and postcode
Telephone number and email address
Product reference
Serial number - The date of purchase of the product and proof of purchase (as described in the WEBSITE section above).
- Our technical support team will confirm product registration and request any additional information needed by email.
POSTAL
- Send the information listed in the EMAIL section to:
- INDUSTRIAS ROYAL TERMIC, S.L. - Rointe, C/E Parcela 43, 30140, Santomera (ESPANA).
- Please ensure you obtain proof of postage.
ERP. REGLAMENTO DE LA COMISION (EU) 2015/1188
| ITEM | SYMBOL | UD. | 0500RAD2 | 0750RAD2 | 1000RAD2 | 1250RAD2 | 1500RAD2 | 2000RAD2 |
| HEATING POWER / POTENCE CALORÍFICA / PODER DE AQUECIMENTO/VERWARMINGSKRACHT | ||||||||
| Nominal heat output / Potencia calorifica nominal / Produção nominal de calor / Nominaal warmtevermogen | Pnom | kW | 0.5 | 0.75 | 1.0 | 1.25 | 1.5 | 2.0 |
| Minimum heating capacity (indicative) / Potencia calorifica minima (indicativa) / Produção minimal de calor (indicativo) / Minimum warmteafgífte (indicatif) | Pmin | kW | N.A.* | N.A.* | N.A.* | N.A.* | N.A.* | N.A.* |
| Maximum continuous heat output / Potencia calorifica máxia continua / Máxima saada de calor continua / Maximale continue warmteafgífte | Pmax,c | kW | 0.5 | 0.75 | 1.0 | 1.25 | 1.5 | 2.0 |
| AUXILIARY ELECTRICITY CONSUMPTION / CONSUMO AUXILIAR DE ELECTRICIDAD / CONSUMO DÉLECTRICIDADE AUXILIAR / HULPELEKTRICITEITSVERBRUJK | ||||||||
| Nominal heat output / Potencia calorifica nominal / Produção nominal de calor / Nominaal warmtevermogen | elMAX | kW | 0.500 | 0.750 | 1.000 | 1.250 | 1.500 | 2.000 |
| Minimum heating capacity (indicative) / Potencia calorifica minima (indicativa) / Produção minimal de calor (indicativo) / Minimum warmteafgífte (indicatif) | elMIN | kW | 0.500 | 0.750 | 1.000 | 1.250 | 1.500 | 2.000 |
| Minimum heating capacity (indicative) / En modo de espera / Em modo de espera / In stand-by | elSB | kW | 0.0008 | 0.0008 | 0.0008 | 0.0008 | 0.0008 | 0.0008 |
| TYPE OF HEAT OUTPUT/INDOOR TEMPERATURE CONTROL / TIPO DE CONTROL DE POTENCIAR CALORÍFICA / DE TEMPERATURE INTERIOR / TIPO DE SAIDA DE CALOR/CONTROLDE TEMPERATURE DO AR / TYPE WARMTEAFGIFTE/REGELING BINNENTEMPERATUUR | ||||||||
| Electronic indoor temperature control and weekly timer / Control electrónico de temperatura interior y temporizador semanal / Controlo electrónico da temperatura interior e temporizador semanal / Elektronische binnentemperatuurregeling en wekelijkke timer | ✓ | ✓ | ✓ | ✓ | ✓ | ✓ | ||
| OTHER CONTROL OPTIONS (SEVERAL CAN BE SELECTED) / OTRAS OPCIONES DE CONTROL (PUEDEN SELECTIONNARE VARIAS) / OUTRAS OPÇões DE CONTROLLO (VÁRIAS PODEM SER SELECTIONDAS) / ANDERE BESTURINGSOPTIES (ER KUNNEN ER VERSCHILLLENDE WORDEN GEGELECTEERD | ||||||||
| Indoor temperature control with open window detection / Control de temperatura interior con detectión de ventanas abiertas / Controlo da temperatura interior com detectão de janela aberta / Binnentemperatuurregeling met detectie van open ramen | ✓ | ✓ | ✓ | ✓ | ✓ | ✓ | ||
| With adaptive start-up control / Con control de puesta en marcha adaptable / Com controdo adaptativo de arranque / Met adaptieve startcontrolle | ✓ | ✓ | ✓ | ✓ | ✓ | ✓ | ||
| With operating time limitation / Con limitação de tempo deestrucatório / Com limitação de tempo deestrucatório / Met bedrjfduurbeperking | ✓ | ✓ | ✓ | ✓ | ✓ | ✓ | ||
| SEASONAL ENERGY EFFICIENCY PERFORMANCE / RENDIMENTO DE EFFICIENCY ENERGÉTICA ESTACIONAL / DESEMPEHNO DE EFFICIÊNCIA ENERGÉTICAZONAL / SEIZOENSGEBONDEN ENERGIE-EFFECTIETIPRESTATIES | ns | 39% | 39% | 39% | 39% | 39% | 39% | |
DECLARATION OF CONFORMITY / DECLARACION DE CONFORMIDAD / DECLARACION DE CONFORMIDADE / VERKLARING VAN CONFORMITEIT
Declares under his responsibility / declara / declara / verklaart:
Product / producto / produto / product: Rointe ARIA
Models / modelos / modelos / typen: AR0500RAD2, AR0750RAD2, AR1000RAD2, AR1250RAD2, AR1500RAD2, AR2000RAD2
The company declares that the above equipment has been designed to comply with the relevant sections of the above specifications. The equipment complies with all applicable essential requirements of the Directives.
Hampton Business Park, Club Way, Peterborough PE7 8JA
T.02033215928
Rointe Ireland
20 Harcourt Street, #247
Dublin 2, D02 H364
T. +44 (0)203 321 5929 / 01 553 0523
Rointe Nederland
3197 LG Botlek, RT
T.0107420046
Copyright © Rointe Heating 2022.
All rights reserved. As part of our continuous improvement policy, we reserve the right to alter or modify any product or specifications without prior notice. This also applies to products that have already been ordered, provided that such alterations can be made without subsequent changes to the already agreed specifications. We cannot accept responsibility for any errors in catalogues or other printed materials.
MARFR22V1 - MPPAMAN441