AX3000G - Soundbar HISENSE - Free user manual and instructions
Find the device manual for free AX3000G HISENSE in PDF.
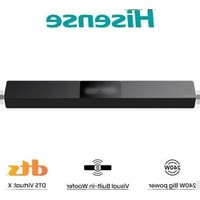
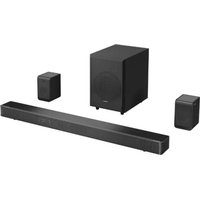
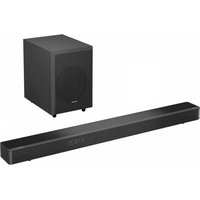
| Product Type | 3.1-channel soundbar with wireless subwoofer |
| Maximum audio power | 280 W |
| Audio technologies | Dolby Atmos, sound modes (Music, Cinema, News, Sport, Night, Game, AI) |
| Connectivity | HDMI eARC/ARC, Bluetooth, optical (OPTICAL), coaxial, USB, AUX |
| HDMI inputs | 1 x HDMI eARC (ARC compatible) |
| USB input | 1 x USB (audio playback) |
| Optical input | 1 x OPTICAL |
| Coaxial input | 1 x COAXIAL |
| AUX input | 1 x AUX (3.5 mm jack) |
| Bluetooth function | Bluetooth (pairing/disconnection, play/pause) |
| Audio settings | Volume, bass, treble, screen brightness, surround sound (SURR), standby mode |
| Remote control | Yes, with 2 AAA batteries |
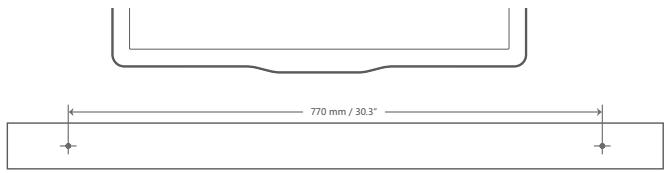
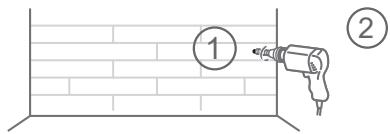
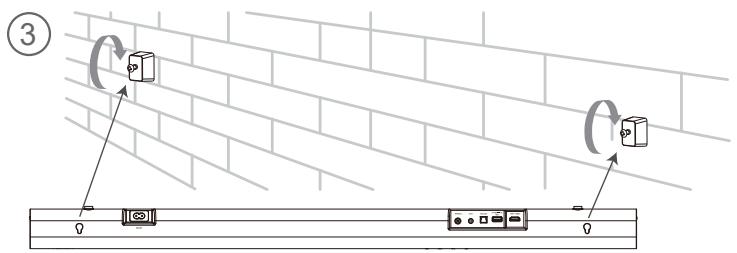
| Wall mounting | Yes, wall brackets included (2 brackets, 2 screws, 2 anchors) |
| Soundbar dimensions | Approximately 1000 mm (width) × 60 mm (height) × 100 mm (depth) (estimated) |
| Soundbar weight | Approximately 2.5 kg (estimated) |
| Subwoofer dimensions | Approximately 200 mm × 300 mm × 300 mm (estimated) |
| Subwoofer weight | Approximately 4 kg (estimated) |
| Power supply | AC 100-240 V, 50/60 Hz (built-in power adapter) |
| Power consumption | Standby: < 0.5 W (estimated) |
| Included cables | 2 power cables, 1 optical cable, 1 HDMI cable |
| Included accessories | Wall brackets, screws, anchors, remote control, batteries, user manual, quick start guide |
| Maintenance and cleaning | Unplug before cleaning, use a soft dry cloth. Do not use abrasive products. |
| Safety | Do not expose to moisture, do not open the device, use only the provided accessories. |
| Spare parts and repairability | Parts available from the manufacturer. Repairability index not provided. |
| General information | Brand: Hisense, Model: AX3000G, Compatible with Roku TV Ready (United States, United Kingdom, Mexico, Canada) |
Frequently Asked Questions - AX3000G HISENSE
User questions about AX3000G HISENSE
0 question about this device. Answer the ones you know or ask your own.
Ask a new question about this device
Download the instructions for your Soundbar in PDF format for free! Find your manual AX3000G - HISENSE and take your electronic device back in hand. On this page are published all the documents necessary for the use of your device. AX3000G by HISENSE.
USER MANUAL AX3000G HISENSE
- Simple setup
- One remote
- Quick settings
280W
Max Audio Power
Dolby Atmos


HOMI
HIGH-DEFINITION MULTIMEDIA INTERFACE

Bluetooth
Roku, the Roku logo, Roku TV, Roku TV Ready, and the Roku TV Ready logo are trademarks and/or registered trademarks of Roku, Inc. Roku TV Ready is only authorized by Roku for agreed-upon countries. This product is Roku TV Ready-supported in the United States, United Kingdom, Mexico and Canada.
Countries are subject to change. For the most current list of countries in which this product is Roku TV Ready-supported, please email rokutvready@roku.com.

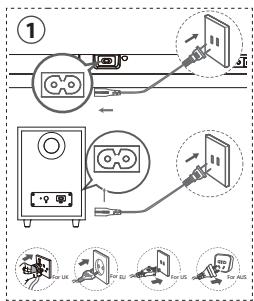
What's in the Box

Main Unit

Wireless Subwoofer

AC Power Cord x 2 For Main Unit / Wireless Subwoofer

* Plug type varies by region

Optical Cable

HDMI Cable

Brackets (x2)/Bracket Screw (x2) / Wall Anchors (x2)

Remote Control / AAA Batteries x 2

User Manual / Quick Start Guide
- Power cord quantity and plug type vary by regions.
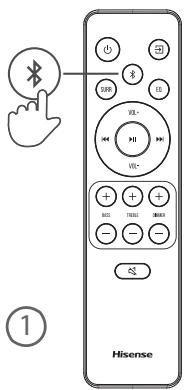
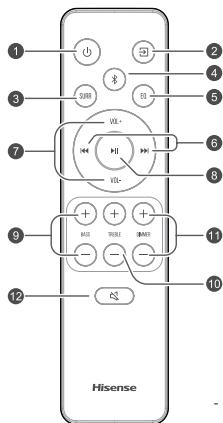
1 Remote Control
① ①
② (SOURCE)
③ SURR
(4) B(BT)
Switch the unit between ON and STANDBY mode.
Select the play mode.
Adjust the surround ON/OFF.
Select the Bluetooth mode. Press and hold the
(BT) button to activate the pairing function in Bluetooth mode or disconnect the existing paired Bluetooth device.
⑤ EQ
(6)
⑦ VOL+/VOL-
(8)
Select MUSIC/MOVIE/NEWS/SPORT/NIGHT/GAME/AI
Skip to previous/next track in BT / USB mode.
Increase/decrease the volume level.
Play/pause/resume playback in BT / USB mode. Press and hold the button for 3s to enter setup menu. Confirm a selection.
BASS+/- Adjust bass level.
10 TREBLE+/- Adjust treble level.
⑪ DIMMER+/- Adjust display brightness.
12 (MUTE) Mute or resume the sound.

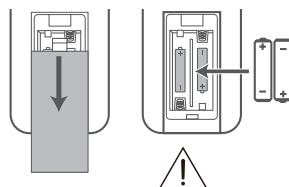
Replace the Remote Control Battery
1 Press and slide the back cover to open the battery compartment of the remote control.
2 Insert two AAA size batteries. Make sure the (+) and (-) ends of the batteries match the (+) and (-) ends indicated in the battery compartment.
3 Close the battery compartment cover.
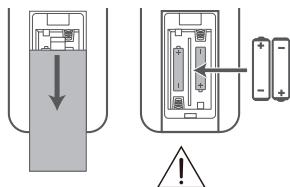
- Do not mix old and new batteries;
- Do not mix alkaline, standard (Carbon-Zinc) or rechargeable (Ni-Cd, Ni-MH, etc.) batteries.
2
Identifying the Parts
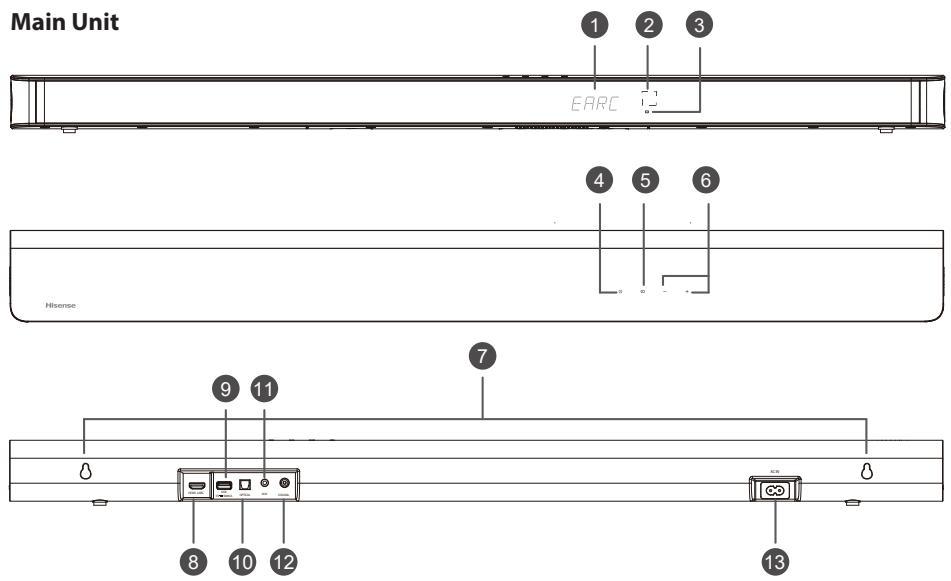
① Display Window
Show the current status.
(2) Remote Control Sensor
Receive signal from the remote control.
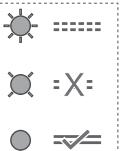
③ Red Standby Indicator
| • Constant on | In Standby mode |
| • Slow blink | In Auto-Wake On mode |
(4) (ON/OFF) Button
Switch the unit between ON and STANDBY mode.
⑤ SOURCE)Button
Select the play mode.
(6) +/-(VOL+/VOL-) Button
Increase/decrease the volume level.
⑦ Wall Mount
Install the wall mounting screws into the wall mount of the unit.
Wireless Subwoofer
① Indicator
| • Fast blink | The subwoofer in pairing mode |
| • Constant on | Connected / Paired successfully |
| • Slow blink | Connection / Pairing failed |
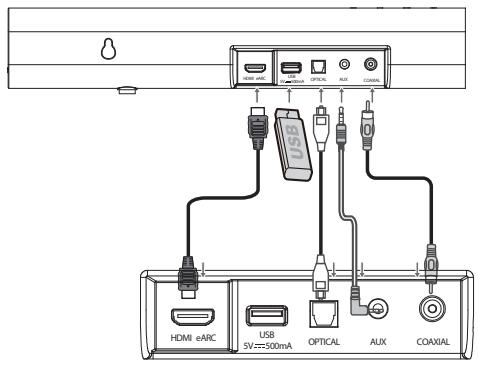
8 HDMI eARC Socket
The port for connecting a TV. The port supports the eARC/ARC HDMI feature, which allows the soundbar to play audio that originates on the connected TV.
⑨ USB Socket
Insert the USB device to play music.
10 OPTICAL Socket
Connect to the OPTICAL OUT socket on an external device.
11 AUX Socket
Connect to an external audio device.
12 COAXIAL Socket
Connect to the COAXIAL OUT socket on an external device.
13 AC IN Socket
Connect to the power supply.
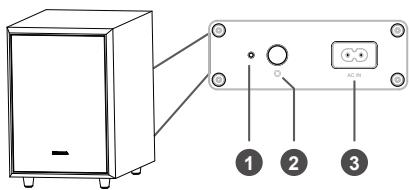

PAIR Button
| 2 seconds | Pairing mode |
| 5 seconds | Clear the pairing record |

AC IN Socket
Connect to power supply.
3
Pair up with the Subwoofer
The subwoofer and soundbar will be automatically paired when they are powered on.
- If no audio from the wireless subwoofer can be heard, manually pair up them.
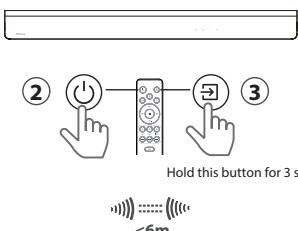
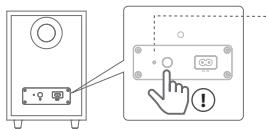
Hold this button for 2 seconds
4
* Power cord quantity and plug type vary by regions.
4
Bluetooth(%) Operation

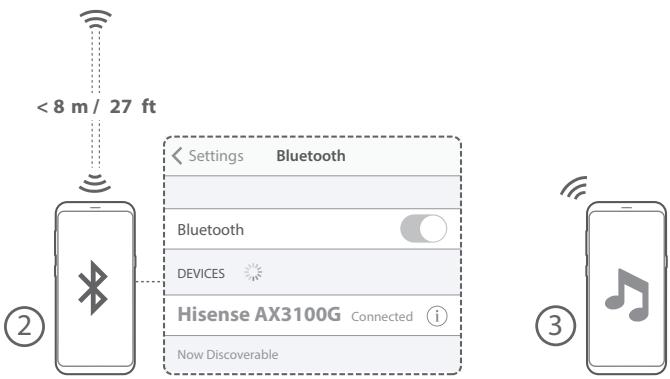
5
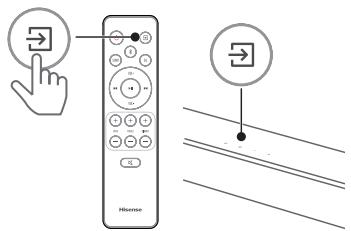
Select the play function ( )

| Display | Mode |
| EARC | HDMI eARC |
| ARC | HDMI ARC |
| OPT | OPTICAL |
| COAX | COAXIAL |
| BT_IN | Bluetooth |
| NO_BT | Connected |
| Not Connected | |
| USB | USB |
| NO_USB | No USB connected |
| AUX | AUX |
6
Wall Mounting
Mounting the Soundbar on the Wall

Hisense
④ Buton de pornography/oprine (ON/OFF)
Comutati unitatea intre modul PORNIT 日 modul STANDBY.
Buton (SURSA)

PykoBODCTBO nonb3ObaTeN/
KpatkoepykoBODTO nonbObaTeT
- KolinyectBO shHypOB nHTaHnI n TIN BUNK 3aBnCt OT perNoHa.
1 Пульт управ lienя
① ①
② 3 (NCTOYHNIK)
3 SURR
(4) B (BT)
⑤ EQ
⑥
⑦ VOL+/VOL-
(8)
PénékhouJIeNHMe IeMHJy PABOcYIM PeMHOMI pEHMOH OXINDAHIN.
Bb60peKIMBAocpOIN3BeDHeHn.
BKJIOEHEIe/BbKJIIOEHEIe peKHMa o6bEMHOrO 38yauHaer.
Bb6op pekima Bluetooth. Hakmite n undepkivbaite KhoKy (BT), tOb6bl kAnmbiPoBaTb yHnKtmo cOpJKeHHa BpEeMh iOn oTKnOHTb cyueCTyUoeec opCKeHHeO uYcPOnCTBO Bluetooth.
Bv6pe9y M3bKIA/KIHO/HOBOCTI/CNTOPT/ HOUb/NTPAI/KNH
PereoxdK peneDuoye/cneDyooueD opoKoeB B peKime BT/USB.
YBENHITb/YMEHbWITb rPOMKoCTb.
BocPON3BDEHNEy/na7a/B036HOHNBEHNE BOCPOIN3BDEHNE B PEXKHE BT/USB.HaMKWTE HZEgKMBHIE KTHOKYI H Y T E HUeEH 3 CekYN,TOb6B BOHTN M BEMHO HACTPoeK.PIOTdEBPTdVbBOpF.
PerynupOBKa ypoBHa H3KxqactOT.
Perynpobkya ypOBH BbICOKHXaCTOT.
Perynpobka npKoctn dncnne.
ÖTKIQUOHEMII INI BO3O6HOBJIENHe 3ByKa.
3aMeha akkuymytopta nynbta dtacnauhoHoro ynpablenu
1 BvduHHTe 3adHIO npaHb npyTa nCTAnzHOHHo ynpabLeHn, qTO6bI OTKpbTb 6atapTeHNOTcEK.
2 BCTaBbTe DBe 6atapeKIM Tnna AAA. Y6eDInTecb, 4TO NOIoc + ) ( - ) 6atapeEepNpaBnHbO cOBnAodKT C o6o3HaueHnMn (+) ( - ) B 8atapeHOM OTCeK.
3 3aKpoTe KpbIuKy 6aTapeHoro OTeka.
He nCnoJIb3yIte BmecTe HOBble I CTapBe 6aTapeKIM;
- He nCIOBn3yIte BMECTe 5UOHOHbIe, CTANDAPrTHbIe (tyolbNo-CINHKOBbIe) IINI nepezapraJaembIe (Ni-Cd, Ni-MH n.t.d.) BarateApKm.
2
Yka3aTeIb deTaJIeN

① Okho OTO6paXeHnA
OTo6paKeHnE TeKyuIero cTaTyca.
②ДатчнлътaynpaBneHn
PpneM cnHnla nIyIbTa ynpaBneHnIa.
③ KpacHbI INHdkaToppeKIMaOxNdaHn
-ПОТОТЯНно ВКЛIOUЧЕN
BpeKmme oKnudnna
-Меденhoe MuraHne
B pexime aBTOMaTnueckoro np6yJxDeHHN