USER MANUAL 450gr - 900gr SWEET ALICE
Non-contractual photo
Read this manual carefully before use, and observe both the safety and usage instructions.
IMPORTANT SAFETY INSTRUCTIONS
This equipment may be used by children aged 8 years and over and by persons with reduced physical, sensory or mental abilities or a lack of experience and knowledge provided they have been supervised or instructed to use the equipment safely and understand the hazards involved. Children should not play with the device.
Cleaning and maintenance must not be carried out by children, unless they are over 8 years old and are supervised. Keep the unit and its cord out of reach of children under 8 years of age.
Warning: Avoid spilling on the connector.
There is a potential risk of injury if used incorrectly. The surface of the heating element may remain warm for some time after use.
The device must not be immersed.
This device is intended for use in domestic andsimilar applications such as :
-
staff kitchen areas in stores, offices and other professional environments ;
-
farms ;
-
the use by customers of hotels, motels and other residential environments ;
- environments such as guest rooms.
If the power cable is damaged, it must be replaced by the manufacturer, its service department or persons of similar qualification in order to avoid danger.
GENERAL SAFETY INSTRUCTIONS
Before using the unit, check that the mains voltage corresponds to that of the unit.
Connect the unit only to an earthed socket, properly installed and connected to the power supply in accordance with the applicable standards.
Always unplug the unit when not in use.
Never leave your device unattended while it is operating or powered on.
Check the condition of your unit regularly and if it is damaged in any way, do not use it but have it checked and repaired by a qualified service technician.
Do not plug the unit into a multiple outlet.
Do not use an extension cord.
Use the appliance only for domestic purposes and as indicated in the instructions.
Do not use the unit near heat sources or flammable materials.
The plug must be unplugged before cleaning the unit.
Do not use the unit outdoors and store it in a dry place.
Do not use accessories not recommended by the manufacturer, as this may present a danger to the user and may damage the unit.
Never move the unit by pulling the cable. Make sure that the power cord cannot be accidentally tripped over to prevent the unit from falling over. Avoid wrapping the cord around the unit and do not twist it.
Place this unit on a table or stand that is stable enough to prevent it from falling.
This table or stand must be heat-resistant.
Wait until your device is completely cold before moving, cleaning or storing it. Always disconnect the unit before handling it.
Make sure that the cord does not come into contact with hot surfaces of the unit. Make sure you do not touch the hot surfaces of the device yourself.
Attention! Risk of burns! Always use a potholder or protective gloves to remove the hot container from the unit.
The device becomes very hot during use.
Make sure that the hot parts of the device do not come into contact with highly flammable materials
such as curtains, tablecloths,... when it is in operation because fire could break out.
Do not cover this device with anything during use. Fire risk!
Make sure to ventilate the room during operation.
Heat and steam escape from the unit during use. Therefore, choose a well-ventilated area and keep a minimum distance of 11 cm between the unit and the wall.
Your unit should never be operated by an external timer or other separate remote control system.
It is essential to keep this device clean as it is in direct contact with food.
Cook only food that is suitable for cooking and safe to eat.
For detailed information on how to clean food contact surfaces, refer to the paragraph "CLEANING AND MAINTENANCE" below in the manual.

Check the inside of
the packaging and the polystyrenes for any accessories left behind, such as caps, knobs or screws.

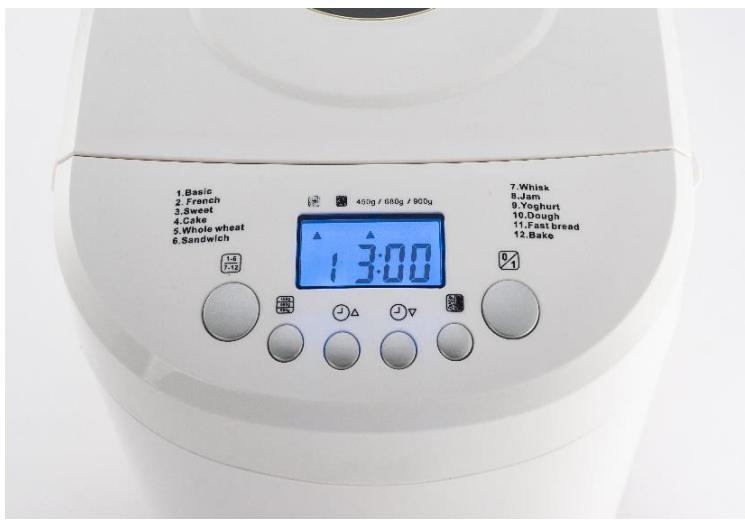
CONTROL PANEL :
| Button | Function |
| 1 | 01 | On/Off button | Press the button to start or stop the operation by holding down for 3 seconds. |
| 2 | 1-67-12 | Programme selection | Choice of recipe according to 12 predefined programmes. |
| 3 | | Browning selection | Choice of browning colour. Light or dark. |
| 4 | | Time + | Increases the duration of the program by one hour. |
| 5 | | Time - | Decreases the duration of the program by one hour. |
| 6 | 450g680g900g | Weight selection | Choice of bread size : 450g/680g/900g. |
BEFORE THE FIRST USE
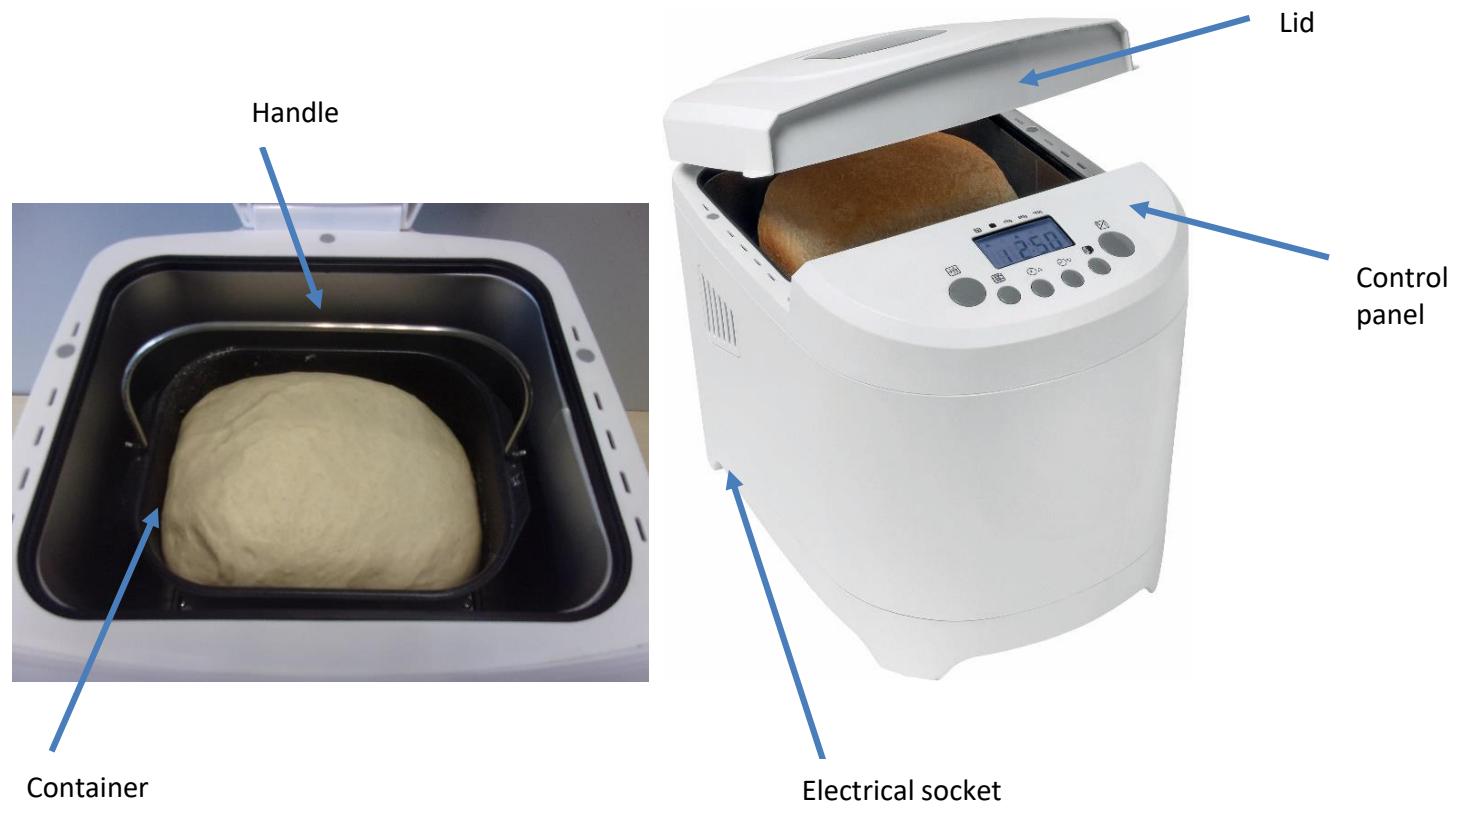
Remove any packaging material from the unit. Do not connect the appliance before cleaning. Before the first use it is recommended to thoroughly wash the cover, container, handle and outside of the appliance with hot soapy water and a soft cloth. The base must be cleaned with a damp cloth or sponge.
USE
- Plug the appliance in.
- Open the lid.
- Position the blade at the bottom of the container.
- Introduce the ingredients according to the size and type of bread desired. The list of ingredients and quantities are given in the tables below. This information is given as an example. You can adjust them to suit your tastes.
- Press the ON/OFF button for 3 seconds to turn on the control panel.
-
An audible signal sounds when the power is on, before resetting or when you press a button.
-
Select the desired programme according to the 12 programmes listed below.
-
Select the desired type of browning (light or dark).
-
Select one of the 3 sizes of bread.
-
Adjust, if necessary, the duration of the program with the Time+ and Time- buttons to delay the baking of the bread. The displayed duration corresponds to the duration of the initial program + the duration of any delay.
-
Press the ON/OFF button to start the programme.
-
When dried fruit is to be added to the mixture, the beep sound is heard 10 times during the kneading process.
-
When the bread making process is finished, the unit beeps 10 times, then the unit goes into heat conservation mode.
-
Open the lid.
15.Use the hook to retrieve the handle from the container.
-
Swivel the container handle slightly until you hear a noise and then lift the container.
-
Check that the container is not too hot, bring a potholder and turn it over to collect the bread.
-
Make sure that the blade is not trapped inside the bread.
-
Enjoy your bread.
PROGRAMMES:
| 1. Plain white bread | 7. Traditional dough |
| 2. French bread | 8. Jams and compotes |
| 3. Sweetened bread | 9. Yoghurt bread |
| 4. Cakes | 10. Leavened dough |
| 5. Wholewheat bread | 11. Quick and easy bread |
| 6. Sandwich | 12. Baking only |
Tips
The measurements of the glass and spoons are as follows, the plastic glass is 250 ml , the teaspoon is 5 ml and the large spoon is 15 ml .
The weight of a cup of flour is 150g , a cup of water is 250g , a small spoon of salt is 6g , a small spoon of dried yeast is 3.5g , a small spoon of baking soda is 6g , a large spoon of sugar is 14g , a large spoon of raisins is 6g , a large spoon of nuts is 6g , a large spoon of milk powder is 6.5 grams, a large spoon of oil is 16g , and an egg is 50 - 60g .
Before measuring liquids with the measuring tools provided, the measuring tools must be placed on a flat surface.
1. Plain white bread :
| Ingredients | 450g | 680g | 900g |
| Water | 170ml | 250ml | 340ml |
| Salt | 1/3 teaspoon | 1/2 teaspoon | 1 teaspoon |
| Sugar | 2 tablespoon | 2 1/2 tablespoons | 3 tablespoons |
| Vegetable oil | 1 tablespoon | 1 1/2 tablespoon | 2 tablespoons |
| Flour | 2 cups | 2 3/4 cups | 3 3/4 cups |
| Fat-free milk powder | 1 1/2 tablespoons | 2 tablespoons | 2 1/2 tablespoons |
| Dried yeast | 1/2 teaspoon | 1 teaspoon | 3 1/4 teaspoon |
2. French bread :
| Ingredients | 450g | 680g | 900g |
| Water | 170 ml | 250ml | 340ml |
| Salt | 2/3 teaspoon | 1 1/4 teaspoon | 1 1/2 teaspoon |
| Sugar | 1 1/2 tablespoon | 2 tablespoons | 2 1/2 tablespoons |
| Vegetable oil | 1/2 tablespoon | 1 tablespoon | 1 1/4 tablespoon |
| Flour | 2 cups | 2 3/4 cups | 3 3/4 cups |
| Fat-free milk powder | 1 1/2 tablespoon | 2 tablespoons | 2 1/2 tablespoons |
| Dried yeast | 1/2 teaspoon | 1 teaspoon | 3 1/4 teaspoon |
3. Sweetened bread :
| Ingredients | 450g | 680g | 900g |
| Water | 70ml | 150ml | 240ml |
| Eggs | 2 | 2 | 2 |
| White sugar | 4 teaspoons | 1/3 cup | 1/2 cup |
| Salt | 1/4 teaspoon | 1/3 teaspoon | 1/2 teaspoon |
| Vegetable oil | 1/2 tablespoon | 1 tablespoon | 1 1/2 tablespoon |
| Flour | 2 cups | 2 1/2 cups | 3 cups |
| Fat-free milk powder | 1 1/2 tablespoon | 2 tablespoons | 2 1/2 tablespoons |
| Dried yeast | 1/2 teaspoon | 1 teaspoon | 3 teaspoons |
4. Cakes :
| Ingredients | 450g | 680g | 900g |
| Eggs | 2 | 3 | 4 |
| Milk | 50ml | 70ml | 80ml |
| Butter (melted) | 1¼ tablespoon | 1½ tablespoon | 1 tablespoon |
| Salt | 1¼ teaspoon | 1¼ teaspoon | 1½ teaspoon |
| Brown sugar | 1 1⁄2 tablespoon | 2 tablespoons | 2 1⁄2 tablespoons |
| Baking flour | 2 cups | 2 3¼ cups | 3 3¼ cups |
| Cream | 1½ teaspoon | 1 teaspoon | 1 1⁄2 teaspoon |
| Baking soda | 1¼ teaspoon | 1/3 teaspoon | 1½ teaspoon |
| Dried yeast | 2 tablespoons | 2 tablespoons | 2 tablespoons |
5. Wholewheat bread :
| Ingredients | 450g | 680g | 900g |
| Water | 170ml | 250ml | 340ml |
| Salt | 1/3 teaspoon | 1/2 teaspoon | 1 teaspoon |
| White sugar | 1 1/2 teaspoon | 2 teaspoons | 2 1/2 teaspoons |
| Vegetable oil | 1/2 tablespoon | 1 tablespoon | 1 1/2 tablespoon |
| Wholewheat | 1 cup | 1 1/4 cup | 1 1/3 cup |
| Flour | 1 cup | 1 1/2 cup | 2 cups |
| Fat-free milk powder | 1 1/2 tablespoon | 1 3/4 tablespoon | 2 tablespoons |
| Dried yeast | 1 teaspoon | 1 teaspoon | 1 1/4 teaspoon |
6. Sandwich :
| Ingredients | 450g | 680g | 900g |
| Water | 110ml | 190ml | 260ml |
| Eggs | 1 | 1 | 1 |
| White sugar | 1 1/2 tablespoon | 2 tablespoons | 2 1/2 tablespoons |
| Vegetable oil | 1 tablespoon | 1 1/2 tablespoon | 2 tablespoons |
| Flour | 2 cups | 2 3/4 cups | 3 1/2 cups |
| Fat-free milk powder | 1 2/3 tablespoon | 1 2/3 tablespoon | 2 tablespoons |
| Dried yeast | 1/2 teaspoon | 1 teaspoon | 3 1/4 teaspoon |
7. Traditional dough :
This programme does not require yeast. It kneads the dough to make the coatings of your food. For this operation you do not need to select the weight or colour programme. This is not a baking programme.
8. Jams and computes :
| Strawberry jam | Banana jam |
| Strawberries | 400g (350ml) peeled | Bananas | 400g (350ml) peeled |
| White sugar | 350g | White sugar | 350g |
| Lemon juice | 1 teaspoon | Lemon juice | 1 teaspoon |
| Starch | 30g | Starch | 300g |
| Ketchup | Apple jam |
| Tomatoes | 400g (350ml) peeled | Apples | 400g (380ml) peeled and minced |
| White sugar | 350g | White sugar | 350g |
| Lemon juice | 1 teaspoon | Lemon juice | 1 teaspoon |
| Starch | 30g | Starch | 30g |
Once the jam is finished, clean the pan. If this is not done, the machine may be damaged, which will shorten the life of the unit.
1: Jam should be placed in clean bottles or plates and then stored in the refrigerator to prevent drying out.
2 : Homemade jam may have a different density because it does not contain additives such as those sold on the market, but this does not mean that your jam is not successful.
3 : It will taste better with homemade bread.
4 : The density of the jam can be improved by adding half a cup or one and a half cups of edible pectins.
5 : Due to the fresh ingredients, it is preferable to work at room temperature (18- 25 degrees).
6 : The number of ingredients must be appropriate, not exceeding the fixed number to prevent the ingredients from boiling during operation.
7 : Jam will taste better if the ingredients are crushed by the blender (or chopped with a knife) first.
9. Yoghurt bread
| Ingredients | 450g | 680g | 900g |
| Water | 80ml | 140ml | 150ml |
| Yoghurt | 100g | 150g | 200g |
| White sugar | 1 1/2 tablespoon | 2 tablespoons | 2 1/2 tablespoons |
| Salt | 1/2 teaspoon | 1/2 teaspoon | 2/3 teaspoon |
| Vegetable oil | 1 tablespoon | 1 1/2 tablespoon | 2 tablespoons |
| Flour | 2 cups | 2 3/4 cups | 3 3/4 cups |
| Dried yeast | 1/2 teaspoon | 1 teaspoon | 3 1/4 teaspoon |
10. Leavened dough :
This programme allows the creation of recipes such as pizza dough, bread dough and waffle dough. This programme does cook the dough.
11. Quick and easy bread :
| Ingredients | 700g |
| Water + eggs | Water 130ml + 2 eggs (110ml) |
| Salt | 1/4 teaspoon |
| White sugar | 2 tablespoons |
| Vegetable oil | 1 tablespoon |
| Flour | 2 1/2 cups |
| Fat-free milk powder | 2 tablespoons |
| Dried yeast | 2 1/2 teaspoon |
| Order of the ingredients | The order is of no importance |
12. Baking only :
For crispy crusts, you can bake the bread again by pressing the "Bake" button. (You can stop cooking or change the cooking time during the cooking process).
CLEANING AND MAINTENANCE
Warning: Allow the unit to cool before cleaning. Remove the plug from the socket. Do not immerse the heating base in water or any other liquid.
Avoid using aggressive detergents or hard sponges that would damage the unit. Do not use sharp, metallic or abrasive objects to clean the unit.
The blade and tank can be cleaned in the dishwasher. Tip: small items should be placed inside the dishwasher basket to avoid damaging your dishwasher.
Clean the pan and utensils with a damp cloth (you can use a neutral cleaner) before using the appliance for the first time.
Remove the power plug and allow the unit to cool completely before cleaning.
Wipe the body with a soft cloth and a little neutral cleaner.
All parts must be reinstalled in the unit after cleaning and wiping.
STORAGE
Wait until the unit has completely cooled before storing it. Be vigilant and do not lose the various elements of the blade. Always store them in the same place.
| Problem | Analysis | Solution |
| Smoke comes out of the heat removal tube during cooking. | Ingredients can get stuck to the heating tube or nearby. The tube is equipped with protective oil to reduce this effect when first used. | Remove the plug and clean the heating tube. |
| The middle of the bread is not baked enough and the bottom is thick. | The cooking time is too long, causing water loss. | Choose the right baking programme and take out the bread as soon as the programme is finished. |
| The bread is difficult to get out of the pan. | The kneading blade may be too tight on the axis of the pan. | When taking out the bread, pour hot water into the pan for 10 minutes and lift the kneading blade while cleaning. |
| Ingredients cannot be completely mixed which impacts bread baking. | 1. Programme not appropriate. | Check if your recipe conforms to the selected programme. |
| 2. Press to stop the current programme. | If the failure time is more than 20 minutes, reorganise the ingredients; if it is less than 20 minutes, press on/off to restart the device. |
| 3. Open the cover several times during the operation that results in drying and yellowing of the bread. | Do not open the lid after yeast has been added. |
| 4. The resistance of the blade is too strong to stir the dough properly. | Check if the hole in the kneading blade is broken check if the kneading blade is working properly. |
| The LCD screen displays "H:HH". When you press. | The oven temperature is too hot to start the unit. | Press Start/Stop, remove the plug and remove the pan, open the cover to cool the unit. |
| The programme start beep has sounded but the baking process has not started. | The pan has not been mounted correctly or the dough is too large to knead. | Check if the pan is mounted correctly and if the dough is prepared as indicated in the recipe and if the quantities are correct. |
| The dough has risen too high and reaches the inner cover. | Too much flour or yeast or too high a temperature. | Reduce the amount of flour and yeast. |
| Too much dough overflowing from the pan. | Too much liquid and yeast. | Reduce the amount of water and yeast. |
| The size of the bread is too | There is either not enough | Check the expiry date of the |
| small. | yeast or the yeast has expired or the water temperature is too hot or the yeast has mixed with salt. | yeast and its quantity. |
| After rising, the middle of the dough is not sufficiently cooked during baking. | 1. the flour is gluten-free. | Use gluten flour or special bread flour. |
| 2. the bread leavened too quickly and at too high a temperature. | Use the unit in a room at room temperature. |
| 3. too much water. | Reduce the water according to the water absorption of the flour. |
| The bread is too heavy and the crumb is too dense. | 1. too much flour and too little water. | Reduce the flour and add water. |
| 2. too much fruit. | Reduce the fruit and add yeast. |
| Too many holes in the bread. | 1. too much water and too much salt. | Reduce the water and check if the added salt. |
| 2. water is too hot. | Lower the temperature. |
| There is flour stuck to the surface of the bread. | 1. too many sticky and strong ingredients such as butter or banana. | When kneading, remove ingredients that are not mixed in the dough with a wooden spatula. |
| 2. kneads incompletely with too little water. | Check if there is enough water and the kneading operation works well. |
WARRANTY
This product is guaranteed for a fixed period of time with the distributor from the date of purchase against any failure resulting from a manufacturing or material defect. This warranty does not cover defects or damage resulting from improper installation, improper use or abnormal wear and tear of the product.
The device must be returned in its original packaging and accompanied by the receipt, subject to proper handling. Therefore, observe the operating instructions and safety instructions given above. In addition, we cannot guarantee your device if you or a third party have made any modifications or repairs.
SELECTIVE COLLECTION OF ELECTRICAL AND ELECTRONIC WASTE
Electrical products should not be disposed of with household products. According to the European Directive 2012/19/EU for the disposal of electrical and electronic equipment and its implementation in national law, used electrical products must be collected separately and disposed of at the collection points provided for this purpose. Contact your local authorities or dealer for recycling advice.
MANUAL DEL USUARIO
EUROTECH company declares that the product meet the following EU directives :
Low voltage Directive (LVD)
Electromagnetic compatibility (EMC)
Restriction of Hazards Substances (RoHS)
Waste of Electric and Electronics Equipments (WEEE)
Ecodesign for energy-related products (ErP)
2014/35/EU
2014/30/EU
2011/65/EU
2012/19/EUE
2009/125/EC
According to EU standards
EN 60335-1 and its last updates
EN 60335-2-9 and its last updates
EN 55014-1 and its last updates
EN 55014-2 and its last updates
EN 61000-3-2 and its last updates
EN 61000-3-3 and its last updates

Quality Manager for EUROTECH company
EUROTECH DISTRIBUTION
37, rue Cesar Loridan - 59910 BONDUES
Tel.:03.20.25.15.71
Fax:03.20.03.59.29
S.A.R.L au capital de 22.900 €
T43429045800034-APE514S
Bondues, France. July 2020