MFO 71 C X 205T - Electric oven VALBERG - Free user manual and instructions
Find the device manual for free MFO 71 C X 205T VALBERG in PDF.
| Product type | Built-in electric oven |
| Brand | VALBERG |
| Model | MFO 71 C X 205T |
| Product code | 967482 |
| Energy efficiency class | A |
| Usable volume (L) | 71 |
| Net weight (kg) | 29.9 |
| Electrical supply | 220-240 V ~ 50 Hz, 2400 W |
| Heating type | Forced air convection, natural convection, grill |
| Cooking modes | Convection, top/bottom heat, grill, fan-assisted grill, defrost |
| Cleaning type | Catalytic (catalytic panels optional) and easy steam cleaning |
| Interior lighting | 1 halogen bulb 25 W, user replaceable |
| Timer | Mechanical, up to 100 minutes, automatic shut-off |
| Number of shelves | 5 positions |
| Included accessories | Metal grid, standard tray |
| Removable door | Yes, for easy cleaning |
| Removable inner glass | Yes (depending on model) |
| Warranty | 2 years |
| Country of manufacture | Turkey |
Frequently Asked Questions - MFO 71 C X 205T VALBERG
User questions about MFO 71 C X 205T VALBERG
0 question about this device. Answer the ones you know or ask your own.
Ask a new question about this device
Download the instructions for your Electric oven in PDF format for free! Find your manual MFO 71 C X 205T - VALBERG and take your electronic device back in hand. On this page are published all the documents necessary for the use of your device. MFO 71 C X 205T by VALBERG.
USER MANUAL MFO 71 C X 205T VALBERG
This product is guaranteed for a period of 2 years from the date of purchase* against any failure resulting from a manufacturing or material defect. This warranty does not cover defects or damage resulting from incorrect installation, improper use or abnormal wear of the product.
*as shown on the sales receipt.
CONDITION DE GARANTIE
Thank you for choosing this VALBERG product.
Chosen, tested and recommended by ELECTRO DEPOT,
VALBERG branded products are easy to use, reliable,
and of an impeccable standard.
With every use of this appliance, you can be sure of
complete satisfaction.
Welcome to ELECTRO DEPOT.
Visit our website: www.electrodepot.fr www.electrodepot.be
| A Before using the appliance | Important instructions and warnings relating to safety and the environment |
| B Preview of the appliance | Description of your appliance Technical specifications Package contents |
| C Using the appliance | Installation Preparation Using the oven |
| C Useful information | Maintenance and upkeep Trouble shooting Packaging and the environment Disposing of your old appliance |
Before getting start, please read the entire operation manual!
Dear customer,
Thank you for choosing a Valberg product. We hope you get the most out of your product, which has been manufactured in state-of-the-art factories with quality materials. We therefore urge you to read this manual and all other related documents carefully before using the product and keeping them. If you pass the appliance on to someone else, don't forget to provide them with the user manual. Observe all warnings and information contained in the user manual.
Please note that this user manual also applies to several other models. The differences between the models will be identified in the manual.
Important instructions and warnings relating to safety and the environment
This chapter contains safety instructions that will help you avoid the risk of personal injury or property damage. Failure to follow these instructions will void any warranty.
General Safety
-
This appliance may be used by children 8 years of age and older and persons with reduced physical, sensory or mental abilities or lack of experience or knowledge, providing they are supervised or instructed on how to use the appliance safely and they understand the risks involved. Children should not play with this appliance. Cleaning and user maintenance shall not be done by children without supervision
-
This appliance is not intended for use by persons (including children) with reduced physical, sensory and mental abilities, or lack of experience and knowledge, unless they are supervised and have received instructions for use. Children, even when supervised, should not play with this appliance.
-
If the appliance is handed over to another person for personal use or sold second-hand, make sure that it is always accompanied by the user manual, labels, any other relevant document and its appendices.
- Installation and repair procedures should be performed by qualified service personnel. The manufacturer cannot be held responsible for damage caused as a result of use by unqualified persons and for any situation that may void the warranty. Prior to installation, read the instructions carefully.
- Do not operate the appliance if it is defective or shows visible damage.
- Make sure the appliance's operation buttons are in the off position after each use.
Electrical safety
- If the product is faulty, do not use it unless it is repaired by authorised service personnel. You risk an electric shock!
- Connect the appliance only to an earthed output / line having the voltage and protection specified in the "Technical characteristics" chapter. Have a qualified electrician earth your installation when using the appliance with or without a transformer. Our company declines all responsibility in the
event of a problem resulting from the non-earthing of the appliance according to the local regulations in force.
- Do not clean the appliance by pouring water into it. You risk an electric shock!
- Never touch the plug with wet hands! Likewise, never unplug the appliance by pulling it by the cable. To do this, it is advisable to always hold the plug before pulling it.
- Unplug the appliance for all installation, maintenance, cleaning and repair operations.
- If the power cable is damaged, it must be replaced by the manufacturer, its after-sales department or similarly qualified persons to avoid any danger.
- Install the appliance so that it can be completely disconnected from the mains. The separation must be carried out by a mains plug or a switch integrated into the fixed electrical installation, according to the building regulations.
- The rear surface of the oven becomes hot during use. Check that the electrical connection is not in contact with the rear surface of the appliance, as this could damage the connections.
A Before using the appliance
- Take care not to trap the power cable between the oven door and the frame, or to pass it over hot surfaces. Otherwise, the insulation of the cable may melt and cause a fire due to a short circuit.
- Any operation on the equipment and electrical systems may only be carried out by authorised and qualified persons.
- In the event of damage, switch off the appliance and unplug it from the mains. To do this, cut the household fuse.
- Check that the fuse voltage is compatible with the appliance.
Product safety
Accessible parts of the appliance become hot during use. Steps should be taken to avoid touching the heating elements. Children less than 8 years of age must be kept away unless continuously supervised.
- Never use the appliance under the influence of alcohol or any other drug.
Take care when using alcoholic beverages in your dishes. Alcohol evaporates at high temperatures and can cause a
fire as it can ignite when in contact with hot surfaces.
- Make sure that no flammable substance is placed near the appliance as its sides may become hot during use.
- The appliance heats up during use. Steps should be taken to avoid touching the heating elements inside the oven.
- Avoid obstructing any ventilation outlets.
- Do not heat cans or closed glass jars in the oven. The pressure that would build up in the can / jar could cause it to burst.
- Do not place baking trays, dishes or aluminium foil directly on the bottom of the oven. Heat build-up could damage the bottom of the oven.
- Do not use strong abrasive cleaners or a sharp metal scraper to clean the oven glass door: they could scratch the surface and crack the glass.
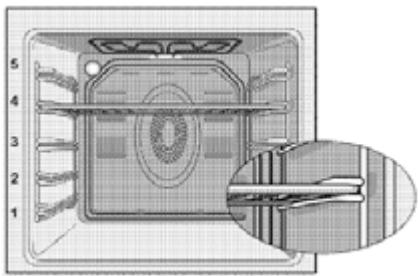
- Do not use steam cleaners to clean the appliance; these present a risk of electric shock (accessories vary depending on the oven model.) Place the rack and the drip pan correctly on the shelves. Slide the rack or the drip pan between 2 grooves and check it is well balanced before placing food on it (see illustration below).

- Do not use the appliance if the glass door is missing or cracked.
- Always use protective oven gloves when placing or removing dishes from the hot oven.
- Place the baking paper containing the food in the pan or on the oven accessory (tray, wire rack, etc.) and place it all in the preheated oven. Remove any excess baking paper overlapping the accessory or pan to avoid contact with the oven heating elements. Never use baking paper at an operating temperature higher than the recommended value for baking paper. Avoid placing baking paper directly on the bottom of the oven.
WARNING
Make sure that the appliance's power cable is unplugged or that the circuit breaker is off before replacing the lamp, to avoid any risk of electric shock.
- To avoid overheating, the appliance must not be installed behind a decorative door.
For your appliance to be reliable:
- Make sure that the plug is properly inserted into the outlet to prevent sparking.
- Use original extension cables only, and be careful not to cut or otherwise damage them.
- Also make sure that the outlet is free from liquid or mould before plugging in the appliance.
Intended use
- This appliance is designed for domestic use only.
- Any commercial use is prohibited.
WARNING
This appliance is for cooking purposes only. It must not be used for other purposes, for example for heating a room.
- Avoid using this appliance to heat plates under the grill, hang up napkins and tea towels, etc. on the handles, or dry and reheat anything.
- The manufacturer cannot be held responsible for damage caused by improper use or handling.
- The oven can be used for defrosting, baking, roasting and
grilling food.
- Original spare parts are available for 10 years from the date of product purchase.
Child safety
WARNING
Accessible parts may become hot during use. Children must be kept away
- The packaging materials can present a danger to children. Keep packaging material away from children. Please dispose of the packaging parts in an environmentally friendly manner.
- Electrical appliances are dangerous for children. Keep children away from the appliance in operation and forbid them to play with it.
- Do not store objects on top of the appliance that children could reach.
- When the oven door is open, do not place heavy objects
on it or allow children to sit on it. The appliance could tip over or the door hinges could be damaged.
Description of the appliance
Control panel
Bulb
Wire rack
Fan motor (behind the steel plate)
Drip pan
10 Oven functions selector
4 Handle
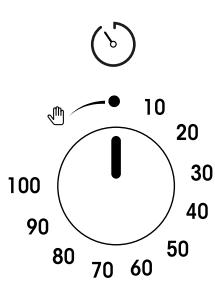
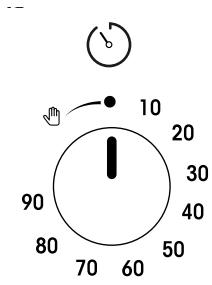
10 Mechanical timer (It depends on the model. Your product's timer can last 100 or 90 minutes. In the illustration, 100 minutes are shown as an example.)
5 Door
12 Oven temperature switch
Rack supports
13 Oven on/off light
Upper heating element
Technical specifications
| Brand | VALBERG |
| Product code | 967482 |
| Model reference | MFO 71 C X 205T |
| Energy efficiency index per cavity | 95.3 |
| Energy efficiency class per cavity | A |
| Energy consumption in kWh per cycle in conventional mode per cavity | 0.95 |
| Energy consumption in kWh per cycle in convection mode per cavity | 0.81 |
| Number of cavities | 1 |
| Source of heat per cavity | Electricity |
| Volume in litres per cavity | 71 |
| Oven type | Built-in |
| Net weight of the appliance in Kg | 29.9 |
| Rated supply (voltage in V, type of current & frequency in Hz) | 220 ~ 240 ~ 50 |
| Electrical protection class: | Class 1 |
| Heating function per cavity | Fan-assisted oven |
| Type of cleaning | Catalyze |
| Number and type of lights | 1 x BJB77.208.7169.10 |
| Lighting power in W per light / total | 25 W halogen |
| Lights replaceable by the user | Yes |
| Total rated power in W | 2400 |
| Country of manufacture | Turkey |
Additional information according to EU regulation 66/2014 and the harmonised standards in force.
The illustrations included in this manual are schematic and may not correspond exactly to the appliance.
The values mentioned on the appliance labels or in the accompanying documentation are obtained under laboratory conditions in accordance with the corresponding standards. Depending on the operating conditions and the environment of the appliance, these values may vary.
Package contents
Accessories supplied may vary by model. Not all the accessories described in the user manual may be part of your appliance.
User manual
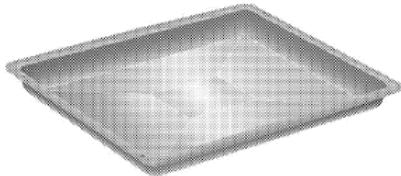
Standard tray
Used for pastries, frozen foods and large roasts.
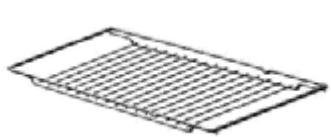
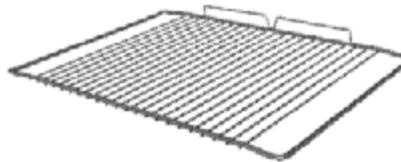
Wire rack
Used for roasts and foods to bake, roast or for stews, it is placed in the oven at the required height.
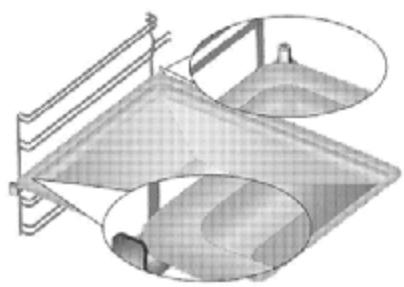
Correctly place the wire rack and the tray on the telescopic frames. (This function is optional. It may not be available on your product.)
The telescopic frames allow you to easily install and remove the trays and the wire rack.
When using the tray and wire rack with the telescopic frames, make sure that the pins on the rear of the telescopic frame are resting against the edges of the metal shelf and of the tray.

Installation
The product must be installed by a qualified person in accordance with the regulations in force. Otherwise the warranty will be voided. The manufacturer will in no case be held responsible for damage resulting from any procedure carried out by unauthorised persons and may, in this case, void the warranty.
The repair of the location and the installation of electricity for the appliance are the responsibility of the customer.
Install the appliance in accordance the gas and electricity regulations in force in your locality.
Before installation, check the appliance for faults. If any are observed, do not install it. Damaged products are a safety hazard.
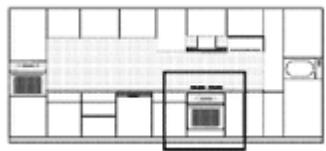
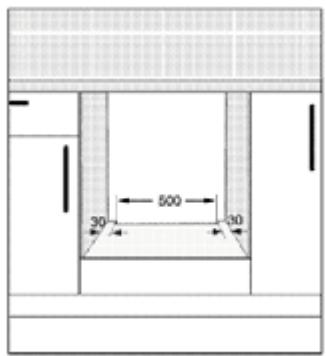
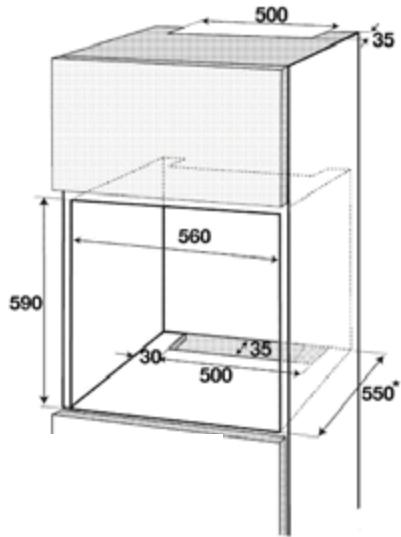
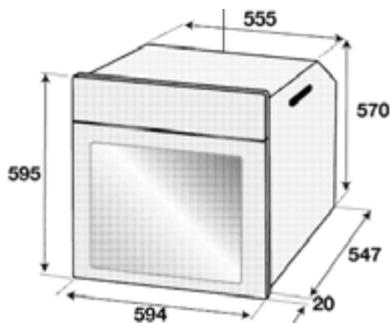
Before the installation
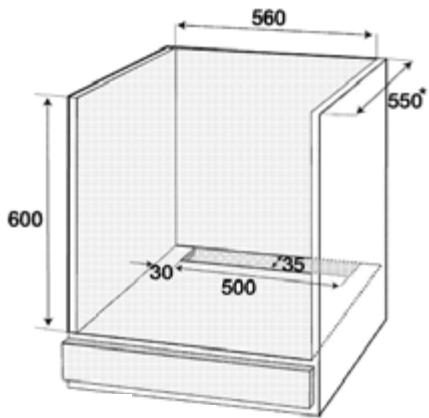
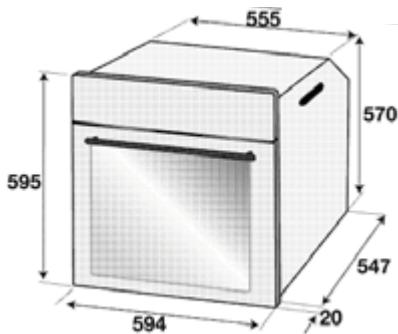
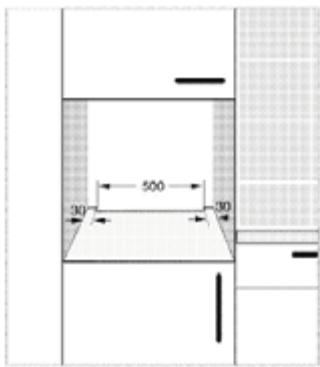
The appliance is intended for installation in commercially available kitchen units. A safety distance must be left between the appliance and the kitchen walls and the units. Refer to the diagram (values in mm).
- Surfaces, synthetic laminates and adhesives must be heat resistant (up to 100^ min.).
Kitchen units must be stable and secure. - If there is a drawer under the oven, a shelf must be installed between the oven and the drawer.
The appliance must be moved by at least two people. - Hold the oven by the slots on both sides to move it.
- Before installing the product, remove all materials and documents inside.
- Kitchen units must conform to the dimensions shown in the figure below. At the back of the kitchen unit, cut an opening to the dimensions shown in the figure below to ensure sufficient ventilation.
Do not install the appliance near refrigerators or freezers. The heat emitted by the appliance could increase the energy consumption of refrigerating devices.
Do not use the door and / or handle to carry or Do not use the door and / or move the appliance.
Installation and connections
Install the appliance in accordance the gas and electricity regulations in force.
Power supply connection
Connect the appliance to an earthed socket protected by a miniature circuit breaker of sufficient capacity, as indicated in the "Technical characteristics" table.
Have a qualified electrician earth your installation when using the appliance with or without a transformer. Our company cannot be held responsible for damage resulting from the use of the appliance without an earthing installation in accordance with the local regulations in force.
The appliance must only be connected to the power supply by an authorised and qualified person. The warranty period of the appliance starts only after its correct installation. The manufacturer cannot be held responsible for damage resulting from procedures carried out by unauthorised persons.
A damaged power cable must be replaced by a qualified electrician. Otherwise there is a risk of electric shock, short circuit or fire!
- The connection must comply with the national regulations in force.
- The values of the power supply must correspond to those given on the rating plate of the appliance. Open the door to see the rating plate.
- The power cable of the appliance must comply with the values in the "Technical characteristics" table.
Before carrying out any electrical installation operation, the appliance must be disconnected from the power supply network, otherwise you risk an electric shock!
The power cable plug must be easily accessible after installation (do not pass it over the hob).
When wiring, you must follow national / local electrical regulations. In addition, you should use recommended sockets and plugs for ovens. If the power limit of the appliance is greater than the current conduction capacity through the plug and socket, connect the appliance directly to a fixed electrical installation without using a plug or socket.
Plug the power cord into the outlet.
Product installation
- Slide the oven into the unit, align it and secure it making sure that the power cable is not broken and / or trapped.
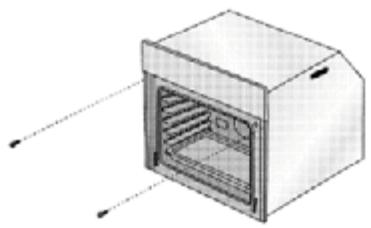
- Secure the oven with the 2 screws, as shown in the illustration.
- After installation, make sure that the screws are tight enough and that the oven does not move. The oven may tip over during use if it is not installed according to the instructions and the screws are not sufficiently tightened.
For products equipped with a fan: (this may not be available on your product.)
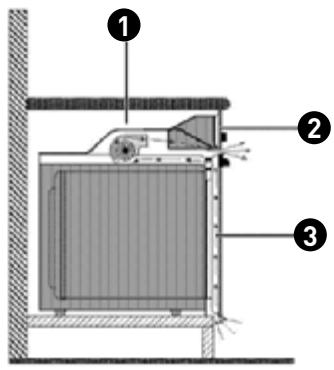
Fan
Control panel
3 Door
The integrated fan cools both the unit surrounding the appliance and the front of the appliance.
The fan continues to run for 20 to 30 minutes, even after the oven has been turned off. If you have set the oven timer, the fan will also turn off at the end of the cooking time, like all other functions.
Final check
Turning on the appliance.
Check the functions.
Subsequent relocation
-
Keep the original box of the appliance and use it for future relocation. Follow the instructions on the box. If you no longer have the original box, wrap the appliance in bubble wrap or heavy cardboard with tape to hold it together.
-
To prevent the rack and drip pan located inside the oven from damaging the door, place a strip of cardboard on the inner door, at the level of the trays. Secure the oven door to the side walls using duct tape.
-
Do not use the door and / or handle to lift or move the appliance.
-
Do not place any object on the appliance and move it flat.
- Inspect the general appearance of the appliance for possible damage due to transport.
Preparation
Tips for saving energy
The following tips will help you use your appliance in an environmentally friendly way and thus save energy:
- Use cooking utensils coated with enamel; heat transmission will be improved.
- When cooking, preheat the oven if recommended in the user manual or the recipe description.
- Do not open the oven door too often during cooking.
- Try to cook several dishes simultaneously in the oven when you can. You can place two baking dishes on the metal frame.
Cook several dishes in succession. The oven will already be at temperature. - You can save energy by switching off your oven a few minutes before the end of the cooking time. Do not open oven door.
- Defrost frozen meals before cooking them.
First use
First cleaning of the appliance
Certain detergents or cleaning products can damage the surface of the appliance. Do not use harsh detergents, cleaning powders / creams, or sharp objects for cleaning.
First use
First cleaning of the appliance
1 Remove all packing materials.
Wipe the surfaces of the appliance with a damp cloth or sponge and finish with a dry cloth.
First cooking
Heat the appliance for 30 minutes and then turn it off. In this way, any production residues or protective layers will be burnt off and removed.
Hot surfaces can cause burns! The appliance can be very hot during use. Never touch the burners, the internal parts of the oven, the heating elements, etc. when they are hot. Keep children away. Always use protective oven gloves when placing or removing dishes from the hot oven.
Electric oven
Remove all the baking trays and the wire rack from the oven.
Close the oven door.
Select the "Traditional" operating mode.
4 Select the strongest intensity for the oven; refer to the Using the electric oven chapter.
Operate the oven for about 30 minutes.
Turn off your oven; refer to the Using the electric oven chapter.
Grill oven
Remove all the baking trays and the wire rack from the oven
Close the oven door.
4 Select the strongest intensity for the grill; refer to the Using the grill chapter.
Operate the oven for about 15 minutes.
Turn off your grill; refer to the Using the grill chapter.
Odours and smoke may emerge for a few hours during first use. This is quite normal. Make sure the room is well ventilated to remove odours and smoke. Avoid inhaling the smoke and odours given off.
Using the oven
General information on baking, roasting and grilling.
Hot surfaces can cause burns! The appliance can be very hot during use. Never touch the burners, the internal parts of the oven, the heating elements, etc. when they are hot. Keep children away. Always use protective oven gloves when placing or removing dishes from the hot oven.
Be careful when opening the oven as steam may escape from it. The steam can cause burns to your hands, face and / or eyes.
Baking tips
Use as much tray space as possible.
- Place the baking tin in the middle.
- Select the correct location before turning on the oven or grill. Do not change the position of the tin when the oven is hot.
- Keep the oven door closed.
Roasting tips
- Season whole chickens, turkeys and large pieces of meat with lemon juice and black pepper before cooking to increase cooking performance.
- Meat roasted with bones takes 15 to 30 minutes longer to cook than an equivalent roast without bones.
Each centimetre of thickness of meat requires approximately 4 to 5 minutes of cooking time.
- Let the meat rest in the oven for about 10 minutes after the end of the cooking time. The juices will be distributed over all the meat and will not flow when it is cut.
- Fish should be placed in the middle of the oven or lower, in a fireproof dish.
Grilling tips
When meat, fish and poultry are grilled, they turn brown quickly, become crisp and do not dry out. Thin pieces, meat skewers and sausages, but also vegetables with a high liquid content (e.g. tomatoes and onions) are particularly suitable for this type of cooking.
- Distribute the pieces to be grilled on the wire rack or the baking tray with the wire rack so that the space covered does not exceed the size of the element.
- Slide the metal shelf or baking tray with the rack into the oven to the desired level. If you are grilling on the shelf, slide the baking tray onto the frame to collect the fat. The slide-in baking tray must be able to cover the entire surface of the grill. This tray may not be supplied with the product. Add a little water to the baking tray to make cleaning easier.
Do not place food too deep in the grill. This is the hottest area and fatty foods could catch fire.
Using the electric oven
Select the operating temperature and mode.

1


2

Oven functions selector

Oven temperature switch
Set the oven timer to the required cooking time; refer to the Using the timer chapter.
Set the function knob to the required function.
Set the temperature selector to the required temperature. The oven heats up to the set temperature and maintains that temperature. During heating, the temperature indicator light stays on.
Switching off the electric oven
Place the oven timer in the Off position.
When the timer is set for a defined period, it stops automatically; refer to the Using the timer chapter.
Turn the function selector and the temperature selector to the Off (upper) position.
Frame positions (for model with rack)
It is important to place the rack correctly on the frame. The rack must be inserted between the metal frames as shown in the illustration. Do not allow the rack to rest against the back wall of the oven. Slide the rack towards the front of the frame and position it level with the inner door to get the best performance from the grill.(The positions of the frames vary depending on the oven model.)
Operating modes
The order of the operating modes shown may vary on your appliance.
Natural convection

The upper and lower heating elements operate simultaneously. Food is cooked from above and below at the same time. This mode is suitable for example for cakes, pastries or cakes and stews cooked in tins. Cooking with a single tray.
Upper / lower heating element with fan

The upper and lower elements, and the fan (in the rear wall) are operating. Hot air is also quickly blown into the oven by means of the fan. Cooking with a single tray.
Upper heating element with fan

The upper and lower elements, and the fan (in the rear wall) are on. The fan allows a better distribution of hot air compared to the operating mode where only the upper heating element is operating.
Lower heating element with fan

The upper and lower elements, and the fan (in the rear wall) are on. The fan allows a better distribution of hot air compared to the operating mode where only the lower heating element is operating. This function should also be used to facilitate steam cleaning.
Fan operation

The oven is not heated. Only the fan (in the rear wall) is on. This operating mode is suitable for slowly defrosting frozen solid foods to room temperature, and cooling cooked foods.
Large grill

The large grill installed on the top wall of the oven is on. It is suitable for grilling large quantities of meat.
- Place large or medium portions evenly under the grill element for grilling.
- Turn food halfway through cooking.
Pulsed grill

The effect of the grill is not as powerful as with the large grill.
- Evenly place large or medium portions evenly under the grill element for grilling.
- Turn food halfway through cooking.
Using the oven timer
Starting cooking
To operate the oven, you must select the required cooking mode and temperature, and set the cooking time. Otherwise, the oven will not work.
1 Turn the timer clockwise to set the cooking time.
Place your dish in the oven.
Select a temperature and an operating mode, refer to the Using the electric oven chapter. The oven will heat to the set temperature and maintain that temperature until the end of the selected cooking time.
Once the cooking time has elapsed, the timer automatically turns anti-clockwise. A warning sound will indicate that the set time has elapsed and the power supply is turned off.
If you do not want to use the timer function, turn the timer anti-clockwise to the hand symbol.
Switch off the oven using the timer, the function selector or the temperature selector.
Switch off the oven before the set time
Turn the timer anti-clockwise to the Off position.
Switch off the oven using the temperature selector and the functions selector.
Cooking times table
The times indicated in this table are only given as an indication. They may vary depending on the temperature, thickness and type of food, as well as your cooking preferences.
Baking and roasting
The 1^st level corresponds to the location of the first rack support.
| Dish | Number of trays | accessories to use | Operating mode | Rack support height | Temperature (°C) | Cooking time (approx. in min.) |
| Cake on tray | One tray | Standard tray* | 3 | 180 | 25 ... 30 | |
| Cake in tin | One tray | Cake tray on wire rack** | 2 | 180 | 40 ... 50 | |
| Small cakes | One tray | Standard tray* | 3 | 160 | 25 ... 35 | |
| Sponge | One tray | Round hinged dish with a diameter of 26 cm on a wire rack** | 3 | 160 | 25 ... 35 | |
| Cookies | One tray | Baking tray* | 3 | 180 | 25 ... 30 | |
| Choux pastry | One tray | Standard tray* | 2 | 200 | 30 ... 40 | |
| Butter pastry | One tray | Standard tray* | 2 | 200 | 25 ... 35 | |
| Sourdough | One tray | Standard tray* | 2 | 200 | 35 ...45 | |
| Lasagne | One tray | Rectangular metal / glass tray on wire rack** | 2 - 3 | 200 | 30 ... 40 | |
| Pizza (thick) | One tray | Standard tray* | 2 | 200 ... 200 | 15 ... 20 | |
| Pizza (thin) | One tray | Standard tray* | 2 | 200 | 10 ... 15 | |
| Steak (whole) / Roast | One tray | Standard tray* | 3 | 25 min 250 max, then 180 ... 190 | 100 ... 120 | |
| Leg of lamb (casserole) | One tray | Standard tray* | 3 | 25 min 220 then 180 ... 190 | 70 ... 90 | |
| Roast chicken (1.8-2 kg) | One tray | Standard tray* | 2 | 15 min 250 max, then 180 ... 190 | 60 ... 80 | |
| Turkey (5.5 kg) | One tray | Standard tray* | 1 | 25 min 250 max, then 180 ... 190 | 150 ... 210 | |
| Fish | One tray | Standard tray* | 3 | 200 | 20 ... 30 |
We suggest preheating the oven for any food to be cooked.
- These accessories are not necessarily supplied with the product.
** These accessories are not supplied with the product. These are commercially available accessories.
Cooking table for test dishes
The dishes mentioned in this cooking table are prepared in accordance with EN 60350-1 standard in order to make it easier for inspection bodies to test the product.
| Dish | Number of trays | accessories to use | Operating mode | Rack support height | Temperature (°C) | Cooking time (approx. in min.) |
| Shortbread biscuits | One tray | Standard tray* | 3 | 180 | 40 ... 50 | |
| Small cakes | One tray | Standard tray* | 3 | 160 | 25 ... 35 | |
| Sponge | One tray | Round hinged dish with a diameter of 26 cm on a wire rack** | 3 | 160 | 25 ... 35 | |
| Apple pie | One tray | Round hinged dish with a diameter of 20 cm on a wire rack** | 2 | 180 | 50 ... 60 |
We suggest preheating the oven for any food to be cooked.
- These accessories are not necessarily supplied with the product.
** These accessories are not supplied with the product. These are commercially available accessories.
Baking tips
- If the cake is too dry, increase the temperature by 10^ and reduce the baking time.
- If the cake is too moist, use less liquid or lower the temperature by 10^ .
- If the cake is too dark on the top, place it on the lower level, lower the temperature and increase the baking time.
- If it is well cooked on the inside but sticky on the outside, use less liquid, lower the temperature and increase the cooking time.
Baking tips
- If the pastry is too dry, increase the temperature by 10^ and reduce the baking time.
Moisten the layers of dough with a mixture made from milk, oil, egg and yoghurt. - If the pastry takes too long to cook, make sure that the thickness of the pastry you have prepared does not exceed the depth of the baking tray.
- If the top of the pastry is golden but the bottom is not cooked, check that you have not used too much sauce for the bottom of the pastry. Try to distribute the sauce evenly over the pastry layers and the top of the pastry to brown them evenly.
Bake the dough according to the mode and temperature indicated in the baking chart. If the lower part is still not golden enough, the next time, place the pastry on a lower level.
Tips to cook vegetables
- If the vegetable dish no longer has any juice and becomes too dry, cook the vegetables in a saucepan with a lid instead of on a tray. Closed containers preserve the juice of the dish.
If a vegetable dish does not cook, parboil the vegetables or prepare them as canned food then place them in the oven.
Use of the grill
Close the oven door while grilling. Hot surfaces can burn!
- Turn the timer anti-clockwise, to the hand symbol, when using the grill.
Lighting the grill
Turn the function selector clockwise to the grill symbol.
Then set the required grill temperature.
If necessary, preheat for about 5 minutes. The thermostat light [temperature] comes on.
Stop the grill
Turn the function selector to the Off (upper) position.
Food that is not suitable for grilling is a fire hazard. Only use grilling foods suitable for intense grill heat. Do not place food too deep in the grill. This is the hottest area and fatty foods could catch fire.
Grilling using the electric grill
Table of cooking times for the grill
| Food | Accessories to use | Rack support height | Recommended temperature (°C)** | Grilling time (approximately) |
| Fish | Wire rack | 4 ... 5 | 250 | 20 ... 25 min.# |
| Chicken wings or thighs | Wire rack | 4 ... 5 | 250 | 25 ... 35 min |
| Lamb chops | Wire rack | 4 ... 5 | 250 | 20 ... 25 min |
| Roast beef | Wire rack | 4 ... 5 | 250 | 25 ... 30 min.# |
| Veal cutlets | Wire rack | 4 ... 5 | 250 | 25 ... 30 min.# |
| Toast* | Wire rack | 4 | 250 | 1 ... 3 min |
depending on the thickness.
Preheat for 5 minutes.
* If the temperature of the grill in your oven cannot be adjusted, the grill will operate at the recommended temperature.
The dishes mentioned in this cooking table are prepared in accordance with EN 60350-1 standard in order to make it easier for inspection bodies to test the product.
| Food | Accessories to use | Rack support height | Recommended temperature (°C)** | Grilling time (approximately) |
| Toast | Wire rack | 4 | 250 | 1 ... 3 min.# |
| Meatballs (beef) - 12 pieces | Wire rack | 4 | 250 | 25 ... 35 min |
Turn the food after 2/3 of the total cooking time.
We suggest preheating the oven for 5 minutes for any food to be roasted.
Maintenance and upkeep
General information
Regular cleaning of the appliance will extend its life and reduce the occurrence of problems.
- Clean the appliance after each use. This will make it easier for you to remove any food
Unplug the appliance from the power outlet before starting cleaning and maintenance, otherwise you risk an electric shock!
Let the appliance cool down before cleaning. Hot surfaces can burn!
residues and prevent them from burning during the next use.
- No special cleaning product is needed to clean the appliance. Use lukewarm water with detergent, a soft cloth or a sponge to clean the appliance and wipe it with a dry cloth.
Always be sure to wipe off excess liquid after cleaning and wipe up any spills immediately. - Do not use detergents containing acid or chlorine to clean stainless steel surfaces and the handle. Use a soft cloth with a non-abrasive liquid detergent to clean these parts, being careful to always rub in the same direction.
The surface could be damaged by certain detergents or cleaning products. Do not use harsh detergents, cleaning powders / creams, or sharp objects for cleaning.
Do not use steam cleaners for cleaning the appliance, as these present a risk of electric shock.
Cleaning the control panel
Clean the control panel and the control knobs with a damp cloth and wipe them dry.
If your product has buttons, do not remove the control buttons to clean the control panel.
The control panel could be damaged!
Cleaning the oven
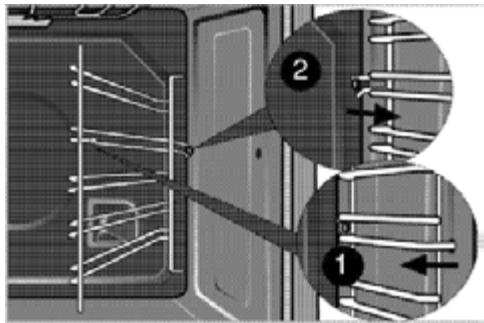
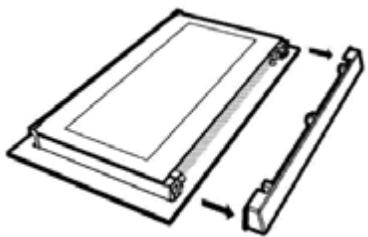
Cleaning the side rail (varies depending on the oven model.)
(This function is optional. It may not be available on your product.)
Remove the front part of the side rail by pulling it to the opposite side of the side wall.
2 Remove the side rail completely by pulling it towards you.
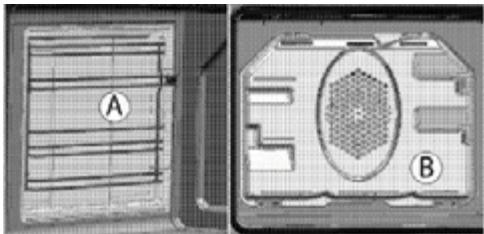
Catalytic walls
(This function is optional. It may not be available on your product.)
The internal side walls (A) and / or the rear wall (B) of your product may be coated with a catalytic enamel. Catalytic walls have a light matte colour and a porous surface. Do not clean the catalytic walls of the oven. Thanks to their perforated structure, the catalytic surfaces absorb grease. When they start to shine, it means they are covered in fat. In this case, it is recommended to replace them.
Easy steam cleaning
This ensures easy cleaning because the dirt (if treated immediately) is softened by the steam that forms inside the oven and by the drops of condensed water on the interior surfaces of the oven.
1 Remove all accessories from the oven.
Pour 500~ml of water on the baking tray and place it on the second level.
Set the oven temperature to 100^ and let it operate on the easy steam clean mode for 25 minutes.
Open the door and wipe the interior surfaces of the oven with a damp sponge or cloth.
Use lukewarm water with detergent, a sponge or a soft cloth to clean any stubborn dirt and remove it using a dry cloth.
During the easy steam clean mode, the water that is placed in the tray to soften the residue and dirt collected in the oven cavity will evaporate and condense in the oven cavity and on the interior glass of the oven door oven, so some water may drain out when you open the oven door. Wipe off any condensation as soon as you open the oven door.
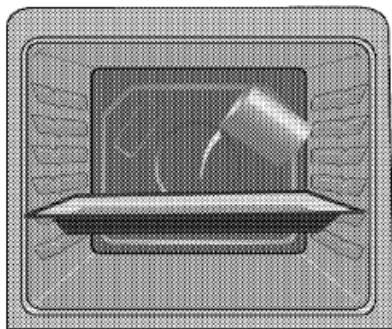
Cleaning the oven door
Use lukewarm water with detergent, a soft cloth or a sponge to clean the door of the oven and wipe the appliance with a dry cloth.
Do not use abrasive detergents or sharp metal scrapers to clean the oven door. You could scratch the surface and damage the glass.
Removing the oven door
Open the front door (1).
Open the clips located on the hinge housing [2]. on the right and left sides of the front door, pressing the clips, as shown in the diagram.
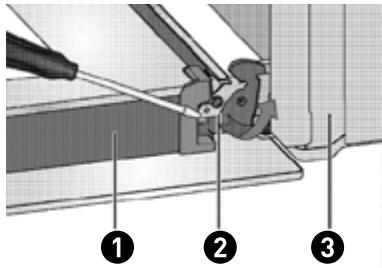
Door
Hinge [closed position]
3 Oven
Hinge [open position]
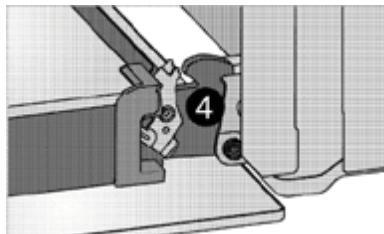
Open the front door halfway.
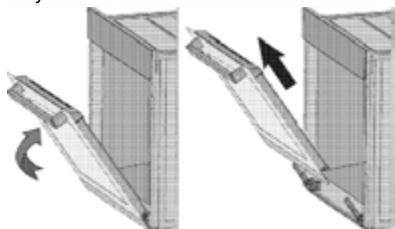
4 Remove the front door by pulling it up to release it from the right and left hinges.
The steps performed during the removal process should be followed in reverse order to install the door. Remember to close the hinge housing clips when reinstalling the door.
Removing the glass from the door
(This function is optional. It may not be available on your product.)
The interior glass panel of the oven door can be removed for cleaning.
Open the oven door.
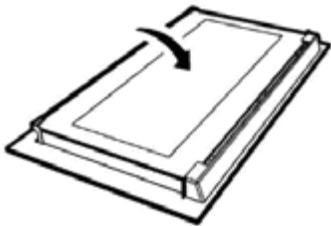
Remove the plastic piece from the top of the door by pulling it towards you.
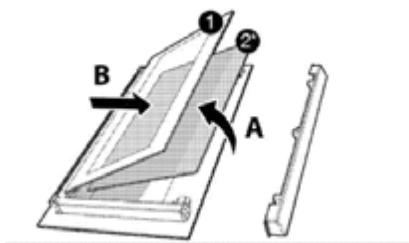
As shown in the figure, slightly lift the bottom glass panel (1) towards direction A, then pull it towards direction B.
Rear glazed panel
Rear glazed panel (may not be available on your product.)
If your appliance is fitted with an interior glass panel (2), repeat this operation to remove it.
The first step in reassembling the door is to reinstall the interior glass panel [2]. Position the chamfered corner of the glass panel so that it fits into the chamfered corner of the plastic notch. (If your appliance is equipped with an interior glass panel). The inner glass panel [2] must be installed in the plastic notch, near the bottom glass panel [1].
6 When you install the bottom glass panel (1), check that the printed side of the panel faces the second glass panel. It is important to insert the lower corners of the bottom glass panel (1) into the lower plastic notch.
Push the plastic piece into the frame until you hear a "click".
Replacing the oven light
Before replacing the oven light bulb, make sure that the appliance is unplugged from the power supply and that it is cool to avoid any risk of electric shock. Hot surfaces can burn!
The oven bulb is a special electric light bulb capable of withstanding heat of up to 300^ . For more details, see Technical Specifications. Oven bulbs are available from your authorised technician.
The location of the lamp may differ from the illustration.
The bulb used in this fixture is not suitable for lighting a room in a home. This bulb is intended to help the user distinguish between foodstuffs.
The bulbs used in this appliance must withstand extreme physical conditions such as temperatures above 300^ .
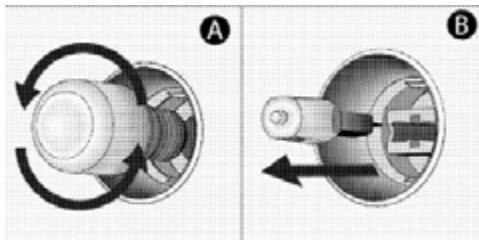
If your oven is equipped with a round lamp:
Unplug the appliance from the power supply.
2 Unscrew the bulb cover by turning it anti-clockwise to remove it.
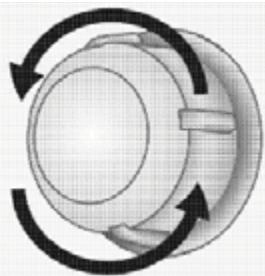
If your oven light is a type (A) as shown in the diagram below, remove it by turning it as shown, before replacing it. If, on the other hand, it is a type (B). pull it out to remove it, as shown in the illustration, before replacing it.
4 Replace the bulb cover.
Maintenance and upkeep
The oven emits steam when in use.
It is normal for steam to escape during operation. This is not a fault.
The appliance makes metallic noises during the heating and cooling phases.
When metal parts are heated, they can relax and make these noises. This is not a fault.
The appliance does not work.
- The power cord is detached or disconnected. >> Check the fuses in the fuse box. Replace or re-enable them as required.
- The appliance is not connected to the earth socket. >> Check the plug connection.
The oven light does not come on.
- The oven bulb is defective. Replace the oven light bulb.
- The power is switched off >> Check if there is power. Check the fuses in the fuse box. Replace or re-enable them as required.
The oven does not heat up.
- The oven has not been set to the required cooking mode and / or temperature. >> Set the oven to a cooking mode and / or to the required temperature.
- On models equipped with a timer, the timer is not set. >> Set the timer. (On products with a microwave oven, the timer controls the microwave only.)
- The power is switched off >> Check if there is power. Check the fuses in the fuse box. Replace or re-enable them as required.
(On models with a timer) The clock screen flashes or the clock symbol is on.
There has been a power cut. >> Set the time. / Turn the appliance off, then on again.
Consult the authorised technician or the dealer who sold you the appliance if you cannot resolve the problem after following the instructions in this chapter. Never try to repair a damaged appliance yourself.
Packaging and the environment
DISPOSING OF PACKAGING MATERIALS
Packaging materials protect your appliance from damage that may occur during transport.
These materials are environmentally friendly since they are recyclable.
Recycling materials saves raw materials and reduces waste production.
Disposing of your old appliance
SELECTIVE SORTING OF ELECTRICAL AND ELECTRONIC WASTE

This appliance bears the WEEE (Waste Electronic AND Electronic Equipment) symbol meaning that, at the end of its life, it must not be disposed of with household waste but must be taken to the local sorting centre. Waste recovery helps preserve our environment.
ENVIRONMENTAL PROTECTION - DIRECTIVE 2012/19/EU
To preserve our environment and our health, the end-of-life disposal of electrical and electronic devices must be done according to very specific rules and requires the involvement of everyone, whether supplier or user.
This is why your appliance, as indicated by the symbol on its nameplate or on the packaging, should under no circumstances be thrown into a public or private bin intended for household waste. The user has the right to take the device to public collection points which selectively sort waste to be either recycled or reused for other applications in accordance with the directive.
For the safety of children, store your old appliances in a safe place until they are disposed of, outside your home.

Chere cliente, cher client,
Convection naturelle