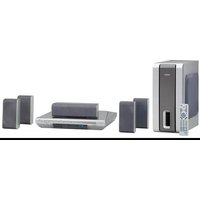
USER MANUAL THC385 THOMSON
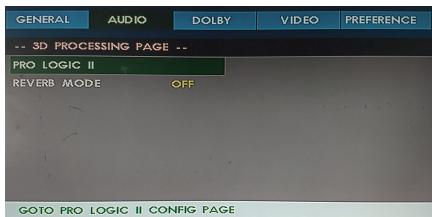
2.5 3D PROCESSING SETUP PAGE
PAGE DE CONFIGURATION DU TRAITEMENT 3D: Réglez la 3D En traitement.
3. REGLAGEVIDEO
3.1 COMPOSANTS
3.2 REGLAGE MODE TV
| CD RIP |
| Ripping | Selected Track |
| Track Progress | track02 30% |
| Progress | |
| Cancel | |
| SUMMARY | |
| Now Ripping | |
| Track 01/01 | |
FIGURE 2
| 00:00 00:00
001/172 C8C |
| 003 | 001 |
| 002 | All Select |
| 003 | All Unsel |
| 004 | Copy |
| 003 | Exit |
| 004 | |
FIGURE 3
| 00:00 00:00
001/172 1000 |
| US81 |
| 003 |
| 004 |
| 003 |
| 004 |
FIGURE 4
FIGURE 5
| 00:00 00:00
001/172 | ### | OBC |
| 001
002
003
004
003
004 | Remain size: |
| 30MB | |
| BACK | NEXT |
LINE IN
This symbol indicates there are dangerous voltages and laserbeams within the product housing, which may have sufficient magnitude to constitute a risk of electric shock if not handled correctly.
To avoid the risk of electric shock and laser radiation, do not open the housing at any time.

This symbol identifies important operating and maintenance (servicing) instructions. Be sure to follow instructions identified with this symbol to avoid potential damage to your unit.
Safety Precautions

WARNING: TO REDUCE THE RISK OF FIRE OR ELECTRIC SHOCK, DO NOT EXPOSE THIS APPLIANCE TO RAIN OR MOISTURE. DANGEROUS HIGH VOLTAGES ARE PRESENT INSIDE THE ENCLOSURE. DO NOT OPEN THE CABINET. REFER SERVICING TO QUALIFIED PERSONNEL ONLY.
DO NOT STARE INTO BEAM OR BLINDNESS MAY RESULT.
This DVD player employs a laser system. To prevent direct exposure to laser beam, do not try to open the enclosure or defeat the interlocks. Use of controls, adjustments or the performance of procedures other than those specified may result herein hazardous radiation exposure. To prevent direct exposure to laser beam, do not try to open the enclosure. Visible laser radiation when open and interlocks defeated.
This product incorporates copyright protection technology that is protected by method claims of certain U. S. Patents and other intellectual property rights owned by Macrovision Corporation and other rights owners. Use of this copyright protection technology must be authorized by Macrovision Corporation, and is intended for home and other limited viewing uses only unless otherwise authorized by Macrovision Corporation. Reverse engineering or disassembly is prohibited.
Consumers should note that not all high definition television sets are fully compatible with this product and may cause artifacts to be displayed in the picture.
In case of 525 or 625 progressive scan picture problems, it is recommended that he used switch the connection to the "standard definition" output. If there are questions regarding our TV set compatibility with this model 525p and 625p DVD player, please contact our customer service centre.
Manufactured under license from Dolby Laboratories. " Dolby " and the double-D symbol are trademarks of Dolby Laboratories. Confidential unpublished works.
Copyright 1992-1997 Dolby Laboratories. All rights reserved.
"DTS" and "DTS Digital Out" are trademarks of Digital Theater Systems, Inc.

The Wastebin
IMPORTANT SAFETY PRECAUTIONS:
1) Read these instructions.
2) Keep these instructions.
3) Heed all warnings.
4) Follow all instructions.
5) Do not use this apparatus near water.
6) Clean only with dry cloth.
7) Do not block any ventilation openings. Install in accordance with the manufacturers instructions.
8) Do not install near any heat sources such as radiators, heat registers, Stoves, or other apparatus (including amplifiers) that product heat.
9) Do not defeat the purpose of the polarized or grounding type plug. A polarized plug has two blades with one wider that the other. A grounding type plug has two blades and a third grounding prong. The wide blade or the third prong are provided for your safety. If the provided plug does not fit into your cutlet, consult an electrician for replacement of the obsolete outlet.
10) Protect the power cord from being walked on or pinched particularly at plugs, convenience receptacles, and the point where the exit from the apparatus.
11) Only use the attachments/accessories specified by the manufacturer.
12) Use only with the cart, stand, tripod, bracket, or table specified by the manufacturer, or sold with the apparatus. When a cart is used, use caution when moving the cart/apparatus combination to avoid injury from tip-over.
13) Unplug this apparatus during lightning storms or when unused for long periods of time.
14) Refer all servicing to qualified service personnel. Servicing is required when the apparatus has been damaged in any way such as power supply cord or plug is damaged, liquid has been spilled or objects have fallen into the apparatus, the apparatus has been exposed to rain or moisture, does not operate normally or has been dropped.
15) Apparatus shall not be exposed to dripping or splashing and no objects filled with liquids, such as vases, shall be placed on the apparatus.
16) Warning to reduce the risk of fire or electric shock, do not expose this apparatus to rain or moisture.

NOTES ON HANDLING
The top and rear panels of the unit may become warm after a long period of use. This is not a malfunction.
- When the unit is not use, be sure to remove the disc and turn off the power.
If you do not use the unit for a long period, the unit may not function properly in the future. Turn on and use the unit occasionally.
Do not place foreign objects on the tray.
LOCATION
Do not locate the unit in places such as:
Near heating devices or in enclosed car.
High temperature (40^ or higher) or high humidity (90% or higher).
Dirty places.
Avoid direct exposure to sunshine
DISTURBANCE
When you place this unit near a TV, radio or VCR, the playback picture may become poor and the sound may be distorted. In this case, place the unit away from the TV, radio or VCR.
NOTES ON MOISTURE CONDENSATION
The pickup may be condensed with water under the following situation.
- When you bring the unit directly from a cold place to a warm place.
- When you use the unit in a room where you just turned on the heater, or a place where the cold air from the air conditioner directly hits the unit.
During the summer, when you use the unit in a hot and humid place just after you move the unit from an air conditioned room.
The room is vaporous or damp.
If condensation exists, the unit will not operate properly. Remove the disc, connect the power cord of the unit to the wall outlet, turn on the unit, and leave it for two or three hours. After two or three hours, the unit will have warmed up and evaporated any moisture. Keep the unit connected to the wall outlet and moisture condensation will seldom occur.

ON HANDLING DISCS
- Do not touch the playback side of the disc.
Do not attach paper or tape to disc.

ON CLEANING DISCS
Fingerprints and dust on the disc cause picture and sound deterioration. Wipe the disc from the centre outwards with a soft cloth. Always keep the disc clean.

If you can not wipe off the dust with a soft cloth, wipe the disc lightly with a slightly moistened soft cloth and finish with a dry cloth.
- Do not use any type of solvent such as thinner, benzine, commercially available cleaners or antistatic spray for vinylLps. It may damage the disc.
ON STORING DISCS
- Do not store discs in a place subject to direct sunlight or near heat source.
- Do not store discs in place subject to moisture and dust such as a bathroom or near a humidifier.
Store discs vertically in a case. Stacking or placing object on discs outside or their case may cause warping.
STRUCTURE OF DISC CONTENTS
Normally, DVD discs are divided into titles, and the titles are sub-divided into chapters. Audio CD are divided into tracks.
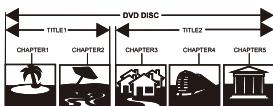
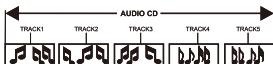
Each title, chapter, or track is assigned a number, which is called title number, chapter number or track number respectively.
There may be discs that do not have these number.
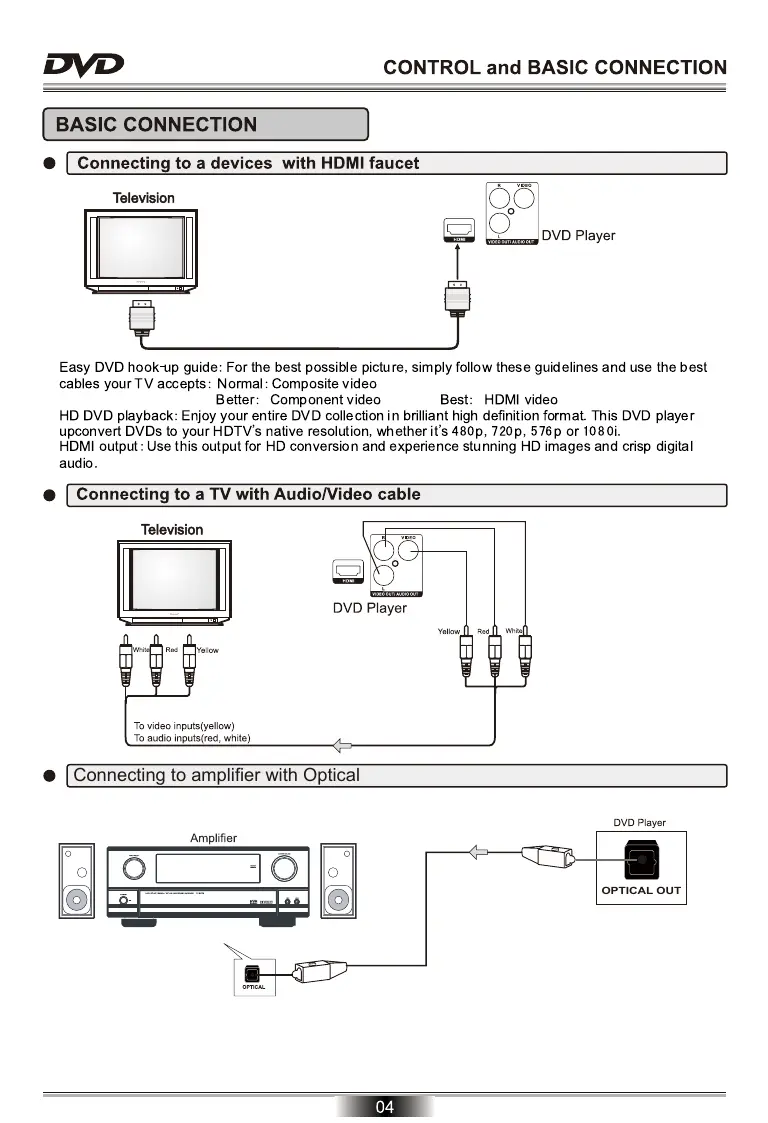
BASIC CONNECTION
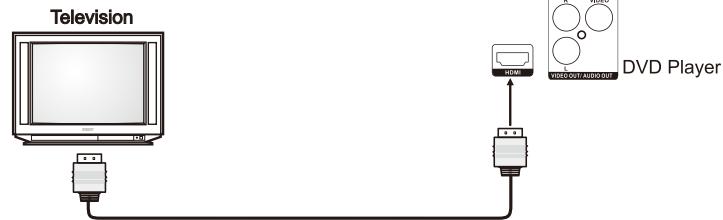
- Connecting to a devices with HDMI faucet
Easy DVD hook-up guide: For the best possible picture, simply follow these guidelines and use the best cables your TV accepts: Normal : Composite video
Better: Component video
Best: HDMI video
HD DVD playback: Enjoy your entire DVD collection in brilliant high definition format. This DVD player upconvert DVDs to your HDTV's native resolution, whether it's 480p, 720p, 576p or 1080i.
HDMI output : Use this output for HD conversion and experience stunning HD images and crisp digital audio.
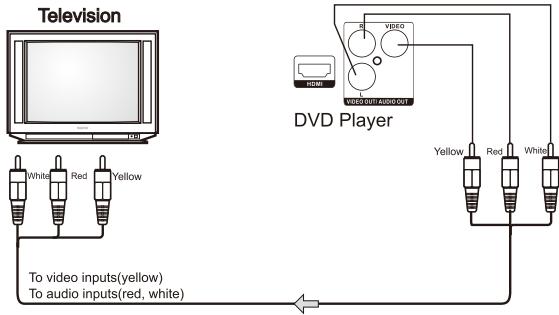
- Connecting to a TV with Audio/Video cable
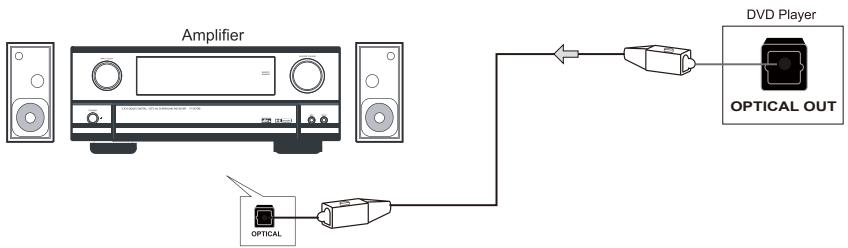
- Connecting to amplifier with Optical
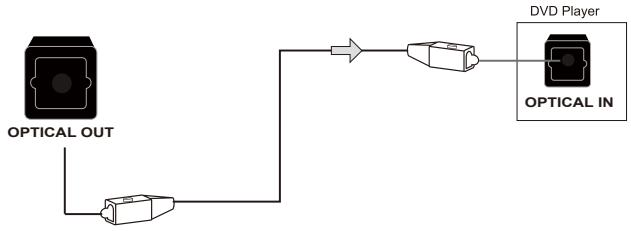
- Connecting to DVD with Optical
NOTE:
1, When THC385 is in mode optical IN it will show SPDF on LED display.
2, optical IN function only works for PCM format. RAW format is not supported by this optical input.
CONNECTION OF DVD AND TV
- If your TV has AV terminals, connect this unit to TV with the attached AV cables, and set the TV to be AV status after confirming the connection is correct.(Figure 1)
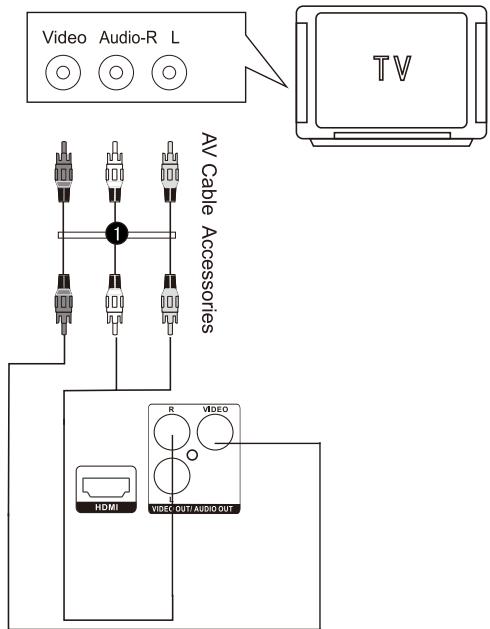
Note:1. Please turn off the power switch of both DVD player and TV before they are connected, and unplug the power plug from the socket on the wall. 2. When watching the disc with different system, adjust the corresponding system according to your TV system. (NTSC/PAL/AUTO) 3. If there are multiple connections between DVD player and TV, select one and unplug other connections so as not to affect the quality of images and sounds. 4. Do not switch the power on and off frequently, switch on and off each time must have an interval of 3 Seconds.
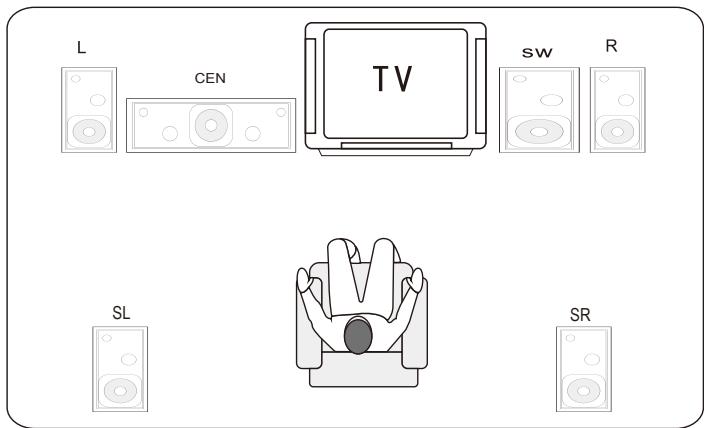
Connect instruction between DVD player and speaker
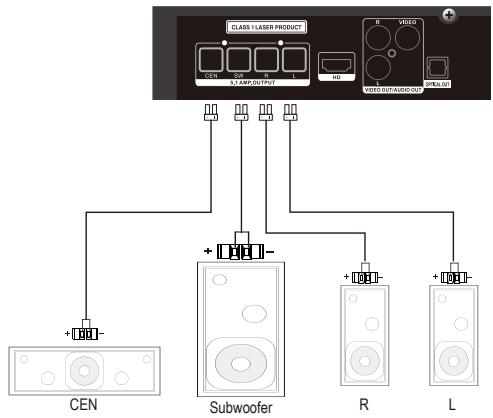
- Connect one speaker (left) to L plugg of the DVD, then connect the second speaker (right) to R plugg of the DVD
- Connect the Subwoofer to SW plugg of the DVD
- Connect the Center to CEN plugg of the DVD
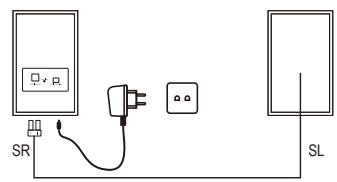
- The two surrounds are connected to each other and connected to the DVD via Bluetooth and powered by the adapter.
- SW = Subwoofer, FR = Front Right, FL = Front Left, CEN = Center, SR = Surround Right, SL = Surround Left.
Preparations
- When you want to view a disc, turn on the TV and select the video input connected to the DVD player.
Basic playback
- Press STANDBY/ON in the front panel, the DVD player turns on and the TV screen will display the start logo. If a disc is already in the tray, it will begin to play once the power is on.
-
Press OPEN/CLOSE to open the disc tray, place a disc on the disc tray.
-
There are two different disc sizes. Place the disc in the correct guide on the disc tray. If the disc is out of the guide, it may damage the disc and cause the DVD player to malfunction.
-
Do not place a disc which is unplayable in this DVD player.
-
Press OPEN/CLOSE to close the disc tray, the playback will automatically start.
- Some discs may not playback automatically, you can press ENTER/PLAY button to start playback.
- Some discs may start playback with a menu, use the cursor button on the remote control to select menu options and press ENTER/PLAY to start, or press digits to select a menu options directly.
Stop playback
- Press STOP button to go to stop mode, the TV screen will show the start logo. With certain disc types, such as DVD, the player can resume from the point where it was stopped.
- Press ENTER/PLAY to resume playback from the location where playback is stopped or from the beginning of the disc.
- Press STOP twice to stop completely.
Previous and Next
During playing, press PREV key can back to start of this chapter, then each press this key will skip a chapter until the start of the disc.
Each press of NEXT key during playing will skip the current chapter and play the next one.
Fast forward and Fast reverse
- Press F.FWD to fast forward through the disc. Each time the F.FWD button is pressed, the fast forward motion speed changes.
- Press ENTER/PLAY to resume normal playback.
- Press F.REV to fast reverse through the disc. Each time the F.REV button is pressed, the fast reverse motion speed changes.
- Press ENTER/PLAY to resume normal playback.
Pause playback
- Press PAUSE II to pause playback (still mode). The sound will be muted during still mode.
- Press ENTER/PLAY or PAUSE to resume normal playback.
Single step playback
- Press STEP continuous to single step forward to the next frame in the video.
- Press ENTER/PLAY to resume normal playback.
NOTES:
- "O" may appear on the TV screen during operation. A "O" means that the operation is not permitted by the unit or the disc.
IMPORTANT NOTE:
THE FOLLOWING FUNCTIONS ARE APPLICABLE ONLY TO DVD DISCS. IF OTHER DISC FORMATS ARE PLAYED, SCREEN DISPLAY AND OPERATION WILL BE DIFFERENT.
SUB/COPY:
Press this button and the screen will display "SUBTITLE 01/XX XXXXX", "01" indicates the ordinal number of this language; "XX" indicates total number of language; "XXXXX" indicates the language of country. (The number of language depends on disc).
COPY:
a. Copy CD music into device
b. Copy the MP3/MP4/JPEG/WMA documents to USB
c. When reading the file in USB, press this button can delete the file
TITLE
According to some DVD discs, pressing this button will display the title menu, you can then press the digits to select the preferred chapter.
PROGRAM
Press this button and the screen will display info window, press digits button to input the program number what you want, when finished, move the cursor to select the "Start" logo, at this time the unit will start program playback and the screen will display "Program" logo.
If you want to cancel this function, press "STOP" and then press ENTER/PLAY.
ANGLE
For discs with this feature, pressing this key to view action from different angles.(Depending on the DVD)
TIME
Press this button one time, the screen will display search menu, the second will cancel. In search menu, you can use UP/DOWN cursor button to select item what you wanted, Then press ENTER/PLAY button to confirm.
REPEAT
Press REPEAT and Chapter repeat will be displayed on screen, the second press will display Title repeat, the third press will display All repeat, the four press will cancel repeating.
A-B REPEAT
Press "A-B RPT" to begin start-point, press again to set an end point and complete setting. The selected section A-B will be repeated. The third press will cancel this function.
Press this button to display root menu, select item according to your preference. (This key is valid to DVDs possessing multi-layer menu.)
The PBC allows the user to play Video CDs interactively. If PBC is ON, the user can use the digits buttons to select track only in the menu, if PBC is OFF, the user can select the track directly.
VOLUME and MUTE
Press "+" at the right of VOLUME to increase volume, " - " to decrease to volume. The first press of MUTE will display MUTE (no voice), the second press will return to normal playback.
LANGUAGE CHANNEL CHOOSE
Press this button on remote control to change the mode of audio.
For example: Audio 1/2: AC 3 2 CH English
Audio 2/2: AC 3 5.1 CH English
Note: When press this button continuously, you must above 3 seconds interval.
JPEG DISC PLAYBACK
When playing JPEG disc, a navigation menu will be displayed automatically if the disc is loaded in succession. In the menu, use UP or DOWN in the cursor to select a file, then press "ENTER/PLAY", the file will be play with a slide-show. Press PREV or NEXT to select the previous or the next picture. Press PAUSE to pause the current picture for enjoying, when press ENTER/PLAY, it will return to normal playing. Press ZOOM to start zoom function. When ZOOM is on, press F.REV and F.FWD to select different enlargement ratio, When ZOOM is on, press CURSOR key can move the enlargement picture.
MPEG4 DISC FUNCTION INTRODUCTION
MPEG-4 is the fourth video and audio encoding standard released by MPEG (The abbreviation of " Moving Pictures Experts Group"). VCD is based on MPEG-1 technology and DVD is based on MPEG-2. MPEG-4 takes advantage of narrow bandwidth, pursue the best picture quality by compress and transmit the data in frame reconstruct technology. The audio data is compressed by WMA standard. MPEG-4 is the most advanced compression technology standard in AV field. It has the highest compression rate. By MPEG-4 technology, we can encode and
compress a DVD film into one or two CD-R disc with pretty good picture quality, or can burn several films that has same quality as VCD into one CD-R disc, or can burn several films that has similar quality to DVD into DVD-ROM disc.
Note:
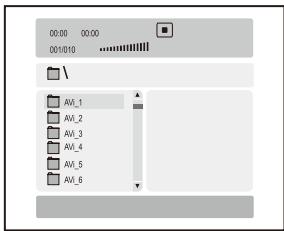
- The MPEG-4 discs in market now have many different formats, such as XVID, AVI, DIVX, RM etc. But some discs with "MPEG4" logo in market are not encoded by MPEG technology. It is normal that some of the discs can't be played well in this player because of the incorrect encoding standard.
- The MPEG-4 files are displayed as a list in the screen, choose the icon by the cursors and press "ENTER/PLAY" button to playback the movie.
HDMI FUNCTION
HDMI, Hi Definition Digital Multimedia Interface supports EDID and DDC2B. This connection operates quickly and conveniently, providing the best in both audio and video playback.
HDMI can transfer uncompressed, high-resolution picture and multi-channel audio digitally up to speeds of 5 GBps. HDMI can support all ATSC HDTV standards not only meet resolution 1080i, which can supply the highest picture quality, but also support DVD Audio and other most advanced digital audio format, and support 8 channel 96kHz digital audio transmission. You only need one HDMI line connected, relieve audio connected. At the same time, the spare space which HDMI standard supplied can apply in the video updating. HDMI can collocate with HDCP (High-bandwidth Digital Content Protection), avoid copyright film being copied without authorization.
When a Kodak Picture CD is inserted on the unit, an automatic slide show is launched. Each picture in the Kodak Picture CD will be displayed consecutively in a slide-show fashion and will be scaled to fit in the whole TV screen.
To display an image indefinitely, press the "PAUSE" key. To view the next or previous picture, press "NEXT" or "PREV" key. To resume the slideshow, press the "ENTER or PLAY" key.
Image Rotation
There are Two modes to rotate a picture: "Left" and "Right". These operations are allowed only when a picture is being displayed normally and will be cancelled automatically when a new picture is displayed. The arrow key is used to select the different rotation modes:
Left < -Turn left
Right > -Turn right
Zoom
The "ZOOM" key is used to turn on or off this function. When this mode is on, any picture will be displayed at the last ratio selected by the user. A message on the screen will indicate the current zoom ratio.
If zoom mode is on, "F.FWD" and "F.REV" key are used to control the ratio of zoom in/out. With ZOOM mode off, a picture is scaled to fit the whole TV screen.
Notes: During zoom function, slide-show transition and image rotation are disabled. To cancel the zoom function press the "ZOOM" key again to resume the slide-show.
Digest
The "STOP" key is used to display thumbnail size pictures. After it is enabled, some scaled-down thumbnail pictures will be displayed on the screen. The "NEXT" and "PREV" keys can be used to display the next/prev pictures in the Kodak Picture CD.
You can select any of the displayed thumbnails by using the Arrow Keys and pressing the "ENTER or PLAY" key. The thumbnail will be enlarged to fit the TV screen and the slide show will start. If you desire to display an image indefinitely, press the "PAUSE" key. To view the next or previous picture press "NEXT" or "PREV" key. To resume the slide show press the "ENTER or PLAY" key.
IMPORTANT NOTE: Quality of pictures displayed on the screen is highly dependent on the viewing device.
SYSTEM SETUP
- When you press SETUP button on the remote control, the setup menu will be displayed. It include General Setting, Audio Setup, Video Setup, Preference Setup, Password Setup and Exit Setup menu.
1.Within the setup menu, you can use UP,DOWN, LEFT and RIGHT buttons on the remote control to move the cursor, and then press the ENTER/PLAY button to make your selection. Press LEFT can return to the previous menu.
2.To exit setup menu, you can select the exit setup menu or press SETUP button.
1. GENERAL SETUP PAGE
Setup TV screen format, video type and all DVD functions.
1.1 TV DISPLAY
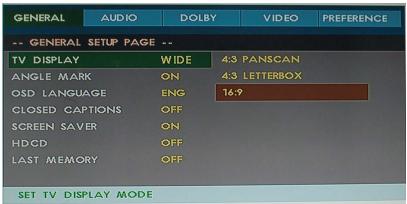
The TV Display which select the different ratio of display format and the screen of TV, There are various types of display on screen for different matches between Disc and TV.
Note:
- No matter which display format is selected, a picture recorded in standard 4:3 format always displays in the 4:3 aspect ratio.
- The display format of DVD titles may vary; please refer to the information that accompanies your specific DVD title.
- If the DVD title is recorded in 16:9 wide display format while the TV is a standard 4:3 screen, horizontal compression of the image will result.
- Some DVD titles may be recorded in special formats. In such cases, the DVD titles will always appear on the screen in their original format, regardless of which TV display format you select.
1.2 ANGLE MARK
ANGLE MARK: Users can select a particular camera angle when playing a DVD which offers multiple angles.
1.3 OSD LANGUAGE
On Screen Display (OSD) Language: Users can select the whole setup menu and on-screen display language.
1.4 CLOSED CAPTIONS
CLOSED CAPTIONS: For hearing-impaired people. the picture can be displayed with recorded explanatory captions.
1.5 SCREEN SAVER
SCREEN SAYER: If the screen saver is on, then there will be an animated picture on the screen whenever the DVD player is idle for a certain time.
1.6 LAST MEMORY
LAST MEMORY: This function is convenient when you want to continue viewing a disc from the point where you were watching before. Unlike the resume function, the Last Memory function is effective even the DVD is removed from the player.
- When Last Memory is ON. Each time when you open the tray to remove the disc.
2.AUDIO SETUP PAGE
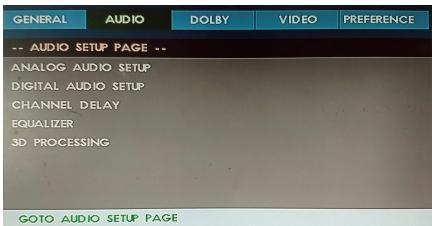
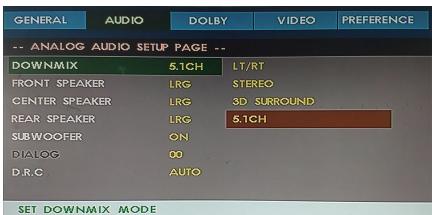
2.1 ANALOG AUDIO SETUP PAGE
ANALOG AUDIO SETUP PAGE: Sets the DOWNMIX, FRONT SPEAKER, CENTER SPEAKER, REAR SPEAKER, SUBWOOFER, DIALOG, D.R.C
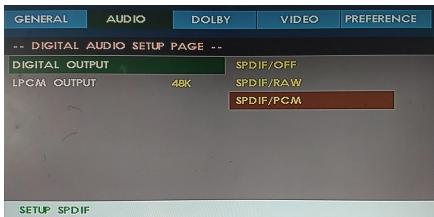
2.2 DIGITAL AUDIO SETUP PAGE
DIGITAL AUDIO SETUP PAGE: Sets the DIGITAL OUTPUT, LPCM OUTPUT
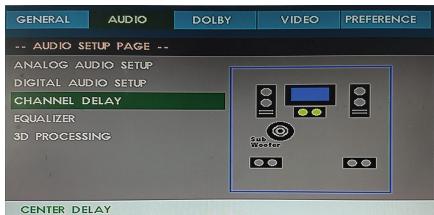
2.3 CHANNEL DELAY SETUP PAGE
CHANNEL DELAY SETUP PAGE: Set the Channel delay.
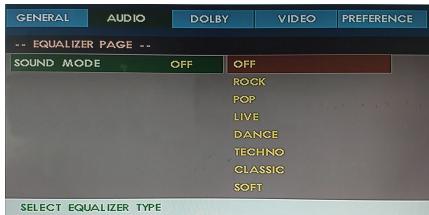
2.4 EQUALIZER SETUP PAGE
EQUALIZER SETUP PAGE: Set the EQUALIZER.
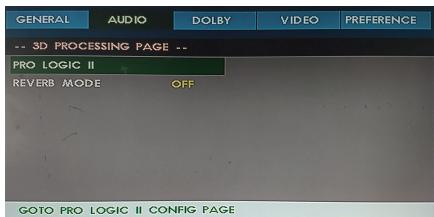
2.5 3D PROCESSING SETUP PAGE
3D PROCESSING SETUP PAGE: Set the 3D Processing.
2.6 DOLBY DIGITAL SETUP PAGE
2.6.1 DUAL MONO
DUAL MONO: If your amplifier / decoder has Dolby Digital output, you may select stereo, left mono, right mono, or mixed mono mode for your amplifier decoder.
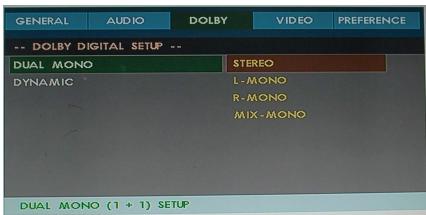
2.6.2 DYNAMIC
DYNAMIC: this function is generally used when playing high volume programs at night, in order not to disturb the neighbor. This setting can dynamically lower the volume and still keep the original tone quality. This is the range, measured in decibels(dB), between the loudest and the quietest sound registers in a soundtrack.
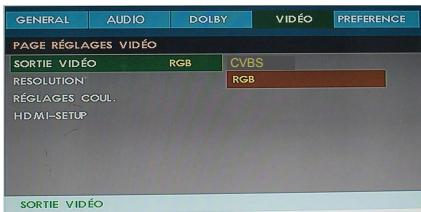
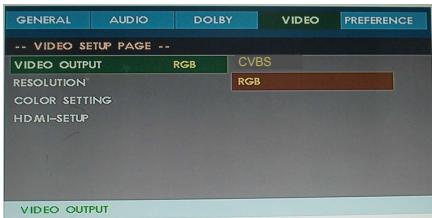
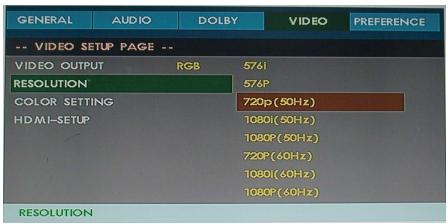
3.VIDEO SETUP PAGE
3.1 COMPONENT
COMPONENT: Sets the video output.
3.2 TV MODE SETUP
TV MODE: Sets the scan mode to same of your TV. If there are picture interferences or no picture, please press "V.MODE" to correct it.
3.3 COLOR SETTING SETUP PAGE
3.3.1 SHARPNESS
SHARPNESS: Sets the sharpness level of video output.
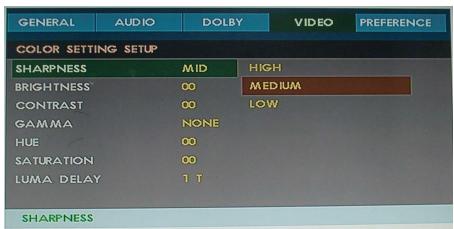
3.3.2 BRIGHTNESS
BRIGHTNESS: Sets the brightness level of video output.
Press right button the TV will display a value Press LEFT/RIGHT button to adjust, then press ENTER/PLAY button to confirm and return upon menu.
3.3.3 CONTRAST
CONTRAST: Sets the contrast level of Video output. Press right button the TV will display a value Press LEFT/RIGHT button to adjust, then press ENTER/PLAY button to confirm and return upon menu.
3.3.4 GAMMA
GAMMA: Sets the gamma value of the Video.
3.3.5 HUE
HUE: Sets the hue value of the Video.
Press right button the TV will display a value Press LEFT/RIGHT button to adjust, then press ENTER/PLAY button to confirm and return upon menu.
3.3.6 SATURATION
SATURATION: sets the saturation of the video.
Press right button the TV will display a value Press LEFT/RIGHT button to adjust, then press ENTER/PLAY button to confirm and return upon menu.
3.3.7 LUMA DELAY
LUMA (Luminance) DELAY: Sets the luminance delay of video output depend on the TV's brightness, color. It sets 1T commonly for DVD.
3.4 HDMI SETUP PAGE
3.4.1 HDMI

3.4.2 RESOLUTION
4. PREFERENCE SETUP PAGE
The preference setting is active only when no disc or stop completely, and the setting is effective on next time power on till exchanging the saved setting.
4.1 TV TYPE
TV TYPE: This player supports different TV output, including MULTI(Auto), NTSC, and PAL systems.
- If your TV support only NTSC or PAL and had you inadvertently selected the wrong TV type, he TV screen will become flickering and black-and-white. In this case, you should press the SETUP button to set as following Note.
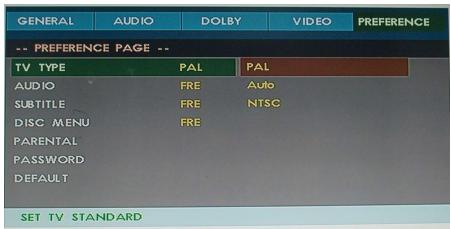
Note: How to Set the TV Type?
You may switch the NTSC/PAL setting of the DVD player to match the video signal of your TV. The table below shows what kinds of disc are compatible with each setting (MULTI, PAL and NTSC)
| Disc | Output Format |
| Type | Format | Selected TV System Mode |
| NTSC | PAL | MULTI |
| DVD | NTSC | NTSC | PAL | NTSC |
| PAL | -------- | PAL | PAL |
4.2 PBC
PBC MODE: Sets the PBC (Playback Control) to be on or off.
4.3 AUDIO
AUDIO: Sets the preferred audio language as the default when playing DVD. (IF DVD support these languages)
4.4 SUBTITLE
SUBTITLE: Sets the preferred subtitle language as the default when playing DVD.(if DVD support these languages)
DISC MENU: Sets the preferred menu language as the default when playing DVD.(if DVD support these languages)
4.6 PARENTAL
PARENTAL: The parental control function works in conjunction with the different censorship classes assigned to DVDs. These classes help to control the types of DVDs that the family watches, There are up to 8 censorship classes for DVDs.
Note:
- The PARENTAL is changeable when PASSWORD MODE set to OFF.
After setting the level of parental control, please set the password as ON to perform the lock of changing.
4.7 DEFAULT
DEFAULT: Resets to all the manufacturer's original settings for this DVD player Press ENTER/PLAY to perform the reset.
5. PASSWORD SETUP PAGE
5.1 PASSWORD
password CHANGE: you can change the password, please type 4 numerals as new password.
The initial password is 0000
CD RIPPING & MP3/MP4 copy function are available on the base of below requirement:
- The CD, MP3/MP4 (Include AVI, DIVX, XVID) disc must in good condition without any scratch and others. The media should be play on the DVD player smoothly.
- The destination USB must compatible by the DVD player. (Should be FAT or FAT32 format)
- Play the CD on the unit.
2.Plug-in the USB on the unit.
- Press "SUB/Copy" button on the remote control and there is a MENU display on the screen(Figure 1).
Press the direction and enter button to carry out the function accordingly.
3-1. Switch the speed between normal and fast from the "Speed" item.
3-2. Change the bitrate of the song on the "Bitrate" item.
3-3. Move the cursor to the "Create ID3" to choose whether create the ID3 or not.
3-4. Check the USB is connected or not from the Device item.
3-5. Move the cursor to the song you'd like to copy and press "ENTER". Choose "Select All" or "Select None" to tips all song or cancel. Press to turn to next page.
4. After the chosen move the cursor to "Star" and press "Enter"(Figure 2)
5. After finish the copy move the cursor to "Exit" to quit the CD RIPPING menu.
MP3/MP4 COPY FUNCTION OPERATION INTRUCTION
- Play the CD on the unit.
2.Plug-in the USB on the unit.
- Turn to the catalog menu by press "STOP,PressPORG". Press "SUB/Copy" on the remote control and press the direction and enter button to carry out the function accordingly.
3-1. Move the cursor to the MP3/MP4 you'd like to copy and press "ENTER". Choose "Select All" or "Select None" to tips all song or cancel. Press to turn to next page.
3-2. After the chosen move the cursor to "COPY" and press "Enter" to next menu, Choose "USB1" and press "Enter" & "NEXT" to carry out the copy function(Figure 4/Figure 5). Press the "Cancel" item on the menu to quit the function during the copy and the system will return to the catalog statue.
| CD RUP |
| OPTIONS | TRACK |
| Speed Fast | track01 05:38 |
| Bitrate 128kbps | track02 05:23 |
| Create ID3 Yes | track03 02:51 |
| Device USB 1 | track04 03:47 |
| track05 04:16 |
| SUMMARY | track06 00:57 |
| Selected Track 1 | track07 05:01 |
| Sealed Time 05:23 | |
| Startl | Exil | Select All Select None |
FIGURE 1
| CD RIP |
| Ripping | Selected | Track |
| Track Progress | track02 | 30% |
| Progress | | |
| Cancel | | |
| SUMMARY | | |
| Now Ripping | | |
| Track 01/01 | | |
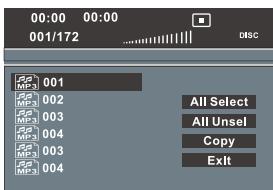
FIGURE 2
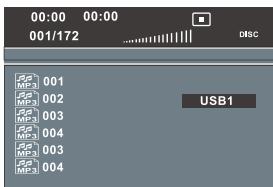
FIGURE 3

FIGURE 4
FIGURE 5
Line in
- You can connect audio devices such as your PC, laptop, iPod/iPhone, CD player or MP3 player to the unit. Connect the headphone jack of a peripheral audio device to the socket LINE IN of the device, using an audio cable (jack cable /RCA not provided).
- To hear the television sound: connect the LINE IN sockets to a Peritel/RCA adaptor (Peritel/Audio output not supplied) using an audio cable (Red/White, not supplied). Then connect this adaptor to the television's Peritel socket.
- Support USB,compatible with JPEG,MP3,AVI,etc.
- USB media operation: USB function are available on no disc or no card status, media will be auto play when USB is connected to the unit in the above status.
Notice:
A. The unit is not all purpose for all of the media as some of them have unforeseeable problem.
- Press BT button on the remote control change to BT mode
- After change to BT mode, indicator light on the front panel will flash 1s in blue color with prompt "Du", then light change to red color automatically.
3.Light will flash quickly to search the BT sourcing which have paired before (memory function), and connect automatically if search successful, light will change to blue color; if cannot search paired BT sourcing, device will entering to Waiting pairing status, light will flash in blue and red alternately quickly, after paired, light will flash in blue color slowly with a prompt "Du".
- Device start playing audio after prompt, light will flash slowly in red and blue color alternately. Stop or pause playing, light will flash slowly in blue color.
- You can control the playing audio by remote control after BT connected successfully.
Notes:
1: Connecting distance no longer than 8M, with no obstacle between device and BT souring.
2: If BT sourcing version is low, device will ask you put in code "0000" for pairing at first time.
3: BT sourcing may be will have some unpredictable faults after connected with several device, please delete some remembered device in your BT sourcing, then re-connect the device.
4: Due to different version in different laptop, the connect way should be different according. If cannot connect successful, please install latest version BT drive.
Please check the following guide for the possible cause and solution for a problem before contacting the nearest service center or dealer for repairs.
SYMPTOMS AND CORRECTIONS
| SYMPTOMS | CORRECTIONS |
| No power | Check to make sure that the power connection is secure. |
| No picture | Make sure the connection between the player and the TV is secure. |
| Make sure that the TV is in good working condition. |
| Please press "V.MODE" button continuously until the picture returns to normal. |
| No sound | Make sure the connection between the player and other devices are secure. |
| Make sure that the TV and AMP are in good working condition and setup properly. |
| Failed to Play | Check that the disc is properly inserted. |
| Clean the disc. |
| Failed to respond to remote control | Remove obstacles between remote control and unit. |
| Aim remote control at the sensor on the front panel. |
| Check batteries and replace them if necessary. |
| Picture Disturbance | Check the disc for dirt and scratches. Clean or replace disc. |
| Shut down the unit, wait ten seconds, and restart the unit. |
| Failed to work with keys | Power surges or other electrical phenomena.Shut down the unit, wait ten seconds, and restart the unit. |
SPECIFICATION
SYSTEM
Power supply 100 - 240V / 50 / 60Hz
RATED WORKING POWER CONSUMPTION 100W
Channel separation >40dB
DVD
Frequency response 20Hz-20KHz(+/-3dB)
Audio S/N >80dB
Horizontal definition 500(TV)
Video type DVD(MPEG2),VCD(MPEG1)
Audio type MPEG1,MPEG2,PCM,Stereo
Audio output(analog audio).Electric level output:1.0-2.0v Resistance:10kΩ
Audio output(digital audio).Electric level output:0.5vp-p Resistance:75Ω
Video output. Electric level output:1.0vp-p Resistance:75Ω
AMPLIFIER
Output power. 100W
FL/FR/SL/SR/CEN 15W/8Ω
Subwoofer 30W/4Ω
Frequency Response. 20Hz~20KHz+/-3dB
S/N. >80dB
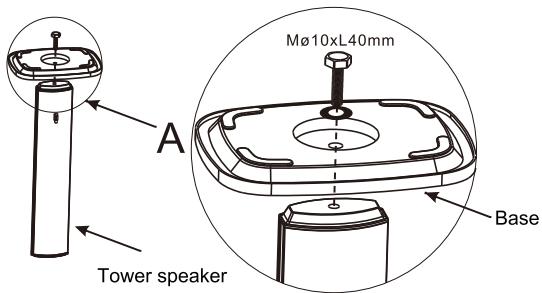
- Firstly, prepare wrench or cross screwdriver.
- Take out the tower speaker and screw, then take out base from Main unit giftbox.
- Assemble as following model A, B shows, tighten the screw.