
CPN-806 - Photo frame BRANDT - Free user manual and instructions
Find the device manual for free CPN-806 BRANDT in PDF.

| Product type | Digital photo frame |
| Brand | Brandt |
| Model | CPN-806 |
| Display resolution | 800 x 600 pixels |
| Screen aspect ratio | 4:3 |
| Storage media | SD/MMC/SDHC card, USB stick |
| Supported image formats | JPEG |
| Power supply | AC adapter 100-240V~, 50/60Hz, output 5V DC 1A |
| PC connection | Yes, via USB cable |
| Copy function | Copy-paste between PC and frame |
| Auto on/off | Adjustable (once, every time, or off) |
| Built-in calendar | Yes |
| Date and time setting | Yes |
| Adjustable brightness | 1 to 15 |
| Remote control | Yes, CR2025 battery included |
| Operating temperature | 5°C to 35°C |
| Package contents | Photo frame, power adapter, manual, stand, remote control |
| Safety | Double insulation, do not expose to water, do not block ventilation |
| Maintenance | Clean with a dry cloth, do not use liquid products |
| Disposal | Recycle according to local regulations, batteries at collection point |
Frequently Asked Questions - CPN-806 BRANDT
User questions about CPN-806 BRANDT
0 question about this device. Answer the ones you know or ask your own.
Ask a new question about this device
Download the instructions for your Photo frame in PDF format for free! Find your manual CPN-806 - BRANDT and take your electronic device back in hand. On this page are published all the documents necessary for the use of your device. CPN-806 by BRANDT.
USER MANUAL CPN-806 BRANDT
Hotline Darty France
- This appliance is intended for domestic household use only and should not be used for any other purpose or in any other application, such as for non domestic use or in a commercial environment.
- Ventilation
Allow at least a 10 cm gap all around the product.
-
The ventilation should not be impeded by covering the ventilation openings with items, such as newspapers, table-cloths, curtains, etc.
-
No naked flame sources, such as lighted candles, should be placed on the apparatus.
-
Attention should be drawn to the environmental aspects of battery disposal. Don't throw used batteries in dustbin. Please contact your retailer in order to protect the environment.
-
This apparatus is not suitable for use in a tropical climate.
-
The apparatus shall not be exposed to dripping or splashing and that no objects filled with liquids, such as vases, shall be placed on the apparatus.
-
To protect the environment, use local recycling facilities for battery disposal.
-
Batteries (battery pack or batteries installed) shall not be exposed to excessive heat such as sunshine, fire or the like.
-
Where the MAINS plug or an appliance couple is used as the disconnect device, the disconnect device shall remain readily operable.
- CAUTION
Danger of explosion if battery is incorrectly replaced. Replace only with the same or equivalent type.

This equipment is double insulated and an earth connection is not required.

This mark is applied to show the equipment conforms to the European low voltage and electromagnetic compatibility directives.
PACKAGE CONTENT
- Digital photo frame (1)
- Power adapter (1)
- Instruction manual (1)
- Bracket (1)
Remote control(1)
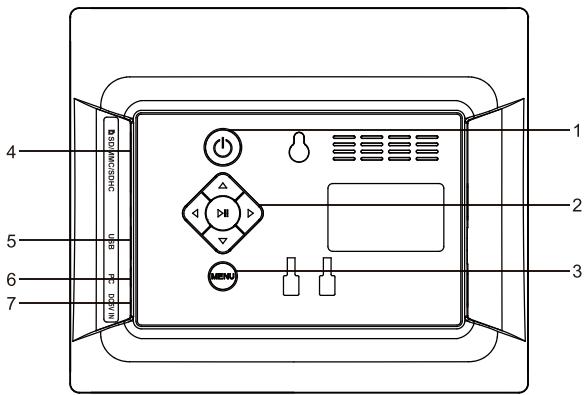
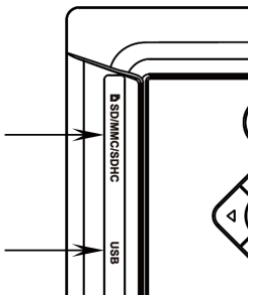
IDENTIFYING THE PARTS
- Power button
- / / / / / / / / / / / / / / / / / / / / / / / / / / / / / / / / / / Buttons
- (MENU) Menu button
- SD/MMC/SDHC Card slot
- USB Port
- PC Port
- DC5V IN Socket
The illustrative drawings below are only for reference.

Insulation sheet
The battery is already installed and an insulation sheet is inserted into the remote control battery compartment.
Remove the insulation sheet before using the remote control.
The remote control will stop functioning when the battery is run down. In this case, follow the instructions below to replace the battery.


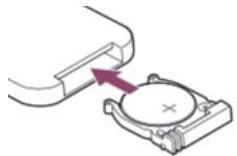
- Press down on the tab and insert your fingernail into the slit to pull out the battery case.
- Place a new CR2025 battery in the battery case with the + side facing up.
- Insert the battery case into the remote control until it clicks.
NOTE: If the remote control is not used for a long period of time, please remove the battery from the compartment. Do not heat batteries or dispose of them in fires. Do not dismantle, deform or modify batteries.
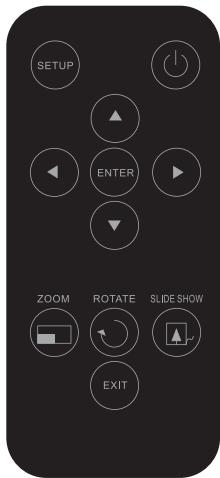
The buttons on this remote control perform the same functions of those on the unit and display.
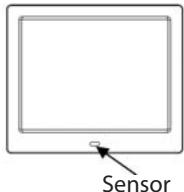
During operation, point the remote control towards the sensor on the main unit. The remote control works best at a distance less than 3m and at an angle of up to 30 degree to the front of the unit. No obstacles may stand in the way between remote control and infrared sensor and do not place the remote control in direct sunlight.
If the remote control fails to work even when it is operated near the main unit, replace the battery.
TURNING ON OR OFF THE PHOTO FRAME
To turn on the photo frame, connect one end of the supplied power adapter to the DC5V IN jack on the photo frame, and plug the power adapter into the mains socket. The display will briefly show the opening image.
To turn off the photo frame, press and the photo frame will be turned off. Disconnect the power adapter from the photo frame and mains socket.

SETTING THE DATE AND TIME
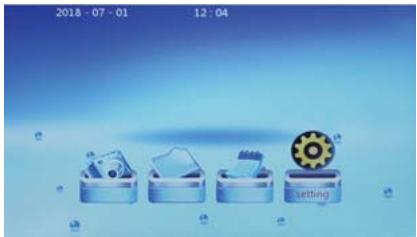
- Press (MENU) to show the main screen.
- Repeatedly press / to select the setting option then press . The Setup menu will be displayed.
- Repeatedly press / to select the Date item then press
The first value (Year) will become red.
- Repeatedly press / to set the year and press to confirm.
The second value (Month) will become red. - Repeatedly press / to set the month and press to confirm.
The third value (Date) will become red. - Repeatedly press / to set the date and press to confirm.
- Repeatedly press until the Time item is selected and press
The hour digits will become red. - Repeatedly press / to set the hours and press to confirm.
The minute digits will become red. - Repeatedly press / to set the minutes and press to confirm.
- When the date and time have been set, press (MENU) to return to the main screen.
CONNECTING TO PC AND USING COPY FUNCTION
The photo frame has built-in memory.
- Connect the photo frame to PC using a USB cable.
- When connected correctly, the screen will show 'USB device is connecting'.
- You can copy and pasta photos between PC and photo frame.
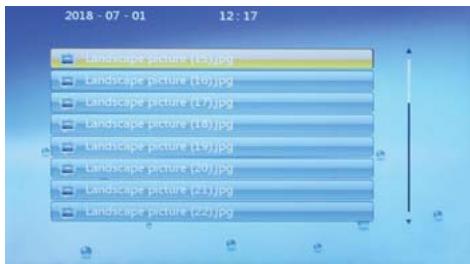
DISPLAYING PHOTOS
-
Insert a memory card or USB memory firmly into the corresponding slot or port of the photo frame.
-
Playback will automatically begin and images on the memory card or USB memory will be displayed one after another as a slideshow.
-
To pause, press . The photo information will be displayed.
- To resume the slideshow, press again.
- When playing photos, press and then press and hold (menu) for about 3 seconds to see a menu list for you to adjust the photo.
- Use / to select Zoom and then press to set the magnification of the picture: x1, x2, x3, x4.
- Use / to select Rotate and then press to the angle of rotation: 0, 90, 180, 270.
- Use / to select Slideshow and then press to show a list. Use / to select the switching mode of slideshow and then press to confirm.
- Use / to select Interval and then press to show a list. Use / to select a switching speed and then press to confirm.
- Use / to select Scale and then press to show a list. Use / to select a Scale type and then press to confirm. To exit from the current setting, press (MEN).

- Press MENU to show a thumbnail of images.
6.To exit,press (MENU) to return to the main screen.
DISPLAYINGCALENDAR
- Repeatedly press / to select the calendar option then press
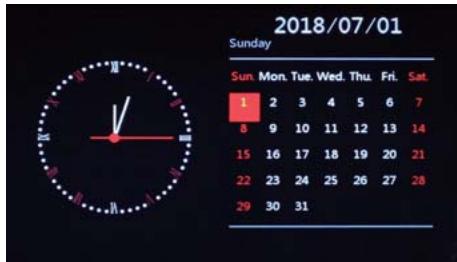
- Repeatedly press / to view the monthly calendar.
- To exit, press (MENU) to return to the main screen.
CHANGING THE MENU SETTINGS
- Repeatedly press / to select the setting option then press The Setup menu will be displayed.
- Repeatedly press / to select an item then press
- Repeatedly press / to select a setting and then press to confirm.
- To exit, press (MENU) to return to the main screen.
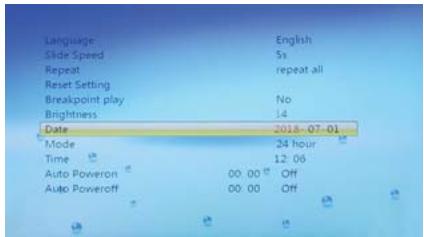
Overview of the menu items
| Language | Set the language |
| Slide Speed | 5s /10s /15s /1min /15min /30min |
| Repeat | Repeat all/off/one/play random |
| Reset Setting | Cue: Restore factory setting? Yes or No |
| Breakpoint Play | Yes or NO |
| Brightness | 1 to 15 |
| Date | YYYY-MM-DD |
| Mode | 24 hour or 12 hour |
| Time | Hour/Minute |
| Auto Power On | You can set the time for the photo frame to turn on or off automatically. 1. When selecting this item, press ➔ and the hour digits become red. 2. Repeatedly press ▲/▼ to set the hours and press ➔ to confirm. • The minute digits will become red. 3. Repeatedly press ▲/▼ to set the minutes and press ➔ to confirm. 4. Repeatedly press ▲/▼ to set the status – Once, Every time or Off. Press ➔ to confirm. |
| Auto Power Off |
SPECIFICATIONS
| Model | CPN-806 |
| Power adapter | Input: AC100-240V~, 50/60Hz, 0.2A Max. Output: 5.0V=1.0A |
| Panel resolution | 800 x 600 pixels |
| Screen format | 4:3 |
| Media | SD / MMC / SDHC + USB |
| Photo format | JPEG |
| Operating temperature | 5°C ~ 35°C |
Direct current Alternating Current
TROUBLESHOOTING
| Problem | Possible Cause / Solution |
| No power | The power adapter is not properly connected to the unit and the mains socket. |
| Screen freezes and does not respond to control. | The unit may have malfunctioned. Switch it off and wait for a few minutes before turning it on again. |
| Unable to insert memory card or USB device | Memory card or USB device is not inserted incorrectly. |
| The unit fails to read memory card or USB device. | Check whether the memory card or USB device is inserted properly. Do not force the memory card in. |
DISPOSAL

As a responsible retailer we care about the environment. As such we urge you to follow the correct disposal procedure for the appliance and packaging materials. This will help conserve natural resources and ensure that it is recycled in a manner that protects health and the environment.
You must dispose of this appliance and its packaging according to local laws and regulations. Because this appliance contains electronic components, the appliance and its accessories must be disposed of separately from household waste when the appliance reaches its end of life. Contact your local authority to learn about disposal and recycling. The appliance should be taken to your local collection point for recycling. Some collection points accept appliance free of charge.
We apologize for any inconvenience caused by minor inconsistencies in these instructions, which may occur as a result of product improvement and development.
Etablissements Darty & fils ©, 129 Avenue Gallieni, 93140 Bondy, France 03 / 07 / 2019
EU Declaration of Conformity
N°86201908610
Product Description - DIGITAL PHOTO FRAME
We declare that the above product has been evaluated and deemed to comply with the requirements of the listed European Directives and standards:
| Reference number | Title |
| 2014/30/EU | EMC Directive (EMC) |
| 2014/35/EU | Low Voltage Directive (LVD) |
| 2009/125/EC | Eco design requirements for energy-related products (ErP) |
| 2011/65/UE | RoHS |
EMC:
Adaptor (5V1A)
EN55032:2015
EN55024:2010/A1:2015
EN55020:2007/A12:2016
EN55014-1:2006/A2:2011
EN55014-2:2015
EN61000-3-2:2014
EN61000-3-3:2013
Main unit :
EN55032:2015/EN55035:2017/EN61000-3-2:2014/EN61000-3-3:2013
LVD:
Adaptor(SV1A) : IEC 62368-1:2014
ErP:
Adaptor(5V1A):
(EC)No.278/2009;
(EU) 2016/2282;
EN 50563:2011+A1:2013
The person responsible for this declaration is:
Position - Poste: General Manager Direct Sourcing
Signature - Signature:
Place, Date / Lieu :
Bondy, August 15, 2019


- Hotline Darty France
- - Ventilation
- - CAUTION
- PACKAGE CONTENT
- TURNING ON OR OFF THE PHOTO FRAME
- SETTING THE DATE AND TIME
- CONNECTING TO PC AND USING COPY FUNCTION
- DISPLAYING PHOTOS
- DISPLAYINGCALENDAR
- CHANGING THE MENU SETTINGS
- Overview of the menu items
- SPECIFICATIONS
- TROUBLESHOOTING
- DISPOSAL
- EU Declaration of Conformity
- Product Description - DIGITAL PHOTO FRAME
- We declare that the above product has been evaluated and deemed to comply with the requirements of the listed European Directives and standards:
- EMC:
- LVD:
- ErP:
- The person responsible for this declaration is:
Brand : BRANDT
Model : CPN-806
Category : Photo frame