HIFI702 - Speaker DARTY - Free user manual and instructions
Find the device manual for free HIFI702 DARTY in PDF.
User questions about HIFI702 DARTY
0 question about this device. Answer the ones you know or ask your own.
Ask a new question about this device
Download the instructions for your Speaker in PDF format for free! Find your manual HIFI702 - DARTY and take your electronic device back in hand. On this page are published all the documents necessary for the use of your device. HIFI702 by DARTY.
USER MANUAL HIFI702 DARTY
Welcome and thank you for choosing Bowers & Wilkins.
Our founder, John Bowers, believed that imaginative design, innovative engineering and advanced technology were keys that could unlock the enjoyment of audio in the home. His belief is one that we continue to share and inspires every product we design.
This is a high performance product that rewards thoughtful installation, so we suggest that you take some time to read this manual before you begin. Continue on page 5
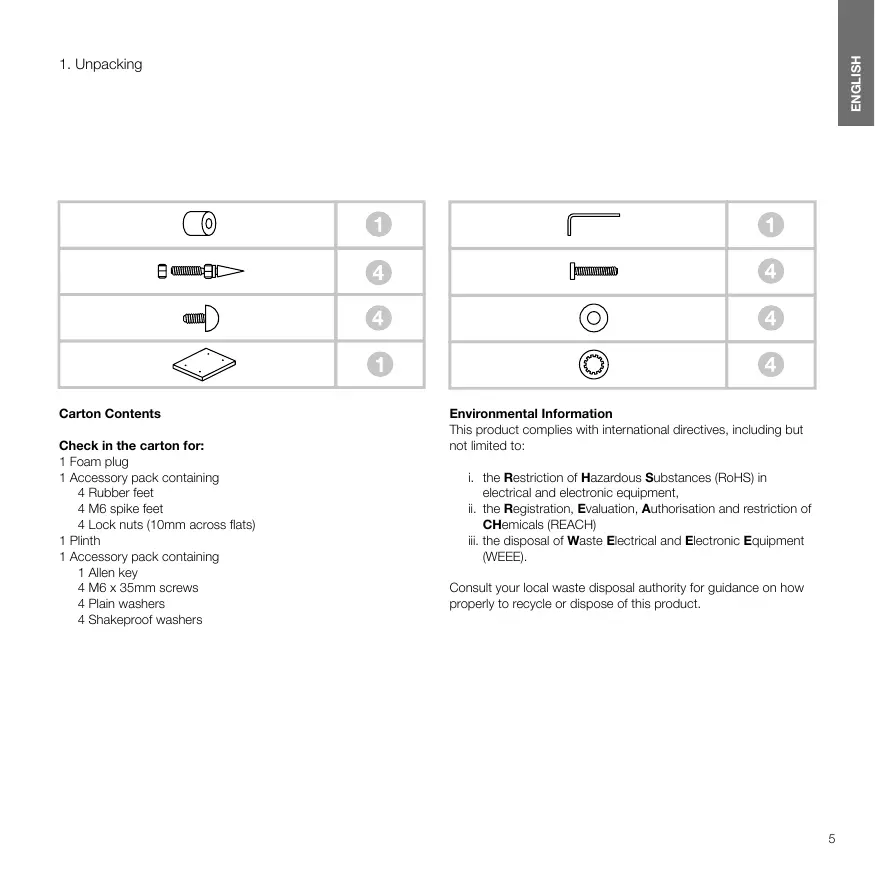
Check in the carton for:
1 Foam plug
1 Accessory pack containing
4 Rubber feet
4 M6 spike feet
4 Lock nuts (10mm across flats)
1 Plinth
1 Accessory pack containing
1 Allen key
4 M6 x 35mm screws
4 Plain washers
4 Shakeproof washers
Environmental Information
This product complies with international directives, including but not limited to:
i. the Restriction of Hazardous Substances (RoHS) in electrical and electronic equipment,
ii. the Registration, Evaluation, Authorisation and restriction of Chemicals (REACH)
iii. the disposal of Waste Electrical and Electronic Equipment (WEEE).
Consult your local waste disposal authority for guidance on how properly to recycle or dispose of this product.
2. Positioning

Speaker Installation
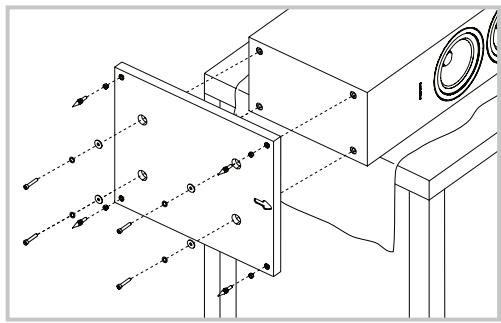
The speakers are intended to be floor mounted only. It is important to ensure that the speakers stand firmly on the floor using the spike feet supplied whenever possible. In addition, fit the plinth for proper stability.
You may attach the plinth during the unpacking process, following the diagrams on the top flap of the carton. Alternatively, you may attach it after the product has been fully unpacked, by covering a suitable support such as a table with a cloth and laying the speaker on its side with the base of the cabinet overhanging the support. Align the plinth with its attachment holes in the underside of the cabinet, ensuring that the arrow on the underside of the plinth points forwards. Secure the plinth using the screws and washers supplied. Fit the shakeproof washers between the plain washers and the screw heads. Tighten the screws using the Allen key supplied.
The spike feet are designed to pierce carpet and rest on the floor surface. Initially, screw the lock nuts onto the spikes enough to leave the nuts floating just above the carpet when the spikes are resting on the floor beneath. Screw the spikes fully into the threaded inserts in the plinth. If the cabinet rocks when placed on the floor, unscrew the two spikes that do not touch the floor until the cabinet rests firmly without rocking. Finally, lock the nuts against the cabinet. It may be more convenient to fit and adjust the spike feet after speaker positioning has been optimised.
If there is no carpet and you wish to avoid scratching the floor surface, use either a protective metal disc (a coin perhaps) between the spike and the floor, or use the supplied rubber feet. Fit the rubber feet and level the cabinet in the same manner as with the spike feet.
Speaker Positioning
Adjustment of speaker position following initial installation will probably further improve the sound quality and is usually worthwhile.
In either stereo or home theatre installations, try to ensure that the immediate surroundings of each speaker are similar in acoustic character. For example, if one speaker is adjacent to bare walls while the other is adjacent to soft furnishings and curtains, both the overall sound quality and the stereo image are likely to be compromised.
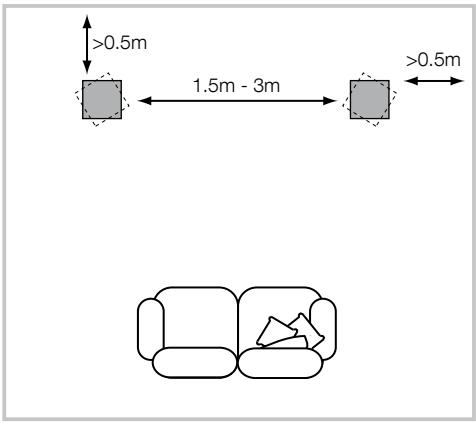
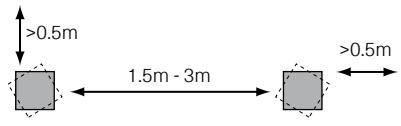
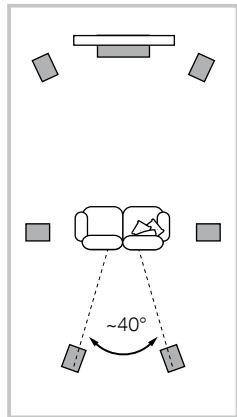
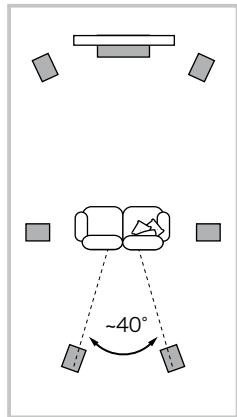
Conventional Stereo Systems
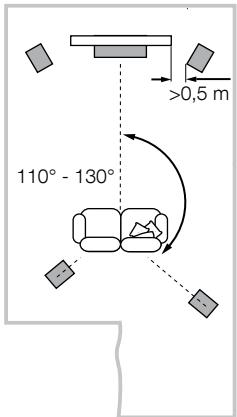
To begin with, the speakers should be positioned between 1.5m and 3m apart at two corners of an equilateral triangle completed by the listening area at the third corner. The speakers should be approximately 0.5m away from the back wall, and at least 0.5m away from any side walls (above).

5 Channels
7 Channels

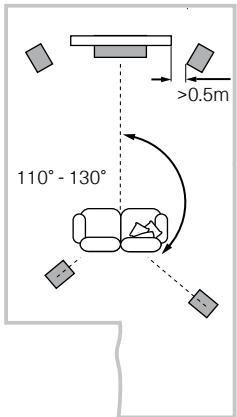
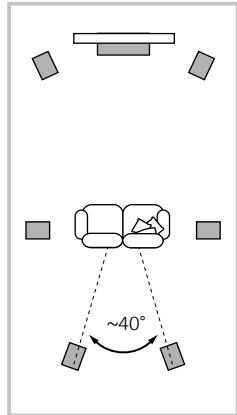
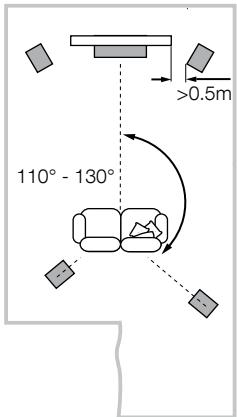
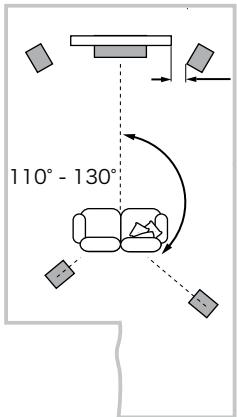
Home Theatre Systems
If the speakers are to be used for the front channels in a home theatre system, they should be placed closer together than for 2-channel audio, because the surround channels tend to widen the image. Positioning the speakers within approximately 0.5m of the sides of the screen will also help keep the sound image in scale with the visual image. As with conventional stereo positioning, the speakers should ideally be at least 0.5m away from any side walls. If you would prefer to place your speaker against the back wall and this location results in over emphasised bass, see the Fine Tuning section of this manual for information on using the foam plugs.
Stray magnetic fields
The speaker drive units create stray magnetic fields that extend beyond the boundaries of the cabinet. We recommend you keep magnetically sensitive articles (CRT television and computer screens, computer discs, audio and video tapes, swipe cards and the like) at least 0.5m from the speaker. LCD, OLED and plasma screens are not affected by magnetic fields.
3. Connections

All connections should be made with the audio equipment switched off.
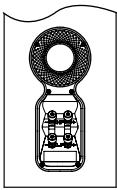
There are 2 linked pairs of terminals on the back of the speaker. For conventional connection (above left), the terminal links should remain in place (as delivered) and just one pair of terminals connected to the amplifier. For bi-wire connections or bi-amplification (above right), the terminal links should be removed and each pair of terminals connected to the amplifier or amplifiers independently. Bi-wiring can improve the resolution of low-level detail.
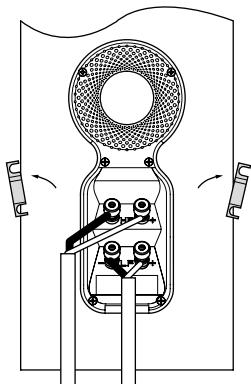
Ensure that the positive terminals on the speaker (marked + and coloured red) are connected to the positive output terminal on the amplifier and the negative terminals on the speaker (marked - and coloured black) are connected to the negative output terminal on the amplifier. Incorrect connection can result in poor imaging and loss of bass.
Ask your dealer for advice when selecting speaker cable.
4. Fine Tuning
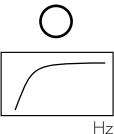
dB
Before fine tuning, make sure that all the connections in the installation are correct and secure.
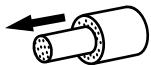
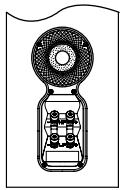
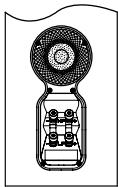
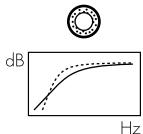
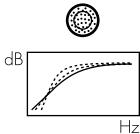
Moving the speakers further from the walls will generally reduce the volume of bass. Space behind the speakers will also help to create an aural impression of depth. Conversely, moving the speakers closer to the walls will increase the volume of bass. If you want to reduce the volume of bass without moving the speakers further from the wall, fit the foam plugs or, for less severe bass reduction, the foam rings in the port tubes (above).
If the bass seems uneven with frequency this will most probably be a consequence of the acoustic properties of your listening room. Even small changes in the position of the speakers or listening position can have a significant effect on sonic performance, especially at low frequencies. Try moving your listening position or locating your speakers along a different wall if possible.
If no alternatives exist, you can adjust your loudspeakers' low-frequency performance using the supplied foam bungs. The bungs are a two-piece part, allowing for a degree of fine-tuning using either the outer, larger-diameter piece in isolation or the two parts together. Using solely the outer, larger-diameter foam bung will deliver less bass attenuation than the complete bung assembly.
The performance of the speaker will change subtly during the initial listening period. If the speaker has been stored in a cold environment, the damping compounds and suspension materials of the drive units will take some time to recover their correct mechanical properties. The drive unit suspensions will also loosen up during the first hours of use. The time taken for the speaker to achieve its intended performance will vary depending on previous storage conditions and how it is used. As a guide, allow up to a week for the temperature effects to stabilise and 15 hours of average use for the mechanical parts to attain their intended design characteristics.
The cabinet surfaces will usually only require dusting. If you wish to use an aerosol or other cleaner, apply the cleaner onto the cloth, not directly onto the product and test a small area first, as some cleaning products may damage some of the surfaces. Avoid products that are abrasive, or contain acid, alkali or antibacterial agents. Marks on the paint surface may be removed with a dilute perfume-free soap solution. Remove any remaining streak marks by spraying with a proprietary glass cleaner and lightly wiping dry with a microfibre cloth. Do not use cleaning agents on the drive units and avoid touching them as damage may result.
Real wood veneers are treated with an ultra-violet resistant lacquer to minimise changes in colour over time. Nevertheless, like all natural materials, a degree of colour change is to be expected. Colour differences may be rectified by exposing all the veneer surfaces equally and evenly to sunlight until the colour is uniform. This process can take a long time, but may be accelerated by careful use of an ultra-violet lamp. Keep the speakers away from direct sources of heat such as radiators and warm air vents in order to minimise the possibility of the wood veneer cracking.
1. Deballage
| 0 | 1 |
| 4 | |
| 4 | |
| 1 |
| 1 | |
| 4 | |
| 4 | |
| 4 |
5 Channels
7 Channels


5 Channels
7 Channels

Heimkinosysteme
Sistemi Home Theatre

5 Channels
7 Channels

Home Theater Systemen
i. Ito ORpaHueHnMmCpNb3ObaHNaONaChbIXMaTepeMaNoB (Restriction of Hazardous Substances - RoHS) B 3NeKtpYeCKOM mEKeTPOHNOHM oBOpyDobAnHO
ii. No peRncTpaun, ouEnKe, ABytropn3aunm n OrpaHnChenIO nCnpNlsOBAHnX mMnuecknx BeueceCTB - Registration, Evaluation, Authorisation and restriction of Chemicals (REACH)
iii. Flo ytniizmaaon tdoB-Waste Electrical and Electronic Equipment - (WEEE).
PINOKOHCyBnTApryTEcB CaVAIE MeCTHOgPAHNA3aIeN, KOTOPAR 3AHMAETC8YTNIN3aIeN OTXoD0B, NO BONPOCAm PpABINHOB C7AUYBAEIOObpyDAHINy BTVIb.
2.Размениe
YCTAHOBKA KOJIOHOK
KoHONKII pIepHa3aHeHbI ToIbKO IaI HAnObHOYCTAHOBKn.
BakHO BCOy, IeTe 103OAMHO, O6cEneHTb INX npOHOe
noJooEnHe NaTOyC nOMoUbIO uINOB, BXoDIAuB KOMTJIeKT.
KpOme TORO,yctAHOBITE AC hpuinraeMyIO pINTy dIaI yuuei
ycToHnBOCTIo.
Bb MoKTe PnIKpeNtB OOnpHyIOIITy B XOte pacNaKOBKn, CcJeYy yka3aHnM PmCYHa H BA pExKHe IIOLOCKoCTN KAPTOHNOI KOkoKNI. KpOMeToro, Bb MoKTe PnIKpeNtB ee NocNE TORO, KaK KOJONKa 6dyet NIOHOCTbO paCnAOKoBAHa, NOKpbIB NOxdoJIuSy IOcTcABky TINa CTOna TE KAnHbIO INOLOXNB HA HeRo KOJONHky bokOM, PnIeHM TAK TcObEy EOCBOHABe CBEWbNAIOCb C 3TOTO cTOna. COBMCTnte PInTy C OTBePCTnAMn Dny e KpENLHeN B NIXKHe JAACTN KOPNYCA, TAK TcObEy CTEJKA Ha NIXHeN BOPEXHOCTN PInTy bU kAsBaBA BnPepeD. PnIKpeNTe IpoCHNo PInTy C NOMOsbU PrnlaeraEMbX B KOMNKeTe BoLTOB u Wsib. HAdNeBte YOpNPbHe U Wsibb Mekdy IIOCKmIM WsabAmn n IOLOBkAmn BoTob. 3aTnHite BoTb c NOMoCbIO SeCTrpaHORO KlnOHa.
IINbIpaCCHTaHbI Ha To, YTObI pOToKTHyB KOBep IOnipatbCBA Na IIOBEXHOCTb NcAchua HabeHNTE KOHTpKaHn Ha IINbI TaT, TcObI octanE He6bIoShu 3azOp HAD KoBpOM npi IINnax, npouHo CToAunx Ha noly. 3aTeM 3aBeHNte IINbI Do ynpora B OTBepTaN CpeBbO BOnOPHn PInTe. EcJIe KOpNc UaTaETC, OTBepHNHe HAdz IINbI, KOtOpBE He KAcAOTc IONa, YTObI OH pOvHNO BCTaHn HA BCE ONpBi. HakoHeL, 3aTbnite KOHTpKaHn B CTOpOHY KOpNcya MIn PInItb. BoJee YDo6Ho OTeRyImpoBaT BICOTy IINbO NobocNe TOrO, KaBblBbEpete ONITmAbHoe MeCTo DnI KOnOHok.
Ecni y BAC HET KOba, N Bbl XOTITMEI36KbTa capaniHn Ha nOny, nCNOB3yTE 3aunTHIbe MeTALINueCKne DnCKN (HanPIMep, MOHTb), BCTAJIReMBe MExdy UINAMn IN NOLOm, INJx YeCTaHOBITE pe3HIOHBIE HOKKN IN KOMNIeKTA. PpVBHNTITE pe3HIOHBIE OONBIy B BYPOBHNIE KOPNc TOHHO TAK JxE, KAk IN B CNYae C UINAMN.

5 Channels
7 Channels
Bb6op MeCTa Ira KOJHOK
Iocne hauhNoy cTahOBKn cIeDyET nonpOboBt b Boone ToHcHO bI6paTb MeTo dAn AC, T.K. 3TO MOKET DoNOLHInTeBHO yUHyuHTb KAcECTBO 3BzAHuy
B CNTECTMAX DomuHrero TeaTpa Wn CTepe CNTECTMAX
ctapAteTceCBdAeTbK, TcObIb 6JlnKHeE OKpyKeHne Kkdoi
m3 KOJLOHOK 6BJNO NOXoKIM NO AkyCTUeCKM CBOtCTBaM.
HanPImep, ecnq DnDA NC pNIMbIKaET K rOblm CTehAM, aDpyraR -K MArKOJ MeBeJI N UToPAm, TO 3TO MOKeT OTPuATeJIbHO
NoJIbTIbH H3ByTuaneH.
06bIHyIe CTepeo CnCTeMbl
Дяна淘汰 PACNANOKITE AC pacTocTHHNOI AT 1,5do 3 M dpyr OTdpyra B DBx yIgXpABHOCTOPONHRe TpeYroBnHnka, TpeTNI yTOI KOTOPORO - 3TO CEHTP 3OHi nPoCNYuINBAHN. KoLOHKn JOKHNb b6tB Na pacTocTHNIO No KaPHeMepe 0,5M ot 3aJeHn 6KObokBx CTeH (CM.PMC.BvIIe).
CnCTembl Domawhero Teatpa
Ecnil AC nOcNb3yOtCk KpOHTaBbHBe KAnaHbB DOMaHHE
TeATpe,Onn OJNkhbCToTb B0nKByDpyK DpyR, Yem B
2-KaahbHomBapnaHTE.K. TbIIOBbe KAnaHbPacSiurpoT
OBpa3.PaMeueHeNE AC Ha paccToHNn Pnp6n3TeNbHO
no 0.5 M OT cTOPOH 3KpaHa TaKHe NOMaTeAe COrNaCoBaTb
MaCtua6 38yBOKoHn 4nprTeNbHO 06pa3.Ak B CnYae
ObbHoroCTpeOE,AC DoNkHbV HnEane PACNOaratbHa
pacToHNn He MeTe 0.5 M OT 3aHDNe 60KobbIX CTeH. Ecln
Bbl PepNDOnuHaTePePdVBHyTB KOLOHNKb6nKe 3KaHDn
CTeH, n 3TO PnpBDOUIT K UpeCeypn DOpHeKHyTbM BocAM,
ObaPaaiTeC B Pa3ed ToTOKhaNactPoKna>3ToTOrpYkoBOCTBA
3a Yka3aHHMMn IO nCmNoBbOBOHnIO npOLOHOBx 3aTnyuek.
PaccceHHoe MarHTHoH NOJe
5 Channels
7 Channels

扬声器的定位

5 Channels
7 Channels
家庭影院系統
5 Channels
7 Channels
S比一力一設置位置
普loreroshtanltoomagohfgeofohfofofofofofofofofofofofofofofofofofofofofofofofofofofofofofofofofofofofofofofofofofofofofofofofofofofofofofofofofofofofofofofofofofofofofofofofofofofofofofofofofofofofofofofofofofofofofofofofofofofo
-
小龍達尼
-
老引
LlJiJUeUdVHJHJUeUdVHJHJUeUdVHJHJUeUdVHJHJUeUdVHJHJUeUdVHJHJUeUdVHJHJUeUdVHJHJUeUdVHJHJUeUdVHJHJUeUdVHJHJUeUdVHJHJIuOuOuOuOuOuOuOuOuOuOuOuOuOuOuOuOuOuOuOuOuOuOuOuOuOuOuOuOuOuOuOuOuOuOuOuOuOuOuOuOuOuOuOuOuOuOuOuOuOuOu0o0o0o0o0o0o0o0o0o0o0o0o0o0o0o0o0o0o0o0o0o0o0o0o0o0o0o0o0o0o0o0o0o0o0o0o0o0o0o0o0o0o0o0o0o0o0o0o0o0o0t 1
Bowers & Wilkins
B&W Group Ltd
Dale Road
Worthing West Sussex
BN11 2BH England
T+44(0)1903221800
F +44 (0) 1903221801
info@bwgroup.com
www.bowers-wilkins.com
B&W Group (UK Sales)
T+44(0)1903221500
Euksales@bwgroup.com
B&W Group North America
T+19786642870
E marketing@bwgroupusa.com
B&W Group Asia Ltd
T+85234729300
E info@bwgroup.hk
Copyright © B&W Group Ltd. E&OE
Printed in China