
NC - Stick vacuum KALORIK - Free user manual and instructions
Find the device manual for free NC KALORIK in PDF.



| Brand | KALORIK |
| Model | NC |
| Category | Stick vacuum cleaner |
| Product Type | 2-in-1 water filtration vacuum cleaner |
| Dimensions (L x W x H) | Approximately 1100 x 300 x 200 mm (estimated) |
| Weight | Approximately 4 kg (estimated) |
| Power Supply | Rechargeable battery, AC adapter included |
| Runtime | Not specified, full charge 6-8 hours |
| Water tank capacity | Up to the indicated mark |
| Filtration | HEPA filter, permanent textile filter |
| Operating modes | On/off, ECO mode |
| Included accessories | Floor brush, handheld vacuum, water tank, inner hose |
| Maintenance and cleaning | Clean filter, dust bin, water tank after each use; wash filters with clean water |
| Safety | Do not vacuum liquids; household use; children over 8 years old under supervision; do not use near hot surfaces |
| Spare parts and repairability | Filters, brush, roller; contact customer service |
| General information | Manual available in PDF; complies with ErP directive |
Frequently Asked Questions - NC KALORIK
User questions about NC KALORIK
0 question about this device. Answer the ones you know or ask your own.
Ask a new question about this device
Download the instructions for your Stick vacuum in PDF format for free! Find your manual NC - KALORIK and take your electronic device back in hand. On this page are published all the documents necessary for the use of your device. NC by KALORIK.
USER MANUAL NC KALORIK
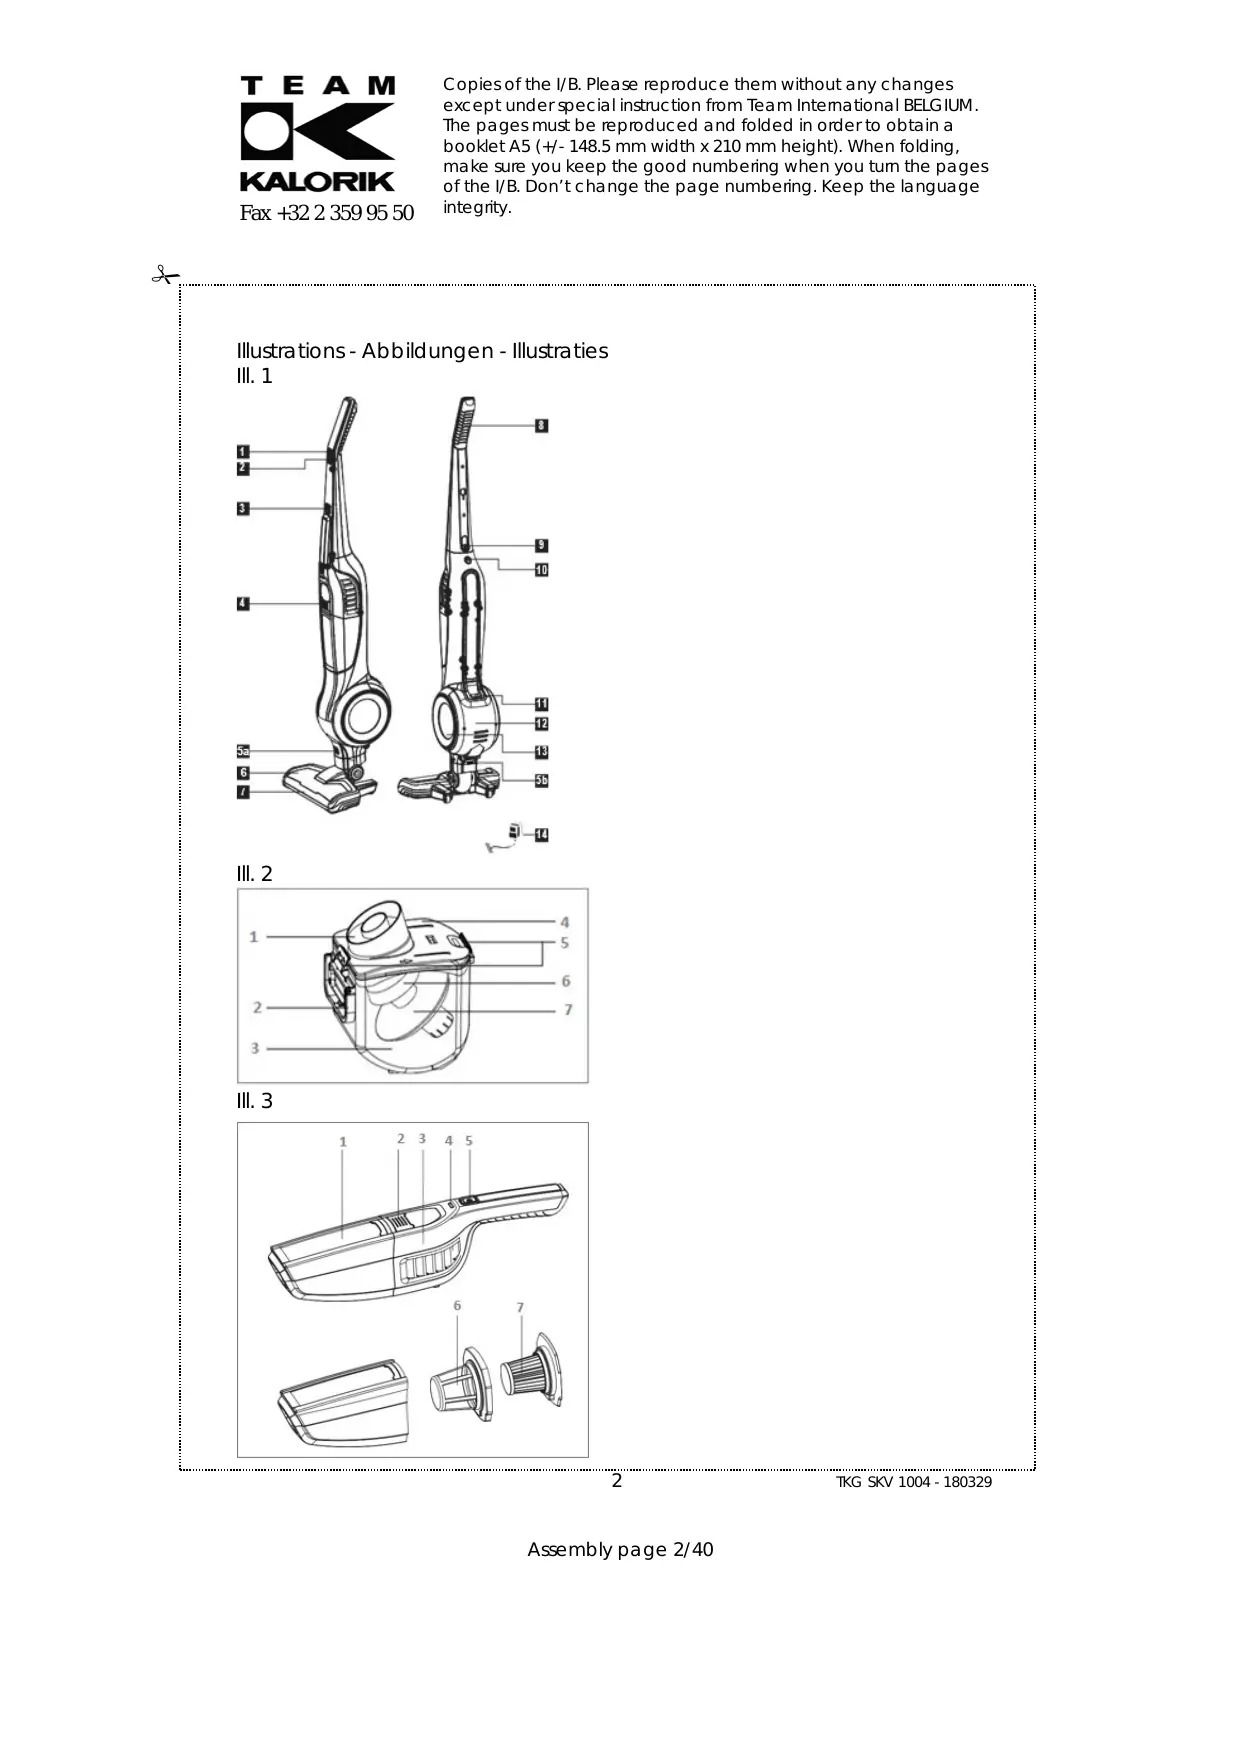
2 in 1 Water Filtration Vacuum Cleaner
- On / Off switch
- Switch for ECO mode
- Switch for releasing the hand vacuum cleaner
- Hand vacuum cleaner
- Button to detach the floor brush (III. 5a+5b)
- Floor brush
- LED-Light indicator
- Handle
- Handle locking screw
- Connection charging cable
- Switch for releasing the water tank
- Water tank casing
- Water tank
- Power supply
Water tank (III.2)
- Textile-permanent filter
- Handle
- Water tank
- Water tank lid
- Lid locking clips
- Inner tube
- Tube end caps
Hand vacuum cleaner (III. 3)
- Dust container
- Dust container release
- Exhaust air slots with textile filter
- Charge indicator
- On-/ Off switch
- Filter Holder
- HEPA filter cartridge
D
- On / Off switch
- Switch for ECO mode
- Switch for releasing the handpiece
- Hand vacuum cleaner
- Button to detach the floor brush (III. 5^a + 5b )
- Floor brush
- LED-Light indicator
- Handle
- Handle locking screw
- Connection charging cable
- Switch for releasing the water tank
- Water tank casing
- Water tank
- Power supply
Water tank (III. 2)
- Textile-permanent filter
- Handle
- Water tank
- Water tank lid
- Lid locking clips
- Inner tube
- Tube end caps
Hand vacuum cleaner (III. 3)
- Dust container
- Dust container release
- Exhaust air slots with textile filter
- Charge indicator
- On-/ Off switch
- Filter Holder
- HEPA filter cartridge
GB OPERATING INSTRUCTIONS
IMPORTANT SAFEGUARDS
Please read these instructions carefully before using the appliance, and always follow the safety and operating instructions.
Important:
This appliance can be used by children over 8 years old and people with reduced physical, sensory or mental capacities or with a lack of experience or knowledge if they have been given supervision or instructions concerning the safe use of the appliance and the risks involved. Children shall not play with the appliance. Cleaning and user maintenance shall not be made by children unless they are older than 8 years and supervised. Never leave the appliance and its cord unsupervised and within reach of children less than 8 years old or irresponsible persons, especially when it is plugged into the wall or when it is cooling down.
- Check that the mains voltage matches the voltage noted on the appliance before using the appliance.
- Only use the supplied charging cable and power adapter to charge the appliance. Do not use the power adapter with other devices.
- If the power supply and / or charging cables are damaged, they must be repaired by the manufacturer, the customer service or a qualified specialist to avoid any possible hazard.
- Use the appliance for household purposes only as described in this manual.
- Never immerse the appliance, the charging cable or the mains plug in water or other liquids.
- Never use the appliance and the power supply near hot surfaces.
- Never use the appliance outdoors and always store it in a dry place.
-
Only suitable for dry vacuuming. Never soak up water or other liquids.
-
Never vacuum toxic materials, as vapors and dust can be hazardous to your health.
- Never use the appliance to vacuum mortar, cement or other substances that harden on contact with water and may interfere with normal operation of the vacuum cleaner.
- Do not use the appliance on pets.
- Sparks within the motor can ignite flammable vapors or dust. Never use it near flammable or explosive liquids (such as gasoline, oil paints, detergents), near gases, explosive substances (such as coal dust, magnesium, gunpowder), smoke or fire sources.
- Use only accessories recommended by the supplier. Other accessories pose a danger to the user and could damage the appliance.
- Always unplug the AC adapter from the wall outlet by pulling on the plug itself. Never pull on the charging cable.
- Regularly remove blockages caused by hair, dust fluff and the like in order not to reduce the suction power.
ASSEMBLING THE VACUUM CLEANER
- Unpack the device and all accessories.
Make sure that all parts mentioned in the manual are present and undamaged. - Carefully secure the handle (8) to the main unit. To do this, carefully pull on the supplied locking screw (9) (III. 4, Fig. 1).
-
Insert the hand vacuum cleaner (4) into the main unit. For this, the device must always be switched off. Pay attention to the "click" sound when snapping in (III. 4, Fig. 3). Make sure that there are no substances between the contacts of the handpiece (4) and the main unit,
Charge the battery in the following situations: -
Before first use; in this case, the battery must be fully charged (6-8 hours).
- After a long period without use. (For optimal battery life, we recommend charging the device at least every three months.)
To load, the hand vacuum cleaner (4) must be inserted in the main unit (III. 5, Fig. 4).
- Plug the mains adapter of the charging cable (14) into a socket (III. 5, Fig. 5). Connect the charging cable (14) to the charging port (10) of the main unit (III. 5,Fig. 6). Make sure that the contacts on the charging cable and the vacuum cleaner are clean. If necessary, remove the charging cable and clean the connectors.
- The charge indicator (4) turns red while the battery is charging (III. 5, Fig. 7) and turns to blue when the battery is fully charged.
- Both the charging cable and the vacuum cleaner may become warm while charging. This is completely normal.
If you use the hand vacuum cleaner for a long period of time, the batteries can also warm up here. This is also completely normal.
Note: For best performance, it is recommended to charge the vacuum cleaner after each use.
USE
DANGER! Do not use the product while it is charging.
DANGER! Never touch the rotating parts of the floor brush during operation.
- Remove the water tank (III. 6) by first using the switch (11) and opening the water tank casing (12). Remove the water tank (3) using the handle (2). Open the locking clips (5) and remove the lid (4).
Pour clean water in the tank, up to the mark.
- Close the lid (4) again and put the water tank (3) back into the main unit.
- Press the on / off switch (1) on the handle (8) of the main unit to switch on the device. Use the ECO switch (2) to change the speed levels.
Note:
- During cleaning, foam may form in the water tank. The performance of the device is not affected by slight foaming.
-
Detergent, soap powder, bleach and the like MUST NOT be added to the water tank.
-
Press the on / off button (1) again to switch off the appliance.
- During short breaks, you can stop the vacuum cleaner by tilting the appliance slightly forward.
Note: Make sure that the vacuum cleaner is on a level, non-slip surface before releasing it, to prevent it from falling over and causing possible damage to the unit or floor.
ATTENTION! Turn off the vacuum cleaner before each shutdown, otherwise the rotating bristles may permanently damage your (carpet) floor.
- The floor brush is suitable for the daily cleaning of larger surfaces, hard and smooth floors or carpets.
- The hand vacuum cleaner is suitable for mattresses, sofas, curtains and wallpapers. Press the release button (3) on the main unit to remove the handle (4) (III. 7, Fig. 8). Switch on the device by pressing the on / off switch (5) on the hand vacuum cleaner.
- Never use the hand vacuum cleaner to vacuum water or other liquids.
BATTERY WARNING
Blue-Battery full
- Blinking blue - Less than 20% battery remaining
- Blinking red - Low battery status
CLEANING AND CARE
- Switch off the appliance before each cleaning.
- Wipe the housing of the hand vacuum cleaner and the main unit with a soft, dry cloth.
- Persistent stains can be removed with a damp cloth and some detergent. Dry the cleaned area completely afterwards.
- Change the water in the tank while using the vacuum cleaner as soon as it is dirty and after each use at the latest. To do this, press the release switch (11) and remove the water tank (III).
10, Fig. 13). Proceed as for filling the water tank. Empty the water tank and clean it thoroughly with water.
- Turn the inner tube (6) counterclockwise to remove it (III. 10, Fig. 15); you can also refer to the marking. Clean the lid, tube, inner tube and textile filter with clean water and let everything dry thoroughly before reassembling and installing the water tank.
- Lay the vacuum cleaner flat on the floor to disassemble the floor brush (6). To do this, press the release switches (5a, 5b) simultaneously (III. 11, Fig. 16).
- Clean the dust container of the hand vacuum cleaner after each use. Remove the dust container from the engine block by pressing the release button (2). We recommend that you do this over a trash can (III. 9, Fig. 10).
- Remove the filter holder (6) and filter cartridge (7) by turning it counterclockwise (III. 9, Fig. 11). Tap the filter cartridge and clean the filter holder under running water (III. 9, Fig. 12). Allow all parts to dry before reassembling.
- Cleaning the filter and the dust container is very important, as it allows the device to operate optimally and eliminates unpleasant odors.
- Manually rotate the mobile element of the floor brush regularly to remove any foreign objects that may be stuck (III. 12).
- If the moving element does not rotate (III. 13), pull back the switch on the left side of the brush (a) and remove the roller (b). (III. 13, Fig. 18). Remove dirt and grime. When using a pair of scissors, be careful not to injure yourself or cut off the brushes (III. 13, Fig. 19 & 20). Put the roller back in and check if it can be easily moved manually (III. 13, Fig. 21)
Note: After each use, check that the brush still rotates smoothly.
TROUBLESHOOTING
| Problem | Possible cause | Solution |
| The vacuum cleaner does not turn on | The vacuum cleaner has not been charged | Make sure the vacuum cleaner has been fully charged before first time use or if it has not been used for a long time |
| The vacuum cleaner is not charging | The power switch is not turned on | Make sure the power switch of the main power supply is turned on |
| The power cord is damaged | Do not use a damaged power cord. Please contact the customer service center | |
| The suction power is decreasing | The crevice tools or extension hose may be blocked | Check for any blockages and clear them |
| The water in the water tank is very dirty | Regularly replace the water in the reservoir by clean water and empty the water tank after each use | |
| The filter is dirty | Check with the supplier for replacement parts | |
| Vacuum cleaner is overheating | The filter is dirty | Check the filter and clean off any dirt |
| The air coming out of the vacuum cleaner smells bad | The filter is dirty | Check the filter and clean off any dirt |
| The filter is not dry | Make sure the filter is dry before inserting it back into the hand vacuum cleaner. Replace the water with clean water if needed. | |
| The battery/charging indicator light is blinking | The vacuum cleaner is out of power | Recharge the vacuum cleaner to its full capacity. The light will stop blinking. |
| The brush does not turn anymore | The brush is dirty | Clean the brush |
PROTECTION OF THE ENVIRONMENT - DIRECTIVE 2012/19/EU
In order to preserve our environment and protect human health, the waste electrical and electronic equipment should be disposed of in accordance with specific rules with the implication
of both suppliers and users. For this reason, as indicated by the symbol on the rating label or on the packaging, your appliance should not be disposed of as unsorted municipal waste. The user has the right to bring it to a municipal collection point performing waste recovery by means of reuse, recycling or use for other applications in accordance with the directive.
ErP Declaration - Regulation 1275/2008/EC
We, Team Kalorik SA/NV, hereby confirm that our product meets the requirements of regulation 1275/2008/EC. Admittedly, our product does not dispose of a function to minimize the power consumption, which should according to regulation 1275/2008/EC put the product in off or standby mode after finishing the main function, but this is practically impossible, as it would compromise the main function of the product so strongly, that using the product would no longer be possible!
For this reason we always tell the customer in our instruction manual to unplug the appliance immediately after use.
The user manual is also available in electronic format from the after-sales service by simple request (see warranty card).
- Check that the mains voltage matches the voltage noted on the appliance before using the appliance.
- Only use the supplied charging cable and power adapter to charge the appliance. Do not use the power adapter with other devices.
- If the power supply and / or charging cables are damaged, they must be repaired by the manufacturer, the customer service or a qualified specialist to avoid any possible hazard.
- Use the appliance for household purposes only as described in this manual.
- Never immerse the appliance, the charging cable or the mains plug in water or other liquids.
- Never use the appliance and the power supply near hot surfaces.
- Never use the appliance outdoors and always store it in a dry place.
- Only suitable for dry vacuuming. Never soak up water or other liquids.
- Never vacuum toxic materials, as vapors and dust can be hazardous to your health.

- Never use the appliance to vacuum mortar, cement or other substances that harden on contact with water and may interfere with normal operation of the vacuum cleaner.
- Do not use the appliance on pets.
- Sparks within the motor can ignite flammable vapors or dust. Never use it near flammable or explosive liquids (such as gasoline, oil paints, detergents), near gases, explosive substances (such as coal dust, magnesium, gunpowder), smoke or fire sources.
- Use only accessories recommended by the supplier. Other accessories pose a danger to the user and could damage the appliance.
- Always unplug the AC adapter from the wall outlet by pulling on the plug itself. Never pull on the charging cable.
- Regularly remove blockages caused by hair, dust fluff and the like in order not to reduce the suction power.
ASSEMBLING THE VACUUM CLEANER
Unpack the device and all accessories.
Make sure that all parts mentioned in the manual are present and undamaged.
- Carefully secure the handle (8) to the main unit. To do this, carefully pull on the supplied locking screw (9) (III. 4, Fig. 1).
- Insert the hand vacuum cleaner (4) into the main unit. For this, the device must always be switched off. Pay attention to the "click" sound when snapping in (III. 4, Fig. 3). Make sure that there are no substances between the contacts of the handpiece (4) and the main unit,
Charge the battery in the following situations:
- Before first use; in this case, the battery must be fully charged (6-8 hours).
- After a long period without use. (For optimal battery life, we recommend charging the device at least every three months.)
To load, the hand vacuum cleaner (4) must be inserted in the main unit (III. 5, Fig. 4).
Plug the mains adapter of the charging cable (14) into a socket (III. 5, Fig. 5). Connect the charging cable (14) to the charging port (10) of the main unit (III. 5,Fig. 6). Make sure that the contacts on the charging cable and the vacuum cleaner are clean. If necessary, remove the charging cable and clean the connectors.
The charge indicator (4) turns red while the battery is charging (III. 5, Fig. 7) and turns to blue when the battery is fully charged.
- Both the charging cable and the vacuum cleaner may become warm while charging. This is completely normal.
If you use the hand vacuum cleaner for a long period of time, the batteries can also warm up here. This is also completely normal.
Note: For best performance, it is recommended to charge the vacuum cleaner after each use.
USE
DANGER! Do not use the product while it is charging.
DANGER! Never touch the rotating parts of the floor brush during operation.
- Remove the water tank (III. 6) by first using the switch (11) and opening the water tank casing (12). Remove the water tank (3) using the handle (2). Open the locking clips (5) and remove the lid (4).
- Pour clean water in the tank, up to the mark.
- Close the lid (4) again and put the water tank (3) back into the main unit.
- Press the on / off switch (1) on the handle (8) of the main unit to switch on the device. Use the ECO switch (2) to change the speed levels.
Note
- During cleaning, foam may form in the water tank. The performance of the device is not affected by slight foaming.
- Detergent, soap powder, bleach and the like MUST NOT be added to the water tank.
Press the on / off button (1) again to switch off the appliance
During short breaks, you can stop the vacuum cleaner by tilting the appliance slightly forward.
Note: Make sure that the vacuum cleaner is on a level, non-slip surface before releasing it, to prevent it from falling over and causing possible damage to the unit or floor.
ATTENTION! Turn off the vacuum cleaner before each shutdown, otherwise the rotating bristles may permanently damage your (carpet) floor.
- The floor brush is suitable for the daily cleaning of larger surfaces, hard and smooth floors or carpets.
- The hand vacuum cleaner is suitable for mattresses, sofas, curtains and wallpapers. Press the release button (3) on the main unit to remove the handle (4) (III. 7, Fig. 8). Switch on the device by pressing the on / off switch (5) on the hand vacuum cleaner.
- Never use the hand vacuum cleaner to vacuum water or other liquids.
BATTERY WARNING
Blue-Battery full
- Blinking blue - Less than 20% battery remaining
- Blinking red - Low battery status
CLEANING AND CARE
- Switch off the appliance before each cleaning.
- Wipe the housing of the hand vacuum cleaner and the main unit with a soft, dry cloth.
- Persistent stains can be removed with a damp cloth and some detergent. Dry the cleaned area completely afterwards.
-
Change the water in the tank while using the vacuum cleaner as soon as it is dirty and after each use at the latest. To do this, press the release switch (11) and remove the water tank (III. 10, Fig. 13). Proceed as for filling the water tank. Empty the water tank and clean it thoroughly with water.
-
Turn the inner tube (6) counterclockwise to remove it (III. 10, Fig. 15); you can also refer to the marking. Clean the lid, tube, inner tube and textile filter with clean water and let everything dry thoroughly before reassembling and installing the water tank.
- Lay the vacuum cleaner flat on the floor to disassemble the floor brush (6). To do this, press the release switches (5a, 5b) simultaneously (III. 11, Fig. 16).
- Clean the dust container of the hand vacuum cleaner after each use. Remove the dust container from the engine block by pressing the release button (2). We recommend that you do this over a trash can (III. 9, Fig. 10).
- Remove the filter holder (6) and filter cartridge (7) by turning it counterclockwise (III. 9, Fig. 11). Tap the filter cartridge and clean the filter holder under running water (III. 9, Fig. 12). Allow all parts to dry before reassembling.
- Cleaning the filter and the dust container is very important, as it allows the device to operate optimally and eliminates unpleasant odors.
- Manually rotate the mobile element of the floor brush regularly to remove any foreign objects that may be stuck (III. 12).
- If the moving element does not rotate (III. 13), pull back the switch on the left side of the brush (a) and remove the roller (b). (III. 13, Fig. 18). Remove dirt and grime. When using a pair of scissors, be careful not to injure yourself or cut off the brushes (III. 13, Fig. 19 & 20). Put the roller back in and check if it can be easily moved manually (III. 13, Fig. 21)
Note: After each use, check that the brush still rotates smoothly.
TROUBLESHOOTING
| Problem | Possible cause | Solution |
| The vacuum cleaner does not turn on | The vacuum cleaner has not been charged | Make sure the vacuum cleaner has been fully charged before first time use or if it has not been used for a long time |
| The vacuum cleaner is not charging | The power switch is not turned on | Make sure the power switch of the main power supply is turned on |
| The power cord is damaged | Do not use a damaged power cord. Please contact the customer service center | |
| The suction power is decreasing | The crevice tools or extension hose may be blocked | Check for any blockages and clear them |
| The water in the water tank is very dirty | Regularly replace the water in the reservoir by clean water and empty the water tank after each use | |
| The filter is dirty | Check with the supplier for replacement parts | |
| Vacuum cleaner is overheating | The filter is dirty | Check the filter and clean off any dirt |
| The air coming out of the vacuum cleaner smells bad | The filter is dirty | Check the filter and clean off any dirt |
| The filter is not dry | Make sure the filter is dry before inserting it back into the hand vacuum cleaner. Replace the water with clean water if needed. | |
| The battery/charging indicator light is blinking | The vacuum cleaner is out of power | Recharge the vacuum cleaner to its full capacity. The light will stop blinking. |
| The brush does not turn anymore | The brush is dirty | Clean the brush |
- Water tank (III.2)
- Hand vacuum cleaner (III. 3)
- D
- Water tank (III. 2)
- GB OPERATING INSTRUCTIONS
- IMPORTANT SAFEGUARDS
- Important:
- ASSEMBLING THE VACUUM CLEANER
- USE
- Note:
- BATTERY WARNING
- CLEANING AND CARE
- PROTECTION OF THE ENVIRONMENT - DIRECTIVE 2012/19/EU
- ErP Declaration - Regulation 1275/2008/EC
- Note
Brand : KALORIK
Model : NC
Category : Stick vacuum