CAF1318E - Coffee maker BRANDT - Free user manual and instructions
Find the device manual for free CAF1318E BRANDT in PDF.
| Product type | Drip coffee maker |
| Brand | BRANDT |
| Model | CAF1318E |
| Power supply | 230 V ~ 50 Hz |
| Power | 1000 W |
| Water tank capacity | 1.8 L maximum |
| Dimensions (W x D x H) | 319 x 243 x 172 mm |
| Net weight | 1.5 kg |
| Coffee type | Ground coffee (medium grind) |
| Filter | Paper filter (standard size) |
| Delayed programming | Yes, up to 24 hours in advance |
| Keep warm | 2 hours with automatic shut-off |
| Anti-drip system | Yes, allows removing the carafe during brewing |
| Carafe | Glass, with lid and handle |
| Cleaning and maintenance | Clean removable parts with soapy water; descale regularly with vinegar |
| Safety | Automatic shut-off after 2 hours; do not immerse the body |
| Warranty | 2 years by the distributor |
Frequently Asked Questions - CAF1318E BRANDT
User questions about CAF1318E BRANDT
0 question about this device. Answer the ones you know or ask your own.
Ask a new question about this device
Download the instructions for your Coffee maker in PDF format for free! Find your manual CAF1318E - BRANDT and take your electronic device back in hand. On this page are published all the documents necessary for the use of your device. CAF1318E by BRANDT.
USER MANUAL CAF1318E BRANDT
FR MANUEL D'INSTRUCTION
EN INSTRUCTION MANUAL
Cafetière
Coffee Maker
CAF1318E

Chère Cliente, Cher Client
VousexzadacquerirunecafetiereBRANDTetnousyouenremercions.
ENGLISH INSTRUCTION MANUAL 9
ressources significatives.
You have just purchased a BRANDT coffee maker and we would like to thank you.
We have placed in this appliance all our passion and know-how so that it best meets your needs. Innovation and performance: we designed it so that it is always easy to use.
In the line of Brandt products, you will also find a wide range of small domestic appliances, compact ovens, microwave ovens, hobs, ventilation hoods, electronic cookers, dishwashers, refrigerators and freezers that can be coordinated with your new BRANDT coffee maker.
Of course, in an ongoing effort to satisfy your demands with regard to our products as best as possible, our after-sales service department is at your disposal and ready to listen in order to respond to all of your questions and suggestions.
You can also log on to our web site at www.brandt.com where you will find all our products, as well as additional, useful information.
BRANDT
As part of our commitment to constantly improving our products, we reserve the right to make changes to their technical, functional and/or esthetical properties in line with their technological development.

Attention: Before installing and using your appliance, please carefully read this Guide to Installation and Use, which will allow you to quickly familiarise yourself with its operation.
www.brandt.com

TABLE OF CONTENTS
1/ INFORMATION FOR THE USER 11
A. Safety recommendations 11
B. Technical data 12
C. Protecting the environment 12
2/ PREPARING YOUR APPLIANCE 12
A.Description of the coffee maker 12
B.Before using the appliance 13
3/ USING YOUR APPLIANCE 13
A. Using the coffee maker 13
B. Using the timer 14
C. Tips for a good coffee 14
4/ CARING FOR AND CLEANING YOUR APPLIANCE 14
A. Cleaning the coffee maker 14
B. Descalng the coffee maker 15
D. Warranty and after-sale service 15
A. Safety recommendations
Before using this appliance for the first time, read the following instructions carefully and keep them for future reference.
Safety tips when connecting the appliance
- After removing the packaging, check that the appliance is in good condition. In doubt contact the nearest Technical Support Service.
- Check if the voltage indicated on the base of the appliance corresponds to the local mains voltage before you connect the appliance.
- In the event of incompatibility between the mains socket and the appliance plug, the socket should be replaced by the manufacturer; it's after sale service or a qualified professional in order to avoid any danger.
- In the event of fault or malfunction where the appliance is not to be used, turn off the appliance and do not attempt to repair. If a repair is required, contact a Technical Assistance Service authorised by the manufacturer and requests the use of original spare parts.
- The use of adaptors, multiple sockets and/or extension cable is not recommended. If it is indispensable to use those elements be careful to respect the limit power.
- If the cable for this appliance is damaged, contact an authorised Technical Assistance Service for it to be replaced.
Safety when using the appliance
The appliance is for domestic use only. Any other use is considered unsuitable or dangerous.
- Do not use the appliance outdoor.
The manufacturer shall not be responsible for any damages that may arise from improper or inadequate use, or for repairs conducted by nongualified personnel.
- Only use the appliance on flat, clean and dry surface.
- Do not use or let any part of the appliance come into contact or near hot surfaces (kitchen gas or electric hobs or ovens).
- Do not touch the hot surfaces. Use the handles.
- Do not touch the appliance with wet or damp hands.
- Keep the appliance away from water or other liquids, to avoid electric shock; do not connect the appliance to the mains if it is on a damp surface.
- Do not leave the appliance unattended when it is turned on because it can be dangerous.
- The use of accessory attachments not recommended by the appliance manufacturer may result in fire, electric shock or injury to persons.
- This appliance is not intended for use by persons (including children) with reduced physical, sensory or mental capabilities, or lack of experience and knowledge, unless they have been given supervision or instruction concerning user of the appliance by a person responsible for their safety.
- Do not allow children and informs person without supervision.
- Do not leave the appliance exposed to the elements (rain, sun, ice, etc.).
- Do not let the liquid evaporate. Do not heat the jug when empty.
- Do not use a jug which is broken or has a loose or weakened handle. Replace it at any sign of damage. A crack or a chip in the glass may cause the jug to break or to contaminate the liquid it contains with glass particles.
The jug is designed for use with this appliance only. Do not place the jug on or near to a hot surface (heater, stove, cooking surface, hot oven, microwave oven, etc.)
- Do not put others liquid than water in the appliance.
- Do not use the appliance without any water inside. This can damage the coffee maker.
- Do not fill the water gauge beyond the "MAX" level and beside the "MIN" level. The maximum capacity is 1.8L.
- Do not use this appliance if the air is charged with more than 90% of humidity.
Safety when cleaning and maintaining the appliance
- Do not pull the main lead to unplug the appliance. To disconnect, grip the plug and pull from the wall socket.
Unplug the appliance before cleaning or maintenance.
- Do not use detergents or abrasive sponges to clean the appliance.
B. Technical data
| Model no. | CAF1318E |
| Power supply | 230V~50Hz |
| Energy consumption | 1000W |
| Dimensions | 243x172x319 mm |
| Net wt. | 1.5 kg |
C. Protecting the environment
At the end of its working life, the product must not be disposed with household waste. It must be taken to a special local authority waste collection centre or to a company providing this service. Disposing household appliances separately avoids possible negative effects on the environment and health and enables the constituent materials to be recycled which saves energy and resources.
To remind you that you must dispose of this appliance correctly the symbol shown above appears on the product warning you not to dispose of it with household waste.
For further information, contact your local authority or the shop where you bought the product.
2/ PREPARING YOUR APPLIANCE
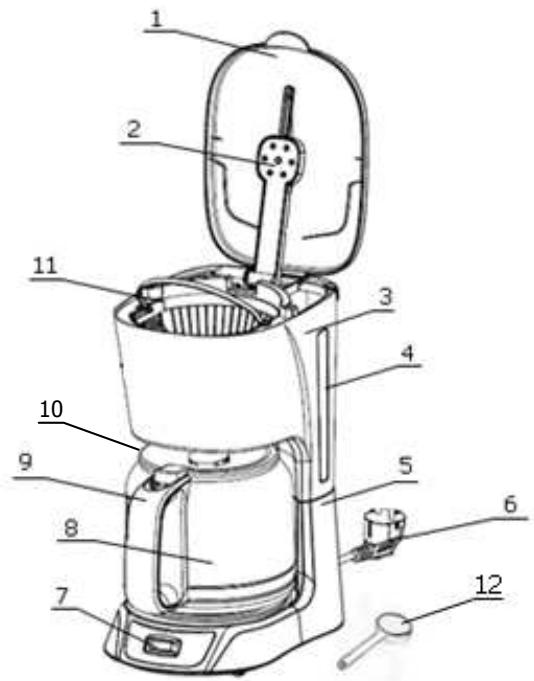
A. Description of the coffee maker
- Top lid
- Shower
- Water gauge
- Up housing
- Base
- Power cord
- Control panel
- Handle
- Jug
- Jug lid
- Funnel
- Spoon
B. Before using your appliance
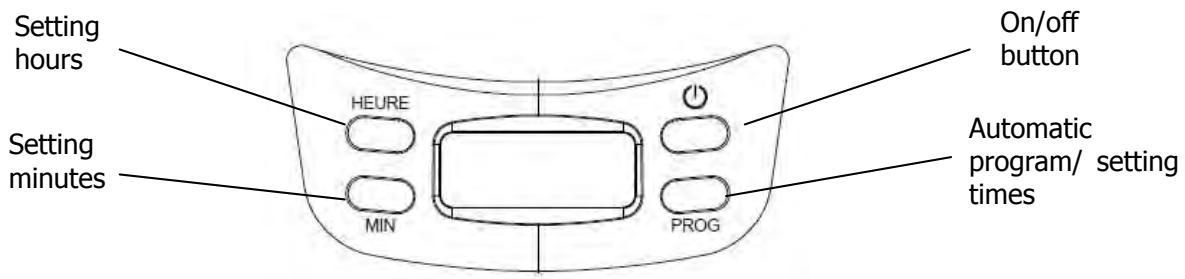
Setting the clock
- Setting the time is not compulsory for using the appliance but useful for using the auto-brew system.
- When plugging the appliance, the LCD display indicates "12:00".
- Press the "prog" key once. The LCD display shows "clock" and the two points in the middle are blinking. Now you can set the current time.
- Press the "Heure" key to set the hour. If you press the button for a long time the hours display will run faster.
- Press the "Minute" key to adjust minutes. If you press the button for a long time the hours display will run faster.
After setting the time, press the "prog" key again.
Auto-Brew system
- Press the "Prog" key once. The LCD display shows "clock" and the two points in the middle are blinking. Press again the "Prog" key. The LCD display shows "Timer". Then you can programme the appliance.
- Press the "Heure" key to set the hour. If you press the button for a long time the hours display will run faster.
- Press the "Minute" key to adjust minutes. If you press the button for a long time the hours display will run faster.
- After setting the time, press the "prog" key to validate. If you do not validate you choice within 8 seconds the programming will be cancel.
3/ USING YOUR APPLIANCE
A. Using the coffee maker
This is not necessary to set the clock of the appliance if you want to prepare your coffee immediately. For using auto brew refer to the next section.
- Open the lid and fill the water reservoir with fresh, cold water up to the level corresponding to the desired number of cups of coffee. Do not exceed the maximum level of the reservoir.
- Place the paper filter in the filter basket.
- Corresponding to your taste, put suitable coffee powder on the paper filter by spoon and close the filter holder lid.
We suggest one level tablespoonful of coffee per cup of coffee. Once you have used the coffeemaker several times, you will be able to adjust the amount of coffee according to your taste. - Close the reservoir lid.
- Place the jug with its lid duly in place, onto the hot plate. The jug will open the anti-drip valve when placed correctly onto the plate; otherwise the filtered coffee will not pass into the jug and the filter may overflow.
- Plug the appliance in and turn the coffee maker on by pressing the on/off switch. The indicator light will come on. The water will begin to filter through the coffee maker, pouring the coffee into the juq.
- Once the coffee is ready, the hot plate will keep the coffee hot for two hours. If there is no need to preserve heat, press ON/OFF button and the unit will stop working.
Unplug the coffee maker.

The coffee maker is fitted with an anti-drip system; this prevents the coffee from dripping onto the plate when the jug is not properly in place.
B. Using the auto brew system
- Open the lid and fill the water reservoir with fresh, cold water up to the level corresponding to the desired number of cups of coffee. Do not exceed the maximum level of the reservoir.
- Place the paper filter in the filter basket.
- Corresponding to your taste, put suitable coffee powder on the paper filter by spoon and close the filter holder lid. We suggest one level tablespoonful of coffee per cup of coffee. Once you have used the coffee maker several times, you will be able to adjust the amount of coffee according to your taste.
- Close the reservoir lid.
- Place the jug with its lid duly in place, onto the hot plate. The jug will open the anti-drip valve when placed correctly onto the plate; otherwise the filtered coffee will not pass into the jug and the filter may overflow.
Plug on the appliance (do not turn on the appliance using the ON/OFF button). - Select the desired time (refer to the section concerning the first use).
The green light will go on showing that the appliance is ready.
If you want to cancel the auto brew system, press "prog" button. The green light will turn off. - At the programmed time the brewing process will begin automatically. The red light will go on and the green one will go off.
The water will begin to filter through the coffee maker, pouring the coffee into the jug. - Once the coffee is ready, the hot plate will keep the coffee hot for two hours. If there is no need to preserve heat, press ON/OFF button and the unit will stop working.
Unplug the coffee maker.
C. Tips for a good coffee
To give the coffee a better flavour and aroma, we advise you to use freshly ground coffee. Medium-ground coffee should be used; it should not be too finely ground. Store the coffee in a dry place. Once the packet of coffee has been opened, it can be kept well-sealed in the refrigerator in order to maintain its aroma. This coffee maker will keep the coffee hot by means of the hot plate, but for best results, drink the coffee as soon as it has been made.
4/ CLEANING & MAINTENANCE
A. Cleaning the coffee maker
Before cleaning the coffee maker, turn it off, unplug the coffee maker and wait for it to cool down.
- Clean the hot plate with a cloth which has been moistened with soapy water.
- Wash the filter holder, the jug and the jug lid in soapy water or in the dishwasher, rinse well and dry the parts before reassembling them.

To remove stains from the jug, rub with bicarbonate of soda or a soft cloth. For stubborn stains, fill the jug with hot water; add 2 spoonfuls of dishwasher detergent and leave to soak for several hours.

- Do not use detergents or abrasive products to clean the coffee maker.
- Do not immerse the appliance in water or in any other liquid.
B. Descaling the coffee maker
Depending on how hard the water is in your area and how often you use the coffee maker, it is possible that the pipes may become blocked due to the lime content of the water. This is noticeable when the filtering process lasts longer than usual. To descale your appliance:
- Fill the reservoir with 1/3 of vinegar and 2/3 of water.
- Plug on and turn on the appliance.
- After 30 seconds turn off the coffee maker using the ON/OFF button.
- Wait for 30 minutes and then turn on the appliance.
- Let the appliance processing normally and turn off the appliance.
- Repeat the process 2 or 3 times according to the degree of lime.
- After decaling the appliance, use it only with water 2 or 3 times in order to eliminate residue of vinegar.
The frequency depends on different type of water you are using:
- Soft water; every 6 months
- Medium water; every 2/3 months
- Hard water: every 6 à 8 weeks
C. Warranty and after-sale service
This product is covered by a 2-year warranty by your retailer. For more details, please refer to the warranty conditions supplied by your distributor.