98UB980V - Téléviseur LG - Free user manual and instructions
Find the device manual for free 98UB980V LG in PDF.
Download the instructions for your Téléviseur in PDF format for free! Find your manual 98UB980V - LG and take your electronic device back in hand. On this page are published all the documents necessary for the use of your device. 98UB980V by LG.
USER MANUAL 98UB980V LG
OWNER’S MANUAL LED TV* *
LG LED TVs are LCD TVs with LED backlighting.
Please read this manual carefully before operating your set and retain it for future reference. UB85** UB93** UB95**
Antenna Connection Satellite dish Connection HDMI Connection - ARC (Audio Return Channel) DVI to HDMI Connection Component Connection Composite Connection MHL Connection Audio Connection - Digital optical audio Connection Headphone Connection USB Connection CI module Connection Euro Scart Connection
B-1 SPECIFICATIONS LANGUAGE COMMON SETTING UP THE TV SETTING UP THE TV A-3
Image shown may differ from your TV.
1 Attach the stand to the TV using the upper mounting hole on the back of the TV. 2 Attach the stand to the TV using the lower connection on the back of the TV. M4 x L20 4EA
NOTE yy Be sure to check the Stand Body (L), (R), when installing on the stand base.
1 Attach the stand to the TV using the upper mounting hole on the back of the TV. 2 Attach the stand to the TV using the lower connection on the back of the TV.
NOTE yy Be sure to check the Stand Body (L), (R), when installing on the stand base.
4EA SETTING UP THE TV
4EA (Insulation Holder)
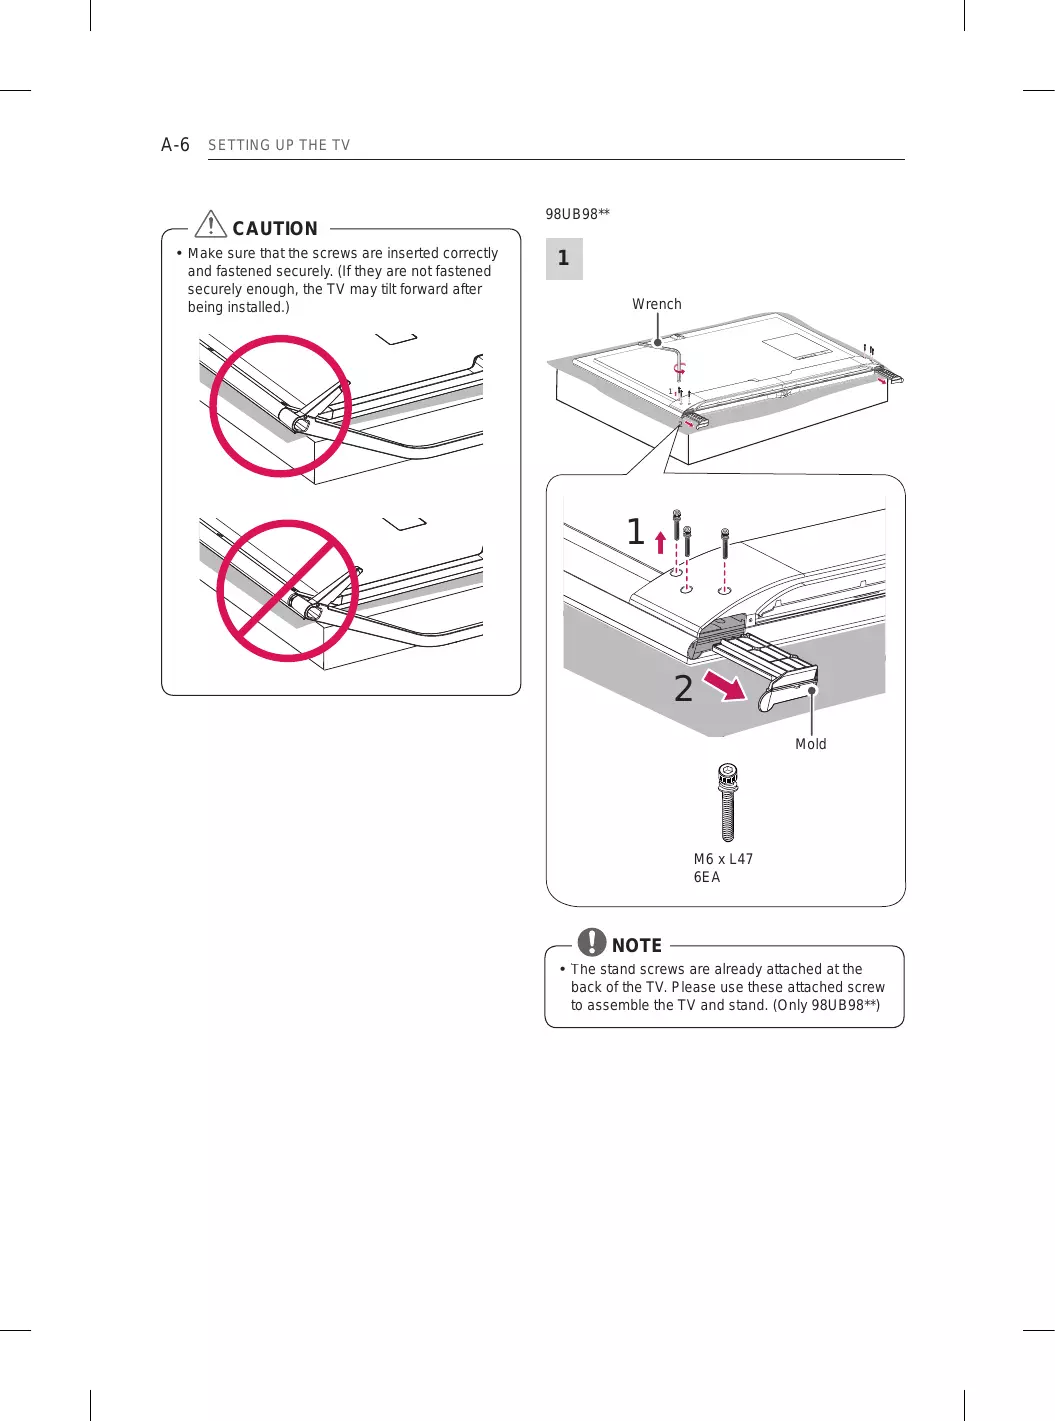
CAUTION y Make sure that the screws are inserted correctly and fastened securely. (If they are not fastened securely enough, the TV may tilt forward after being installed.)
6EA NOTE y The stand screws are already attached at the back of the TV. Please use these attached screw to assemble the TV and stand. (Only 98UB98**)
1 When assembling the stand, lay the front screen protective package included in the product box on a table or flat surface and then place the TV screen face down on the protective package. 2 Attach the stand to the TV using the upper mounting hole on the back of the TV. 3 Attach the stand to the TV using the lower connection on the back of the TV.
1 * Use at1least two people to attach the stand to the TV. 1 When assembling the stand, lay the front screen protective package included in the product box on a table or flat surface and then place the TV screen face down on the protective package. 2 Attach the stand to the TV using the upper mounting hole on the back of the TV. 3 Attach the stand to the TV using the lower connection on the back of the TV.
6EA M4 x L14 4EA M4 x L10
2EA SETTING UP THE TV CAUTION yy When attaching the stand to the TV set, place the screen facing down on a cushioned table or flat surface to protect the screen from scratches. (Only UB85**, UB93**, UB95**, UB98**) yy Make sure that the screws are inserted correctly and fastened securely. (If they are not fastened securely enough, the TV may tilt forward after being installed.) Do not use too much force and over tighten the screws; otherwise screw may be damaged and not tighten correctly.
Tidying cables Image shown may differ from your TV. 1 Gather and bind the cables with the Cable Holder and the Cable Management. 2 Fix the Cable Management firmly to the TV. (Only UB85**-ZA, UB93**, UB95**-ZA)
NOTE yy Remove the stand before installing the TV on a wall mount by performing the stand attachment in reverse. yy Remove the protective film from the stand base and then attach the stand body to the stand base. (Only UC97**)
1 Gather and bind the cables with the Cable Holder. (Only 65/79/84UB98**)
1 Fix the Cable Management firmly to the TV.
Assembling the AV cover
1 Insert the cover holder attached to the AV port cover into the hole of the main body of the product as illustrated. 2 Attach the port cover onto the AV port part. (The cover remains attached through the use of a magnet.)
AV Port Cover Cable Management
CAUTION yy Do not move the TV by holding the cable holders, as the cable holders may break, and injuries and damage to the TV may occur.
1 Insert the cover holder attached to the AV port cover into the hole of the main body of the product as illustrated. 2 Attach the AV port cover by inserting it into the left hole of the port. (The cover remains attached through the use of a magnet.)
This section on MAKING CONNECTIONS mainly uses diagrams for the UB85** models.
2 Wall Antenna Socket
English Connect the TV to a wall antenna socket with an RF cable (75 Ω).
NOTE CAUTION yy If you do not attach the cover holder, the cover may fall off and cause injury.
yy Use a signal splitter to use more than 2 TVs. yy If the image quality is poor, install a signal amplifier properly to improve the image quality. yy If the image quality is poor with an antenna connected, try to realign the antenna in the correct direction. yy An antenna cable and converter are not supplied. yy Supported DTV Audio: MPEG, Dolby Digital, Dolby Digital Plus, HE-AAC yy This TV cannot receive UHD (3840 x 2160 pixels) broadcasts directly because the related standards have not been confirmed. (Depending on model)
MAKING CONNECTIONS Deutsch Schließen Sie das TV-Gerät mit einem HF-Kabel (75 Ω) an eine Wandantennenbuchse an.
Satellite dish Connection
Sluit de TV met behulp van een RF-satellietkabel (75 Ω) aan op een satellietschotel.
(Only satellite models)
English Connect the TV to a satellite dish to a satellite socket with a satellite RF cable (75 Ω).
MAKING CONNECTIONS English
Transmits the digital video and audio signals from an external device to the TV. Connect the external device and the TV with the HDMI cable as shown.
NOTE yy It is recommended to use the TV with the HDMI connection for the best image quality. yy Use the latest High Speed HDMI™ Cable with CEC (Customer Electronics Control) function. yy High Speed HDMI™ Cables are tested to carry an HD signal up to 1080p and higher. yy Supported HDMI Audio format : Dolby Digital(32Khz, 44.1Khz, 48Khz), DTS(44.1Khz, 48Khz), PCM(32Khz, 44.1Khz, 48Khz, 96Khz, 192Khz) yy When you use HDMI port 3, it is recommended that you use the cable provided. If you want to use a regular HDMI cable, use one that is a highspeed HDMI cable (3m or less). (Depending on model) 1) HDMI specifications may be different for each input port, so make sure to check the device specifications before connecting.
(*Not Provided - Depending on model)
2) The HDMI IN 3 port is especially suitable for the specifications to enjoy UHD Video (4:4:4, 4:2:2) of 4K @ 50/60 Hz. However, video or audio may not be supported depending on the specifications of the external equipment. In that case, use any other HDMI IN port. 3) Contact customer service for more information on the HDMI specifications of each input port. 4K @ 50/60 Hz Support Format
1: Only Supported at HDMI IN 3 Port
MAKING CONNECTIONS ARC (Audio Return Channel) English yy An external audio device that supports SIMPLINK and ARC must be connected using HDMI(4K @ 60 Hz)/DVI IN 2 (ARC) port. yy When connected with a high-speed HDMI cable, the external audio device that supports ARC outputs optical SPDIF without additional optical audio cable and supports the SIMPLINK function.
MAKING CONNECTIONS DVI to HDMI Connection
Transmits the digital video signal from an external device to the TV. Connect the external device and the TV with the DVI-HDMI cable as shown. To transmit an audio signal, connect an audio cable.
IN NOTE yy Depending on the graphics card, DOS mode may not work if a HDMI to DVI Cable is in use. yy When using the DVI/HDMI cable, single link is supported.
HINWEIS yy Abhängig von der Grafikkarte funktioniert der DOS-Modus bei Einsatz eines HDMI-zu-DVIKabels möglicherweise nicht. yy Bei Verwendung des HDMI/DVI-Kabels wird nur eine einfache Verbindung unterstützt.
(*Not Provided) (*Not Provided)
MAKING CONNECTIONS English
Component Connection
Transmits analogue video and audio signals from an external device to the TV. Connect the external device and the TV with a component cable(or component gender cable) as shown.
yy If cables are not installed correctly, it could cause this image to display in black and white or with distorted colours.
Composite Connection
English Transmits analog video and audio signals from an external device to the TV. Connect the external device and the TV with the composite cable(or composite gender cable) as shown.
REMARQUE Mobile phone
English Mobile High-definition Link (MHL) is an interface for transmitting digital audiovisual signals from mobile phones to television sets.
NOTE yy Connect the mobile phone to the HDMI(4K @ 60 Hz)/DVI IN 4(MHL) port to view the phone screen on the TV. yy The MHL passive cable is needed to connect the TV and a mobile phone. yy This only works for the MHL-enabled phone. yy Some applications can be operated by the remote control. yy For some mobile phones supporting MHL, you can control with the magic remote control. yy Remove the MHL passive cable from the TV when: »» the MHL function is disabled »» your mobile device is fully charged in standby mode
yy Connectez le téléphone portable au port d’entrée HDMI(4K @ 60 Hz)/DVI IN 4(MHL) pour afficher l’écran du téléphone sur le téléviseur. yy Le câble passif MHL sert à connecter la TV à un téléphone portable. yy Cette fonctionnalité est uniquement disponible sur les téléphones prenant en charge la connexion MHL. yy Certaines applications peuvent être utilisées depuis la télécommande. yy Vous pouvez utiliser la télécommande Magic sur certains téléphones portables prenant en charge la connexion MHL. yy Retirez le câble passif MHL du téléviseur uniquement si : »» la fonction MHL est désactivée, »» votre périphérique mobile est complètement chargé et en mode veille ou
OPTICAL AUDIO IN Digital Audio System
English You may use an external audio system instead of the built-in speaker.
Digital optical audio Connection Transmits a digital audio signal from the TV to an external device. Connect the external device and the TV with the optical audio cable as shown.
NOTE yy Do not look into the optical output port. Looking at the laser beam may damage your vision. yy Audio with ACP (Audio Copy Protection) function may block digital audio output.
MAKING CONNECTIONS Headphone Connection
Français Transmet le signal du casque de la TV au périphérique externe. Connectez le périphérique externe et la TV avec le casque comme indiqué sur l’illustration suivante.
REMARQUE English Transmits the headphone signal from the TV to an external device. Connect the external device and the TV with the headphone as shown.
NOTE yy AUDIO menu items are disabled when connecting a headphone. yy OPTICAL DIGITAL AUDIO OUT is not available when connecting a headphone. yy Headphone impedance: 16 yy Max audio output of headphone : 0.627 mW to 1.334 mW yy Headphone jack size: 0.35 cm
yy Les éléments du menu AUDIO sont désactivés lorsque vous branchez un casque. yy La sortie audio numérique optique n’est pas disponible lorsque vous branchez un casque. yy Impédance du casque : 16 Ω yy Sortie audio max. du casque : 0,627 mW à 1,334 mW yy Taille de la prise casque : 0,35 cm
HUB (*Not Provided) USB (*Not Provided)
English Connect a USB storage device such as a USB flash memory, external hard drive or a USB memory card reader to the TV and access the Smart Share menu to use various multimedia files.
NOTE yy Some USB Hubs may not work. If a USB device connected using a USB Hub is not detected, connect it to the USB IN port on the TV directly. yy Connect the external power source if your USB is needed. yy Connecting via USB 3.0 : Some USB device may not work if it does not meet USB 3.0 standard. In case, connect it to USB IN 2 or USB IN 3 port.
REMARQUE yy Certains ports USB peuvent ne pas fonctionner. Si un appareil USB branché sur un port USB IN n’est pas détecté alors connectez-le directement au téléviseur. yy Connectez la source d’alimentation externe si une connexion USB est nécessaire. yy Guide de connexion pour USB 3.0 : Certains appareils USB peuvent ne pas fonctionner s'ils ne prennent pas en charge la norme USB 3.0. Connectez l'appareil aux ports USB IN 2 ou USB IN 3.
English View the encrypted (pay) services in digital TV mode. This feature is not available in all countries.
NOTE yy Check if the CI module is inserted into the PCMCIA card slot in the right direction. If the module is not inserted properly, this can cause damage to the TV and the PCMCIA card slot. yy If the TV does not display any video and audio when CI+ CAM is connected, please contact to the Antenna/Cable/Satellite Service Operator.
MAKING CONNECTIONS Deutsch Zeigen Sie verschlüsselte Dienste (Bezahldienste) im digitalen TV-Modus an. Diese Funktion ist in einigen Ländern nicht verfügbar.
MAKING CONNECTIONS English
Transmits the video and audio signals from an external device to the TV set. Connect the external device and the TV set with the euro scart cable (or Scart gender cable) as shown. Output Type Current input mode
NOTE yy Any Euro scart cable used must be signal shielded. yy When watching digital TV in 3D imaging mode, only 2D out signals can be output through the SCART cable. (Only 3D models)
Connect various external devices to the TV and switch input modes to select an external device. For more information on external device’s connection, refer to the manual provided with each device. Available external devices are : HD receivers, DVD players, VCRs, audio systems, USB storage devices, PC, gaming devices, and other external devices.
yy The external device connection may differ from the model. yy Connect external devices to the TV regardless of the order of the TV port. yy If you record a TV program on a DVD recorder or VCR, make sure to connect the TV signal input cable to the TV through a DVD recorder or VCR. For more information of recording, refer to the manual provided with the connected device. yy Refer to the external equipment’s manual for operating instructions. yy If you connect a gaming device to the TV, use the cable supplied with the gaming device. yy In PC mode, there may be noise associated with the resolution, vertical pattern, contrast or brightness. If noise is present, change the PC output to another resolution, change the refresh rate to another rate or adjust the brightness and contrast on the PICTURE menu until the picture is clear. yy In PC mode, some resolution settings may not work properly depending on the graphics card. yy If Ultra HD content is played via PC, the video or audio may have disruptions intermittently depending on your PC’s performance.
LSW440B LSW440B MSW240
SPECIFICATIONS SPECIFICATIONS Product specifications may be changed without prior notice due to upgrade of product functions. 49UB85**
MODELS Dimensions (W x H x D) Weight
MODELS Dimensions (W x H x D) Weight
MODELS Dimensions (W x H x D) Weight
200W Power consumption
60UB850V-ZD With stand (mm)
Dimensions (W x H x D)
210W Dimensions (W x H x D) Weight
MODELS Dimensions (W x H x D) Weight
MODELS Dimensions (W x H x D) Weight
Dimensions (W x H x D)
100.0 mm x 55.0 mm x 5.0 mm Operating Temperature
Environment condition
0 °C to 40 °C Operating Humidity
VHF, UHF C-Band, Ku-Band
VHF: E2 to E12, UHF : E21 to E69, CATV: S1 to S20, HYPER: S21 to S47
Maximum number of storable programmes
Please contact LG First. If you have any inquiries or comments, please contact LG customer information centre. LG Customer Information Centre Country
Record the model number and serial number of the TV. Refer to the label on the back cover and quote this information to your dealer when requiring any service.