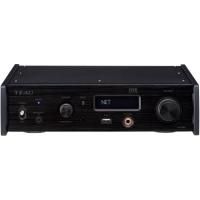
505 - Audio Amplifier TEAC - Free user manual and instructions
Find the device manual for free 505 TEAC in PDF.



User questions about 505 TEAC
0 question about this device. Answer the ones you know or ask your own.
Ask a new question about this device
Download the instructions for your Audio Amplifier in PDF format for free! Find your manual 505 - TEAC and take your electronic device back in hand. On this page are published all the documents necessary for the use of your device. 505 by TEAC.
USER MANUAL 505 TEAC
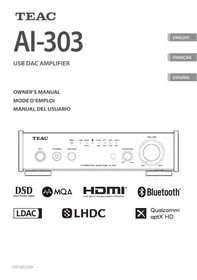
Integrated Amplifier
ENGLISH
FRANÇAIS
ESPÁÑOL
OWNER'S MANUAL
MODE D'EMPLOI
MANUAL DEL USUARIO
CAUTION
RISK OF ELECTRIC SHOCK DO NOT OPEN
CAUTION: TO REDUCE THE RISK OF ELECTRIC SHOCK, DO NOT REMOVE COVER (OR BACK). NO USER-SERVICEABLE PARTS INSIDE. REFER SERVICING TO QUALIFIED SERVICE PERSONNEL.

The lightning flash with arrowhead symbol, within an equilateral triangle, is intended to alert the user to the presence of uninsulated "dangerous voltage" within the product's enclosure that may be of sufficient magnitude to constitute a risk of electric shock to persons.

The exclamation point within an equilateral triangle is intended to alert the user to the presence of important operating and maintenance (servicing) instructions in the literature accompanying the appliance.
WARNING: TO PREVENT FIRE OR SHOCK HAZARD, DO NOT EXPOSE THIS APPLIANCE TO RAIN OR MOISTURE.
CAUTION
DO NOT REMOVE THE EXTERNAL CASES OR CABINETS TO EXPOSE THE ELECTRONICS. NO USER SERVICEABLE PARTS ARE INSIDE.
- IF YOU ARE EXPERIENCING PROBLEMS WITH THIS PRODUCT, CONTACT THE STORE WHERE YOU PURCHASED THE UNIT FOR A SERVICE REFERRAL. DO NOT USE THE PRODUCT UNTIL IT HAS BEEN REPAIRED.
- USE OF CONTROLS OR ADJUSTMENTS OR PERFORMANCE OF PROCEDURES OTHER THAN THOSE SPECIFIED HEREIN MAY RESULT IN HAZARDOUS RADIATION EXPOSURE.
1) Read these instructions.
2) Keep these instructions.
3) Heed all warnings.
4) Follow all instructions.
5) Do not use this apparatus near water.
6) Clean only with dry cloth.
7) Do not block any ventilation openings. Install in accordance with the manufacturer's instructions.
8) Do not install near any heat sources such as radiators, heat registers, stoves, or other apparatus (including amplifiers) that produce heat.
9) Do not defeat the safety purpose of the polarized or grounding-type plug. A polarized plug has two blades with one wider than the other. A grounding type plug has two blades and a third grounding prong. The wide blade or the third prong are provided for your safety. If the provided plug does not fit into your outlet, consult an electrician for replacement of the obsolete outlet.
10) Protect the power cord from being walked on or pinched particularly at plugs, convenience receptacles, and the point where they exit from the apparatus.
11) Only use attachments/accessories specified by the manufacturer.
12) Use only with the cart, stand, tripod, bracket, or table specified by the manufacturer, or sold with the apparatus. When a cart is used, use caution when moving the cart/apparatus combination to avoid injury from tip-over.
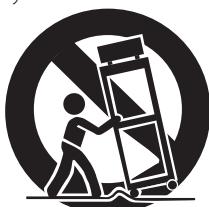
13) Unplug this apparatus during lightning storms or when unused for long periods of time.
14) Refer all servicing to qualified service personnel. Servicing is required when the apparatus has been damaged in any way, such as power-supply cord or plug is damaged, liquid has been spilled or objects have fallen into the apparatus, the apparatus has been exposed to rain or moisture, does not operate normally, or has been dropped.
- The apparatus draws nominal non-operating power from the AC outlet with its POWER or STANDBY/ON switch not in the ON position.
- The mains plug is used as the disconnect device; the disconnect device shall remain readily operable.
- Caution should be taken when using earphones or headphones with the product because excessive sound pressure (volume) from earphones or headphones can cause hearing loss.
CAUTION
- Do not expose this apparatus to drips or splashes.
- Do not place any objects filled with liquids, such as vases, on the apparatus.
- Do not install this apparatus in a confined space such as a book case or similar unit.
- The apparatus should be located close enough to the AC outlet so that you can easily reach the power cord plug at any time.
- If the product uses batteries (including a battery pack or installed batteries), they should not be exposed to sunshine, fire or excessive heat.
- CAUTION for products that use replaceable lithium batteries: there is danger of explosion if a battery is replaced with an incorrect type of battery. Replace only with the same or equivalent type.
WARNING
Products with Class I construction are equipped with a power supply cord that has a grounding plug. The cord of such a product must be plugged into an AC outlet that has a protective grounding connection.
IN USA/CANADA, USE ONLY ON 120V SUPPLY.
Precautions concerning batteries
Misuse of batteries could cause them to rupture or leak leading to fire, injury or the staining of nearby things. Please read and observe the following precautions carefully.
- Be sure to insert the batteries with correct positive () and negative () orientations.
- Use batteries of the same type. Never use different types of batteries together.
- If the remote control is not used for a long time (more than a month), remove the batteries to prevent them from leaking.
- If the batteries leak, wipe away the leakage inside the battery compartment and replace the batteries with new ones.
- Do not use batteries of types other than those specified. Do not mix new batteries with old ones or use different types of batteries together.
- Do not heat or disassemble batteries. Never throw batteries into fire or water.
- Do not carry or store batteries with other metallic objects. The batteries could short circuit, leak or explode.
- Never recharge a battery unless it is confirmed to be a rechargeable type.
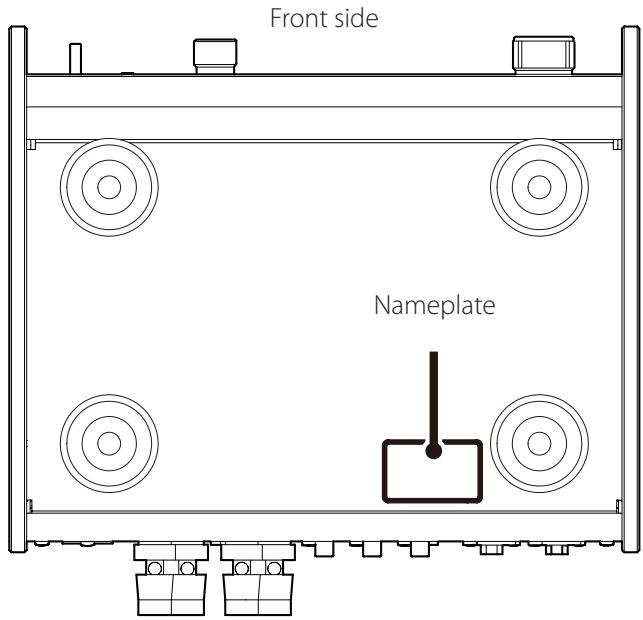
The nameplate is located on the bottom of the unit as shown below.
Model for USA
Declaration of Conformity

Responsible party:
Pioneer & Onkyo U.S.A. Corporation
Address: 22828 Lockness Avenue, Torrance, CA 90501 U.S.A.
Telephone number: 1-201-785-2600
This device complies with Part.15 of FCC Rules. Operation is subject to the following two conditions: (1) this device may not cause harmful interference, and (2) this device must accept any interference received, including interference that may cause undesired operation.
Information
This equipment has been tested and found to comply with the limits for a Class B digital device, pursuant to Part 15 of the FCC Rules. These limits are designed to provide reasonable protection against harmful interference in a residential installation. This equipment generates, uses, and can radiate radio frequency energy and, if not installed and used in accordance with the instructions, may cause harmful interference to radio communications. However, there is no guarantee that interference will not occur in a particular installation. If this equipment does cause harmful interference to radio or television reception, which can be determined by turning the equipment off and on, the user is encouraged to try to correct the interference by one or more of the following measures:
- Reorient or relocate the equipment and/or the receiving antenna.
- Increase the separation between the equipment and receiver.
- Connect the equipment into an outlet on a circuit different from that to which the receiver is connected.
- Consult the dealer or an experienced radio/TV technician for help.
CAUTION
Changes or modifications not expressly approved by the party responsible for compliance could void the user's authority to operate the equipment.
Model for Canada
Industry Canada's Compliance Statement:
This Class B digital apparatus complies with Canadian ICES-003.
Model for Europe

This product complies with the European
Directives request, and the other Commission
Regulations.
For European Customers
Disposal of electrical and electronic equipment and batteries and/or accumulators
a) All electrical/electronic equipment and waste batteries/ accumulators should be disposed of separately from the municipal waste stream via collection facilities designated by the government or local authorities.
b) By disposing of electrical/electronic equipment and waste batteries/accumulators correctly, you will help save valuable resources and prevent any potential negative effects on human health and the environment.
c) Improper disposal of waste electrical/electronic equipment and batteries/accumulators can have serious effects on the environment and human health because of the presence of hazardous substances in the equipment.
d) The Waste Electrical and Electronic Equipment (WEEE) symbols, which show wheeled bins that have been crossed out, indicate that electrical/electronic equipment and batteries/accumulators must be collected and disposed of separately from household waste.
If a battery or accumulator contains more than the specified values of lead (Pb), mercury (Hg), and/or cadmium (Cd) as defined in the Battery Directive (2006/66/EC), then the chemical symbols for those elements will be indicated beneath the WEEE symbol.

Pb,Hg,Cd
e) Return and collection systems are available to end users. For more detailed information about the disposal of old electrical/electronic equipment and waste batteries/accumulators, please contact your city office, waste disposal service or the shop where you purchased the equipment.
Thank you for choosing TEAC.
Read this manual carefully to get the best performance from this unit.
After reading it, keep it in a safe place for future reference.
IMPORTANT SAFETY INSTRUCTIONS 2
Included accessories. 5
Maintenance 5
Using the TEAC Global Site. 5
Before use. 6
Using the remote control 6
Connecting speakers 7
Connections. 8
Connecting headphones 9
Main unit parts and functions. 10
Remote control parts and functions. 11
Basic operation 12
Troubleshooting. 14
Specifications. 15
Check to be sure the box contains all the included items shown below.
Please contact the store where you purchased this unit if any of these items are missing or have been damaged during transportation.
Power cord × 1
Remote control (RC-1332) × 1
Batteries for remote control (AAA) × 2
Owner's manual (this document, including warranty) × 1
- For information about the warranty, users living in the USA and Canada should see pages 44-45 and the back cover (warranty document). Users living in Europe and other regions should see page 45.
Maintenance
Wipe dirt from the top cover and other panel surfaces using a soft cloth that has been slightly dampened with a diluted neutral cleanser.
Do not wipe with chemical cleaning cloths, thinner or other chemical agents. Doing so could damage the surface.
For your safety, disconnect the power cord from the outlet before cleaning.
Using the TEAC Global Site
You can download updates for this unit from the TEAC Global Site:
http://teac-global.com/
In the TEAC Downloads section, click the desired language to open the Downloads website page for that language.

Placement precautions
- Place the unit in a stable location near the audio system that you will use with it.
- Do not install this unit in a location that could become hot. This includes places that are exposed to direct sunlight or near a radiator, heater, stove or other heating equipment. Moreover, do not place it on top of an amplifier or other equipment that generates heat. Doing so could cause discoloration, deformation or malfunction.
Also avoid locations that are subject to vibrations or exposed to excessive dust, cold or moisture.
- When installing this unit, leave a little space (at least 3cm or 1^ ) between it and walls and other devices in order to allow good heat dissipation.
If you put it in a rack, for example, leave at least 5cm ( 2'' ) open above it and at least 10cm ( 4'' ) open behind it. Failure to provide these gaps could cause heat to build up inside and result in fire.
- You may stack this unit with a PD-501HR, NT-505 or other 501/503/505 series units. However, if heat should cause the protection circuit to be activated and sound output stops suddenly, place this unit on top and with sufficient distance between it and walls and other devices in order to improve heat dissipation.
- Do not place CDs, CD-Rs, cassette tapes, other audio equipment or other items that are susceptible to heat on top of the unit. Doing so could damage these items.
- Do not put cloth on top of the unit or place the unit on top of bedding or thick carpets. Doing so could cause the unit to overheat and damage it.
- Do not move the unit during use.
- The voltage supplied to the unit should match the voltage printed on the rear panel. If you are in any doubt regarding this matter, consult an electrician.
- Do not open the body of the unit as this might result in damage to the circuitry or cause electric shock. If a foreign object should get into the unit, contact your dealer.
- When removing the power plug from the wall outlet, always pull directly on the plug; never yank on the cord.
Using the remote control
Precautions for use

Misuse of batteries could cause them to rupture or leak, which might result in fire, injury or the staining of nearby materials. Please carefully read and observe the precautions on page 3.
- When using the remote control, point it toward the remote control signal receiver on the main unit from a distance of 5m (16 ft) or less. Do not place obstructions between the main unit and the remote control.
- The remote control might not work if the remote control signal receiver on the unit is exposed to direct sunlight or bright light. If this occurs, try moving the unit.
- Beware that use of this remote control could cause the unintentional operation of other devices that can be controlled by infrared rays.
Installing batteries
Remove the cover from the back of the remote control and insert two AAA batteries with their / oriented as shown in the case. Replace the cover.
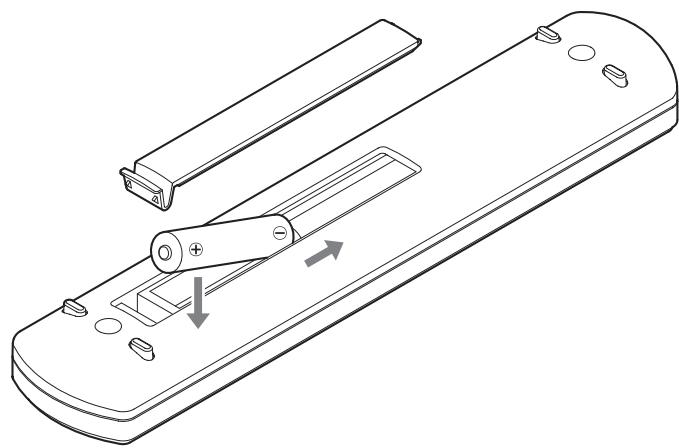
When to replace batteries
If the distance required between the remote and the main unit decreases or if the unit stops responding to the remote buttons, replace both batteries with new ones.
Dispose of the used batteries according to the instructions on them or requirements set by your local municipality.
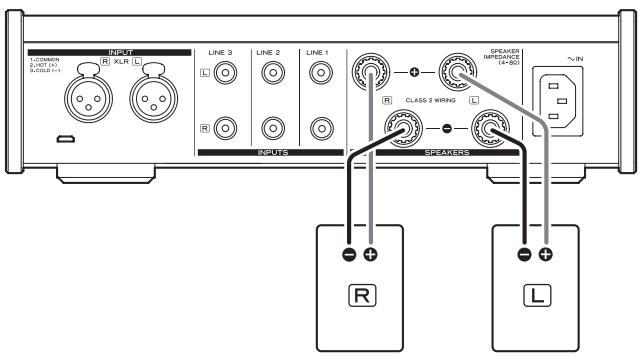
Precautions when connecting speakers
- Connect the power plugs after all connections have been made.
- Carefully read the manuals of the devices that you are connecting and follow their instructions when making connections.
- When the left and right grounds are shared in a sub woofer with a built-in amplifier, for example, use might not be possible depending on connection conditions.
ATTENTION
- This unit works with speakers that have nominal impedances between 4 and 8 . Use of speakers with impedances of less than 4 , in particular, could cause the protection circuit to activate and sound output to stop. In some cases, damage could even occur to this unit and the speakers.
- This unit's red terminal is positive () and its black terminal is negative () . Generally, the wire of the speaker cable is marked to distinguish it from the wire of the cable. Connect the marked wire to the red terminal and the unmarked wire to the black terminal.
- If the exposed end of a core wire in a speaker cable contacts another cable or terminal, a short could occur.
- Never allow speaker cables to cause a short.
- To prevent hum and noise, avoid bundling the cables together with the AC power cord or other cables.
How to connect speakers
1 Remove about one centimeter (1/2") of insulation from the end of the speaker cable and twist the core wires well.
2 Turn the terminal cap counterclockwise to loosen it.
3 Insert the wire into the hole in the terminal post and turn the terminal cap clockwise to securely connect it.
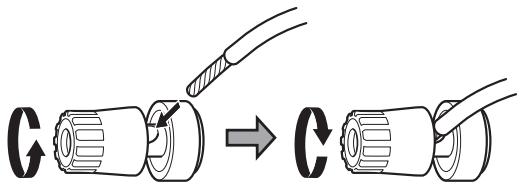
- Connect it so that none of the wire insulation is touching the terminal.
4 Confirm that the cable is fastened securely by gently pulling the cable.
Connecting with banana plugs
You can also make connections using commercially-available banana plugs. First, connect the banana plugs to the speaker cables and then connect the plugs to the terminals.
- Keep the caps tightened when in use.
- Carefully read the instructions for the banana plugs that you are using.
ATTENTION
Notice about the European model
In accordance with European safety regulations, connecting banana plugs to speaker terminals is not allowed on European models.
The holes into which banana plugs could be inserted have been covered with black caps.
Connect speakers using bare wires or spade lugs.
If a black cap should become separated from its terminal, return it to its original position.
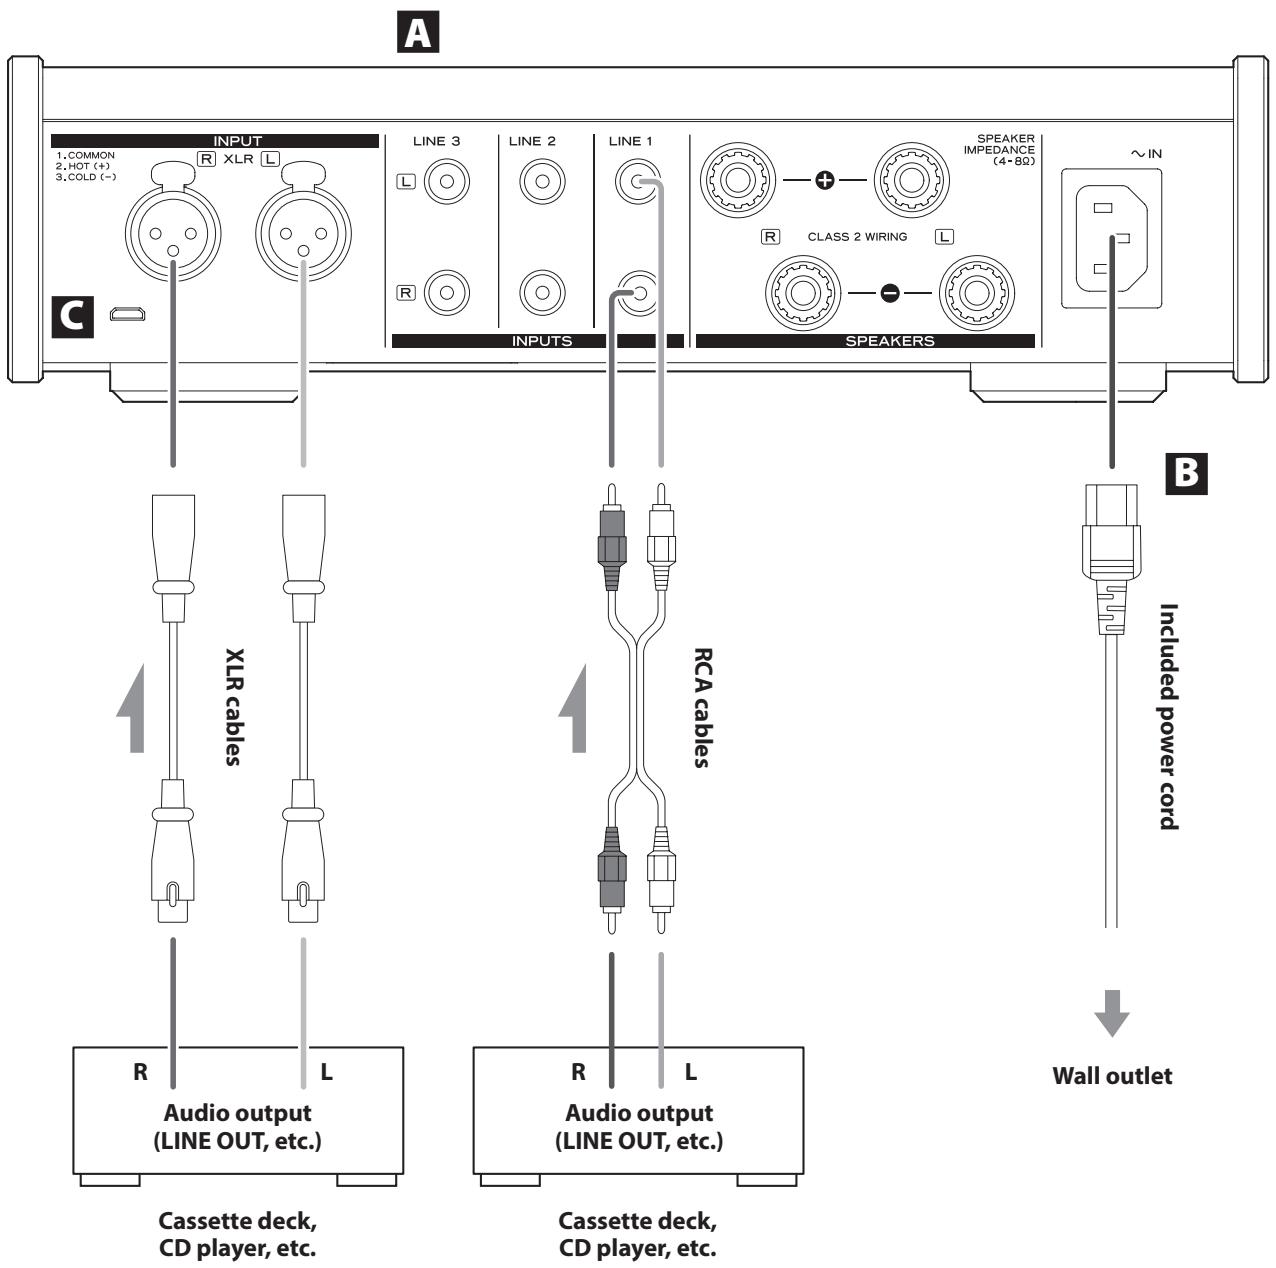
A Analog audio input connectors (LINE 1, LINE 2, LINE 3, XLR)
Use these to input stereo analog audio. Connect the audio output connectors of a cassette deck, CD player or other audio output equipment to these.
Connect this unit's R input connector to the R output connector of the audio output device, and this unit's L input connector to the L output connector of the other device.
- This unit's XLR connectors are 2: HOT.
Use commercially-available audio cables for connections.
LINE1: RCA cables
LINE2: RCA cables
LINE3: RCA cables
XLR: XLR cables
B Power inlet (~IN)
Connect the supplied power cord here.
After all other connections are complete, connect the power cord's plug to a wall outlet.
Do not use any power cord other than the one included with this unit. Use of other power cords could result in fire or electric shock.
Unplug the cord from the outlet when not using the unit for a long time.
Complete all other connections before setting the STANDBY/ON switch to ON.
- Carefully read the manuals of the devices that you are connecting and follow their instructions when making connections.
- Do not bundle connecting cables with power cords. Doing so could cause noise.
- Connect all plugs completely.
C Maintenance port
This is used for maintenance. Do not connect anything to this port unless instructed to do so by our service department.
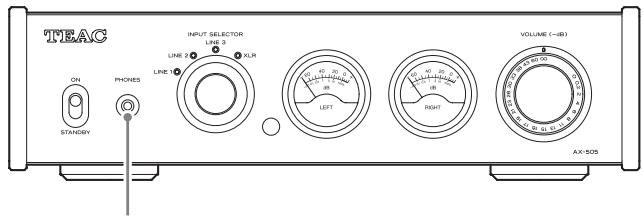
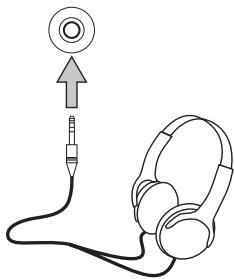
PHONES
CAUTION
While wearing headphones, do not connect or disconnect them or turn the unit on or off.
Doing so could result in a sudden loud noise that could harm your hearing.
Always set the volume to minimum (- dB) before putting headphones on (page 12).
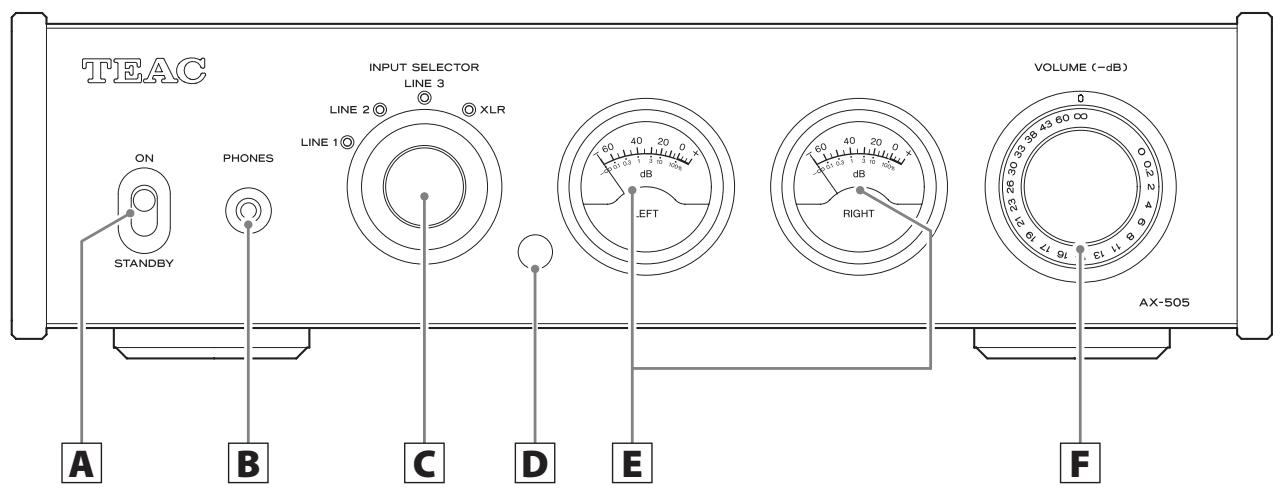
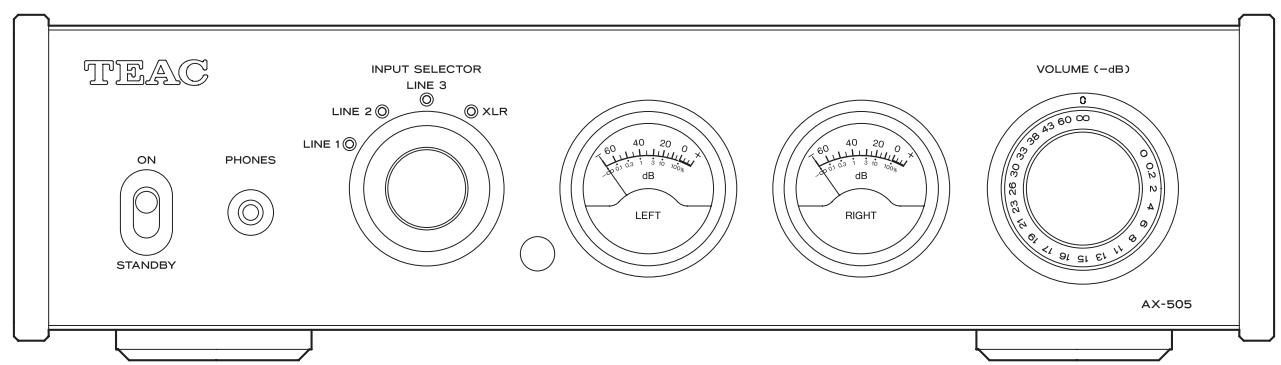
A STANDBY/ON switch
Use to put the unit into standby mode or turn it on.
B PHONES jack
Connect headphones with a 3.5mm (1/8") stereo mini plug here (page 9).
- This headphone amp circuit uses a four-pole connector with independent left and right for grounding. Ordinary plugs with 3 or 4 poles can be used.
- When headphones are connected to this unit, sound will be output from the PHONES jack but will not be output from the SPEAKERS terminals on the back of the unit.
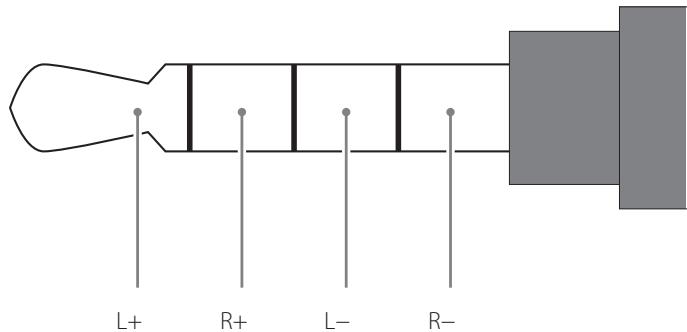
Wiring illustration
C INPUT SELECTOR knob
Use to select the input source. The indicator lights for the selected source.
Remote control signal receiver
This receives signals from the remote control. When operating the remote control, point it at the remote control signal receiver.
E Level meters
These show the output levels.
F VOLUME knob
Use to adjust the volume. Turn right to increase and left to decrease the volume.
The maximum volume level is 0 and the minimum level is - (negative infinity). Before setting the STANDBY/ON switch to ON, set the VOLUME knob to its minimum value (-) . Failure to do so could result in sudden loud noises that could damage speakers and harm your hearing.
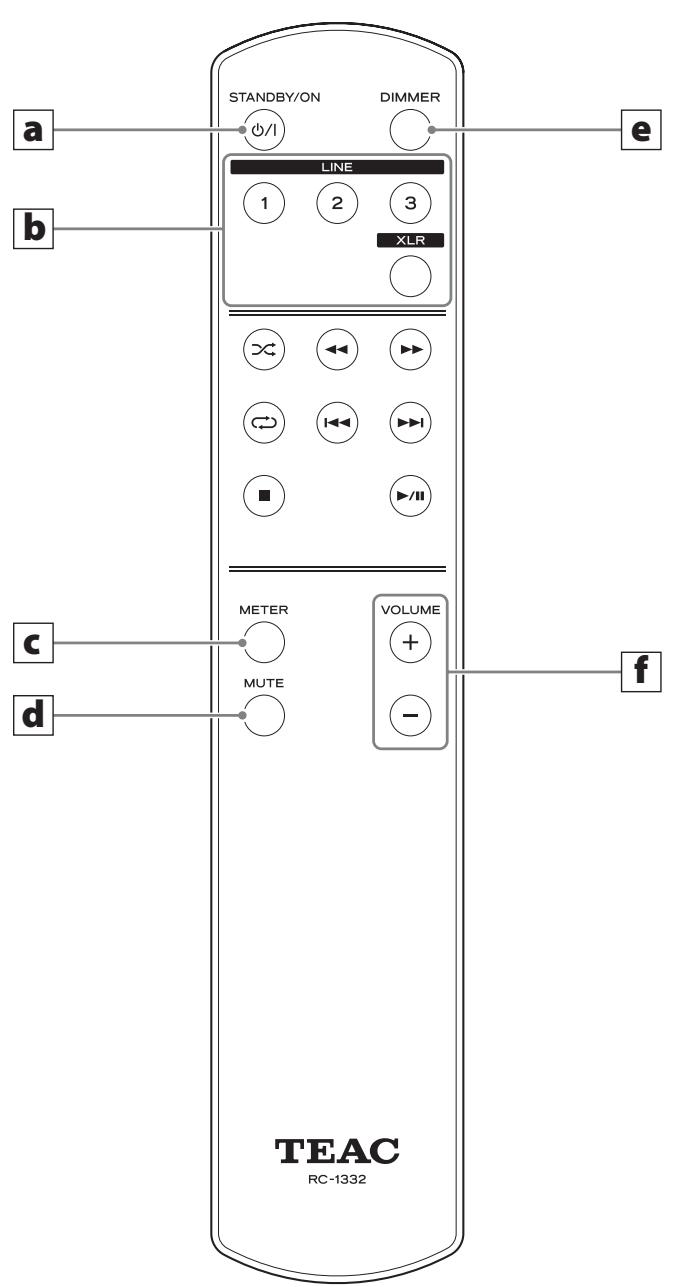
The RC-1332 remote control supplied with the AX-505 can control both AX-505 and PD-501HR units.
Only the buttons used for the AX-505 are explained in this document.
When the main unit and the remote control both have buttons with the same functions, this manual explains how to use one of the buttons. The other corresponding button can be used in the same manner.
a STANDBY/ON button
Press to put the unit into standby mode or turn it on.
b Input selection buttons
Use to select the playback source.
C METER button
Press to change level meter operation.
d MUTE button
Press this button to mute the sound temporarily. Press it again to restore sound output at the previous level (page 13).
Press and hold to cancel muting (page 13).
e DIMMER button
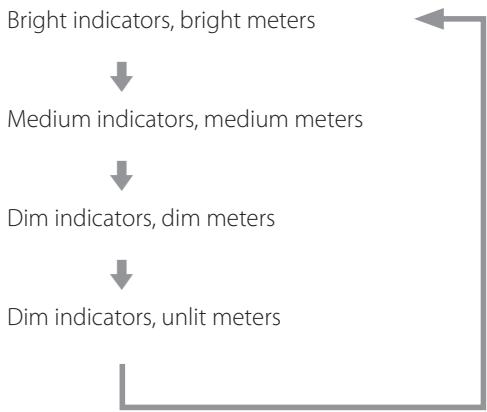
Use to change the brightness of the input source indicators and level meters.
Press to cycle through the brightness settings in the following order.
f VOLUME (+ / - ) buttons
Use to adjust the volume.
Press and hold a VOLUME button to continuously change the volume.
1 Minimize the volume.
Use the VOLUME knob or the remote control VOLUME buttons to minimize the volume.
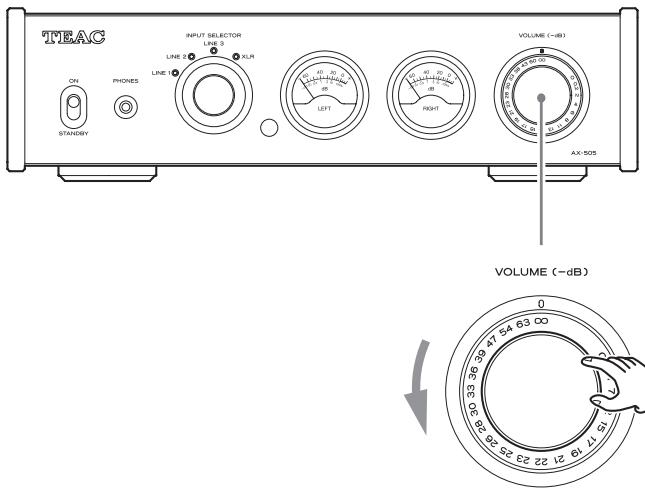
- dB: Minimum volume 0 dB: Maximum volume
2 Set the STANDBY/ON switch to ON.
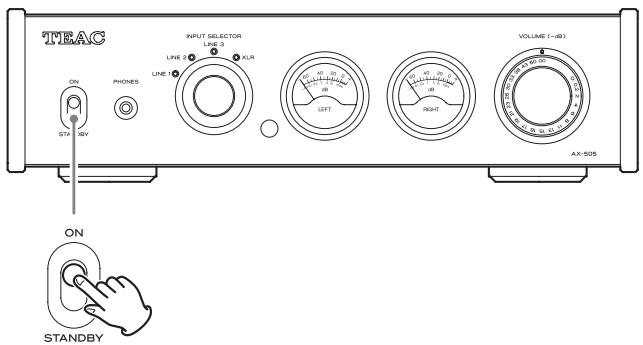
The input source indicators will blink and the mute function will turn on. When the amplifier operation stabilizes, the indicators will light and the mute function will turn off.
3 Turn the INPUT SELECTOR knob to select the input source.
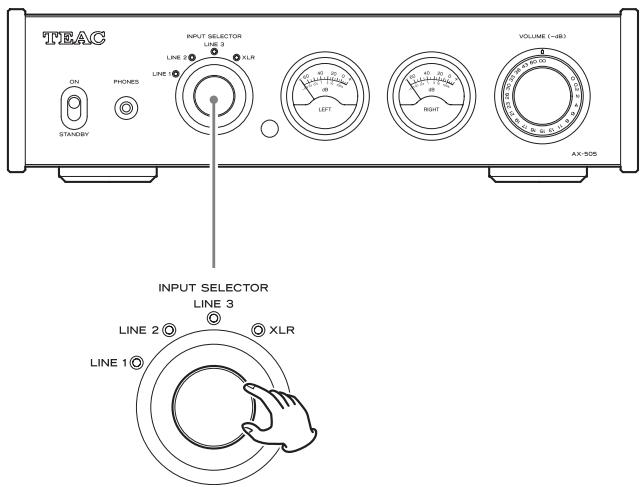
The input indicator lights for the selected source.
4 Operatetheplaybackdevice.
Refer to the operation manual of that device.
5 Adjust the volume.
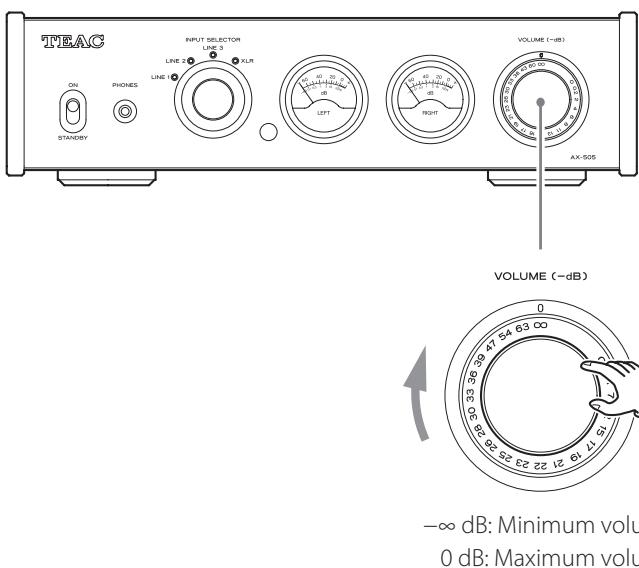
Start playback on the source and use the VOLUME knob or remote control VOLUME buttons to adjust the volume to its optimal level.
Automatic power saving function
This unit has an automatic power saving function.
If the automatic power saving function is set to on, the unit will automatically enter standby mode if there is no audio input for about 30 minutes.
You can check the automatic power saving setting by looking at the input source indicators immediately after turning the unit on.
Automatic power saving function on
An input source indicator will blink every two seconds.
Automatic power saving function off
After all input source indicators light for two seconds, an input source indicator will blink every two seconds.
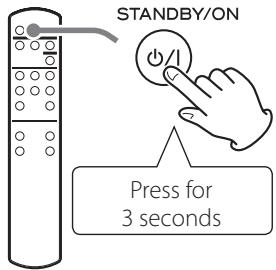
Turning automatic power saving on and off
Press the remote control STANDBY/ON button to put the unit into standby.
Press and hold the remote control STANDBY/ON button for three seconds.
The unit turns on, all the input source indicators blink and the on/off setting changes.
Muting playback
If you want to temporarily mute the volume of this unit, press the remote control MUTE button.
- The input source indicators blink when playback is muted.
Press the remote control MUTE button again to cancel muting.

Changing level meter operation
Press the remote control METER button to cycle through level meter operation settings.
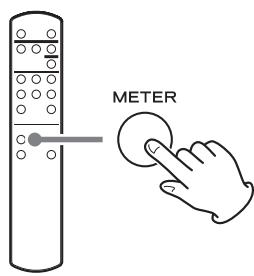
Normal
- When level meter operation is +20 ~dB , needle movement will be greater than usual.
Restoring default settings
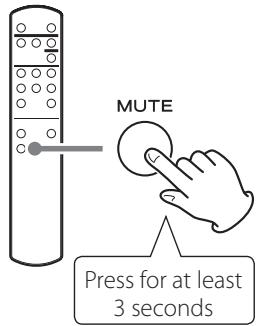
After minimizing the volume, press and hold the remote control MUTE button for at least 3 seconds.
The defaults will be restored after the input source indicators and level meters blink and the unit restarts.
If you experience a problem with the unit, please take a moment to review the following information before requesting service. If it still does not operate correctly, contact the retailer where you purchased the unit.
General
The unit does not turn on.
Check that the power cord is completely plugged into the power outlet. If the outlet is switched, confirm that the switch is in the ON position.
Connect a different electrical device to the outlet to confirm that it is supplying power.
No sound is output.
Adjust the VOLUME knob. Turn it clockwise (right) to increase the volume (page 10).
Use the INPUT SELECTOR knob to select the input that is connected to the source that you want to hear (page 12).
Reconfirm the connections with other equipment.
Remote control does not work.
Set the main unit STANDBY/ON switch to ON before using the remote control.
If the batteries are exhausted, replace both of them with new ones.
The remote control will not work if there is an obstruction between it and the main unit.
Point the remote control at the remote control center on the unit from a distance of less than 5m (16 ft.).
A television set or another device operates in error.
Some televisions that are able to receive signals from wireless remote controls might be operated in error by this unit's remote control.
If this is the case, turn the other devices off when using this remote control.
Noise occurs.
Place the unit as far away as possible from TVs, microwave ovens and other devices that have strong magnetism.
There is a humming noise.
If a connecting cable is near a power cord, fluorescent light or similar cause of interference, increase the distance between them as much as possible.
There is no sound from one side of the headphones.
Confirm that the headphones plug is inserted completely.
The level meter lights are blinking and no sound is output.
The and speaker cables might have shorted. Set the STANDBY/ON switch to STANDBY, and check the speaker connections.
Sound output stops suddenly and the level meter lights are blinking.
The protection circuit might have activated due to high temperature, excessive load or another cause. Set the STANDBY/ON switch to STANDBY, check the power and speaker connections, and wait several minutes before setting it to ON again. If this unit is becoming hot, increase the amount of space between it and walls and other devices to increase the dissipation of heat.
Automatic power saving caused the unit to enter standby.
Set the STANDBY/ON switch to STANDBY once and then set it to ON again.
Amplifier
Rated output. 115 W + 115 W
(4Ω,1kHz,THD 0.8%)
70W + 70W
(8Ω,1kHz,THD 0.8%)
Allowable speaker impedance 4-8Ω
Total harmonic distortion. 0.002%
(8Ω,1kHz,1W,JEITA)
S/N ratio (input short)
LINE IN 110 dB
(8Ω, 1 kHz, IHF-A)
Frequency response 10 Hz - 50 kHz (-5 dB)
(8Ω, 1 kHz, 1 W, JEITA)
Headphones output
Connector. 3.5mm (1/8") 4-pole stereo mini jack
Maximum output level 360 mW + 360 mW
(into 32Ω load, THD 10%, JEITA)
Frequency response. 5 Hz - 150 kHz (-3 dB)
Distortion 0.003%
(30mW output into 32Ω load, JEITA)
S/N ratio. 115 dB
Compatible impedance range 16-600Ω
Analog inputs
LINE connectors 3 pairs
Maximum input level. 2.5 Vrms
Input impedance. 10 kΩ or more
XLR connectors. 1 pair
Maximum input level. 3 Vrms
Input impedance. 10 kΩ or more
General
Power supply
Model for Europe. AC 220-240 V, 50/60 Hz
Model for USA/Canada AC 120 V,60 Hz
Power consumption
Models for Europe and USA/Canada 56 W
External dimensions (W × H × D , including protrusions)
290 × 81.2 × 264 ~mm (11 1 / 2^ × 31 / 4^ × 101 / 2^ )
Weight 4.2 kg (9 3/8 lb)
Operating temperature range +5^ to +35^
Operating humidity range. 5% - 85% (no condensation)
Storage temperature range. -20^ to +55^
Included accessories
Power cord × 1
Remote control (RC-1332) × 1
Batteries for remote control (AAA) × 2
Owner's manual (this document, including warranty) × 1
-
For information about the warranty, users living in the USA and Canada should see pages 44-45 and the back cover (warranty document). Users living in Europe and other regions should see page 45.
-
Design and specifications are subject to change without notice.
- Weight and dimensions are approximate.
- Illustrations in this manual might differ slightly from production models.
CAUTION
RISK OF ELECTRIC SHOCK DO NOT OPEN
ATTENTION : POUR RÉDUIRE LE RISQUE D'ÉLECTROCUTION, NE RETIREZ PAS LE CAPOT (OU L'ARRÊRE). AUCUNE PIECE INTERNE N'EST RÉPARABLE PAR L'UTILISATEUR. CONFIEZ TOUTE RÉPARATION À UN SERVICE APRES-VENTE QUALIFIÉ.

Warranty provisions (United States and Canada only)
Length of Warranty
The parts and labor warranty will be effective for one (1) year from the date of the original purchase for products not used for commercial purposes. For products used commercially, the warranty is ninety (90) days for magnetic heads and optical pickups, one (1) year for all other parts and ninety (90) days for labor.
Who Is Covered Under This Warranty
This warranty is valid only in the United States or Canada, dependent upon the country in which original purchase was made, and enforceable only by the original purchaser within the country in which the purchase was made.
This warranty is not valid if the product was purchased through an unauthorized dealer.
What Is Not Covered Under This Warranty
- Damage to or deterioration of the external cabinet.
- Damage resulting from accident, misuse, abuse, or neglect.
- Damage resulting from failure to follow instructions contained in the products owners' manual or otherwise provided with the product.
- Damage occurring during shipment of the product (Claims must be presented to the carrier).
- Damage resulting from the repair or attempted repair by anyone other than TEAC or an authorized TEAC service station.
- Damage resulting from modification or attempted modification of product not authorized by TEAC.
- Damage resulting from causes other than product defects, including lack of technical skills, competence, or experience of the user.
- Damage to any unit that has been altered or which the serial number has been defaced, modified or removed.
What TEAC Will Pay For
TEAC will pay all labor and material expenses for items covered by the warranty. Payment of shipping charges is covered in the next section.
How To Obtain Warranty Service
Your unit must be serviced by an authorized TEAC service station within the country in which the product was purchased. If you are unable to locate an authorized service station in your area, please contact TEAC at the applicable address shown at the end of this warranty statement. PLEASE DO NOT RETURN YOUR UNIT TO TEAC WITHOUT OUR PRIOR AUTHORIZATION. You must pay shipping charges if it is necessary to ship the product for service. However, if the necessary repairs are covered by warranty, we will pay the return shipping charges to any destination within the country in which the product was purchased. Whenever warranty service is required, you must present the original dated sales receipt, or other proof indicating the purchase place and date, as proof of warranty coverage.
LIMITATION OF IMPLIED WARRANTYES
ALL IMPLIED WARRANTYES, INCLUDING WARRANTYES OF MERCHANTABILITY AND FITNESS FOR A PARTICULAR PURPOSE, ARE LIMITED IN DURATION TO THE LENGTH OF THIS WARRANTY.
EXCLUSION OF DAMAGES
TEAC'S LIABILITY FOR ANY DEFECTIVE PRODUCT IS LIMITED TO REPAIR OR REPLACEMENT OF THE PRODUCT, AT TEAC'S OPTION. TEAC SHALL NOT BE LIABLE FOR DAMAGE BASED UPON INCONVENIENCE, LOSS OF USE OF THE PRODUCT, INTERRUPTED OPERATION, COMMERCIAL LOSS OR LOST PROFITS, OR ANY OTHER DAMAGES, WHETHER INCIDENTAL, CONSEQUENTIAL, PUNITIVE OR OTHERWISE.
SOME STATES OR PROVINCES DO NOT ALLOW LIMITATIONS ON HOW LONG AN IMPLIED WARRANTY LASTS AND/OR DO NOT ALLOW THE EXCLUSION OR LIMITATION OF INCIDENTAL OR CONSEQUENTIAL DAMAGES, SO THE ABOVE LIMITATIONS AND EXCLUSIONS MAY NOT APPLY TO YOU.
THIS WARRANTY GIVES YOU SPECIFIC RIGHTS, AND MAY VARY FROM SOME OF THE RIGHTS PROVIDED BY LAW. THESE RIGHTS MAY VARY FROM STATE TO STATE OR PROVINCE TO PROVINCE.
This product is subject to the legal warranty regulations of the country of purchase. In case of a defect or a problem, please contact the dealer where you bought the product.
In countries/regions other than the USA, Canada and Europe
This warranty gives you specific legal rights, and you may also have other rights that vary by country, state or province.
If you have a warranty claim or request, please contact the dealer where you bought the product.

- Integrated Amplifier
- CAUTION
- WARNING
- Precautions concerning batteries
- Model for USA
- Declaration of Conformity
- Information
- Model for Canada
- Model for Europe
- For European Customers
- Disposal of electrical and electronic equipment and batteries and/or accumulators
- Maintenance
- Using the TEAC Global Site
- Placement precautions
- Using the remote control
- Precautions for use
- Installing batteries
- When to replace batteries
- Precautions when connecting speakers
- ATTENTION
- How to connect speakers
- Confirm that the cable is fastened securely by gently pulling the cable.
- Connecting with banana plugs
- Notice about the European model
- A Analog audio input connectors (LINE 1, LINE 2, LINE 3, XLR)
- B Power inlet (~IN)
- Complete all other connections before setting the STANDBY/ON switch to ON.
- C Maintenance port
- A STANDBY/ON switch
- B PHONES jack
- C INPUT SELECTOR knob
- Remote control signal receiver
- E Level meters
- F VOLUME knob
- a STANDBY/ON button
- b Input selection buttons
- C METER button
- d MUTE button
- e DIMMER button
- f VOLUME (+ / - ) buttons
- Minimize the volume.
- Set the STANDBY/ON switch to ON.
- Turn the INPUT SELECTOR knob to select the input source.
- Operatetheplaybackdevice.
- Adjust the volume.
- Automatic power saving function
- Turning automatic power saving on and off
- Press the remote control STANDBY/ON button to put the unit into standby.
- Press and hold the remote control STANDBY/ON button for three seconds.
- Muting playback
- Changing level meter operation
- Restoring default settings
- General
- The unit does not turn on.
- No sound is output.
- Remote control does not work.
- A television set or another device operates in error.
- Noise occurs.
- There is a humming noise.
- There is no sound from one side of the headphones.
- The level meter lights are blinking and no sound is output.
- Sound output stops suddenly and the level meter lights are blinking.
- Automatic power saving caused the unit to enter standby.
- Amplifier
- Headphones output
- Analog inputs
- Included accessories
- Warranty provisions (United States and Canada only)
- Length of Warranty
- Who Is Covered Under This Warranty
- What Is Not Covered Under This Warranty
- What TEAC Will Pay For
- How To Obtain Warranty Service
- LIMITATION OF IMPLIED WARRANTYES
- EXCLUSION OF DAMAGES
- In countries/regions other than the USA, Canada and Europe
Brand : TEAC
Model : 505
Category : Audio Amplifier