
TOA60E - Countertop oven CUISINART - Free user manual and instructions
Find the device manual for free TOA60E CUISINART in PDF.
| Product type | Countertop oven / Air fryer mini-oven |
| Brand | Cuisinart |
| Model | TOA60E |
| Power supply | 220-240 V ~ 50/60 Hz |
| Cooking functions | Air fry, Bake, Roast and pizza, Broil, Toast and panini, Toast, Keep warm |
| Maximum temperature | 230 °C |
| Timer | Yes, with automatic shut-off (beep at end of cycle) |
| Included accessories | Air fry basket, Rack, Baking pan, Crumb tray |
| Number of rack positions | 2 positions |
| Interior light | Yes, interior light button |
| Cord storage | Yes, at the back of the appliance |
| Maintenance and cleaning | Hand wash accessories (not dishwasher safe); clean exterior with damp cloth; do not use abrasive cleaners |
| Safety | Automatic safety door shut-off; hot surfaces – do not touch; do not leave unattended |
| Warranty | 3 years against manufacturing defects (standard replacement) |
| Spare parts and repairability | Product not repairable; no repair parts available; accessories available up to 5 years after purchase |
| Usage | Indoor household use only |
| Required safety distance | 10 cm all around the appliance |
| Surface temperature of adjacent furniture | Must withstand a temperature increase of at least 85 °C |
Frequently Asked Questions - TOA60E CUISINART
User questions about TOA60E CUISINART
0 question about this device. Answer the ones you know or ask your own.
Ask a new question about this device
Download the instructions for your Countertop oven in PDF format for free! Find your manual TOA60E - CUISINART and take your electronic device back in hand. On this page are published all the documents necessary for the use of your device. TOA60E by CUISINART.
USER MANUAL TOA60E CUISINART
CAREFULLY READ ALL THE INSTRUCTIONS BEFORE USING THE APPLIANCE AND KEEP IN A SAFE PLACE FOR FUTURE REFERENCE.
- WARNING: very hot surfaces.
-
DO NOT TOUCH hot surfaces as possible injury could occur. Always use the handle.
-
THIS IS AN ATTENDED APPLIANCE. Do not leave unattended during use, unplug after each use. Never leave the appliance unattended when switched on or plugged in.
- Any adjacent furniture must be able to withstand a minimum temperature rise of 85^ , above the ambient temperature of the room it is located in, whilst in use. This appliance requires 100mm clearance around the front, back and sides of the appliance.
- Certain types of vinyl or laminate kitchen furniture are particularly prone to heat damage or discolouration at temperatures even below the guidelines given above. Any damage caused by the appliance being installed in contravention of these instructions, will be at the liability of the owner. You should not use this appliance to store items on or as a work surface.
- Do not use the appliance near or under combustible materials like curtains or furniture.
- This appliance is not intended for use by persons with reduced physical, sensory or mental capabilities, or lack of experience and knowledge unless they have been given supervision or instruction concerning use of the appliance by a person responsible for their safety.
-
Children should always be supervised to ensure that they do not play with this appliance.
-
To avoid burns, use extreme caution when removing accessories from the Air Fryer Mini Oven, or disposing of hot grease.
- This appliance is for indoor, domestic use only and is not intended to be used in applications such as: staff kitchen areas in shops, offices and other working environments; farmhouses; by customers in hotels, motels and other residential type environments; bed and breakfast type establishments.
- Do not use the appliance if the supply cord is damaged. In the event of supply cord damage, discontinue use immediately. If the supply cord is damaged it must be replaced by the manufacturer. Return the appliance to the Customer Care Centre (see "International guarantee" on page 116). No repair must be attempted by the consumer.
- Do not wrap the supply cord around the main body of the appliance during or after use.
- Do not leave the supply cord hanging over the edge of a kitchen table or worktop.
- Do not allow the supply cord to come into contact with sources of heat.
- Do not place any of the following materials in the Air Fryer Mini Oven: paper, cardboard, plastic and similar products.
- As the outer surfaces may get hot when the appliance is in use, take care not to allow the appliance surfaces to come into contact with other heat sensitive surfaces.
- Always unplug the appliance from the mains outlet and allow to cool before cleaning.
- Use recommended temperature settings for all cooking, baking, roasting and air frying.
-
Do not rest cooking utensils or baking dishes on the glass door.
-
Always ensure the baking tray is in place, when cooking with the oven rack to protect the heating elements from condensation, grease and crumbs.
WARNING: Placing the oven rack in position 1 or 2 with the rack upwards, while toasting, may result in a fire.
ELECTRICAL SAFETY
- Always ensure the voltage to be used corresponds with the voltage on the appliance, this is indicated on the bottom of the housing.
- The appliance is not intended to be operated by means of an external timer or separate remove control system.
- Always disconnect the appliance from the electric supply if it is left unattended and before assembling, disassembling or cleaning.
- Never pull the plug out of the mains socket by the supply cord.
- Always ensure that your hands are dry before touching the supply cord or removing the plug from the mains socket.
GENERAL SAFETY
- Ensure all packaging materials and any promotional labels or stickers are removed from the appliance before first use.
- Always inspect the appliance before use for noticeable signs of damage. Do not use if damaged, or if the appliance has been dropped. In the event of damage, or if the appliance develops a fault, contact the Cuisinart Customer Care Line (see "International guarantee" on page 116)
- Before switching on the appliance ensure that the selected plates are correctly fitted and locked into position.
- Do not use the appliance for anything other than its intended use.
- Do not touch hot surfaces; use the handles whilst the
appliance is switched on and during cooling time.
- Position the Air Fryer Mini Oven on a stable, level, heat resistant surface near a power socket.
- Do not place anything on top of the appliance while it is operating or while it is hot.
- Do not wrap food in plastic film, polythene bags or metal foil during cooking. This may cause damage to the cooking plates and create a fire hazard.
- Do not use accessories or attachments with this appliance other than those recommended by Cuisinart.
- Do not place the appliance on or near a hot gas or electric burner or place in a heated oven.
- Never leave the appliance unattended when switched on or plugged in.
- Periodically check all parts before use. If any part is damaged DO NOT USE.
- To avoid injury or possible fire, do not cover the appliance when in use.
- To protect against fire, electric shock or personal injury, do not immerse the housing base, cord or plug in water or other liquids or place in a dishwasher.
- To disconnect, turn the control to the off setting and then remove the plug from the mains.
- Switch off and unplug the appliance after use.
- Unplug from the mains when not in use and before cleaning. Allow to cool completely before fitting or removing parts and before cleaning the appliance.
- This appliance can be used by children aged from 8 years and above and persons with reduced physical, sensory or mental capabilities or lack of experience and knowledge if they have been given supervision or instruction concerning use of the appliance in a safe way and understand the hazards involved.
Children shall not play with the appliance. Cleaning and user maintenance shall not be made by children unless they are older than 8 and supervised.
- Keep the appliance and its cord out of reach of children less than 8 years.
- We recommend carefully washing the accessories by hand, as they are not suitable for dishwasher use.
NOTE: Some condensation may form on the outside of the oven, which may cause water droplets on the worktop.

WARNING: Polythene bags over the product or packaging may be dangerous. To avoid danger of suffocation, keep away from babies and children. These bags are not toys.
This product complies fully with all appropriate EU and UK legislation and the standards relevant with this type and class of appliance. We are an ISO9001:2015 certified company that continually evaluates our Quality Management System Performance. If you have any queries regarding product safety and compliance, please contact our Customer Services Department (see "International guarantee" on page 116).
Disposing of electrical and electronic appliances at the end-of-life
This symbol on the product or on the packaging indicated that this product may not be treated as household waste. Instead it should be handed over to the appliance collection point for the recycling of electrical and electronic equipment. By ensuring this product is disposed of correctly you will help prevent potential negative consequences for the environment and human health which could otherwise be caused by inappropriate waste handling of the product. For more detailed information about the recycling of this product, please contact your local council office or your household waste disposal service.
2. INTRODUCTION
Congratulations on your purchase of the Cuisinart Air Fryer Mini Oven.
For over 30 years Cuisinart's aim has been to produce the very finest kitchen equipment. All Cuisinart products are engineered for exceptionally long life and designed to be easy to use as well as to give excellent performance day after day.
To learn more about our products and for recipe ideas visit our website www.cuisinart.eu
3.PRODUCT FEATURES (refer to cover)
- Power Light
- On/Oven Timer Dial
- Oven Temperature Dial
- Function Dial
- On/Toast Dial
- Interior Oven Light Button
- Pull-Out Crumb Tray
- AirFryer Basket
- Oven Rack
- Baking Tray
- Safety Auto Off Door Switch (Not Shown)
- Cord Storage (Not Shown)
4. USE
Before using your AirFryer Mini Oven for the first time, ensure all packaging is removed and it's placed on a flat surface. All accessories should be cleaned thoroughly (see Cleaning & Maintenance Section).
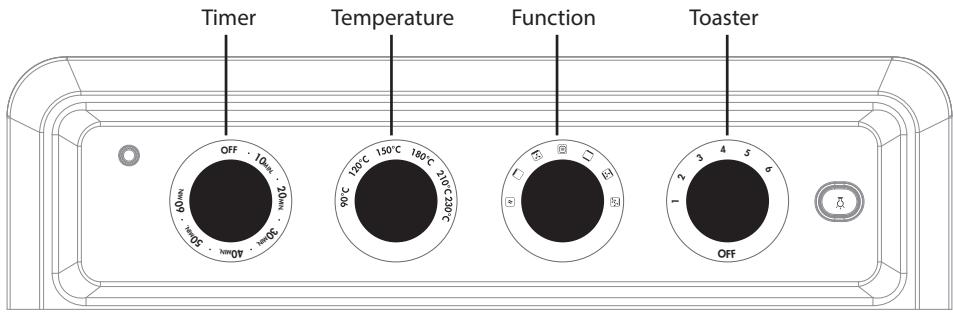
AirFryer Mini Oven Controls
AirFryer Mini Oven Functions
AirFry
This function is used to AirFry meals, as a healthy alternative to deep frying in oil. The AirFry function uses a combination of hot air, high fan speed and 2 upper heating elements to prepare a variety of meals, that are both delicious and healthier than traditional frying.
Use the provided air fryer basket onto the oven rack for air fry function. Use the rack position 2 (see table for rack positions).
Bake
Baking is recommended for a variety of foods that you would normally prepare in your oven. Baked goods that require a gentler cooking method, like cakes, muffins and pastry, provide best results when using the bake function.
Use the baking tray for all baking requirements. Use rack position 1 for all fresh food and rack position 2 for all frozen foods (see table for rack positions).
Roasts & Pizzas
The roasts & pizza function uses a fan to circulate heated air around for food to cook faster and is used for roast meats, such as chicken, pork and beef. It can also be used for pizzas, vegetables and baked goods such as scones and bread.
Use the baking tray for all cooking requirements, using this function. Use rack position 1 for all fresh food and rack position 2 for all frozen foods (see table for rack positions).
Grill
The grilling function can be used to cook meat such as beef, chicken pieces, pork chops, sausages and burgers. It can also be used when cooking fish. Use rack position 2 for grilling (see table for rack positions).
Paninis & Toasties
The paninis & toasties function can be used when making paninis, toasties and for browning casseroles and gratins.
Use rack position 2 for all cooking requirements, using this function (see table for rack positions).
Toast
Always use the oven rack, in position 2 (see table for rack positions), for even toasting. Always position any food for toasting in the middle of the rack.
| Symbol | Function | Application |
| ~ | Keep warm | Use this function to keep cooked food warm. Can be used for food cooked using other appliances, such as pancakes or waffles. |
| Paninis & Toasties | The Paninis & Toasties function can be used for browning and to grill flat foods. Use for gratins, cheese toppings, toasted sand-wiches and bacon. Fan slowly works for this function. | |
| Grill | The Grill function can be used to cook meat such as beef, pork, lamb chops, sausages and burgers. Also, fish and kebabs. | |
| Toast | The Toast function can be used for toasting. Use for bread, crumpets and bagels. Fan slowly works for this function. | |
| Bake | The Bake function can be used as a conventional oven for traditional baking. Use for pies (sweet & savoury), quiches, (including blind baking) cakes, muffins, pastries, soufflés, meringues and baked fruits. Also use when cooking frozen foods. Fan slowly works for this function. | |
| Roasts & Pizza | The Fan-Assisted Bake function can be used for the cooking of baked items. Use for pizzas, roasted vegetables, scones, bread loaves and cookies. Also used for roast meats such as chicken, beef, lamb and pork. | |
| Airfry | The AirFry function can be used for frying foods, using little to no oil, for healthier cooking. These include chicken wings, calamari rings, fish gou-jons, french fries, potato wedges, vegetable crisps. |
Oven Rack and Pan Position Diagrams
Please refer to the diagrams below for oven rack positions:
| POSITION 1 FOR BAKING | ||
| POSITION 2 FOR BAKING NOTE: For chicken or other large items, the pan or rack can be in Position 1, as shown above. | ||
| POSITION 2 FOR GRILLING AND AIRFRYING | PARTS | |
| AirFryer Basket | ||
| POSITION 2 FOR TOASTING | Oven Rack Baking tray/Drip Tray |
WARNING: Placing the oven rack in position 2 with the rack upwards, while toasting, may result in a fire.
NOTE: The oven rack can be used upside down.
To position the baking tray and the oven rack, they have to be slightly inclined, in order to avoid damaging the hook.
Using The Different Functions
N.B: Ensure the crumb tray is in place and there is nothing in the oven, before switching on.
AirFry
Place the air fryer basket onto the oven rack - air fry in rack position 2. Set the function dial to air fry and set the temperature dial to the desired temperature. Turn the timer dial to the desired cooking time, to turn the oven on and begin air frying.
The oven power light will illuminate. The timer will ring once when the cycle is complete and the oven will power off, when the time expires.
To stop airfrying, turn the timer dial to the off position.
For cooking guidelines for airfrying, see chart on page 25.
Bake or Roasts & Pizzas
Fit the baking tray or oven rack into either rack position.
Set the function dial to bake or roasts & pizzas. Set the temperature dial to the desired temperature. Then turn the timer dial to the recommended cooking time, to turn on the oven. It's recommended to preheat the oven for 5 minutes, prior to baking delicate items, such as cakes and muffins. (Incorporate this time into the total baking time).
The power light will illuminate. The timer will ring once when the time has expired and the cycle is complete and the oven will power off, when the time expires.
To stop baking mid-cycle, turn the timer dial to the off position.
Grill or Paninis & Toasties
Place the air fryer basket on top of the baking tray, to grill, in rack position 2. Set the function dial to either grill or paninis and coasties. Set the temperature dial to the desired temperature. Then turn the timer dial to the desired cooking time to turn on the oven and begin grilling. The power light will illuminate. The timer will ring once, when the cycle is complete and the oven will power off, when the time expires.
To stop grilling, turn the timer dial to the off position.
Keep Warm
Fit the provided baking tray or oven rack, to rack position 2. Set the temperature dial to the desired temperature and then select keep warm, on the function dial. Then turn the timer dial to the desired time, to start the oven and begin warming.
The power light will illuminate. The timer will ring once, when the cycle is complete and the oven will power off, when the time expires.
To stop warming, turn the timer dial to the off position.
Toast
Fit the oven rack into rack position 2. If toasting two items, centre them in the middle of the oven rack. Four items should be evenly spaced – two in the front and two in the back. Six items should be evenly spaced – three in the front and three in the back.
Set the function dial to toast and then set the temperature dial to the desired temperature. Turn the toaster dial to the desired shade setting from 1 to 6, within the marked settings to turn on the oven and begin toasting. The oven power light will illuminate. When completed, the time will ring and turn off.
To stop toasting, turn the toaster dial to the off position.
5. HINTS & TIPS
Airfrying Tips:
- Airfrying is a healthyl alternative to frying. Many foods that can be fried, can be airfried without using excess amounts of oil. Airfried foods will taste lighter and less greasy, than deep-fried foods.
- Most oils can be used for airfrying. Olive oil is preferred for a richer flavour. Vegetable, canola or grapeseed oil is recommended for a mild flavour.
- Distribute oil evenly on food, to achieve the crispiest and most golden results. Oil can be sprayed or brushed onto foods for airfrying. Alternatively, olive oil and non-stick cooking sprays can be used.
- An assortment of coatings can be used on air fry foods. Some examples of different crumb mixtures include: breadcrumbs, seasoned breadcrumbs, panko breadcrumbs, quinoa and various flours.
- Most foods do not need to be flipped during cooking, but larger items, like chicken fillets, should be flipped halfway during cooking to ensure quick, even cooking and browning.
- When air frying large quantities of food, that crowd the pan, toss food halfway through cooking, to ensure even cooking and colouring.
- Use higher temperatures for foods that cook quickly, like bacon and chips and use lower temperatures for foods that take longer to cook, likebreaded chicken.
- Foods will cook more evenly, if they are cut to the same size.
- Line the baking tray with aluminum foil, for easier cleaning.
- Please note that when most foods cook, they release water. When cooking large quantities for an extended period of time, condensation may build up, which could leave moisture on your countertop.
Baking Tips:
- Select bake for more delicate items like custards, cakes and eggs.
- Most baked goods, as well as larger items like chicken, are cooked in rack position 1.
- Use the baking tray in rack position 1 for fresh pizza. For frozen pizza, place directly onto the oven rack, in position 2, to cook.
Convection Baking Tips:
- Select bake for more delicate items like custards, cakes and eggs.
- Most baked goods, as well as larger items like chicken, are cooked in rack position 1.
- Use the baking tray in rack position 1 for fresh pizza. For frozen pizza, place directly onto the oven rack, in position 2, to cook.
Roasts & Pizzas Tips:
- Select roasts & pizzas for baked goods, which require even browning, such as scones and breads, as well as for roasts and poultry. Roasts & pizzas is also perfect for baking evenly browned and crispy homemade pizzas.
-
Most recipes recommend reducing heat or temperature by 3 - 4^, when convection baking.
-
Always check to ensure food is cooked properly, at least 10 minutes before the end of the suggested cooking time.
Grilling Tips:
- For best results, use the provided air fryer basket, fitted inside the baking Tray, to grill.
- Never use glass oven dishes to grill.
- Be sure to keep an eye on food – items can burn easily, when grilling.
6. CLEANING & MAINTENANCE
- Before first use and after every use, clean each part thoroughly.
Always allow the oven to cool completely before cleaning.
Always unplug the oven from the mains. - Do not use abrasive cleaners, hard implements or a scourer, as this may cause damage to the finish. Simply wipe the exterior with a clean, damp cloth and dry thoroughly. Apply the cleaning solution to a cloth, not directly onto the Air Fryer Mini Oven, before cleaning.
- To clean the interior, use a damp cloth and a mild liquid soap solution or a spray, onto a sponge. Never use harsh abrasives or corrosive products. These could damage the oven surface. Never use steel wool pads or metal scourers on the interior of the oven.
- The oven rack, baking tray, air fryer basket and crumb tray should be handwashed in hot, soapy water. They are NOT dishwasher safe.
- After cooking greasy foods and after your oven has cooled, always clean the top interior of the oven. If this is done on a regular basis, your oven will perform like new. Removing the grease will help keep the tasting consistent, cycle after cycle.
- To remove crumbs, slide out the crumb tray and discard crumbs. Wipe clean and replace. To remove baked on grease, soak the tray in hot, sopay water. Never operate the oven without the crumb tray in place.
- Never wrap the cord around the outside of the oven. Use the cord storage cleats on the back of the oven.
N.B. Do not use abrasive cleaners, hard implements or a scourer, as this may cause damage to the non-stick coating.
7. AIRFRYING GUIDELINES
The chart below lists recommended cooking times and portions, for various types of foods that can be airfried in the Air Fryer Mini Oven. If portion sizes exceed recommendations, you can toss occasionally while cooking to ensure the crispiest, most even results. Smaller amounts of food may require less time. For best air fry results, use the oven light to regularly check on food.
| Food | Temperature | Time |
| Bacon | 200°C | 6 – 8 mins |
| Chicken Wings | 200°C | 20 – 25 mins |
| Sausages | 200°C | 12 mins |
| Fresh Calamari Rings | 200°C | 9 mins |
| Fresh Scampi | 200°C | 10 mins |
| Frozen Appetizers – e.g. Mozerella Sticks, etc | 200°C | 5 – 7 mins |
| Frozen Chicken Nuggets | 200°C | 10 mins |
| Hand-Cut Fries | 200°C | 10 – 20 mins |
| Hand-Cut Chips | 200°C | 10 – 20 mins |
| Vegetable Chips – Sweet Potato, Beetroot & Parsnip | 200°C | 10 – 15 mins |
| Frozen Fries | 230°C | 15 – 25 mins |
| Frozen Chips | 230°C | 10 – 15 mins |
1. VEILIGHEIDSWAARSCHUWINGEN (ORIGINELE INSTRUCTIES)
LEES ALLE INSTRUCTIES ZORGVULDIG DOOR VOORDAT U HET APPARAAT GAAT GEBRUIKEN EN BEWAAR ZE GOED, ZODAT U ZE LATER KUNT RAADPLEGEN.
Grill of panini's & tosti's
6. LIMPEZA E MANUTENÇÂO
MeCTax, HeIOCTyINbIX MlaJeHcAm I DeTAM. DaHHbIe NaKeTbI He ngpyuSha!
Данhoe Издени NOЛНOCьTO COOTBETCTByeT BCEM npimehЯembIM 3akOHODaTeNbHbIM aKTam ECи BeINko6pHTaHn,a TaKxe CTaHdApTAM,OTHOCSUIMCk K 3tOMy TIny n KIacCy np6OpOB.Ha7a KOMpaHnA cepTnΦnucropoBaHa B COOTBETCTBn CO CTaHdApTOM ISO9001:2015,oppeJEnJIoUm Tpe6ObaHnK CnCTeme ynpaBHeHnKaueCTBOM,3ΦΦeKTHBHOCTb KOTOpO HaxOДNTcnoI IOCTOAHhBM KOHTPOJeM.EcIn y Bac eCTb KaKneJIb6O BONPOCSbl OTHCOnTEbHo 6e3OpacHocTn PpoDyKcNn IIn ee COOTBETCTBn Tpe6ObaHnM,OBpaTntEcB OtDeI O6CnyXuBaHnKlneHTOB (cm. pa3deI «MeKdyHapOJa rapaHTn》,ctp.116).
Yttnn3aun OTXOIOB 3JeKtpnueCKoro N 3JeKtpoHHoro 6OpUdoBaHnno OKOHuaHn cPoka Cnyx6bl
Данны симboл на TOBape пли Ha erо упakOBke OЗначаET,чTO np6Op He cIeIyET Bbl6paCbIbA Tb C 6blTOBbIMN OTXODAMN.ВмecTo 3TOTO erO cIeIyET cIaTb B COOTBeTCTByUoIиpyHKTc6opa n ytlin3aunn əJIeKtpnueCKoro n əJIeKTPoHNO6obopyOBOHANIA.ObecneuBaJn HADJIeKaUyO ytlin3aunIOdaHNO rnp6opa, Bbl cNoC06CTByeTe ppeDOrBpaUeHIO BO3MOxHBIX HeRaTHBbIX NocIeDCTBn DЯ OkpykaUoIeCpeDbI N 3dOpOBbY cheLOBeka, KOTOpbIe B npOTNBHom clyuaeMOryt 6blTb Bbl3BaHbl HeInpaBnIbHbIM O6paUeHnEM COTcLyuKWBsIM np6Opom.DЯ NOlyuEHHa 6OJIe Pndpo6Hoi
3aneKaHne n npriroTOBJIe HnIcIbI
PnuroTOBneHne TOCTOB
Дя равhoeрноюжаринTOCTOB BCERda nCNoIb3yTe peWEtky dYXOBKN B NOLOXeHIN 2 (cM. tabniu dy Bbl6opa noLoXeHn peWeTkn).Bce npOdyktbl nJa npriroTOBHeHn TOCTOB cIeNyET KnaCTb nocepeniHne peWeTkn.
PeWeTky dIa IyXOBKn MoXHO NcNoJIb3OBAtB b NepeBepHyToM BnIe.
YtO6bl yCTaHOBNb IpoTnBeHb npeWetky dIyDxOBKn, INX Heo6xOdImo CnerKa HaKIOHNTb, YtO6bl He NOBpeINb KpIouOK.
Kak nonb30BaTbcpa3nHbIMn fynkunmN
N.B: Ipeep TeM, KaK BkIIOuHTb KOHBeKUHOHHyO MmHN-ryXOBKy, npOBepbTe, yCTaHOBJIeH IIN JOtOK IЯсбОа КpoшЕ; npOdyKtbl He DoJIKhbl HaxOДNTbCBA DxyOBKe B MOMENT BKJIQUeHnI.
Kohbekun
PnIb nnPiHaHHuTOCTbl
Прии NCIOЛьЗОВAHи ржима «гриь» NOCTaBbTe ceTky-KOP3Hny Ha npOTnBeHb, yCTaHOblHbI B NOLOXeHne 2. UctahOBIne pyUk hyacTpoKn ΦyHKcNи B NOLOXeHne «Гриь» IIN « ПанHHи N ToCTbI «. YCTaHOblte pyUk peYunlpOBKn TempeApTypbI Ha xJenaembl yOPObeHb HarpeBa. YTO6bl BKIIQUHTb DxOVBKy n HauTaB pIoUeCC npIROTOBLeHnry, yCTaHOblte pyUk TaI Mepa Na XeJaemoe BpEma. 3aRopNTc CBeTOBn DaTUnK NOdKlUChENr np6bopa K cETn. По ZabepSeHnцклпnpIROTOBJIeHn Taimep npOZBOHnT ODNH pa3, И NO INCTeueHn 3aDaHHoro BpEmeHn DuxOBKa BbIKLIOuNTcR.
YTo6bI OCTaHOBnTb IpoUeCC rOToBKn B pexIMe rPnIb, NOBepHnTe pyuKy TaMepa B NIOJoxHeNc «Off» («BbIKl.»)
Повдержанецтени.
UctaHOBtne npotmbHeB nnn peWetky dYxOBKn B noJooKeHne 2. UcTaHOBnTe pyKy perynipOBKn TEMpePaTpybHa Jxenaembl ypoBeH hArpeBa N BbI6epnte YHKnIO NOdEprKaHne Tenna C NOMOsbIO pUyKn HAcTPOKn KfYHKnI. UTo6bl BKNIOuHTb dYxOBKy n Haatb PpOceC, BbI6epNTe
XeIaEmyIO npOOnJxNtJIbHOCTb NODepXaHnT TePNa C NOMOuO pyUKN TaIMepa.
3aropntcBcETOBdAaTnKnoKnIouHn np6opa K cetn. IIO 3aBepHeHH nKJIa taMep npO3BOHNT OINH pa3, IN IO NCTeueHHn 3aDaHHOro BpeMeHH duXOBKa BbIKIouHTcN.
YTo6bI OCTaHOBnTb IpoUeCC NpOdEprKaHnA TcNla, NOBepHnTe pyuKy TaMepa B NpOJxHeNc «off» («BbIKL.»)
PpIroTOBHeHne TOCTOB
UctahOBITE peeETky dYXOBKN B NOJoxHeNE 2. EcnBbI NOJkapNBaTe 2 TocTa, NOJoxNTE IN NOCTy peeETKn. EcnBbl roTOBnTE OJHOBPemHNO 4 TOCTa, paCNOJoxNtE IN HA OJINHaKOBOM paccToHHn Ipyr OT dpyra, DBA BVpeDen IN DBA c3aDi. Ppr noJxapNBaHN 6 TOCTOB IN TAKKe CJeNyET paCNOJoxNtB Ha paBHOM pacCTOAHNN, TPr BVpeDen IN TPr c3aDi.
UctaHOBtpe pyKu HacTPOkN FyHKcB IN NOLOKeHne TocTeP N 3aTeM UcTaHOBtpe pyKu perynpObKN TemnepaTypbHa JKeJaembl yPoBeHb HarpeBa. TTo6bI BkInouHTb dYxOBKY n HaatbTpnpuroBLeHne TOCTOB, BOCNoJIb3yIeTcb pyKo HAcTPOkN TOCTepa: Bbl6epnte Heo6XoDmyIO CTeneHb NdoJXapINBaHnraTOCTOB,OT 1 Do 6,BpaMKax npedymotpeHHbx HAcTpoE.K. 3arOpNTcCBETOBo DNATNK NpOKLIOUeHn pnp6opa K cetn. IIO 3aBepeHn CzIKla npriroTOBLeHn rTOCTOB TaIMep np03BOHNT OOnH pa3, IN DxyOBKa BblKlIOHNTcR.
YTO6bI OCTaHOBnTb npOceCC npriTOBJIeHnT TOCTOB, NOBepHnTe pyuKy TaIMepa dJa TocTepa B noJIOKeHne «off» («ВыIKN.»)
CoBeTbI NO BblneKaHnIO:
Для пиротовлия 6лiod,тpe6уоцх 6олee DeикathorO noDxOda,taknx KaK 3aBapHbIe Kpembl,TopTbI nЯцa,BbIbupaTe pexnM «Выпеканe»
Длгприготовлия 60льшинства xлб66уночьх n3дели, a takke npodyktob 60льшпх pa3меров, taknx kak kypuna, pewetky cneуet yctahabnBaTb B noLOжени 1.
ДлгпргOTOBLEня CBExeи ПИць IncNoIb3yIte npOTnBHe, yCTaHOBLeHbI B NOLOXeHn1.ДлгпргOTOBLEня 3amOpOxeHHOI ПИць NOLOXnTe ee HeNOCpeDCTBeHHO Ha peWeTKy dYxOBKn, uCTaHOBNeHHyU B NOLOXeHn2.
Cobetbno 3aneKaHnIO npuROTOBJeHnIO nuiZbl
Дя Bынеканя npodkykTOB, Tpe6yUOxNx paBHomepHOrO nOpDpyMaHnBaHnry, Taknx KaK 6yIouChn xNe6, a TAKxe ДЯ пи�ROTOBLeHnja XapKOro N PtNUcbl, BbIbnpaIte peXIM «3aNekaHne n ppiroTOBLeHnne NiuCtBu». 3TOT pexm TaKxe NideaIbHo NOxDxODNT DЯ pniroTOBLeHnna DomaShHeN paBHomepHO npoxapeHHo NiuCtbl C xpyCTaIe KOPoYkoN.
B 60JIbIINHCTBe peIeIeNTOB npN KOHBeKUHOHHOM BbIeKaHmpeKOMeHdyETcY MeHbIINTb Tempepaty Ha 3^ - 4^ C.
- KaK MInHmym 3a 10 MInHyT Do OkoHuaHn yKa3aHHoro BpeMeHn peKOMeHnyetc npOKOHtpOnIpOBaTb npOceC npriROToBHeHn 6JIouJa.
CobetbI no npnroTOBneHIO ha rpnle:
Для достинжени Наиунчuxи pezyltaTOB пи rOTOBKe Ha Гпіе BOCNoJIb3yITeCb ceTKoI-KOP3INHO, yCTaHOBuB ee Ha npOTnBEhB.
- Hnkorda He nCnOlb3yIte cTeKJIaHHyIO nocyu npri roTOBKe Ha rpnne.
- He octablan Te npodykTBi 6e3 npncMOtpa: npn nprirotoblen Hn rnpne OHN MOryt Ierko noDropeTb.
6. yXoI N OBCJIyKINBAHNE
ENGLISH: CUISINART guarantees easier contact with its customer services in every country. For details of the customer services in your area, call:
Cuisinart offers you a 3-year warranty. We offer a standard exchange of the appliance (identical or equivalent) during this period. To benefit from the warranty, the original proof of purchase (sales ticket or receipt) must be attached to this warranty slip along with your full contact details. The warranty does not cover damage resulting from misuse, falls, dismantling, or repair by unauthorized persons. This guarantee in no way affects your rights under statutory law.
DEUTsCH: GARANTIE
Open Size: 210x280MM
Fold Size:210x140MM
Number of Page: 126PP (6pcs gate-fold cover+120pcs inside pages) Thread sewing binding
Material: Cover:157gsm gloss art paper
Inside:105gsm gloss art paper
Coating: waterbase varnishing for whole book
Color(Front): 1C(black) + 1C(black)
(Back): 1C(black) + 1C(black)
Date: 19-Apr-2022
Co-ordinator: Astor You/Simon Peng
Hugo Description
PDF version: TOA60E IB-20-333A(0.0)
Hugo Code: LNK 0068 IB-1A1
Operator:Bin
Hugo Diecut:
IRP:AAJ
Hot Stamping:
Spot UV:
Embossing:
Remark:
- ELECTRICAL SAFETY
- GENERAL SAFETY
- Disposing of electrical and electronic appliances at the end-of-life
- INTRODUCTION
- Congratulations on your purchase of the Cuisinart Air Fryer Mini Oven.
- 3.PRODUCT FEATURES (refer to cover)
- USE
- AirFryer Mini Oven Functions
- AirFry
- Bake
- Roasts & Pizzas
- Grill
- Paninis & Toasties
- Toast
- Oven Rack and Pan Position Diagrams
- Using The Different Functions
- Bake or Roasts & Pizzas
- Grill or Paninis & Toasties
- Keep Warm
- HINTS & TIPS
- Airfrying Tips:
- Baking Tips:
- Convection Baking Tips:
- Roasts & Pizzas Tips:
- Grilling Tips:
- CLEANING & MAINTENANCE
- AIRFRYING GUIDELINES
- VEILIGHEIDSWAARSCHUWINGEN (ORIGINELE INSTRUCTIES)
- Grill of panini's & tosti's
- LIMPEZA E MANUTENÇÂO
- 3aneKaHne n npriroTOBJIe HnIcIbI
- PnuroTOBneHne TOCTOB
- Kak nonb30BaTbcpa3nHbIMn fynkunmN
- Kohbekun
- PnIb nnPiHaHHuTOCTbl
- Повдержанецтени.
- PpIroTOBHeHne TOCTOB
- CoBeTbI NO BblneKaHnIO:
- Cobetbno 3aneKaHnIO npuROTOBJeHnIO nuiZbl
- CobetbI no npnroTOBneHIO ha rpnle:
- yXoI N OBCJIyKINBAHNE
- DEUTsCH: GARANTIE
- Hugo Description
Brand : CUISINART
Model : TOA60E
Category : Countertop oven