A HK1 41 ACTIVYS BL - Convection Oven MOULINEX - Free user manual and instructions
Find the device manual for free A HK1 41 ACTIVYS BL MOULINEX in PDF.

User questions about A HK1 41 ACTIVYS BL MOULINEX
0 question about this device. Answer the ones you know or ask your own.
Ask a new question about this device
Download the instructions for your Convection Oven in PDF format for free! Find your manual A HK1 41 ACTIVYS BL - MOULINEX and take your electronic device back in hand. On this page are published all the documents necessary for the use of your device. A HK1 41 ACTIVYS BL by MOULINEX.
USER MANUAL A HK1 41 ACTIVYS BL MOULINEX
Take the time to read all the instructions and refer to the User Guide.
This appliance complies with the regulations and safety conditions in force and with the directives:
- Electromagnetic Compatibility Directive 89/336/EEC as modified by 92/31/EEC and 93/68/EEC.
- Low-Voltage Directive 73/23/EEC as modified by Directives 93/68/EEC.
As for any cooking appliance, do not leave it unattended when in use and keep it out of reach of children at all times.
Given the diversity of applicable standards, if this appliance is to be used in a country other than that in which it is purchased, you should have it checked by an approved service centre.
Do not place the appliance close to a source of heat.
This appliance is not designed to be built in.
Place the appliance on a solid work surface away from water splashes.
Do not carry or move the appliance during use.
Check that the supply voltage matches that indicated on the appliance (alternating current only).
Do not allow the supply cord to hang down or to touch the hot parts of the oven.
Do not pull on the supply cord to unplug the appliance.
Unplug the appliance before any major cleaning or in the event of a thunderstorm.
Always connect the appliance to an earthed socket (16 A).
Only use an extension cable that is in good condition, has an earthed socket and a conductor cross-section at least equal to that of the cord supplied with the appliance.
Check that the electrical system is able to supply an appliance of this rated power.

This electrical appliance operates with high temperatures that could cause burns. Do not touch the metal parts of your oven.
The door and outer surface temperatures are high when the appliance is operating. Use the handles and knobs. Use oven gloves if necessary.
To avoid electric shock, never immerse the supply cord, the socket or the appliance in water or in any other liquid.
Should any part of the appliance catch fire, do not attempt to extinguish it with water. Disconnect the appliance and smother the flames with a damp cloth.
Do not store inflammable materials in the vicinity of the appliance or under the surface on which it is installed.
Never use the appliance if:
- the supply cord is defective,
- It the appliance has fallen to the floor and shows visible signs of damage or does not function correctly.
In either case, the appliance must be sent to the nearest KRUPS approved service centre to eliminate any risk (list attached).
In order to avoid any risk of fire, do not operate the appliance under a wall cupboard, a shelf or near to inflammable materials such as blinds, curtains, hangings, etc.
Do not use the appliance as a source of heating.
Do not place paper, card or plastic in the appliance and place nothing on it (utensils, grids, objects, etc.).
Do not remove the control knobs from the control panel when cleaning it.
Do not insert anything in the ventilation slots and do not obstruct them.
For your own safety, never dismantle the appliance yourself; contact an approved Service Centre for repairs.
Depending on model :
Timer : For times less than 25 minutes, turn the button to 30 minutes and come back to the required time.
Environment protection first!
Your appliance contains valuable materials which can be recovered or recycled.
Leave it at a local civic waste collection point.
This appliance is designed solely for domestic use; any professional or inappropriate use or use not in accordance with these instructions renders the manufacturer's liability and guarantee null and void.
Never line the inside of your oven with aluminium foil.
KEEP THESE INSTRUCTIONS
APPLIANCE CHARACTERISTICS
1 Main indicator lamp
2 Timer setting knob (0 to 120 minutes)
3 Function select knob: Oven
Grill
Grill + Rotisserie
4 Temperature setting knob (100°C to 280°C)
5 Hinged grill element
6 Hinged bottom element
7 Spit support fixing hole
8 Reversible shelf
9 Fixed cord
10 Rotisserie kit (1 spit, 2 spit forks)
11 Spit support
12 Drip pan*
USING THE APPLIANCE
Before using your appliance, read the page, "IMPORTANT PRECAUTIONS".
Before using for the first time
Place your oven on a stable surface.
Remove all self-adhesive labels and protection from inside and outside your oven.

The packaging is recyclable but can be useful to transport the oven or return it to an approved service centre.
Remove the accessories* from the oven (shelf, spit etc.).
Clean oven and accessories with a damp cloth. Dry thoroughly. (Fig A)
Close the door using the handle only. (Fig H)
Connect the cord to an earthed socket. (Fig B)
Set the function selector switch to "oven"(Fig C)
Set the oven thermostat to 280^ (Fig D)
Set the timer to 15 minutes. (Fig E)
The oven will start.

Some smoke may be produced. This is quite normal and will soon disappear with use.

Always use the handle when opening or closing the door.
Stopping the oven
Whatever cooking mode is being used, the oven can be stopped before cooking has finished. To do this, set the cooking time to 0 using the timer.
Oven cooking \*
Insert the shelf at the desired height. (Fig F)
Place your prepared dish of food on the shelf and close the oven. (Fig G) - (Fig H)
Turn the selector knob to "oven" (Fig C)
Turn the thermostat knob to the desired temperature according to your recipe. (Fig D)
Set the timer knob to the desired cooking time. Fig 1)
Cooking will start.
At the end of the cooking time, the oven will turn off automatically.
You can stop the oven before the end of the cooking time by setting the timer to 0.

Your oven is powerful and fast. Preheating is not always necessary.
The door and outer wall temperatures are high when the oven is operating.
Use gloves

For certain dishes, we recommend that:
-
you keep a check on the cooking and do not eat fried food if it is burned; fried food should be just lightly browned, especially chips cooked in your oven,
-
you eat a balanced, varied diet, including large amounts of fruit and vegetables
Grilling
To grill or prepare gratins.
Allow about 4 minutes for preheating.
Place your dish or your meat on the shelf as close as possible to the grill element without the food touching it. (Fig J)
Place your dish or your meat on the shelf as close as possible to the grill element without the food touching it.(Fig J)
Leave the door ajar. (Fig R)
Set the function selector switch to "grill" ^* . (Fig K)
Set the timer knob to the desired cooking time. (Fig L)
The oven will start.
Meat should be turned halfway through grilling (sausages, pork chops etc.).
At the end of the cooking time, the oven will turn off automatically.
Spit roasting under the grill
To cook poultry or meat on the spit.
Fitting the spit:
To install the spit, fit the spit support in the holes on the left wall. (Fig M)
Slide one spit fork along the spit by pressing on its end. Release the end to lock the spit fork in place. (Fig N)
Truss poultry and meat tightly, then skewer them on the spit. Slide the second spit fork into the meat as far along as possible, so that the meat to be roasted is held securely in place. Release the end to lock the second spit fork in place.
Move the first spit fork, if necessary, in order to centre the meat on the spit, and lock the 2 forks in place.
Remove the shelf and insert the drip pan in the oven in the lowest position (guide arrows on the pan). (Fig 0)
Insert the pointed end of the spit into the drive hole in the right wall of the oven and push it home. (Fig P)
Fit the other end of the spit in the support. (Fig Q)
Leave the door ajar. (Fig R)
Set the selector to the position, "grill/rotisserie" (* (Fig S).
Set the timer knob to the desired cooking time.
Cooking will start, and the spit will begin to turn.
At the end of the cooking time, the oven will turn off automatically.

Always leave the door ajar when using the grill function.
CLEANING AND CARE

Do not allow grease to accumulate in the appliance.
Before cleaning or care, allow the oven to cool.
A quick wipe with a sponge is sufficient to clean the outside of the appliance.
Clean the door, enamelled or lacquered surfaces and translucent parts with a damp sponge and a mild detergent. (Fig T)

Do not use aggressive cleaning products (especially soda-based oven cleaners), scouring sponges or abrasive pads.
To facilitate cleaning of the self-cleaning sides after cooking fatty food, heat the empty oven for ten minutes with the thermostat at its maximum setting and with the door closed.
The grill element is hinged but cannot be removed*. (Fig U)
The oven has a hinged bottom element (Fig V) (not removable).
Never attempt to move the heating elements by force.
All accessories* (shelf, pan, rotisserie kit) can be cleaned with water and detergent or put in the dishwasher.
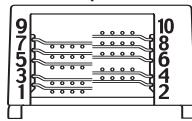
Shelf position
COOKING TABLE
The cooking times below are given by way of indication. They can vary depending on the size, thickness, freshness and initial temperature of the item to be cooked.
| Dish | Temperature setting | Cooking time | Shelf position |
| Chicory with ham | 200/220°C | 20mn | 3 |
| Gratin dauphinois | 220°C | 70mn | 3 |
| Roast pork | 240°C | 75mn | 3 |
| Leg of lamb | 240°C | 60/70mn | 2 |
| Chicken (1.5 kg) | 图 | 80mn | Door ajar. |
| Roast beef | 240°C | 35/40mn | 3 |
| Fish in white wine | 240°C | 15mn | 3 |
| Frozen thin crust pizza | 240°C | 12mn | 5 |
| Cheese soufflé | 220°C | 25/30mn | 2 |
| Vol-au-vents | 180°C | 33/35mn | 3 |
| Individual pies | 180/200°C | 30mn | 4 |
| Quiche Lorraine | 240°C | 20/25mn | 4 |
| Frozen chips 300g | 260°C | 14/16mn | 5 |
| Chicken drumsticks | 240°C | 25/30mn | 4 |
| Stuffed tomatoes | 220/240°C | 35/40mn | 2 |
| Brioche | 180°C | 30/35mn | 2 |
| Raisin cookies | 180°C | 10/15mn | 4 |
| Sponge cake | 180°C | 32/35mn | 2 |
| Crème caramel | 240°C | 30/35mn | 2 |
| Clafoutis | 180°C | 40/45mn | 3 |
| Tarte tatin | 260°C | 20/25mn | 4 |
| Fruit cake | 180°C | 40/45mn | 2 |
| Apple tart | 260°C | 23/25mn | 4 |
| Marble cake | 180°C | 35/40mn | 2 |