SANEHUMIDIFICATEUR2348 - Humidifier DARTY - Free user manual and instructions
Find the device manual for free SANEHUMIDIFICATEUR2348 DARTY in PDF.

User questions about SANEHUMIDIFICATEUR2348 DARTY
0 question about this device. Answer the ones you know or ask your own.
Ask a new question about this device
Download the instructions for your Humidifier in PDF format for free! Find your manual SANEHUMIDIFICATEUR2348 - DARTY and take your electronic device back in hand. On this page are published all the documents necessary for the use of your device. SANEHUMIDIFICATEUR2348 by DARTY.
USER MANUAL SANEHUMIDIFICATEUR2348 DARTY
natural_image
White portable water purifier with digital display and ventilation slots (no visible text or symbols)Photo non contractuelle / Foto is niet bindend / Imagen no contractual / Non contractual photo
text_image
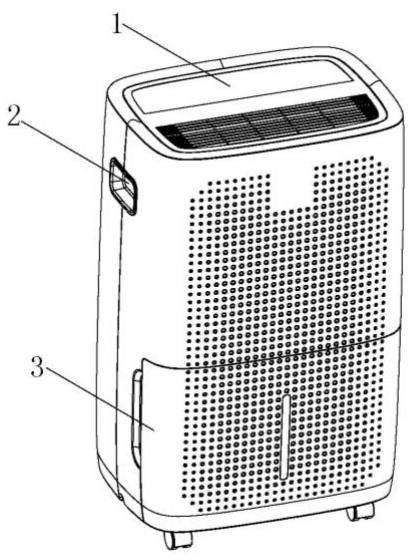
Technical diagram of a portable air purifier with labeled parts 1, 2, and 3
text_image
Technical diagram of an air conditioner unit with numbered parts labeled 4 through 9natural_image
Diagram of a portable air conditioner unit with cooling fins and heat exchanger (no text or symbols)natural_image
Line drawing of hands using a handheld device to lift water from a grid-patterned tray (no text or symbols)natural_image
Line drawing of a hand inserting a component into a device with a grid-patterned panel (no text or symbols)natural_image
Diagram of a perforated container with a small mechanical device above it, no text or symbols presentnatural_image
Line drawing of a portable air conditioner unit with grid-patterned panel and handle (no text or symbols)natural_image
Line drawing of a portable air conditioner unit with cooling fins and attached tubing (no text or symbols)NETTOYAGE ET ENTRETIEN
natural_image
Line drawing of a portable air conditioner unit with side panels showing ventilation grilles (no text or symbols)natural_image
Line drawing of a portable air conditioner unit with cooling fan and control panel (no text or symbols)- Ranger l'appareil
natural_image
Line drawing of a portable air purifier with ventilation grilles and directional arrows indicating airflow (no text or symbols)text_image
Technical diagram of a portable air purifier with labeled parts 1, 2, and 3
text_image
Labeled diagram of an air conditioner unit with numbered parts for identificationnatural_image
Line drawing of a portable air purifier with cooling fan and wheels (no text or symbols)natural_image
Line drawing of a hand using a handheld device to clean or wash a textured surface (no text or symbols)natural_image
Line drawing of a hand inserting a component into a portable air purifier device (no text or symbols visible)natural_image
Technical line drawing of a perforated industrial machine with a small robotic arm attached (no text or symbols)natural_image
Line drawing of a portable air conditioner unit with control panel and door handle (no text or symbols)Continue pompontwatering
natural_image
Line drawing of a portable air conditioner unit with ventilation slots and attached cable (no text or symbols)REINIGING EN ONDERHOUD
natural_image
Line drawing of a portable air conditioner unit with ventilation grilles and side panel (no text or symbols)natural_image
Line drawing of a portable air conditioner unit with cooling fan and control panel (no text or symbols)natural_image
Line drawing of a portable air purifier with ventilation grilles and directional arrows indicating airflow (no text or symbols)text_image
Technical diagram of a portable air purifier with labeled parts 1, 2, and 3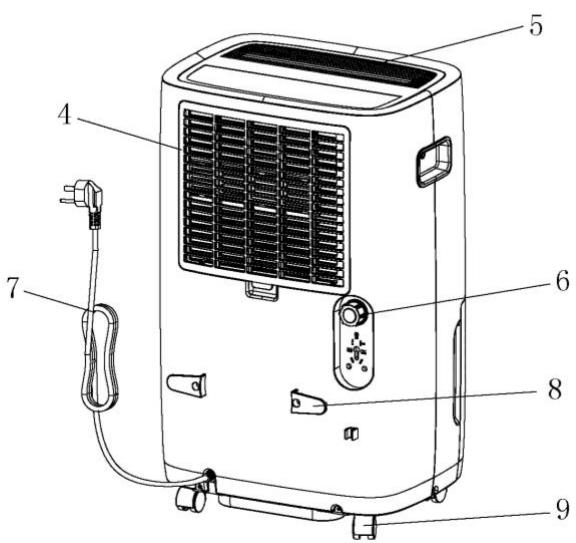
text_image
Technical diagram of an air conditioner unit with numbered parts labeled for identification.natural_image
Line drawing of a portable air conditioner unit with cooling fins and a hand operating it (no text or symbols)natural_image
Line drawing of hands using a handheld device to lift water from a grid-patterned tray (no text or symbols)natural_image
Line drawing of a hand inserting a component into a device with a grid-patterned panel (no text or symbols)natural_image
Technical line drawing of a perforated industrial machine with internal components and mounting bracket (no text or symbols)natural_image
Line drawing of a portable air conditioner unit with grid-patterned panel and handle (no text or symbols)natural_image
Line drawing of a portable air conditioner unit with cooling fins and attached cable (no text or symbols)LIMPIEZA Y MANTENIMIENTO
natural_image
Line drawing of a portable air conditioner unit with side panels showing ventilation grilles (no text or symbols)natural_image
Line drawing of a portable air conditioner unit with cooling fan and control panel (no text or symbols)natural_image
Line drawing of a portable air purifier with ventilation grilles and directional arrows indicating airflow (no text or symbols)IMPORTANT SAFETY INSTRUCTIONS
Read these instructions carefully before using this appliance for the first time and keep them for future use.
WARNING
Do not use any means to accelerate the defrosting process or to clean other than those recommended by the manufacturer.
The appliance must be stored in a room which does not contain any permanently operating ignition sources (e.g. open fires, gas appliances or electric radiators in operation).
Do not pierce or burn.
Caution, refrigerants may be odourless.
The appliance must be installed, operated and stored in a room with a floor area of more than 4 m^2 .
-This appliance may be used by children aged 8 years and older and by persons with reduced physical, sensory or mental capabilities or without experience or knowledge, if they are properly supervised or if they have been given instructions on how to use the appliance safely and if the risks involved are understood.
Children must not play with the appliance.
Cleaning and maintenance by the user must not be carried out by children without supervision.
-Keep the unit and its cable out of the reach of children under 8 years of age.
- The appliance must be installed in accordance with national electrical installation regulations.
- If the power cable is damaged, it must be replaced by the manufacturer, its service department or similarly qualified persons in order to avoid danger.
- For the correct installation of the unit, please refer to the corresponding chapter in the manual.
GENERAL SAFETY INSTRUCTIONS
- Before connecting the unit, make sure that the mains voltage corresponds to the voltage indicated on the unit's rating label.
- Never immerse the unit, power cord or plug in water or any other liquid.
- Place the unit on a stable, level and unobstructed surface to avoid possible vibrations and unpleasant noises.
- Never use the device :
- if the cable or plug is damaged,
- if you notice the slightest malfunction
- if the device has been dropped or damaged.
- Never repair the device yourself: improper repair can pose a serious risk to the user. This device may only be repaired by a qualified service technician.
- Never plug in the unit with wet or damp hands as there is a risk of electric shock.
- Always turn off and unplug the unit before moving it or before cleaning or draining it.
- This appliance cannot be plugged into a power strip with other household appliances or with an extension cord.
- This appliance is intended for domestic use inside your home only, excluding any industrial or commercial use.
- The appliance must be installed in accordance with national electrical installation regulations.
- Do not place this device near a heat source or use it in the presence of explosive or flammable vapours.
- Do not cover the unit with a cloth or place any objects on the unit.
- Make sure that the air inlets and outlets are not obstructed or covered by curtains or hanging clothes.
- The drainage pipe must not be installed outdoors.
- To avoid spilling water, empty the water tank before moving the unit.
- Do not tilt the unit to one side or the other as water may leak out and damage the unit.
- Do not move the unit if there is water in the tank or during operation.
- Do not insert any objects into the water tank or the body of the appliance.
- If you smell smoke when starting up or if you see smoke, immediately unplug the unit from the power outlet.
- The unit must be installed at a distance of 50 cm from a wall or any other object.
- Never leave the appliance unattended within the reach of children, whether it is switched on or off.
- Always unplug your device after use and before cleaning. Never unplug the unit by pulling on the power cord.
- Disconnect the unit from the mains when emptying and cleaning.
- Always empty the water tank before storing the unit.
- This product must not be connected to an external timer or remote control system.
- Do not drink the water collected in the tank.
- Never operate the unit without the filter.
- Operating operations may only be carried out in accordance with the recommendations in this manual.
- The unit must be stored in a well-ventilated area where the floor area is at least the same as the floor area indicated on the product's rating label.
- The appliance must be stored in a room which does not contain permanently burning open fires (e.g. gas appliances) or sources of ignition (e.g. electric radiators in operation).
- The unit must be stored to prevent damage or shock that could release the flammable refrigerant.
- Any person working on a refrigerant system should hold a valid and up-to-date certificate from an industry-accredited assessment authority recognising his competence to handle refrigerants safely in accordance with the assessment specification recognised in the relevant industrial sector.
- Service operations must only be carried out in accordance with the equipment manufacturer's recommendations. Maintenance and repair operations that require the assistance of other qualified persons must be carried out under the supervision of the person competent in the use of flammable refrigerants.
| Logo | Meaning |
 | Flammable refrigerant |
 | Read the user manual |
 | User's Manual: Instructions for use |
 | Service Indicator: Read Service Manual |
text_image
Technical diagram of a portable air purifier with labeled parts 1, 2, and 3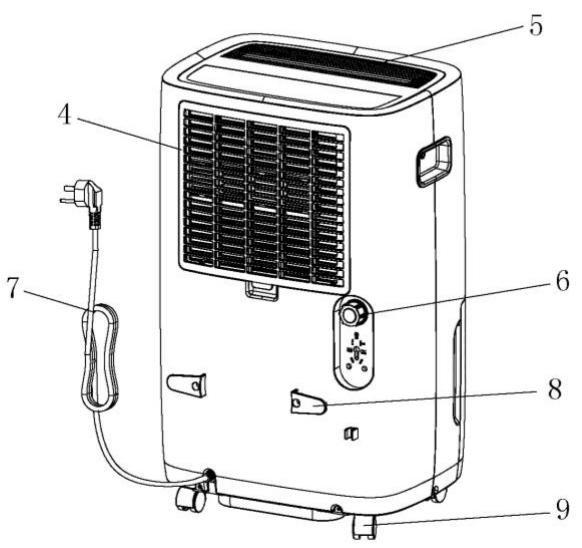
text_image
Technical diagram of an air conditioner unit with numbered parts labeled 4 through 9- Top panel
- Handle
- Water tank
- Filter
- Air outlet
- Drain
- Power cord
- Cable holder
- Casters
text_image
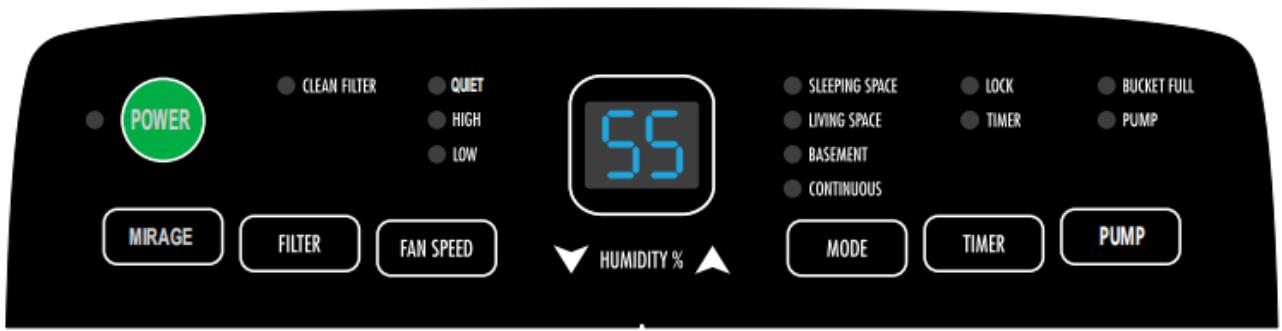
POWER MIRAGE FILTER FAN SPEED CLEAN FILTER QUIET HIGH LOW 55 HUMIDITY % SLEEPING SPACE LIVING SPACE BASEMENT CONTINUOUS MODE TIMER PUMP LOCK TIMER BUCKET FULL PUMPThe above indicator has 3 functions :
- When the unit is plugged in, it indicates the humidity level in the room.
- When you adjust the humidity, it indicates the humidity level you have selected.
- When you program the on/off time of the unit, it displays the times.
- When the ambient humidity is below 20%, it displays 20.
-
When the humidity in the environment is above 90%, it displays 90.
-
Press the "POWER" button to start the system. The default operating mode is 50% humidity and low speed.
- When the wind speed needs to be adjusted, press the FAN SPEED button to obtain a calm, high or low wind speed. When the corresponding indicator light is lit, the current wind speed has been set.
- Press the up or down arrows on the humidity button to adjust the humidity level. The humidity level is set between 35% and 80%, with 5% added and decreased each time.
- Press the "MODE" button to select the following humidity functions: LIVING SPACE (50%) BASEMENT (45%) CONTINUOUS MODE (55%). The corresponding mode indicator light will come on.
- When the dehumidifier is turned off, press the TIMER button to set the timer. The TIMER indicator light will come on and the display will initially show 0.5. Press the up and down arrows to set the time. To cancel the timer function, press the timer button again.
When the dehumidifier is switched on, press the timer button to set the timer stop function. Press the "UP" and "DOWN" buttons to set the timer.
The timer range is set between 0.5-24 hours.
Press the timer button for 3 seconds to activate the key lock function. The lock indicator light will come on and the other buttons will stop working. Press the timer button again for 3 seconds to cancel the key lock function. The lock indicator light goes out.
-
Press the DRIVE button to turn on the front panel display and press again to turn off the front panel display. The front panel display is the same as the top screen display.
-
When the dehumidifier has been running for a total of 250 hours, the filter indicator light will come on, reminding you that the filter needs to be cleaned. Clean the filter.
Once the filter has been cleaned, press the FILTER button and the filter indicator light goes out.
- To start the pump function, press the PUMP button. The PUMP indicator light comes on.
To stop the pump function, press the PUMP button and again. The PUMP indicator light goes out.
EMPTY THE COLLECTED WATER
When the water tank is full, the tank full indicator light will come on. The dehumidifier stops automatically and the buzzer emits 3 beeps to warn the user that the water must be emptied from the tank.
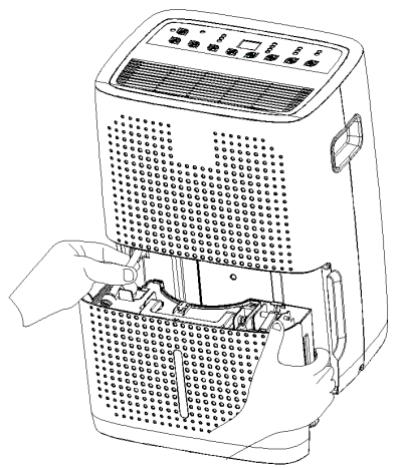
Empty the water tank
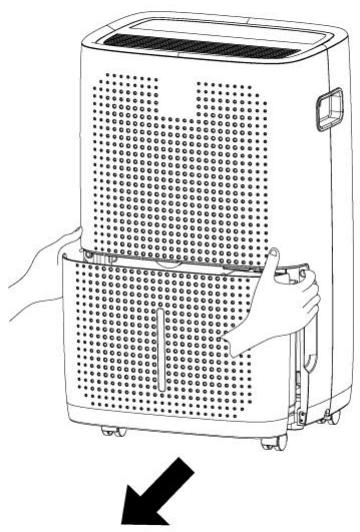
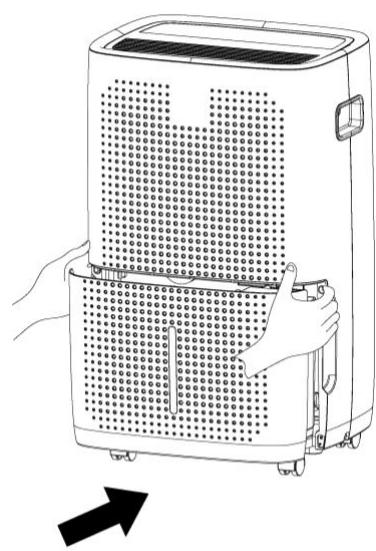
- Press lightly on the sides of the tank with both hands and gently remove the tank.
natural_image
Illustration of a portable air purifier with hands operating it, showing heat dissipation (no text or symbols)natural_image
Line drawing of a hand using a handheld device to lift a perforated material (no text or symbols)- When replacing the water tank in the appliance, first place the suction hose of the water pump in the square hole of the water tank cover with your left hand and then press the drain tank firmly into position with both hands.
natural_image
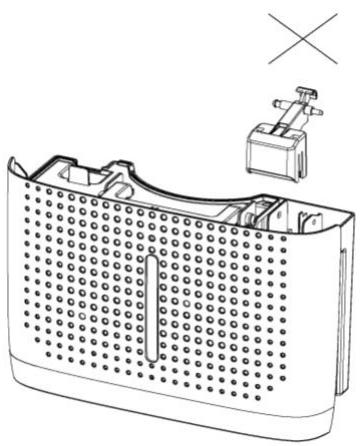
Line drawing of a hand inserting a component into a device with a grid-patterned lid (no text or symbols)CAUTION: Do not remove the float from the water tank. The water level sensor will no longer be able to correctly detect the water level without the float and water may run out of the water tank.
natural_image
Technical line drawing of a mechanical component with perforated surface and mounting bracket (no text or symbols)- If the tank is dirty, wash it with cold or lukewarm water. Do not use detergent, scouring pads, chemically treated dust cloths, gasoline, benzene, thinner, or other solvents, as they can scratch and damage the tank and cause water leakage.
- When replacing the water tank, press firmly on the tank with both hands. If the tank is not positioned correctly, the "TANK FULL" sensor will be activated and the dehumidifier will not operate.
natural_image
Line drawing of a portable air conditioner unit with grid-patterned panel and control panel (no text or symbols)Continuous pump drainage
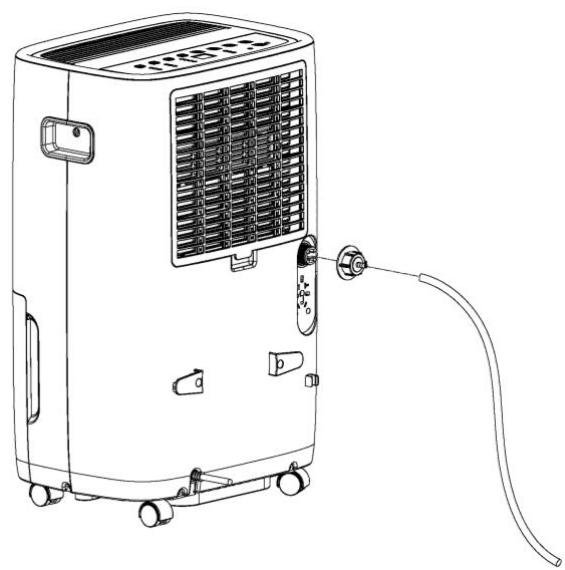
Before using the pump function for continuous drainage, make sure that the hose is properly connected to the hole at the back of the dehumidifier (6). Place the other end of the hose in a sink or container large enough to hold a large amount of the collected water.
When the pump function is activated and the tank is full, the pump starts to empty the water for 90 seconds and then stops.
natural_image
Line drawing of a portable air conditioner unit with cooling fins and attached cable (no text or symbols)CLEANING AND MAINTENANCE
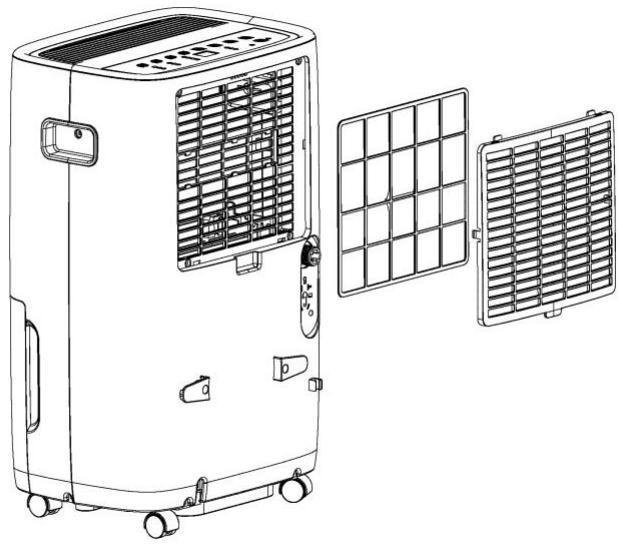
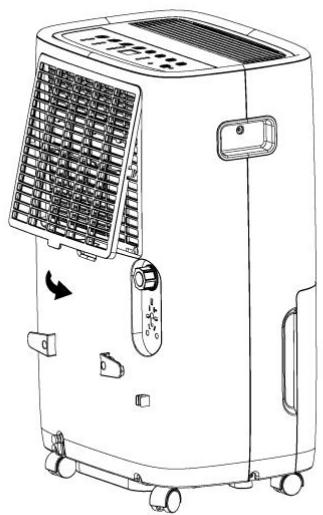
- To clean the main body
Wipe it with a soft, damp cloth.
- To clean the air filter
- First open the inlet grate and wash it with water. Let it air dry.
natural_image
Line drawing of an air conditioning unit with ventilation grilles and fan compartments (no text or symbols)- Attach the air filter and gently insert the filter into the grill.
natural_image
Line drawing of a portable air conditioner unit with cooling fan and control panel (no text or symbols)- Storing the unit
When the unit is not used for a long period of time and you wish to store it, please follow these steps :
-
Empty the remaining water in the tank.
-
Fold back the power cord and put it in the water tank. Make sure the tank is dry.
- Clean the air filter.
- Store in a cool, dry place.
INSTALLATION
Empty the water tank before each use of the appliance.
The appliance must remain in an upright position for at least 24 hours before it is put into operation. This period must be observed if the appliance has been transported.
When using the appliance, doors and windows must be kept closed to prevent energy loss.
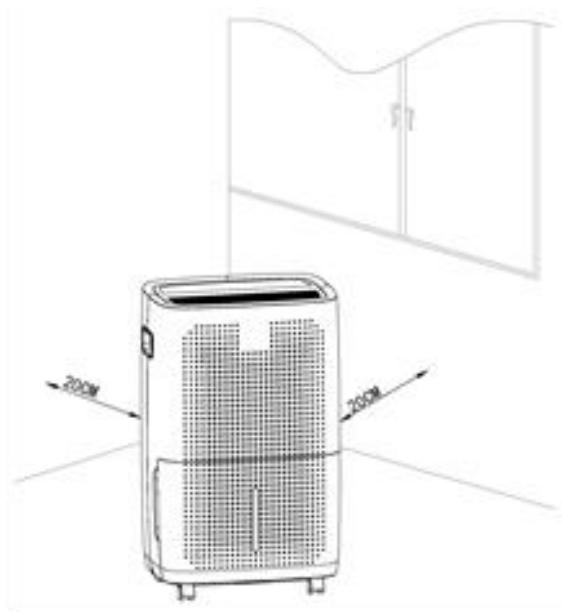
Install the unit in an upright position on a flat, stable and dry surface as shown in the sketch below :
Observe the following minimum distances :
20 cm minimum on front / back and sides
natural_image
Line drawing of a portable air purifier with ventilation grilles and directional arrows indicating airflow (no text or symbols)Do not place the unit against a wall or near curtains or any other flammable material.
Do not place the unit near a radiator or other heat sources, or on a heated carpet or floor.
Do not use this appliance in the kitchen, toilet, or bathroom.
Make sure that the power cord is arranged so that no one can get in the way of it.
TROUBLESHOOTING
| Problem | Possible causes | Solution |
| The device does not work. | Has the power cord been disconnected? | Plug the power cord into the power outlet. |
| Is the full tank indicator light flashing? (The tank is full or in a bad position). | Drain the water into the drain tank and reposition the tank. | |
| Is the room temperature higher than 35°C or lower than 5°C? | The protective device is activated and the device cannot be started. | |
| Dehumidification function does not work. | Is the air filter clogged? | Clean the air filter according to the instructions in the manual. |
| Is the intake or exhaust duct obstructed? | Remove the obstruction from the exhaust or intake duct. | |
| No air is released. | Is the air filter clogged? | Clean the air filter according to the instructions in the manual. |
| The device is noisy. | Is the unit tilted or unstable? | Place the unit on a stable and solid surface. |
| Is the air filter clogged? | Clean the air filter according to the instructions in the manual. |
| Code E1 is displayed | Abnormal exhaust pipe temperature sensor | Check the exhaust pipe temperature sensor and the associated circuit |
| Code E2 is displayed | Capteur de température de la bobine anormal | Check coil temperature sensor and associated circuitry |
| Code EH is displayed | Anomalie du capteur d'humidité | Check humidity sensor and associated circuitry |
| Code E5 is displayed | Panne de pompe | Check for abnormal water pump and wiring. |
INFORMATION REGARDING SERVICE OPERATIONS
1. Checking the zone :
Before starting work on systems containing flammable refrigerants, safety checks are necessary to ensure that the risk of ignition is kept to a minimum. When repairing the refrigeration system, the following precautions must be observed before carrying out work on the system.
The work is undertaken in accordance with a controlled procedure so as to minimize the risk of the presence of flammable gases or vapours during the performance of the work.
2. General work area
All maintenance personnel and other persons working in the local area must be informed of the nature of the work being carried out. Work in confined spaces should be avoided. The area around the workspace should be isolated. It must be ensured that the conditions in the area have been secured by controlling flammable materials.
3. Checking for the presence of refrigerant
The area must be checked with a suitable refrigerant detector before and during work to ensure that the technician is aware of potentially flammable atmospheres. Ensure that the leak detection equipment used is suitable for use with flammable refrigerant, i.e. non-sparking, properly sealed or intrinsically safe.
4. Presence of fire extinguishers
If work involving heat is to be carried out on refrigeration equipment or its associated parts, suitable fire protection equipment must be available within easy reach. A dry powder or CO2 fire extinguisher must be available near the loading area.
5. Absence of ignition sources
No person carrying out work in connection with a refrigeration system which involves the exposure of any piping system containing or having contained a flammable refrigerant shall use ignition sources in such a way that they may result in a fire or explosion hazard. All possible sources of ignition, including cigarette smoke, must be kept at a sufficient distance from the site of installation, repair, removal and disposal, during which time flammable refrigerant may possibly be released into the surrounding space. Before work begins, the area around the equipment must be inspected to ensure that there is no risk of fire or ignition. No Smoking" signs must be posted.
6. Ventilated areas
Make sure the area is outdoors or sufficiently ventilated before entering the system or operating a hot wok. A certain degree of ventilation must be maintained during the work. Ventilation must safely disperse any refrigerant released and preferably expel it to the outside into the atmosphere.
7. Refrigeration equipment checks
When electrical components are modified, they must be suitable for their intended use and meet the correct specification. At all times, the manufacturer's maintenance and service guidelines must be followed. If in doubt, consult the manufacturer's technical service for assistance.
The following controls must be applied to installations using flammable refrigerants :
- the size of the charge as a function of the size of the room in which the rooms containing the refrigerant are installed;
- machines and ventilation outlets are working properly and are not obstructed.
8. Electrical device checks
Repair and maintenance of electrical components should include initial safety checks and component inspection procedures. If there is a defect that could compromise safety, no electrical supply shall be connected to the circuit until it has been satisfactorily remedied. If the defect cannot be rectified immediately but it is necessary to continue operation, a suitable temporary solution must be used. This situation shall be reported to the owner of the equipment so that all parties are informed.
Initial security checks should include :
- that the capacitors are discharged: this must be done in a safe way to avoid any possibility of sparks;
- that no live electrical components or wiring are exposed when charging, recovering or purging the system;
- that there is continuity of grounding.
9. Repairs to hermetic components
When repairing sealed components, all power supplies must be disconnected from the equipment being worked on before any removal of sealed covers, etc.
If it is absolutely necessary to have a power supply for the equipment during servicing, some form of continuously operating leak detection should be located at the most critical point to warn of a potentially hazardous situation.
Particular attention must be paid to the following points to ensure that when working on electrical components, the enclosure is not modified in such a way that the level of protection is affected. This includes damage to cables, excessive number of connections, terminals not conforming to the original specifications, damage to seals, incorrect installation of cable glands, etc.
Make sure that the device is mounted securely.
Make sure that seals or sealing materials have not degraded to the extent that they are no longer used to prevent the ingress of flammable atmospheres. Spare parts must comply with the manufacturer's specifications.
NOTE: The use of silicone sealant may impair the effectiveness of some types of leak detection equipment. It is not necessary to isolate intrinsically safe components before working on them.
- Repair of intrinsically safe components
Do not apply any permanent inductive or capacitive load to the circuit without making sure that it will not exceed the permitted voltage and current for the equipment being used.
Intrinsic components are the only types on which you can work under voltage in the presence of a flammable atmosphere.
Replace components only with parts specified by the manufacturer. Other parts may cause the refrigerant to ignite in the atmosphere due to leakage.
- Wiring
Check that the wiring will not be subject to wear, corrosion, excessive pressure, vibration, sharp edges or any other adverse environmental effects. The check also takes into account the effects of aging or continuous vibration from sources such as compressors or fans.
- Detection of flammable refrigerants
Under no circumstances should potential ignition sources be used in the investigation or detection of refrigerant leaks. A halide torch (or any other detector using an open flame) must not be used.
- Leak detection methods
The following leak detection methods are acceptable for systems containing flammable refrigerant.
Electronic leak detectors shall be used to detect flammable refrigerants, but sensitivity may not be adequate or may require recalibration (detection equipment shall be calibrated in a refrigerant-free area). Ensure that the detector is not a potential source of ignition and that it is suitable for the refrigerant used.
Leak detection liquids are suitable for most refrigerants, but the use of detergents containing chlorine should be avoided, as chlorine can react with the refrigerant and corrode copper pipes.
If a leak is suspected, all open flames must be removed/extinguished.
If a refrigerant leak requiring brazing is found, all refrigerant must be recovered from the system. Oxygen Free Nitrogen (OFN) must then be purged from the system before and during the brazing process.
14. Withdrawal and evacuation
When introducing refrigerant into the refrigerant circuit for repair - or for any other purpose - conventional procedures must be used. However, it is important to follow best practices, as flammability is a factor to consider. The following procedure must be followed :
Remove refrigerant;
Purge the circuit with an inert gas ;
Evacuate ;
Purge again with an inert gas ;
Opening the circuit by cutting or soldering.
The refrigerant charge must be recovered in the appropriate recovery cylinders. The system must be "flushed" with DNF to make the unit safe. This process may need to be repeated several times. Compressed air or oxygen should not be used for this task.
Flushing should be carried out by breaking the vacuum in the system with the FOD and continuing to fill until the working pressure is reached, then venting to atmosphere, and finally reducing the vacuum. This process must be repeated until there is no more refrigerant in the system. When the final charge of NFO is used, the system must be vented to atmospheric pressure to allow the work to proceed.
This operation is absolutely essential to be able to carry out brazing operations on the piping. It must be ensured that the vacuum pump outlet is not close to a source of ignition and that ventilation is available.
15. Loading procedures
In addition to the standard underwriting procedures, the following requirements must be complied with.
-Make sure that there is no contamination of the different refrigerants when using the charging equipment. Pipes or lines should be as short as possible to minimize the amount of refrigerant they contain.
- Cylinders shall be held in an upright position.
- Ensure that the refrigeration system is grounded before charging the system with refrigerant.
- Label the system when loading is complete (if it has not already been done).
- Care must be taken to ensure that the refrigeration system is not overloaded.
Before recharging the system, it must be pressure tested with the NFA. The system must be leak tested at the end of charging but before commissioning. A follow-up leakage test must be carried out before leaving the site.
16. Decommissioning
Before performing this procedure, it is essential that the technician is thoroughly familiar with the equipment and all its details. It is recommended that all refrigerants be recovered safely. Before performing the task, a sample of oil and refrigerant must be taken in case an analysis is required before
reusing the recovered refrigerant. It is essential that electrical power is available before the task is started.
Familiarise yourself with the equipment and how it works.
a) Electrically isolate the system.
b) Before beginning the procedure, ensure that: mechanical handling equipment is available, if repaired, to handle the refrigerant cylinders; all personal protective equipment is available and used properly; the recovery process is supervised at all times by a competent person; the recovery equipment and cylinders comply with the appropriate standards.
c) Pump the refrigeration system, if possible.
d) If a vacuum is not possible, make a manifold so that the refrigerant can be removed from the different parts of the system.
e) Make sure that the cylinder is located on the scale before recovery takes place.
f) Start the recovery machine and operate it according to the manufacturer's instructions.
g) Do not overfill cylinders (no more than 80% liquid charge).
h) Do not exceed the maximum working pressure of the cylinder, even temporarily.
i) When the cylinders have been properly filled and the process is complete, ensure that the cylinders and equipment are removed from the site promptly and that all equipment isolation valves are closed.
j) The recovered refrigerant must not be charged into another refrigeration system unless it has been cleaned and checked.
17. Labelling
Equipment must be labelled to indicate that it has been taken out of service and emptied of refrigerant. The label must be dated and signed. Make sure the equipment is labelled to indicate that the equipment contains a flammable refrigerant.
18. Recovery
When removing refrigerant from a system, whether for maintenance or decommissioning, it is recommended that all refrigerant be removed safely.
When transferring refrigerant into cylinders, ensure that only suitable refrigerant recovery cylinders are used. Ensure that the correct number of cylinders are available to hold the full system charge. All cylinders to be used are designed for the recovered refrigerant and labeled for that refrigerant (i.e. special cylinders for refrigerant recovery). Cylinders must be complete with the overpressure value and associated closing values in good working order. Empty recovery cylinders shall be evacuated and, if possible, cooled before recovery takes place.
The recovery equipment shall be in good working order and shall include a set of instructions concerning the equipment available and shall be suitable for the recovery of flammable refrigerants.
In addition, a set of calibrated scales shall be available and in good working order. Pipes must be complete with leak-free disconnecting couplings and in good condition.
Before using the recovery machine, make sure that it is in good working order, that it has been properly maintained and that all associated electrical components are sealed to prevent ignition in the event of a refrigerant leak. If in doubt, consult the manufacturer.
The recovered refrigerant must be returned to the refrigerant supplier in the correct recovery cylinder and the corresponding waste transfer note must be made out. Do not mix refrigerants in the recovery units and especially not in the cylinders.
If compressors or compressor oils must be removed, ensure that they have been drained to an acceptable level to ensure that flammable refrigerant does not remain in the lubricant. The evacuation process must be completed before returning the compressor to the suppliers. Only electrical heating of the compressor body should be used to speed up this process. The oil change in a system must be carried out safely.
TECHNICAL CHARACTERISTICS
Power supply : 220-240 V\~, 50 Hz
Power : 460W
Dehumidification capacity : 30L/day
WARRANTY
This product is warranted for a period agreed upon with the distributor from the date of purchase against failure due to defects in workmanship or material. This warranty does not cover defects or damage resulting from improper installation, improper use or abnormal wear and tear of the product.
The unit must be returned in its original packaging and accompanied by the sales receipt provided that it has been handled properly. Therefore, please observe the above operating and safety instructions. Furthermore, we will not be able to guarantee your device if you or a third party has carried out modifications or repairs.
SELECTIVE COLLECTION OF ELECTRICAL AND ELECTRONIC WASTE
Electrical products must not be disposed of with household products. According to the European Directive 2012/19/EU for the disposal of electrical and electronic equipment and its implementation in national law, used electrical products must be collected separately and disposed of at the collection points provided for this purpose. Please contact your
local authority or dealer for recycling advice.