H12 PRO - Stick vacuum DREAME - Free user manual and instructions
Find the device manual for free H12 PRO DREAME in PDF.
User questions about H12 PRO DREAME
0 question about this device. Answer the ones you know or ask your own.
Ask a new question about this device
Download the instructions for your Stick vacuum in PDF format for free! Find your manual H12 PRO - DREAME and take your electronic device back in hand. On this page are published all the documents necessary for the use of your device. H12 PRO by DREAME.
USER MANUAL H12 PRO DREAME
FOR PURCHASING THIS DREAM WET AND DRY VACUUM.
Registration Quick Start
Welcome to register a Dreame account by scanning the QR code. You are available for the User Manual and Special Offers.

With it you are obtaining a high quality product that is engineered for optimal performance.
If you have any questions on the product, please contact us: aftersales@dreame.tech.
Contents
EN User Manual 001
HE 021
SA 041
Safety Information
Important Safety Instructions For Household Use Only
- Please read this manual carefully before use and retain it for future reference.
- When using an electrical appliance, basic precautions should always be followed, including the following:
- READ ALL INSTRUCTIONS BEFORE USING (THIS APPLIANCE). Failure to follow the warnings and instructions may result in electric shock, fire and/or serious injury.
WARNING- To reduce the risk of fire, electric shock, or injury:
- Use only as described in this user guide. Use only manufacturer's recommended attachments.
- Use indoors only, on non-carpeted floor surfaces such as vinyl, tile, sealed wood, etc. Be careful not to run over loose objects or the edges of area rugs. Stalling the brush may result in premature belt failure.
- This appliance can be used by children aged from 8 years and above and persons with reduced physical, sensory or mental capabilities or lack of experience and knowledge if they have been given supervision or instruction concerning use of the appliance in a safe way and understand the hazards involved. Children shall not play with the appliance. Cleaning and user maintenance shall not be made by children without supervision.
- This appliance is not intended for use by persons (including children) with reduced physical, sensory or mental capabilities, or lack of experience and knowledge, unless they have been given supervision or instruction concerning use of the appliance by a person responsible for their safety.
- Do not use a flammable or combustible liquid to clean floors.
- Do not use to pick up flammable or combustible liquids, such as gasoline. Do not use in areas where flammable or combustible liquids may be present.
- For the purposes of recharging the battery, only use the detachable adapter provided with this appliance. Use only with
adapter. - An adapter that is suitable for one type of battery pack may create a risk of fire when used with another battery pack.
- Do not immerse the appliance in liquid.
- Plastic film can be dangerous. To avoid the danger of suffocation, keep it away from children.
- Keep hair, loose clothing, fingers, and all parts of the body away from openings and moving parts of the appliance and its accessories.
- Only use the type and amount of liquids specified under the operations section of this guide. Liquid must not be directed towards equipment containing electrical components.
Safety Information
- Do not put any object into openings. Do not use the appliance when any opening is blocked; keep free of dust, lint, hair, and anything that may inhibit air flow.
- Do not use it without filters in place.
- Do not use the appliance with a damaged adapter. If the adapter is damaged, it must be replaced by the manufacturer, its service agent or similarity qualified persons in order to avoid hazards.
- Do not pick up toxic material (chlorine bleach, ammonia, drain cleaner, etc.). Do not pick up hard or sharp objects such as glass, nails, screws, coins, etc.
- Do not use the appliance in an enclosed space filled with vapour given off by oil-based paint, paint thinner, some moth-proofing substances, flammable dust, or other explosive or toxic vapour. Do not pick up anything that is burning or smoking, such as cigarettes, matches or hot ashes.
- Follow all charging instructions and do not charge the appliance outside of the temperature range specified in the battery as doing so increases the risk of fire.
- Charger base output terminals should not be short-circuited. Do not use it with damaged charger base. If the appliance has been dropped, damaged, left outdoors, dropped into water, or is not working as it should, return it to a service center.
- Keep the adapter cable away from heated surfaces. Do not handle the adapter plug or appliance with wet hands. To unplug, grasp the adapter plug, rather than the cable.
- Do not pull or carry adapter by cable, use cable as a handle, close door on cable, or pull cable around sharp edges or corners.
- Switch off when not in use, before cleaning, maintaining or servicing the appliance, and before connecting or disconnecting the tool with a moving brush.
- Do not use an appliance that is damaged or modified. Damaged or modified appliance may exhibit unpredictable behavior resulting in fire, explosion, or risk of injury.
- Do not expose the appliance to fire or excessive temperature. Exposure to fire or excessive temperature may cause an explosion.
- Ensure that the appliance is placed on a horizontal surface. Do not use the appliance at the same position if the appliance is equipped with a brush roller and the handle is not completely upright. Do not store the appliance in a place where it may freeze.
- Use extra care when cleaning on stairs.
- Prevent unintentional starting. Ensure the switch is in the OFF-position before picking up or carrying the appliance. Carrying the appliance with your finger on the switch or energizing appliance that have the switch on invites accidents.
- This product contains batteries that can only be replaced by qualified technicians or after-sales service.
Safety Information
SAVE THESE INSTRUCTIONS IMPORTANT SAFEGUARDS
- Have servicing performed by a qualified repair person using only identical replacement parts. This will ensure that the safety of the product is maintained.
- Do not modify or attempt to repair the appliance excepts as indicated in the instructions for use and care.
- Do not use in extremely hot or cold environments (below 0^ / 32^ or above 40^ / 104^ ). Please charge the appliance in temperature above 0^ / 32^ and below 40^ / 104^ .
- If appliance has been dropped, damaged, left outdoors, dropped into water, or is not working as it should, never attempt to operate it. Please have it repaired at an authorized service center.
D□C detachable supply unit read operator's manual
We, Dreame Trading (Tianjin) Co., Ltd., hereby, declares that this equipment is in compliance with the applicable Directives and European Norms, and amendments. The full text of the EU declaration of conformity is available at the following internet address: https://global.dreametech.com
For detailed e-manual, please go to https://global.dreametech.com/pages/user-manuals-and-faqs
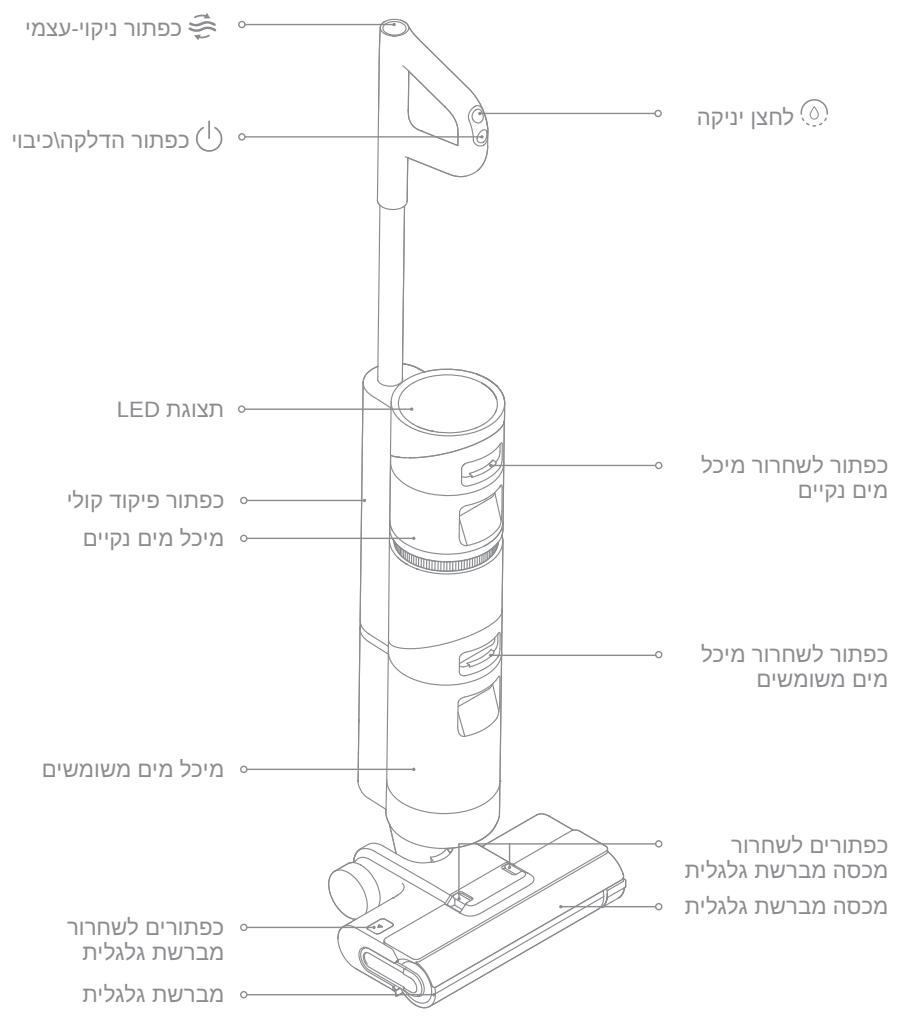
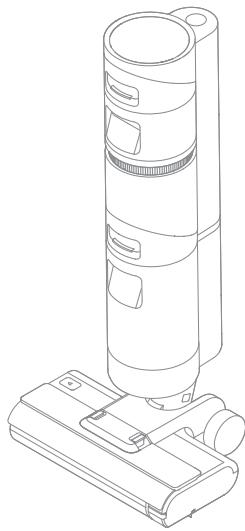
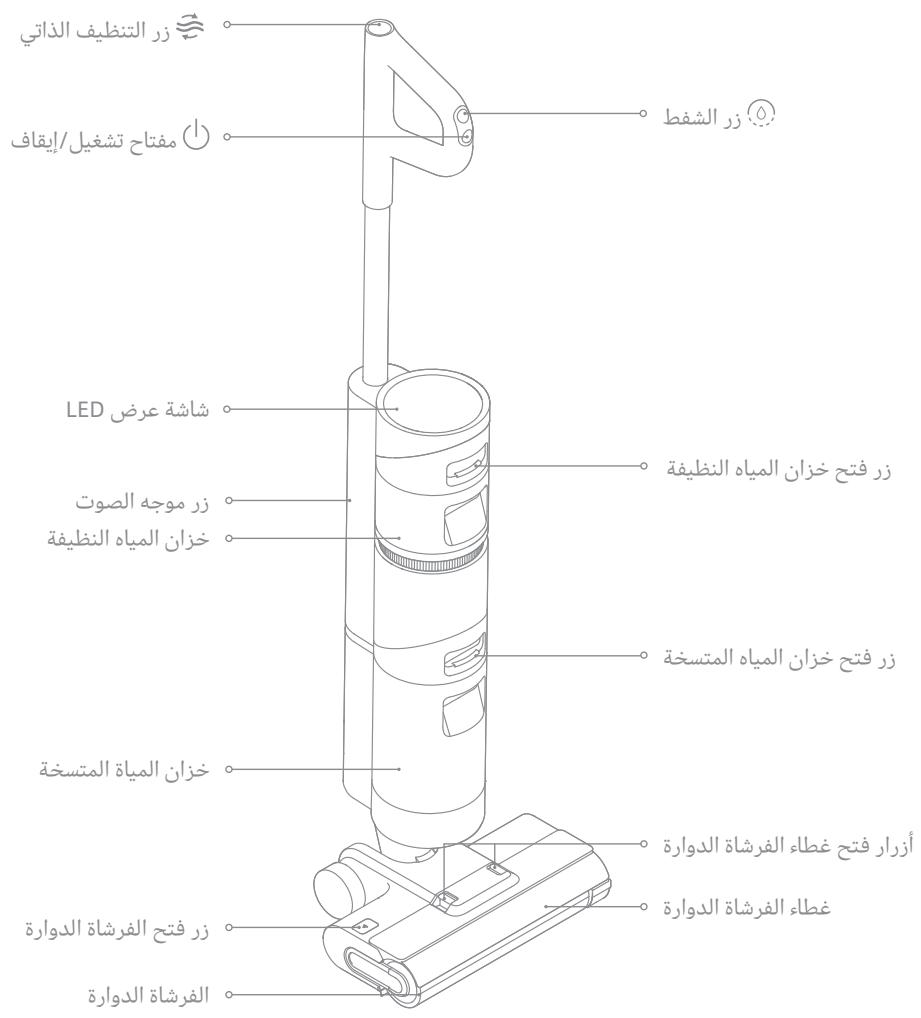
Product Overview
EN
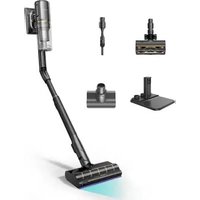
Packing List
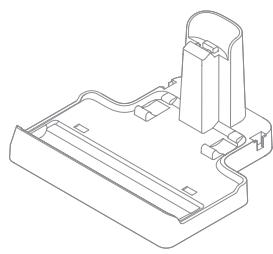
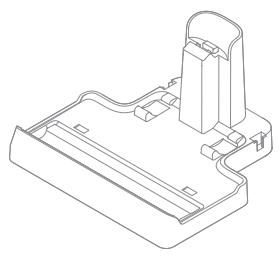
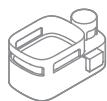
Charging Base
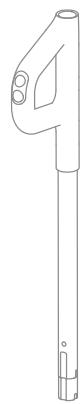
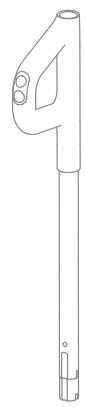
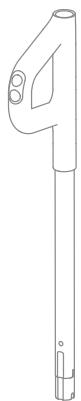
Handle
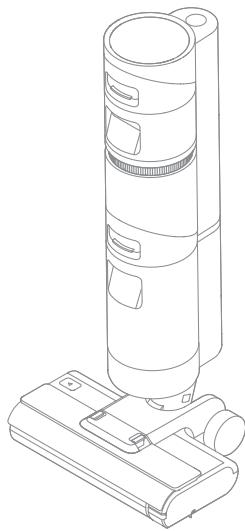
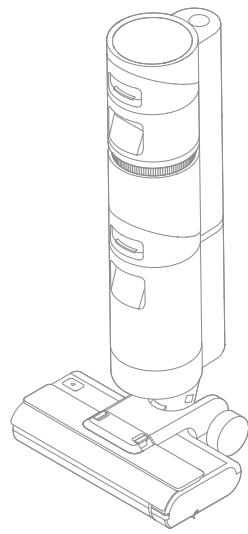
Main Body
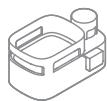

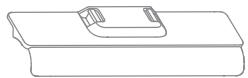
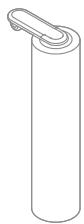
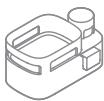
Accessory Holder

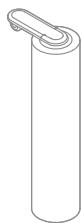
Cleaning Brush

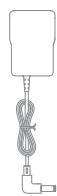
Power Adapter
Spare Brush Roller

Replacement Filter
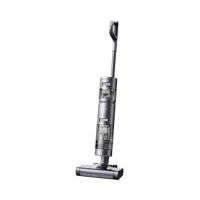
Vacuum
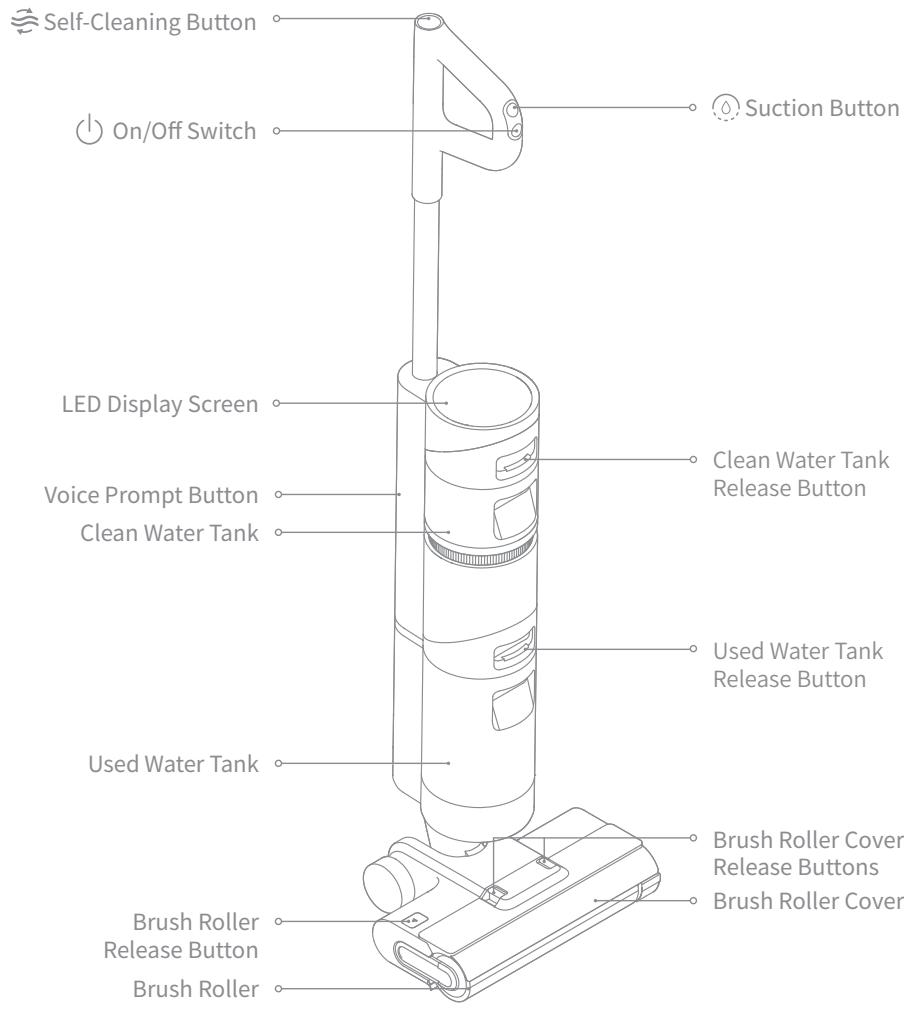
Product Overview
EN
Brush Assembly

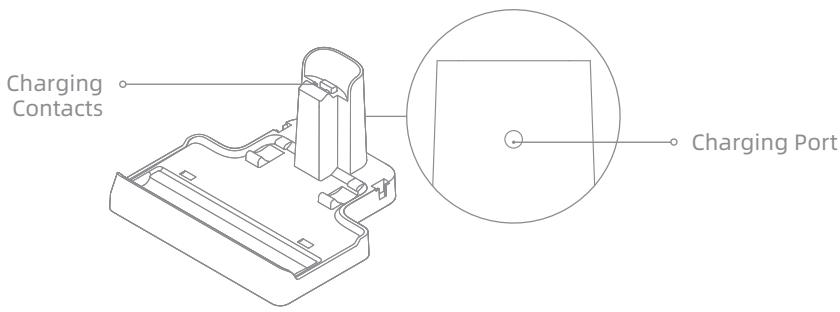
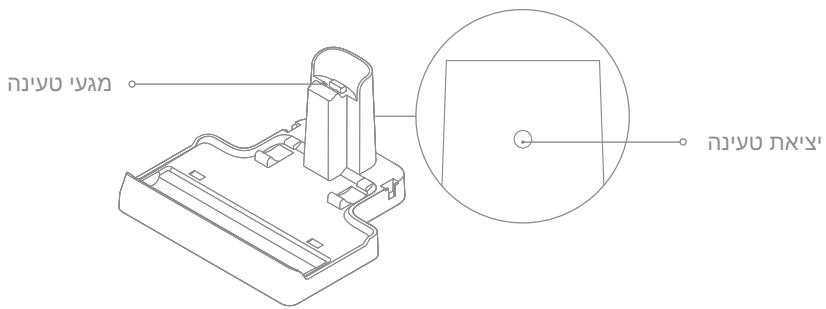
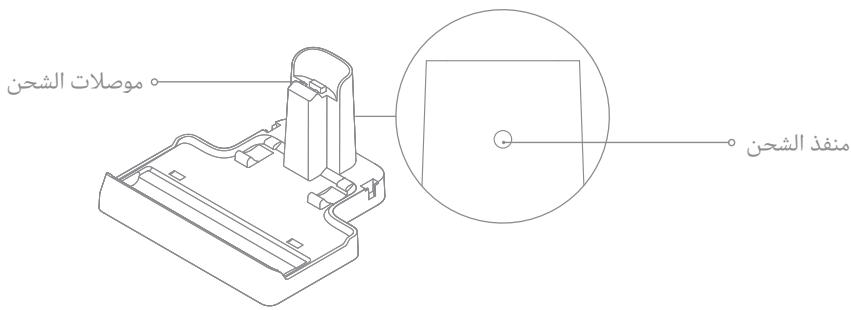
Charging Base
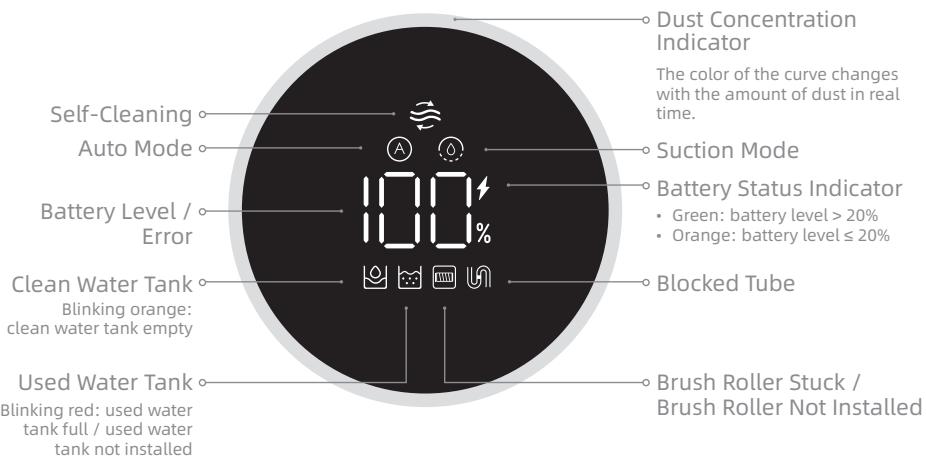
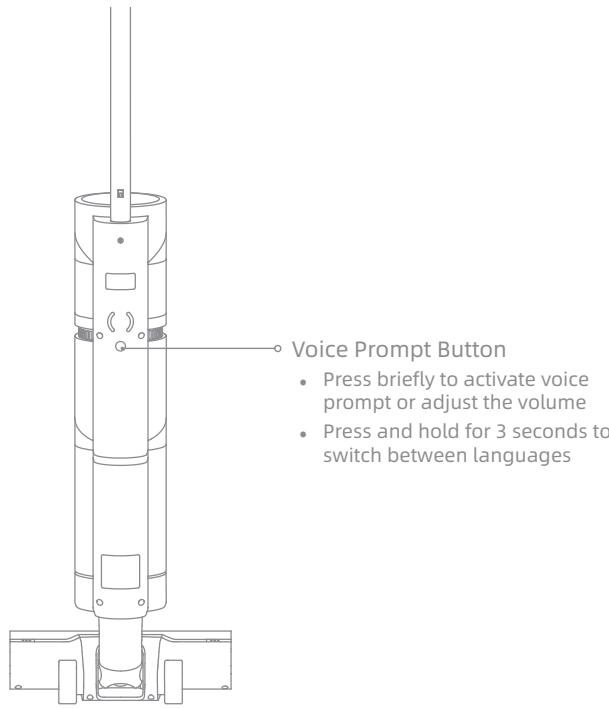
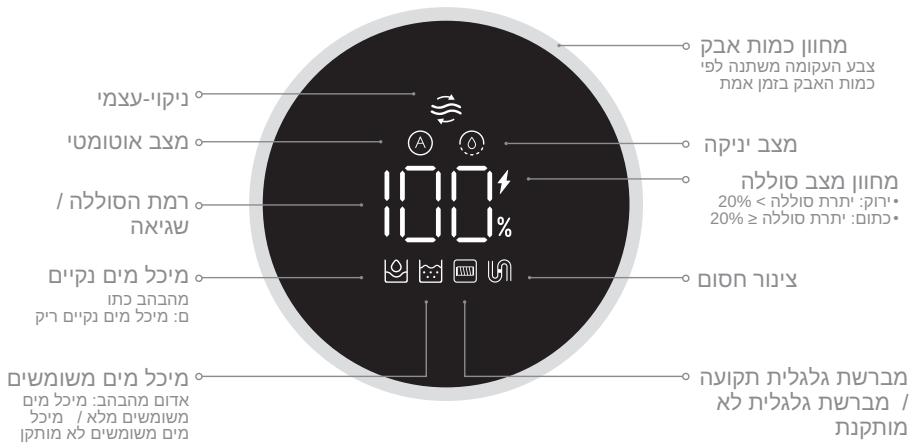
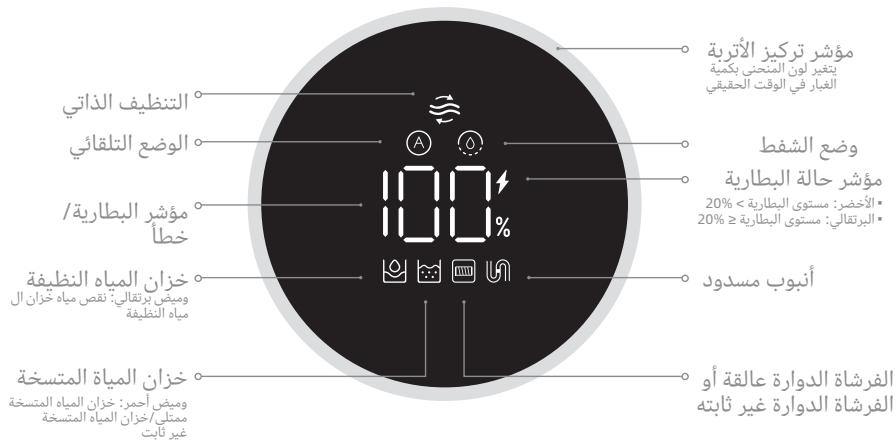
Display Screen
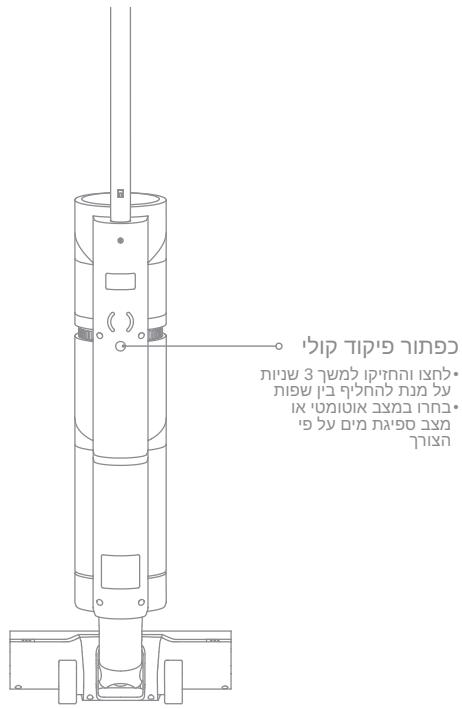
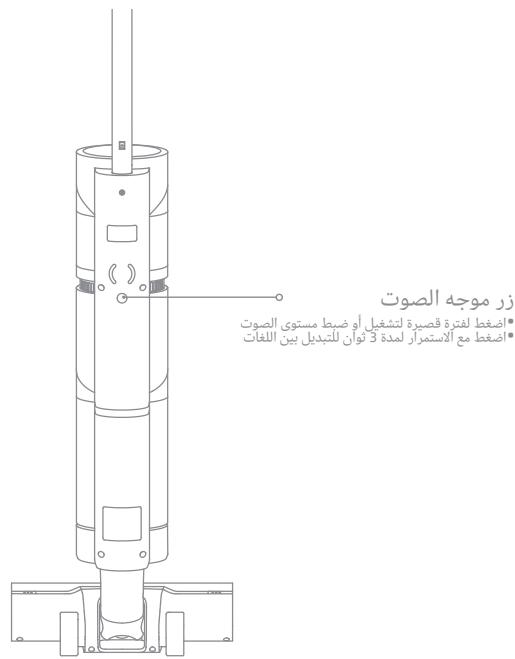
Voice Prompt Button
Installation
EN
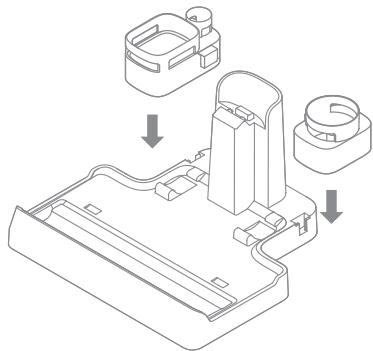
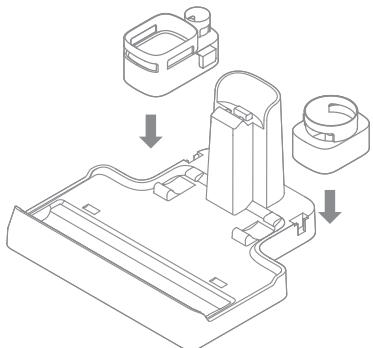
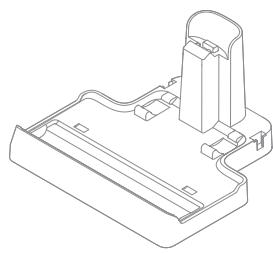
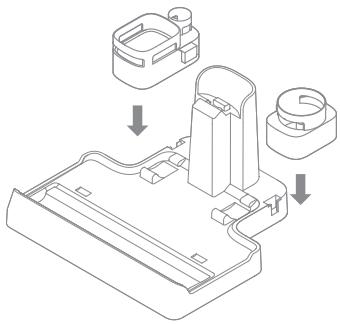
Accessory Holder Installation
Install the accessory holder into the charging base as indicated.
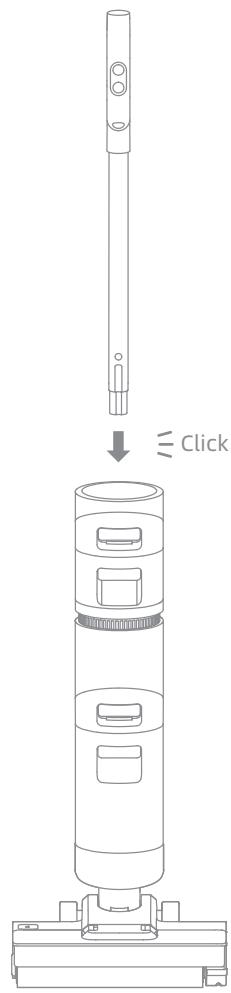
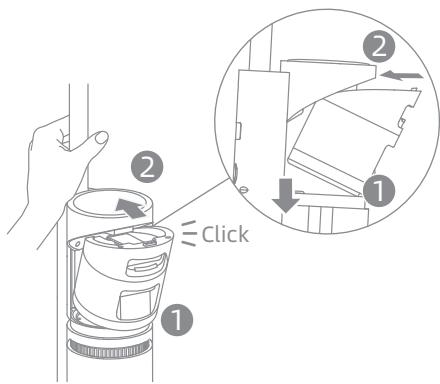
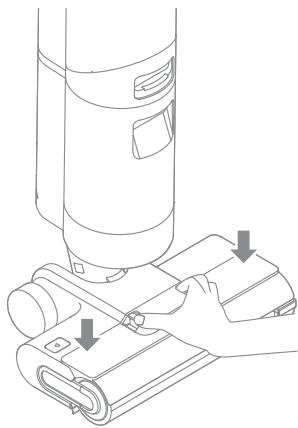
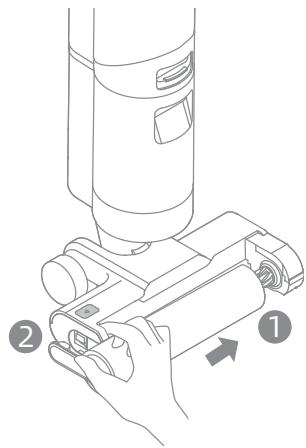
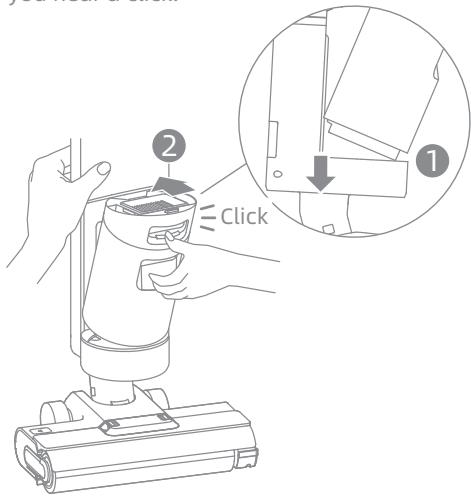
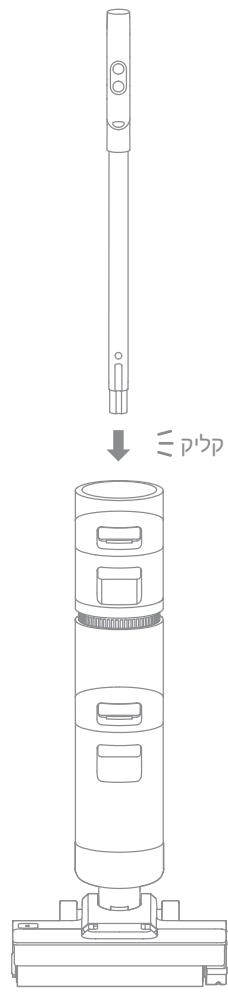
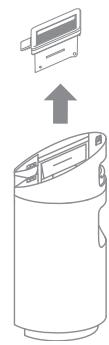
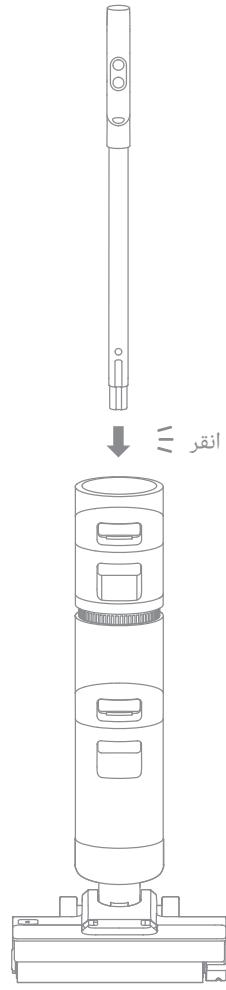
Vacuum Installation
Insert the end of the handle vertically into the port on the top of the vacuum as indicated until you hear a click.
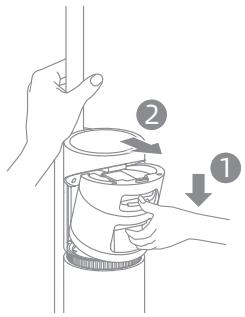
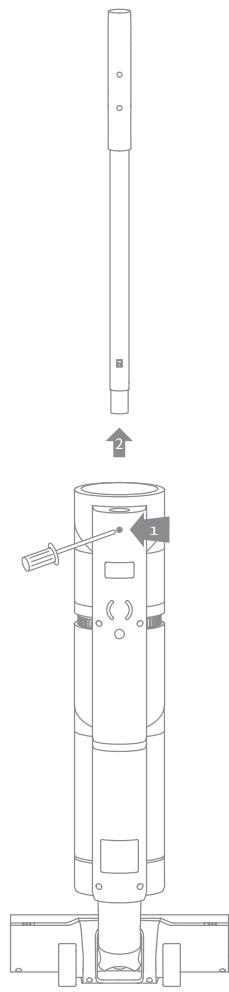
Note: To disassemble, extend a hard object into the hole on the back of the vacuum to press contacts, and pull the handle upwards at the same time.

Note: Fully charge the vacuum before first use.
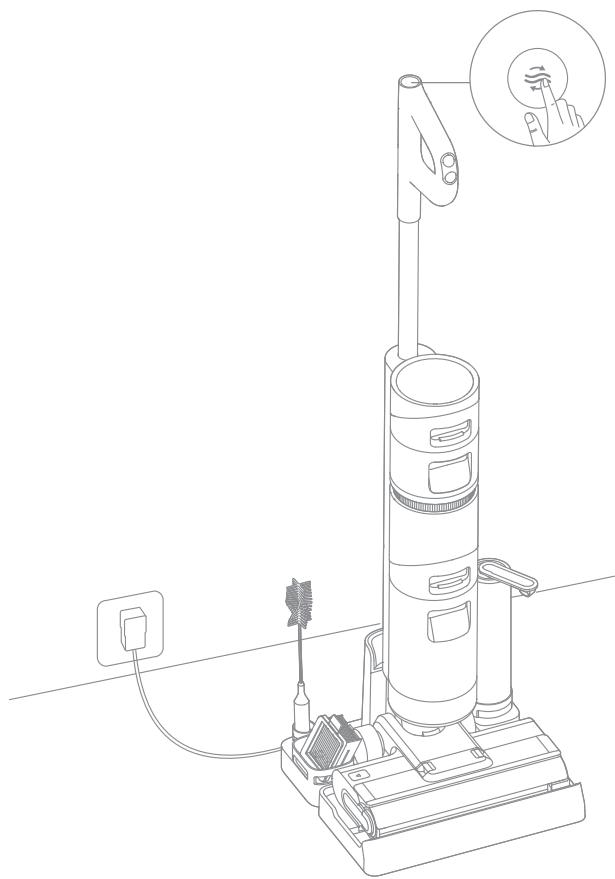
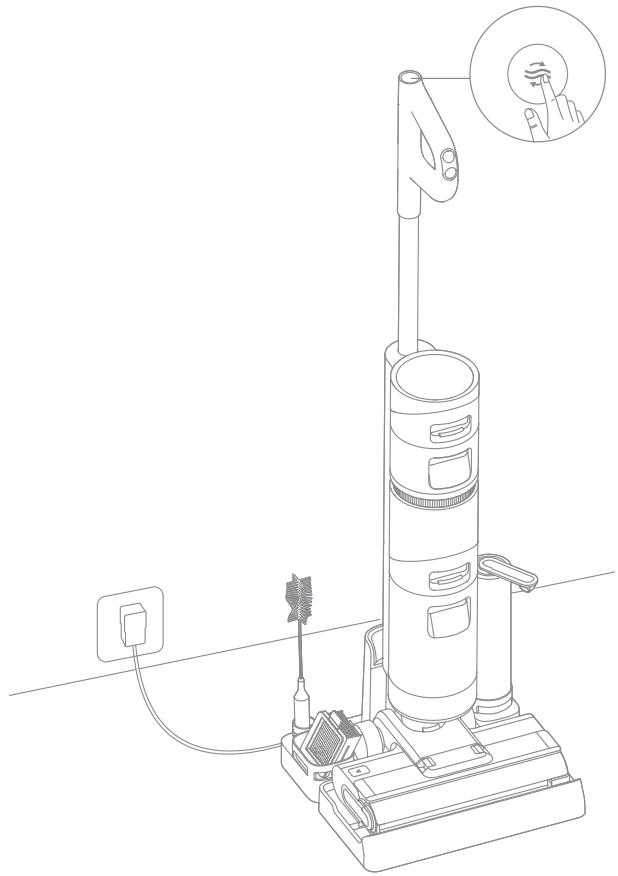
- Place the charging base on the level ground against a wall. Connect one end of the power adapter to the charging base and another end to a power outlet.
- Place the vacuum on the charging base, the on the screen will light up to indicate the charging status. The number on the display screen represents the current battery level as a percentage during charging. When the number is at 100, the battery is fully charged and the will turn off. If no operation is performed within 10 seconds, the screen will turn off automatically.
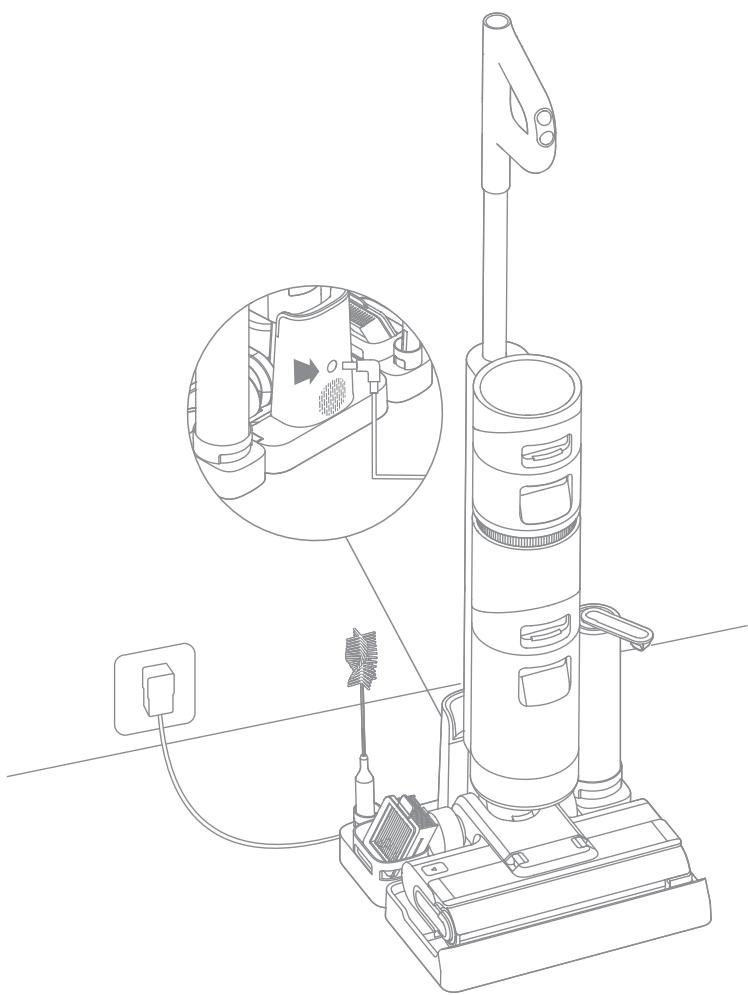
Note: If there is no operation within 15 minutes of being fully charged, the vacuum will enter sleep mode.
How to Use
EN
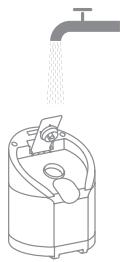
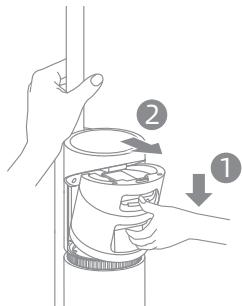
Filling the Clean Water Tank
- Press the clean water tank release button and pull the tank outwards to remove it.
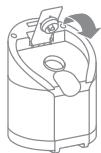
- Remove the cover of the clean water tank and fill the tank with clean water.
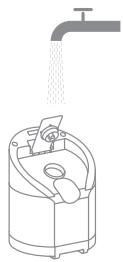
- Close the tank cover tightly.
- Install the clean water tank and ensure it clicks into place.
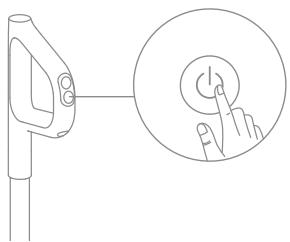
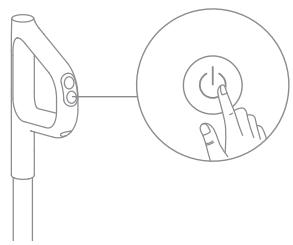
Starting Cleaning
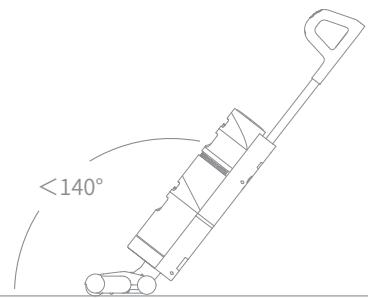
Briefly press the button to power on, and the vacuum will start cleaning. The vacuum comes with an upright/reclining switch. Please gently step on the brush cover and recline the vacuum backwards to start operating. If the vacuum is in the upright position while working, the current task will be suspended.
Note: When the vacuum is working, neither move it off the ground nor lay it flat. Otherwise, the dirty water may flow into the motor.

Do not recline the vacuum backwards more than 140^ to prevent the vacuum from leaking water.
Do not use to vacuum any foamy liquids.
Auto Mode / Suction Mode
The vacuum is powered on by default in Auto mode, you can switch to the Suction mode based on your needs.
Auto Mode: The vacuum can adjust its suction power depending on different situations.
Suction Mode: The vacuum can clean the water stains on the floor.

Care & Maintenance
Tips:
- Turn off the vacuum before care and maintenance.
- Replace parts if needed. The parts must be replaced by those available from the manufacturer or its service agent.
- If the vacuum is not used for an extended period, fully charge it, unplug the power adapter, and store the vacuum in a cool, low-humidity environment away from direct sunlight. To avoid over-discharge of the battery, charge the vacuum at least once every 3 months.
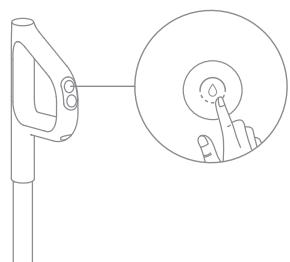
One-Touch Self-Cleaning
-
The self-cleaning function can be enabled only when the vacuum is being charged and the battery level is more than 15% .
-
After the vacuum completes the cleaning task, place it back onto the base and make sure that the water in the clean water tank is sufficient for self-cleaning.
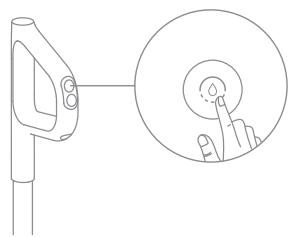
- Briefly press the self-cleaning button on the top of the handle, the self-cleaning indicator will light up, and the vacuum will start self-cleaning.
- After the self-cleaning ends, the vacuum continues charging its battery.
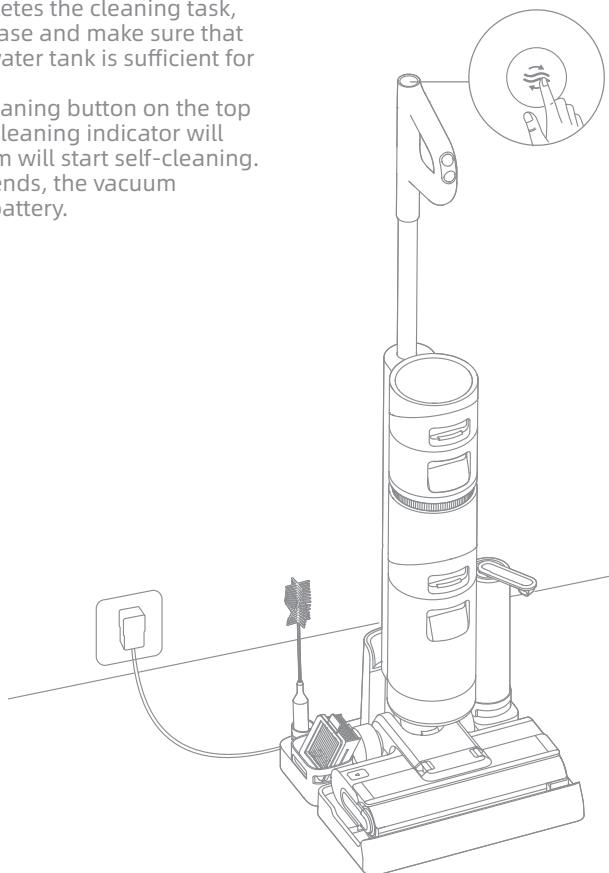
Note: After the vacuum completes self-cleaning, clean the used water tank promptly. If some stains are left on the charging base, clean the base.
Care & Maintenance
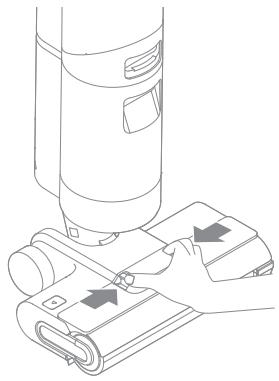
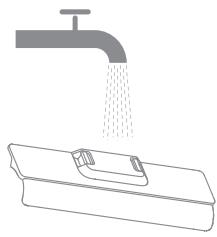
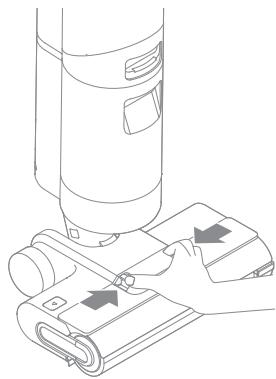
Cleaning the Brush Roller Cover
-
Clean it as needed.
-
Press the brush roller cover release buttons at both ends inward to remove the cover
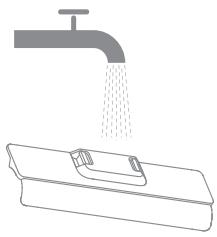
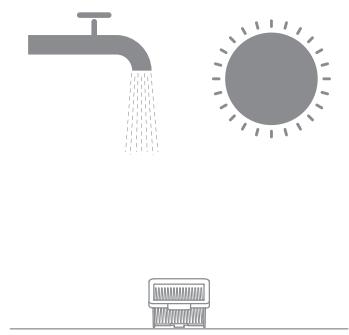
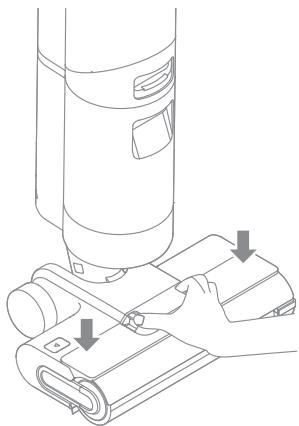
- Rinse the cover with clean water or wipe it with a cloth.
-
Dry the cover completely before use.
-
Re-install the cover back.

Care & Maintenance
EN
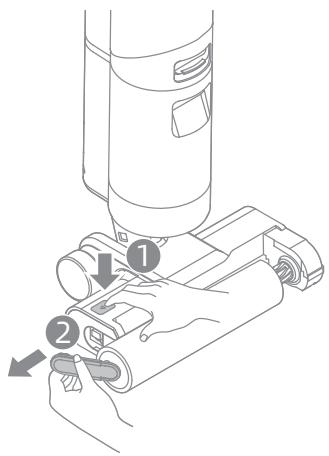
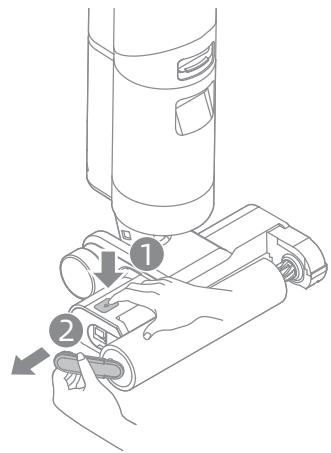
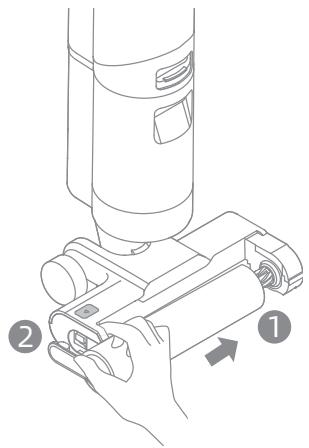
Cleaning the Brush Roller
-
Clean it as needed. Replacing every 3 to 6 months is recommended.
-
Press the brush roller release button, and the brush roller handle pops out. Pull it to take out the brush roller.
-
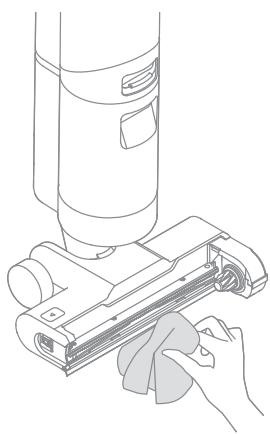
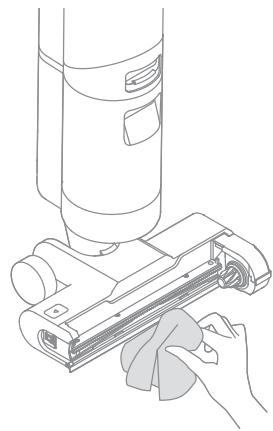
Wipe the suction inlet with a dry cloth or wet tissue. Do not rinse the brush assembly with water.
-
Clean out any hair and debris tangled on the brush roller with the provided cleaning brush. Rinse the brush roller with clean water and dry it completely.

- After cleaning the brush roller, align and push the right end into the right slot on the brush assembly and press the brush roller handle into the left slot on the brush assembly.
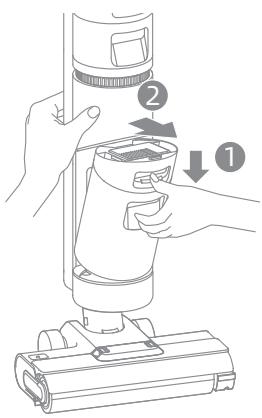
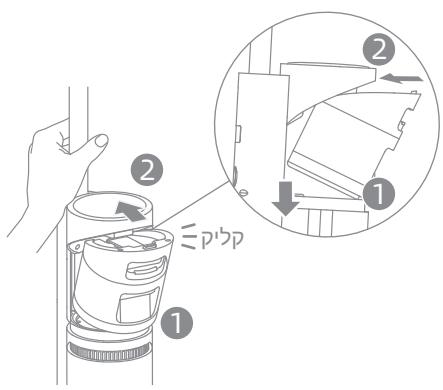
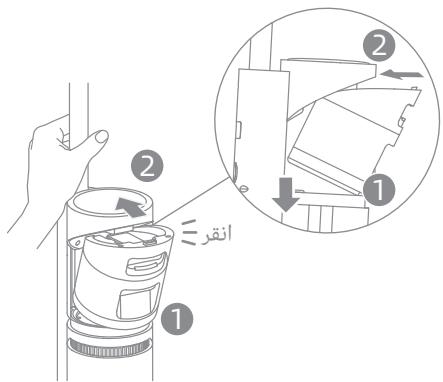
Cleaning the Used Water Tank
-
Cleaning the used water tank after each use and before and after enabling the self-cleaning function is recommended.
-
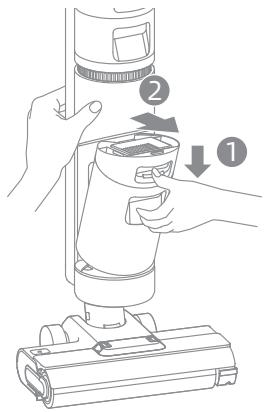
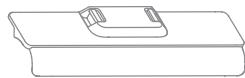
Press the used water tank release button, and pull the used water tank outwards to take it out.
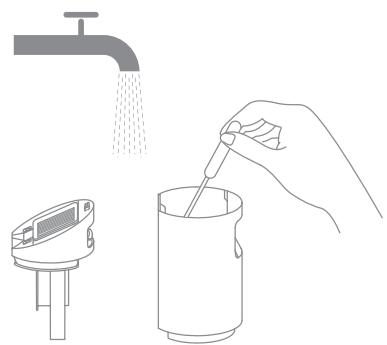
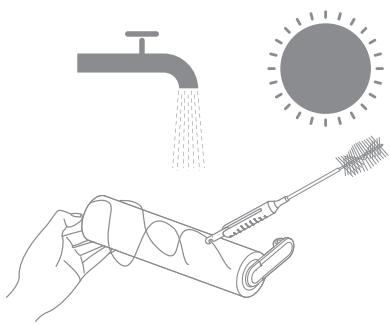
- Rinse the used water tank and tank cover with clean water. Clean the inner wall of the tank with the provided cleaning brush.
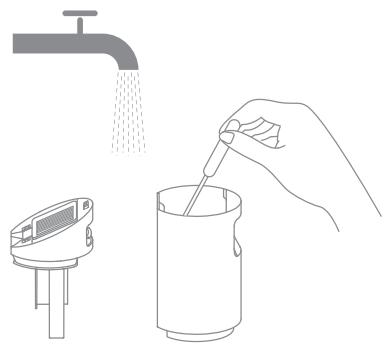
- Hold the used water tank and remove the tank cover. Pour out the wastewater.
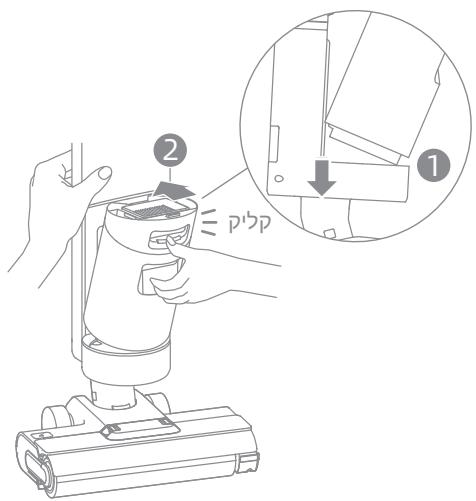
- After the cleaning is completed, close the tank cover, snap the bottom of the tank into the support position of the vacuum, and gently push the tank until you hear a click.
Care & Maintenance
EN
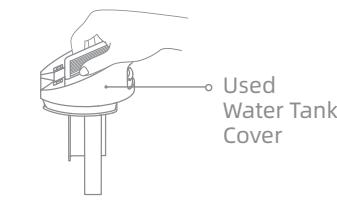
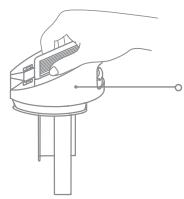
Cleaning the Filter
-
Replace it every 3 to 6 months.
-
Remove the filter from the top of the used water tank.
-
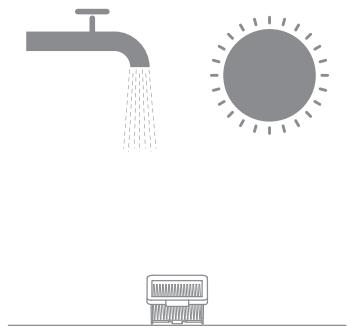
If the filter is dirty, rinse it with clean water and dry it completely before use.

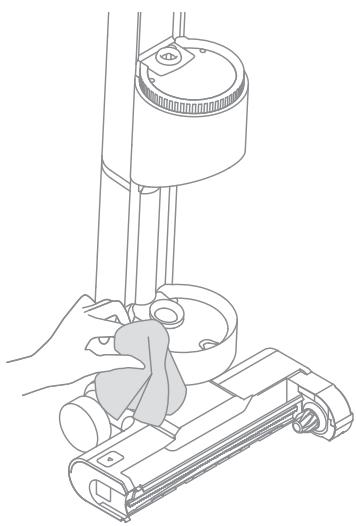
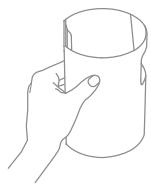
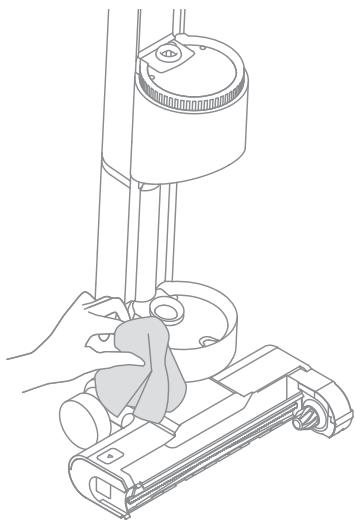
Cleaning the Tube
Remove the used water tank, wipe it with a damp cloth to clean out the tube before use.
| Error | Possible Cause | Solution |
| The vacuum does not work. | The handle is not installed in place. | Re-install the handle. |
| The vacuum is out of battery or its battery level is low. | Fully charge its battery before use. | |
| The vacuum is in the upright position. | Recline the vacuum backwards. | |
| The brush roller is not installed in place, or the brush roller is entangled by hairs and unable to rotate.. | Re-install or clean the brush roller. | |
| The used water tank is not installed in place. | Re-install the used water tank. | |
| The used water tank is full. | Empty the used water tank. | |
| The suction power of the vacuum is weak. | The filter is clogged. | Clean the filter. |
| The brush roller cover, filter, or clean water tank are not installed in place. | Install the brush roller cover, filter, and clean water tank in place before use. | |
| The brush roller is entangled by hairs. | Refer to the maintenance guide [Cleaning the Brush Roller] section. | |
| There are some foreign objects in the tube or the tube is blocked. | Clean the tube. | |
| The motor is making a strange noise. | Too much dirty water in the used water tank. | Empty the used water tank. |
| The suction inlet is blocked. | Clear any blockage in the suction inlet. | |
| The battery status indicator does not light up while charging. | The power adapter is not plugged into the electrical outlet. | Make sure the power adapter is plugged in. |
| The power adapter is not connected to the charging base. | Make sure they are connected. | |
| The battery status indicator does not light up while charging. | The vacuum is not placed onto the charging base properly. | Make sure the vacuum is placed onto the charging base properly. |
| No water comes out of the vacuum. | The clean water tank is not installed in place, or the water in the clean water tank is insufficient. | Re-install or fill the clean water tank. |
| The vent leaks water. | A collision or a sharp pull causes water to enter the motor. | Move gently back and forth when the vacuum is turned on. |
| The filter is not completely dry after being cleaned. | Dry the filter completely before use. | |
| Self-cleaning fails. | The brush roller may be jammed by large particles. | Open the brush roller cover to check and clean the brush roller. |
| The vacuum is not being charged. | Make sure the vacuum is being charged before enabling the self-cleaning function. | |
| The self-cleaning cannot be enabled if the battery level is lower than 15%. | The self-cleaning function can be enabled only when the vacuum is being charged and the battery level is more than 15%. | |
| The used water tank is not installed in place, or the used water tank is full. | Re-install or empty the used water tank. | |
| The clean water tank is not installed in place, or the water in the clean water tank is insufficient. | Re-install or fill the clean water tank. |
If the vacuum is not working properly, the screen display will show an error message. Please refer to the troubleshooting table to find your solution.
| Error Icon | Possible Cause | Solution | ||
| Insufficient water in clean water tank | Fill the clean water tank. | |||
| Used water tank not installed | Install the used water tank. | |||
| Used water tank full | Empty the used water tank. | |||
| Brush roller stuck | Clean the brush roller with the provided cleaning brush. | |||
| Brush roller not installed | Install the brush roller. | |||
| Blocked tube | Check whether the filter is clogged. | |||
| Refer to the maintenance manual [Cleaning the Tube] section. | ||||
| Troubleshooting Code | Possible Cause | Solution | ||
| E1/EE/EF | Motor error | Please contact customer service. | ||
| E2/E3/E7/E8/E9 | Battery error | Please contact customer service. | ||
| E4/E5 | Incompatible power adapter | Please use the original power adapter. If the problem persists, contact customer service. | ||
| E6 | Battery overheating | Wait until the battery's temperature returns normal. | ||
Specifications
EN
| Wet and Dry Vacuum Floor Washer | |||
| Model | HHR14B | Charging Time | Approx. 5 hours |
| Rated Voltage | 21.6 V --- | Charging Voltage | 26 V --- |
| Rated Power | 200 W | Rated Capacity | 3650 mAh |
| Nominal Capacity | 4000 mAh | Used Water Tank Capacity | 500 mL |
| Clean Water Tank Capacity | 900 mL | ||
| Power Adapter | |||
| Model | YLS0241A-U260090 | Average Active Efficiency | 87.28% |
| Input | 100-240V~50/60 Hz 0.8 A Max | Efficiency at Low Load (10%) | 79.74% |
| Output | 26 V --- 0.9 A | No-Load Power Consumption | 0.08 W |
- The lithium-on battery pack contains substances that are hazardous to the environment. Before disposing of the appliance, please first remove the battery pack, then discard, or recycle it in accordance with local laws and regulations of the country or region it is used in.
- The appliance must be disconnected from the power supply when removing the battery. Keep batteries out of the reach of children. Never put batteries in mouth. If swallowed, contact your physician or local poison control.
- Under abusive conditions, never contact the battery from which the liquid may be ejected. If contact accidentally occurs, rinse with water. If liquid contacts eyes, seek medical help immediately. Liquid ejected from the battery may cause irritation or burns.
WEEE Information
All products bearing this symbol are waste electrical and electronic equipment (WEEE as in directive 2012/19/EU) which should not be mixed with unsorted household waste. Instead, you should protect human health and the environment by handing over your waste equipment to a designated collection point for the recycling of waste electrical and electronic equipment, appointed by the government or local authorities. Correct disposal and recycling will help prevent potential negative consequences to the environment and human health. Please contact the installer or local authorities for more information about the location as well as terms and conditions of such collection points.
NININININ
y
.
nYxN,niunnnn,yniO nn ninn non by -nn
n nn nnnn nnnn nnnn nnnn nnnn nnnn nnnn nnnn nnnn nnnn nnnn nnnn nnnn nnnn nnnn nnnn nnnn nnnn nnnn nnnn nnnn nnnn nnnn nnnn nnnn nnnn nnnn nnnn nnnn nnnn nnnn nnnn nnnn nnnn nnne
nynnnn nn nnnn nnnn nnnn nnnn nnnn nnnn nnnn nnnn nnnn nnnn nnnn nnnn nnnn nnnn nnnn nnnn nnnn nnnn nnnn nnnn nnnn nnnn nnnn nnnn nnnn nnnn nnnn nnnn nnnn nnnn nnnn nnnn nnnn nnnn nn
.
.
1 1 1 1 1 1 1 1 1 1 1 1 1 1 1 1 1 1 1 1 1 1 1 1 1 1 1
y
.
DIO,INN INN NNNN,INN NNNN NNNN NNNN NNNN NNNN NNNN NNNN NNNN NNNN NNNN NNNN NNNN NNNN NNNN NNNN NNNN NNNN NNNN NNNN NNNN NNNN NNNN NNNN NNNN NNNN NNNN NNNN NNNN NNNN NNNN NNNN NNNN NNNN NNN
n nn nnnn nnnn nnnn nnnn nnnn nnnn nnnn nnnn
nny nny nny nny nny nny nny nny nny nny nny nny
1NIN,IN,INN,IN
11111111111111111111111 0
, , , , , , , , , , , , , , , , , , , , , , , ,
nniin ninn,nnnn nn nnnn
INXnnnynnnnnnnnnnnnnnnnnnnnnnnnnnnnnnn
.
IN 1N N IN,IN DIOIIOOHNIN INN
.
ywnn nn nnnn nnnnnnnnnnnnnnnnnnnnnnnnnnnnnnnnnnnnnnnnnnnnnnnnnnnnnnnnnnnnnnnnnnnnnnnnnnnnnnnnnnnnnnnnnnnnnnnnnnnnnnnnn
.
n nn nnnn nn nnnnnn nn nnnnnn nn nnnnnn nn nnnnnn nn nnnnnn nn nnnnnn nn nnnnnn nn nnnnnn nn nnnnnn nn nnnnnn nn nnnnnn nn nnnnnn nn nnnnnn nn nnnnnn nn nnnnnn nn nnnnnn nn nnnnnn nn nnnnnn nn nnnnnn nn nnnnnn nn nannnnn nn nannnnn nn nannnnn nn nannnnn nn nannnnn nn nannnnn nn nannnnn nn nannnnn nn nannnnn nn nannnnn nn nannnnn nn nannnnn nn nannnnn nn nannnnn nn
.
nynnnnnnnnnnnnnnnnnnnnnnnnnnnnnnnnnnnnnnnnnnnnnnnnnnnnnnnnnnnnnnnnnnnnnnnnnnnnnnnnnnnnnnnnnnnnn
.
ywn yynn nnynnnynnnynnnnnnnnnnnnnnnnnnnnnnnnnnnnnnnnnnnnnnnnnnnnnnnnnnnnnnnnnnnnnnnnnnnnnnnnnnnnnnnnnnnnnnnnnnnnnnnnnnn
y
.
.
100 100
n nn nnnnnnnnnnnnnnnnnnnnnnnnnnnnnnnnnnn
n nn nnn nn nn nn nn nn nn nn nn nn nn nn nn nn nn nn nn nn nn nn nn nn nn nn nn nn nn nn nn nn nn nn nn nn nn nn nn nn nn nn nn nn nn nn nn nn nn nn nn nn nn nn nn nn nn nn nn nn nn nn nn nn nn nn nn nn nn nn nn nn nn nn nn nn nn nn nn nn nn nn nn nn nn nn nn nn nn nn nn
bninni by
D'IVN nn nn N
n nnnn nn nnnnnn nn nnnnnnnnnnnnnnnnnnnnnnn
y
. npnnn nn nnnn nn nn nn nn nn nn nn nn
(40^ / 104^ yin in 0^ / 32^ -nnnnn) iipipin nn nnnnnnnnnnnnnnn
.40°C/104°F - 50mmol 0°C/32°F by niunonniyn N
.
nwnnnnn
mnnn nnpox n
NINNNN N
D□C

n nn nnnn nn nnnn nn nnnn
https://global.dreametech.com/pages/user-manuals-and-faqs
Nnnn
yoo
T
7y

nnn

brown brown
n nn nnn

ywnn

y
D'ON P'NN Npnn
Jn nn nnnnnnnnnnnnnnn
JINN NNN
n nn nnnnnnnnnnnnnnnnnnnnnnnnnnnnnnnnnnnnnnnnnnnnnnnnnnnnnnnnnnnnnnnnnnnnnnnnnnnnnnnnnnnnnnnnnnnnnnnnnnnnnnnnn
ninn nnn nn nn nn nn nn nn nn nn nn nn nn nn nn nn nn nn nn nn nn nn nn nn nn nn nn nn nn nn nn nn nn nn nn nn nn nn nn nn nn nn nn nn nn nn nn nn nn nn nn nn nn nn nn nn nn nn nn nn nn nn nn nn nn nn nn nn nn nn nn nn nn nn nn nn nn nn nn nn nn nn nn nn nn nn nn nn nn nn nn nn nn nn nn nn nn nn nn nn nn nn
1111111111111111111111111111
o'wnnn nn nnnn nn nnnn nn nnnn nn nnnn nn nnnn nn nnnn nn nnnn nn nnnn nn nnnn nn nnnn nn nnnn nn nnnn nn nnnn nn nnnn nn nnnn nn nnnn nn nnnn nn nnnn nn nnnn nn nnnn nn nnnn nn nnnn nn nnnn nn nnnn nn nnnn nn nnn
.
n nn nnn .nnnn nn nn nn nn nn nn nn nn nn nn nn nn nn nn nn nn nn nn nn nn nn nn nn nn nn nn nn nn nn nn nn nn nn nn nn nn nn nn nn nn nn nn nn nn nn nn nn nn nn nn nn nn nn nn nn nn nn nn nn nn nn nn nn nn nn nn nn nn nn nn nn nn nn nn nn nn nn nn nn nn nn nn nn nn nn nn nn nn nn nn nn nn
,100- xin 9000n .n yun n nn nn nn nn nn nn nn nn nn nn nn nn nn nn nn nn nn nn nn nn nn nn nn nn nn nn nn nn nn nn nn nn nn nn nn nn nn nn nn nn nn nn nn nn nn nn nn nn nn nn nn nn nn nn nn nn nn nn nn nn nn nn nn nn nn nn nn nn
n nn nnnnnnnnnnnnnnnnnnnnnnnnnnnnnnnnnnnnnnnnnnnnnnnnnnnnnnnnnnnnnnnnnnnnnnnnnnnnnnnnnnnnnnnnnnnnnnnnnnn
'UNION

n nn nnnnnnnnnnnnnn 2
.
Dn nn nn nn nn
"nnnnn nn nnnnnnnnnnnnnnnnnnnnnnnnnnnnnnnnnnnnnnnnnnnnnnnnnnnnnnnnnnnnnnnnnnnnnnnnnnnnnnnnnnnnnnnnnnnnnnn
i

NINNTI D'pnn nn nn npn .4
inipnnn
. npnna nn nnnn nn .3

iipnnn
ynnn nn nnnn nn nnnn nn nnnn nn nnnn nn nnnn nn nnnn nn nnnn nn nnnn nn nnnn nn nnnn nn nnnn nn nnnn nn nnnn nn nnnn nn nnnn nn nnnn nn nnnn nn nnnn nn nnnn nn nnnn nn nnnn nn nnnn nn nnnn nn nnnn nn nnnn nn
ninn nnn nni nni nni nni nni nni nni nni nni nni nni nni nni nni nni nni nni nni nni nni nni nni nni nni nni nni nni nni nni nni nni nni nni nni nni nni nni nni nni nni nni nni nni nni nni nni nni nni nni nni nii

n nn nnnn nn by nnn 140-n nn nn nn nn nn nn nn
.
n /unioin
n nn nnnnnnnnnnnnnnnnnnnnnnnnnnnnnnnnnnnnnnnnnnnnnnnnnnnnnnnnnnnnnnnnnnnnnnnnnnnnnnnnnnnnnnnnnnnnnnnnnnnnnnnnn
n nn n nn nn nn nn nn nn nn nn nn nn nn nn nn nn nn nn nn nn nn nn nn nn nn nn nn nn nn nn nn nn nn nn nn nn nn nn nn nn nn nn nn nn nn nn nn nn nn nn nn nn nn nn nn nn nn nn nn nn nn nn nn nn nn nn nn nn nn nn nn nn nn nn nn nn nn nn
.
:1
.1
nn by nn bynn n by npn nn nn .nn n nn nn .2
nannnn nnnn nn nnnn nn nnnn nn
yun nn npn ,nn n hionny yuyn ,nN nipynwn .3
y nns yun nn bnnn by n np ny nn by .nxn nn
.
NNN NnNnNnNnNnNnNnNnNnNnNnNnNnNnNnNnNnNnNnNnNnNnNnNnNnNnNnNnNnNnNnNnNnNnNnNnNnNnNnNnNnNnNnNnNnNnNnNnNnNnNn
.15% by nnnn nn nnnn nn nnnnnnnnnnnnnnnnnnnnnnnnnnnnnnnnnnnnnnnnnnnnnnnnn
n nn nnnnnnnnnnnnnnnnnnnnnnnnnnnnnnnnnnnnnnnnnnnnnnnnnnnnnnnnnnnnnnnnnnnnnnnnnnnnnnnnnnnnnnnnnnnnnnnnnnnnnnnnnnnnnnnnnnnnnnnnnnnnnnnnn
.2n nn nn
.0non 1nnn nn nnnn nn nnnn .3
n nn nnnnnnnnnnnnnnnnnnnnnnnnnnnnnnnnnnnnnnnnnnnnnnnnnnnnnnnnnnnnnnnnnnnnnnnnnnnnnnnnnnnnnnnnnnnnnnn
.00an nn np,nyon 0o by oion
nbnnnnnnnnnnnnn
.
n nn nnnnnnnnnnnnnnnnnnnnnnnnnnnnnnnnnnnnnnnnnnnnnnnnnnnnnnnnnnnnnnnnnnnnnnnnnnnnnnnnnnnnnnnnnnnnnnnnnnnnnnnnnnn
n nn nnnnn
.
.mnnn nn nn nn nn pnn .4
y 3
.

n
iunynnniynnnynnnnynnnnynnnnnnnnnnnnnnnnnnnnnnnnnnnnnnnnnnnnnnnnnnnnnnnnnnnnnnnnnnnnnnnnnnnnnnnnnnnnnnnnnnnnnnnnnnnnnnnnnnnnnnnnnnnnnnn

y 1
iN NNNN NNNN NNNN
nun nn nnnnnnnnnn 3 .ninnn nn nn nn nn
Dwnnn nn bn nip
n nn nnnnnnnnnnnnnnnnnnnn
nniinnnnnnnnnnnnnnnnnnnnnnnnnnnnnnnn
y
n nn nnn nn nn nn nn nn nn nn .4
nnnn nn nn nn nn nn nn nn nn nn nn nn nn nn nn nn nn nn nn nn nn nn nn nn nn nn nn nn nn nn nn nn nn nn nn nn nn nn nn nn nn nn nn nn nn nn nn nn nn nn nn nn nn nn nn nn nn nn nn nn nn nn nn nn nn nn nn nn nn nn nn nn nn nn nn nn nn nn nn nn nn nn nn nn nn nn nn nn nn nn nn nn nn nn nn nn nn nn nn nn nn.
ynnn nn nnnnnnnnnnnnnnnnnnnnnnnnnnnnn
nni nn nnn nnn nnn nnn nnn .3 nnn nnn nnn nnn nnn nnn nnn nnn nnn nnn nnn nnn nnn nnn nnn nnn nnn nnn nnn nnn nnn nnn nnn nnn nnn nnn nnn nnn nnn nnn nnn nnn nnn nnn nnn nnn nnn nnn
DOnn 'p
.17TIN67y3bINIXINNN*
bn bn bn nn nnnn nn .1
.
n nn nnnnnnnnnnnnnn nn.2
y
y
n nn nnnnnnnnnnnnnnnnnnnnnnnnnnnnnnnnnnnnnnnnnnnnnnnnnnnnnnnnnnnnnnnnnnnnnnnnnnnnn
| الترجمة | الترجمة | الترجمة | |
| . نَتُنْهُ وَمُّلِهُ | . نَتُنْهُ وَمُّلِهُ | . نَتُнْهُ | |
| الترجمة الحرفية بُّدِهُ .مُّلِهُ | الترجمة الحرفية بُّدِهُ .مُّلِهُ | ||
| . نَتُنْهُ وَمُّلِهُ | . نَتُнْهُ وَمُّلِهُ | ||
| الترجمة الحرفية بُّدِهُ .مُّلِهُ | . نَتُнْهُ وَمُّلِهُ .مُّلِهُ | ||
| . نَتُнْهُ وَمُّلِهُ | . نَتُнْهُ وَمُّلِهُ .مُّلِهُ | ||
| . نَتُнْهُ وَمُّلِهُ | . نَتُнْهُ وَمُّلِهُ .مُّلِهُ | ||
| . نَتُнْهُ | . نَتُнْهُ | ||
| . نَتُнْهُ | . نَتُnْهُ | . نَتُnْهُ | |
| الترجمة الحرفية بُّدِهُ .مُّلِهُ | . نَتُnْهُ وَمُّلِهُ .مُّلِهُ | ||
| . نَتُnْهُ | . نَتُnْهُ | ||
| . نَتُnْهُ | . نَتُnْهُ | ||
| . نَتُnْهُ | . نَتُnْهُ | ||
| . نَتُnْهُ | . نَتُnْهُ | ||
| . نَتُnْهُ | . نَتُnْهُ | ||
| . مَّلِهُ | . مَّلِهُ | ||
| . مَّلِهُ | . مَّلِهُ | ||
| . مَّلِهُ | . مَ�َلِهُ | ||
| . مَ�َلِهُ | . مَ�َلِهُ | ||
| . مَ�َلِهُ | . مَ�َلِهُ | ||
| . مَ�َلِهُ | . مَ�َلِهُ | ||
| . مَ�َلِهُ | . مَ�َلِهُ | ||
| . مَ�َلِهُ | . م—" " " " " " " " " " " " " " " " " " " " " " " " " " " " " " " " " " " " " " " " " " " " " " " " " " " " " " " " " " " " " " " " " " " " " " " " " " " " " " " " " " " " " " " " " " " " " " " " " " " " " “" " " " " " " " " " " " " " " " " " " " " " " " " " " " " " " " " " " " " " " " " " " " " " " " " " " " " " " " " " " " " " " " " " " " " " " " " " " " " " " " " " " " " " " " " " " " " " " " " " " " . نَتُнْهُ | . نَتُnْهُ | |
| . نَتُnْهُ | . نَتُnْهُ | ||
| . نَتُnْهُ | . نَتُnْهُ | ||
| . نَتُnْهُ | . نَتُnْهُ | ||
| . نَتُnْهُ | . نَتُnْهُ | ||
| . نَتْعَنْ | . نَتْعَنْ | ||
| . نَتْعَنْ | . نَتْعَنْ | ||
| . نَتْعَنْ | . نَتْعَنْ | ||
| . نَتْعَنْ | . نَتْعَنْ | ||
| . نَتْعَنْ | . نَتْعَنْ | ||
| . نَعَنْ | . نَعَنْ | ||
| . نَعَنْ | . نَعَنْ | ||
| . نَعَنْ | . نَعَنْ | ||
| . نَعَنْ | . نَعَنْ | ||
| . نَعَنْ | . نَعَنْ | ||
| . نَعَنْ | . نَعَنْ | ||
| . نَعَنْ | . نَعَنْ | ||
| . نَعَنْ | . نَعَنْ | ||
| . نَعَنْ | . نَعَنْ | ||
| . نَعَنْ | . نَعَنْ | ||
| . نَعَنْ | . نَعَنْ | ||
| . م—" " " " " " " " " " " " " " " " " " " " " " " " " " " " " " " " " " " " " " " " " " " " " " " " " " " " " " " " " " " " " " " " " " " " " " " " " " " " " " " " " " " " " " " " " " " " " " " " . نَعَنْهُ | . نَعَنْهُ | ||
| . نَعَنْهُ | . نَعَنْهُ | ||
| . نَعَنْهُ | . نَعَنْهُ | ||
| . نَعَنْهُ | . نَعَнْهُ | ||
| . نَعَنْهُ | . نَعَнْهُ | ||
| . نَعَنْهُ | . نَعَнْهُ | ||
| . نَعَнْهُ | . نَعَнْهُ | ||
| . نَعَнْهُ | . نَعَнْهُ | ||
| . نَعَнْهُ | . نَعَнْهُ | ||
| . نَعَнْهُ | . نَعَнْهُ | ||
| . نَعَнْهُ | . نَعَнْhee | ||
| . نَعَнْهُ | . نَعَнْhee | ||
| . نَعَнْهُ | . نَعَнْhee | ||
| . نَعَнْهُ | . نَعَнْhee | ||
| . نَعَнْهُ | . نَعَнْhee | ||
| . نَعَнْهُ | . نِرْبْرْرْرْرْرْرْرْرْرْرْrْrْrْrْrْrْrْrْrْrْrْrْrْrْrْrْrْrْrْrْrْrْrْrْrْrْrْrْrْrْrْrْrْrْrْrْrْr \( ^{①} \) | . نَرْبْrْrْr \( ^{①} \) | |
| . نَرْبْrْr \( ^{①} \) | . نَرْبْr \( ^{①} \) | ||
| . نَرْبْr \( ^{①} \) | . نَرْب \( ^{①} \) | ||
| . نَرْب \( ^{①} \) | . نَرْب \( ^{①} \) | ||
| . نَرْب \( ^{①} \) | . نَرْب \( ^{①} \) | ||
| . نَرْب \( ^{①} \) | . نَرْب \( ^{①} \) | ||
| . نَرْب \( ^{^2} \) | . نَرْب \( ^{^2} \) | ||
| . نَرْب \( ^{^2} \) | . نَرْب \( ^{^2} \) | ||
| . نَرْب \( ^{②} \) | . نَرْب \( ^{②} \) | ||
| . نَرْب \( ^{②} \) | . نَرْب \( ^{②} \) | ||
| . نَرْب \( ^{②} \) | . نَرْب \( ^{②} \) | ||
| . نَرْب \( ^{②} \) | . نَرْب \( ^{②} \) | ||
| . نَرْب \( ^{②} \) | . نَرْب \( ^{②} \) | ||
| . نَرْب \( ^{②} \) | . نَرْب \( ^{②} \) | ||
| . نَرْب \( ^{②} \) | . نَرْب \( ^{②} \) | ||
| . نَرْب \( ^{②} \) | . نَرْب \( ^{②} \) | ||
| . نَرْب \( ^{②} \) | . نَرْب \( ^{②} \) | ||
| . نَرْب \( ^{②} \) | . نَرْب \( ^{②} ③ \) | ||
| . نَرْب \( ^{②} \) | . نَرْب \( ^{②} ③ \) | ||
| . نَرْب \( ^{②} \) | . نَرْب \( ^{②} ③ \) | ||
| . نَرْب \( ^{②} \) | . نَعَن \( ^{②} \) | ||
| . نَعَن \( ^{②} \) | . نَعَن \( ^{②} ③ \) | ||
| . نَعَن \( ^{②} \) | . نَعَن \( ^{②} ③ \) | ||
| . نَعَن \( ^{②} \) | . نَعَن \( ^{②} ③ \) | ||
| . نَعَن \( ^{②} \) | . نَرْب \( ^{②} \) | ||
| . نَعَن \( ^{②} \) | . نَرْب \( ^{②} ③ \) | ||
| . نَعَن \( ^{②} \) | . نَعَن \( ^{②} ③ \) | ||
| . نَعَن \( ^{②} \) | . نَرْب \( ^{②} ③ \) | ||
| . نَعَن \( ^{②} \) | . نَرْب \( ^{②} ③ \) | ||
| . نَعَن \( ^{②} \) | . نَرْب \( ^{②} ③ \) | ||
| . نَعَن \( ^{^2} \) | . نَعَن \( ^{^2} ③ \) | ||
| . نَعَن \( ^{^2} \) | . نَرْب \( ^{^2} ③ \) | ||
| . نَعَن \( ^{^2} \) | . نَرْب \( ^{^2} ③ \) | ||
| . نَعَن \( ^{^2} \) | . نَرْب \( ^{^2} ③ \) | ||
| . نَعَن \( ^{②} \) | . نَرْب \( ^{②} ③ \) | ||
| . نَعَن \( ^{②} \) | . نَرْب \( ^{②} ③ \) | ||
| . نَعَن \( ^{②} \) | |||
| הכלה | הכלה הכלה הכלה | הכלה הכלה הכלה | |
| הכלה הכלה הכלה . . . . . . . . . . . . . . . . . . . . . . . . . . . . . . . . . . . . . . . . . . . . . . . . . . . . . . . . . . . . . . . . . . . . . . . . . . . . . . . . . . . . . . . . . . . . . . . . . . . . . . . . . . . . . . . . . . . . . . . . . . . . . . . . . . . . . . . . . . . . . . . . . . . . . . . . . . . . . . . . . . . . . . . . . . . . . . . . . . . . . . . . . . . . . . . . . . . . . . . . . . ; . . . . . . . . . . . . . . . . . . . . . . . . . . . . . . . . . . . . . . . . . . . . . . . . . . . . . . . . . . . . . . . . . . . . . . . . . . . . . . . . . . . . . . . . . . . . . . . . . . . ? . . . . . . . . . . . . . . . . . . . . . . . . . . . . . . . . . . . . . . . . . . . . . . . . . . . . . . . . . . . . . . . . . . . . . . . . . . . . . . . . . . . . . . . . . . . . . . . . . . . - . . . . . . . . . . . . . . . . . . . . . . . . . . . . . . . . . . . . . . . . . . . . . . . . . . . . . . . . . . . . . . . . . . . . . . . . . . . . . . . . . . . . . . . . . . . . . . . . . . . - - - - - - - - - - - - - - - - - - - - - - - - - - - - - - - - - - - - - - - - - - - - - - - - - - - - - - - - - - - - - - - - - - - - - - - - - - - - - - - - - - - - - - - - - - - - - - - - - - - - - - . . . . . . . . . . . . . . . . . . . . . . . . . . . . . . . . . . . . . . . . . . . . . . . . . . . . . . . . . . . . . . . . . . . . . . . . . . . . . . . . . . . . . . . . . . . . . . . . . . . 25% 25% 25% 25% 25% 25% 25% 25% 25% 25% 25% 25% 25% 25% 25% 25% 25% 25% 25% 25% 25% 25% 25% 25% 25% 25% 25% 25% 25% 25% 25% 25% 25% 25% . 25% 25% 25% 25% 25% 25% 25% 25% 25% 25% 25% 25% 25% 25% 25% 25% 25% 25% 25% 25% 25% 25% 25% 25% 25% 25% 25% 25% 25% 25% 25% 25% 25% |
Nn nn nnnnnnnnnnnnnnnnnnnnnnnnnnnnnnnnnnnnnnnnnnnnnnnnnnnnn
JINNN
a aalllg aalll gaaagagaaalall
.ajlo
gol gol jilw aljgi yj. jilw lal jy jilw all pws j s wll jilw al aosg eg bao
I I J I J J J J J J J J J J J J J J J J J J J J J J J J J J J J J J J J J
. aodol j s o o! odol 1 g e y ios lao a g slal g laa g j c lly d j g f clll j
Jg g aeaal 4a J go all aai Jgall al Ig 1g 0g j
jzg jilao Jiaosao
Jg aeaalss Jg jy alls Jg jol alj g jol jol jol
..jbs juiu jilao jao jao jai
aJgdlalawylaagglalwogjIaglgulwglalaaJJagpdaowol pucuacssll
yI 1g I g I g yI g I g I g I g I g I g I g I g I g I g I g I g I g I g I g I g
.
- jaii i g d g 10000000000000000000000000000000000000000000
oJyIgjo jglll j51j agolll gai jzglw 2. aJbaw Jc gogogjglj go
.4a 1 j 1 j k j k j j j j j j j j j j j j j j j j j j j j j j j j j j j j j j j j j j j j j j
aalll aaii iie jaiy
y. alo g jall lalil jd jaii iaij g g jaii jn o 5b .gaoa aie jiae
gag g jiaol jgsy jaiol jqgljao jao
a a a a a a a a a a a a a a a a a a a a a a a a a a a
a oJxu 15 aI Juaa. aJol Jue bao piauLy Jao Cyo! iabw yai wall sljly pa
.
aIg plu wull lola j 1000 g lo slu wly jgl o! glglo jduy paa
g 32 / a 0 j
32/ aegio a 0 joojle oJy J a J y J 104/a 40
104/2g 2g 40 ju
J. alaewi Jglj X, lao JaoX gslj g ad abgaw g jdu j glj j glj jalogaw a
.aa 1 a
a
juxuill ocie

Lolal

a

a|b|c|d|e
ybllojgol

bolool
oljolllo

jouill dcl
gall go j
joooll ool
jaiol jclg lalol Jolo ayy
Jolj jq
Lgai 111111111111111111111111111111111
jolal jll j 100000000000000000000000000000000000000000000000000000000

.oo Jg8 Lqolzaiw!Jd JolKlly aJbUjll jaoi:aa
Jg jzai oae aellal Jg yj bdo f jyoggy g, lalll ayjgo ayagaae jge jzai oae e 1.1
gagll gaii jw w yj 1y i aai lgl
aaii i 100% gaii jgjg jia jia
Jaa Jaa Jaa Jaa Jaa Jaa Jaa Jaa Jaa Jaa

.10 15: a
sall no sks la cai g jzlallll 2.2
aaiil aolil jj 1
a
wug aaiioll oaii jj jjjlaol.1
A

a a 100 100 100 100 100 100 100 100 100 100 100 100 100 100 100 100 100 100 100
A
.0kOy a a aol ool oJ sallac 3

| x - 1| = | x|
J JI/100/100/100/100/100/100/100/100/100/100/100/100/100/100/100/100/100/100/100/100/100/100/100/100/100/10

Jkawgolg jll aaiSall allol p2g lssj g Jawg Jaoji loic: aai
.0aJ1 140 jao JaiSall aolj
.1gjglw g jzjzj 1
b#ddg/2lgl
.1JLJI Jc sly jolaoiao laa JbAuta aogjy Jai JzJgJ 1JzJ 1JzJ 1JzJ 1JzJ 1JzJ 1JzJ 1JzJ 1JzJ 1JzJ 1JzJ 1JzJ 1JzJ 1JzJ 1JzJ 1JzJ 1JzJ 1JzJ 1JzJ 1JzJ 1JzJ
.12 11 11 11 11 11 11 11 11 11 11 11 11 11
:
aIg 1 aIg 1 1 1 1 1 1 1 1 1 1 1 1 1 1 1 1 1
2
a.oosxlopooc
gJ 1000000000000000000000000000000000000000000000000
Jbllgjai jbljaiy jwai.0aalwssaaai jcLaygbljiaasio yjay g
3 J5 10
j j
.15% joojlllglgagolg aolal jaoaie 1
ololl jIjI sIol jooIg oJusall aIaill lIac ay joxll ssLg paaau gOg aaiSoll 1.1
.
wag, aalw alg jll aalw wag g, 1a aall lclj jlll
.1JU 1JU JU JU JU JU JU JU JU JU JU .3
cJl] .acjydoaolal oal jzabbi yg ydlal aalaoe gll Jx
. aclll alai jaoal lssla gai jao
.1daxx21 J 3 1sllaxl 4

oljg lcllaio pIa gJew sI calai.2
oljg cblaw.aouajll aillalj ge oI alj
.1olai aag j slalgl 0jgl
gagolzolawjllogwai j 4
laagolwajl gao jlc jnall axi jn jyj
.1sawal gao jlc jnaaia j! o

- The word "dreme" is the abbreviation of Dreame Technology Co., Ltd. and its subsidiaries in China. It is the transliteration of the company's Chinese name "追觅", which means striving for excellence in every endeavor and reflects the company's vision of continuous pursuit, exploration and search in technology.
Inr.Dreame Technology Co., Ltd. and its subsidiaries nnn nn Dreame . p01 1111111111111111111111111111111111111
SsGgLdAeTlllOySswIgOgDwIaIgSsiUoR 5sWgBbIgAswSgOgO 0
GtALJgCleSswIgOgSwIaIgSswIg"追觅"swal Gswal Aogwal Aosjll