DPP-MS300/MS300E - Photo printer SONY - Free user manual and instructions
Find the device manual for free DPP-MS300/MS300E SONY in PDF.
| Brand | Sony |
| Model | DPP-MS300 / MS300E |
| Product type | Digital photo printer |
| Compatible operating systems | Microsoft Windows 95 / 98 |
| Recommended processor | Pentium 100 MHz or higher |
| Minimum RAM | 16 MB (64 MB recommended) |
| Required hard disk space | 80 MB or more |
| Connectivity | Parallel port (printer) |
| Removable storage media | Memory Stick, PC Card |
| Readable image file formats | JPEG, BMP, GIF, PMP, NIU (proprietary format) |
| Print resolution | 306 dpi or 153 dpi (depending on setting) |
| Supported paper sizes | A6 Standard / Labels, A6 Super Coat |
| Print types | Labels (2, 4, 16 divisions), greeting cards, calendars, split images |
| Included software functions | Sony Printing Utility (editing, transfer, template creation) + Printer driver |
| Consumables | Print paper and ink cartridge (standard or Super Coat type) |
| Continuous printing | Up to 25 copies with automatic feeder VPF-A3 (optional) |
| Maintenance | Use only recommended consumables; in case of paper jam, turn the printer off and on again |
| Safety | Do not cancel a print job in progress; respect paper/cartridge combinations |
Frequently Asked Questions - DPP-MS300/MS300E SONY
User questions about DPP-MS300/MS300E SONY
0 question about this device. Answer the ones you know or ask your own.
Ask a new question about this device
Download the instructions for your Photo printer in PDF format for free! Find your manual DPP-MS300/MS300E - SONY and take your electronic device back in hand. On this page are published all the documents necessary for the use of your device. DPP-MS300/MS300E by SONY.
USER MANUAL DPP-MS300/MS300E SONY
This User's Guide describes the installation and operations of the application software for Microsoft Windows supplied with the Sony Digital Photo Printer DPP-MS300/MS300E.
First read the operating instructions of the Sony Digital Photo Printer DPP-MS300/ MS300E, and then read this guide and retain it for future reference.
Any design data such as sample pictures provided in this software cannot be modified or duplicated except for the purpose of personal use. Any unauthorized duplication of this software is prohibited under copyright law.
Please note that unauthorized duplication or modification of others' portraits or copyrighted work could infringe the rights reserved by right holders.
Notice for users
Program ©1999 Sony Corporation Documentation ©1999 Sony Corporation
All rights reserved. This manual or the software described herein, in whole or in part, may not be reproduced, translated or reduced to any machine readable form without prior written approval from Sony Corporation.
IN NO EVENT SHALL SONY
CORPORATION BE LIABLE FOR ANY
INCIDENTAL, CONSEQUENTIAL OR
SPECIAL DAMAGES, WHETHER BASED
ON TORT, CONTACT, OR OTHERWISE,
ARISING OUT OF OR IN CONNECTION
WITH THIS MANUAL, THE SOFTWARE OR
OTHER INFORMATION CONTAINED
HEREIN OR THE USE THEREOF.
By breaking the seal of the envelope of the CD-ROM package, you accept all the terms and conditions of this agreement. If you do not accept these terms and conditions, please return this disk envelope unopened, along with the rest of the package, immediately to the dealer where you obtained it.
Sony Corporation reserves the right to make any modification to this manual or the information contained herein at any time without notice.
The software described herein may also be governed by the terms of a separate user license agreement.
- Microsoft, MS, MS-DOS and Windows® are registered trademarks of Microsoft Corporation in the United States and other countries.
- IBM and PC/AT are registered trademarks of International Business Machines Corporation of the U.S.A.
- Pentium is a registered trademark of Intel Corporation.
- All other companies and product names mentioned herein may be the trademarks or registered trademarks of their respective companies. Furthermore, "TM" and "®" are not mentioned in each case in this manual.
User Registration
To receive customer services, complete and return the registration card included in your package.
Table of contents
Overview 4
About this manual 4
System requirements 5
Features 6
Preparations 7
Installing the Software 7
Basic Operations 10
Using the Sony Printer Utility for MS300/MS300E. 10
Starting the Sony Printer Utility for MS300/MS300E ... 10
Basic operating procedures 11
Transferring the images of "Memory Stick" or PC card to your PC hard disk 12
Making a sticker 14
Making a greeting card 17
Using the Sony DPP-MS300/MS300E Printer Driver 19
Other Information 21
Troubleshooting 21
About this manual
Note
In the dialog boxes and windows, "MS300" appears as the application or printer name.
This manual explains how to install the supplied Sony Digital Photo Printer Utility for MS300/MS300E and Sony DPP-MS300/MS300E Printer Driver for the DPP-MS300/MS300E Digital Photo Printer, and how to perform basic operations. For detailed operations, see online help and for the latest software information, see the "Readme.txt" file.
To access the Sony Printer Utility for MS300/MS300E Help
After installing the software, choose "Start" "Programs" "Sony Printer Utility for MS300" "Sony Printer Utility for MS300 Help" or choose "Help topics" from the Sony Printer Utility for MS300/MS300E "Help" menu.
To view the Sony Printer Utility for MS300/MS300E "Readme.txt" file
After installing the software, choose "Start" "Programs" "Sony Printer Utility for MS300" "Readme."
To access the Sony DPP-MS300/MS300E Printer Driver Help
After installing the software, choose "Start" "Programs" "Sony Printer Utility for MS300" "Sony DPP-MS300 Printer Driver Help."
System requirements
Your PC and system software must meet the following minimum requirements to use the Sony Printer Utility for MS300/MS300E and Sony DPP-MS300/MS300E Printer Driver.
IBM PC/AT compatibles
OS: Microsoft Windows 95/98
CPU: Pentium 100 MHz and above is recommended.
RAM: When using the Sony Printer Utility for MS300/MS300E
16 MB or more (64 MB or more is recommended.)
- When using the Sony DPP-MS300/MS300E Printer Driver
Depending on the application software used for printing
Hard disk space:
80 MB or more (The larger the pictures and the greater the number of pages you print, the more hard disk space is required.)
CD-ROM drive (for software installation)
Video board and display driver:
640 × 480 pixels with high (16-bit) colors or more ( 800 × 600 pixels with high (16-bit) colors is recommended.)
Port: Your computer must have a printer port.
Features
The supplied CD-ROM contains the Sony Digital Photo Printer Utility for MS300/MS300E and the Sony DPP-MS300/MS300E Printer Driver.
Sony Digital Photo Printer Utility for MS300/MS300E
The Sony Digital Photo Printer Utility for MS300/MS300E ("Sony Printer Utility for MS300/MS300E") enables you to retouch and process the images.
With the Sony Printer Utility for MS300/MS300E, you can:
- Transfer images stored in a "Memory Stick" or PC card inserted in the printer to your PC hard disk.
- Print images from your PC hard disk with photographic quality.
-
Make various prints including:
-
a 2-split, 4-split, or 16-split stickers
- a postcard with the selected greeting and input messages
- a split image of multiple images (2, 4, 9, 13, 16 planes are available.)
-
a calendar of 1, 2, or 12 months
-
Make an original frame for a picture.
- Save the created print image in your PC hard disk.*
*Note for the file extension
The working file with this software issaved with the .NIU" file extension.
If you want to use the created image with the Sony Printer Utility for MS300/MS300E from other application software, you can also export the image to bitmap (".BMP") or JPEG (".JPG") format.
Sticker

Postcard
Calendar
Splitimage
Sony DPP-MS300/MS300E Printer Driver
The Sony DPP-MS300/MS300E Printer Driver enables you to print an image from your PC hard disk using the Sony Printer Utility for MS300/MS300E (and other application software) and the DPP-MS300/MS300E Digital Photo Printer.
Installing the Software
Note
The windows and dialog boxes in this manual may differ from what are actually displayed.
Install the Sony Printer Utility for MS300/MS300E and the Sony DPP-MS300/MS300E Printer Driver for Windows 95/98 as follows.
1 Connect the PC and the printer.
For the connections, refer to "Connecting the printer" on pages 8 through 11 of the operating instructions for the printer.
2 Turn on your PC and the printer and start Windows.
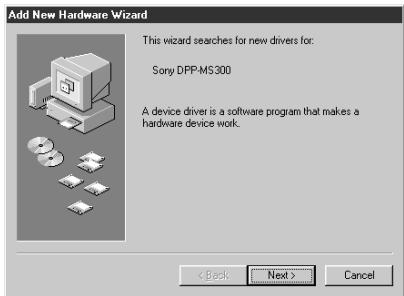
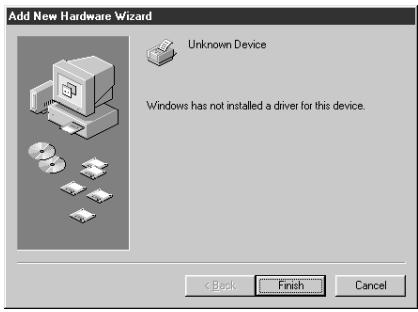
3 If the following "New Hardware Found" screen is displayed, check "Do not install a driver" and click "OK".
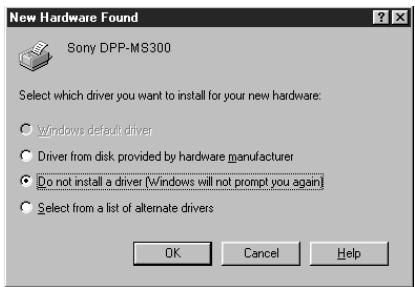
- If the "Update Device Driver Wizard" screen for Windows 95 or "Add New Hardware Wizard" screen for Windows 98 is displayed, click "Next" until the "Finish" button appears. Then click "Finish."

Installing the Software (continued)
If the installer does not start up automatically Start "Setup.exe" in the "Disk1" folder of the CD-ROM.
About the language options
You can select the language from English, Spanish, French and German.
Note
Close all programs before running the installer.
4 Insert the supplied CD-ROM into the CD-ROM drive.
The installer automatically starts up, and the language selection dialog box appears.
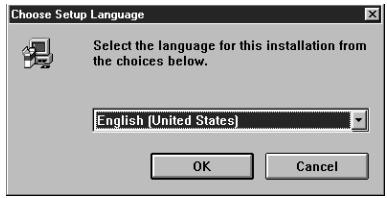
5 Select the language for the application, then click "OK."
The "Welcome" dialog box appears.
6 Click "Next."
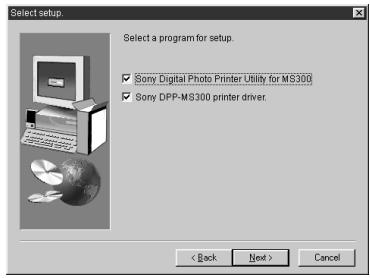
The screen to select the files to be installed appears.
Notes
- During installation, you may be asked to insert the Windows 95 or 98 CD-ROM. Insert the specified CD-ROM.
After you click "Finish," you may be prompted to restart the computer. After you have restarted your computer, display "Readme" by choosing "Start" "Programs" "Sony Printer Utility for MS300" "Readme."
7 Check "Sony Digital Photo Printer Utility for MS300" and "Sony DPP-MS300 Printer Driver" and then click "Next."
The screen for selecting the directory in which you install the Sony Printer Utility for MS300/MS300E appears. If you want to install the files in a specific directory, click "Browse" and designate the directory.
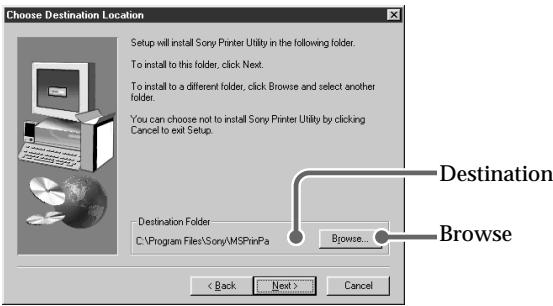
8 Click "Next."
The installation starts. While installing, the installation status is displayed.
When installation ends, the "Finish Setup" screen appears.
9 Click "Finish."
Installation ends and "Readme" appears automatically. Since this file includes the latest information about the software, read the file carefully.
Uninstalling the software
For details on uninstalling the software, see the Sony Printer Utility for MS300/MS300E Help and Sony DPP-MS300/MS300E Printer Driver Help.
Using the Sony Printer Utility for MS300/MS300E
This section explains how to start up the Sony Printer Utility for MS300/MS300E (below), how to transfer and save the images of "Memory Stick" or PC card in your PC hard disk (page 12), and how to make stickers (page 14) and greeting cards (page 17).
Starting the Sony Printer Utility for MS300/MS300E
1 Turn on your PC and the printer.
2 Start Windows.
3 Click "Start" on the task bar, point to "Programs," select "Sony Printer Utility for MS300," and then click "Sony Printer Utility for MS300."
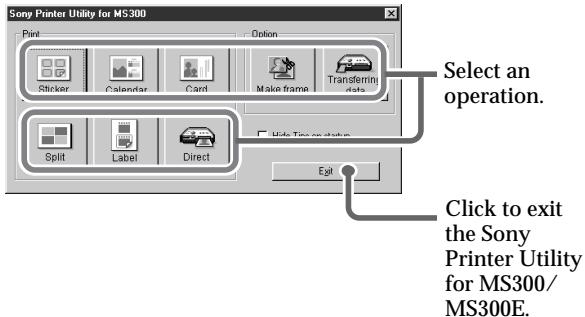
The Sony Printer Utility for MS300/MS300E starts, and the start menu window of the Sony Printer Utility for MS300/MS300E appears.
Select the desired operation and click the corresponding button icon in the window.
Using the navigation bar Use the navigation bar to make the desired image with the Sony Printer Utility for MS300/ MS300E.
You can go to the next step or go back to the previous step by clicking the corresponding button on the navigation bar. Since the current step is highlighted in the navigation bar, you can see an overview of the total operating procedures.
- To go to the next step, click "Next."
- To go back to the previous step, click "Back."
- To go to the printing step, click "Print."
- To go to the desired step, click the desired step button.
Basic operating procedures
When you select and click the desired operation in the start menu window, the following operation window appears (the operation window depends on your selection).
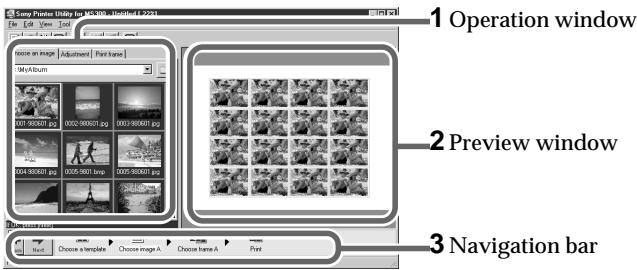
In each operation window, the basic operation flow is as follows:
1 Select an image or type characters in the operation window.
2 Confirm the image (print image) in the preview window.
3 After confirmation, click "Next" on the navigation bar so that the operation window of the next step appears.
Repeat these steps until you finish making images.
Using the Sony Printer Utility for MS300/MS300E (continued)
Note
If the printer does not contain the print cartridge, you cannot transfer the images of "Memory Stick" or PC card into your PC hard disk.
Transferring the images of "Memory Stick" or PC card to your PC hard disk
1 Set the INPUT SELECT switch on the printer to "VIDEO STILL" or "VIDEO MOTION" and slide the "Memory Stick"/PC card selection switch to the desired slot position.
For connections and printing operations, refer to the operating instructions of the printer.
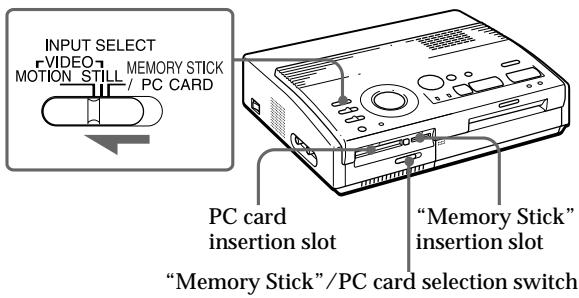
2 Insert the "Memory Stick" or PC card on which you recorded images into the insertion slot.
While the printer is accessing the "Memory Stick" or PC card, the access indicator flashes.
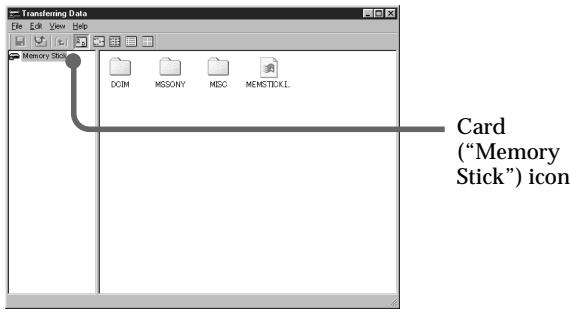
3 Click "Transferring data" in the start menu window.
The window for transferring the images on the card ("Memory Stick" or PC card) appears.
Tips
To save multiple images at a time, click the desired images and click "Save."
- To cancel a selection, click the selected image again.
- To manage the image files easily, make folders and then group images with the subjects or date of the image.
- When transferring the images on a "Memory Stick" recorded with the Sony Digital Still Camera DSC-F55/F55E, you can view the images as thumbnails by clicking on the tool bar.
Note
When you record images using the E-mail mode of the Sony Digital Still Camera DSC-F55/F55E, E-mail size (320 x 240) images are stored in the "MSSONY\IMCIF100" directory on the "Memory Stick." Do not attempt to transfer the images in the "MSSONY\IMCIF100" directory for printing. Make sure to transfer and print the relevant images with higher resolution stored in the "DCIM/100MSDCF" in the "Memory Stick." For details, refer to the operating instructions of the Digital Still Camera DSC-F55/F55E.
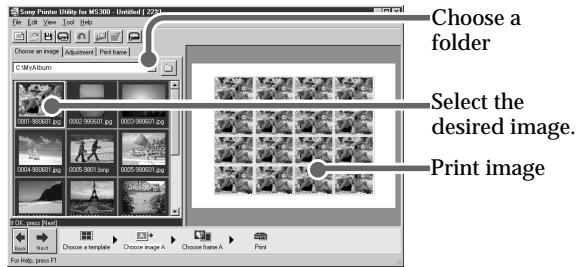
4 On the left pane of the window, click the card icon and select the folder in which the images you want to print are stored.
The files in the selected folder are listed on the right pane of the window.
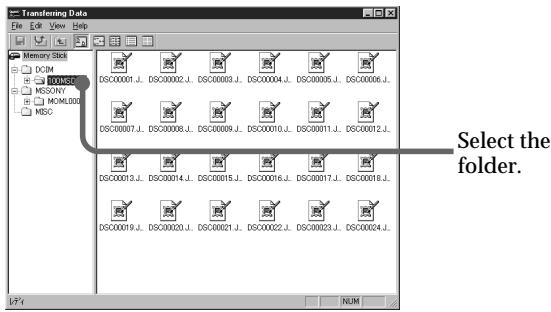
5 Click the image file you want to transfer to your PC hard disk and click "Save."
The "Browse for Folder" window appears.
6 Select the destination folder and click "OK."
The selected image files in the "Memory Stick" or PC card are transferred and saved to the specified folder in your PC hard disk.
7 Click "Exit" from the "File" menu.
The start menu window appears again.
Using the Sony Printer Utility for MS300/MS300E (continued)
Making a sticker
You can print multiple images on a single sheet, using the images on your PC hard disk. This section describes how to make a sticker of 16-split planes of the same image.
16-split planes
What's a template? A regular form that allows you to place an image and text in specific positions to easily make a print with the Sony Printer Utility for MS300/MS300E.
When you start the Sony Printer Utility for MS300/MS300E for the first time
The images included in the sample folder appears in the operation window. Click "□" above the operation window, select the desired directory which includes the desired image, then click "OK."
The images included in the selected directory appear in the operation window.
1 Click "Sticker" (Sticker)" in the start menu window.
The template for the sticker appears in the operation window.
2 Click "16-split" (16-split).
The selected template image appears in the preview window.

3 Click "Next," then click the image you want to print.
The selected image appears in the preview window.
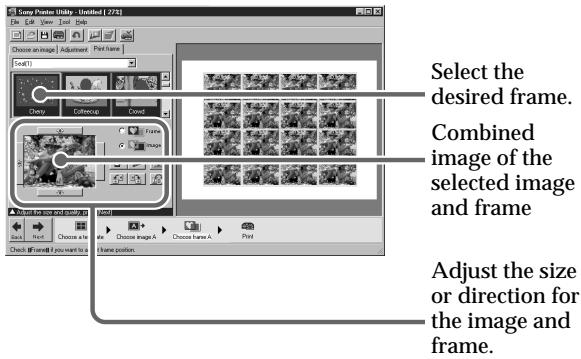
Adjusting the size or direction for the image and frame
Click "Frame" or "Image" to designate the object you want to adjust, then adjust the size or direction.
For details, see the Sony Printer Utility for MS300/ MS300E Help.
Notes
-
Use the set of print paper and print cartridge supplied together in the same carton. If you use the paper and cartridge in a different combination, proper printing results may not be obtained or other trouble may occur. Also make sure to set "Size" as shown in the table. If you make a different setting, you cannot print.
-
For the details on print paper and print cartridge, refer to "Using print packs (not supplied)" on page 14 of the operating instructions of the printer.
4 Click "Next," then click the frame you want to print over the image.
The selected frame overlaps the selected image, and the overlapped image appears in the operation window.
5 Click "Next" and the "Print" dialog box appears. To change the printer settings, click "Print Setup" in the "Print" dialog box.
The "Print Setup" dialog box appears.
6 Set "Size" of the "Paper" by referring to the combination below.
| Print paper loaded | Print cartridge loaded | “Size” setting |
| Standard paper | Standard type | A6 Standard/Sticker |
| 2/16-cut sticker | Standard type | A6 Standard/Sticker |
| Super Coat | Super Coat type | A6 Super Coat |
Using the Sony Printer Utility for MS300/MS300E (continued)
Making continuous prints
You can print up to 25 copies continuously by using the automatic feeder VPF-A3.
Stopping printing
Click "Cancel." For further details, refer to the Sony Printer Utility for MS300/MS300E Help. If the data has already started printing, don't try to cancel the job. Doing so will cause the paper to jam.
If you want to use the image file created with the Sony Printer Utility for MS300/MS300E from other application software
Choose "Export..." from the File menu, then save the image in bitmap (.BMP) or JPEG (.JPG) format.
When you create an image in a floppy disk, use the "Export..." command.
Exiting the Sony Printer Utility for MS300/ MS300E
Click the close button of the operation window, or choose "Exit" from the File menu.
7 In the "Print Setup" dialog box, click "OK" to return to the "Print" dialog box. Select the number of prints.
Input the desired number of prints directly into the "Copies" box, or click or to display the desired number of prints.
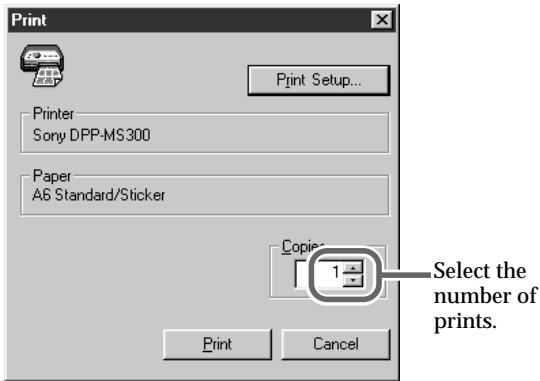
8 Click "Print."
The printer starts printing.
Saving the created image
You can save the created image on your PC.
1 Click "B (Save)" on the tool bar, or choose "Save As..." from the File menu.
The "Save As" dialog box appears.
2 Designate the destination directory and the file name, then click "Save."
The created image is saved in ".NIU" format which is an original file format for the Sony Printer Utility for MS300/MS300E.
Making another type of print
Click "New image" on the tool bar so that the start menu window appears.
If you want to make a greeting card, see the next page. If you want make other types of print images, see the Sony Printer Utility for MS300/MS300E Help.
Tip
Among the card templates, ready-made types are also available. Just by selecting the template and inputting messages, you can make a card very easily.
Making a greeting card
You can make a greeting card with your address, name and message using an image from your PC hard disk.
Greeting card

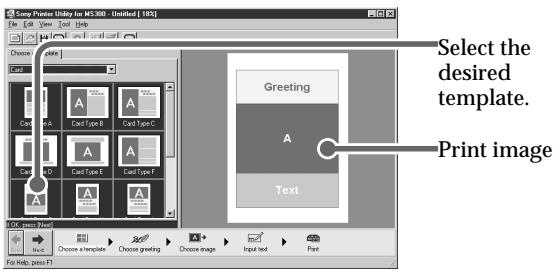
1 Click "Card" (Card) in the start menu window.
The template for the card appears in the operation window.
2 Click "Card Type G".
The selected template image appears in the preview window.
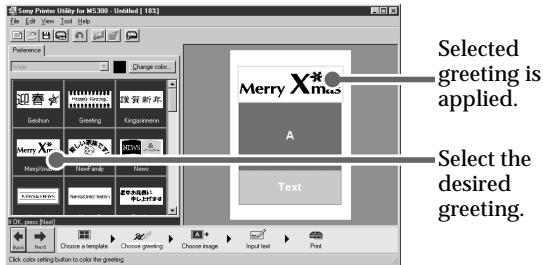
3 Click "Next," then click the greeting you want to print on a greeting card.
For example, select "Merry X'mas" in this step. You can also change the color of the greeting. (You cannot change the color of some greetings.)
continued
Using the Sony Printer Utility for MS300/MS300E (continued)
If you want to display the image in other directories or the floppy disk
Click "□" above the operation window and select the desired directory.
Adjusting the picture quality or adding a frame to the image Click the "Adjust" or "Print frame" tab.
4 Click "Next," then click the image you want to print with the selected greeting.
The selected image appears in the preview window.

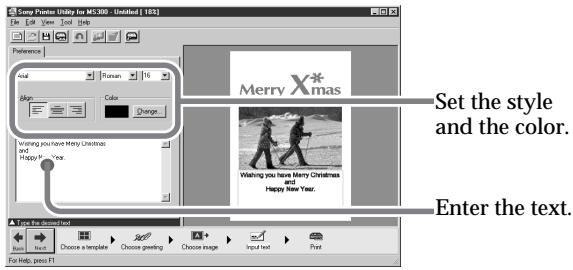
5 Click "Next," then type the desired messages. You can type your name, address, and so on. You can also change the color of the text.
6 Click "Next" and make the print settings (page 15).
7 Click "Print."
The printer starts printing.
Saving the created image
You can save the created image on your PC.
For details, see page 16.
Exiting the Sony Printer Utility for MS300/MS300E Click the close button of the operation window, or choose "Exit" from the "File" menu.
Using the Sony DPP-MS300/MS300E Printer Driver
Note
This sections explains the settings and operations with a typical application as an example.
Depending on the application, print settings and operations may differ. For the details, refer to the manual of your application.
Tip
When you print in 306 dpi using the application software, set the picture size to 1376 × 1024 pixels.
Notes
-
Use the set of print paper and print cartridge supplied together in the same carton. If you use the paper and cartridge in a different combination, proper printing results may not be obtained or other trouble may occur. Also make sure to set "Size" as shown in the table. If you make a different setting, you cannot print.
-
For the details on print paper and print cartridge, refer to "Using print packs (not supplied)" on page 14 of the operating instructions of the printer.
With the Sony DPP-MS300/MS300E Printer Driver, you can print an image from your PC hard disk using the "Sony Digital Photo Printer Utility for MS300/MS300E" or other application software.
1 Start the application software that you use to print with, and select the image to be printed.
2 Click "Print Setup" from the "File" menu of the application.
The "Print Setup" dialog box appears.
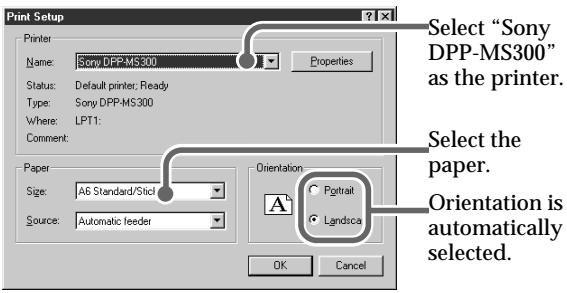
3 Set the printer.
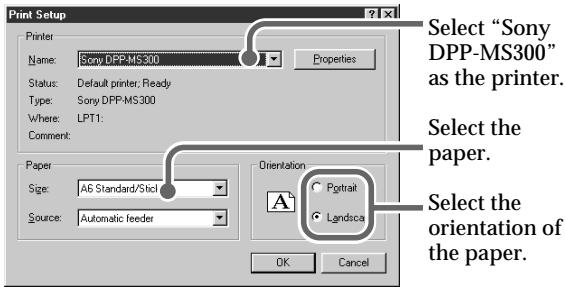
The above dialog box is an example of "Sony Digital Photo Printer Utility for MS300/MS300E." The dialog box differs depending on the application.
① Set“Printer”to“SonyDPP-MS300.”
② Set "Size" by referring to the combination below.
| Print paper loaded | Print cartridge loaded | “Size” setting |
| Standard paper | Standard type | A6 Standard/Sticker |
| 2/16-cut sticker | Standard type | A6 Standard/Sticker |
| Super Coat | Super Coat type | A6 Super Coat |
③ Set "Orientation."
To print in portrait (tall) format, select "Portrait." To print in landscape (wide) format, select "Landscape."
continued
Using the Sony DPP-MS300/MS300E Printer Driver (continued)
Making continuous prints
You can print up to 25 copies continuously by using the automatic feeder VPF-A3.
4 Click "OK" to close the "Print Setup" dialog box.
5 Click "Print" from the "File" menu of the application.
The "Print" dialog box appears.
6 Set "Copies."
Input the desired number of prints directly into the "Copies" box, or click or to display the desired number of prints.

Stopping printing
Click "Cancel." For further details, refer to the Sony DPP-MS300/ MS300E Printer Driver Help.
If the data has already started printing, don't try to cancel the job. Doing so will cause the paper to jam.
The above dialog box is an example of "Sony Digital Photo Printer Utility for MS300/MS300E." The dialog box differs depending on the application.
7 Click "Print."
The printer starts printing.
Troubleshooting
Use the following measures to solve problems you may experience with your Sony Printer Utility for MS300/MS300E or Sony DPP-MS300/MS300E Printer Driver.
If the problem persists, consult your Sony dealer.
Cannot install the Sony Printer Utility for MS300/MS300E.
There is not enough free space on your hard disk.
Check the hard disk. If there is not enough space, increase enough space for installing the Sony Printer Utility for MS300/MS300E (approx. 80MB).
The "AutoPlay" settings of the CD-ROM are not set to "AutoPlay."
Change the "AutoPlay" settings of your PC.
Start "Setup.exe" in the "Disk 1" folder of the CD-ROM.
Other programs are running.
Close all the programs before running the installer.
Startup screen does not appear
"Show Start Menu" in the "View" menu is not checked.
Choose "Show Start Menu" in the "View" menu to check the menu item.
The image which you want to process does not appear in the operation window
The image format of the image is not JPEG, GIF, BMP and PMP.
Convert the image format using other application software.
Troubleshooting (continued)
Cannot transfer the "Memory Stick" or PC card images to your computer hard disk.
The printer's settings are not correct.
Set the INPUT SELECT switch to "VIDEO STILL" or "VIDEO MOTION." (page 12)
The printer does not contain the print cartridge.
Insert the proper print cartridge into the printer.
Cannot open the saved ".NIU" file
The image is saved in removable media such as a floppy disk, ZIP disk or MO (Magneto-optical) disk.
Insert a disk which contains the image or copy the image data to the hard disk of your PC.
The image file has been moved to other directories, the image file has been deleted, or the file name has been changed.
Restore the directories of the image file or file name of the image file. Or, re-select a new image file.
The printer prints the image split into pieces, or the edges of the printed image are jagged.
The resolution of the image is incorrectly set or the size of the image is too large.
When printing in 306 dpi, trim the image to within 1,376 × 1,024 pixels.
When printing in 153 dpi, trim the image to within 688 × 512 pixels.
The edges of the printed characters are jagged.
As the printer prints in 153 dpi, the printed characters may look jagged depending on the size.
Print from application software that supports the font smoothing (anti-aliasing) function.
The printer does not start printing.
No print paper, no print cartridge, or a paper jam can be the cause.
Check the indicators on the printer and refer to the printer's operating instructions.
Make sure that you set the correct combination of print paper, print cartridge and "Size" setting in the "Print Setup" dialog box.
It may take a long time to set up the data for printing depending on your PC or application software. It may also take a long time when you set to print many copies.
Wait until your PC completes the processing.
The printer may be malfunctioning.
Check the indicators on the printer and refer to the printer's operating instructions.
If the printer does not start printing within 5 minutes after the print paper is inserted when there is nothing wrong with the printer or your PC, turn off the printer and turn it on again. Then try printing again. It may take more than 5 minutes when you set to print many copies.
There is not enough free space on the hard disk.
Check the hard disk. If there is not enough space, increase enough space for image processing.
You are running the "Transferring Data" function.
Cancel the "Transferring Data" application.
(Sony Printer Utility for MS300/MS300E) 10