
TDS6041 - Iron BOSCH - Free user manual and instructions
Find the device manual for free TDS6041 BOSCH in PDF.
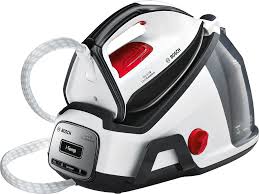


| Product type | Steam generator |
| Brand | BOSCH |
| Model | TDS6041 |
| Power | 2400 W |
| Voltage | 220-240 V ~ 50/60 Hz |
| Water tank capacity | 1.5 L |
| Functions | Continuous steam, PulseSteam, vertical ironing, Eco mode |
| Auto shut-off | After 8 minutes of inactivity |
| Anti-calc system | Calc'nClean with integrated descaling |
| Soleplate type | High-quality smooth soleplate (material not specified) |
| Safety | SecureLock lock, hot surface, child protection (keep out of reach of children under 8) |
| Maintenance | Regular descaling of boiler and iron, cleaning of soleplate |
| Anti-calc filter | Yes, removable and washable |
| Power cord length | Approximately 2 m |
| Weight | Approximately 4 kg |
| Dimensions (L x W x H) | Approximately 30 x 20 x 30 cm |
| Included accessories | Calc'nClean tank (depending on model) |
| Warranty | 2 years |
| Recommended water | Tap water, possible mix with distilled water in hard water areas |
| Usage | Household, max altitude 2000 m |
Frequently Asked Questions - TDS6041 BOSCH
User questions about TDS6041 BOSCH
0 question about this device. Answer the ones you know or ask your own.
Ask a new question about this device
Download the instructions for your Iron in PDF format for free! Find your manual TDS6041 - BOSCH and take your electronic device back in hand. On this page are published all the documents necessary for the use of your device. TDS6041 by BOSCH.
USER MANUAL TDS6041 BOSCH
Register your new Bosch now: www.bosch-home.com/welcome
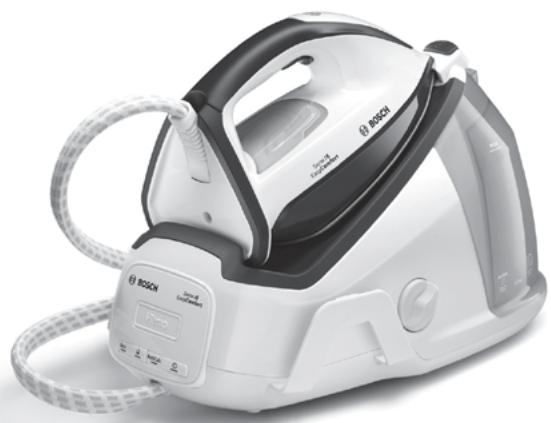
Serie 16 (TDS60..) EasyComfort

BOSCH
de Gebrauchsanleitung en Operating instructions fr Notice d'utilisation it Istruzioni per l'uso nl Gebruiksaanwijzing da Brugsanvising no Bruksanvisning
sv Bruksanvisning fi Käytöhjeet es Instrucciones de uso pt Instruções de utilização el Odyieic xpon tr Kullanma talimati pl Instrukcja obslugi
hu Hasznalatiutasitask uk Inctpykui 3 BnKOpncTaHHa ru Hnctpykun IIO 3KcIaTaun ro Instructiuni de folosire ar kz TaaandahyKeHHderi HcyakaybIK

Index
| DEUTSCH | 6 |
| ENGLISH | 14 |
| FRANÇAISE | 22 |
| ITALIANO | 30 |
| NEDERLANDS | 38 |
| DANSK | 46 |
| NORSK | 54 |
| SVENSKA | 62 |
| SUOMI | 70 |
| ESPAÑOL | 78 |
| PORTUGUES | 86 |
| ЕLVHNIKA | 94 |
| TÜRKQE | 102 |
| POLSKI | 110 |
| MAGYAR | 118 |
| УКPassИСьКА | 126 |
| РУССКИ | 134 |
| ROMÁN | 142 |
| العربية | 157 |
| ΚΑ3ΑΚ | 158 |
DEUTSCH
ESPANOL
ENGLISH
PORTUGUES
FRANÇAISE
EMLHNIKA
ITALIANO
TÜRKÇE
DUTCH
POLISH
DANISH
HUNGARIAN
NORWEGIAN
UKRAINIAN
SWEDISH
RUSSIAN
FINNISH
ROMANIAN
KAZAKH
General safety instructions
During use, the decalcifying or rinsing aperture of the boiler is under pressure and must not be opened. The appliance must not be left unattended while it is connected to the supply mains. Remove the plug from the socket before filling the appliance with water or before pouring out the remaining water after use. The appliance must be used and placed on a stable surface. When placing the iron on its stand or on its heel, make sure that the surface on which the stand or heel is placed is stable. The appliance should not be used if it has been dropped, if there are visible signs of damage, or if it is leaking water. It must be checked by an authorized Technical Service Centre before it can be used again. With the aim of avoiding dangerous situations, any work or repair that the appliance may need, e.g., replacing a faulty mains cable, must only be carried out by qualified personnel from an Authorized Technical Service Centre. This appliance can be used by children aged from 8 years and above and persons with reduced physical, sensory, or mental capabilities or lack of experience and knowledge if they have been given supervision or instruction concerning use of the appliance in a safe way and understand the hazards involved. Children shall not play with the appliance. Cleaning and user maintenance shall not be made by children without supervision. Keep the appliance and its cord out of reach of children under 8 years of age when it is turned on or cooling down. This appliance is designed only for household use up to 2000m above sea level. CAUTION. Hot surface. Surface is liable to get hot during use.
Important notices
- Carefully read through the operating instructions for the appliance and safeguard them for future reference.
- This appliance has been designed exclusively for normal household use in a home environment.
- This appliance must be used only for the purposes for which it was designed, i.e., as an iron. Any other use will be considered improper and consequently dangerous. The manufacturer will not be held responsible for any damage arising from misuse or improper use.
- This appliance is to be connected and used in accordance with the information stated on its characteristics plate.
- This appliance must be connected to an earthed socket. If it is absolutely necessary to use an extension cable, make sure that it is suitable for 16A and has a socket with an earth connection.
- The appliance must never be placed directly under the tap to fill the water tank.
- The electrical plug must not be removed from the socket by pulling the cable.
- Never immerse the iron in water or any other fluid.
- Do not leave the appliance exposed to weather conditions (rain, sun, frost, etc.)
- This appliance reaches high temperatures and produces steam during use, which could cause scalds or burns if not used properly.
- Do not allow the power cable to come into contact with the soleplate when it is hot.
Advice on disposal
Our goods come in optimised packaging. This basically consists in using non-contaminating materials which should be handed over to the local waste disposal service as secondary raw materials. Your local town council can give you information about how to dispose of obsolete appliances.
This appliance is labelled in accordance with European Directive 2012/19/EU concerning used electrical and electronic appliances (waste electrical and electronic equipment - WEEE).
The guideline determines the framework for the return and recycling of used appliances as applicable throughout the EU.
Description

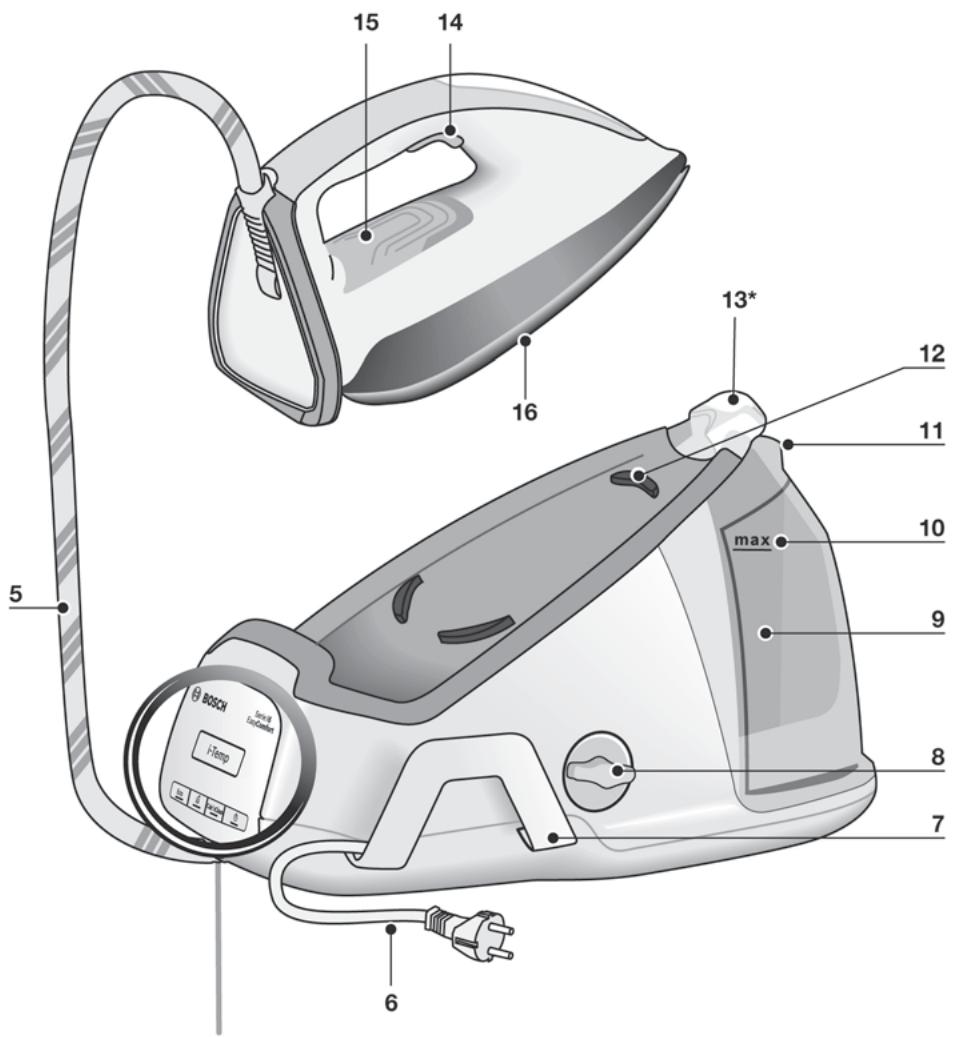
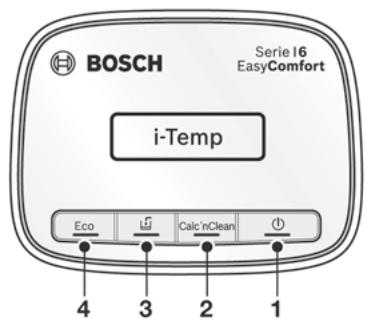
- "on / off" button with indicator light
- "Calc'nClean" descending button with indicator light
- "Water tank empty" button with indicator light
- Energy saving "Eco" button with indicator light
- Steam hose
- Mains cable
- Mains cable and steam hose storage holder
- Boiler cap / "Calc'nClean" scale collector *
- Water tank
- Level mark for maximum filling
- Filling lid
- Iron pad
- Iron lock system "SecureLock" *
- Steam release button
- Iron indicator light
- Soleplate
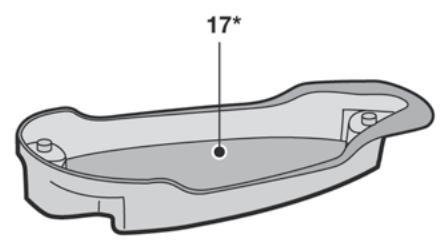
- "Calc'nClean" container *
Introduction

EasyComfort for simple, fast and safe ironing.
Discover the new way of ironing with EasyComfort – no more changing the temperature of the iron and tedious pre-sorting! Now all ironable materials, from ultra fine delicates to extra thick fabrics, are creasefree in a flash with a single temperature setting. Which means more time to do other things.

1. Filling the water tank
This appliance has been designed to use normal tap water.
Important: Do not use additives! The addition of other liquids, such as perfume, vinegar, starch, condensation water from tumble dryers or air conditioning systems, or chemicals will damage the appliance. Any damage caused by the use of the aforementioned products will make the guarantee void!
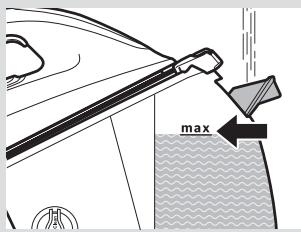
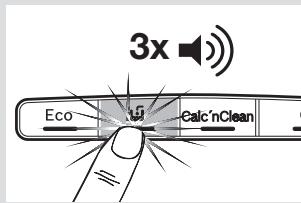
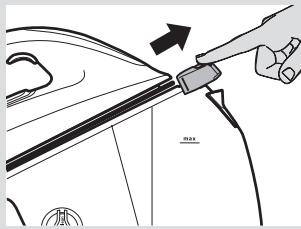
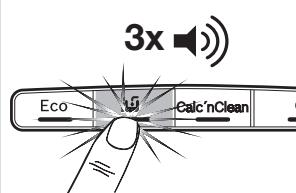
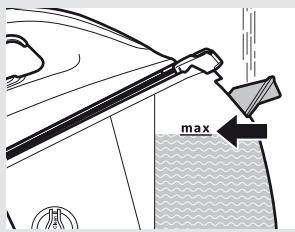
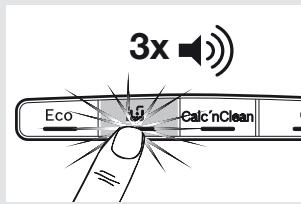
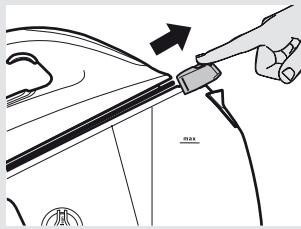
1 Open the filling lid (11). 2 Fill the water tank (9). Never fill beyond the level "max" (10) for maximum filling! 3 Close the filling lid. 4 Refill the water tank when the indicator light (3) comes on. Three beeps will be heard. Important: Once refilled, press button (3).
Tip: To prolong the optimum steam function, you may mix tap water with distilled water 1:1. If the tap water in your area is very hard, mix tap water with distilled water 1:2.

2. Heating
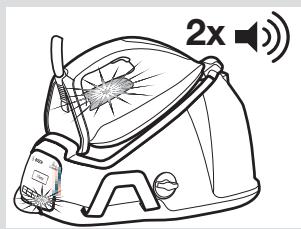
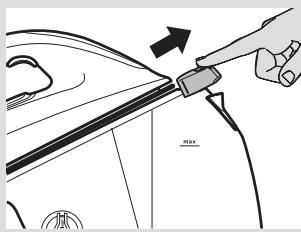
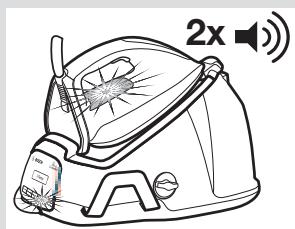
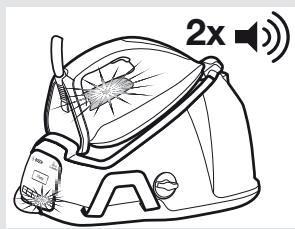
If your steam station is equipped with an iron lock system (13*) , release the iron by pressing the button. Unwind the steam hose (5) and the mains cable (6). Plug mains cable into an earthed socket. 3 Press the button (1) to switch the appliance on. Indicator lights (1, 15) will flash indicating that the appliance is heating up. 4 When the iron is ready to use, the indicator lights (1, 15) will remain permanently lit. Two beeps will be heard.
3. Ironing
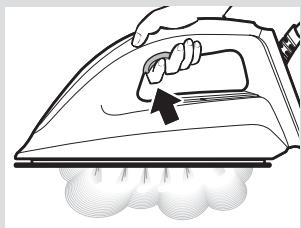
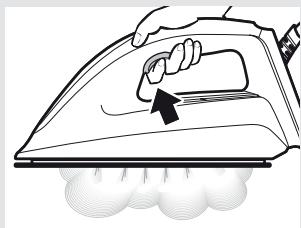
Press the steam release button (14) for ironing with steam.
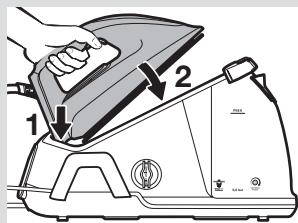
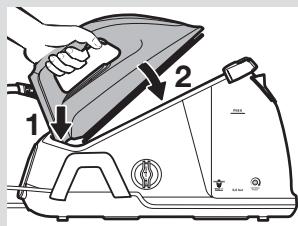
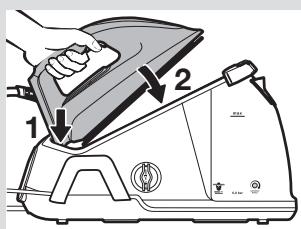
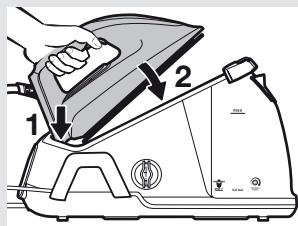
Important: When placing the iron on the pad, be sure to first insert the heel in the upper side of the control panel, as shown in the figure.
Tip: For better ironing results, iron the last strokes without pressing the steam release button (14) to dry the garment.

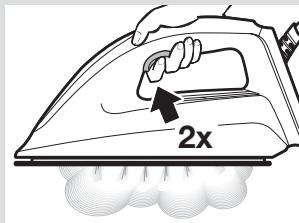
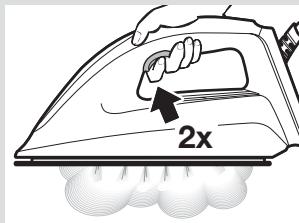
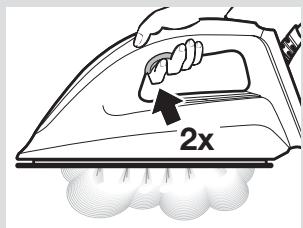
"PulseSteam" function
This appliance has a special function for tackling difficult creases.
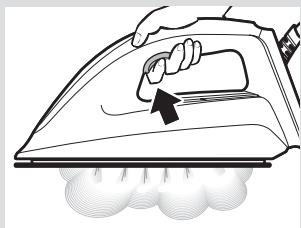
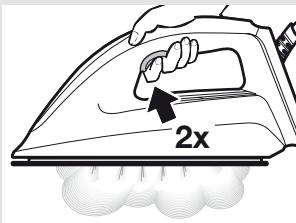
Press the steam release button (14) two times in quick succession (double-click). Powerful shots of steam will be released.

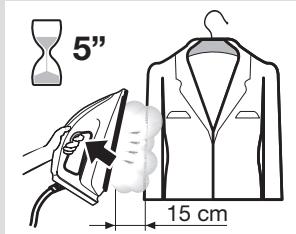
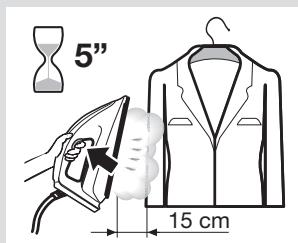
Vertical steam
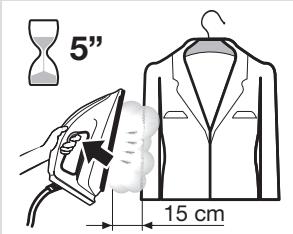
Can be used to remove creases from hanging clothes, curtains, etc.
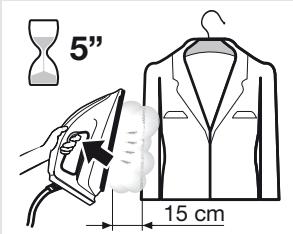
1 Hold the iron in an upright position 15 cm away from the garment to be steamed. Press the steam release button (14) repeatedly with pauses of at least 5 seconds.
Warning! : never point the steam jet at garments being worn, or at people or animals.

4. Energy saving
If the energy saving setting is selected, you can save energy and water and still achieve good results when ironing most of your garments.
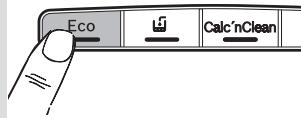
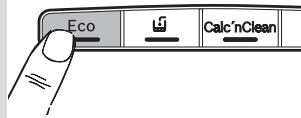
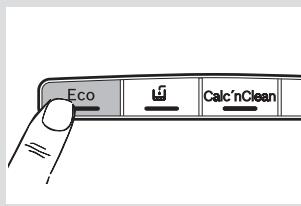
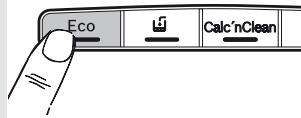
Press the energy saving button "Eco" (4). The indicator light will come on. 2 To switch back to the normal energy setting, press the "Eco" button again. It is advisable to use the normal energy setting to get optimum results on thick and very wrinkled fabrics.
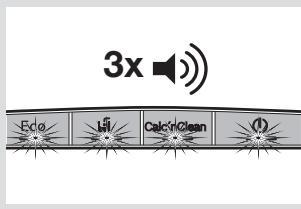

5. Auto switch off
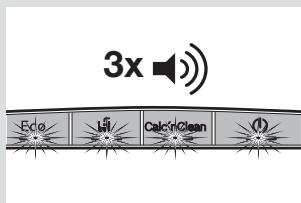
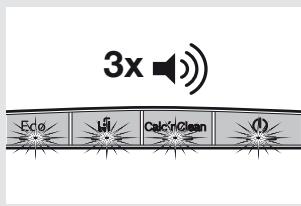
For your safety and to save energy, the appliance switches off automatically when it has not been used for 8 minutes. Three beeps will be heard, and all indicator lights (1, 2, 3, 4) will flash.
To switch the steam station back on, press the steam release button (14) again.

Cleaning & Maintenance
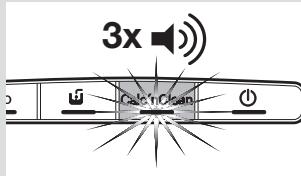

1. Descaling process
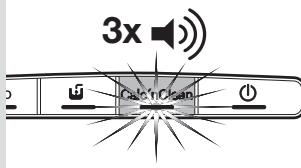
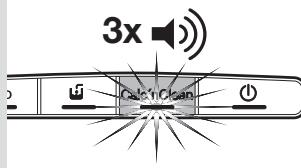
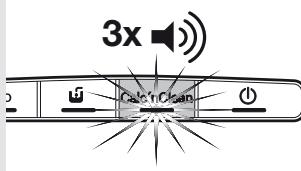
Important: to keep your appliance in good condition for a long time, you should carry out the descaling process after a period of use. The "Calc'nClean" indicator light (2) will flash and three beeps will be heard, indicating that the process should be performed.
Descaling the boiler
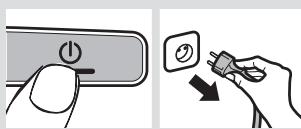
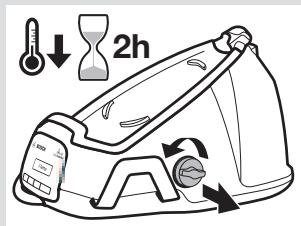
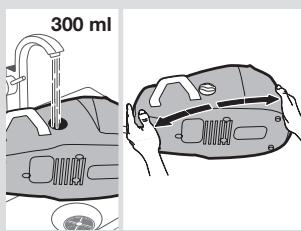
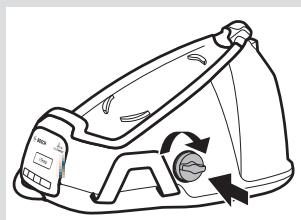
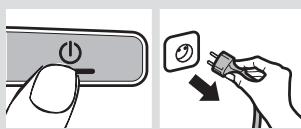
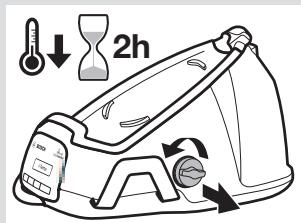
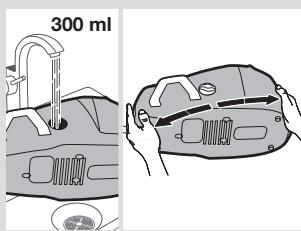
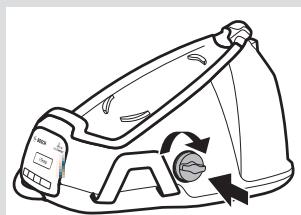
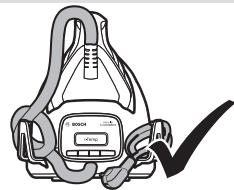
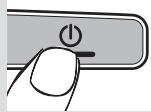
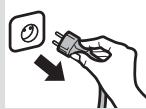
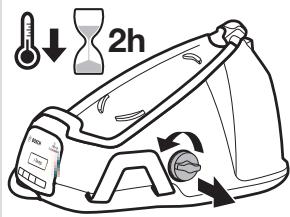
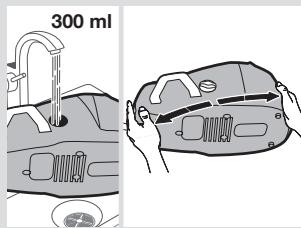
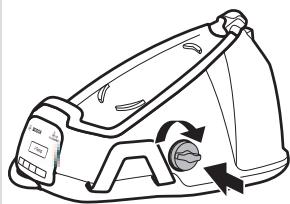
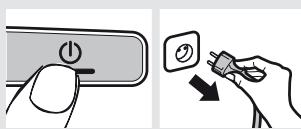
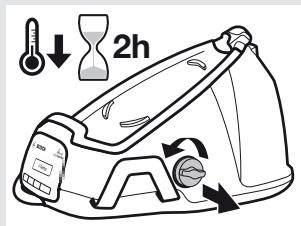
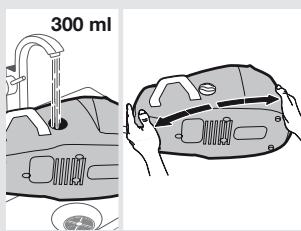
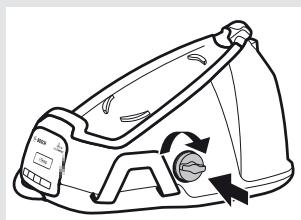
Press the button (1) to switch the appliance off. Unplug the appliance and let it cool down for at least 2 hours. 2 Empty the water tank. 3 Remove the iron from the pad (12). 4 Unscrew and remove the boiler cap (8) and take it out. Empty the boiler completely. 5 Fill the boiler with approximately 300 ml of tap water. Close the boiler cap and shake the base unit for a few moments. Then, empty it completely.
Important: To obtain the best result, we recommend that this operation be performed twice. Before re-closing, make sure no water remains in the boiler.
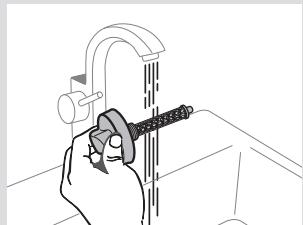
If your appliance is equipped with scale collector (8*) , it must be washed (see the "Descaling the scale collector" section). 7 Replace and tighten up the cap.
Descaling the limescale collector *
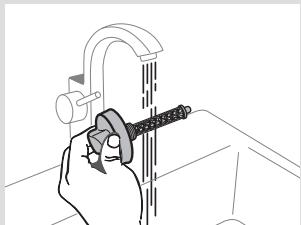
1 Place the limescale collector under the water tap. 2 Wash it up until limescale residues are removed.
Descaling the iron
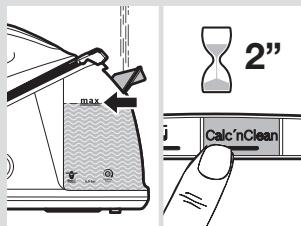
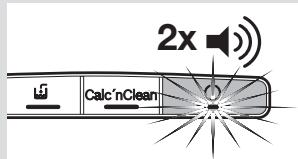
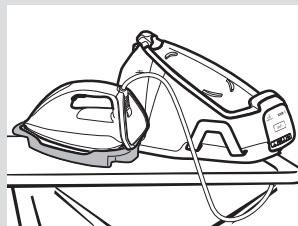
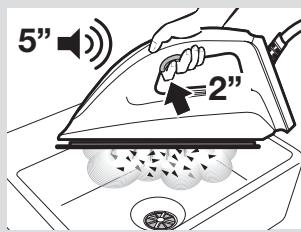
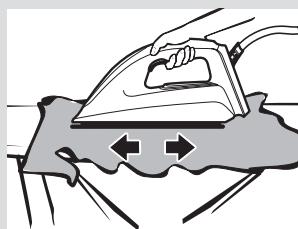
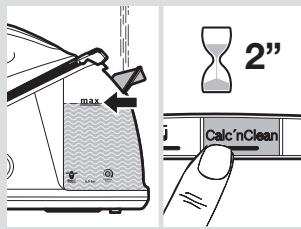
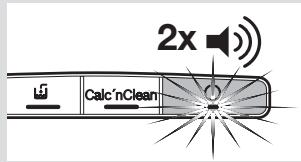
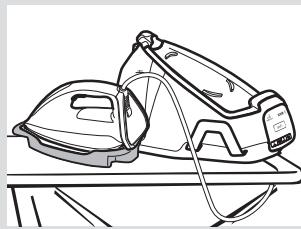
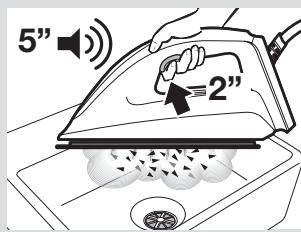
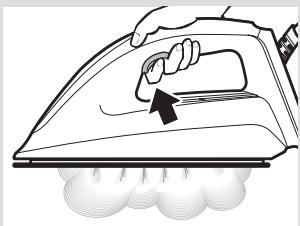
1 Fill the tank (9) with tap water. 2 Plug in the mains cable (6) and press the button (1) to switch the appliance on. Press the descaling button (2) for 2 seconds. Its indicator light will remain permanently lit. 4 Wait until the indicator light (1) stops flashing and remains lit permanently. Two beeps will be heard. Hold the iron in a horizontal position over an empty sink to collect the water. If your appliance is equipped with a "Calc'nClean" container (17*) , place the iron on it. 6 Press the steam release button (14) for 2 seconds. The descaling process will start automatically. Warning: boiling water and steam will be released through the soleplate, carrying limescale and/or deposits that may be inside. During the process, a beep will be heard every 5 seconds. After approximately 3 minutes, the iron will stop releasing steam. A long beep will be heard, indicating that the descaling process has finished. The appliance will switch off automatically. To clean the soleplate (16), immediately rub off any residue by running the hot iron over a wet cotton cloth.
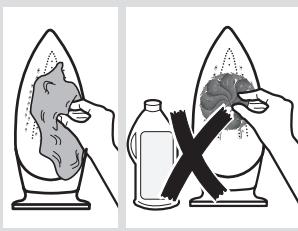

2. Cleaning the appliance
Regularly clean your appliance for proper maintenance. Attention! Burn risk!
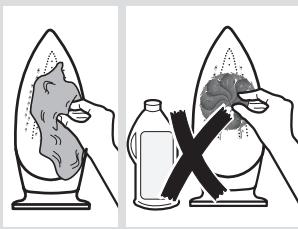
If the appliance is only slightly soiled, wipe it with a damp cotton cloth only, and then dry it. To keep the soleplate smooth, you should avoid contact with hard metal objects. Never use a scouring pad or chemicals to clean the soleplate.

Storing the appliance
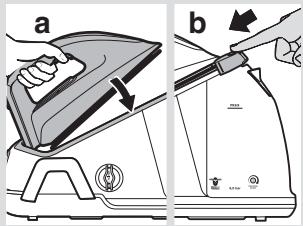
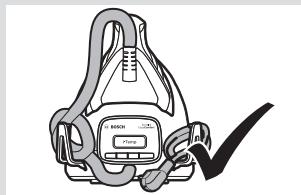
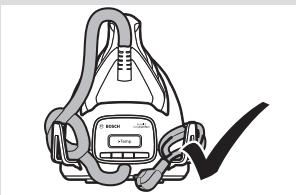
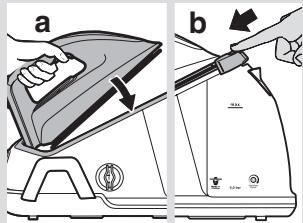
1. Unplug the appliance and let it cool down. Empty the water tank (9). 2. Place the iron on the steam station, standing on the pad (12). If your steam station is equipped with an iron lock system (13*), fix the iron to it. First insert the heel and then block the tip by moving the lock system against the iron. Store the steam hose (5) and the mains cable (6) on the storage holder (7).

Troubleshooting
| Problem | Possible causes | Solution |
| The iron begins to smoke when switched on. | 1. During first use: certain components on the appliance have been lightly greased at the factory and may produce a small amount of smoke when initially heated. 2. During subsequent use: the soleplate may be soiled. | 1. This is completely normal and will stop after a short while. 2. Clean the soleplate according to the cleaning instructions in this manual. |
| Water flows through the holes on the soleplate. | 1. The water is condensing inside the tubes because steam is being used for the first time or has not been used for a long time. | 1. Point the iron away from the ironing area and press the steam release button until steam is produced. |
| Dirt comes out through the soleplate. | 1. There is a build up of limescale or minerals in the boiler and iron. 2. Chemical products or additives have been used. | 1. Carry out a cleaning cycle (see the “Descaling process” section). 2. Never add products to the water (see the “Filling the water tank” section). Clean the soleplate with a damp cloth. |
| The “Calc'nClean” indicator light (2) does not turn off. | 1. The iron descaling process has been stopped before being completed. | 1. Restart and complete the iron descaling process. |
| The appliance makes a pumping sound. | 1. Water is being pumped into the steam tank. 2. The sound does not stop. | 1. This is normal. 2. If the sound does not stop, do not use the steam station and contact an authorised technical service centre. |
| Loss of pressure during ironing. | 1. The steam release button has been activated for too long a period of time, meaning it has been pressed too frequently. | 1. Use the steam release button at intervals. |
| Water spots appear on the garment during ironing. | 1. May be caused by steam condensed on the ironing board. | 1. Wipe the textile cover of the ironing board, and iron any water drops to dry them. |
| The hose gets hot during use. | 1. This is normal. It is caused by the steam passing through the hose during steam ironing. | 1. Place the hose on the opposite side so that you do not touch the hose during ironing. |
| Water leakage from the boiler. | 1. Boiler cap (8) is loose. | 1. Tighten the cap. |
If the above tips do not solve the problem, get in touch with our customer service.
You can download this manual from the Bosch local homepages.

- Water tank cap for steam generator / connector For collecting scale with «Calc'nClean» *
- Water reservoir
- Mark of maximum level?
- Filling opening cap 12. Iron base
- Iron locking button «SecureLock» *
- Steam release button
- Iron indicator 16. Soleplate
- «Calc'nClean» descaling cartridge
Introduction

EasyComfort iron - an elegant solution for simple, fast and safe ironing.
Discover for yourself a new way of caring for fabric with the EasyComfort iron - and you will forget what ironing at temperature and pre-sorting laundry is! Now delicate and finest fabrics can be perfectly ironed in just a few minutes, using only one ironing temperature. And that means you can spend more time on more enjoyable things.
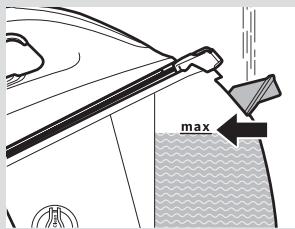

1. Filling the water tank
Removing scale with steam
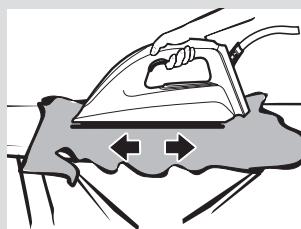
1 Fill the water tank (9) with tap water. 2 Connect the power cord (6) to a suitable outlet to turn on the appliance. 3 Press the steam release button (2) and hold it pressed for 2 seconds. The indicator will light up with a steady light. Wait until the indicator (1) stops blinking and lights up with a steady light. Then you will hear two sound signals. 5 Point the iron at the ironing board: water will flow out of it. If the kit includes the 'Calc'nClean' accessory (17*), attach the iron to it. 6 Press the steam button (14) and hold it pressed for 2 seconds. The descaling process starts automatically. Attention! Scale and dirt will come out through the soleplate with water and steam. During the process, every 5 seconds you will hear a sound signal. 7 After about X minutes, the iron will take on a clean appearance. You will hear a long sound signal, indicating the end of the descaling process. Then the appliance turns off automatically. 8 To clean the soleplate of the iron (16), wipe off all deposits with a damp cloth while the iron is warm.

2. Cleaning the iron
Regularly clean the appliance to ensure proper functioning.
Attention! Risk of burns!
1 If the appliance is slightly dirty, wipe it with a damp cloth, then dry it. 2 To maintain the soleplate's smoothness, avoid contact with metal objects. In any case, do not use abrasive sponges or chemical agents to clean the soleplate.

Storing the appliance
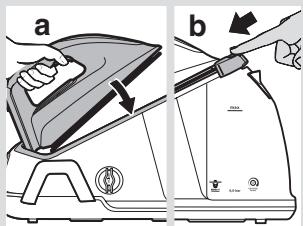
1 Unplug the appliance from the outlet and let it cool down. Empty the water tank (9). 2 Place the iron on the steam station (12). If your steam station is equipped with an iron locking device (13*), lock the iron with it. First insert the front part of the iron into the corresponding recess, then close the iron, sliding the locking device onto it. 3 Wind the steam hose (5) and power cord (6) around the storage space (7).

Troubleshooting
Problem
The iron is turned on, but no steam comes out.
Possible causes
1. First use: Some parts of the appliance are lubricated at the factory, so the iron may emit a small amount of smoke during first use. 2. Subsequent use: Possibly, the water tank is empty.
Solution
1. The iron should be used at normal speed. 2. Clean the soleplate as described in the instructions.
| ПюбLEMа | Можлови prочун | Рiwенья |
| Крзь OTвори упiodшев TeчЕ ВODа. | 1. Вoda КONDс ecvcbcsу trубкax, TOMу сцфунckця подчи napri використовс bvpse abso dobroг He використову balacry. | 1. Спreamу TE npackу поа зону=npасьань та кльka разови натучыт b NaKONkyВипухсу napri, дokи He поche Виходити napa. |
| 3 OTвори пiodшев Виховпь бpvd. | 1. Y baskу naporeheparopa i npacsiу TBOPINBcH hakinababo mHepealnbH bIDKlaedehnY. 2. Булco використанo ximiuhi zacobn abso domiushk. | 1. Виконай TE zuKlОчшени (ДODATKOBA IHФормачи habeDEhaу роздлп «Пю畴едура видаленин Нakuny'). 2. Нikоли He doDAbaIteу b Vodу stорони рechOBuHи (ДODATKOBA IHФормачи habeDEhaу роздлп «Наловенну pezeрbyapar dlya BODN). OчирTi NBIOswBy 3a DoPOMorOBO TKAHNH. |
| Иndиатор «Calc'nClean» (2) He Вимкается. | 1. Пю畴ура видаленин Нakuny I3 npackи buly na nepeudachno 3унинна. | 1. Зanystitb 3NoBv npocedуpy видаленин Нakuny I doBeDITb IIdo KINca. |
| Уseredingи пистою чутп 3byknomп. | 1. Вoda PerekayuTcBЯСпю do baskу naporeheparopa. 2. 3byk He npinnHЯТьс. | 1. Лс HopmaльneЯВише. 2. Ркшо 3buk He npinnHЯТьс, He використову te napOBу CTANCUTo Ta 3BepHITbCdo abTporizobahoro cepBicHoro ceHTpy. |
| Пд чacnpасьань падаe ТИСК. | 1. Кнока випсуку napи buly na HATSCHyta npotrayom 3aHaJdTOr TrpIBaIORO chasy, ab6 Byn HATSCaJIи I3aHaJdTоЧASTO. | 1. Habtscakii Te Khonky Bvnyscu yapri 3 DejaKIM i INTeRbAionom. |
| Y proucei npасьань на Виroбi 3'ЯlbЯOTbcSу MOKpi Плами. | 1. Н doши ду npasycanBny 3ibpbavc kondeHcT. | 1. ВИтrtb TkaHInne pokpittTуdoши Дли npasycanBny Ta ckopnstaytecprackoU dlya IIпдсушвань. |
| Пд чсвиморstаньшалногарriBaETbCS. | 1. ЛсHopmaьеявиш. Лс TrpanлЯeTbCS TOMU, сцпдчac npasycanBna 3 Використанm Napri ShanaHrmpoxDITbnapa. | 1. Перемicitьшалгу npotnileжнiy bik takimчIHOM, сцбВи He topkaJncs Myo npotrayom npasycanBnH. |
| I3 basky naporeheparopatate经Boa. | 1. Кшиcka basky naporeheparopatopa (8) He zaKpuchena. | 1. 3aTaryHITb KpushiK |
If the problem described above is not resolved, contact the service center.
You can download the instructions from the regional Bosch website.
Tips for disposal
Our products are supplied in environmentally friendly packaging. The packaging is made from non-hazardous materials that can be disposed of at your local waste disposal service. Information on the disposal of used electrical appliances can be obtained from your local administration.

Attention! Never direct the steam jet at people or animals.

4. Energy saving
By selecting the energy saving mode, you can save electricity while getting satisfactory results for ironing most items.
1 Press the energy saving mode button "Eco" (4). The indicator light will turn on. 2 To return to the normal energy consumption mode, press the "Eco" button again. It is recommended to use the normal energy consumption mode for optimal ironing of thick or heavily wrinkled fabrics.

5. Automatic shut-off
To ensure your safety and save energy, the appliance automatically turns off if it is not used for 8 minutes.
In this case, you will hear three beeps, and all indicator lights (1,2,3,4) will start flashing.
1 To turn the iron back on, press the steam release button (14).

Cleaning and care

Aa
aaiiie 150
∴ a| 5| = a| 11|
jie j

alil jjz jybjg .d yjl g jl j. (9)
alalloljia jiall albi
(6)(5)
.(7)
1
2
3
Jbcj 1c


s (2) "Calc'nClean"
Therefore, in Rt ABN:
A. ab, c. sol, c. sol, c. sol
1
2
3
4
5
6
7
51.3

j11 (14) j11 11 11 11 11
1
0jgall Jzdu jy 5u 5u cll gol 5al g u g a yic jL ic pA .kullb gao sa Ls kill gl gall
11 111111111111111111111111111
"PulseSteam"




"SecureLock" 13.13
j1.14
olall 15.15
ol ol ol ol ol.16
"Calc'nClean" 17
jduy 2jo "di/1j
"Calc'nClean" a
Therefore, a1 = 2√5, a2 = -4√5, b1 = 2√6
jJy aJ 200o"gJll J jJ.3
a 4
15.15
15
jIyIyIyIyIyIyIyIyIyIyIyIyIyIyIyIyIyIy
"Calc'nClean"
1
EasyComfort
EasyComfort

1
A = g ÷ 12g
A = 2g
1
J aJ b
a 152 j80 a 152 a 152 a 152 a 152 a 152 a 152 a 152
J 8 n nn Jn Jn Jn Jn
alaijwly abjy jblaoi Igicg wlg aoy jblj gll plaijwla
Jlcl JlsbI jg jg y. jgeJIy JlsbJ jg JleJI
8 jn nn Jlslj 1 Jglii n e 12y JgJgSll ll gSall b
This appliance is intended for use in household and similar applications such as: staff kitchen areas in shops, offices and other working environments; farm houses; by clients in hotels, motels and other residential type environments; bed and breakfast type environments. It is not intended for use by persons (including children) with reduced physical, sensory or mental capabilities, or lack of experience and knowledge, unless they have been given supervision or instruction concerning use of the appliance by a person responsible for their safety. Children should be supervised to ensure that they do not play with the appliance. If the supply cord is damaged, it must be replaced by the manufacturer, its service agent or similarly qualified persons in order to avoid a hazard. Do not immerse the appliance, cord or plug in water or any other liquid. Do not use the appliance near water. Do not use the appliance with wet hands. Do not use the appliance outdoors. Do not place the appliance on or near a hot gas or electric burner, or in a heated oven. Do not let the cord hang over the edge of a table or counter, or touch hot surfaces. The appliance is not intended to be operated by means of an external timer or separate remote-control system. Do not use the appliance for other than intended use. The use of accessory attachments not recommended by the appliance manufacturer may cause injuries. Unplug from outlet when not in use, before putting on or taking off parts, and before cleaning. Allow to cool before putting on or taking off parts. Do not operate any appliance with a damaged cord or plug or after the appliance malfunctions, or has been damaged in any manner. Return the appliance to the nearest authorized service facility for examination, repair or adjustment. To protect against fire, electric shock and injury to persons, do not immerse cord, plugs, or appliance in water or other liquid. Do not use this appliance near bathtubs, showers, basins or other vessels containing water. This appliance is intended for household use only and not for commercial use. Save these instructions.
- Do not touch the hot surfaces of the appliance during operation; use handles or knobs.
- Before connecting the appliance, ensure that the voltage indicated on the rating plate matches your local power supply.
- This appliance is designed for domestic use only and is not intended for commercial or industrial use. If the appliance is used improperly or for other purposes, the warranty may be voided.
- This appliance must be connected to a properly grounded outlet.
- Do not use the appliance with a damaged cord or plug. If the supply cord is damaged, it must be replaced by the manufacturer, its service agent or similarly qualified persons in order to avoid a hazard. The water tank must be filled with water only, and no other liquids should be added. Do not operate the appliance without water in the tank.
- Do not immerse the appliance in water or any other liquid.
- Do not use abrasive cleaners (powder, sprays, etc.) on the appliance.
- Do not operate the appliance with a damaged cord or plug, or if it has been dropped or damaged in any way. Do not touch the hot surfaces with wet hands.
Coffee maker
Our products are manufactured in accordance with the EU Directive. If you have any questions regarding the disposal of this product, please contact your local waste management authority. For more information on recycling, please visit our website.
This appliance complies with the European Directive 2012/19/EU on Waste Electrical and Electronic Equipment (WEEE). This directive specifies the requirements for the collection and recycling of waste electrical and electronic equipment.
Spare parts

- 1. Indicator light for "ON/OFF" button 2. Indicator light for "Calc'nClean" button 3. Indicator light for "Water level" button 4. Indicator light for "Eco" button
- This appliance
- 7. Power cord 8. Water tank / "Calc'nClean" collector* 9. Water tank 10. Maximum fill level mark 11. Key lock 12. Steam button 13. Steam lock button "SecureLock"* 14. Descaling button 15. Steam indicator light 16. Steam button 17. "Calc'nClean" container
8. Water tank / "Calc'nClean" collector* 9. Water tank 10. Maximum fill level mark 11. Key lock 12. Steam button 13. Steam lock button "SecureLock"* 14. Descaling button 15. Steam indicator light 16. Steam button 17. "Calc'nClean" container
Introduction

Congratulations, you have purchased the EasyComfort steam iron.
EasyComfort humidifiers are designed to operate with water and to maintain the required temperature and humidity parameters. Using materials that are resistant to high temperatures, they are suitable for all types of heating systems. During operation, follow the safety instructions carefully.

1. Filling with water
Fill the tank with water before use.
Note: Do not add cleaning agents, fragrances, chemicals, or other substances to the water. It is possible to use distilled or demineralized water. The use of such additives may damage the device.
1. Open the water tank cap (11). 2. Fill the water tank (9). Do not exceed the maximum fill level marked "max" (11)! 3. Close the water tank cap. 4. Fill the water tank through the indicator opening (3). An audible signal will sound. Note: The tank capacity is 3 liters.
Tip: To extend the function's lifespan, you can mix tap water with distilled water in a 1:1 ratio. If the tap water in your area is very hard, mix it with distilled water in a 1:2 ratio.

2. Switching on
1. If the device is plugged into a power outlet (13*), the power indicator will light up. 2. Prepare the power cord (5) and the plug (6). Insert the plug into a suitable outlet. 3. To turn on the device, press the power button (1). The indicator lights (1, 15) will illuminate, showing that the device is on. When the water runs out, the indicator lights (1, 15) will flash. Two audible signals will sound.

3. Operation
1. To start operation, press the mist button (14).
Note: When placing the device, ensure that the mist outlet is not blocked and that the control panel is easily accessible.
Tip: For better steam distribution, press the mist button (14) to direct the steam towards the desired area.

PulseSteam function
This function is designed for rooms with high humidity levels.
1. Press the mist button (14) twice. The device will emit steam in pulses.

This device is intended for drilling holes in concrete, brick, and similar materials.
1. Press the drill bit against the surface for 15 cm. 2. Press the trigger (14) for 5 seconds to start the rotation.
Warning: Do not touch the drill bit immediately after use, as it may be hot.

4. Hammer drilling
If hammer drilling parameters are selected, the hammer drilling function will be activated, and you can use it for drilling in concrete and masonry.
1. Press the "Eco" hammer drilling button (4). The indicator light will turn on. 2. To switch to hammer drilling mode, press the "Eco" button again. To avoid overheating, do not use hammer drilling mode continuously for more than 15 minutes.

5. Screwdriving
For safety and hammer drilling, if the tool has not been used for 8 minutes, it will automatically switch to standby mode.
The standby indicator will light up and all indicator lights (1,2,3,4) will turn off.
1. To exit standby mode, press the trigger (14) again.

Maintenance and technical service

1. Drilling process
Note: To ensure a long service life, the drilling process should be performed at a certain interval. The "Calc'nClean" indicator light (2) will light up and emit a signal, indicating that maintenance is required.


- INDEX
- GENERAL SAFETY INSTRUCTIONS
- IMPORTANT NOTICES
- ADVICE ON DISPOSAL
- DESCRIPTION
- INTRODUCTION
- EASYCOMFORT FOR SIMPLE, FAST AND SAFE IRONING
- FILLING THE WATER TANK
- HEATING
- IRONING
- PULSESTEAM" FUNCTION
- VERTICAL STEAM
- ENERGY SAVING
- AUTO SWITCH OFF
- CLEANING & MAINTENANCE
- DESCALING PROCESS
- DESCALING THE BOILER
- DESCALING THE LIMESCALE COLLECTOR
- DESCALING THE IRON
- CLEANING THE APPLIANCE
- STORING THE APPLIANCE
- TROUBLESHOOTING
- EASYCOMFORT IRON - AN ELEGANT SOLUTION FOR SIMPLE, FAST AND SAFE IRONING
- REMOVING SCALE WITH STEAM
- CLEANING THE IRON
- PROBLEM
- POSSIBLE CAUSES
- SOLUTION
- TIPS FOR DISPOSAL
- AUTOMATIC SHUT-OFF
- CLEANING AND CARE
- JIE J
- JBCJ 1C
- PULSESTEAM
- EASYCOMFORT
- COFFEE MAKER
- SPARE PARTS
- CONGRATULATIONS, YOU HAVE PURCHASED THE EASYCOMFORT STEAM IRON
- FILLING WITH WATER
- SWITCHING ON
- OPERATION
- PULSESTEAM FUNCTION
- HAMMER DRILLING
- SCREWDRIVING
- MAINTENANCE AND TECHNICAL SERVICE
- DRILLING PROCESS
Brand : BOSCH
Model : TDS6041
Category : Iron