
OBL234X01 - Blender OSTER - Free user manual and instructions
Find the device manual for free OBL234X01 OSTER in PDF.
| Product type | Blender |
| Brand | OSTER |
| Model | OBL234X01 |
| Bowl capacity | 1.25 L (5 cups) |
| Bowl material | Heat-resistant Boroclass® glass |
| Blade | Special 6-blade with integrated bowl base |
| Preset functions | Smoothie, Blend |
| Manual speeds | 3 speeds (1, 2, 3) |
| Pulse functions | Pulse and Reverse Pulse |
| Control type | Touch electronic |
| Power | Domestic mains (voltage not specified) |
| Safety | Automatic shut-off, thermal switch, safety lock, protected blades |
| Bowl and accessories cleaning | Dishwasher safe (top rack) or hand wash with warm soapy water |
| Motor base cleaning | Wipe with a soft damp cloth, do not immerse |
| Spare parts available | Bowl, lid, cap, blade, sealing gasket, tightening ring |
| After-sales service | Email: OsterEurope@newellco.com, Phone: 0805 542 055 (France) |
| Country of origin | China |
Frequently Asked Questions - OBL234X01 OSTER
User questions about OBL234X01 OSTER
0 question about this device. Answer the ones you know or ask your own.
Ask a new question about this device
Download the instructions for your Blender in PDF format for free! Find your manual OBL234X01 - OSTER and take your electronic device back in hand. On this page are published all the documents necessary for the use of your device. OBL234X01 by OSTER.
USER MANUAL OBL234X01 OSTER
Italiano / Italian 20
Portugues / Portuguese 25
IMPORTANT SAFETY INFORMATION
Read all instructions before using this product.
- This appliance shall not be used by children. Children shall not play with the appliance. Keep the appliance and its cord out of reach of children.
- Appliances can be used by persons with reduced physical, sensory, or mental capabilities or lack of experience and knowledge if they have been given supervision or instruction concerning use of the appliance in a safe way and understand the hazards involved.
- Do not operate any appliance with a damaged cord or plug or after the appliance malfunctions, or has been damaged in any manner. If the supply cord is damaged, it must be replaced by the manufacturer, its service agent or similarly qualified persons in order to avoid a hazard.
- To protect against electric shock, do not place or immerse cord, plugs, or motor base in water or other liquid. The jug, blade, seal, and locking ring should be washed in warm, soapy water. Please refer to Page 6 for cleaning instructions.
- The blades have very sharp edges, take care when handling or cleaning.
- Always disconnect from the power supply if left unattended and before assembling, disassembling or cleaning. To disconnect turn any control to off then unplug from the power supply. Do not unplug by pulling on the cord.
- Never use this appliance for anything other than its intended use. Misuse can cause injuries. This appliance is for household use only. Do not use this appliance outdoors.
- Never attempt to overcome the interlock.
- The blender and its accessories should not be used for longer than 2 minutes continuously.
- Be careful if hot liquid is poured into the blender as it can be ejected out of the appliance due to a sudden steaming;
- CAUTION: In order to avoid a hazard due to inadvertent resetting of the thermal cutout, this appliance must not be supplied through an external switching device, such as a timer, or connected to a circuit that is regularly switched on and off by the utility;
This appliance must not be placed on or near any potentially hot surfaces (such as a gas or electric hob).
Never let the power cord hang over the edge of a work top, touch hot surfaces or become knotted, trapped or pinched.
Do not use the appliance if it has been dropped, if there are any visible signs of damage or if it is leaking.
Make sure that all attachments are securely and correctly fitted before operating the appliance.
Allow moving parts to come to a stop and unplug the appliance before changing or cleaning accessories.
Avoid contact with moving parts. Keep hands and utensils out of the jug while blending to prevent personal injury or damage to the blender. A rubber spatula may be used only when the blender is not running and the appliance is unplugged.
Do not use the blender without the lid and feeder cap in place.
Never attempt to place the blade assembly onto the motor unit without the jug.
Never attempt to fit or remove the jug to the motor unit when the motor is running.
Do not blend carbonated liquids, this may create an overpressure hazard.
This appliance is for household use only. Do not use the appliance for anything other than intended use. Do not use this appliance outdoors.
Never use any attachment or accessory not recommended by the manufacturer.
Always ensure that hands are dry before handling the plug or switching on the appliance.
Always use the appliance on a stable, secure, dry and level surface.
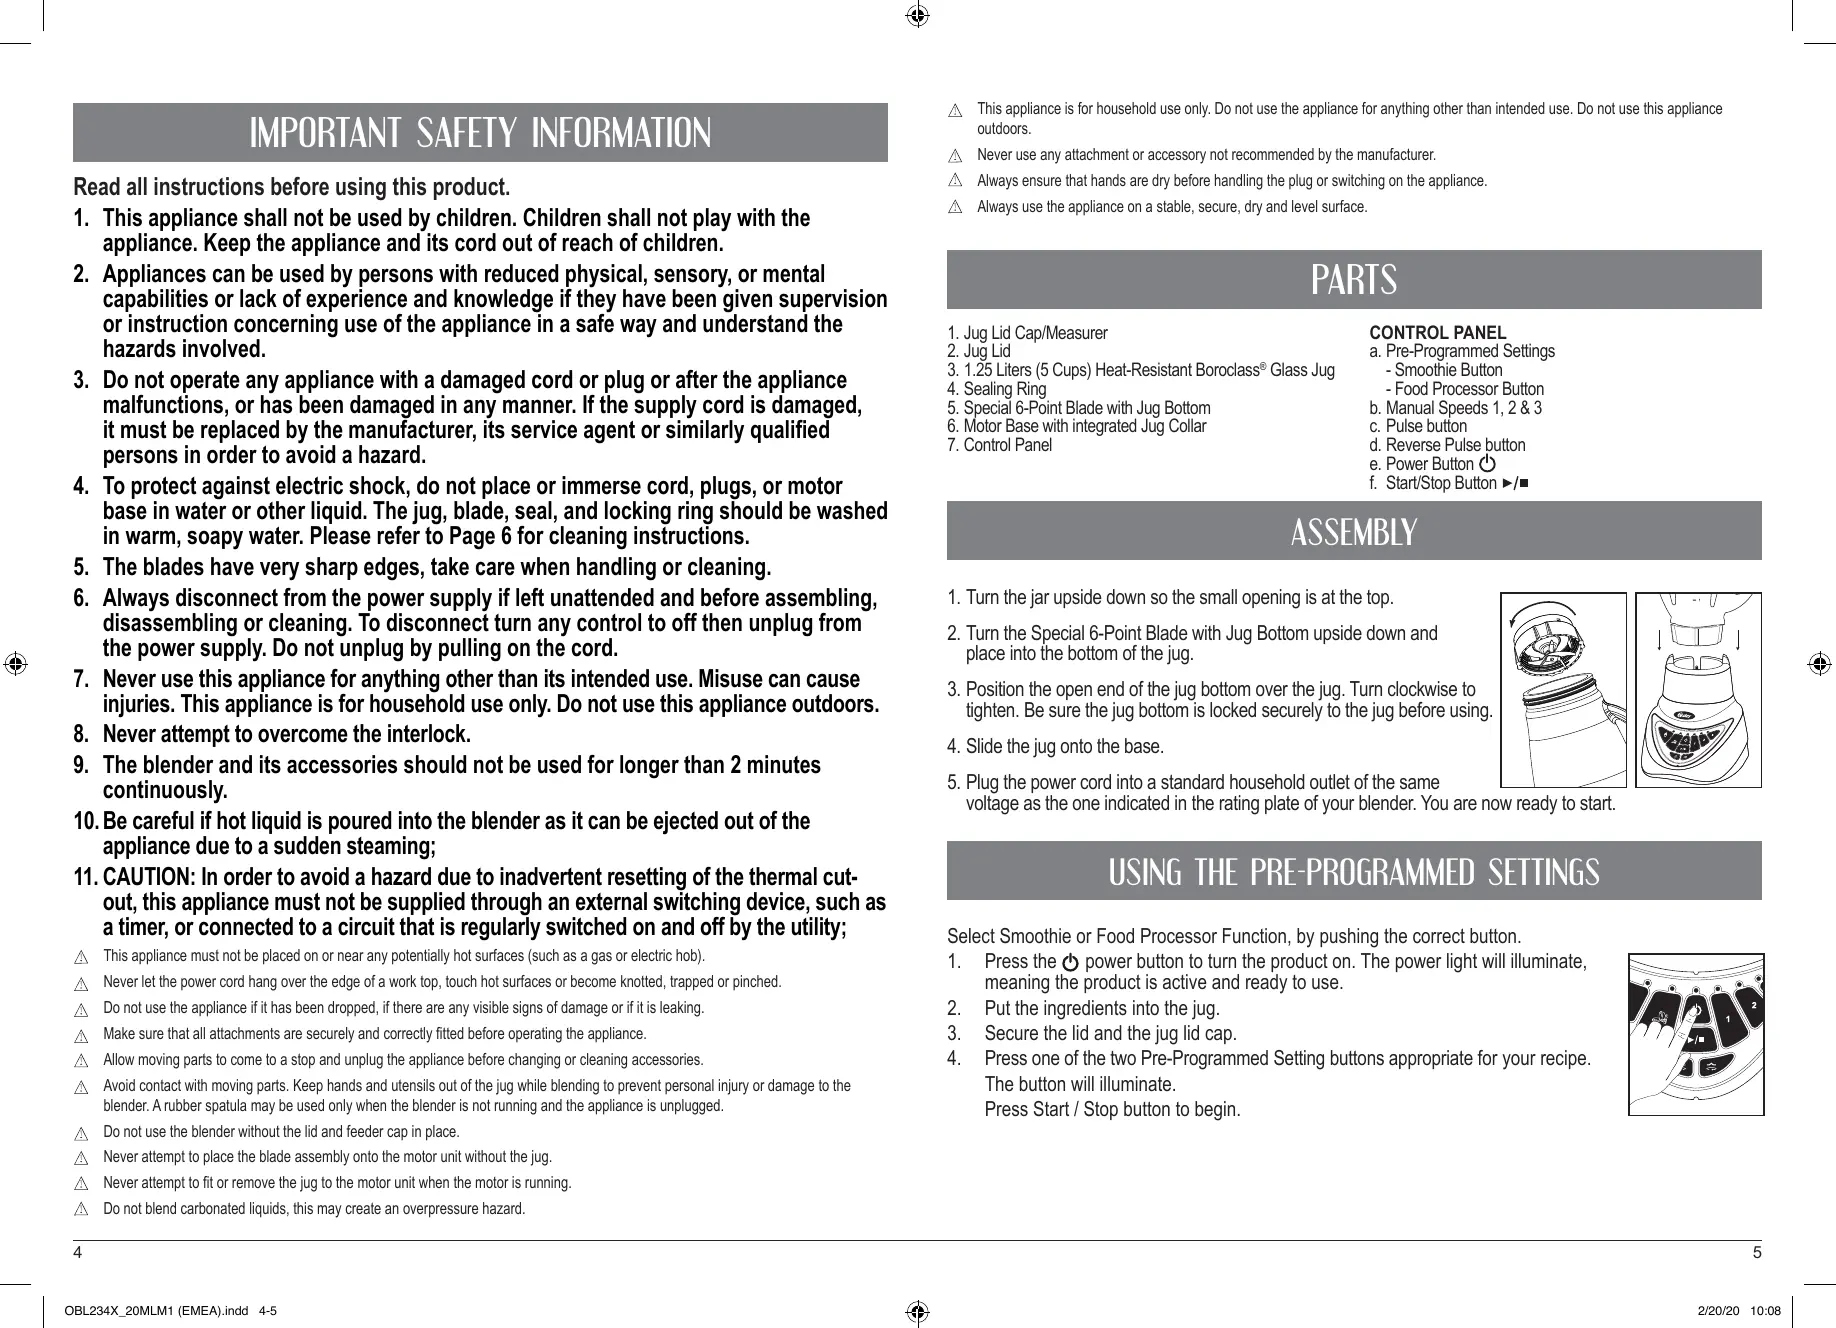
PARTS
- Jug Lid Cap/Measurer
- Jug Lid
- 1.25 Liters (5 Cups) Heat-Resistant Boroclass® Glass Jug
- Sealing Ring
- Special 6-Point Blade with Jug Bottom
- Motor Base with integrated Jug Collar
- Control Panel
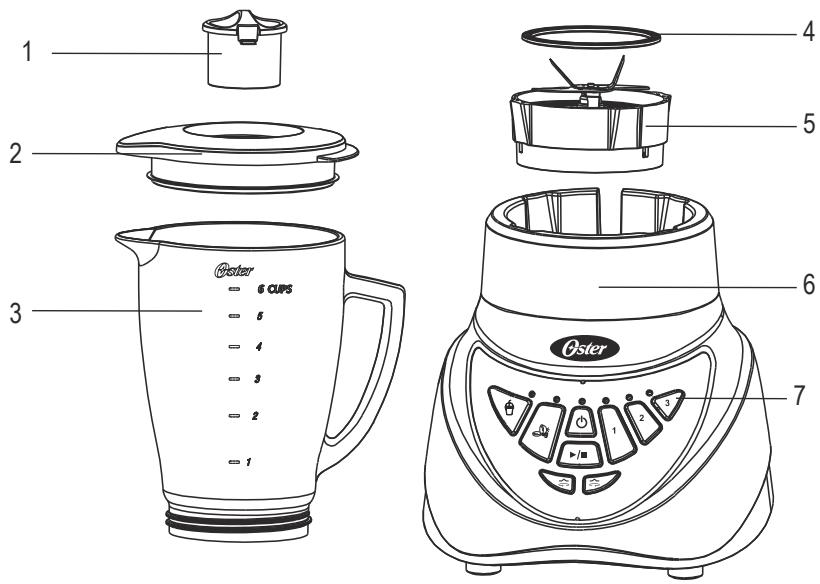
CONTROL PANEL
a. Pre-Programmed Settings
- Smoothie Button
- Food Processor Button
b. Manual Speeds 1, 2 & 3
c. Pulse button
d. Reverse Pulse button
e. Power Button
f. Start/Stop Button ■
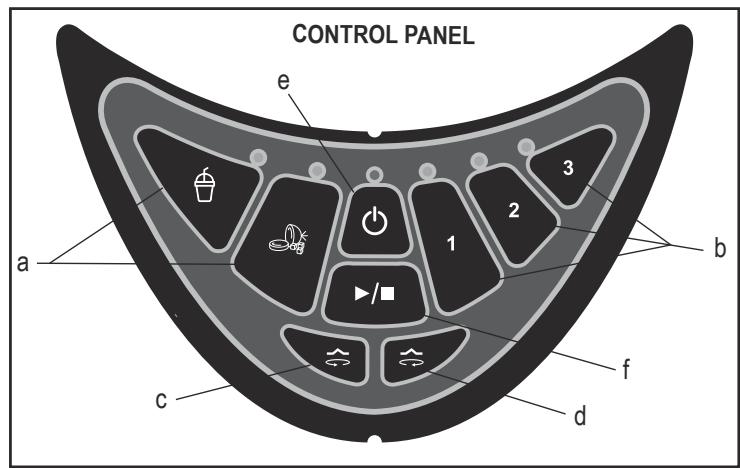
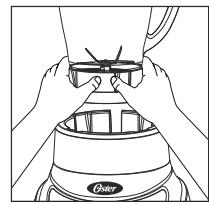
ASSEMBLY
- Turn the jar upside down so the small opening is at the top.
- Turn the Special 6-Point Blade with Jug Bottom upside down and place into the bottom of the jug.
- Position the open end of the jug bottom over the jug. Turn clockwise to tighten. Be sure the jug bottom is locked securely to the jug before using.
- Slide the jug onto the base.
- Plug the power cord into a standard household outlet of the same voltage as the one indicated in the rating plate of your blender. You are now ready to start.
USING THE PRE-PROGRAMMED SETTINGS
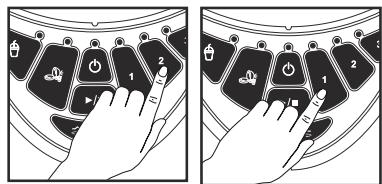
Select Smoothie or Food Processor Function, by pushing the correct button.
- Press the power button to turn the product on. The power light will illuminate, meaning the product is active and ready to use.
- Put the ingredients into the jug.
- Secure the lid and the jug lid cap.
- Press one of the two Pre-Programmed Setting buttons appropriate for your recipe. The button will illuminate.
Press Start / Stop button to begin.
- To change your selection, press Stop followed by another Pre-Programmed Setting button.
- Once the program is finished the product automatically stops. Please note: You may press the Start / Stop button to end the program at any time. Press the Start / Stop button to start a new cycle from the beginning.
- Press the power button to turn the product off.
This product is pre-programmed to turn off automatically if not used for a period of several minutes. All lights will turn off when the unit automatically powers down.
USING THE MANUAL CONTROLS
The Manual Controls include:
- Speed "3" - High speed
- Speed "2" - Medium speed
- Speed "1" - Low speed
Max Pulse - Pulse -
Low Pulse - Reverse Pulse
-
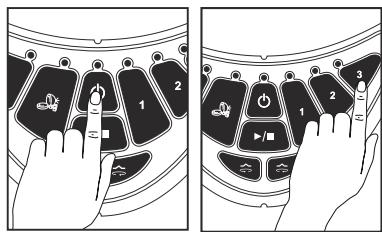
Press the power button to turn the product on. The power light will illuminate, meaning the product is active and ready to use.
- Put the ingredients into the jug.
- Secure the lid and the jug lid cap.
USING THE MANUAL SPEED "1/2/3" BUTTONS
- Press the "1/2/3" Speed button to run the product at a low/medium/high speed.
- Press the Start / Stop button to start the operation.
- Press the Start / Stop button to pause the operation at any time.
- Press the power button to turn the product off.
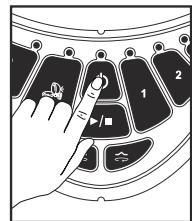
USING THE PULSE BUTTON
- Press and hold the Pulse Button.
- Release the pulse button to stop.
- Press the power button to turn the product off.
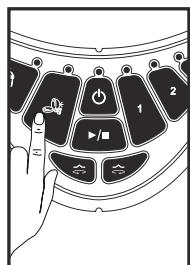
USING THE REVERSE PULSE BUTTON
- Press and hold the Reverse Pulse Button.
- Release the pulse button to stop.
- Press the power button to turn the product off.

CARING AND MAINTAINING YOUR OSTER BLENDER WITH REVERSIBLE MOTOR
AFTER USE:
- Lift the jug from the base, remove the lid and empty the jug.
- If necessary, use a rubber spatula to scrape foods away from the sides of the jar.
CLEANING
Release the Special 6-Point Blade with Jug Bottom, from the bottom of the jug by turning the jug bottom counterclockwise.
The jug lid, jug lid cap and blade are dishwasher safe. Use the top rack of the dishwasher for the jug lid, jug lid cap, and blade.
You can also wash the parts in warm, soapy water. Rinse well and dry. Wipe the base with a soft, damp cloth to clean. Never submerge the low profile base in a liquid. Check the parts as you put them back together.
STORING
Reassemble the blender for storage. Leave the lid open a gap so no odors are retained.

WARNING: Never put the jug, or any other parts, in a microwave oven. Never store foods or drinks in the jug.
BLENDING TIPS
Liquids
Put liquids into the jug first, unless the recipe says otherwise.
Using the jug lid food chute
Do not remove the lid while in use. Food may splatter if you do. Instead, open the jug lid cap to add smaller ingredients.
Working with Hot Foods or Liquids
WARNING: When you work with HOT FOODS, remove the jug lid food chute to vent steam. Tilt the lid away from you partially covering the opening. Keep hands and other exposed skin away from the lid opening to prevent possible burns.
When you work with HOT LIQUIDS, remove the jug lid food chute and start at a low speed, and then gradually increase to a faster speed. Do not add liquid over the cup (1L) level. Always keep hands away from steam. Do not blend boiling liquids in the blender.

Ingredients Quantities
Do not overfill the Blending Jug past the 1.25L (5 Cups) fill line. Overfilling may create a hazard and damage the blender. If you want greater amount, prepare in batches. Using larger amounts may overload and strain the motor.
Frequently Asked Questions
Why doesn't the blender/food processor turn on?
- Make sure the base is plugged in an active power receptacle.
- Verify red light is active after pushing on/off button.
How can I prevent liquids from leaking out?
Check to see that the sealing ring is correctly assembled in between the jug blade and the jug.
ELECTRICAL SAFETY [UK & IRELAND ONLY]
If the plug is not suitable for the socket outlets in your home, it can be removed and replaced by a plug of the correct type.
If the fuse in a moulded plug needs to be changed, the fuse cover must be refitted. The appliance must not be used without the fuse cover fitted.
If the plug is unsuitable, it should be dismantled and removed from the supply cord and an appropriate plug fitted as detailed. If you remove the plug it must not be connected to a 13 amp socket and the plug must be disposed of immediately.
If the terminals in the plug are not marked or if you are unsure about the installation of the plug please contact a qualified electrician.
![OSTER OBL234X01 - ELECTRICAL SAFETY [UK & IRELAND ONLY] - 1](/content/2024/11/228402/images/e11f4eda4963823415be6f60bdc0e7db9cb58e3793b02abbbaaf851a446ec6bb.jpg)
This symbol indicates that this unit is a Class II appliance and therefore an earth connection is not required.
Plug should be ASTA approved to BS1363 Fuse should be ASTA approved to BS1362
![OSTER OBL234X01 - ELECTRICAL SAFETY [UK & IRELAND ONLY] - 2](/content/2024/11/228402/images/fe6ca0f1d13276c3f5b2817dbcfa2b7f72876fa801d09b4c26381613d9bceedd.jpg)
Ensure that the outer sheath of the cable is firmly held by the cord grip
AFTER SALES SERVICE & REPLACEMENT PARTS
In the case the appliance does not operate but is under warranty, return the product to the place it was purchased for a replacement. Please be aware that a valid form of proof of purchase will be required. For additional support, please contact our Consumer Service Department at:
United Kingdom: 0800 028 7154 | Spain: 0900 81 65 10 | France: 0805 542 055. For all other countries, please call +44 800 028 7154.
International rates may apply. Alternatively, e-mail: OsterEurope@newellco.com.
WASTE DISPOSAL
Waste electrical products should not be disposed of with household waste. Please recycle where facilities exist. E-mail us at OsterEurope@newellco.com for further recycling and WEEE information.

CONSIGNES DE SECURITE IMPORTANTES
© 2020 Jarden Consumer Solutions (Europe) Limited. All rights reserved.
Jarden Consumer Solutions (Europe) Limited, 5400 Lakeside, Cheadle Royal Business Park, Cheadle, Cheshire, SK8 3GQ, United Kingdom.
Newell Poland Services Sp. z o.o., Plac Andersa 7, Poznan, 61-894, Poland.
Jarden Consumer Solutions (Europe) Limited and Newell Poland Services Sp. z o.o. are subsidiaries of Newell Brands Inc. The product you buy may differ slightly from the one shown on this carton due to continuing product development.
Made in China.
OBL234X_20MLM1 (EMEA)
GCDS-OST849727-JC
P.N. 199694
- IMPORTANT SAFETY INFORMATION
- PARTS
- CONTROL PANEL
- ASSEMBLY
- USING THE PRE-PROGRAMMED SETTINGS
- USING THE MANUAL CONTROLS
- USING THE MANUAL SPEED "1/2/3" BUTTONS
- USING THE PULSE BUTTON
- USING THE REVERSE PULSE BUTTON
- CARING AND MAINTAINING YOUR OSTER BLENDER WITH REVERSIBLE MOTOR
- AFTER USE:
- CLEANING
- STORING
- BLENDING TIPS
- Liquids
- Using the jug lid food chute
- Working with Hot Foods or Liquids
- Ingredients Quantities
- Frequently Asked Questions
- ELECTRICAL SAFETY [UK & IRELAND ONLY]
- AFTER SALES SERVICE & REPLACEMENT PARTS
- WASTE DISPOSAL
- CONSIGNES DE SECURITE IMPORTANTES
Brand : OSTER
Model : OBL234X01
Category : Blender