LM962B10 - Blender MOULINEX - Free user manual and instructions
Find the device manual for free LM962B10 MOULINEX in PDF.
| Product type | Blender |
| Brand | Moulinex |
| Model | LM962B10 |
| Number of speeds | 5 speeds + pulse |
| Bowl capacity (thick mixtures) | 1.5 L maximum |
| Bowl capacity (liquid mixtures) | 1.25 L maximum |
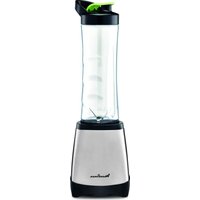
| Included accessories | Glass blender jar (D), Herb mill (E), Spice mill (F) – depending on model |
| Bowl material | Graduated glass |
| Blades | Stainless steel, very sharp |
| Safety | Safety lock: the appliance only operates if the bowl or accessory is correctly positioned and locked |
| Cleaning the bowl and accessories | Dishwasher (top rack, Eco or Light wash program) |
| Cleaning the motor unit | Damp cloth, do not immerse |
| Lid gasket | Removable (D5) |
| Blade unit gasket | Non-removable |
| Usage | Blend, chop, grind, make soups, sauces, smoothies, etc. |
Frequently Asked Questions - LM962B10 MOULINEX
User questions about LM962B10 MOULINEX
0 question about this device. Answer the ones you know or ask your own.
Ask a new question about this device
Download the instructions for your Blender in PDF format for free! Find your manual LM962B10 - MOULINEX and take your electronic device back in hand. On this page are published all the documents necessary for the use of your device. LM962B10 by MOULINEX.
USER MANUAL LM962B10 MOULINEX
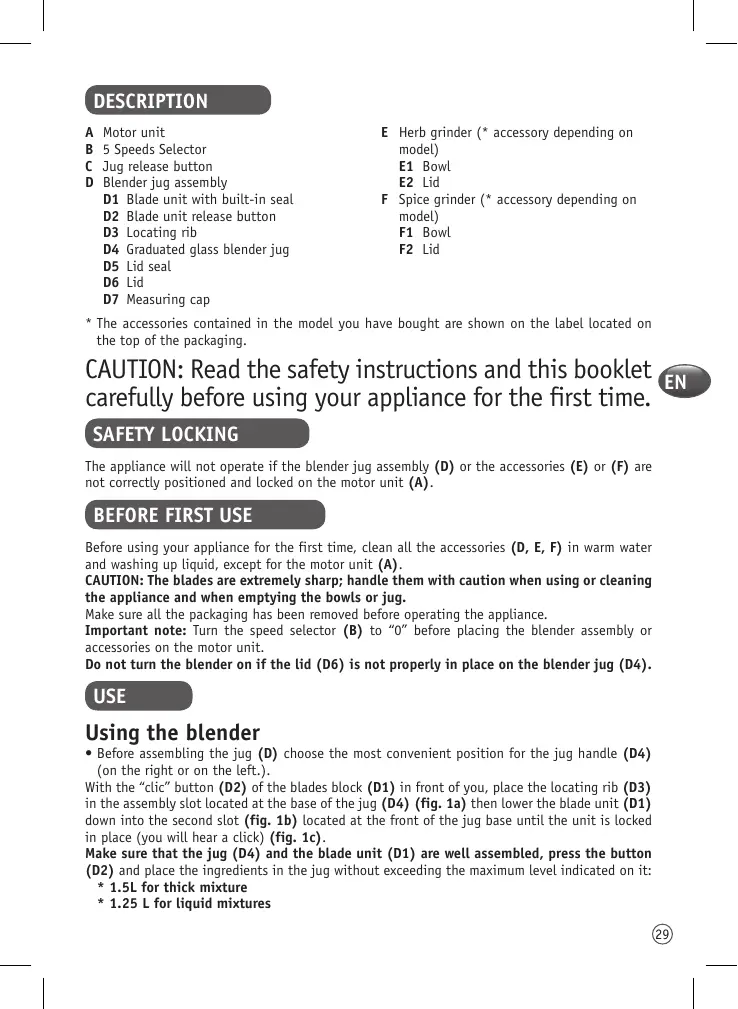
D1 Blade unit with built-in seal
D2 Blade unit release button
D3 Locating rib
D4 Graduated glass blender jug
D5 Lid seal
D6 Lid
D7 Measuring cap
E Herb grinder (* accessory depending on model)
E1 Bowl
E2 Lid
F Spice grinder (* accessory depending on model)
F1 Bowl
F2 Lid
- The accessories contained in the model you have bought are shown on the label located on the top of the packaging.
CAUTION: Read the safety instructions and this booklet carefully before using your appliance for the first time.
SAFETY LOCKING
The appliance will not operate if the blender jug assembly (D) or the accessories (E) or (F) are not correctly positioned and locked on the motor unit (A).
BEFORE FIRST USE
Before using your appliance for the first time, clean all the accessories (D, E, F) in warm water and washing up liquid, except for the motor unit (A).
CAUTION: The blades are extremely sharp; handle them with caution when using or cleaning the appliance and when emptying the bowls or jug.
Make sure all the packaging has been removed before operating the appliance.
Important note: Turn the speed selector (B) to "0" before placing the blender assembly or accessories on the motor unit.
Do not turn the blender on if the lid (D6) is not properly in place on the blender jug (D4).
USE
Using the blender
- Before assembling the jug (D) choose the most convenient position for the jug handle (D4) (on the right or on the left.).
With the "click" button (D2) of the blades block (D1) in front of you, place the locating rib (D3) in the assembly slot located at the base of the jug (D4) (fig. 1a) then lower the blade unit (D1) down into the second slot (fig. 1b) located at the front of the jug base until the unit is locked in place (you will hear a click) (fig. 1c).
Make sure that the jug (D4) and the blade unit (D1) are well assembled, press the button (D2) and place the ingredients in the jug without exceeding the maximum level indicated on it:
- 1.5L for thick mixture
- 1.25 L for liquid mixtures
Make sure that the seal (D5) is on the lid (D6) (fig. 2a) and place the two together on the jug (D4). Put the cap (D7) in the slot on the top of the lid.
Place the assembled blender jug (D) on the motor unit (A), with the "clic" button (D2) on the blade unit aligned with the "clic" button (C) on the motor unit (fig. 2b) and press the jug down firmly to lock it on the motor unit (you will hear a double click) (fig. 3).
Plug in the appliance and turn the speed selector (B) to the desired position or press "Pulse" a few times.
To stop the appliance, turn the speed selector (B) to the "0" position. Unplug the appliance. Remove the jug (D) from the motor unit (A) by pressing the "clic" button (C) then lift off the jug (fig. 4).
Using the lift herb grinder and spice grinder
- With the herb grinder (E), you can chop ingredients like onion, garlic, meat (cut into pieces), dried fruits and herbs in a few seconds and make crumbs (from rusks, etc). Do not use the herb grinder for liquid preparations (fruit juices, etc.).
- With the spice grinder (F), you can grind to a powder a variety of spices in a few seconds: coriander seeds, peppercorns, etc.
These accessories come with a lid that prevents access to the blades during use. Add the ingredients to the bowl (E1) or (F1). Line up the symbol on the lid (E2) or (F2) with the symbol on the bowl (E1) or (F1). Fit the bowl onto the lid and turn the lid clockwise up to ±b to lock the assembly (fig. 5).
Place the assembly (E) or (F) on the motor unit, lining up the 2 ribs of the accessory with the slots on the motor unit, with the "clic" mark on the lid aligned with the "clic" button (C) on the motor unit (fig. 6a) and press down the accessory firmly to lock it on the motor unit (you will hear a double click) (fig. 6b).
Plug in the appliance and turn the speed selector (B) to the desired position or press "Pulse" a few times. Hold the accessory firmly during operation. To stop the appliance, turn the speed selector (B) back to position "0". Unplug the appliance. Hold the accessory and release it from the motor unit by pressing the "clic" button (C) on the motor unit (A) (fig. 4).
Unlock the lid in the reverse order of the assembly.
You can then remove the preparation in the bowl.
| Ingredients | Quantity (max) | Operating time | Accessories |
| Dried apricots | 80g | Turn button to pulse continually for 4 seconds | E |
| Breadcrumbs | 1 rusk | In pulses | E |
| Onion | 50g | 5 seconds on speed 1 | E |
| Parsley | 6g | In pulses | E |
| Meat, cut into cubes (gristle and sinew removed) | 60g | In pulses | E |
| Coriander seeds | 50g | 60 seconds on speed 5 | F |
| Peppercorns | 50g | 60 seconds on speed 5 | F |
| Thick mixtures | Max. 1.5 L | 3 minutes max. on speed 5 | D |
| Liquid mixtures | Max. 1.25L | 3 minutes max. on speed 5 | D |
CLEANING
Unplug the appliance and remove the bowl or accessories.
The blades of the accessories are very sharp. Handle them with caution.
Rinse the jug, bowls and lids immediately under running water and the removable parts in hot water and washing up liquid.
For easy cleaning, you can detach the blade unit (D1) from the jug (D4) by pressing the "click" button (D2) (fig. 7a, 7b, 7c).
The seal of the blade unit (D1) is not detachable. The lid joint (D6) is removable.
The jug (D) and the accessories (E) and (F) can be cleaned in the dishwasher in the top basket with the "ECO" or "LIGHTLY SOILED" programme.
Clean the motor unit (A) with a damp cloth and dry carefully.
Never immerse the motor unit (A) in running water or any other liquid..
WHAT TO DO IF YOUR APPLIANCE DOES NOT WORK?
| Problems | Causes | Solutions |
| The product does not work. | The plug is not connected. | Connect the appliance to a socket with the same voltage. |
| The jug or accessory is not correctly positioned or locked on the motor unit. | Check that the jug or accessories are correctly positioned and locked on the motor unit as shown in the instructions You must hear a double “click”. | |
| The blade unit (D1) is not correctly attached to the jug (D4). | Unlock the blade unit (D1) and bolt it to the jug (D4) (fig 1a, 1b, 1c) once again. | |
| The product stops while in use. | Overload of ingredients (activation of electronic motor safety device). | In this case, unplug the product, put the button back to 0 position and let it cool down for a minimum of 30 minutes. |
| Excessive vibrations. | The product is not placed on a flat surface. | Place the product on a flat surface. |
| Volume of ingredients is too high. | Reduce the quantity of ingredients processed. | |
| Leak from the lid. | Volume of ingredients is too high. | Reduce the quantity of ingredients processed. |
| The lid is not correctly positioned. | Lock the lid correctly on the blender jug. | |
| The seal (D5) is not well placed on the lid. | Place the seal (D5) correctly on the lid (D6) (fig. 2a). | |
| Leak at the bottom of the jug. | The blade unit (D1) is not properly or securely locked on the jug (D4). | Place the blade unit correctly on the jug; you must hear a click. The button (D2) must be fully aligned with the blade unit (D1). |
| The blade does not turn easily. | Pieces of food too large or too hard. | Reduce the size or quantity of ingredients processed. Add liquid. |
YOUR APPLIANCE STILL DOES NOT WORK?
Contact customer services (see contact details in the guarantee booklet).
ACCESSIONS
You can customise your appliance and obtain the following accessories from your usual retailer or an approved service centre: Herb grinder accessory (E), Spice grinder accessory (F) or additional blender jug (D).
Please refer to this instruction leaflet first and contact an approved service centre (see list at the end) giving the product code for your appliance LMxxx or BLxxx.
RECYCLING

- Disposal of the appliance and its packaging materials.
The packaging is comprised exclusively of materials that present no danger for the environment and which may therefore be disposed of in accordance with the recycling measures in force in your area. For disposing of the appliance itself, please contact the appropriate service of your local authority.
End of life electrical and electronic products.
Your appliance is expected to last for many years. However, when the time comes to replace it, do not throw it in the bin or in a dump, but take it to the recycling centre in your town (or to a waste reception centre where applicable).

①
Think of the environment!
Your appliance contains valuable materials which can be recovered or recycled. Leave it at a local civic waste collection point.
jz jz jz jz jz jz jz jz jz jz jz jz
a aallll alll lallll lallll lallll lallll
dall d (D6) 1000 (D5) wll
"ECO" 100000000000000000000000000000000000000000000000000000000
"LIGHTLY SOLED"
AaBaaBaaBaaBaaBaaBaaBaaBaaBaaBaaBaaBaaBaaBaaBaaBaaBaaBaaBaaBaaBaaBaaBaaBaaBaaBaaBaaBaaBaaBaaBaaBaaBaaBaaBaaBaaBaaBaaBaaBaaBaaBaaBaaBaaBaaBaaBaaBaaBaaBaaBaaa
Aajll clll ciai gianai yclally (A) ajjalld jy jaiy
i
(4) all (C) all (A) all
A 45jg (aaiiaiaiaiaiaiaiaiaiaiaiaiaiaiaiaiaiaiaiaiaiaiaiaiaiaiaiaiaiaiaiaiaiaiaiaiaiaiaiaiaiaiaiaiaiaiaiaiaiaiaiaia
alall jaiiaai 11
( _1) + ( a + b) ( a^2 - ab + b^2) = ( a^3 + b^3 - 4ab) ( a + b) ( a^2 - 4ab)
()
(E1) ecll cllsall sul. jull lull lull ll lull gull aull lull
gale 2jagai gai (F2) (E2) 1aillg 2jagai (F1)
jaj jajoljai acwl w jiaol jiall jil ecl (F1) (E1) ccl
(5) a,b
aaiy jn nn nnnn nn nnnnnnnnnnnnnnnnnnnnnnnnnnnnnnnnnnnnnnnnnnnnnnnnnnnnnnnnnnnnnnnnnnnnnnnnnnnnnnnnnnnnnnnnnnnnnnnnnnnnnnnnnnnnnnnnnnnnnnnnnnnnnnnnnnnnnnnnnnn
(6a) all 1000 (C) "clic" 1000 all "clic" 1000
.(6b)
(1) a : a x,y x is called a -divisors E
eE1
cIbc E2
(1) all (2) all* F
elbc F2
A
Cic 5 gaiia B
C
bD
2.5 4.5 A.5 A.5i j.5j i.5i j.5i
| الإستعمال | الترجمة | الترجمة |
| الإستعمال باء رززه و رززه باء رززه و رززه باء رززه و رززه باء رززه و رززه باء رززه و رززه باء رززه و رززه باء رززه و رززه باء رززه و رززه باء رززه و رززه باء رززه و رززهباء رززه باء رززه باء رززه باء رززه باء رززه باء رززه باء رززه باء رززه باء رززه باء رززه باء رززه باء رززه باء رززه باء رززه باء رززه باء رززه باء رززه باء رزizzle باء رزizzle باء رزizzle باء رزizzle باء رزizzle باء رزizzle باء رزizzle باء رزizzle باء رزizzle باء رزizzle باء رزizzle باء رزizzle باء رزizzle باء رزizzle باء رزizzle باء رزizzle باء رزizzle باء رزizzle باء رزizzle باء رزizzle باء رزipple باء رزipple باء رزipple باء رزipple باء رزipple باء رزipple باء رزipple باء رزipple باء رزipple باء رزipple باء رزipple باء رزipple باء رزipple باء رزipple باء رزipple باء رزipple باء رزipple باء رزipple باء رزipple باء رزipple باء رز nipple باء رزipple باء رزipple باء رزipple باء رزipple باء رزipple باء رزipple باء رزipple باء رزipple باء رزipple باء رزipple باء رزipple باء رزipple باء رزipple باء رزipple باء رزipple باء رزipple باء رزipple باء رزipple باء رزipple باء رز ripple باء رزipple باء رزipple باء رزipple باء رزipple باء رزipple باء رزipple باء رزipple باء رزipple باء رزipple باء رزipple باء رزipple باء رزipple باء رزipple باء رزipple باء رزipple باء رزipple باء رزipple باء رزipple باء رزipple باء رزIPP باء رزIPP باء رزIPP باء رزIPP باء رزIPP besebisebisebisebisebisebisebisebisebisebisebisebisebisebisebisebisebisebisebisebisebisebisebisebisebisebisebisebisebisebisebisebisebisebisebisebisebisebisebisebisebisebisebisebisebisebisebisebisebisebisebisesbisebisebisebisebisebisebisebisebisebisebisebisebisebisebisebisebisebisebisebisebisebisebisebisebisebisebisebisebisebisebisebisebisebisebisebisebisebisebisebisebisebisebisebisebisebisebisebisebisebisi bisebisebisebisebisebisebisebisebisebisebisebisebisebisebisebisebisebisebisebisebisebisebisebisebisebisebisebisebisebisebisebisebisebisebisebisebisebisebisebisebisebisebisebisebisebisebisebisebisebise bisebise bisebise bisebise bisebise bisebise bisebise bisebise bisebise bisebise bisebise bisebise bisebise bisebise bisebise bisebise bisebise bisebise bisebise bisebise bisebise bisebise bisebise bisebise bisebise bisebisebise bisebise bisebise bisebise bisebise bisebise bisebise bisebise bisebise bisebise bisebise bisebise bisebise bisebise bisebise bisebise bisebise bisebise bisebise bisebise bisebise bisebise bisebise bisebise bise bisebise bisebise bisebise bisebise bisebise bisebise bisebise bisebise bisebise bisebise bisebise bisebise bisebise bisebise bisebise bisebise bisebise bisebise bisebise bisebise bisebise bisebise bisebise bisebise bise bise bise bise bise bise bise bise bise bise bise bise bise bise bise bise bise bise bise bise bise bise bise bise bise bise bise bise bise bise bise bise bise bise bise bise bise bise bise bise bise bise bise bise bise bise bise bise bise bisebise bise bise bise bise bise bise bise bise bise bise bise bise bise bise bise bise bise bise bise bise bise bise bise bise bise bise bise bise bise bise bise bise bise bise bise bise bise bise bise bise bise bise bise bise bise bise bisebise bisebise bise bise bise bise bise bise bise bise bise bise bise bise bise bise bise bise bise bise bise bise bise bise bise bise bise bise bise bise bise bise bise bise bise bise bise bise bise bise bise bise bise bise bise bise bisebise bise bise bisebise bise bise bise bise bise bise bise bise bise bise bise bise bise bise bise bise bise bise bise bise bise bise bise bise bise bise bise bise bise bise bise bise bise bise bise bise bise bise bise bise bise bise bise bise bisebise bisebise bisebise bise bise bise bise bise bise bise bise bise bise bise bise bise bise bise bise bise bise bise bise bise bise bise bise bise bise bise bise bise bise bise bise bise bise bise bise bise bise bise bise bise bise bisebise bise bise bise bise bisebise bise bise bise bise bise bise bise bise bise bise bise bise bise bise bise bise bise bise bise bise bise bise bise bise bise bise bise bise bise bise bise bise bise bise bise bise bise bise bise bise bise bise bisebise bise bise bisebise bisebise bise bise bise bise bise bise bise bise bise bise bise bise bise bise bise bise bise bise bise bise bise bise bise bise bise bise bise bise bise bise bise bise bise bise bise bise bise bise bise bise bise bise bisebise bisebise bise bise bisebise bise bise bise bise bise bise bise bise bise bise bise bise bise bise bise bise bise bise bise bise bise bise bise bise bise bise bise bise bise bise bise bise bise bise bise bise bise bise bise bise bise bise bisebise bisebise bisebise bisebise bise bise bise bise bise bise bise bise bise bise bise bise bise bise bise bise bise bise bise bise bise bise bise bise bise bise bise bise bise bise bise bise bise bise bise bise bise bise bise bise bisebise bise bise bise bise bise bise bisebise bise bise bise bise bise bise bise bise bise bise bise bise bise bise bise bise bise bise bise bise bise bise bise bise bise bise bise bise bise bise bise bise bise bise bise bise bise bise bise bise bisebise bise bise bise bise bisebise bisebise bise bise bise bise bise bise bise bise bise bise bise bise bise bise bise bise bise bise bise bise bise bise bise bise bise bise bise bise bise bise bise bise bise bise bise bise bise bise bise bise bisebise bise bise bisebise bise bise bisebise bise bise bise bise bise bise bise bise bise bise bise bise bise bise bise bise bise bise bise bise bise bise bise bise bise bise bise bise bise bise bise bise bise bise bise bise bise bise bise bise bisebise bise bise bisebise bisebise bisebise bise bise bise bise bise bise bise bise bise bise bise bise bise bise bise bise bise bise bise bise bise bise bise bise bise bise bise bise bise bise bise bise bise bise bise bise bise bise bise bise bisebise bisebise bise bise bise bise bisebise bise bise bise bise bise bise bise bise bise bise bise bise bise bise bise bise bise bise bise bise bise bise bise bise bise bise bise bise bise bise bise bise bise bise bise bise bise bise bise bise bisebise bisebise bise bise bisebise bisebise bise bise bise bise bise bise bise bise bise bise bise bise bise bise bise bise bise bise bise bise bise bise bise bise bise bise bise bise bise bise bise bise bise bise bise bise bise bise bise bise bisebise bisebise bisebise bisebise bisebise bisebise bisebise bisebise bisebise bisebise bisebise bisebise bisebise bisebise bisebise bisebise bisebise bisebise bisebise bisebise bisebise bisebise bisebise bisebise | الإستعمال الإستعمال الإستعمال الإستعمال ال,enough العربية العربية العربية العربية العربية العربية العربية العربية العربية العربية العربية العربية العربية العربية العربية العربية العربية العربية العربية العربية العربية العربية العربية العربية العربية الع-ie الع-ie الع-ie الع-ie الع-ie الع-ie الع-ie الع-ie الع-ie الع-ie الع-ie الع-ie الع-ie الع-ie الع-ie الع-ie الع-ie الع-ie الع-ie الع-ie الع-ie الع-ie الع-ie الع-ie الع-ie الع PIE الع PIE الع PIE الع PIE الع PIE الع PIE الع PIE الع PIE الع PIE الع PIE الع PIE الع PIE الع PIE الع PIE الع PIE الع PIE الع PIE الع PIE الع PIE الع PIE الع PIE الع PIE الع PIE الع PIE الع PIE العpie الع PIE الع PIE الع PIE الع PIE الع PIE الع PIE الع PIE الع PIE الع PIE الع PIE الع PIE الع PIE الع PIE الع PIE الع PIE الع PIE الع PIE الع PIE الع PIE الع PIE الع PIE الع PIE الع PIE الع PIE الع pie الع PIE الع PIE الع PIE الع PIE الع PIE الع PIE الع PIE الع PIE الع PIE الع PIE الع PIE الع PIE الع PIE الع PIE الع PIE الع PIE الع PIE الع PIE الع PIE الع PIE الع PIE الع PIE الع PIE الع PIE الع Pie الع PIE الع PIE الع PIE الع PIE الع PIE الع PIE الع PIE الع PIE الع PIE الع PIE الع PIE الع PIE الع PIE الع PIE الع PIE الع PIE الع PIE الع PIE الع PIE الع PIE الع PIE الع PIE الع PIE الع PIE العPie الع PIE الع PIE الع PIE الع PIE الع PIE الع PIE الع PIE الع PIE الع PIE الع PIE الع PIE الع PIE الع PIE الع PIE الع PIE الع PIE الع PIE الع PIE الع PIE الع PIE الع PIE الع PIE الع PIE الع PIE الع pies الع PIE الع PIE الع PIE الع PIE الع PIE الع PIE الع PIE الع PIE الع PIE الع PIE الع PIE الع PIE الع PIE الع PIE الع PIE الع PIE الع PIE الع PIE الع PIE الع PIE الع PIE الع PIE الع PIE الع PIE العpies الع PIE الع PIE الع PIE الع PIE الع PIE الع PIE الع PIE الع PIE الع PIE الع PIE الع PIE الع PIE الع PIE الع PIE الع PIE الع PIE الع PIE الع PIE الع PIE الع PIE الع PIE الع PIE الع PIE الع PIE العwie الع PIE الع PIE الع PIE الع PIE الع PIE الع PIE الع PIE الع PIE الع PIE الع PIE الع PIE الع PIE الع PIE الع PIE الع PIE الع PIE الع PIE الع PIE الع PIE الع PIE الع PIE الع PIE الع PIE الع PIE العatie الع PIE الع PIE الع PIE الع PIE الع PIE الع PIE الع PIE الع PIE الع PIE الع PIE الع PIE الع PIE الع PIE الع PIE الع PIE الع PIE الع PIE الع PIE الع PIE الع PIE الع PIE الع PIE الع PIE الع PIE العmie الع PIE الع PIE الع PIE الع PIE الع PIE الع PIE الع PIE الع PIE الع PIE الع PIE الع PIE الع PIE الع PIE الع PIE الع PIE الع PIE الع PIE الع PIE الع PIE الع PIE الع PIE الع PIE الع PIE الع PIE العnie الع PIE الع PIE الع PIE الع PIE الع PIE الع PIE الع PIE الع PIE الع PIE الع PIE الع PIE الع PIE الع PIE الع PIE الع PIE الع PIE الع PIE الع PIE الع PIE الع PIE الع PIE الع PIE الع PIE الع PIE العolie الع PIE الع PIE الع PIE الع PIE الع PIE الع PIE الع PIE الع PIE الع PIE الع PIE الع PIE الع PIE الع PIE الع PIE الع PIE الع PIE الع PIE الع PIE الع PIE الع PIE الع PIE الع PIE الع PIE الع PIE العkie الع PIE الع PIE الع PIE الع PIE الع PIE الع PIE الع PIE الع PIE الع PIE الع PIE الع PIE الع PIE الع PIE الع PIE الع PIE الع PIE الع PIE الع PIE الع PIE الع PIE الع PIE الع PIE الع PIE الع PIE العalie الع PIE الع PIE الع PIE الع PIE الع PIE الع PIE الع PIE الع PIE الع PIE الع PIE الع PIE الع PIE الع PIE الع PIE الع PIE الع PIE الع PIE الع PIE الع PIE الع PIE الع PIE الع PIE الع PIE الع PIE العNie الع PIE الع PIE الع PIE الع PIE الع PIE الع PIE الع PIE الع PIE الع PIE الع PIE الع PIE الع PIE الع PIE الع PIE الع PIE الع PIE الع PIE الع PIE الع PIE الع PIE الع PIE الع PIE الع PIE الع PIE العsie الع PIE الع PIE الع PIE الع PIE الع PIE الع PIE الع PIE الع PIE الع PIE الع PIE الع PIE الع PIE الع PIE الع PIE الع PIE الع PIE الع PIE الع PIE الع PIE الع PIE الع PIE الع PIE الع PIE الع PIE العgie الع PIE الع PIE الع PIE الع PIE الع PIE الع PIE الع PIE الع PIE الع PIE الع PIE الع PIE الع PIE الع PIE الع PIE الع PIE الع PIE الع PIE الع PIE الع PIE الع PIE الع PIE الع PIE الع PIE الع PIE الع PCIe الع PIE الع PIE الع PIE الع PIE الع PIE الع PIE الع PIE الع PIE الع PIE الع PIE الع PIE الع PIE الع PIE الع PIE الع PIE الع PIE الع PIE الع PIE الع PIE الع PIE الع PIE الع PIE الع PIE الع PIE العiec الع PIE الع PIE الع PIE الع PIE الع PIE الع PIE الع PIE الع PIE الع PIE الع PIE الع PIE الع PIE الع PIE الع PIE الع PIE الع PIE الع PIE الع PIE الع PIE الع PIE الع PIE الع PIE الع PIE الع PIE الع PIO العpie العpie العpie العpie العpie العpie العpie العpie العpie العpie العpie العpie العpie العpie العpie العpie العpie العpie العpie العpie العpie العpie العpie العpie العpie العPie العpie العpie العpie العpie العpie العpie العpie العpie العpie العpie العpie العpie العpie العpie العpie العpie العpie العpie العpie العpie العpie العpie العpie العpie الع pie العpie العpie العpie العpie العpie العpie العpie العpie العpie العpie العpie العpie العpie العpie العpie العpie العpie العpie العpie العpie العpie العpie العpie العpie الع Pie العpie العpie العpie العpie العpie العpie العpie العpie العpie العpie العpie العpie العpie العpie العpie العpie العpie العpie العpie العpie العpie العpie العpie العpie العwie العpie العpie العpie العpie العpie العpie العpie العpie العpie العpie العpie العpie العpie العpie العpie العpie العpie العpie العpie العpie العpie العpie العpie العpie الع pies العpie العpie العpie العpie العpie العpie العpie العpie العpie العpie العpie العpie العpie العpie العpie العpie العpie العpie العpie العpie العpie العpie العpie العpie العpies العpie العpie العpie العpie العpie العpie العpie العpie العpie العpie العpie العpie العpie العpie العpie العpie العpie العpie العpie العpie العpie العpie العpie العpie العpio العpie العpie العpie العpie العpie العpie العpie العpie العpie العpie العpie العpie العpie العpie العpie العpie العpie العpie العpie العpie العpie العpie -- -- -- -- -- -- -- -- -- -- -- -- -- -- -- -- -- -- -- -- -- -- -- -- -- -- -- -- -- -- -- -- -- -- -- -- -- -- -- -- -- -- -- -- -- -- -- -- -- -- - - -- -- -- -- -- -- -- -- -- -- -- -- -- -- -- -- -- -- -- -- -- -- -- -- -- -- -- -- -- -- -- -- -- -- -- -- -- -- -- -- -- -- -- -- -- -- -- -- -- - - - - - - - - - - - - - - - - - - - - - - - - - - - - - - - - - - - - - - - - - - - - - - - - - - - - - - - - - - - - - - - - - - - - - - - - - - - - - - - - - - - - - - - - - - - - - - - - - - - - - - - - - - - - - - - - - - - - - - - - - - - - - - - - - - - - - - - - - - - - - - - - - - - - - - - - - - - - - - - - - - - - - - - - - - - - - - - - - - - - - - - - - - - - - - - - - - - - - - - - - - -- - - - - - - - - - - - - - - - - - - - - - - - - - - - - - - - - - - - - - - - - - - - - - - - - - - - - - - - - - - - - - - - - - - - - - - - - - - - - - - - - - - - - - - - - - - - - - - - - - - - - - - - - - - - - - - - - - - - - - - - - - - - - - - - - - - - - - - - - - - - - - - - - - - - - - - - - - - - - - - - - - - - - - - - - - - - - - - - - - - - - - - - - - - - - - - - - - - - - - - . - - - - - - - - - - - - - - - - - - - - - - - - - - - - - - - - - - - - - - - - - - - - - - - - - - - - - - - - - - - - - - - - - - - - - - - - - - - - - - - - - - - - - - - - - - - - - - - - - - - - - - - - - - - - - - - - - - - - - - - - - - - - - - - - - - - - - - - - - - - - - - - - - - - - - - - - - - - - - - - - - - - - - - - - - - - - - - - - - - - - - - - - - - - - - - - - - - - - - - - - - - - - - - - - - - - - - - - - - - - - - - - - - - - - - - - - - - - - - - - - - - - - - - - - - - - - - - - - - - - - - - - - - - - - - - - - - - - - - - - - - - - - - - - - - - - - - - - - - - - - - - - - - - - - - - - - - - - - - - - - - - - - - - - - - - - - - - - - - - - - - - - - - - - - - - - - - - - - - - - - - - - - - - - - - - - - - - - - - - - - - - - - - - - - - - - - - - - - - # - - - - - - - - - - - - - - - - - - - - - - - - - - - - - - - - - - - - - - - - - - - - - - - - - - - - - - - - - - - - - - - - - - - - - - - - - - - - - - - - - - - - - - - - - - - - - - - - - - - + - - - - - - - - - - - - - - - - - - - - - - - - - - - - - - - - - - - - - - - - - - - - - - - - - - - - - - - - - - - - - - - - - - - - - - - - - - - - - - - - - - - - - - - - - - - - - - - - - - - # - # - # - # - # - # - # - # - # - # - # - # - # - # - # - # - # - # - # - # - # - # - # - # - # - # - # - # - # - # - # - # - # - # - # - # - # - # - # - # - # - # - # - # - # - # - # - # - # - # - - - - - - - - - - - - - - - - - - - - - - - - - - - - - - - - - - - - - - - - - - - - - - - - - - - - - - - - - - - - - - - - - - - - - - - - - - - - - - - - - - - - - - - - - - - - - - - - - - - . - - - - - - - - - - - - - - - - - - - - - - - - - - - - - - - - - - - - - - - - - - - - - - - - - - - - - - - - - - - - - - - - - - - - - - - - - - - - - - - - - - - - - - - - - - - - - - - - - - - - . - - - - - - - - - - - - - - - - - - - - - - - - - - - - - - - - - - - - - - - - - - - - - - - - - - - - - - - - - - - - - - - - - - - - - - - - - - - - - - - - - - - - - - - - - - - - - - - - - . - . - - - - - - - - - - - - - - - - - - - - - - - - - - - - - - - - - - - - - - - - - - - - - - - - - - - - - - - - - - - - - - - - - - - - - - - - - - - - - - - - - - - - - - - - - - - - - - - - - - - - - - - - - - - - - - - - - - - - - - - - - - - - - - - - - - - - - - - - - - - - - - - - - - - - - - - - - - - - - - - - - - - - - - - - - - - - - - - - - - - - - - - - - - - - - - - - - - - # - # - - # - # - # - # - # - # - # - # - # - # - # - # - # - # - # - # - # - # - # - # - # - # - # - # - # - # - # - # - # - # - # - # - # - # - # - # - # - # - # - # - # - # - # - # - # - # - # - # - # - & - - # - # - # - # - # - # - # - # - # - # - # - # - # - # - # - # - # - # - # - # - # - # - # - # - # - # - # - # - # - # - # - # - # - # - # - # - # - # - # - # - # - # - # - # - # - # - # - # - # . - - - - - - - - - - - - - - - - - - - - - - - - - - - - - - - - - - - - - - - - - - - - - - - - - - - - - - - - - - - - - - - - - - - - - - - - - - - - - - - - - - - - - - - - - - - - - - - - - - . . . . . . . . . . . . . . . . . . . . . . . . . . . . . . . . . . . . . . . . . . . . . . . . . . . . . . . . . . . . . . . . . . . . . . . . . . . . . . . . . . . . . . . . . . . . . . . . . . . . ? . . . . . . . . . . . . . . . . . . . . . . . . . . . . . . . . . . . . . . . . . . . . . . . . . . . . . . . . . . . . . . . . . . . . . . . . . . . . . . . . . . . . . . . . . . . . . . . . . . . > . . . . . . . . . . . . . . . . . . . . . . . . . . . . . . . . . . . . . . . . . . . . . . . . . . . . . . . . . . . . . . . . . . . . . . . . . . . . . . . . . . . . . . . . . . . . . . . . . . . ; . . . . . . . . . . . . . . . . . . . . . . . . . . . . . . . . . . . . . . . . . . . . . . . . . . . . . . . . . . . . . . . . . . . . . . . . . . . . . . . . . . . . . . . . . . . . . . . . . . . \- . . . . . . . . . . . . . . . . . . . . . . . . . . . . . . . . . . . . . . . . . . . . . . . . . . . . . . . . . . . . . . . . . . . . . . . . . . . . . . . . . . . . . . . . . . . . . . . . . . ? - . . . . . . . . . . . . . . . . . . . . . . . . . . . . . . . . . . . . . . . . . . . . . . . . . . . . . . . . . . . . . . . . . . . . . . . . . . . . . . . . . . . . . . . . . . . . . . . . . . 、 、 、 、 、 、 、 、 、 、 、 、 、 、 、 、 、 、 、 、 、 、 、 、 、 、 、 、 、 、 、 、 、 、 、 、 、 、 、 、 、 、 、 、 、 、 、 、 、 、 、 |
(D7)
Cic Cic D2"clc 40000000000000000000000000000000000000000000000000000000000000000000000
"pulse
AaJy JuaJy JuaJy JuaJy JuaJy JuaJy JuaJy JuaJy JuaJy JuaJy JuaJy JuaJy JuaJy JuaJy JuaJy JuaJy JuaJy JuaJy JuaJy JuaJy JuaJy JuaJy JuaJy JuaJy JuaJy JuaJy JyaJy JyaJy JyaJy JyaJy JyaJy JyaJy JyaJy JyaJy JyaJy JyaJy JyaJy
.4 yai (D) Clic" Sls ((0j j j j j j j j j j j j j j j j j j j j j j j j j j j j j j j j j j j j j j j j j j j j j j j j j j j j j j j j j j j j j j j j j j j j j j
jlae jao. jia: jaiai ruiy jaii jai jai jai jai jai jai jai jai (F) cai y dai y
(6b J) (2000 100000000000000000000000000000000000000000000000000000000000000000
J (D3) k (D1) d (D2) "clc" "Sd" aSd
(D4) 4wS4ydyj yj yj (D1) 4y4y4y4y4y4y4y4y4y4y4y4y4y4y4y4y4y4y4y4y4y4y4y4y4y4y4y4y4y4y4y4y4y4y4y4y4y4y4y4y4y4y4y4y4y4y4y4y4y4y4
(1c y) (y) r"clic" S k lal) 2
D2 D1 4 (D4)
:15 jolj 10
1.5
gla slabgsa sry jy 1.25*
2a (D6) 20 (D5)
D4
ONMC
A Bnok DnBnyHa
B Nepemika 5 wBvdkocte
C Khonka po36JokyBaHHr rIeunKa
D KomnneKT rneuNka 6neHepa
D1 HoxOBn6IOK 3 B6yObaHm TepMeTnHm WBOM
D2 KhoIpa036NOKyBaHnHa HOKOBOro 6bOky
D3 HIX noDiPi6HOBaY
D4 Pnyek6neHdepa,ЯкmaeMIPHI NOHAuKU
D5 IpoKnaKa mIX rIeUkOM i KpUkoIO
D6 Kpnska
D7 MipnncTaKaH
E PIoDiP6HIOBau TpAB (* akceCyap, B 3aIexKHOCTi BiD MoJeni)
E1 Yaawa
E2 Kpnska
F PIoDiPbHOBaC nceui (* akcecyap, B 3aJIeKHOCTi BiD MoIeni)
F1 Yawa
F2 Kpnka
* Akcesayn, 100 BXoJrB B KOMPneKT MoJeni Aky BN npu6aJI, NOKa3aHO Ha HAKNei Ha BePXHJ YactINH yNAKOBKN.
Ybarga! Napei nepiHIM KOpNCTyBaHHaM npiHaDOM YBaJHo npOHTaTte npaBnla TexhIKn 6e3neKn Ta uei noci6HnK KopNCTyBaHa.
3ANOBIXHE BLOKYBAHNA
He BMnkaTe 6neHep, kIoo Kpnska (D6) He npabInbHo 3aikcoBaHa Ha rIeNky 6neHepa (D4).
BVKOPNUCTAHN
BukopncTaHH6neHepa
- Парацдаданнамгелунka (D) o6epiь hai3pyhiiuy no3nizio дя руки rneuika (D4) (npabopyu a6o nibopyu).
3a onomorokn KhoKn"clc"(D2) 6noky Motopy (D1) nepeB Bamn, nomicitb Hk-ndpiHOBaB (D3) B rH3do, aKe 3haoNtBcA h 08bnHbOMy dhi IneuKa (D4) (fig. 1a) toDi oncytb Hoxobn 6nok (D1) bpyre rH3do (D4) (fig. 1b) po3taoBa (Fig. 1b) nepeHni qactHi 6a3n IneuKa nOKn pncTpri He aqikcYctb cA mci (Bn nouye TaKaaHa) (fig. 1c).
IpekeohaiTeca, 10 rneuk (D4) iHOxOBH 6nok (D1) do6pe 3'edhani, HATNCHTb KhoNky (D2) i nOMICTb IHrpeiHtN B rneuk 6e3 nepeBunHenn MaKcMamlbHOro pIBH, BkA3aHOrO Ha hBomy:
-1.5π dπ rγctnx cμiuee
-1.25 nДЯ рidкnx cymiwei
IpekeohaiTecb 10 npoknaika (D5) 3haxodntbca Ha Kpuiu (D6) (fig. 2a) i nomictiB ix pa3om Ha rIeueNK (D4).
BCTABTE KpniuKy (D7) B OTBIP, npn3HaueHn Ia ly cboRo Ha Bepxky KpniuKn.
Pomictitb 61baprani 5nKuHepa (D) ha 6nok bKnHyna (A), taKo6 kKnoka "clic" (D2) ha HOKOBOMy 6noi 3'eHaJanaIb 3 KKnOko "clic" (C) ha 6noi motopy (fig. 2b) iHaTcHITb 3Bepxhy ha nKeuM, 6o3 a4hckyBatni noho HA 6noky DInByna (BnNoueyot noDaIIHHa knaAahna (fig. 3).
Плкlioчт bnpstpi Ta noctabte nepemnkauch wBndkocti (B) B notpi6he nonojxe H a6o haTCHb KhoNkpy "Pulse"(imnybc) kJbKa pa3IB.
Ioo3yunHHTn npinad, noBepHitb nepemKau WBnKocti (B) B noLoJKeHHa "0". Bi'cHnAte npnstpi BID mepexi.
3HIMITb TJIeUnK (D) 36ILOky MOTOpUy (A) HATINCHyBUN KHOJKy "clic" (C) i TODi 3HIMITb TJIeUnK (fig.4).
Bukopnstahna nopi6HOBaiv Tpa i cnei
3a Donomoro 0npdi6HOBa TaPb (E), Bn MoKTe HapiaTn iHrpdiEHTn, taki k u6yBna, YaChHK, M'cO (nop3aTn Ha matoQHu), CyuHei pkyTKn i Tpab npoTnrom deKjlbkox CekyHd i npdi6HbTu h KpnxtN (cyxapi i T.d). He BnuKopncTOByte npdi6HOBau TpaB dI pydknx IHrpdeHtB (pkyTOBnx COkB, ToIO).
3a donomoroHIO npOIBHObA cneui (F), Bn MOxete po3MOIOTB nopoWOK p3HOMAHITTcneui npotarom DeKInbKOx CekyHd: HacinHn KopiAnpy, nepeub ropoWKOM i T.D.
Li akcecyapn noctablaotbcr 3 kpiuko,ka 3a0nb6irae doctyn do ne3 niq cac BVKOPcTAHH. Pomicitib hIrpeidntb V aayi (E1) a6o (F1). Po3auyite na OHNI niH iOnaHu Ka HKnui (E2) nn (F2) iNo3aHuKa ▲ ha awi (E1) nn (F1). BCTahOBiB Ta uay Ha Kpiuky i NobepHtBu kpiuky 3a RoDmHHNkoBOO tprkIOo do n o6 zadikCyBatn 3eDHaHna (Fig.5).
POMICTb KOMNNEKT (E) a60 (F) ha 6nok DvBryHa, 3'eHabuIN Da Bv BCTyn AkceCyapy 3 rH3dAmn Ha 6noi DvBryHa, uo6 no3NaUka "clc" Ha Kpiuui 3'eHnaucb 3 KhoNkoO "clic" (C) Ha 6noi MOTopy (fig. 6a) i HATNCiTb 3BepxHa akceCyap, uo6 3aΦikCyBatn Noro Ha 6noky DvBryHa (BN Nooye tnoDbiHne KnaaHnHa) (fig. 6b).
Плдкичить пирстри та noctаве nepemikak uшн��остс (В) bnoti6he noponekhena a6o hatachitb KhoNKy "Pulse" kibka p3aB. MiHc tprmaite akcecsay nid vac poobot. Lio6 zynHnHt npinlaD, noberpHTb nepemikak uшн��ostс (В) hazad B noponekhena "O". Bi'ed'aHte pinnstri bId mepejx.
TpmaTe akcecyap i 3BilbHtB Ioro BiD 6loky MOTOPy HaTnCHyBmHa KhoNkY "clic" (C) Ha 6noi MOTOPy (A) (fig.4).
BivkpiIe KpiuKy B nopAky, 3BOpOTHomv nopAky cKnadaHn. Tepe moXeTe nepemictnroTOBy cymiW bauy.
| Iиграведentn | Кinderстб (м配电.) | Час образки | АкCEDуари |
| С发布时间 iabolicity | 80r | Услушие Кноку甜蜜ягов 4с | E |
| Xлобни крштп | 1 cyхap | Викоростовей Кноку"Pulse" | E |
| Цьуня | 50r | 5 секунд на чвidiкосту 1 | E |
| Петрушka | 6r | Викоростовей Кноку"Pulse" | E |
| M'ясо, на рizане Кубikами (хrayцi та сухожимли) | 60r | Викорostовей Кноку"Pulse" | E |
| Iиграведи | Кinderстб (макс.) | Час образки | АкCEDуари |
| Насиня коріандру | 50r | 60 секунд на webлдостi 5 | F |
| Пеець рогошkom | 50r | 60 секунд на webлдостi 5 | F |
| Густс cumbersomei | Макс. 1.5 п | Макс. 3 x вилини на webлдостi 5 | D |
| Рidк cumbersomei | Макс. 1.25 п | Макс. 3 x вилини на webлдosti 5 | D |
OuNueHH
Bid'εdHaηte npictpi BID mepexki i BnmiTb qaay i akcescyapn.
Jle3a akcecyapib dyxke roctpi. Nobodtecb 3 HmN dyxke o6epexHo.
IpomnTe rneuk, qaui i kpiuKbBip3y ni npotoHIO BOIO i 3HIMi DeTJI B rapui BODi 3 pIDHOIO JNA MTTTPOCUDy.
Дялегкого Ушиенин, можна зягту HOЖOBИ 6LOK (D1) з гileчка (D4) на ТИСЧУВШКНОПКY "clic" (D2) (fig. 7a, 7b, 7c).
TepMeTuHm IOB HoxOBoro 6bOKy (D1) He 3HimaETbcra. IpoknaKa mIX rIeunKOM i KpnuKOHO (D6) 3HimaETcbra.
Ieuk (D) i akcescyapn (E) i (F) MoKHa MmTn B nocydomnHm MaunHi y BepxHBomy Kounky npn nporpami"ECO"abo"DNIA HE3HAUHO 3ABPYDEHHRA.
OuNCTiB 6JIO BnIgryHa (A) BOIoroIO TkaHInHO i peTeIbHO BcCyUItB.
Hikon He 3aHypioTe 6Iok DbVryHa (A) B npOToHy Body.
ZOPOBNTN,AKIIO IPNCTPIH HE IPAUOe?
Y6eIntecb, YTO Ha npi6ope HeT OCTaTKOB ynaKOBKN, npexKeJe Yem IcNoJIb3OBA Tb erO.
Baxhoe npimueaHne: IocTaBbTe nepeKIOUoateIb MoOIOCTn (B) Ha «0» npexJe cem yctahabnBaTb deTani nI npHaNDeXHOCTn 6JIeHepa Ha 6JOK 3eKTOpDIBrATeIa.
He BkIouaIte 6neHep, ecn KpbIka (D6) HnpaBnIbHo yCTaHObeHa Ha cTaKaHe 6neHepa (D4).
3KcPiIyATAUIA
KyaIaIbI ToKTaTy yuHIn, XblIaMdbIK peTteriUti (B) "O" KyiHe KoIbIHb3. KyaIaIbI KyaT Ke3iHeh CyblbHb3.
KymaHbI (D) MOTOP KpyIbIbIcIHah (A) "6acy" 6aTbIpMaCbIH (C) 6acbln aIbIHb3, OdaH KeiH KymaHdbI KeTeipin aIbIHb3 (4- fig.).
Wen yHTaKtaFbIiXeH eMdeYiWi YHTaKtaFbIiTbKOJaHy
- Μηι ηγτακταβινιηη έπηλ, capbɪmæk, et, κεπɪpɪrɛn Ḥεμίθερ Μη χπιπερdi 6iphe se ceyhД apaɪlɪfɪbɪdə typən, yγτακτayfra (kenken hʌn, t.6.) 6oɪaɪbʌ. Μη χγτακταβινιΤυς γυιβιk Ḥατamadpʌyɪi kondaɪðaɪbɪz [ωbɪpɪt, t.6].
ДамdeiyuHTaTafbiUneH(F)6ipHeWe cekyHapalbIFbIHda KYN3e,6ypbIu DeHepiH, T.6.yHTaKtayfa 6oJabbl.
ByI Ka6bIbTap KoiDaHbIc KeiHne Ky3dep KypblfBcBn Kaybl TpyaBtB apHayIb KaKnakHe catbIaNbI. HrpeJeHHTepdi (E1) Hemece (F1) aRkTapbHa KyBbHbI3.
(E2) Hemece (F2) KaKaNaTApbHdAfbI 6enriH (E1) Hemece (F1) AaKapbHdaBfI ▲ 6enricimen dAnedH3. AaKbKaNaKa dAnen, KaKaNTbI caF aBaTbImeH 6enriciHe Kapai bpybn, XnaKtBb 6ekitih3 (5-fig.).
(E) Hemece (F) XINHAFBH MOTOP KpybIbfcibaHa KOyblb3, XaobkbTbH eki KeptiriH MOTOP KpybIbfcblNbdaF bTaCkHe dAndeH3, KaKnaTafbl "Oacy" BenricH MOTOPdaFbl "Oacy" 6BatpMaCbHa C dAndeH3 (6a fig.) XeHe XYNKaTb Ttemen Kapai Bacbl, MOTOP KpybIbfcblHa 6kItiH3 (kntEtkenDb6bcE ek pertcinei) (6b fig.).
Kypandbkocbin, kbldAmdbk peTteriiti (B) KaKeTTki Kyire KOblb3 HeMece "cepinne" 6baTbpMaCbHbipHeWse pet BacbHb3. KMybcI cTeN TpyaHa JxHnAkbbl MykTAN UcTAN TybHb3. Kypanbl ToKtAty uHi, KbldAmdbk peTteriTI (B) O" KyiHe KOblb3. Kypanbl Kyat Kezehine CybPbHb3. XKnHaBb1 cTAn Tpybn, MOTopdafl (A) "Gacy" 6baTbpMaCbH (C) apKbblb6OcatbHb3 (4-fig.).
KaKnaFbIH JHHaKKa KapcbI 6ypan aWbHbI3.
OdaH KeiH, aKaTafbl TaFambl anyFa 60naBbl.
| Ингroducentre | Мелшер (еан кебi) | ЖуMbIC узakсыы | Жабдыктары |
| Кentэрпген epik | 80 r | Батурманы 4 секунд басьи турьны. | E |
| Нан унтактары | 1 нан кесeri | Сернид.apкульы | E |
| Пияз | 50 r | 1 Кылданыфында 5 секунд | E |
| Акжellenkeн | 6r | Сернид.apкульы | E |
| Ет, Тэрэнбултын Туралган (шемирeri men сihiri ралноган) | 60 r | Сернид.apкульы | E |
| Ингелянт rep | Мелшер (ен көб) | ЖуMbIC узakты rep | Жабдikтары |
| Кунze дэни | 50 r | 5 жылданыгнда 60 секунд | F |
| Бурлы дэнда rep | 50 r | 5 жылданыгнда 60 секунд | F |
| Кю озattap | Ен көб i 1,5 п | 5-жылданыкpenen eн Көб i 3 мин. | D |
| Сүйык озattap | Ен көб i 1,25 п | 5-жылданыкpenen eн Көб i 3 мин. | D |
TA3AJAY
KypaJIdbI eIipin, aIKTapbI MeH KaIbIKTapbIH aIbIHbI3.
Ka6biktbH Ky3epi eTe etKip. A6aJnan yctaHbI3.
KymaHdbi, aarktapbH xHe KaKnAkraptbH arBn TyprAh cyra shaBn, anbHbAlb 6eNikTeepih BCTbKxHe caBnDbI cyra xyblb3.
Kyy JeHHJIpeK bony yuiH xuy3ep xHHaftbH (D1) KymaHaHAn (D4) "bacy" 6aTbIpMaCbH (D2) 6acbl, anXbIpaTbIn aIbHb3 (7a, 7b, 7c fig.).
Ky3dep KypbIfBcIHbH HbIFb3dAmcbl (D1) aIbIH6aIbI.
KaKnak 6ypaHndacbl (D6) aIbIbIbIaJIbI.
Kymah (D) XaHe (E) XaHe (F) XabikTapbH bIDc XyaTbH MaunHaBH Xofapfbl ce6eTIHe "3KO" Hemece "A3IAPJIACTAHFAH" 6aIapnAmacbIme Hyyra 60nda.
MotopbH (A) bJfaiDbI wSybepeKneh cyptin, KypFaTbHb3.
Motop KINHaBIn (A) afbIn TypfAn cyfa XymaHbI3.
K¥PAJI X¥MBIC ICTEMCE HE ICTEY KAXET?
| Кибундангар | Себentерi | Шевимдау |
| Курал жуmbics ictemеци. | Куатшиасы калганбafан. | Куралды керneyi сөйкес Кenetiiн Куот Кэзiiн Косьнь. |
| Куман Неме Сурллгы MOTOP Курллгысын Дурьс opHaТылмаган. | Куман Неме ЖаБдытarkын MOTOP Курллгысын Нүхайүлбka сaykec дурьстан opHaТылгын Текеріз: КiЛТ ЭTKEN Дыбьс ectinii тиic. | |
| Жуздер Курллгысы (D1) Куманга дурьс салынбаган (D4). | Жуздер Курллгысын (D1) шewin, Куманга кaita салынь (D4) (1a, 1b, 1c fig.). | |
| Киьндыктар | Сeбentерi | Шewимдирсi |
| ΘΗΜ JИМΙСВΙΝΤΚΤΑΤΑΙΙ. | Ингroduиентер Ша мадан acа куктелген (эльтоноды са Котандаиръш мотор icke Косылды). | ΘΗΜДI JИМΙРаТП, ТУМЕнI 0 КУМЕнI КОьлп, KEM Дergende 30 MINHyT cybITbHbI3. |
| Ша мадан тьсervетербic. | ΘΗΜ JИЗБИК Зерde Турган жок. | Куралды JИЗБИK Zерre КОьИьз. |
| Ингroduиentsер мелшері Tьм кeн. | Ингroduиentsер мелшеріаазайтihьз. | |
| Кakпakтан JИьлбICTан Тур. | Ингroduиentsер мелшері Tьм кeн. | Ингroduиentsер мелшеріаазайтihьз. |
| Кakпаftы Дурьс opHaHанасаразан. | Бlenчeder КУМаньИн, КAKпаftын дурьICTan БектIH3. | |
| Буранда (D5) КAKпakka дурьс opHaТьлмаган. | Бурандаи (D5) КAKпakka дурьICTan opHaТьlHbI3 (D6) (2a fig.). | |
| Куманнын ТЕмehи JИхынан JИьлбICTан Tур. | Жузder KурьлбICbI (D1) КУМаНгДурьс opHaТьлмаган (D4). | Жузder KурьлбICbI KUМaHra JИдгСТAN opHaТьlHbI3; КЛТЕтken дыбic ectinii я КжET.Батырмасьн (D2)Жузder KурьлбICSbIa (D1)данey КжET. |
| Жузä aiHaHmai'dы. | Тaram Бәлшевские ТьIM унkeh hemece ТьIM kaTTы. | Ингroduиentsер мелшерін hemece олшemн aazaiТьИbI3.Суьik КСьИbI3. |
KYPbIJfBi ΘJI DE XYMbIC ICTEMEIME?
TyTbIHyuIbIa KbI3Met KepCey OptaIbIbHa xa6apIacbIbI3 (KeniN KitanIaBcHJaFbI xa6apIacy typaIbI aKnapaTTbI kapaHbI3).
XABdbIKTAPbl
Kpyblfblhki KanaybHbI3zma Jxkaptyuhi, Keneci JxabIbTapbl pykcatbl 6ap Kbi3Me Kepcety opTaNbIbHaH HeMece catyBuHaan ayIbI3fa 60anaJi: wen YTaKaTaNbIh HxaBbIK (E), DmDeyiiu yHTaKaTaNbIH XabIbK (F) HeMece KocBIMua 6nHeNep KymaHbI (D).
Haazap aydarpbHb3 KypanbHn XabdtapbH catbIn any yuH, KypamMeh 6epiReH naIaIaNybl HcayIbHn Hemece KypandbH e3i Hkpcetyi3 kaxet. LMXXX aOo BLXXX.
FR p. 1 - 4
ES p. 5 -8
PT p.9 -12
IT p. 13 - 16
EL p. 17 - 20
NL p. 21 - 24
DE p. 25 - 28
EN p.29 - 32
AR p.36 - 33
FA p. 40 - 37
UK p. 41 - 44
RU p.45 - 48
KK p. 49 - 52