
GMN2130 - Refrigerator GRUNDIG - Free user manual and instructions
Find the device manual for free GMN2130 GRUNDIG in PDF.



| Product Type | Portable blender / multifunction mixer |
| Brand | GRUNDIG |
| Model | GMN2130 |
| Power supply | 220-240 V~, 50/60 Hz |
| Rated power | 700 W |
| Number of speeds | 6 speeds (1 to 6) + Turbo function |
| Main functions | Whisking, kneading, mixing, chopping (with blades) |
| Included accessories | 2 beaters, 2 dough hooks, 2 chopping blades (upper and lower), glass bowl, central lid |
| Bowl material | Glass |
| Maximum flour capacity (mixing) | 900 g |
| Typical processing time | 5 to 30 seconds depending on ingredients (eggs: 5 s, lean meat: 20 s, hazelnuts: 20 s) |
| Cleaning of beaters and hooks | Dishwasher-safe |
| Cleaning of bowl and central lid | Dishwasher-safe (top rack) |
| Safety | Unplug before changing accessories or cleaning |
| Safety | Do not immerse the motor unit or power cord |
| Safety | Use on a stable, flat, clean, and dry surface |
| Repairability | Accessories available at least 5 years after purchase |
| Intended use | Private household only |
| Compliance | WEEE Directive (2012/19/EU), RoHS Directive (2011/65/EU) |
Frequently Asked Questions - GMN2130 GRUNDIG
User questions about GMN2130 GRUNDIG
0 question about this device. Answer the ones you know or ask your own.
Ask a new question about this device
Download the instructions for your Refrigerator in PDF format for free! Find your manual GMN2130 - GRUNDIG and take your electronic device back in hand. On this page are published all the documents necessary for the use of your device. GMN2130 by GRUNDIG.
USER MANUAL GMN2130 GRUNDIG
natural_image
Exterior view of a modern kitchen blender with a black handle and glass interior (no visible text or symbols)DE
EN
TR
FR
ES
HR
FI
NO
NL

natural_image
Abstract gray curled corner on white background (no text or symbols)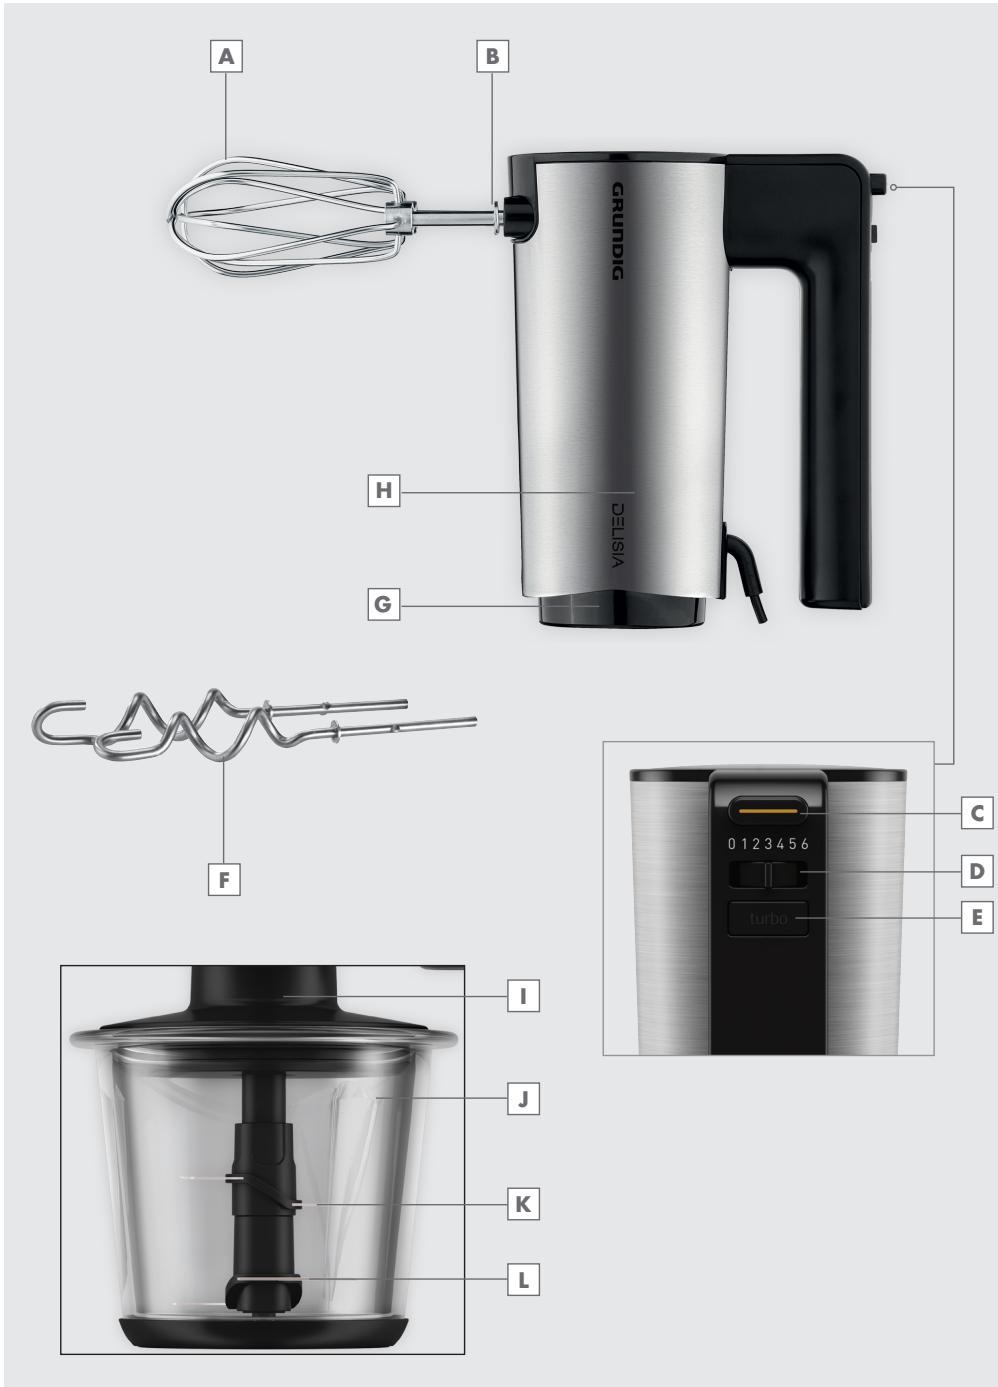
DEUTSCH 05-15
ENGLISH 16-24
TÜRKÇE 25-33
FRANÇAIS 34-43
ESPAÑOL 44-53
HRVATSKI 54-62
SUOMI 63-71
NORSK 72-80
NEDERLANDS 81-90
Verarbeitungszeit
Please read this instruction manual thoroughly prior to using this appliance! Follow all safety instructions in order to avoid damages due to improper use!
Keep the instruction manual for future reference. Should this appliance be given to a third party, then this instruction manual must also be handed over.
■ This appliance is intended for private domestic use only and is not suitable for professional catering purposes. It should not be used for commercial use.
- Do not use the appliance outdoors or in the bathroom.
- Check if the mains voltage on the rating label corresponds to your local mains supply. The only way to disconnect the appliance from the mains is to pull out the plug.
■ For additional protection, this appliance should be connected to a residual current protection switch with a rating of no more than 30 mA. Please contact an electrician for advice.
■ Always disconnect the appliance from the supply if it is left unattended and before assembling, disassembling or cleaning.
- Do not immerse the appliance, power cord or power plug in water or in other liquids.
■ Disconnect the power plug after using the appliance, before cleaning the appliance, before leaving the room or if a fault occurs. Do not disconnect the plug by pulling on the cord.
- Do not wrap the power cord around the appliance.
- Do not squeeze or bend the power cord and do not rub it on sharp edges in order to prevent any damage. Keep the cord away from hot surfaces and open flames.
- Do not use an extension cord with the appliance.
■ Never use the appliance if the power cord or the appliance is damaged.
■ Cleaning and user maintenance shall not be made by children without supervision.
- Our GRUNDIG Household Appliances meet applicable safety standards; if the appliance or power cord is damaged, it must be repaired or replaced by the dealer, a service centre or a similarly qualified and authorized service person to avoid any dangers. Faulty or unqualified repair work may cause danger and risks to the user.
- Do not dismantle the appliance under any circumstances. No warranty claims are accepted for damage caused by improper handling.
■ Always keep the appliance out of the reach of children.
The appliance should not be used by the following persons, including children: those with limited physical, sensory or mental capabilities and also those with a lack of experience and knowledge. This does not apply to the latter if they were instructed in the use of the appliance or if they use it under the supervision of a person responsible for their safety.
■ Children should always be supervised to ensure that they do not play with the appliance.
■ This appliance cannot be used by children.
- Do not leave the appliance unattended when it is in use. Extreme caution is advised when the appliance is being used near children and people with limited physical, sensory or mental capabilities.
■ Before using the appliance for the first time, clean all parts. Please see details in the "Cleaning and care" section.
■ Dry the appliance and all parts before connecting it to the mains supply and before attaching the accessories.
■ Never operate or place any part of this appliance on or near to hot surfaces such as a gas burner, hotplate or heated oven.
- Do not use the appliance for anything other than its intended use.
■ Operate the appliance with the delivered parts only.
■ Do not use the appliance with damp or wet hands.
■ Be careful when handing the sharp cutting blades, emptying the bowl and during cleaning.
■ Always use the appliance on a stable, flat, clean and dry surface.
■ Make sure that there is no danger that the power cord could be accidentally pulled or that someone could trip over it when the appliance is in use.
■ Position the appliance in such a way that the plug is always accessible.
■ Hold the appliance by the handle only.
■ Do not stick any foreign objects on the appliance.
- Do not touch any moving parts. Wait until the appliance has come to a complete standstill. Make sure that long hair, loose clothing, jewellery and kitchen utensils are not near the appliance during use. These items could pose a danger, should they get caught in the mixer.
■ While the appliance is in operation, do not put any objects near the moving parts. There is a risk of injury.
■ To avoid splashes, place the whisk/dough hook completely into the food mixture before switching on the mixer.
- Do not use the appliance for anything other than its intended use. The Hand Mixer is designed for mixing and whisking food only.
■ Never detach the beaters or dough hooks from the main body while the appliance is still connected to the power supply. Always disconnect the appliance from the power supply first.
■ Never clean the beaters or dough hooks under running water while they are still connected to the main body.
■ Always protect the motor unit from water or excessive humidity.
■ Be careful if hot liquid is poured into the food processor or blender as it can be ejected out of the appliance due to a sudden steaming.
■ Switch off the appliance and disconnect from supply before changing accessories or approaching parts that move in use.
AT A GLANCE
Dear Customer,
Congratulations on the purchase of your new GRUNDIG Hand Mixer HM 8680.
Please read the following user notes carefully to ensure you can enjoy your quality product from GRUNDIG for many years to come.
A responsible approach!

GRUNDIG focuses on contractually agreed social working conditions with fair wages for both internal employees and suppliers. We also attach great importance to the efficient use of raw materials
with continuous waste reduction of several tonnes of plastic every year. Furthermore, all our accessories are available for at least 5 years.
For a future worth living.
For a good reason. Grundig.
Beaters
By using beaters, you can prepare light batter mixture, eggs, egg whites, whipping cream, mayonnaise, puree, creams, sauces and pudding mixtures.
Kneading hooks
By using dough hooks, you can prepare heavy yeast dough and pastry dough, such as potato dough for making potato dumplings and potato pancakes.
Controls and parts
See the figure on page 3.
A Beaters
B Accessory slots for beaters and dough hooks
c Accessory release switch
D Speed control
E Turbo button
F Kneading hooks
G Mixer bottom cover
H Motor unit
Middle cover
J Glass Bowl
K Upper blade
Lower blade
Preparation
1 Remove all packaging and sticker materials and dispose of them according to the applicable legal regulation.
2 Before using the appliance for the first time clean beaters and dough hooks (see the "Cleaning and care" section).
Mixing
1 Make sure that the power cord has been disconnected from the wall socket and the speed control is set to speed 0 prior to attaching the beater or dough hooks to the mixer.
2 Insert the beaters A or kneading hooks G into the accessory slots for beaters and dough hooks B on the mixer until they lock into place.
Notes
■ The beaters A can be inserted in either of the two accessory slots B.
3 Insert the plug into the wall socket.
4 Dip the beaters A or kneading hooks F into the food mixture before switching the hand mixer on.
5 Set the speed control D to the desired speed (1 to 6 speed settings).
- The appliance begins to operate.
Note
■ Select a suitable speed level, depending on the type of food. While mixing, you can press the Turbo button E to briefly raise the speed level to the maximum speed. The speed of the Turbo button E corresponds to the level 6 of the speed control D.
Caution
■ Here, the standard load means the added flour should be less than 900g in every time blend and the added water ratio should be around 72g of water for each 100g of flour.
6 After you finish operation, set the speed control D to speed 0. Disconnect the plug from the wall socket. Wait for the appliance to come to a complete standstill and then pull out the hand mixer from the food mixture.
7 Hold the beaters A or kneading hooks F with one hand and push the accessory release switch C.
- The beaters A or kneading hooks F will be released.
Caution
■ Never press the accessory release switch ☐ unless the speed control is on position 0 and the appliance is disconnected from the wall socket.
Hints and tips
■ To avoid mixing egg shells with the food already in the container, put them into a separate container first. Then add them to the mixture.
Remember that climatic conditions, seasonal temperature differences, temperature and consistency of the ingredients could affect the preparation time necessary as well as the results.
■ Always start blending on a low speed. Increase the speed gradually until you have reached the recommended speed for the food you are mixing.
Chopping
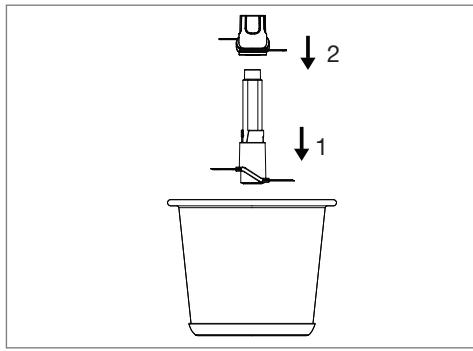
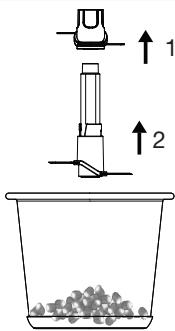
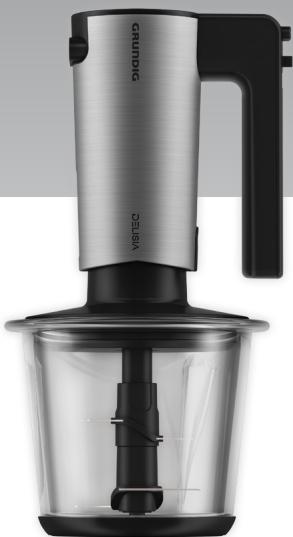
1 Place the lower cutter blade L on the glass container J by holding its plastic side and then place the upper cutter blade K on the fixed shaft of the lower blade.
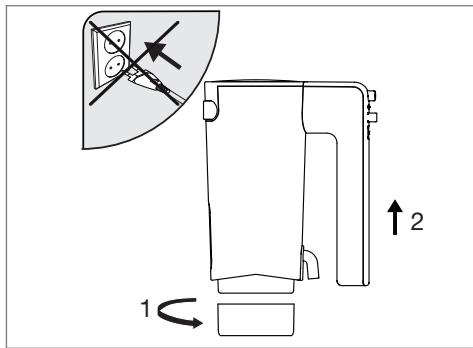
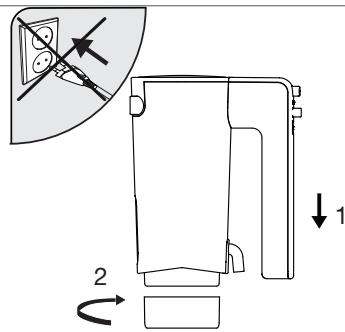
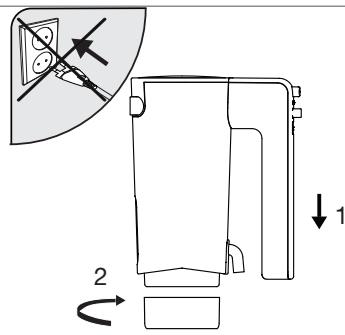
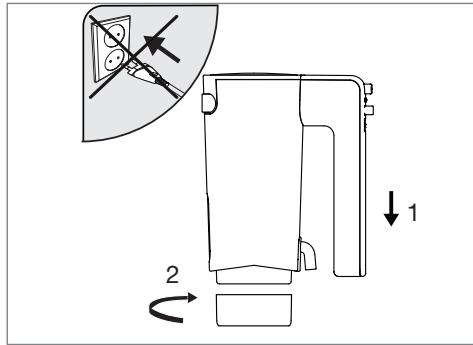
2 Remove the cover G under the mixer by rotating it counter-clockwise. Make sure that the appliance is unplugged.
3 Place the middle cover I and then the motor unit H on the glass container J by rotating it clockwise. Plug in the appliance.
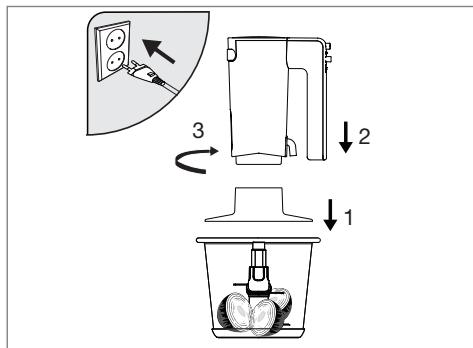
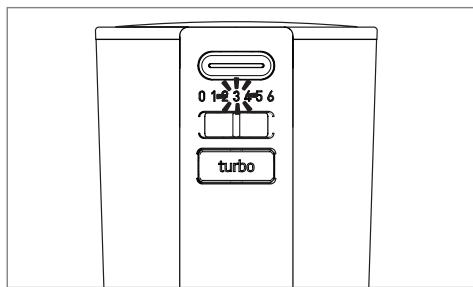
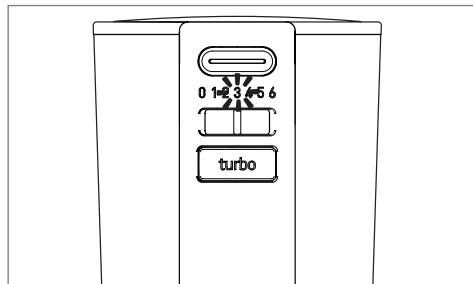
4 Run the appliance moving the operation button gradually D to desired speed level. The corresponding LED will be lit in accordance with the speed level you have selected.
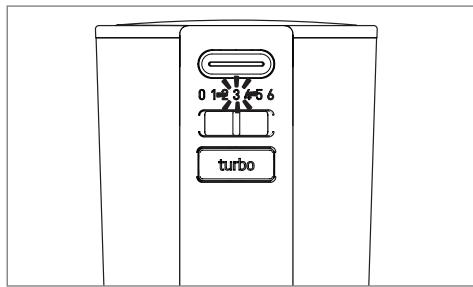
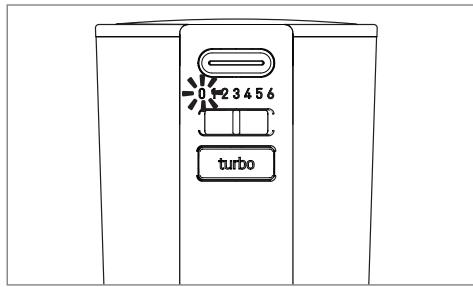
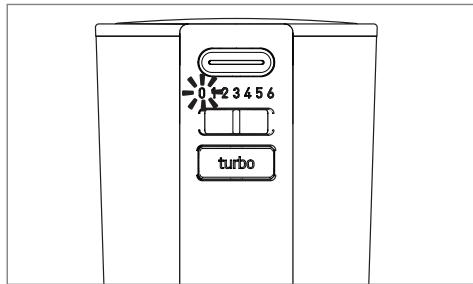
5 When whisking/mixing is completed, move operation button D to "O" position and wait for it to stop completely.
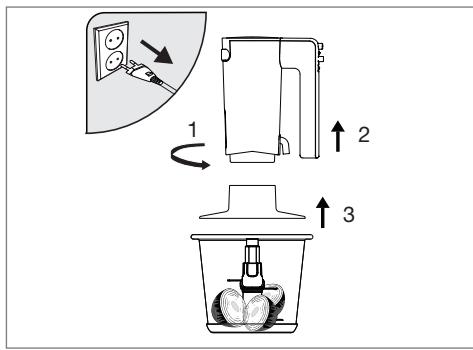
6 Unplug the appliance. Remove the motor unit H by rotating it counter-clockwise direction. Then remove the middle cover I by pulling out upwards direction.
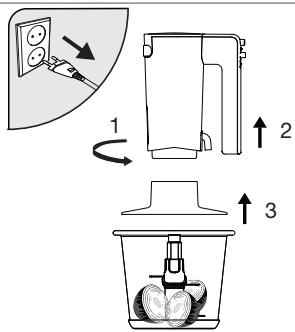
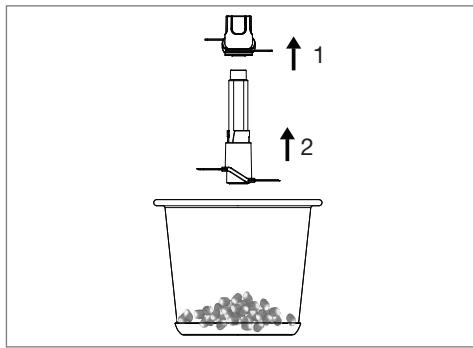
7 Remove firstly the upper cutter blade K and then lower cutter blade L inside the glass container J by holding the plastic side. Remove the processed food from glass container J.
8 Attach the mixer bottom cover G that you have removed by rotating it in clockwise direction. Make sure that the appliance is unplugged.
Maximum quantities and processing time
Refer to the table for processing time and maximum quantities.
| Ingredients | Maximum quantity | Processing time |
| Egg | 60 g | 5 s |
| Powdered sugar | 120 g | |
| Starch | 140 g |
| Lean meat (cut into small cubes) | 300 g | 20 s |
| Cheese (cut into small cubes) | 150 g | 5 - 10 s |
| Onions/Garlic (small pieces) | 300 g | 20 s |
| Tomato | 300 g | 15 - 20 s |
| Fruits (small pieces) | 300 g | 15 - 20 s |
| Hazelnut | 300 g | 20 s |
| Parsley | 100 g | 10 s |
| Date palm | 500 g | 5 s |
Cleaning and care
Caution
■ Never use petrol, solvents, abrasive cleaners, or metal objects and hard brushes to clean the appliance.
1 Turn the appliance off and disconnect it from the wall socket.
2 Let the appliance cool down completely.
3 Use a damp soft cloth to clean the exterior of the appliance.
Caution
■ Never put the appliance or power cord in water or any other liquids and never hold them under running water.
4 Clean the beaters A or kneading hooks F with warm, soapy water. Then rinse the beaters or kneading hooks with clear water and dry them off thoroughly. The beaters or kneading hooks can also be cleaned in the dishwasher.
Note
■ Before using the appliance after cleaning, dry all parts carefully using a soft towel.
■ The glass container ⚠ and middle cover ⚠ can be washed in the dishwasher on the upper shelf.
Storage
If you do not plan to use the appliance for a long period of time, please store it carefully.
■ Make sure the appliance is unplugged and completely dry.
■ Store the appliance in a cool, dry place.
■ Make sure the appliance is kept out of the reach of children.
Compliance with the WEEE Directive and Disposing of the Waste Product:
This product complies with EU WEEE Directive (2012/19/EU). This product bears a classification symbol for waste electrical and electronic equipment (WEEE).
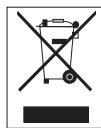
This product has been manufactured with high quality parts and materials which can be reused and are suitable for recycling. Do not dispose of the waste product with normal domestic and other wastes at the end of its service life. Take it to the collection center for the recycling of electrical and electronic equipment. Please consult your local authorities to learn about these collection centers.
Compliance with RoHS Directive
The product you have purchased complies with EU RoHS Directive (2011/65/EU). It does not contain harmful and prohibited materials specified in the Directive.
Package information

Packaging materials of the product are manufactured from recyclable materials in accordance with our National Environment Regulations. Do not dispose of the packaging materials together with the domestic or other wastes. Take them to the packaging material collection points designated by the local authorities.
Technical data

Power supply: 220 - 240 V\~, 50/60 Hz
Power: 700 W
Technical and design modifications reserved.
4 Pokrenite uređaj postupnim pomicanjem gumba za rad D na željenu brzinu. Uključit će se ogovarajuća LED žaruljica u skladu s brzinom koju ste odabrali.
5 Kada dovršite tučenje/miješanje pomaknite gumb za rad D u položaj „0” i čekajte da se do kraja zaustavi.
6 Isključite uređaj iz napajanja. Uklonite motor H tako da ga okrenete u smjeru suprotnom od smjera kazaljke na satu. Zatim uklonite srednji poklopac I tako da ga izvučete podizanjem.
7 Prvo uklonite gornju oštricu rezača Ka zatim donju oštricu rezača L unutar staklenog spremnika J držeći plastičnu stranu. Izvadite obrađenu hranu iz staklenog spremnika J.
8 Umetnite donji poklopac miksera G koji ste uklonili tako da ga okrećete u smjeru kazaljke na satu. Pazite da je uređaj isključen iz napajanja.
תְרָה בְּרָה בְּרָה
הכלהה 4
תְבָר
הכלה,הכלההוּרָהוּרָהוּרָהוּרָהוּרָהוּרָהוּרָהוּרָהוּרָהוּרָהוּרָהוּרָהוּרָהוּרָהוּרָה
.הכלההוּרָהוּרָהוּרָהוּרָהוּרָהוּרָהוּרָהוּרָהוּרָהוּרָהוּרָהוּרָהוּרָהוּרָהוּרָה
.הכלההוּרָהוּרָהוּרָהוּרָהוּרָהוּרָהוּרָהוּרָהוּרָהוּרָהוּרָהוּרָהוּרָהוּרָהוּרָה
הכלה 12-הכלה 12-
.תְּרָהוֹם
natural_image
Abstract gray page corner with curled edge on white background (no text or symbols)AUS GUTEM GRUND
GRUNDIG
HAND MIXER SET
HM 8680
natural_image
Exterior view of a modern kitchen blender with visible brand name 'GRUNDIG' and 'DELISA' on the handle (no additional text or symbols)- Verarbeitungszeit
- AT A GLANCE
- A responsible approach!
- Beaters
- Kneading hooks
- Controls and parts
- Preparation
- Mixing
- Notes
- Note
- Caution
- Hints and tips
- Chopping
- Maximum quantities and processing time
- Cleaning and care
- Storage
- Compliance with the WEEE Directive and Disposing of the Waste Product:
- Compliance with RoHS Directive
- Package information
- Technical data
- תְרָה בְּרָה בְּרָה
- תְבָר
- AUS GUTEM GRUND
- GRUNDIG
- HAND MIXER SET
- HM 8680
Brand : GRUNDIG
Model : GMN2130
Category : Refrigerator