
DDE5980G - Dishwasher AEG - Free user manual and instructions
Find the device manual for free DDE5980G AEG in PDF.



| Product type | Range hood |
| Brand | AEG |
| Model | DDE5980G |
| Energy efficiency class | A+ (estimated) |
| Power supply | 220-240 V ~ 50 Hz |
| Motor power | Not specified |
| Speed levels | 5 (Speed 1, 2, 3, Intensive 1, Intensive 2, Breeze) |
| Lighting | Adjustable brightness LED |
| Grease filter material | Dishwasher-safe metal |
| Activated carbon filter | Included, replaceable |
| Filter cleaning alarm | Yes (grease filters: 40h, carbon filters: 160h) |
| Control panel | Sliding panel with touch controls |
| Air outlet diameter | 120 mm minimum |
| Minimum safety distance (cooking surface) | 650 mm |
| Dimensions (W x D x H) | 600 x 500 x 400 mm (estimated) |
| Net weight | 15 kg (estimated) |
| Maximum noise level | 65 dB(A) (estimated) |
| Maximum airflow rate | 600 m3/h (estimated) |
| Maintenance | Clean grease filters every 2 months, replace carbon filter every 4 months |
| Safety | Automatic shutdown in case of overheating, protection against gas backflow |
Frequently Asked Questions - DDE5980G AEG
User questions about DDE5980G AEG
0 question about this device. Answer the ones you know or ask your own.
Ask a new question about this device
Download the instructions for your Dishwasher in PDF format for free! Find your manual DDE5980G - AEG and take your electronic device back in hand. On this page are published all the documents necessary for the use of your device. DDE5980G by AEG.
USER MANUAL DDE5980G AEG
CONTENTS
- RECOMMENDATIONS AND SUGGESTIONS......3
- USE....5
- MAINTENANCE....5
- CONTROLS....6
- LIGHTING 6
FOR PERFECT RESULTS
Thank you for choosing this AEG product. We have created it to give you impeccable performance for many years, with innovative technologies that help make life simpler – features you might not find on ordinary appliances. Please spend a few minutes reading to get the very best from it.
Visit our website for:

Get usage advice, brochures, trouble shooter, service information: www.aeg.com

Register your product for better service: www.registeraeg.com

Buy Accessories, Consumables and Original spare parts for your appliance: www.aeg.com/shop
CUSTOMER CARE AND SERVICE
Always use original spare parts.
When contacting our Authorised Service Centre, ensure that you have the following data available: Model, PNC, Serial Number.
The information can be found on the rating plate.

Warning / Caution - Safety information

General information and tips

Environmental information
Subject to change without notice.
1. RECOMMENDATIONS AND SUGGESTIONS
- The Instructions for Use apply to several versions of this appliance. Accordingly, you may find descriptions of individual features that do not apply to your specific appliance.
- The manufacturer will not be held liable for any damages resulting from incorrect or improper installation.
- The minimum safety distance between the cooker top and the extractor hood is 650 mm (some models can be installed at a lower height, please refer to the paragraphs on working dimensions and installation).
- Check that the mains voltage corresponds to that indicated on the rating plate fixed to the inside of the hood.
- For Class I appliances, check that the domestic power supply guarantees adequate earthing. Connect the extractor to the exhaust flue through a pipe of minimum diameter 120 mm. The route of the flue must be as short as possible.
- Do not connect the extractor hood to exhaust ducts carrying combustion fumes (boilers, fireplaces, etc.).
- If the extractor is used in conjunction with non-electrical appliances (e.g. gas burning appliances), a sufficient degree of aeration must be guaranteed in the room in order to prevent the backflow of exhaust gas. The kitchen must have an opening communicating directly with the open air in order to guarantee the entry of clean air. When the cooker hood is used in conjunction with appliances supplied with energy other than electric, the negative pressure in the room must not exceed 0.04 mbar to prevent fumes being drawn back into the room by the cooker hood.
- In the event of damage to the power cable, it must be replaced by the manufacturer or by the technical service department, in order to prevent any risks.
- If the instructions for installation for the gas hob specify a greater distance than specified above, this has to be taken into account. Regulations concerning the discharge of air have to be fulfilled.
- Use only screws and small parts in support of the hood.
Warning: Failure to install the screws or fixing device in accordance with these instructions may result in electrical hazards.
- Connect the hood to the mains through a two-pole switch having a contact gap of at least 3 mm.
- Do not flambé under the range hood; risk of fire.
- This appliance can be used by children aged from 8 years and above and persons with reduced physical, sensory or mental capabilities or lack of experience and knowledge if they have been given supervision or instruction concerning use of the appliance in a safe way and understand the hazards involved. Children shall not play with the appliance. Cleaning and user maintenance shall not be made by children without supervision.
- “CAUTION: Accessible parts may become hot when used with cooking appliances.”
- The symbol ☒ on the product or on its packaging indicates that this product may not be treated as household waste. Instead it shall be handed over to the applicable collection point for the recycling of electrical and electronic equipment. By ensuring this product is disposed of correctly, you will help prevent potential negative consequences for the environment and human health, which could otherwise be caused by inappropriate waste handling of this product. For more detailed information about recycling of this product, please contact your local city office, your household waste disposal service or the shop where you purchased the product.
- Switch off or unplug the appliance from the mains supply before carrying out any maintenance work.
- Clean and/or replace the Filters after the specified time period (Fire hazard).
2. USE
- The extractor hood has been designed exclusively for domestic use to eliminate kitchen smells.
- Never use the hood for purposes other than for which it has been designed.
- Never leave high naked flames under the hood when it is in operation.
- Adjust the flame intensity to direct it onto the bottom of the pan only, making sure that it does not engulf the sides.
- Deep fat fryers must be continuously monitored during use: overheated oil can burst into flames.
3. MAINTENANCE
- The sponge-like part of the filter can be washed in the dishwasher at least once every 4 months, or more frequently if use is particularly intense. Operation is guaranteed for up to a maximum of 5 washes, after which it must be replaced (W).

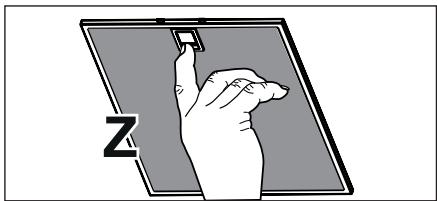
- The Grease filters must be cleaned every 2 months of operation, or more frequently for particularly heavy usage, and can be washed in a dishwasher (Z).
- Control lights, if present.
- Clean the hood using a damp cloth and a neutral liquid detergent.
4. CONTROLS

| Button | Function | Led |
| A | PANEL CLOSEDBrief pressure: Activates the keyboard functions. The panel opens after 1 second, the lights turn on at maximum intensity and the motor starts at speed one (B). | The buttons turn white. |
| PANEL OPENBrief pressure: Deactivates the keyboard functions.- When pressed for 3 sec., the panel closes. | If the motor does not start the buttons switch off after 1 minute. | |
| MOTOR ONBrief pressure: Motor off. | All the buttons are on. | |
| B | Activates speed one. | The button turns from white to red. |
| C | Activates speed two. | The button turns from white to red. |
| D | Activates speed three. | The button turns from white to red. |
| E | Activates INTENSIVE 1 speed for 10 minutes. At the end of this time the system will automatically return to the speed set before. It is disabled by changing speed or pressing button A. | The button turns from white to red. |
| Press and hold the button for approximately 3 seconds, with all the loads turned off (Motor and Lights), to turn the Activated Charcoal Filter alarm on/off. | H flashes 5 times. | |
| F | Activates INTENSIVE 2 speed for 5 minutes. At the end of this time the system will automatically return to the speed set before. It is disabled by changing speed or pressing button A. | The button turns from white to red. |
| G | Activates BREEZE speed for 60 minutes. At the end of this time the motor switches off. It is disabled by changing speed or pressing button A. | The button turns from white to red. |
| H | Filter alarm button.This button is normal off. It is only displayed when the filter alarm is triggered. The alarm can be reset by pressing and holding this button for approximately 3 seconds. | Button H fixed (30 seconds): indicates the need to wash the metal grease filters. The alarm is triggered after the Hood has been in operation for 40 working hours.Button H flashing (30 seconds): indicates the need to change the activated charcoal filters, and also to wash the metal grease filters. The alarm is triggered after the Hood has been in operation for 160 working hours. |
| I | Press briefly: Turns the lighting system on and off at maximum intensity. | - |
| Press and hold to change the lighting intensity up or down. | - |
5. LIGHTING
- For replacement contact technical support ("To purchase contact technical support").


CUSTOMER SERVICE AND MAINTENANCE
We recommend using only original spare parts.
- Control lights, if installed.

- Any control lights.


Brand : AEG
Model : DDE5980G
Category : Dishwasher