
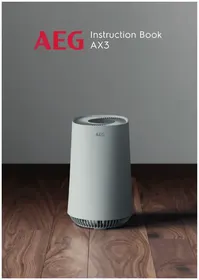
AX91-604GY - AX91-604DG - Air purifier AEG - Free user manual and instructions
Find the device manual for free AX91-604GY - AX91-604DG AEG in PDF.
| Product type | Air purifier |
| Brand | AEG |
| Compatible models | AX91-604GY, AX91-604DG |
| Filter type | Replaceable multi-layer filter |
| SMART mode | Yes, with automatic air quality sensor |
| Manual mode | Yes, with manual fan speed adjustment |
| WiFi connectivity | Yes, via Wellbeing app |
| Ionizer | Yes, can be activated via app |
| Child lock | Yes, activation by simultaneous long press |
| Air quality sensor | Yes, with light indicator (green to brown) |
| Filter replacement indicator | Yes, light indicator |
| Scheduling function | Yes, via Wellbeing app |
| Control type | Touch panel |
| Fan speed | Variable (slider in manual mode) |
| Power supply | 50 Hz or 60 Hz |
| Maintenance | Clean the sensor and housing with a vacuum cleaner and dry cloth |
| Filter replacement | Non-washable multi-layer filter, replace according to indicator |
| Safety instructions | Unplug before cleaning, do not use an extension cord, keep out of reach of children |
| Disposal | Recycling at an official collection point or return to customer service |
Frequently Asked Questions - AX91-604GY - AX91-604DG AEG
User questions about AX91-604GY - AX91-604DG AEG
0 question about this device. Answer the ones you know or ask your own.
Ask a new question about this device
Download the instructions for your Air purifier in PDF format for free! Find your manual AX91-604GY - AX91-604DG - AEG and take your electronic device back in hand. On this page are published all the documents necessary for the use of your device. AX91-604GY - AX91-604DG by AEG.
USER MANUAL AX91-604GY - AX91-604DG AEG
natural_image
Modern smart air purifier with hexagonal design and 'SMART' control buttons, no visible text or symbols on the device itself.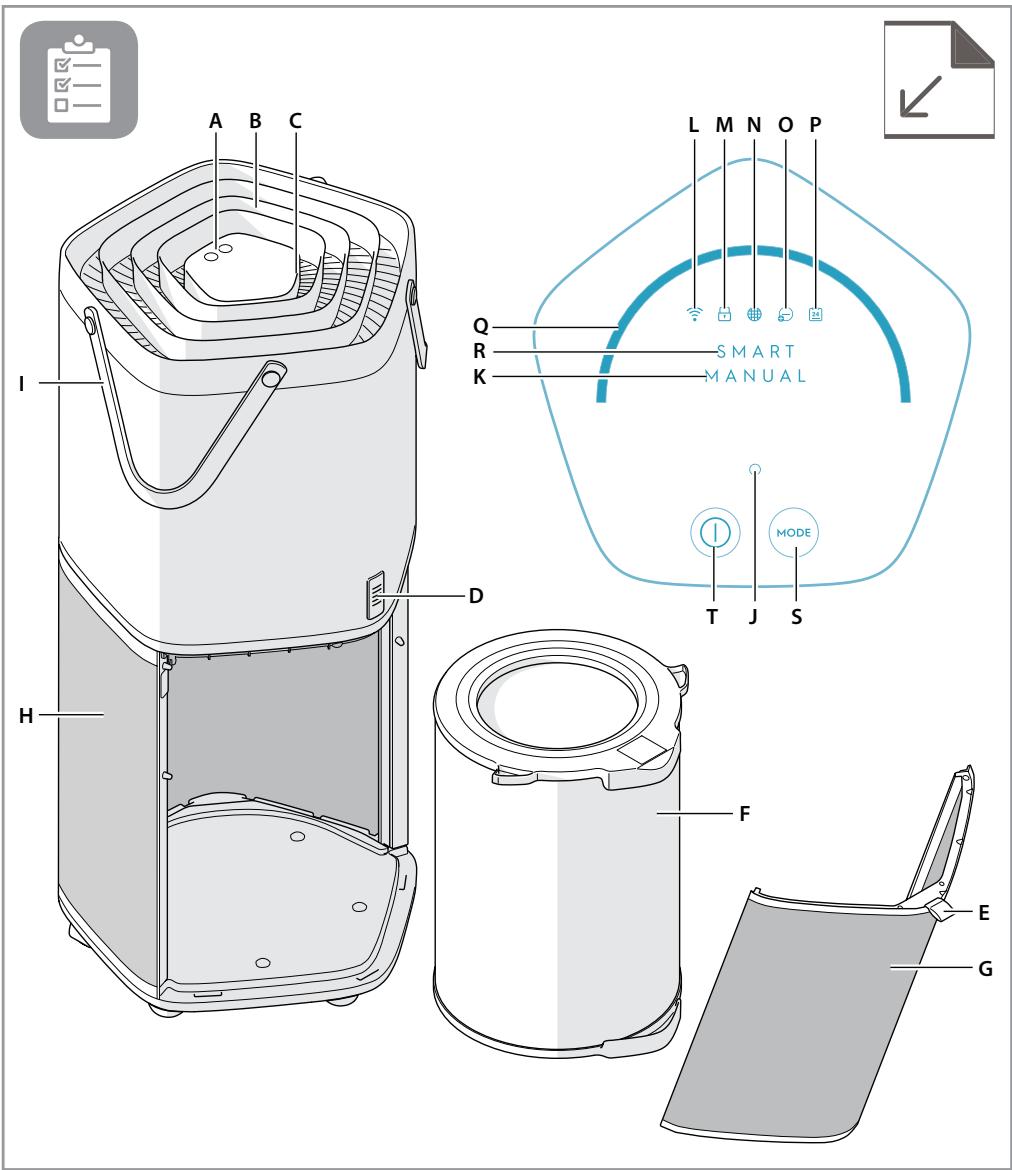
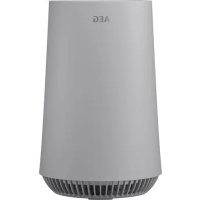
EN DESCRIPTION OF YOUR AIR PURIFIER AX9-40/AX9-60
Appliance:
A. Control panel
B. Air outlet
C. Air quality light
D. Air quality sensor
E. Fabric handle
F. Multi-layer filter
G. Air intake door
H. Air intake
I. Product handles
Control panel:
J. Loading LED
K. Manual mode indicator
L. WiFi indicator
M. Child lock indicator
N. Filter change indicator
O. Ionizer indicator
P. Schedule indicator
Q. Fan speed slider
R. SMART mode indicator
S. Mode button
T. On/Off button
Features might be added or updated with new App releases.
DA BESKRIVELSE AF LUFTRENSER AX9-40/AX9-60
Luftrenseren:
| A. Betjeningspanel | E. Stofhåndtag | J. Infolampe | O. Indikator for ionisering |
| B. Luftudtag | F. Flerlagsfilter | K. Indikator for manuel funktion | P. Timer-indikator |
| C. Luftkvalitetslampe | G. Låge til luftindtag | L. WiFi-indikator | Q. Skydeknap til blæserhastighed |
| D. Luftkvalitetssensor | H. Luftindtag | M. Børnesikringsindikator | R. Indikator for SMART funktion |
| I. Håndtag | N. Indikator for filterskift | S. Funktionsvælger | |
| T. Tænd/Sluk-knap |
natural_image
Illustration of a mechanical device with a blue tool and crossbar, no visible text or symbols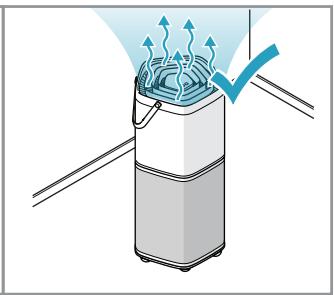
natural_image
Illustration of a kitchen appliance with airflow arrows and a checkmark (no text or symbols)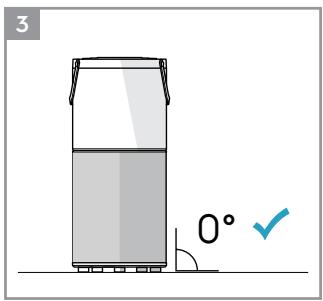
natural_image
Simple line drawing of a container with a 0° angle and checkmark indicating inspection (no text or symbols)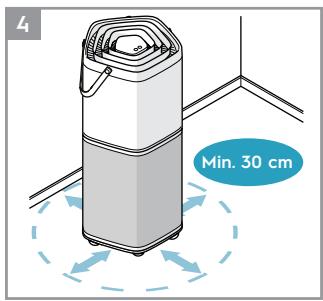
natural_image
Illustration of a portable thermospan with a hand holding a notebook and a blue arrow indicating motion (no text or symbols)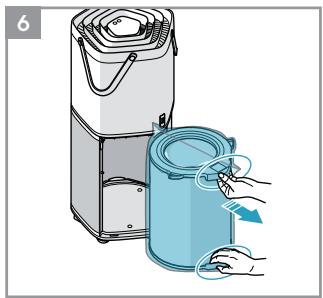
natural_image
Illustration of a hand using a tool to lift a blue cylindrical container (no text or symbols visible)
natural_image
Illustration of a cylindrical container with an upward arrow indicating flow or direction (no text or symbols)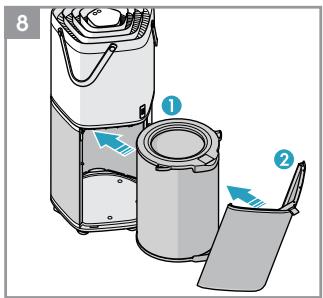
natural_image
Diagram of a mechanical device with concentric layers and a handle, no text or symbols present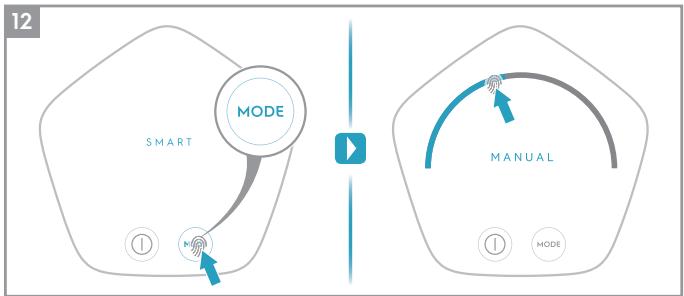
flowchart
graph LR
    A["SMART MODE"] --> B["Switch ①"]
    B --> C["Switch ②"]
    C --> D["Switch ③"]
    D --> E["Switch ④"]
    E --> F["Switch ⑤"]
    F --> G["Switch ⑥"]
    G --> H["Switch ⑦"]
    H --> I["Switch ⑧"]
    I --> J["Switch ⑨"]
    J --> K["Switch ⑩"]
    K --> L["Switch ⑪"]
    L --> M["Switch ⑫"]
    M --> N["Switch ⑬"]
    N --> O["Switch ⑭"]
    O --> P["Switch ⑮"]
    P --> Q["Switch ⑯"]
    Q --> R["Switch ⑰"]
    R --> S["Switch ⑱"]
    S --> T["Switch ⑲"]
    T --> U["Switch ⑳"]
    U --> V["Switch ㉑"]
    V --> W["Switch ㉒"]
    W --> X["Switch ㉓"]
    X --> Y["Switch ㉔"]
    Y --> Z["Switch ㉕"]
    Z --> AA["Switch ㉖"]
    AA --> AB["Switch ㉗"]
    AB --> AC["Switch ㉘"]
    AC --> AD["Switch ㉙"]
    AD --> AE["Switch ㉚"]
    AE --> AF["Switch ㉛"]
    AF --> AG["Switch ㉜"]
    AG --> AH["Switch ㉝"]
    AH --> AI["Switch ㉞"]
    AI --> AJ["Switch ㉟"]
    AJ --> AK["Switch ㉟c"]
    AK --> AL["Switch ㉟d"]
    AL --> AM["Switch ㉟e"]
    AM --> AN["Switch ㉟f"]
    AN --> AO["Switch ㉟g"]
    AO --> AP["Switch ㉟h"]
    AP --> AQ["Switch ㉟i"]
    AQ --> AR["Switch ㉟j"]
    AR --> AS["Switch ㉟k"]
    AS --> AT["Switch ㉟l"]
    AT --> AU["Switch ㉟m"]
    AU --> AV["Switch ㉟n"]
    AV --> AW["Switch ㉟o"]
    AW --> AX["Switch ㉟p"]
    AX --> AY["Switch ㉟q"]
    AY --> AZ["Switch ㉟r"]
    AZ --> BA["Switch ㉟s"]
    BA --> BB["Switch ㉟t"]
    BB --> BC["Switch ㉟u"]
    BC --> BD["Switch ㉟v"]
    BD --> BE["Switch ㉟w"]
    BE --> BF["Switch ㉟x"]
    BF --> BG["Switch ㉟y"]
    BG --> BH["Switch ㉟z"]
    BH --> BI["Switch ㉟w"]
natural_image
Illustration of a hand placing a blue lid onto a white cylindrical device (no text or symbols)
natural_image
Illustration of a handheld vacuum cleaner with a magnified inset showing its brush tip (no text or symbols present)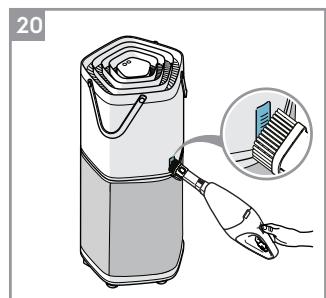
natural_image
Illustration of a portable air conditioner unit being connected to a hand using a tool, with an inset showing the device's exterior (no text or symbols present)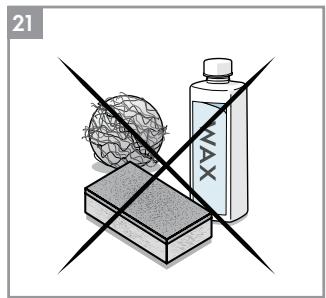
natural_image
Isometric illustration of a rolled-up cardboard box with a blue arrow indicating compression (no text or symbols)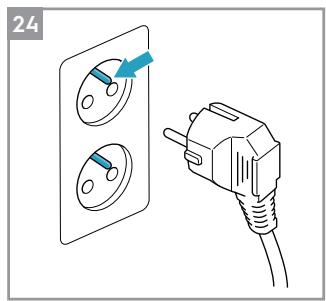
natural_image
Diagram of a mechanical component with a blue arrow indicating direction, no text or symbols presentSAFETY INFORMATION
This USER MANUAL provides specific operating instructions for your model. Use the unit only as instructed in this USER MANUAL. These instructions are not meant to cover every possible condition and situation that may occur. Common sense and caution must be practiced when installing, operating, and maintaining any appliance.
WARNING! Avoid fire hazard or electric shock. Do not use an extension cord or an adaptor plug. Do not remove any prong from the power cord.
This appliance can be used in 50Hz or 60Hz power supply without any change.
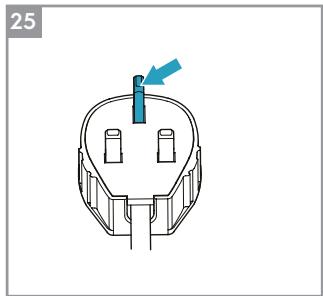
Do not, under any circumstances, cut, remove or bypass the grounding prong (see picture 24 on page 5). For UK (see picture 25 on page 5).
Do not store or use gasoline or other flammable vapors and liquids in the vicinity of this or any other appliance. Read product labels for flammability and other warnings.
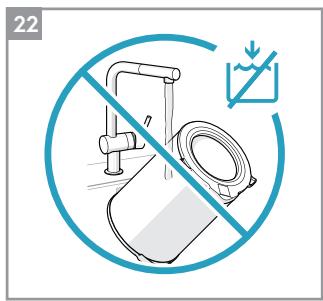
Do not let water or any other liquid or flammable detergent enter the appliance to avoid electric shock and/or a fire hazard.
Do not touch the fan blade when removing the filter.
Children and Vulnerable People Safety
WARNING! Risk of suffocation, injury or permanent disability.
This appliance can be used by children aged from 8 years and above and persons with reduced physical, sensory or mental capabilities or lack of experience and knowledge if they have been given supervision or instruction concerning use of the appliance in a safe way and understand the hazards involved.
Children shall not play with the appliance.
Cleaning and user maintenance shall not be made by children without supervision.
Children under 3 years of age should be kept away from the appliance unless continuously supervised.
Keep all packaging away from children.
Electrical Information
WARNING! Avoid fire hazard or electric shock.
If you are not sure the outlet is adequately grounded or protected by a time delay fuse or circuit breaker, have a qualified electrician install the proper outlet according to the National Electrical Code and applicable local codes and ordinances.
Do not use an extension cord or an adapter plug.
Never unplug the unit by pulling on the power cord. Always grip the plug firmly and pull straight out from the receptacle.
Do not pinch, bend, or knot the power cord.
Do not cut or damage the power cord. If the power cord is damaged, it should only be replaced by an authorized Electrolux servicer. This unit contains no user-serviceable parts. Always call an authorized Electrolux servicer for repairs.
If the supply cord is damaged, it must be replaced by the manufacturer, its service agent or similarly qualified persons in order to avoid a hazard.
Be sure to unplug the unit before cleaning to prevent shock or fire hazards.
Safety Precautions
CAUTION! Avoid Serious Injury or Death.
Do not insert or place fingers or objects into the air discharge area or front grille of the unit.
Do not start or stop the unit by unplugging the power cord or turning off the power at the electrical box.
In the event of a malfunction (sparks, burning smell, etc.), immediately stop the operation, disconnect the power cord, and call an authorized Electrolux servicer.
Do not operate the unit with wet hands.
Do not pull on the power cord.
CAUTION! Avoid Injury or damage to the unit or other property.
Do not direct airflow at fireplaces or other heat related sources as this could cause flare ups.
Do not climb on or place objects on the unit.
Do not hang objects off the unit.
Do not place containers with liquids on the unit.
Turn off the unit at the power source when it will not be used for an extended period of time.
Operate the unit with air filter in place.
Do not block or cover the intake grille, discharge area and outlet ports.
Ensure that any electrical/electronic equipment is 30 cm away from the unit.
DISPOSAL

This symbol on the product or on its packaging indicates that the product may not be treated as household waste.
To recycle your product, please take it to an official collection point or to an Electrolux service center that can remove and recycle the battery and electric parts in a safe and professional way. Follow your country's rules for the separate collection of electrical products and rechargeable batteries.
ENGLISH
Thank you for choosing the Electrolux air purifier AX9-40/AX9-60.
Always use original accessories and spare parts to get the best results. This product is designed with the environment in mind. All plastic parts are marked for recycling purposes.
BEFORE STARTING
- Read this manual carefully.
- Check that all parts described are included.
- Pay special attention to the safety precautions!
Picture pages 4-5
BEFORE FIRST USE
Place the product according to the instructions below for optimal operation and results:
1 Operate the air cleaner in an enclosed area. Close all doors, windows, and other openings connecting to the outside of the room.
2 Place the air cleaner in a location that does not restrict the airflow through the top of the appliance.
3 The appliance must be placed on a leveled floor that can support it.
4 There should be a minimum of 30 cm of clearance around the appliance.
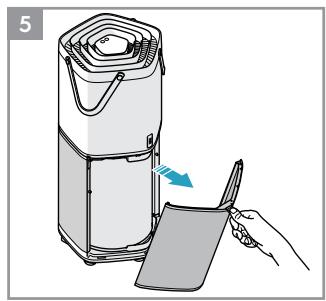
Remove the plastic protective bag from the multi-layer filter:
5 Pull the Fabric handle outward to remove the air intake door.
6 Take out the multi-layer filter pulling it out by the handle.
7 Remove the plastic protective bag from the multilayer filter.
8 Reinstall the multi-layer filter into the appliance.
OPERATION INSTRUCTIONS
TO TURN ON THE APPLIANCE
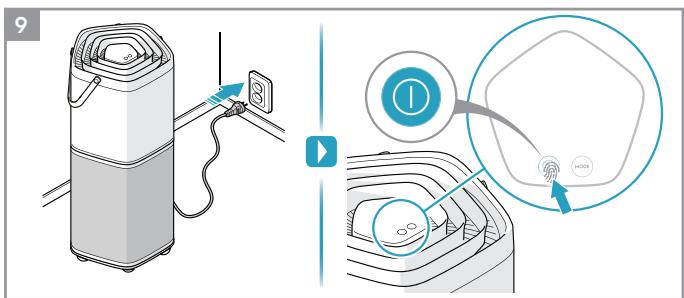
9 Plug in the appliance and tap (touch and release) the "①" button to turn it on.
NOTE: It will take about 10 seconds for the sensor to analyze the air quality, during this time the Loading LED and the Air quality light will pulsate slowly in white. Each time the appliance is turned on the SMART mode is activated automatically and the fan runs in low speed until the air quality analysis is complete.
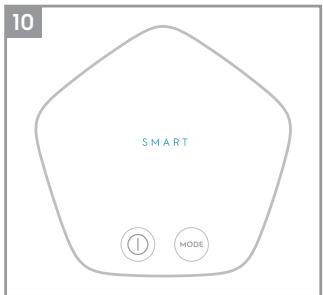
SMART MODE
10 In this mode, the appliance will choose the fan speed automatically, based on the air quality level. This is the default mode each time the appliance is turned on.
NOTE: In "SMART" mode the fan speed cannot be changed manually.
About the Air quality light
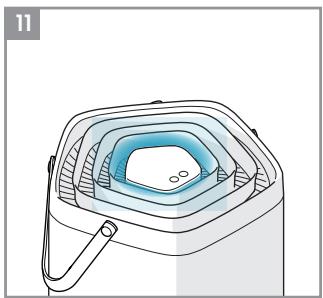
11 The appliance has an air quality sensor that analyzes the air quality.
The air quality light will show the real-time air quality through different colors of light. As shown below:
| LIGHT'S COLOR | PM 2.5 ( g/m^3 ) | AIR QUALITY |
| Green | 0-12 | Very Good |
| Yellow | 13-35 | Good |
| Orange | 36-55 | Poor |
| Red | 56-150 | Very Poor |
| Purple | 151-250 | Bad |
| Maroon | >250 | Very Bad |
NOTE: It will take about 10 seconds for the sensor to analyze the air quality each time the appliance is turned on. During this time, the air quality light will pulsate slowly in white.
Very high humidity conditions in the room might produce condensation in the sensors. This could affect the accuracy of the sensor readings.
MANUAL MODE
12 Tap the "MODE" button to switch the appliance to "MANUAL" mode. In this mode, the fan speed can be changed manually by touching the Fan speed slider.
NOTE: The fan speed will change gradually after a new fan speed is selected.
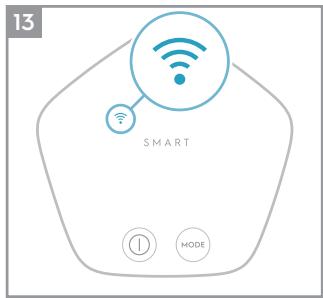
WIFI FUNCTION
13 This appliance is equipped with a WiFi module, which enables remote control and access to the full functionality of the system via our smartphone app. Download our Wellbeing App and follow the instructions for how to connect it with your appliance. When the connection is stablished, the WiFi indicator will light up.
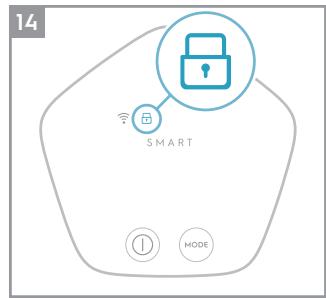
CHILD LOCK FUNCTION
14 The Child lock can be activated and deactivated by long pressing the On/Off and the Mode button simultaneously for 4 seconds. This function can also be activated or deactivated via the Wellbeing App. When the Child lock is activated, the control panel of the appliance cannot be interacted with and the Child lock indicator light up.
FILTER CHANGE INDICATOR
15 The filter change indicator will light up to remind you to change the filter. Refer to the instructions in the Wellbeing App or the Electrolux website on where to purchase replacement filters. Ensure the plastic protective bag is removed from the replacement filter before use. After the filter is replaced, the filter change indicator will turn off automatically.
NOTE: The multi-layer filter cannot be washed, it can only be replaced.
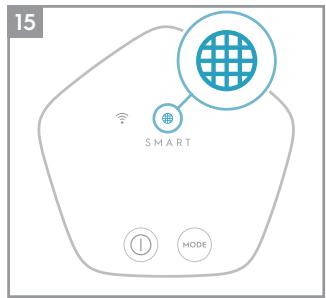
IONIZER FUNCTION
16 The ionizer function can only be activated and deactivated by using the Wellbeing App (smartphone application). When this function is activated, the ionizer indicator lights up and the appliance generates ions to improve the unit's performance and with it the room's air quality.
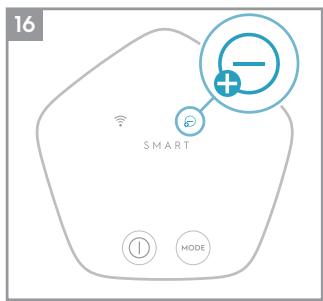
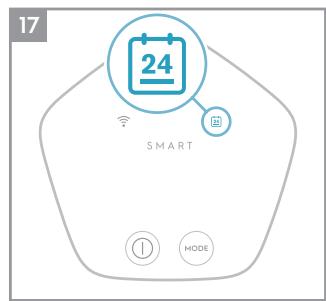
SCHEDULE FUNCTION
17 In the Wellbeing App (smart phone application) you can set different schedules, for example that the fan speed goes down during night time and then goes back to normal speed during day time. When a schedule is set, the schedule indicator on the appliance will light up.
CARE AND CLEANING
Unplug the appliance before cleaning to prevent shock or fire hazards.
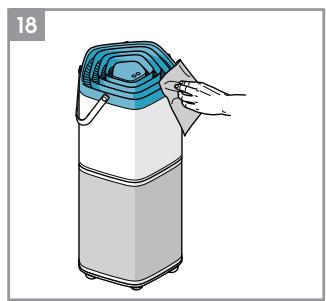
18 The plastic parts of the appliance may be cleaned with an oil-free dry cloth or by using a vacuum cleaner with a soft brush.
19 The fabric on the appliance cannot be removed. Clean the fabric by using an oil-free dry cloth or a vacuum cleaner with a soft brush.
20 Dust accumulated in the Air quality sensor can result in incorrect sensor readings and affect performance. Use a vacuum cleaner with a soft brush to remove any dust that might accumulate in this area. Vacuum at least monthly.
21 Never use abrasive, harsh cleaners or wax when cleaning the unit.
22 NOTE: The multi-layer filter can not be washed, it can only be replaced.
CAUTION! Do not touch the fan blade when removing the multi-layer filter.
Storage
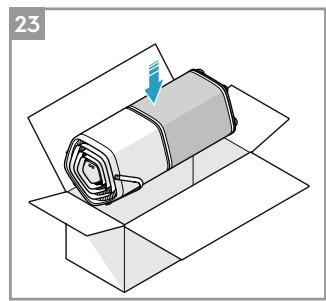
23 If you are not planning to use the appliance for a long time, cover it with plastic or return it to its carton.
Enjoy a great cleaning experience with your Electrolux air purifier AX9-40/ AX9-60!
Electrolux reserves the right to change products, information and specifications without notice.
TROUBLESHOOTING
| PROBLEM | SOLUTION |
| The air purifier does not operate. | ·Check if the power plug is disconnected. Push the power plug firmly into the electrical outlet.·Check if the house fuse is blown or the circuit breaker tripped. Replace the fuse with a time delay type or reset the circuit breaker. |
| The fan does not operate. | ·Ensure that the air intake door (image 8) is closed properly, and the filter is installed correctly, then retry using the purifier. |
| The air quality does not improve. | ·Check if the windows or doors are opened. Close all doors, windows and other openings connecting to the outside of the room. |
| The appliance is very loud. | ·Ensure that there are no obstacles near the appliance and that it has a minimum of 30 cm of clearance around it for optimal operation. |
| The fan speed does not change after selecting a new fan speed. | ·The fan speed will decrease or increase gradually, this is normal. If it does not change after a prolonged period of time after the input then please reach out to an Electrolux authorized servicer for support. |
| The appliance produces a strange smell. | ·The first time you use the purifier, you might perceive a plastic or paint smell. This is normal, but it should disappear quickly. If the smell persist or if you sense a burning smell, please disconnect the purifier and reach out to an Electrolux authorized servicer for support. |
| The app does not operate properly or it is not possible to onboard the appliance on the app. | ·Please reach out to an Electrolux authorized servicer for support on the topic. |
| The Loading LED flashes quickly during operation. | ·If this problem occurs the unit is not working normally. Unplug the unit from the electrical outlet and plug it again after 30 seconds. If the problem remains please reach out to an Electrolux authorized servicer for support. |
| For any further problems, contact an authorized Electrolux service centre. | |
The software in the air purifier is partly based on free and open source software. To see the full copyright information and applicable license terms, please visit: www.electrolux.com/appliance-supplementary
SIKKERHEDSINFORMATION
www.electrolux.com/appliance-supplementary
www.electrolux.com/appliance-supplementary
INFORMATION DE SÉCURITÉ
The software in the air purifier is partly based on free and open source software. To see the full copyright information and applicable license terms, please visit: www.electrolux.com/appliance-supplementary
VEILIGHEIDSINFORMATIE
www.electrolux.com/appliance-supplementary
AEG
- EN DESCRIPTION OF YOUR AIR PURIFIER AX9-40/AX9-60
- Appliance:
- Control panel:
- DA BESKRIVELSE AF LUFTRENSER AX9-40/AX9-60
- SAFETY INFORMATION
- Children and Vulnerable People Safety
- Electrical Information
- Safety Precautions
- DISPOSAL
- ENGLISH
- BEFORE STARTING
- Picture pages 4-5
- BEFORE FIRST USE
- OPERATION INSTRUCTIONS
- TO TURN ON THE APPLIANCE
- SMART MODE
- About the Air quality light
- MANUAL MODE
- WIFI FUNCTION
- CHILD LOCK FUNCTION
- FILTER CHANGE INDICATOR
- IONIZER FUNCTION
- SCHEDULE FUNCTION
- CARE AND CLEANING
- Storage
- Enjoy a great cleaning experience with your Electrolux air purifier AX9-40/ AX9-60!
- SIKKERHEDSINFORMATION
- INFORMATION DE SÉCURITÉ
- VEILIGHEIDSINFORMATIE
- AEG
Brand : AEG
Model : AX91-604GY - AX91-604DG
Category : Air purifier