
AKR 650/1 IX - Basket WHIRLPOOL - Free user manual and instructions
Find the device manual for free AKR 650/1 IX WHIRLPOOL in PDF.
| Product type | Cooker hood |
| Brand | Whirlpool |
| Model | AKR 650/1 IX |
| Height (min-max) | 56 - 86.1 cm |
| Width | 89.8 cm |
| Depth | 45 cm |
| Extraction duct diameter | 15 cm |
| Power supply | 220-240 V ~ 50 Hz |
| Installation type | Wall mounting |
| Operating modes | Extracting (external evacuation) or recirculating (with carbon filter) |
| Number of speeds | 3 speeds + stop |
| Lighting | LED, 2.5 W max, socket E14 |
| Grease filter | Metal, dishwasher safe, clean monthly |
| Carbon filter | Replacement every 4 months, not washable |
| Minimum safety distance (electric hob) | 50 cm |
| Minimum safety distance (gas/mixed hob) | 65 cm |
| Noise level | Not specified |
| Maximum air flow | Not specified |
| Weight | Approximately 15 kg (estimate) |
| Warranty | See warranty booklet |
| Standards | EN/IEC 60335-1, EN/IEC 60335-2-31, EN/IEC 61591, EN 55014-1, etc. |
| QR code for documentation | Available at docs.whirlpool.eu |
Frequently Asked Questions - AKR 650/1 IX WHIRLPOOL
User questions about AKR 650/1 IX WHIRLPOOL
0 question about this device. Answer the ones you know or ask your own.
Ask a new question about this device
Download the instructions for your Basket in PDF format for free! Find your manual AKR 650/1 IX - WHIRLPOOL and take your electronic device back in hand. On this page are published all the documents necessary for the use of your device. AKR 650/1 IX by WHIRLPOOL.
USER MANUAL AKR 650/1 IX WHIRLPOOL
- Before any cleaning or maintenance operation, disconnect hood from the mains by removing the plug or disconnecting the mains electrical supply.
- Always wear work gloves for all installation and maintenance operations.
- This appliance can be used by children aged from 8 years and above and persons with reduced physical, sensory or mental capabilities or lack of experience and knowledge if they have been given supervision or instruction concerning use of the appliance in a safe way and understand the hazards involved.
- Children shall not be allowed to tamper with the controls or play with the appliance.
- Cleaning and user maintenance shall not be made by children without supervision.
- The premises where the appliance is installed must be sufficiently ventilated, when the kitchen hood is used together with other gas combustion devices or other fuels.
- The hood must be regularly cleaned on both the inside and outside (AT LEAST ONCE A MONTH).
- This must be completed in accordance with the maintenance instructions provided. Failure to follow the instructions provided regarding the cleaning of the hood and filters will lead to the risk of fires.
- Do not flambe under the range hood.
- Do not remove filters during cooking.
- For lamp replacement use only lamp type indicated in the Maintenance/Replacing lamps section of this manual.
The use of exposed flames is detrimental to the filters and may cause a fire risk, and must therefore be avoided in all circumstances.
Any frying must be done with care in order to make sure that the oil does not overheat and ignite.
CAUTION: Accessible parts of the hood may become hot when used with cooking appliances.
- Do not connect the appliance to the mains until the installation is fully complete.
- With regards to the technical and safety measures to be adopted for fume discharging it is important to closely follow the regulations provided by the local authorities.
- The air must not be discharged into a flue that is used for exhausting fumes from appliance burning gas or other fuels.
- Do not use or leave the hood without the lamp correctly mounted due to the possible risk of electric shocks.
- Never use the hood without effectively mounted grids.
- The hood must NEVER be used as a support surface unless specifically indicated.
- Use only the fixing screws supplied with the product for installation or, if not supplied, purchase the correct screws type.
- Use the correct length for the screws which are identified in the Installation Guide.
- In case of doubt, consult an authorized service assistance center or similar qualified person.
WARNING!
- Failure to install the screws or fixing device in accordance with these instructions may result in electrical hazards.
- Do not use with a programmer, timer, separate remote control system or any other device that switches on automatically.
Very young children(0-3 years)should be kept away from the appliance. Young children (3-8 years)should be kept away from the appliance unless continuously supervised.
CAUTION:The appliance is not intended to be operated by means of an external switching device, such as a timer,or separate remote controlled system.
This appliance is not for professional use. Do not use the appliance outdoors.
The appliance must be handled and installed by two or more persons-risk of injury.
Installation, including water supply (if any), electrical connections and repairs must be carried out by a qualified technician.
Once installed, packaging waste (plastic, styrofoam parts etc.) must be stored out of reach of children - risk of suffocation.
Do not use the appliance when you are wet or barefoot.
Never use steam cleaning equipment - risk of electric shock.
The packaging material is 100% recyclable and is marked with the recycle symbol

The hood can look different to that illustrated in the drawings in this booklet. The instructions for use, maintenance and installation, however, remain the same.
Closely follow the instructions set out in this manual. All responsibility, for any eventual inconveniences, damages or fires caused by not complying with the instructions in this manual, is declined. This appliance is intended to be used in household and similar application such as: - staff kitchen areas in shop, offices and other working environments; - farm houses; - by clients in hotels, motels and other residential type environments; - bed and breakfast type environments.
It is important to conserve this booklet for consultation at any moment. In the case of sale, cession or move, make sure it is together with the product.
- Read the instructions carefully: there is important information about installation, use and safety.
- Do not carry out electrical or mechanical variations on the product or on the discharge conduits.
- Before proceeding with the installation of the appliance verify that there are no damaged all components. Otherwise contact your dealer and do not proceed with the installation.
The minimum distance between the supporting surface for the cooking equipment on the hob and the lowest part of the range hood must be not less than 50cm from electric cookers and 65cm from gas or mixed cookers.
If the instructions for installation for the gas hob specify a greater distance, this must be adhered to.
ELECTRICAL CONNECTION
The mains power supply must correspond to the rating indicated on the plate situated inside the hood. If provided with a plug connect the hood to a socket in compliance with current regulations and positioned in an accessible area, after installation. If it not fitted with a plug (direct mains connection) or if the plug is not located in an accessible area, after installation, apply a double pole switch in accordance with standards which assures the complete disconnection of the mains under conditions relating to over-current category III, in accordance with installation instructions.
WARNING!
Before re-connecting the hood circuit to the mains supply and checking the efficient function, always check that the mains cable is correctly assembled.
If the cable is not fitted with a plug, connect the wires according to the following table:
Mains voltage and frequency
Refer to the rating indicated on the plate inside of the hood
Wire connection

N:blue
L:brown
Replacing the power cable
Warning! If the supply cord is damaged, it must be replaced by the manufacturer, its service agent or similarly qualified persons in order to avoid hazard.
AIR VENT
(for the suction versions)
Connect the hood and discharge holes on the walls with a diameter equivalent to the air outlet (connection flange).
Using the tubes and discharge holes on walls with smaller dimensions will cause a diminution of the suction performance and a drastic increase in noise.
Any responsibility in the matter is therefore declined.
Use a duct of the minimum indispensable length.
Use a duct with as few elbows as possible (maximum elbow angle: 90^
Avoid drastic changes in the duct cross-section.
The company declines any responsibility whenever these regulations are not respected.
FILTERING OR DUCTING?
! Your cooker hood is ready to be used in suction version.
To use the hood in filtering version the special ACCESSORY KIT must be installed.
Check on the first pages of this manual if the ACCESSORY KIT is furnished or must be bought separately.
Note: If furnished, in certain cases, the additional activated carbon filtering system may be installed on the hood.
Information about the conversion of the hood from suction version to filtering version is present in this manual.
Ducting version
In this case the fumes are conveyed outside of the building by means of a special pipe connected with the connection ring located on top of the hood.
CAUTION!
The exhausting pipe is not supplied and must be purchased apart.
Diameter of the exhausting pipe must be equal to that of the connection ring.
CAUTION!
If the hood is supplied with active charcoal filter, then it must be removed.
Filter version
The aspirated air will be degreased and deodorised before being fed back into the room.
In order to use the hood in this version, you have to install a system of additional filtering based on activated charcoal.
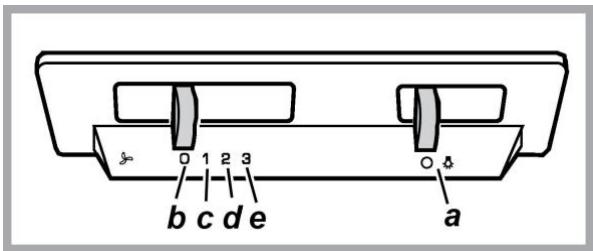
CONTROLS
The hood is fitted with a control panel with aspiration speed selection control and a light switch to control cooking area lights.

a. ON/OFF lighting
b. OFF motors
c.-d.-e. Minimum suction power (c.), medium (d.), maximum (e.).
MAINTENANCE
Cleaning
Clean using ONLY a cloth dampened with neutral liquid detergent. DO NOT CLEAN WITH TOOLS OR INSTRUMENTS. Do not use abrasive products. DO NOT USE ALCOHOL!
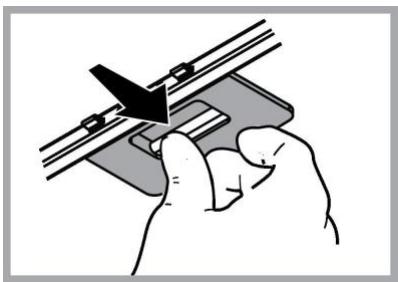
Maintenance of the anti-grease filters
Traps cooking grease particles.
The grease filter must be cleaned once a month using non aggressive detergents, either by hand or in the dishwasher, which must be set to a low temperature and a short cycle. When washed in a dishwasher, the grease filter may discolor slightly, but this does not affect its filtering capacity.
To remove the grease filter, pull the spring release handle.

Maintenance of the charcoal filter
It absorbs unpleasant odors caused by cooking.
The saturation of the charcoal filter occurs after more or less prolonged use, depending on the type of cooking and the regularity of cleaning of the grease filter.
In any case it is necessary to replace the cartridge at least every four months.
The charcoal filter may NOT be washed or regenerated.
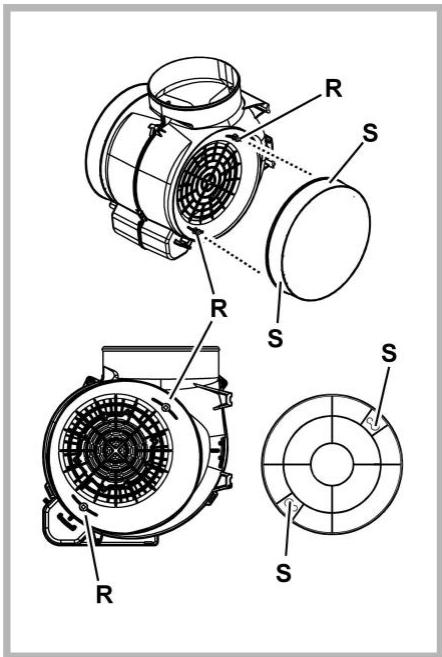
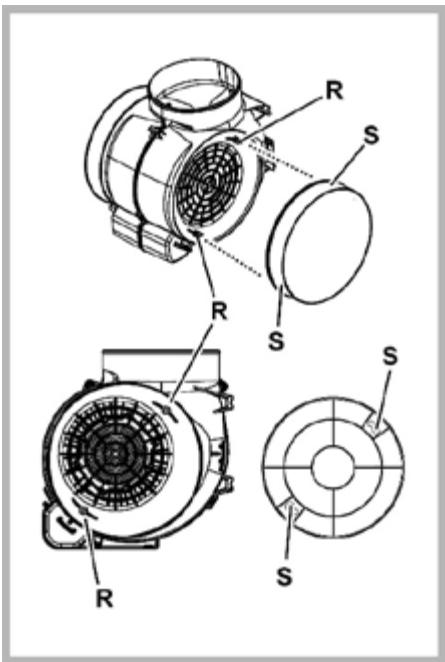
Remove the grease filters.
Fit the charcoal filters over the motor.
Align the pins R on the cowl with the slots S, then turn the filter clockwise until it locks in place.
Reverse the above procedure to remove the charcoal filters.
Refit the grease filters.

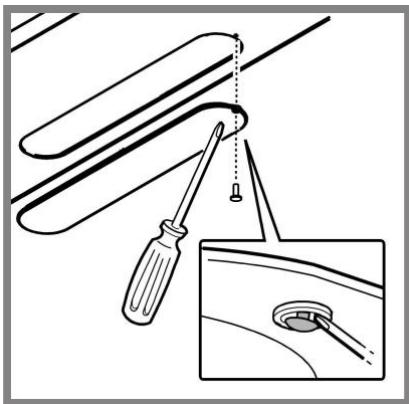
Replacing lamps
Disconnect the appliance from the electricity.
Warning! Prior to touching the light bulbs ensure they are cooled down.
Remove the overhead light levering on the fixing clip with a screwdriver or similar tool.

Replace the damaged lamp.
Use E14 2,5W max LED lamps only. For more details, check enclosed leaflet "ILCOS D" (alfanmeric position "1e").
Close the overhead light again with the clip.
DISPOSAL
- This appliance is marked according to the European directive 2012/19/EC on Waste Electrical and Electronic Equipment (WEEE).
- By ensuring this product is disposed of correctly, you will help prevent potential negative consequences for the environment and human health, which could otherwise be caused by inappropriate waste handling of this product.

- The symbol on the product, or on the documents accompanying the product, indicates that this appliance may not be treated as household waste. Instead it should be taken to the appropriate collection point for the recycling of electrical and electronic equipment. Disposal must be carried out in accordance with local environmental regulations for waste disposal.
- For further detailed information regarding the process, collection and recycling of this product, please contact the appropriate department of your local authorities or the local department for household waste or the shop where you purchased this product.
Appliance designed, tested and manufactured according to:
- Safety: EN/IEC 60335-1; EN/IEC 60335-2-31, EN/IEC 62233.
- Performance: EN/IEC 61591; ISO 5167-1; ISO 5167-3; ISO 5168; EN/IEC 60704-1; EN/IEC 60704-2-13; EN/IEC 60704-3; ISO 3741; EN 50564; IEC 62301.
- EMC: EN 55014-1; CISPR 14-1; EN 55014-2; CISPR 14-2; EN/IEC 61000-3-2; EN/IEC 61000-3-3. Suggestions for a correct use in order to reduce the environmental impact: Switch ON the hood at minimum speed when you start cooking and kept it running for few minutes after cooking is finished. Increase the speed only in case of large amount of smoke and vapor and use boost speed(s) only in extreme situations. Replace the charcoal filter(s) when necessary to maintain a good odor reduction efficiency. Clean the grease filter(s) when necessary to maintain a good grease filter efficiency. Use the maximum diameter of the ducting system indicated in this manual to optimize efficiency and minimize noise.
MALFUNCTIONS
If something appears not to be working properly, do the following simple checks before calling Technical Service:
If the hood is not working:
Check that:
- The power has not been disconnected.
- A speed has been selected.
If the hood performs inefficiently:
Check that:
- The motor speed selected is sufficient for the amount of smoke and vapours released.
- The kitchen is sufficiently ventilated to allow air intake.
- The charcoal filter is not worn (hood in filtering version).
If the hood has turned off during normal functioning:
Check that:
- The power has not been disconnected.
- the omnipolar disconnection device has not tripped.
If the hood fails to operate correctly, briefly disconnect it from the mains power supply for almost 5 sec. Then connect it in again and try once more before contacting the Technical Assistance Service.
TECHNICAL DATA
| Height (cm) | Width (cm) | Depth (cm) | Ø of the exhaust tube (cm) |
| 56-86,1 | 89,8 | 45 | 15 |
| 69,4-86,1 | |||
| 56-86,1 | 59,8 | 45 | 15 |
| 69,4-86,1 |
CE

Components not provided with the product

You can download the Safety Instructions, User Manual, Product Fiche and Energy data by:
- Visiting our website docs.whirlpool.eu
Using QR Code - Alternatively, contact our After-sales Service (See phone number in the warranty booklet). When contacting our After-sales Service, please state the codes provided on your product's identification plate.
BvbiHa Tpy6a He NoctaAcTbCra I TOMy Heo6xIHO II pIuIbAtn Okpmo.
JiameTp BnBIDHOI TpybN NOBHN BiINOBiATn Jiametpy 3'EDHyBaIbHoro KjIbua.
YBAGA!
Jaio BnraJHnn KOBnak Mae ByrInbHi pfInbTPO, To ix Tpe6a 3HaTNI.
BukonhaHn3 peunpkylaicio
BTRHyTe NOBITPRA 3HEKINIOEbCra Ta OCHUyEBcra Ta 3HOBy NOBEPaETbCra B PnMIuEHHeH. IToI TORO, Uo6 BVKNOPCTOBYBaTN KOBnak y CbOMy peKIMi, Heo6xIDHO BCTaHOBtN DOdaTkoBY CNTEmy (pifIbTp i3 AKTHOBaHIM ByIIJPM.
KOMAHДИ
BHTAaKa oIaHaHa nHaJIeIIO KOMaHd 3 KOHTPOeM UbIaKoCTI BHTaRyBaHnTa KOHTPOeM CbITJa dIra OCBtIeHnBaPInbHOI NOBepxHi.
a. ON/OFF cBirno
b. OFF DBMnyH
c.d.e. IotyXhICtB BCMOKTyBaHHa MIHImaJIbHa (c.),cepeHnA (d.),MAKcIMaJIbHa (e.).
TEXHlUHE OBCJyROyBAHHRA
UH
ДячICTКВИКОПСТОВУТЕЛИЗЕСпUEДыну СЕРБЕТК, HAMOЧЕН HeITРаJIьHIM piKIM MInOHIM 3acOBOM. HE BИКОПСТОВУТЕ 3ACOBIB A5O IHCTPYMEHTIB ДЯ OCUПSEHH!
He BnKOpNCTOBuYIte 3aoc6n IIO MaHOTb a6pa3nBHi MATEPIAII. HE BnKOPNCTOBUYITE CINPT!
06cIyroByBaHHJxHApOBuXΦIbTpIB
3aTpMycxHnpoBcnoLyuHn, 10 BuHmkaOTb nD yac nproTuBaHH iXi.
IIOBHNH YCTNTNCb OIN Ha McraHe CnIbHOIOHMMMIMHOHM 3acobam, BpyHy a60 B NOcyDMmHi MaunHi pInH3bKl TEMNEpATy i 3 KOpOTKM LkNlOM.
PnMNTI B NocydommHm MaunH MetaneBm fipIbTp 3aTpIMKx Hxpy MOKe BTPaTITN KOJip, aJe Ioro XapakTePcTnK 3 fipIbTrpyBaHHr KODHM YIHOM He 3MiHrTbC.
ДяЗИТТУФINБТРУЗАТПМКИЖИРNOTЯНITьHACEБЕпужинHypyKBYIDUdENNEHNAФINБТРY.
O6cIyroByBaHHa ByrInbHoro φIbtpy
B6npaε HennpεmHi 3anaxu Kxhhi.
IpeBipka ByrilbHoro fipbtpy Ha HacnHeHH npOBoDHTcBc nicJI 6IlbM MeHl DOBATO nepIOy BVKOPNCtAHN B 3aIeXHOCTi BiD TMny KxHi i peryIpaHOCti OOHCTKN fipbtpy XmipIB. Y bJb-RAKOMY BINpAky Heo6xIDHO 3aMIHITn IaTPOH MAKCIMYM KoxHiOTnpn MiCJI.
HEpiIJaIaE MmTTHO NIOHOBHeHHO.
3Hrtn pfInbTpr 3aTpIMKxJxPrib.
BctahOBHTnΦijbTpH, NOkPmbaOuH DmByH
Ipebeiptnu, uo6 ctepxHI Ra TpaHcnpTepi BiNobiadin
OTBOPAM;NOTIM NOBepTaTn 3a rOdINHHKOBOIO CTPIIKOHO,DOKNI He 6yide 6nOKyBaHnA 60
Дя demoTHaKy diTn B o6peHcHomy HaprMky.
BctaHObHTn 3HOby fipIbTpN 3aTpIMK JxipIB.
3aMiHa JAmNoUOK
BidKnHouHTn npHaIaB iD eJeKtpomepeXi.
Ybara! Iepu HIX TopkATn lamnn Heo6xIDHO BneBHNTNcI OBOH OXOJTN.
3HATn 3aTnckauo pikcy npaoB, BBOJH nHbOTo BIKpyTKy.
3amHHTn NIOUKoJKeHny lamny.
BukopncTObyIte CbitIOJDi lamn BkNIOHm MaKc.2,5W-E14.
Дябьш detanbhoi inhopmaui DnB.doataok "ILCOS D" (no3uja "1e").
BCTAHOBHTN Ha Micce Ipafoh Ta 3akpinTu noRo 3aTnCKaem.
YTNJI3ALIJA
DAnHm Bnip6 npomapKobAHn BiIDnoBIDHO Do EbponecBkoI DpEeKTMn 2012/19/EC, ytni3auij eJeKtpuHoro i eJeKtpoHoro oBnaHaHHA (WEEE). 3a63neUyOnn BpHy ytiniaauio cboRo Bnpo6y, Bu donomoxte nopepeTn noTeHui Hi HeaTMBi HacniKn dIra OToyUOHoro cepeoBnua i 3doop8' IIOHNH, KOTPI MOrNb 6 MaTn MlCe B npotInexHOMy Bnaiky.

CnMBON Ha cAmOy Bnpo6i a6o Ha cynpobodkyohomy Noro doKymenti Bk3y, 10 npyn tni3aui 5b0r0 Bnpo6y 3 HmH Me MoXHa NOBODTNCRA K 3I 3BnuAHHMn N6byTOBMn BiH Ma 3daBaTncy y BiNOBIDHn PNYKT npinomy eNEKTPNHO i ENEKTPHO 6bnadHn Dn pndalbwoi ytni3aui. 3dabAHn Ha 3nam NobHHN BOKHOYBaTNC 3riDn 3MICeBIMn npabINAMn no ytni3aui BIDXoDIB. Ipn 6bnbe DetalbHOI INopopmaui npnpabINA NOBDOHEHN 3 TaKIMN Bnpo6Ma, ix ytni3aui i nepepokn 3BeptaiTeCb Micebi opraHn BnA, Bcny6y no ytni3aui BIDxOJD, a6o B maraHn, B kOMy BN npindan daHm Bnip6.
PpIaD cnpoekToBaHO, BInpo6yBaHO i BnroToBJeHO 3riJHo 3:
- Bezneka: EN/IEC 60335-1; EN/IEC 60335-2-31, EN/IEC 62233.
- Eκυργαταιδηινος έλερεισίας Αναλεύμουσα Αναλεύμουσα Αναλεύμουσα Αναλεύμουσα Αναλεύμουσα Αναλεύμουσα Αναλεύμουσα Αναλεύμουσα Αναλεύμουσα Αναλεύμουσα
EMC: EN 55014-1; CISPR 14-1; EN 55014-2; CISPR 14-2; EN/IEC 61000-3-2; EN/IEC 61000-3-3. Поради дд павиьhoи ekсчлуатцla тд заимкеня врпуньшу МИIMалььну wBNДКICTbпесд почтКOM рпогotувану дд, iЗamuaite II npaICOBATN ha Deiklka XBINH nICnIЯСИнгелян pRIGOTBYAHN. 3iBbYHTe WBNIDKCTb TINs y pasi BENKoi KINBJKOci DMy i napy ta BIKOPNCTOByte NaDyB tINk y kpaHix BINAdKax. Дд nbTpIMaHnB BUCOKoi efeKTNBHOCTI BIDANENH 3anXib, 3a Heo6xIHOCtI, BOKOHYE ZAMHy ByrInBHO(-IX) φiNbtpy(-IB).Дд nbTpIMaHnB BUCOKoi efeKTNBHOCTI φiNbtpy(XkpB, 3a Heo6xIHOCtI, BOKOHYE UCHTKy φiNbtpy(-IB) XkpB. BIKOPNCTOByte MAKCIMaBHN DiAmETP cNCTeM NOBITPOBOJB, UO Bka3aHm Y IHCTpyKUII DnI ONTHIMIAZU efeKTNBHOCTI ta Mihimzau liuMy.
3BOI Y ΦYHKUIOHYBAHHI
Jaio hne paoe HaneKHM NHom,peed TMK 3BepHyTcB Cnykby no TeXHHOMy o6cyroBaHIO, BmHOaTe HaCTynI npocTI nepebipk:
KU BoBraKKa He npauoE:
nepeBipNTM:
- Yu He 6yIyo nepepBaHO nOaHu CTpyM.
- Yu6byo oboaHO 6yDyR-ky UbndKiCtB.
-Якшовпогано працьо:
nepebipnT:
-ун образашвдкICTь ДИгУна ДОСТАТНЯ ВИРОБLEHOI KЛБКOSTIДИМΥ i nap.
- Yu Kuxh JIOCTaTHb IOPOBITpeHa dIg TORO, IIO6 BNTRAKKa MOrNa BIKoHaTn 3a6ip nobITpr.
- Yn ByirnbniΦiNbTp He BIdnpaCbobAHn (BNTJkA B peximi3 peuPKyIJIqJeIO nobITp).
- KIIO BITRAKKA BIMKHyJNACB XOJI HOPMaJIbHOI pOBOTM: nepeBipNTI:
- Yu He 6yIyo nepepBaHO nOaHu CTpyM.
- Yu He CnpaIooBav OndHonoJIIOCHN BIMNKaay anapaty.
Y pa3i moKJIINBIX 360Ib Y pOBoTI, nepeT TmM Jk 3BepHyTnCn DO cIyK6n TexHnHO o6cNpyoBaHHa BIDKTHouHTn BiEeKTKPOxKMBHeHH a npat Mihymu Ha 5 CekyHd, BmMaOHu BNkPy i nOIM 3HOBy NiD'EnHaTu NOr. JaKUo anHomai B po60ti npOobKyec icHyBaTN 3BepHyTnC B cIyK6b TeXo6cNpyoBaHHa.
TEXHlHi DAH
a a a a a a a a a a a a a a a a a a a a a a a a a a a a a a a
11 11 11 11 11 11 11 11 11 11 11 11 11 11 11 11 11
( x - 1) ( x + 3) = 0
Jbc J1
aaii aaiaaai aaiaaai iiaai ai aai iiaai iiaai iiaai iiaai iiaai
J2 = V2 max. 小 S 由
aai joo
Jull
aejw juii pi
aieeio blll oelis ciS 1
即 12
oJall ojSgol all aaiS gaiS oJilal all ae
aal 1
(2)
:
aui jia
Jill 15
jie jie jie ball jial jial jia
y 5 1 1 1 1 1 1 1 1 1 1 1 1 1 1 1
Culal
y 111 111 111 111 111 111 111 111 111 111 111 111 111 111 111 111 1

a.b.c.11
2,5W-E14 2,2000000000000000000000000000000000000000000000000000000000000000000000000
aIi 1 aIa Iaag bia wI aIbill aJai plll
plll cia g il gai ai iwi y. slzao aIw Cil
!aBti
piuui y. abil s algo ge ic ayjall cl jiall plai w Jg
jgllll j! caiy aiy
jia jia jia jia jia jia jia jia jia jia jia jia jia jia jia jia jia jia jia jia jia jia jia jia jia jia jia jia jia jia jia jia jia jia jia jia jia jia jia jia jia jia jia jia
Jusss
Aa aal aai jaa -jaoa aai

a a a a a a a a a a a a a a a a a a a a a a a a a a a
i
a 1
a 1111111111111111111111111111111111
jlll lisiunu bii juaia g aagall llaac n aaiill lrr
J 1 J 1 J 1 J 1 J 1 J 1 J 1 J 1 J 1 J 1 J 1 J 1 J 1 J 1 J 1 J 1 J 1 J 1 J 1 J 1 J 1 J 1 J 1 J 1 J 1 J 1 J 1 J 1 J 1
a
jol 1 jol i jol 1 jol jil jil jil aolo clogg 2 g j: clogill ayi jil
aannn nnnn nnnn nn nnnn nnnn nnnn nnnn nnnn nnnn nnnn nnnn nnnn nnnn nnnn nnnn nnnn nnnn nnnn nnnn nnnn nnnn nnnn nnnn nnnn nnnn nnnn nnnn nnnn nnnn nnnn nnnn nnnn nnnn nnnn nnnn nnnn nnnn
i 1
Soll
50 50 50
a blllall j jllly Jull gill all gall a 65 a lly
a a a a a a a a a a a a a a a a a a a a a a a
-
-
-
-
-
-
-
-
-
-
-
-
-
-
-
- 1.
-
-
-
-
-
-
-
-
-
-
-
-
-
-
y
.5
aal gllgall gall jbi ciil kki yj yu blaill dl jai p
1y 2
A
aalall yalall g jai jai aai jai jai jai jai jai jai jai jai jai jai jai jai jai jai jai jai jai jai jai jai jai jai jai jai jai jai jai jai jai jai jai jai jai jai jai jai jai jai jai jai jai jai jai jai jai jai jai jai jai jai
Aalall alall alall glll pall jraa aall


