
HCA62741W - Basket BEKO - Free user manual and instructions
Find the device manual for free HCA62741W BEKO in PDF.
| Product Type | Cooker Hood |
| Brand | BEKO |
| Model | HCA62741W |
| Usage | Domestic |
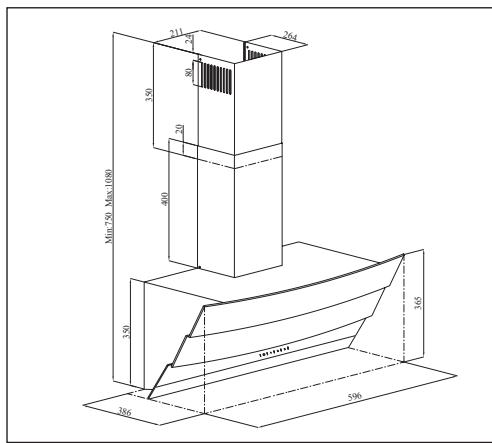
| Width | 596 mm |
| Depth | 386 mm |
| Height (minimum) | 750 mm |
| Height (maximum) | 1080 mm |
| Net Weight | 10.4 kg |
| Supply Voltage | 220-240 V ~ 50 Hz |
| Total Power | 316 W |
| Motor Power | 210 W |
| Lighting Power | 2 x 3 W (halogen) |
| Maximum Airflow | 537 m³/h |
| Number of Speeds | 3 |
| Control | Electronic 3 levels |
| Air Outlet Diameter | 120 / 150 mm |
| Grease Filter | Aluminum (washable) |
| Charcoal Filter | Optional (replace every 6 months) |
| Lighting | Yes, halogen |
| Automatic Shut-off Function | Yes, 15 minutes |
| Minimum Distance from Cooktop | 65 cm |
| Material | Stainless Steel |
| Color | White |
Frequently Asked Questions - HCA62741W BEKO
User questions about HCA62741W BEKO
0 question about this device. Answer the ones you know or ask your own.
Ask a new question about this device
Download the instructions for your Basket in PDF format for free! Find your manual HCA62741W - BEKO and take your electronic device back in hand. On this page are published all the documents necessary for the use of your device. HCA62741W by BEKO.
USER MANUAL HCA62741W BEKO
Please read this user manual first!
Dear Customer,
Thank you for preferring a Beko product. We hope that you get the best results from your product which has been manufactured with high quality and state-of-the-art technology. Therefore, please read this entire user manual and all other accompanying documents carefully before using the product and keep it as a reference for future use. If you handover the product to someone else, give the user manual as well. Follow all warnings and information in the user manual.
Remember that this user manual is also applicable for several other models. Differences between models will be identified in the manual.
Explanation of symbols
Throughout this user manual the following symbols are used:


This product was manufactured using the latest technology in environmentally friendly conditions.
1 Important instructions for safety and environment 22-24
1.1 General safety 22
1.1.1 Electrical safety 22
1.1.2 Product safety 23
1.1.3 Children's safety 24
1.2 Intended use 24
1.3 Compliance with WEEE regulation and disposal of the waste product 24
1.4 Package information 24
2 Technical specifications of your appliance 25-26
3 Installing your appliance 27-32
3.1 Installation accessories.. 27
3.2 Installing the hood onto the wall 28
3.2.1 Boring the hanger holes.. 29
3.2.2 Hammering the wall plugs 30
3.2.3 Installing the hanger screws 30
3.2.4 Hanging the hood onto the wall 30
3.3 Installing the hood flue 31
3.4.1 Using with flue connection 32
3.4.2 Using without flue connection 32
3.5 Flue connection: 32
4 Operating your appliance 33-34
4.1 Digital electronic control with 3 levels . . . 33
4.2 Energy efficient usage: 34
4.3 Operating the hood: 34
5 Cleaning and maintenance 35-36
5.1 Aluminum filter 35
5.1.1 Removing the aluminum filters 35
5.2.1 Replacing the carbon filter 35
5.3 Cleaning 36
5.4 Replacing the lamps.. 36
1 Important instructions for safety and environment
This section contains safety instructions that will help protect from risk of personal injury or property damage. All warranties will become void if you do not follow these instructions.
1.1 General safety
- Always have the installation and repairing procedures carried out by the Authorised Service Agent. Manufacturer shall not be held responsible for damages arising from procedures carried out by unauthorised persons.
- This appliance is not intended for use by persons (including children) with reduced physical, sensory or mental capabilities, or lack of experience and knowledge. Children should be supervised to ensure that they do not play with the appliance.
1.1.1 Electrical safety
-
Disconnect the product from the mains during installation, maintenance, cleaning and repairing procedures.
-
If the power cable is damaged, it must be replaced by the manufacturer, after sales service or a similarly qualified person (preferably an electrician) or someone designated by the importer in order to avoid possible risks.
- Operating voltage is 220 to 240 volts.
- If the appliance has a failure, it should not be operated unless it is repaired by the Authorised Service Agent. There is the risk of electric shock!
- Do not route power cable close to hobs. Otherwise power cable may cause fire since it melts down easily.
- Never plug the hood before installation is completed.
- In order to obtain the best performance, external conductor must not be longer than 4 ~m . It must not contain more than 2 perpendicular ( 90^ ) angles and its diameter must be min. 120 ~mm .
- Disconnect the appliance before any intervention to the internal parts of the appliance.
1 Important instructions for safety and environment
1.1.2 Product safety
- You can use a pipe with a diameter of 120 ~mm or 150 ~mm on the flue connection of the hood.
- Do not make connections to the flues connected with stoves, exhaust shafts or flues with rising flames. Observe the rules set by authorities on the discharge of exhaust air.
- The height between the lower surface of the hood and upper surface of the stove/oven should not be less than 65 ~cm .
- Do not operate the hood without aluminum filters and do not remove the filters while it is operated.
- Never touch the hood's lamp after they operated for a long time. Hot lamps may burn your hand.
- Avoid big flames beneath the product. Otherwise, particles on oil filter may ignite and lead to a fire.
- Turn on the hobs after placing pans or pots on it. Otherwise, rising temperature may deform certain parts of your product.
-
Turn off the hobs before taking away pans or pots.
-
Avoid inflammable materials under the hood.
- Oil may ignite while frying foods. Therefore, be careful about cloths and curtains.
- Never leave the cooker unattended when frying foods; otherwise boiled oil may cause fire.
- There is the risk of fire if your hood is not cleaned in the specified periods.
- Be extremely careful and wear gloves when cleaning the hood.
- We advise you to operate the appliance a few minutes before starting to cook in order to increase the suction power. Thus, you shall have a continuous and stable suction power when the vapors arises.
- Operate your hood for 15 minutes more after the end of cooking or frying in order to remove smell cooking vapour in the kitchen.
- When the hood is in use, especially together with gas cookers, make sure that environment is ventilated with clean air.
- Pay attention not to connect the appliance to the flues used by non-electrical devices. (E.g.: Heater flue).
1 Important instructions for safety and environment
- When a non-electrical device is concurrently used in the same room together with the hood, the negative pressure in the room must be maximum 0.4 mbar in order to prevent hood from sucking other device's exhaust into the room.
1.1.3 Children's safety
- Packaging materials are dangerous to children. Keep packaging materials in a safe place out of reach of children.
- Electrical appliances are dangerous to children. Keep children away from the product. Do not allow children play with the appliance.
1.2 Intended use
- This appliance is intended for domestic use. It is not suitable for commercial use and it must not be used out of its intended use.
- The manufacturer shall not be liable for any damage caused by improper use or handling.
- The period required for the availability of spare parts for the correct operation of the appliance is 10 years.
1.3 Compliance with WEEE regulation and disposal of the waste product

This product does not contain harmfuland forbidden materials described in the"Directive on the Restriction of the Useof Certain Hazardous Substances inWaste Electrical and Electronic
Equipment" (WEEE) issued by the T.R. Ministry of Environment and Urbanization.
Complies with the WEEE Directive.
This product has been manufactured with high quality parts and materials which can be reused and are suitable for recycling. Therefore, do not dispose the product with normal domestic waste at the end of its service life. Take it to a collection point for the recycling of electrical and electronic equipment. Please consult your local authorities to learn the nearest collection point. Help protect the environment and natural resources by recycling used products.
1.4 Package information

Ni-MH
The product package is made of recyclable material as per the National Legislation. Do not dispose of the package waste together with the household
waste or other waste and deliver them to the package collection points indicated by the local authority.
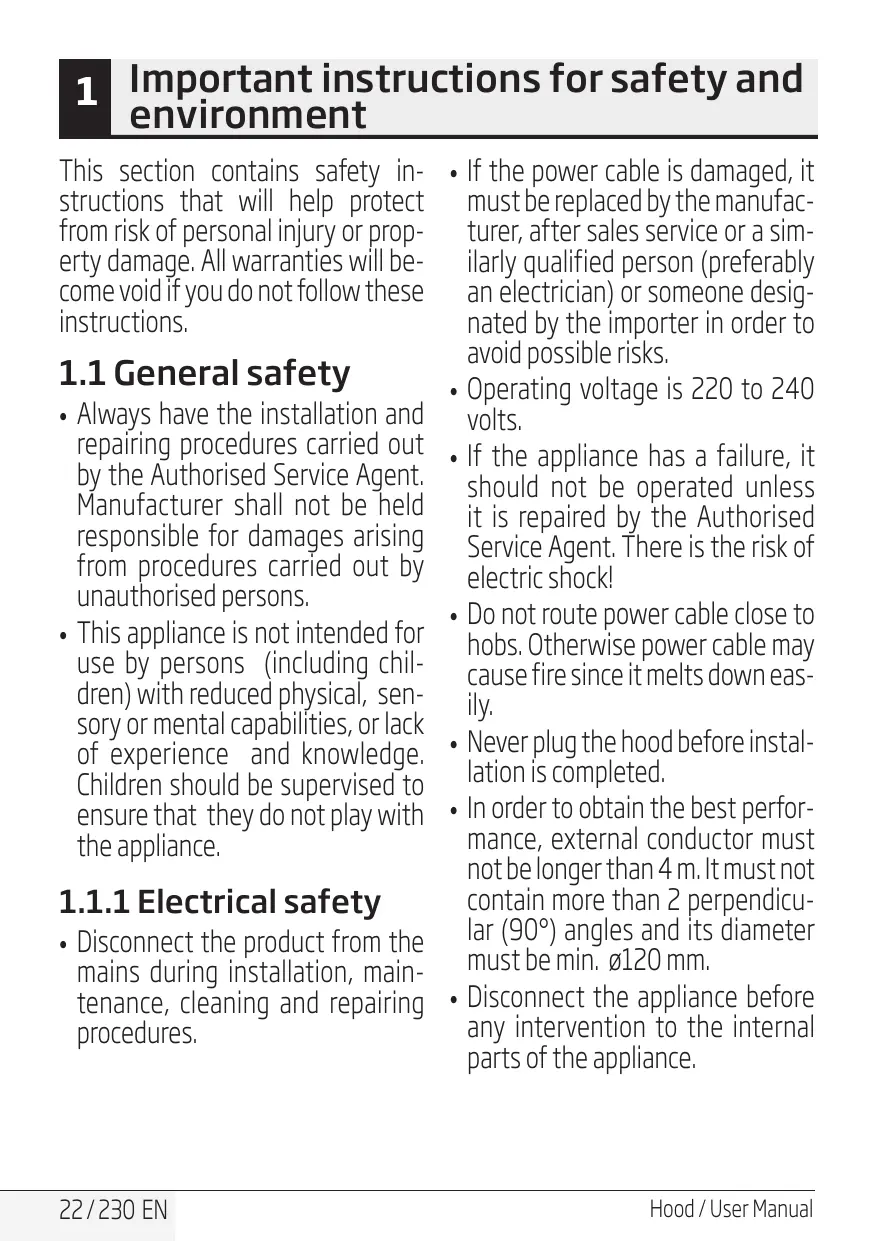
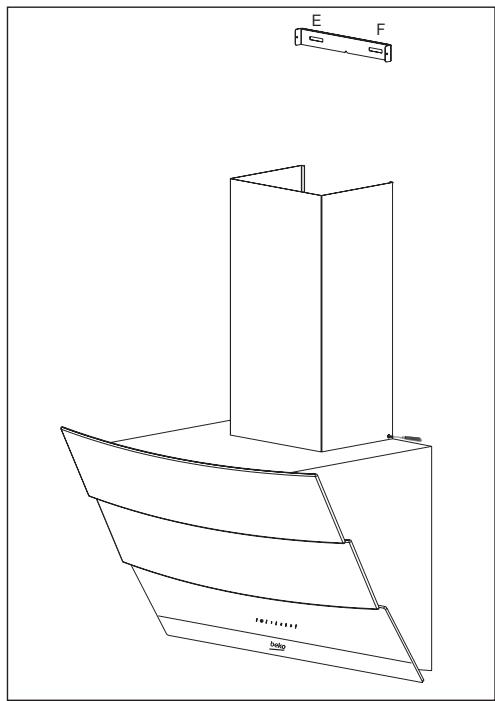
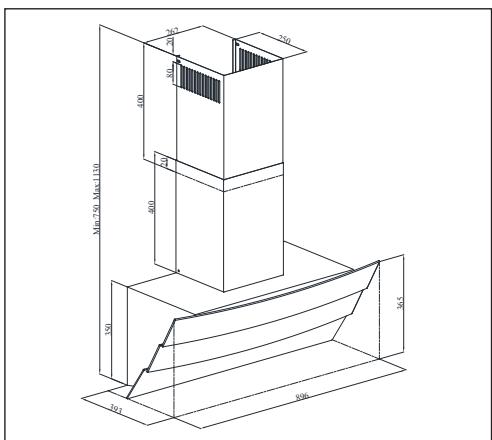
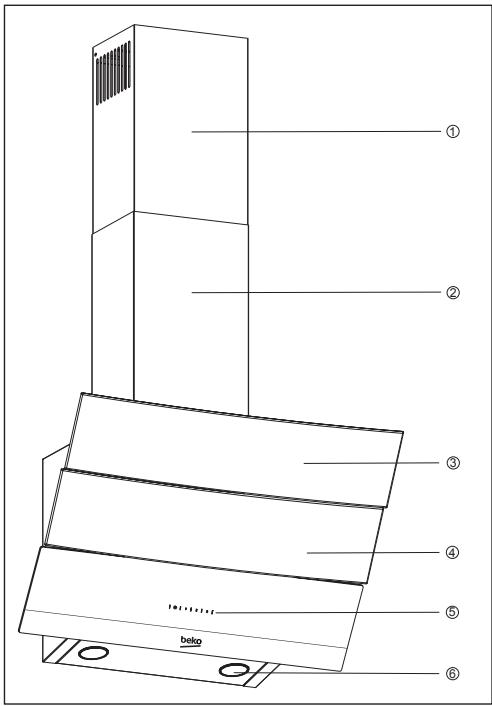
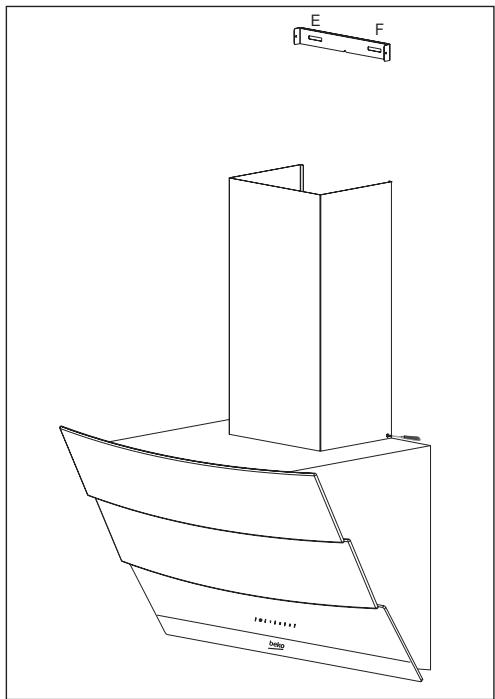
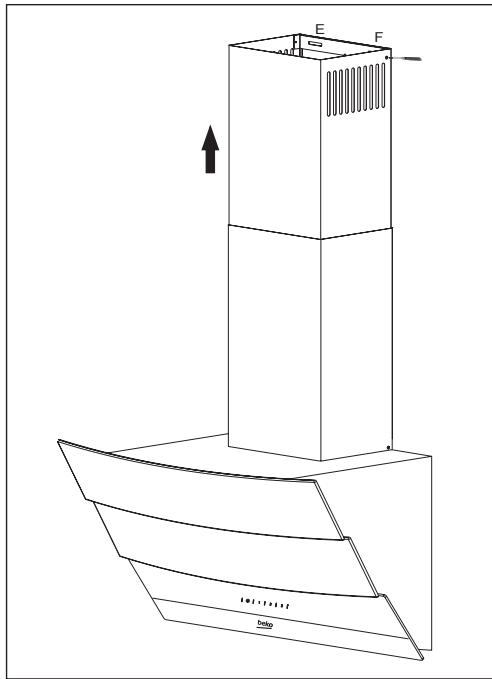
2 Technical specifications of your appliance
- Internal flue
- External flue
- Glass cover
- Filter (under the glass cover)
- Control panel
- Illumination
(Figure 1)
| HCA 92640 BH | HCA 92640 WH | HCA 62640 W | |
| Width | 896 mm | 896 mm | 596 mm |
| Depth | 393 mm | 393 mm | 386 mm |
| Height | 750 mm / 1130 mm | 750 mm / 1130 mm | 750 mm /1080 mm |
| Supply voltage | 220 - 240 V, 50 Hz | 220 - 240 V, 50 Hz | 220 - 240 V, 50 Hz |
| Control | With 3 levels | With 3 levels | With 3 levels |
| Lamp power | 2 x 3 W | 2 x 3 W | 2 x 3 W |
| Air outlet pipe | 120 / 150 mm | 120 / 150 mm | 120 / 150 mm |
| Capacity | 577 m³/h | 577 m³/h | 537 m³/h |
| Motor power | 1 x 210 W | 1 x 210 W | 1 x 210 W |
| Total power | 316 W | 316 W | 316 W |
| Net weight | 13 kg | 13 kg | 10,4 kg |
| Colour | Black | White | White |
Values stated on the product labels or in the documentation accompanying it are obtained in laboratory conditions in accordance with relevant standards. These values may vary depending on operational and environmental conditions of the product.
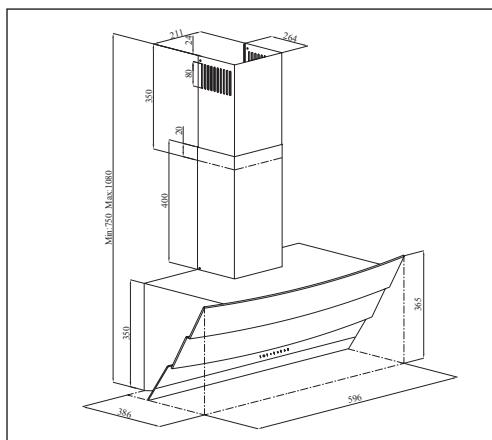
2 Technical specifications of your appliance
| HCA 62640 WH | HCA 62640 B | HCA 62640 BH | |
| Width | 596 mm | 596 mm | 596 mm |
| Depth | 386 mm | 386 mm | 386 mm |
| Height | 750 mm /1080 mm | 750 mm /1080 mm | 750 mm /1080 mm |
| Supply voltage | 220 - 240 V, 50 Hz | 220 - 240 V, 50 Hz | 220 - 240 V, 50 Hz |
| Control | With 3 levels | With 3 levels | With 3 levels |
| Lamp power | 2 x 3 W | 2 x 3 W | 2 x 3 W |
| Air outlet pipe | 120 / 150 mm | 120 / 150 mm | 120 / 150 mm |
| Capacity | 537 m³/h | 537 m³/h | 537 m³/h |
| Motor power | 1 x 210 W | 1 x 210 W | 1 x 210 W |
| Total power | 316 W | 316 W | 316 W |
| Net weight | 10,4 kg | 10,4 kg | 10,4 kg |
| Colour | White | White | Black |
3 Installing your appliance
Please consult the nearest Authorised Service Agent for the installation of your hood.
*Preparation of location and electrical installation for the product is under customer's responsibility.

Caution!
Remove the protective film (if any) on the hood and flue surface after the installation.
Distance between lower surface of the hood and upper surface of the hob should be at least 65 cm.
Have a qualified electrician make the electrical connection.
Install your appliance so that you can reach the power connection (plug, outlet) easily after installation.
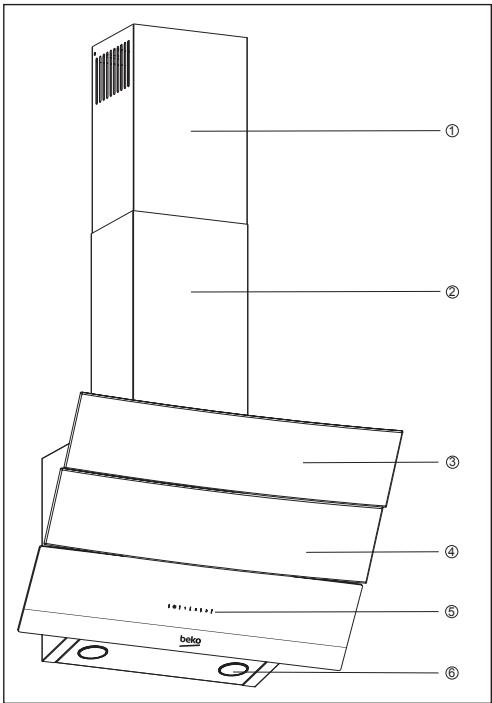
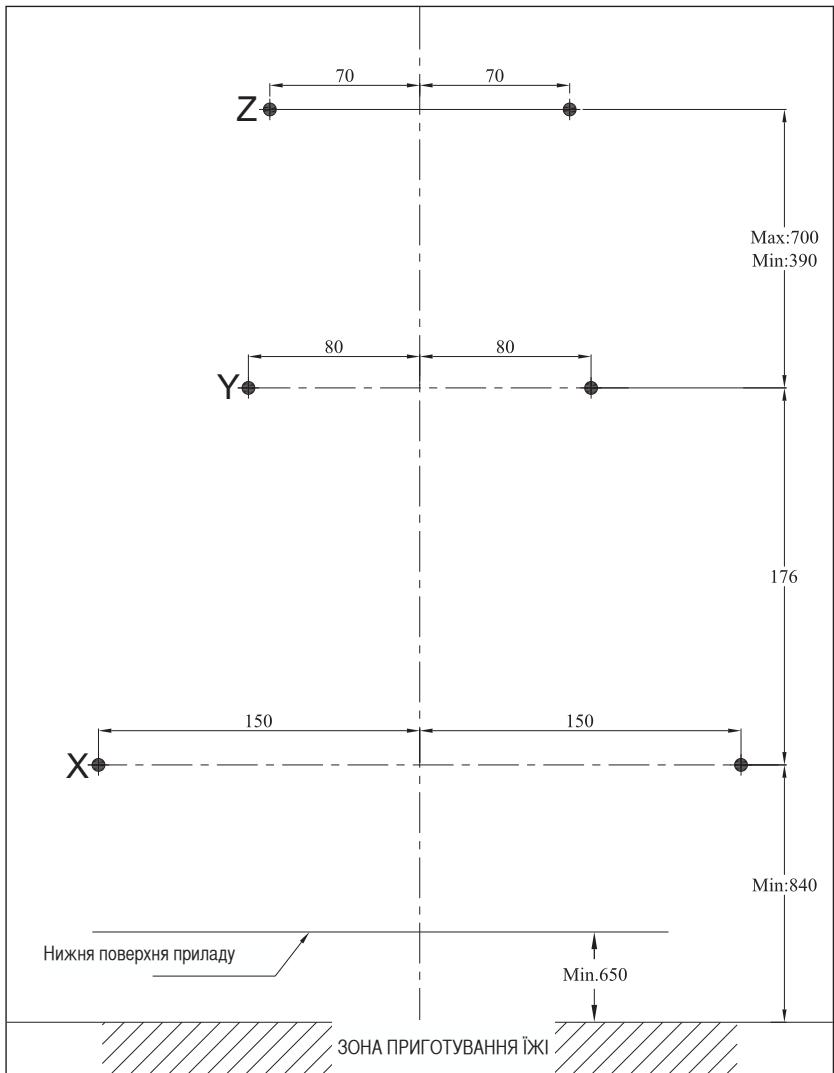
Dimensions are given in mm.
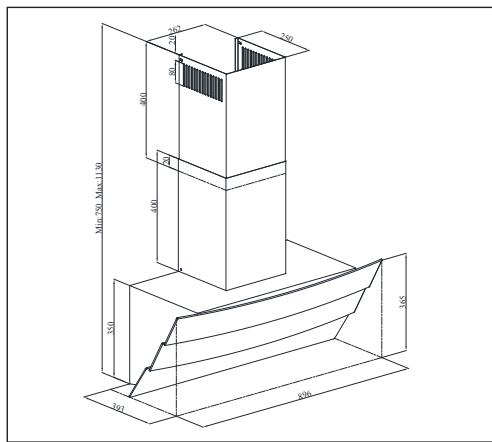
(Figure 3b)
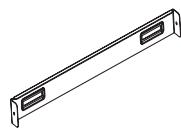
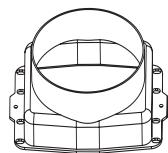
3.1 Installation accessories
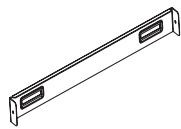
1 x flue connection plate
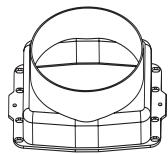
1x0150 mm plastic flue

1 x 0120/150 mm plastic flue adapter
3 Installing your appliance
Information required for the preparation of the installation place for your hood is given below.
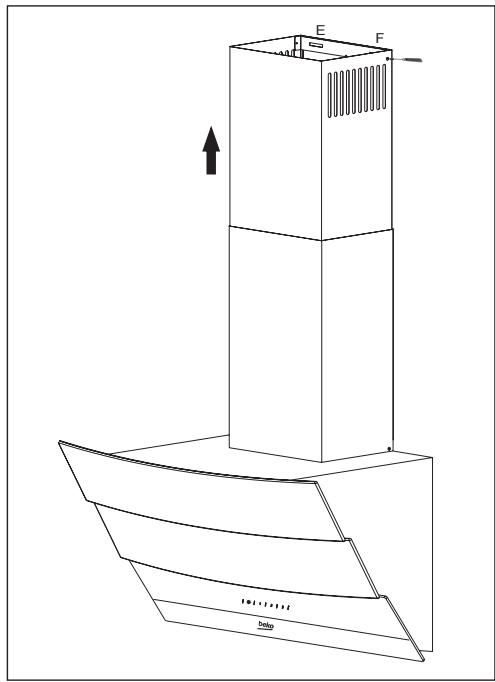
3.2 Installing the hood onto the wall
To install the hood onto the wall, loosen the screws of hanger plates on the motor housing and pull the plates upwards. Then, tighten the screws of the hanger plates. (Figure 3a).
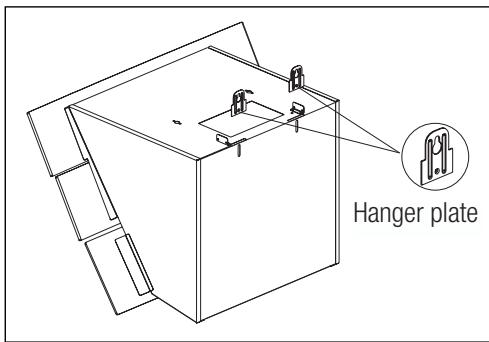
(Figure 3a)
(Figure 3b)
Secure the 0.150 mm plastic flue adapter onto the top of the body with 3.5x9.5 screw included in installation accessories (Figure 4).
If you will use 0 120 mm flue pipe, install 0 120 mm flue adapter onto it.
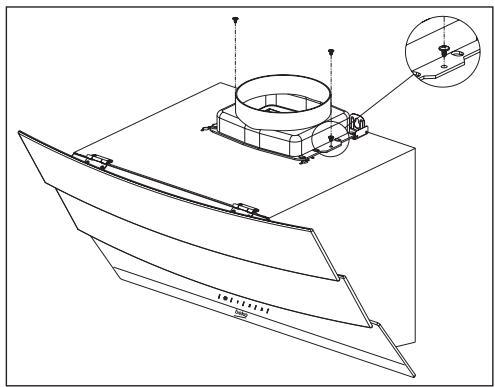
(Figure 4)
3 Installing your appliance
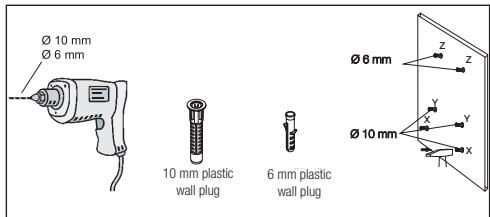
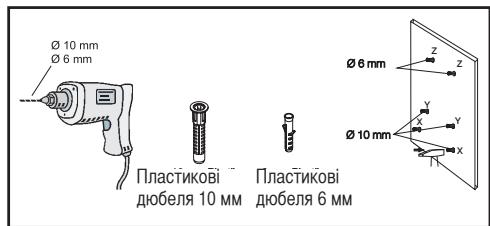
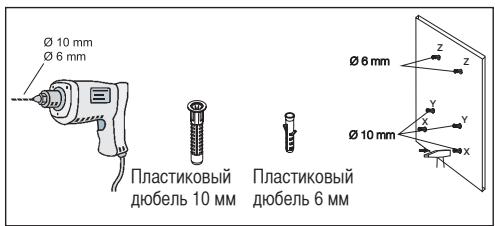
3.2.1 Boring the hanger holes
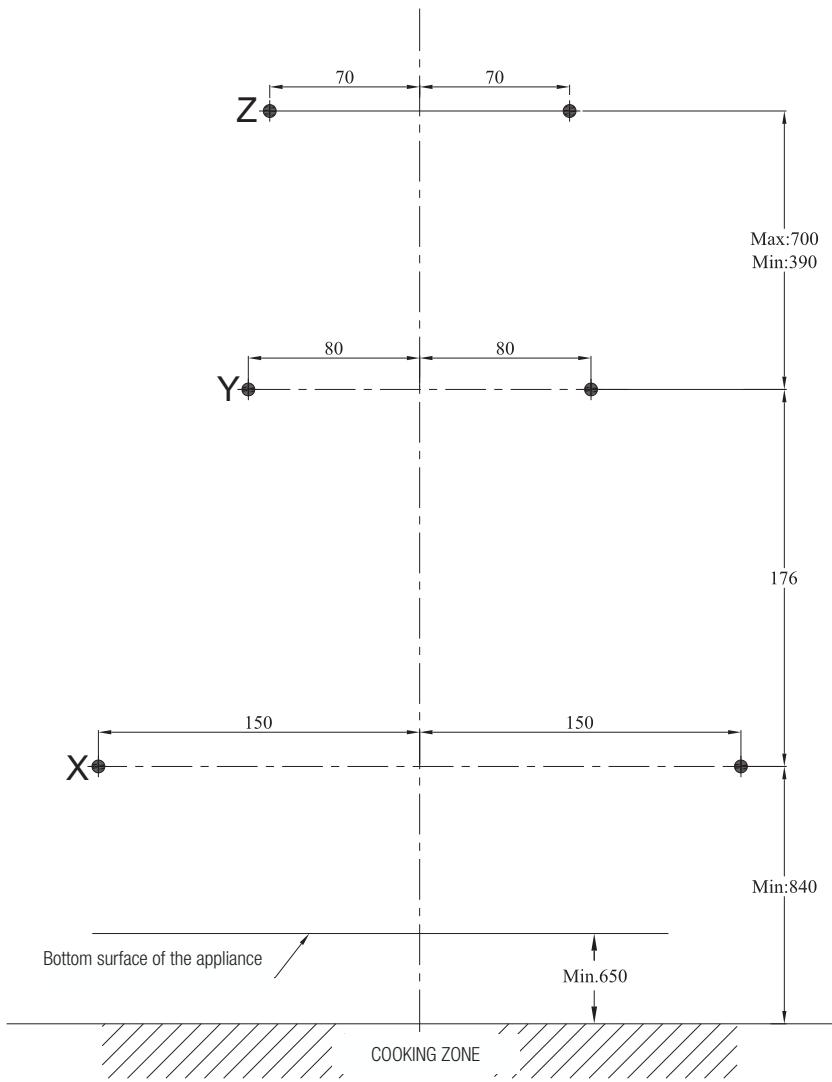
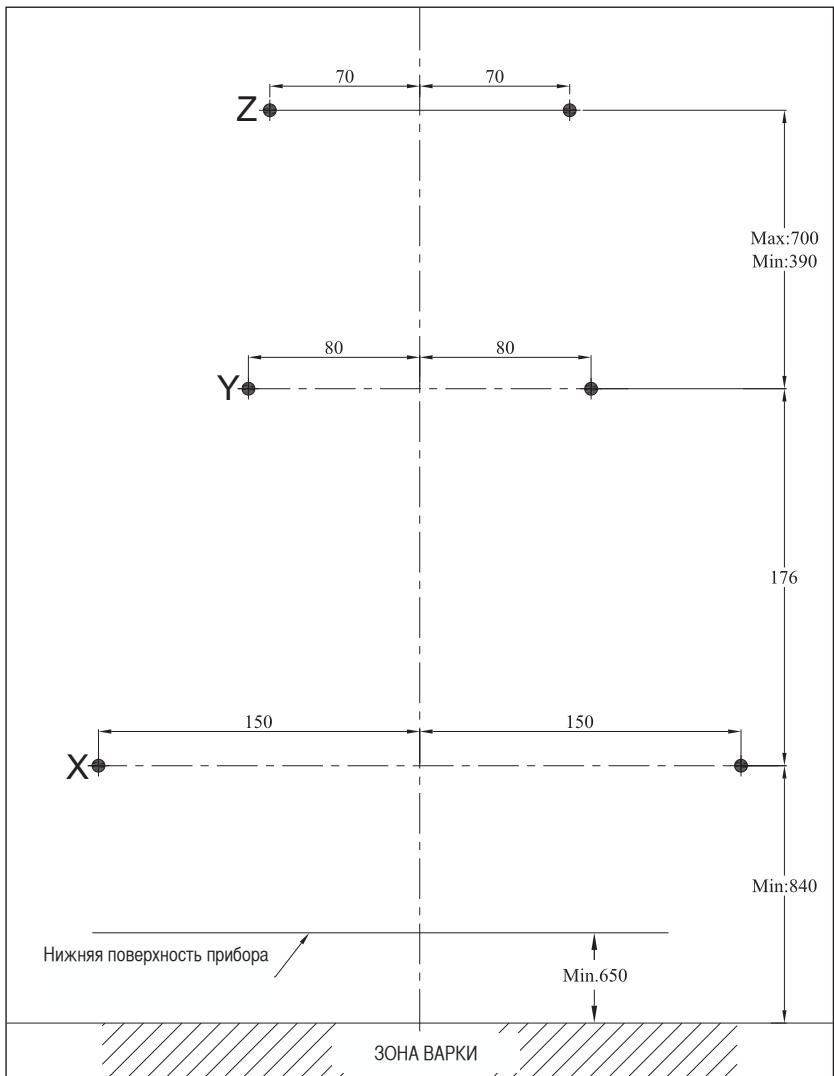
Affix the installation template onto the installation place of the hood. Drill the points market with (X,Y) (Figure 5) using a 10 mm bit and points market with (Z) (Figure 5) using a 6 mm bit.
(Figure 5)
3 Installing your appliance
3.2.2 Hammering the wall plugs
Hammer 0 10 mm wall plugs (X,Y) into the holes drilled for hanger screws. Hammer 2 x 0 6 mm wall plugs (Z) into the holes drilled with a 06 mm bit for the external flue connection plate. (Figure 5)
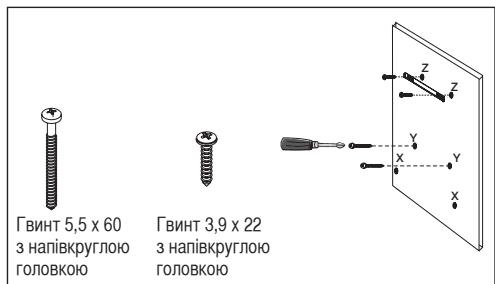
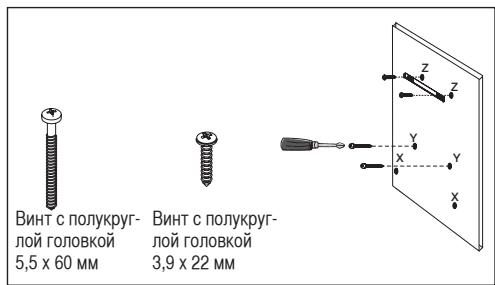
3.2.3 Installing the hanger screws
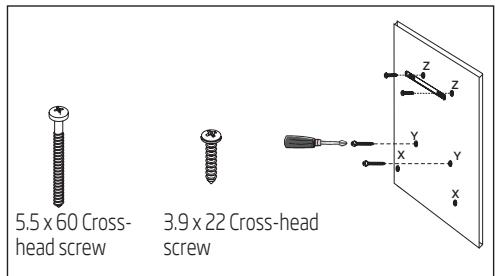
Install 5.5 × 60 hanger screws into the 0 10 ~mm wall plugs (Y) you have hammered into the wall. There must be a gap of 5 ~mm between the screw head and the wall. (Figure 6)
Connect the internal flue connection plate to the 6 mm wall plugs (Z) on the wall using Ø 3.9x22 screws. (Figure 6)
(Figure 6)
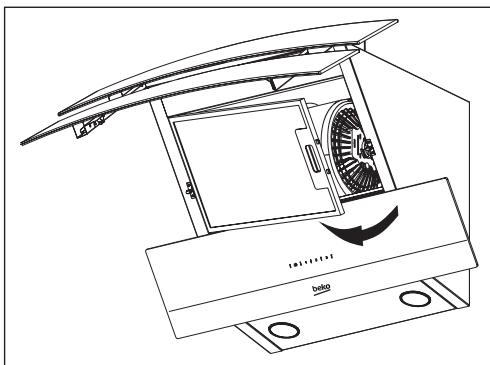
3.2.4 Hanging the hood onto the wall
- Hang the hood onto the screws you have installed into the Y holes.
- Open the side suction window of the hood by pulling it towards yourself. Install the 5.5x60 screws through the X holes located inside in order to secure the appliance.
3 Installing your appliance
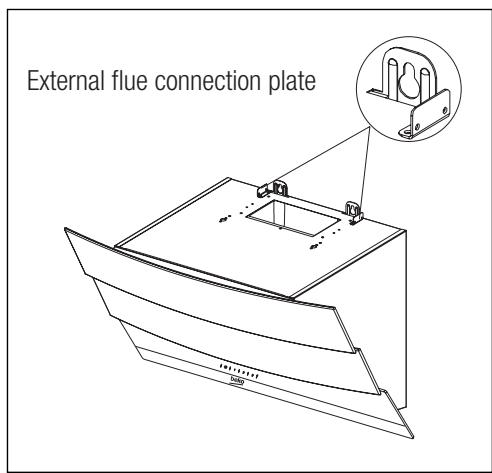
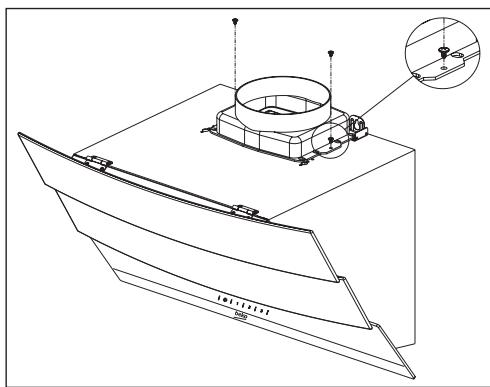
3.3 Installing the hood flue
Disconnect the product from mains supply before starting flue installation. Fit the sheet metal flue parts around the body.
Screw the external flue to the external flue connection plates located on the motor housing. (Figure 3b / 7)
(Figure 7)
Extend and screw the internal flue from its outer edges onto the flue connection plate which was secured to the wall (Figure 8).
(Figure 8)
3 Installing your appliance
3.4.1 Using with flue connection
- The vapour is removed via flue pipe which is secured to the connection head on the hood.
- Diameter of the flue pipe should be equal to the diameter of connection ring. To allow the air be removed easily out of the room in horizontal arrangements, the pipe should be slightly tilted upwards (approximately 10^ ).
3.4.2 Using without flue connection
Air is filtered by the carbon filter and returned to the room. Carbon filter is used when there is no flue in the house.
- If the hood will be used without flue connection remove the diverters inside the flue adapter.
- Remove the aluminum filter. To install the carbon filter, center the carbon filter on the plastic part on both sides of the fan body, and secure it on the tabs. Secure the filter by turning the tabs to right or left.
Install the aluminum filter.
3.5 Flue connection:
Place adapter supplied together with the hood into the ventilation hole located on the top section of the hood. Procure a pipe with a diameter of 120 / 150mm . Connect one end of the pipe to the adapter and the other end to the flue.
Make sure that these two connections are secure enough
so that they will not dislocate when the hood is operated in max. speed. Check that the flaps inside flue are functional when tightened with the clamp. Fit the flue connection pipe onto the adapter. If you fit the flue connection pipe inside the adapter, air suction will not occur since the flaps that prevent air backflow will remain closed.
It is not advisable to make connections to the flues connected with stoves or exhaust shafts. Do not make connections to such flues.
Pipe connection must be as short as possible and have minimum number of elbows.
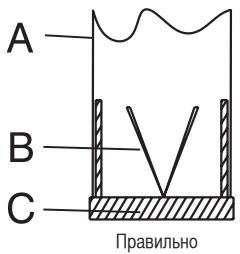
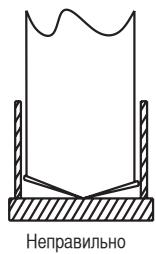
A: Flue outlet pipe
B: Flaps that prevent backflow
C: Plastic flue
3.5.1 Backflow prevention system (N-RV)
When the hood is operated, flaps are closed in order to prevent possible odours and dust from entering into the ambient from outside.
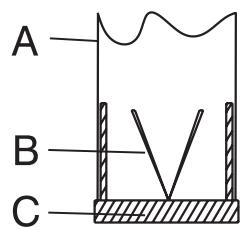
Correct
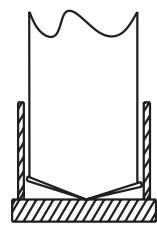
Not correct
(Figure 9)
(Figure 9)
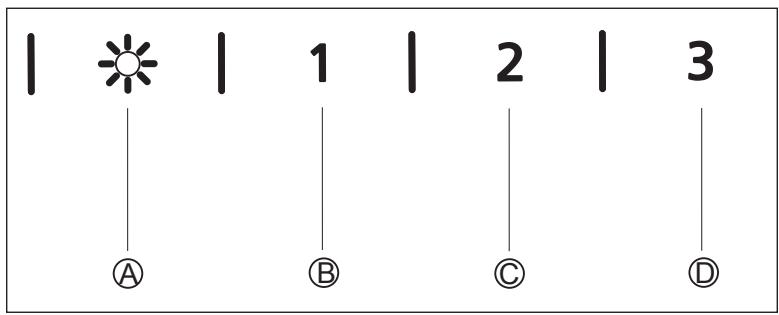
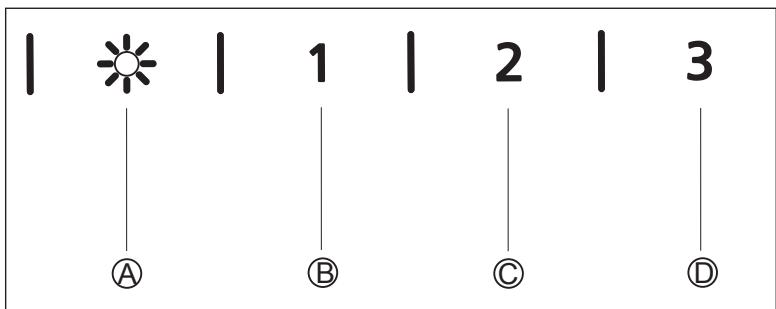
(A): Light On / Off key
(B):1st level key
(C): 2nd level key
(D): 3rd level key
4.1 Digital electronic control with 3 levels
(A) Light On/Off Key: You can illuminate the cooking area by pressing this key.
(B) key: You can start your hood at speed level 1 by pressing this key.
When you press this key again to switch off the appliance, speed level indication on the display disappears.
(C) key: You can start your hood at speed level 2 by pressing this key.
When you press this key again to switch off the appliance, speed level indication on the display disappears.
(D) key: You can start your hood at speed level 3 by pressing this key.
When you press this key again to switch off the appliance, speed level indication on the display disappears.
Auto-stop in 15 min.:
This appliance is equipped with an Auto-Stop function which allows the appliance to ventilate the room for an additional period of time in order to remove the unpleasant odour and vapour in the room after the cooking is over. Appliance stops automatically after a certain period of time.
To enable the Auto-stop function, press any of the speed level keys (B, C, D) on the control for longer than 2 seconds. A timer with 15 minutes will be activated.
If you press the same speed level key while the Auto-stop function is enabled, function will be disabled and the appliance will stop.
If you select a different speed level this function will be disabled.
If you want your appliance to stop automatically, you must enable the Auto-stop function again.
Periodical cleaning of metal filters:
Filters must be cleaned at about every 60 hours of operation or 4 weeks depending on the frequency of usage.
4 Operating your appliance
4.2 Energy efficient usage:
- When operating the hood, adjust the speed level according to the odour and vapour intensity in order to prevent unnecessary power consumption.
- Use low speeds in normal conditions (1-2), and high speed (3) when smell and vapors are intensified.
- Lights on the hood are intended for illuminating the cooking zone.
Using them to illuminate the ambient/kitchen will result with unnecessary power consumption and inadequate illumination.
4.3 Operating the hood:
- Hood is equipped with a motor having various speed settings.
- For a better performance, we advise you to use low speeds in normal conditions, and high speeds when smell and vapors are intensified.
- You can start the hood by pressing the desired speed level key (B,C,D).
- You can illuminate the cooking area by pressing the light key. (A)
Prior to cleaning and maintenance, unplug the appliance or turn the main switch off or loosen the fuse that supplies the hood.
5.1 Aluminum filter
This filter captures oil particles in the air. You are recommended to clean your filter every month under normal usage conditions. First remove the aluminum filters for this process. Wash the filters with liquid detergent and rinse them with water and install them back after they get dry. Aluminum filters may get discolored as they are washed; this is normal and you don't need to change your filter.
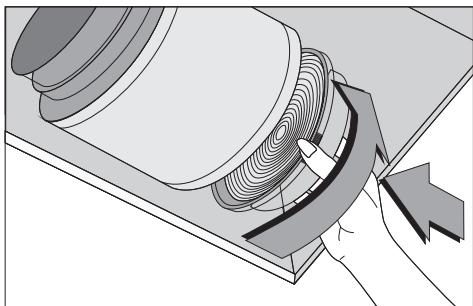
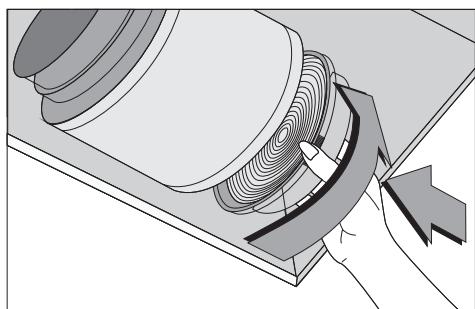
5.1.1 Removing the aluminum filters
- Push the aluminum filter lock forward.
- Then, slightly lower it and pull forward. Otherwise, you may bend the filter. (Figure 10) After the aluminum filter is washed and dried, reinstall the filter to its slot by applying above steps in reverse order.

(Figure 10)
Note:
You can also wash aluminum filters in dishwasher.
Carbon filter (Using without flue)
This filter removes the cooking odours. If it is not possible to use a flue, it purifies the air which is circulated inside the kitchen. Carbon filter of your appliance will get clogged in time depending on the frequency of use, style of cooking and regular cleaning of the aluminum filters.

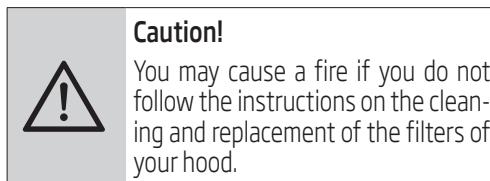
Caution!
Carbon filter should never be washed.
You may obtain carbon filters from Beko Authorised Service Agents.
5.2.1 Replacing the carbon filter
- Remove the aluminum filters. (Figure 10)
- To remove carbon filter, turn the tabs counterclockwise and release the filter. (Figure 11)
Install the new carbon filter.
Install the aluminum filters.
(Figure 11)
Anti-odor filters contain charcoal (active carbon).
They must be changed with periods of approximately 6 months.
Regardless of using a carbon filter or not, aluminum filters must always be installed.
Do not operate your appliance without the aluminum filter in place. Using with carbon filter will decrease suction performance of the appliance.
5.3 Cleaning
Particularly do not neglect to clean your hood immediately after you have made frying.
Use a soft cloth soaked with liquid detergent to clean the outer surface of your hood.
Never use abrasive or scratching materials for cleaning.
You may use the cleaning agents commercially available for persistent grease etc. by following the warnings on the product. In order not the scratch the brushed steel body, wipe in the same direction with the bush trace.
Do not use cleaning agents containing hydrochloric acid, bleach or abrasive powders in order to maintain the surface quality of your product. Use a cloth dampened in soapy water or special stainless steel cleaning spray for stainless steel steel surfaces. Remove the protective foil on the appliance.
If you need to transport the appliance:
- Keep the original packaging of the appliance. Transport the appliance with its original package, and follow the transport markings on the original package.
If you do not have the original package:
- Do not place any objects on the hood.
- Protect the outer surface from impacts.
- Pack the appliance so that it would not be damaged during transport.
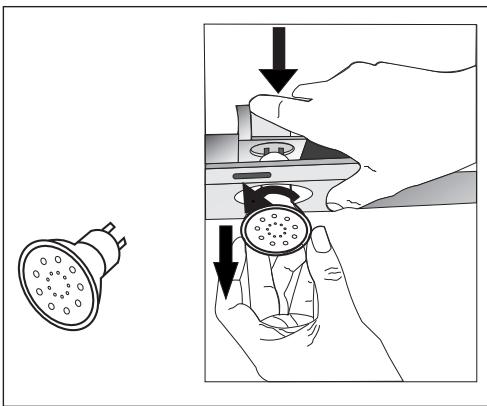
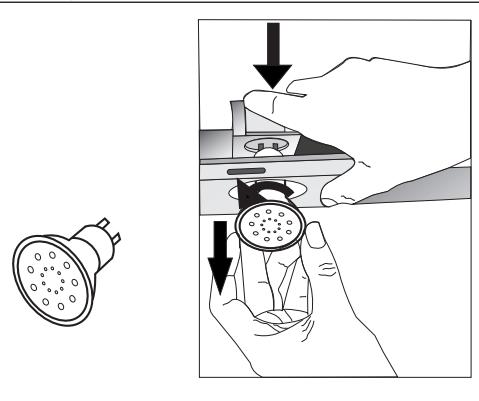
5.4 Replacing the lamps
Disconnect the hood from the mains supply.
This appliance is equipped with 3 W halogen lamps.
To replace the halogen lamps, press the lamp downwards from the rear section of the lamp holder to release the lamp. Then turn it counterclockwise by 1/4 tour and remove it.
Perform the above steps in reverse order to fit the new lamps.
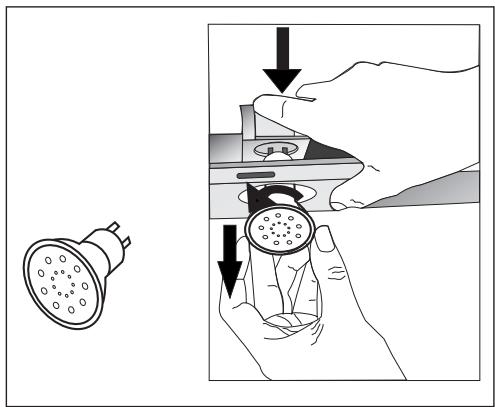
Note:
You may procure lamps from Authorised Service Agents.
5.1 Aluminium filter
*Iokyneb Hece BiDnOBiJaBHiCtB 3a NiIroTOB- Ky Micra i eNeKTPoMOHTax KpoDyKTy.
(PncyHOK 2)
BiDCTaHb MIX HNXHBoHO NOBepxHEO BNTJAKKn i BepxHBoHO YacTHNOHO BapINbHOI NOBepxHi He Ma6byTN MeHIOO, HIX 65 cm.
Плкноченя пилаядо eNeKtpomepeksi noBHNEN BKNOHyBaTN DoCbiDyeHn eJeKtpNK.
BctaHObit npinaTakm YHOM, 0o6 BIn DiCTaBAI Do MICUpiKluOeHHn DO eNEKtpomepeksi (po3ETKn).
PozMipn Bka3aHo y MM.
3.1 3acobnyyctaHOBKN
1 x pnaHka nii'eHaHHnOBiTPoPoBovdy
1x0150 MM Пл actko-Bи NOBITpOPIOBi
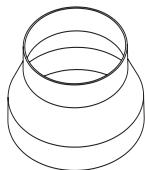
1x0120/150 MM nlaactKobni aanTpE IЯ NOBITpOpiBOy
3 UcTaHOBKa npuJaNy
IhOpMaiz, Heo6XiHa nla NiIgROBKn Micz yCTaHOBKn BNTJxKn, NpaHa HNXy.
3.2 YctaHOBka BNTJXKN Ha CTiHi
Lio6 BCTaHOBnT BNTJkKky Ha ctiHi, BiDkpyTiTb GBHnT PnactInh KpiPiJeHb Ha Kopnyci DnRyHa i NotarHtB PnactInn BBepx. Iicna 3akpyTiTb GBHnT PnactInn KpiPiJeHb. (PncyHOK 3a)
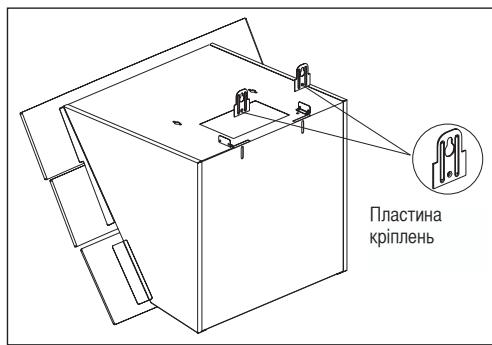
(PncyHOK 3a)
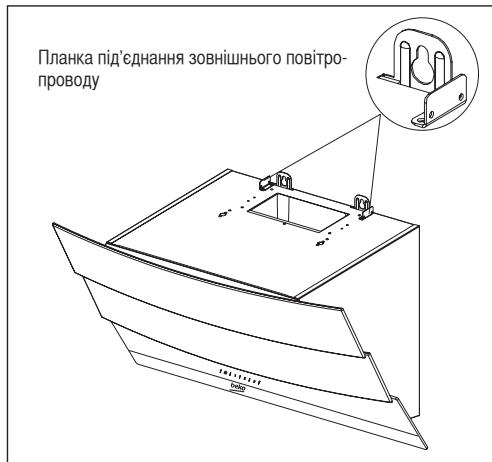
(PncyHOK 3b)
3aφikcyIte pIacTKOBn aIaNTep (0 150 MM) NOBITpOPIBOyHa BepXHi yactNHi KOpNcY 3a DOnOMoTO rBHTiB 3,5 x 9,5, IIO BKJIHOeHI Do KOMPJIeKTy 3aco6iB dIy uCTaHOBKn (PncyHOK4).
Jkuo BnKOpNCToBvEcna NobITpOPOBID 120 MM, yCTaHOBIb aAnTepe (0 120 MM) nobITpoIPOBOy Ha HbOrO.
(PncyHok 4)
3.2.1 CbepdJIiHnO tBopiB IJn KpInIeHb
PnKpiniMbontaXnHsa6NoHaMicyeYCTaHOBKnBNTaXKn.BncBepnItbOTBOpnYTOckax,PO3NaueHx(X,Y)(PncyHOK5),3aDOnomoroOcBepnA010MM,aTOckN,PO3NaueHi(Z)(PncyHOK5)3aDOnomoroOcBepnA06MM.
(PucyHok 5)
3.2.2 3a6uBaHHnДIO6eJIb MOJOTKOM
3a6nTe MoIOTKOM IIO6eJI 0 10 MM (X,Y) B OTBOpN, BNCBepdIeHI dJIa NIDBicHIX rBnHTiB. 3a6nTe MoIOTKOM 2 x 0 6 MM IIO6eJI (Z) y OTBOpN, BNCBepdIeHI CBePdIOM 0 6 MM, dJIaNkN pIe'edHaHHra 3OBHIuHbOro NOBiTPoPiBOy. (PncyHok 5)
3.2.3 YctaHOBka NiBicHNX TBNHTiB
BctaHObitb 5,5 x 60 niDbichi rBnHTu y IIO6eJIax 0 10 MM (Y), 3a6ntux y CTiny. Mix roJIOBKOIO rBnHTa i CTiHO Maec 6yTu BiDcTaHb 5 MM. (PncyuHok 6)
3aKpiniTb PnAnky NiI'EnHaHH 3OBHiUHbOro NO-BiTpOpnoBdy Ha IIO6JIax 6 MM (Z) 3a DoNOMoTOHO TBnHTiB 0 3,9 x 22. (PcCyHOK 6)
3.2.4ПдбИшУВаньВNTЯЖКиHa cTiHi
-ПидьсбтЕВТЯЖКУHAГИNTN,BCTaHOBJIeHi yOTBopaxY.
BiiKpnTe 6iHHe BIKHO BCMOKtYBaHHa, noTAYbHn Ioro Ha ce6e. BcTaHObit rBnHTn 5,5 x 60 y oTBOpn X, kki 3haxoJrbcBcepeHni, uO6 3akpInNTn npJa.i.
3.3 YcTaHOBKa noBiTpponpoBODY BNTJXKIN
Khonka (C): HaTnCHyBnHa 10 KhoNky, MoKHa yBIMkHyTN BNTJxK Ky Ha npYrOmy pIBH iBnI-KoCTi.
JaKIO BnIe pa3 HATNCHe TaHcKHOKNky, 106 BmKHyTn npJlaD, IHNkaCia pIBHb WbNdkOci Ha ekpaHI 3HNKHe.
Khonnka (D): HATNCHYBUN Ha zu KHOJky, MOXHa yBIMKHyTN BNTAAKKy Ha TpeTbOMy pIBHi WBNUKOCTi.
YKIO BNI ue pa3 HATNCHe TaHIO KHONky,IO6 BIMKHyTI pNJIaI, IHINKAciPiBnIKoCTi Ha ekpaHI 3HNKHe.
ABTomatuHa 3yunHka yepe3 15 XB.:
üe npjla ochaueHHKjieo
«ABTomatNuHa 3yInnKa»,Якdo3B0JЯпpoBI-tpIOBaTN npIMiUeHH npOTaROMdoaTKOBOrO yacy 3 MeTOB BnIaJIeHH HePnEMLHx 3aIaxiB i BnIapIB nicI npiroTuBaHH Jxi.ПрnaI 3yINHcTbC8 aBTOMatNuHo NO 3akIHcEHnO neBHOro npomixkU yacy.
Lio6 yBIMKHyTn cyHKUIO «ABTomatNHa 3yHINKa», HaTNCiTb 6yDb-ky KHOKNy piBnH 8WbnKocTi (B, C, D) ha naheLi Ta ytpmMyTe ii 2 cekyn. YbIMKHeTbc TaMep Ha 15 XBNH. Jkso HATNCHYr Ty camy KHONKY pIBH YA BWNKocTi, KOJY BIMKHeHa cyHKUIA «ABTomatNHa 3yHNKa», To zI cyHKUIA BIMKHeTbcA, a npnaad 3yINHHTbcra.
JaKuo o6paTn iHwIn piBeHb WbNkOcTi, To cyaФyHKU BmMKHeTbcra.
JaKIO noTpi6Ha aBtOMaTHuHa 3yNnHKa npIaNy, noTpi6Ho ige pa3 BmKHyTN yHkciO «ABtOMaTHuHa 3yNnHKa>.
PepioDnHa OuNcTka MeTaJIeBx φIJIbTpIb:
fijbtpn cniD ouuCyBaTu npi6n3Ho KoxHi 60 roHn pOoToN a6o KoxHi 4 TnxHi, 3aJeKHO BID qACTOTN BKNOpNCTaHH.
4.2 EheproepeKTHBHa ekpnyataci:
-Пд.Yac BnKOpncTaHHB BnTЯKKN,peYHNoIte pIBeH шВиДКоCTi,3aJIeXHo BiД inteHcNB-HocTi 3anaxiB Ta BnapiB,単6 3anobirn NaMipHomy cnoXkBaHHIO eHepri.
3a 3BnuaHnX yMOB, BCTaHOBnHOte Hn3bky uBnKicTb (1-2), i 36iNbJyTe II (3), kUo pIBeHb 3aIaxiTa BnapiB cTa e 6iNb w IHTeHcNBHM.
- JIamn Ha Bntjxu np3haeHi IJn ocBtJIeHH 30Hn nproTyBaHH iXi.
BnKopncTaHHxix3MeTOOOCBtJIeHHHaBkoJinuHb0i30HNa6o KuxHi npu3BeDeNo HeuJBoBOrO eHepeCnOxKuBaHH Ta HeoCTaTHbOrOpIBHcBITna.
4.3 Ekcnnyataia BnTAAKKN:
- Bintjxka ochaueHa DBNrHyOM, 10 Maepi3Hi HanaHTyBaHHa WbNdkOcTi.
-Дя крашою роботи пилаяу 3а HopmaьнхуMOB peKOMeHnyETbCS BKNOPncTOByBaTnHn3bKi WBNkOcTi, i BUCOKi,Якso piBeHb 3a-naxiB Ta BnnapiCCTae 6JIbSi INTehCNBHIM. - Bintjxka BMnKaetcbc, kKIO HaTnchTyN KHOpy Heo6XiHOro pIBH 5BnKocTi (B,C,D).
- OcBItIeHHra 3OHN npriToyBaHHa iXi BMnKaεTbc 3 ΦONOMOIO KHOKN iDcBiYBaHHa. (A)
Ipeed ouHneHHa m I texHiHm O6cIyroByBaHHaM BiE'EnaHte npuad BiM MepeKi eIeKTPoKnBJIeHHa 60 BIMKHITb TOnOBHn BUMKauch, a60 BiKpyTb 3anO6IXHK, kNk 3diC-HIOe ENEKTPOXKNBHeHH BITRAKKn.
5.1 AIIOMiHieBn φIbTp
LcH pIbTp BNOBIOe yacTKn OJIy NOBItpi.3a HOpMaJIbHNx yMOB eKcIIpyataupekOMeHnyEETBCrO uNtBuATn ceH pIbTp zomicra.ДЯ ZbOrO cNoayKHeo6xIDHO 3rTn aIHomHiEbi PJIbTpNi. PpOMNIte pIbTpriPiKM MIOUHM 3acobom i CNOLOCHITb Ix YNCTOBOJIO.ПICrN ZbOrO d03BOJIbTe pIbTpam BnCOXHyTN i BCTaHOBiTB Ix Ha MICe. AINOMIHcBi pIbTpMOKyTB BTPaTIaN KONIP BHaCNIIDOK MNTT. Lc HopMaJIbHO, pIbTp, y TaKOMy BnPaIKy, 3MiHOBaTN He NOTpi6HO.
5.1.1 3HЯTTaJIiOMHIEBxΦJIbTpIB
- NocyHbTe BnepeD fikcaTOp aIHomiHiEBOrO fInbTpa.
2.Псляцboro злегka onуctiь НOrO iNotЯгнітБВперед.Y inшOMу BИпадКУ Bn MoжeteNORHyTNФЛьТР.(Pисунok 10)Псля мttTЯ BИсушУВаньФльТра BCtaHOBiTB NOrOHa MlCSe, ВИКОнHuOn BИшЕВka3aHI KpOKn Y 3ВОРOTHOMY ПОрДКУ.
(PncyHOK 10)
Плчиміта:
MttT aHOMHiEBNX φiNbTpBi MoxHa 3iiCHO-BaTN y NocydomnHiMaunHi.
ByrilbHnΦilbTp (BVKOpncTaHHa 6e3 nobitponpoBody)
LcH FJIbTp BnDAnJe 3aIaxn PnIPOrYBaHNr iXi. RaKIO Hemae MoKJIbOcTi BnKOpNCTOBvBaTn NOBITpOnpoBId, FJIbTp OUYUe NOBITpy, JKe NOBepTaEc7cR Ha3ad y KuyxHIO. 3 YacOM ByrIbHnF IJbTp PrnAdy MOnke 3acMitITncsB 3aJIexKHOCTi BiD YaCTOTN BnKOpNCtAHN BNTaKKN, CNoCoby PnIPOrYBaHNr iXi i YaCTOTN OUYUeHNr aJIOMHIEBHX FJIbTpIB.

ybara!
Mntu ByrIbHn IJIbTp 3a6opo-HeHO.
Pnp6bTu ByrIbHi fIbTpno MoXHa y npedCTaBnKIB aTOpN3ObaHOro cepBicHoro ueThpy Beko.
5.2.1 3aɪnha ByrɪnlbHoro φɪnbTpa
3HimTb aIIOHIeBi pJIbTpN. (PucyHOK 10)
- Lio6 3nTn ByrIbHn nIbTp nobepHiB nIaHKn npOt rOAnHHKOBoCTpIKn i 3HIMtB φIbTp. (PncyHOK 11)
- BCTaHOBIb HOBi ByrIbHn φIbTp.
BcTaHOBiTb aIiomHicEbi fiNbTpN.
(PncyHok 11)
5 OuichiHЯ i TexHiCyHe o6cIyroBvBaHHa
ΦIbTpN, 10 yCyBaIOb 3aIax, MICTaTb DepeBHe Byrllna (akTNBHe Byrllna).
3aminy TaKnx pfIbTpib Heo6xIDHO BnKOHyBaTN KOKH6 MICAIB.
He 3aJIeXHo BiI TOrO, BnKOpNCTOByOTcBcR ByrIiNbHi pJIbTpN Hi Hi, aJIHOMiHieBi pJIbTpN MaIOt b 3aBXd6yTn BCTaHOBJIeHi.
He BnKOpNCToBvIe TnpIaJ 6e3 aJIHmIHieBnx fiIbTpIb. BnKOpNCtAHNByrIbHx NpIbTpIb 3MeHUnTb NOTyXhICTh BCMOKTyBaHHN PnpIaNy.
5.3 Ouichienna
OuHueHHBnTgXKHeo6XiDHO3diCHIOBaTH BIDpa3y JKnicLa CmaKeHH.
Дя OУИцЕнгЯ 3OBHIIshHbOI NOBepxHI BINTJXKN BIVKOPINCTOByTe M'ЯКу TKAHNHy, 3MOueHy piKIM MInOHUM 3acO6OM.
He BnKOpNCToBvIe abpa3uBHi MaTepiAIn Ta MaTepiAIn, kI MoKyTb IopJpaTu NOBepxHIO BVITXKKN.
Ypa3i BnKOpNCtAHHnHaBbHx y npOdaJy MNochx 3ac06iB, kki pIxDoJrTb dIra 3HrTTa CtiKOrO KInpy, 3a6pUdHeHHToIIO, DOTpIMyTEcB BkA3iBOK 3 BnKOpNCtAHHn TaKOrO MNoOro 3ac06y. LlO 6 He NpOprNaTm MaTOBn CTaJIeBn KOpNc npIlaNy, BNTnpaiTe BnTjXkKy Y TOMy HaprrMky, y JAKOMY HaHeceHO MaTOBe NOKpTTra.
Lio6 36epeTn JkicTb nobepxHb BNTJkN, He BVKOpncTOByTe MIOUcI 3acOu, Jki MicTb coJIaHy KNCIoTy, BiD6JIIOUcI peOboHHn a60 abpa3aNbHI nopouKn.ДЯ nobepxoHb i3 hepXaBIIOOCTani BVKOpncTOByTe TkaHNy, 3MoUeHy y MInbHi BOi, a6o CneuaJIbHi cnpei dIy OunueHnHn HEPXaBIIOOCTaJI. 3HIMtB 3axnchy foIbry 3 npnaNy.

Ybara!
HeDToPmAmHn IHCTpyKci3OunuehnI 3aMHNphiBtpiB BNTJxKKMOKe npN3BeCTn DO BUNHKeHHNoKexi.
Iiuc TpaHcnpTuBaHHn npHaay:
36epiraIte opirihbHy ynaKOBky npilayu. TpaHcnpTyBaHHy npilady Heo6xIDHO 3iHCHOBaTH yopirihbHi ynaKOBU ta doTpMyOuNcB TpaHCnOpTHOro MapKyBaHHa H opirihbHi ynaKOBU.
Jkto opnirnaIbHa ynakobka He 36epeRnac:
He po3miuye Ha Bntjxj 6ydb-ki nped-METI.
3axnctitb 3OBHIHIO NOBepxHIO BNTJKKy BiD yapib.
- YnakyIte npinad TaKIM YHOM, 106 BIn He NOxKOINBCN iD Yac TpaHCNOPTyBaHH.
5.4 3amHa JAmn
BiD'eHaTe BnTgKky BiD Mepexi eNeKtpoKuBJIeHHJ.
Ley npilaochauehenraIoreHHmJ lammaMn 3 Bt.
Lio6 3amHnTn raIoreHHy JAMny, HATNCiTb Ha Hei y Hanpymky BnH3 Ha 3aHni YacTnHi NaTPOHy. IicJy cboRo NOKpyiTb JAMny npOTn rOdHnHnkOBoi CTpiKn Ha 1/4 0ebpTy i 3HimiTb II.
LIO6 BCTaHOBtI NHOBy IaMpy, BnKOHaIte Bn-ueBkazhi Dii y 3BOpOTHomy nopAky.
IpnMItKa:
PpIbTaN JaAMn MoKHa y IpeIcTaBHNkIB aB-Topu3OBAHOrO cepBicHO ueHTpy.
He cIeIyety pa3peIaTb DeTAm IrgpaTb C npI6Opom.
1.2 Ha3naYeHne n3deJnA
- 3TOT npi6op npedHa3NaueHДЯ 6bITOBORO npIMeHEnra. Pnp6Op He IOxOHTДЯ KOM-MepueCKOrO nCNoJb3OBaHNr IHe DoJXeH NcNoJb3OBaTbcr BZeJIax, OTJIuHbIX OT ZeJIeBOrO Ha3NaueHnA.
- ПюиЗВоДиTeЛь He HeceT OТВETCTBeHHOCTN 3a KaKne-ЛбОПOBpeжДeHЯ, BO3нИКшe Bpe3yЛbTaTe He npaВиЛьНOro ИСПОЛьЗОВаHЯ ИЛn Орашени Cприбором.
Cpok 3KcIpyatau np6bopa coCTaBnAeT 10 JET. B TeueHne 3TOrO BpeMeHNo ObecneuBaetc HAIChne 3aPacHbIX YacTei, He- 6xOIMbIX IJIyHKUHOHPOBAHnI np6bopa.
1.3 CoOTBeTcTBnE DnpeKtNbBe no yTNIn3aun OTXoDob 3NeKtpnueCKOrO n 3JIeKTPoHNO obOpyIOBaHnI yTNIn3aun np6opa
Данн布局прибор He coideркnt onacHbIX w/ЛIN 3aPpeHHbIX MaTePnaJIOB, yKa3aHHbIX B «ДиpeKtNBe 06OrganuHeHn NcNoJIb3OBAHn HeKOTOpbIX BpeHbIX BeIeCTB B JLeKtpnYe
CKOM N 3JNeKTPoHHom O6OpyIOBaHmN》,N3daHNo MInncTepcTbOM NO oxpaHe OkpyKaIOUeI cpeblI rOpoDcKOrO pHaHnPoBaHnry TypeckOn peCny6nKn.
Co0TBeTCTByeT Tpe6oBaHnM DInpeKtNbBbI EC 06 yTJIN3aCmN 3JIeKtpnueCKOTo N 3JIeKtpoHHo- ro 06OpydoBaHn.
3TO n3dJIne n3rOToBJIeHO n3 BbICOKoKaeeCTBeHHbIX MaTePnAIOB I KOMNoHEHTOB, KOToPbIe pInrOJHbI dJIa NOBTOPO HcNOpNb3OBAHnI NIOJExKAT BTOpUHOn Nepepa6OTke. B CBy3Nc 3TINHm He cJeDyET yTNlN3INPOBaTb n3dJIeNE cO6bIuHbIMN 6bITOBbIMN OTXODAMn IIO NCTeueHnCpoka erO 3KcNpyatauN. Ero cJeDyET cdaTb BYNHKT c6opA OTXODB 3JIeKtpNuECKOTO IN 3JIeKTPoHOrO 06OpUdoBAHn. O MeCtOHaxOXJDeHn6JnxKaJWeO PyHKTa c6opA OTXoOB MoXHOy3HaTb B MeCtHBIX oprahax BlaactN. POMoraiTe3aunITb OKpyKaHOUyO cpeDy IN npnpOdHblepecypcbI, o6ecneuBra nepepa6OTky n3dJIin, BblSeDuNX n3 yNOtpe6JeHnI.
1.4 HhΦopMaζησο6 yπaκOBke

Ni-MH
YnakOBKa npnbopa n3roToBJeHa n3 MaTePnaIaOB, npriOdHbIX IJIe nepepa60TKI, B COOTBeTCTBUN C HauNoHaJIb-HbIM 3aKoHOJaTeJIbCTBOM.
3aIpeaaetcYtINJIN3HPOBaTbOTXOdbIOTyNAKOBKN C6bITOBbIMN INJINpYrIMN BnJaMn OTXoDOB;CJIeJyET CdaBaTb INB NpyKtblc6opA,yUpeJxDeHHbIe MeCTHBIMN OpraHaMn Blaactn.
2 TexHHueckne xapaKtepcntknp6opa
- BHyTpHnry Tpy6a
- HapyKna Tpy6a
- cTeKJIaHHa KpbIuKa
- Φιλβτρ (ΠΟД CTΕΚΙΑΝΗΟ ΚρβΙΙΚΟ)
- NaHeJIb ynpaBJIeHnIa
- OcBeUeHne
(PucyHOK 1)
Pa3MepbI pInBedeHb I MM.
3.2.1 CbepJIeHne OTBepCTn IpnOBBeCKN
Прикpenntb MOHTaЖньшабLOH K MeCTy yCTaHOBKN BbITJxKn. ПрocBepNTb OTBepCTnI, nOmeeHHbIe (X, Y) (pncyHOK 5), c nOmoCbIO CBepNa DnAmETpOM 10 MM, n OTBepCTne, nOmeeHHoe (Z) (pncyHOK 5), c nOmoCbIO CBePna DnAmETpOM 6 MM.
(DNCYHOK5).
3.2.2 3a6bAhnne IIO6eIeI
3a6ntb MOJOTKOM IIO6eJIa (X, Y) dImaMeTpom 10 MM B OTBepCTnIa, IpOcBepJIeHHbIe IJIa BnHTOB NODBeCKN. 3a6ntb 2 IIO6eJIa (Z) dImaMeTpom 6 MM B OTBepCTnIa, IpOcBepJIeHHbIe IPII NOMOUI CBePna dImaMeTpom 6 MM IJIa COeINHInTeJIbHOI IIaCTINbI HapUxHoi Tpy6bl (pncyHOK 5).
3.2.3 YcTaHOBKa BnHTOB DЯI NOdBecKn
YcTaHOBtB BnHTb IOBeCKN 5,5X60B IIO6eJIy (Y) DnAmETpOM 10 MM, KOToPbIe 3a6uIN BCTeHy. MeKdy RoJOBKO BnHTa N CTeHoi DoJIxKeH 6bITb 3a3Op B 5 MM (PncyHOK 6).
PπpKpeπntb coeHnHTeBHyO pIaCTnHy BHYTpeHHe Tpy6bl K IIO6eJAM (Z) DInHOJ 6 MM HaCTeHe, INcIJIb3yR BnHTbl DnaMeTpOM 3,9 X 22 (pncyHok 6).
(pncyho6).
3.2.4 NpOBeuINBaHne BbITaXKn HaCTeHy
- PioBecntb BbITaJkKy Ha BnHTbI, yCTaHOBJeH HbIE B OTBepCTnX, NOpYeHHbIX 6yKBOY Y.
- OTKpbIb 60KOBoe OKHO BByTJKKN IJIBAcBbAHn, NOTaHyBaHa Ce6y. YcTaHOBnTBBNHtbl 5,5X 60 B OTBepCTn, NOMEeHHbIE6yKBoi X, paCNoIOxKeHHbIe BHyTpNi, YTO6bl3aKpeINb BbITAXKKy.
3.3 YcTaHOBKa BbITJXHOI Tpy6bl
Heo6xoJIMO OTKJIIOUaTb PnIbOp OT 3JIeKTPocTe T, IpexKe Yem PnIcTpyNaTb K yCTaHOBKe Tpy6bl. YcTaHOBtB MeTaJIINueCKne JInCTbI Tpy6bl BOKpyr Kopnyca.
PnPKpyTntb HApyKHyHO Tpy6y K CoeINHtTeJIb HbIM PIIaCTINHAM BHeUHeN Tpy6bl, pacNoJIOKeHNbIM Ha Kopnyce DBNrTaTeJIa (pncyHok 3b/7).
(PnCyHOK7).
3 UcTaHOBKa npn6opa
Pacuipntb npkpyTntb BHyTpehHIO Tpy6y Oe BHeIHeRo KpaK CoeINHTeJbHOI pJIactnHe Tpy6bl, PpIKpeIIeHHoK CTeHe (pcsyHok 8).
(pncyHOK8)
3.4.1 NcnoIb3ObaHne c ПОДКЛIOUЧЕНМ K ДБIMOXOу
- Пар удалаятся черз дыIMOXOD, КOTорьй ппкрелен К сеДиНITEЛьнОг FOLOBKE BblTЯЖК.
ДиamEtр дIMoxOJa DoJIxHe6bITb paBHe DnAmEtpy coeINHtIELBOrO KOIbua. To6bl BO3dYx 6e3 npo6JIem ydaJIaJcR N3 NOMEueHnB TROPn3OHTaJIbHbIX KOHCTpyKUnx, Tpy6a DOJIxHa 6bITb CJIeRka HaKJIoHeHa BBePx (PpIMepHO Ha 10^
3.4.2 NcnoJb3OBAHne 6e3 NOKJIIOUChENK DbIMOXOy
- Bo3nyx Фильтугетсу Гльним Фильтуром И ВОЗврацаetсь В РOMEЧЕп.Угльньй Фильту ИСПОЛьзуETс,ecINВДOMeHETДbl-MOXOДa.
- Ecnn BbITJkKa 6yIeT NcNoJIb3OBAb7c8be3
- NOdkNlHouEHHa K DbIMOXOy, Heo6XoDnMo
- CHrTb DnBepTopb1 BHyTpNaNTepa Dbl-MOXOda.
CnTb aIIOHMnHeBbI pNtbp. YTObI yCTaHOBTb yToIbHbI pNtbp, paCNOJoxntb eO NO ceHTpy Ha IJIaCTIKOBoi qACTn C oEHX CTOpOH KOpNycBa BcHTIaTopa I PrNKpeNTb K PnKCaTopam. 3aKpeNTb pNtbp, NOBepHyB PnKCaTopbHaPaBO nIIN HaleBO. - YCTaHOBnTb aIOMMHHeBbI ΦnJIbTp.
3.5ПодкlioчениКДыIMOXOу
IomeCTb aadTep, KOtopb IocTaBJaTeTCBMECTe C BbITJXKOJ, B BeHTNJRAUHOHoe OTBepCTne, paCIOJIOXeHHoe B BepxHe cekuIN BblTJAK. Heo6xoIma Tpy6a dnaMaTePOM 120/150 MM. POnKJIIOHTb OINH KOHeu Tpy6b K aAdanTepy, a DpyrO KoHeu K DbIMOXOyD.
CneNyet npOBepntb, yTo6bl 3TN Dba coeHHeHnIy 6bln HaJeKHO 3aKepeIeHbI
TakIM o6pa3OM, yTO6bI He CMECTNIINc, KOrJa BbITJXKa pa6OtaET Ha MaKcIMaJIbHOI CKOpocTn. Heo6xOIMO npOBepntb, yTO6bI 3aDBHXK KN BHyTpN DbIMOXOJa FyHKUHNOHPOBaIN Pn3aT8KKe C 3aKIMOM. YcTaHOBnTB CoeINHtTeJbHyTOpy6y DbIMOXOJa Ha aJaANTep. EcnYcTaHOBnTB CoeINHInTeJbHyTO py6y DblMOxOJa BHyTpN aAdIaTepa, BCacbIBaHNr BO3dYxa He IpoN30JDeT, TAK KaK 3aDBNXKKn, KOToPbIE PpejTCTBYOT o6paTHOMy NOTOky BO3dYxa, OCTaHOTcR 3aKpbITbIMN.
3 UcTaHOBKa npn6opa
He peKOMeHdyetycNoKDJIHOaTbcKДbIMOXOdAm,CoEINHEHHbIM C PIIITOnI NII BbIXODbIMN BeHTnJIaUIOHHbIMN IaxTaMn. He cIeJyET noKJIIOUaTbcK TAKIM DblMOxOaAM. CoEINHEHnTpy6 DoJXHbI 6bITb KaK MoXHo 6oJIee KOpOTKnMN IN IMTeb MNHMajlbHOe KOJIueCTBO KOJIeH.
A:BO3dYXOBbIyCCKHoeOTBepCTneDbIMOXOda
B:3aIbVnKKn, npenTCTByHouNe o6paTHOMy nOtOKy BO3dyxa
C:Пл actikobаяТуба
3.5.1 CnCTema npeIoTbpaueHna o6paTHoro nToKa Bo3duxa (N-RV)
Korda BbITXKa pa6oTaeT, 3aDBNXKN 3aKpbI-Tbl, YTO6bl IpeIDTBpaTnTb IOnaDaHne N3BHe BO3MOXHbIX 3aNaXOB IN PbIJN.
(pncyHOK9)
(pncyHOK9)
(A):KHOIIa BkI./BbIK.I.OBcEueHnI
(B):KhoNka 1-ro ypoBnA
(C):KhoNka 2-ro ypoBnA
(D):KhoNka 3-ro ypoBnA
4.1 Lüφoboe ŒlektpOHHOe ynpabJIeHne Ha 3 ypoBnax
(A) KhoKa BkJ./BbIK.OCBeueHn: npHaKaTmN 3ToT KHOKN OCBeuaeTcBapOuHa nOBepxHOCTb.
Khonka (B): Пин Нжати NGHONK ycta-HaBJIINBaETcya ypoBeHb 1 cKOpocTn pa60TbI Bbl- TJAKKN.
He cIeNyET npene6peRaTb YnCTKoB BbITJxKKn Cpa3y nocLe JkapKn.
IЯ OUCNTKIN BHEUHeI NOBEPXHOCTN BByTJK Kn Heo6xOДIMO INCNoJIb3OBA Tb MryKHy TKaHb, CMOueHHyO XnDkMm MOIOUM CpeCDTBOM.
He cneNyET nCNoJIb3OBAt b a6pa3nBHbIe nnuZapaNaIOUeMaTePnaJIbI DnA YnCTKn BbITaKKN.
Moxho nCnoB3OBAt b KOMMepeeCKn IOCTyHbIe YNCTAUNe CpeCTBa IJRA NocToHHoM Cma3Kn I T. D., PnpJeepKINBaCb PpeDyPpeXDaHOuIX INCTpyKcH Na npOdyKTe. Yo6bI He NOUAPAanb t UeTKoI CTaJIbHOk Kopnyc, Heo6xoDIMO IpOTnPaTb eRo B TOM Je HApRaBHeHm CO CNeDM.
He cIeNyET IcNoIb3OBAtB YIcTЯIe CpeICTBa, CoIepXaIe COnJHyIO KcNlOTy, OTBeJIINBaTeIb IIN a6pa3nBhIe NpOuKNI, YTObIcoxpaHITb KaueCTBO NOBepXHOCTN PnIbOpa. CLeNyET IcNoIb3OBAtB TkaHb, CMOeHHUOBMbIbHO Bode, IIN CNeuaJIbHbI CnpE JnOuCTKn NOBepXHoCTe N3 HEPXaBEoUe CTaJI. ChrTa 3aunTHyIO PIIeHKy C BblTgKkN.

OctopoxHo!
Heco6JIIODeHnE INcTpyKuI IO OuNCtKe N 3aMeHe QINJBTpOB BbITJXKKMOKET PnIBeCTN K BO3-HNKHOBEHNO NOkapa.
B cnyuae ecn Heo6xOIMo nepeBe3TN npi- 6op:
Heo6xOJIMO coXpaHЯTb opuHaJIbHyU yNaKOBky BbITJxKn. IpeEBo3NtB BbITJxKkCNeIyET B ee opuHaJIbHOY yNaKOBKe, pIeIdepXuBaJaCb TpaHCnOpTHoM MapKnupOBKn Ha yNaKOBKe.
B clyueae oTcyTCTBnOpunHaJIbHOH ynaKOBKn:
He cIeJeT KlaCTb NOCTOpOHnE PpeIMTeBHa BbITaXKky;
- cIeIyTe OBe3OpaNTb BHeUHIO NOBepX-HoCTb OT yJaPOB;
- CNeIyE t yNaKOBaTb BbITaXKy TaKIM O6pa30M, UTo6bl He NIOBpeINtB ee BO BpEmr TpaH-CnOpTnPOBKN.
5.4 3aMeHa JIaMn
OTcoeHnHTb BbITaKky OT pO3eTKn 3JIeKTpocetN.
JaHHbI npH6Op oChaueH raIoreHHbIMn JAMnMoUHOCTbO 50 Bt.
ДяЗamHeI rAIOReHHbIX JAMN CJIeDyET HaJXaTb JAMNBy BHN3 OT 3aHNeY acTn DePkaTeJЯambl, 3aTeM NOBepHyTb JAMNpy IpOTuB YacoBOI CTpeJIKN Ha 1/4 NOBOPoTa N BbIHyTb ee.
YcTaHOBky HOBOJ JAMNBI BbIIOJIHЯTb B 06paTHOM IopRJaKe.
Плимочаиме.
JaMtbI MoXHO npNo6peCTn y aBTopn3OBaHHbIX TEXHnuecknx CneuaJIncTOB.