
SCREENY - Cordless phone THOMSON - Free user manual and instructions
Find the device manual for free SCREENY THOMSON in PDF.
| Product Type | Corded telephone with LCD display and advanced functions |
| Brand | Thomson |
| Model | SCREENY (TH-525FBLK / TH-525FWHT) |
| Power Supply | 3 AA batteries (for display and settings); works without batteries to make calls |
| Display | LCD screen with contrast adjustment (8 levels) |
| Main Functions | Incoming/outgoing call, hands-free, redial, incoming/outgoing call list, FAV (speed dial) and SOS keys, volume amplifier (+10 dB), flash (R), pause |
| Memory | Up to 9 speed dial numbers (keys 1-9); 1 SOS number |
| Settings | Date/time, area code and international prefix, LCD contrast, call mode (tone T or pulse P) |
| Volume | Ringer volume (off, medium, high); hands-free speaker volume (low, medium, high); handset earpiece amplifier |
| Connections | RJ11 LINE port for telephone line; RJ11 EXT port for second telephone |
| ADSL Compatible | Yes, with ADSL filter (not supplied) |
| Package Contents | Base, handset, spiral cord, telephone cable, user manual |
| Care and Cleaning | Dry, soft, lint-free cloth; no aggressive products |
| Safety | Indoor use only; do not expose to moisture; do not disassemble; do not use during a storm or near a gas leak |
| Spare Parts and Repairability | Contact sparesbrun@logisav.fr for parts (telephone socket free on request) |
| General Information | Complies with LVD 2014/35/EU and EMC 2014/30/EU directives; recycling according to WEEE 2012/19/EU directive |
| Dimensions (approx.) | Base approx. 20 x 15 x 6 cm; handset approx. 22 x 5 x 4 cm |
| Weight (approx.) | Approx. 500 g (with batteries) |
Frequently Asked Questions - SCREENY THOMSON
User questions about SCREENY THOMSON
0 question about this device. Answer the ones you know or ask your own.
Ask a new question about this device
Download the instructions for your Cordless phone in PDF format for free! Find your manual SCREENY - THOMSON and take your electronic device back in hand. On this page are published all the documents necessary for the use of your device. SCREENY by THOMSON.
USER MANUAL SCREENY THOMSON
For instruction manual in another languages, check online at http://www.thomsonphones.eu
François 1
English 13
Espanol 20
Nederlands 27
Deutsch 34
Contenu
Mise en route
Important safety instructions
To reduce the risk of fire, electric shock and injury, always observe the following basic precautions when using your telephone:
- This appliance is intended for indoor use only.
- Do not expose your telephone to moisture and avoid contact with liquids.
- To prevent electric shock, do not disassemble the handset or the telephone base.
- Do not use the telephone in the vicinity of a gas leak.
- Clean your telephone with a dry, soft, lint-free cloth. Do not use any cleaning agents or solvents, especially aggressive ones.
- To prevent electric shock, do not use your telephone during a thunderstorm.
- Batteries must be disposed safely. Deposited in collection boxes provided (ask your dealer) in order to protect the environment.
Package contents
| Quantity | |
| Coreded phone | 1 |
| Coiled cable | 1 |
| Telephone cable | 1 |
| User manual | 1 |
Important:
YOU ARE USING A BROADBAND OR ADSL LINE
To ensure proper functioning of your telephone, you need to install a filter (not supplied) between the telephone wall jack and the telephone base. Without this filter, you may experience interference to the phone and loss of broadband signal. Consult the instructions to install the filter properly.
Installation
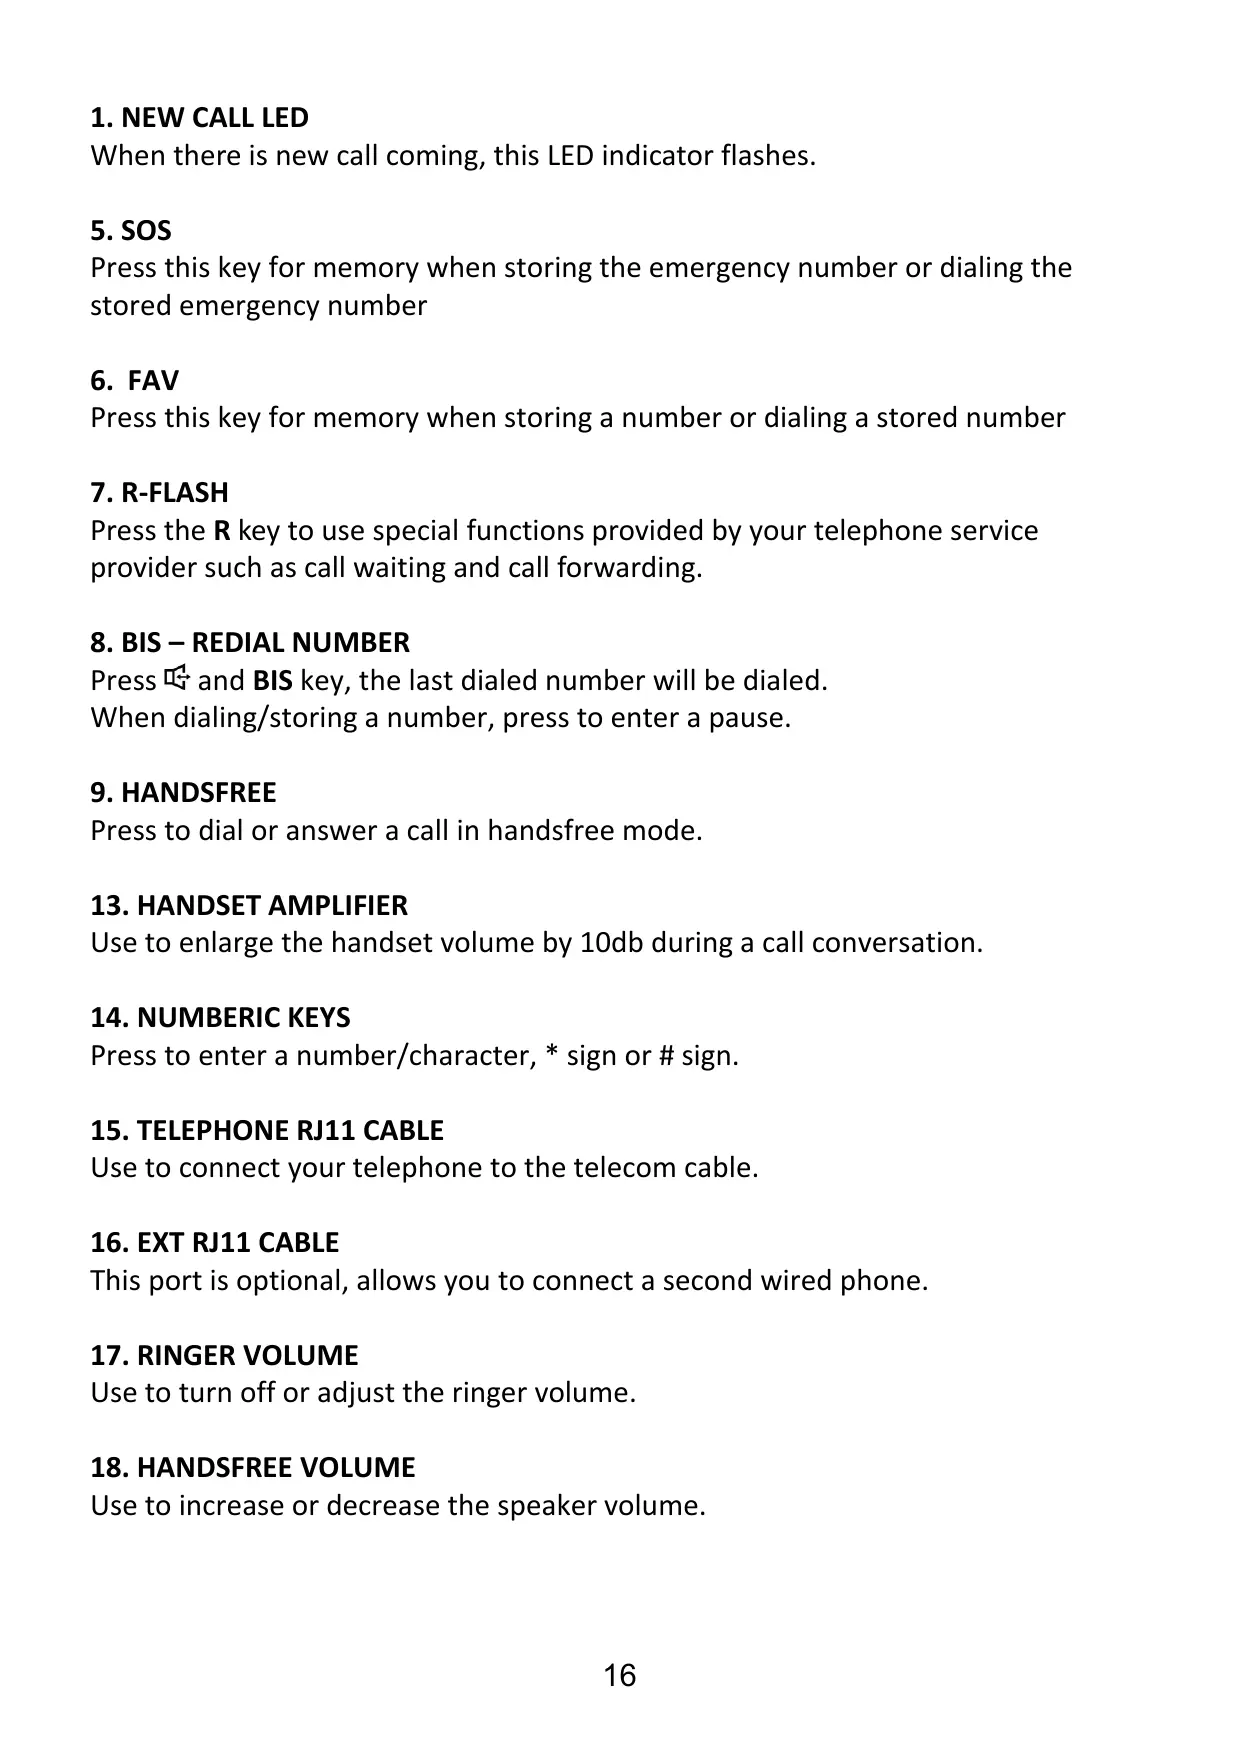
- Insert one end of the RJ11 cable into LINE jack of the phone, the other connect with local network.
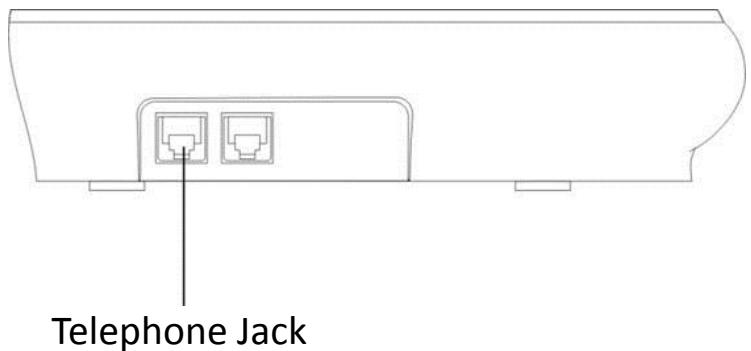
- Use coiled cord to connect the base and handset. The Jack is located on the left side of the unit. Do not connect to the EXT jack on the rear of the unit.
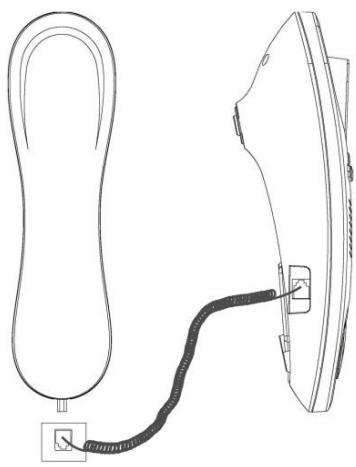
- The installation of the battery
This product requires 3 AA batteries to keep the display on for the setting. Without the batteries, it is always possible to dial a number by using the telephone wire.
Getting to know your phone
-
NEW CALL LED
-
R-FLASH
-
HANDSET AMPLIFIER
-
DELETE
-
BIS - REDIAL NUMBER
-
NUMBERIC KEYS
-
DIAL OUT RECORD
-
HANDSFREE
15.TELEPHONE RJ11 CABLE
-
DOWN
-
LCD DISPLAY
-
EXT RJ11 CABLE
5.SOS
-
UP
-
RINGER VOLUME
6.FAV
-
SET
-
HANDSFREE VOLUME
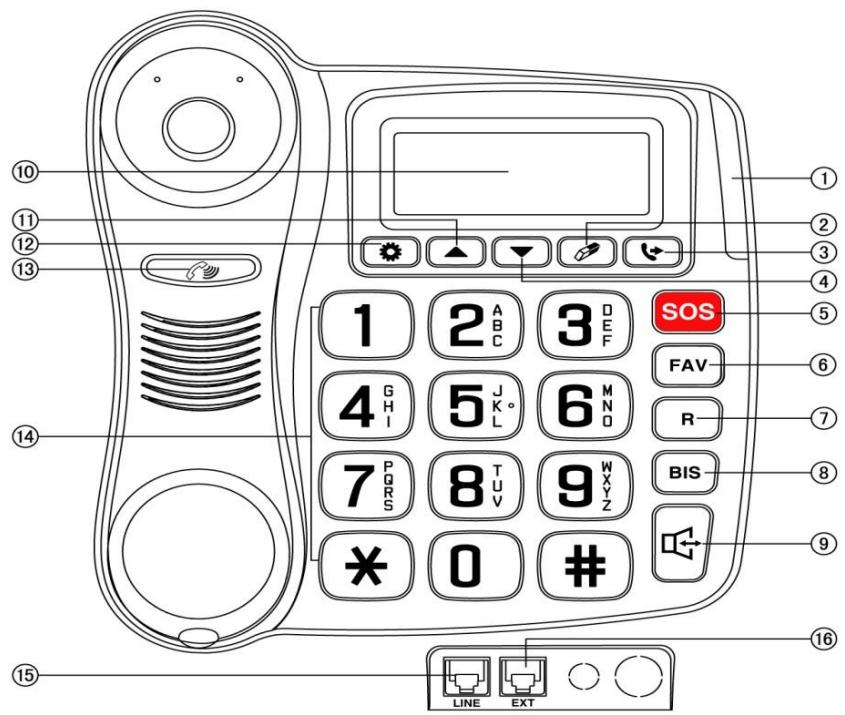
1. NEW CALL LED
When there is new call coming, this LED indicator flashes.
5. SOS
Press this key for memory when storing the emergency number or dialing the stored emergency number
6. FAV
Press this key for memory when storing a number or dialing a stored number
7. R-FLASH
Press the R key to use special functions provided by your telephone service provider such as call waiting and call forwarding.
8. BIS - REDIAL NUMBER
Press and BIS key, the last dialed number will be dialed. When dialing/storing a number, press to enter a pause.
9. HANDSFREE
Press to dial or answer a call in handsfree mode.
13. HANDSET AMPLIFIER
Use to enlarge the handset volume by 10db during a call conversation.
14. NUMBERIC KEYS
Press to enter a number/character, * sign or # sign.
15. TELEPHONE RJ11 CABLE
Use to connect your telephone to the telecom cable.
16. EXT RJ11 CABLE
This port is optional, allows you to connect a second wired phone.
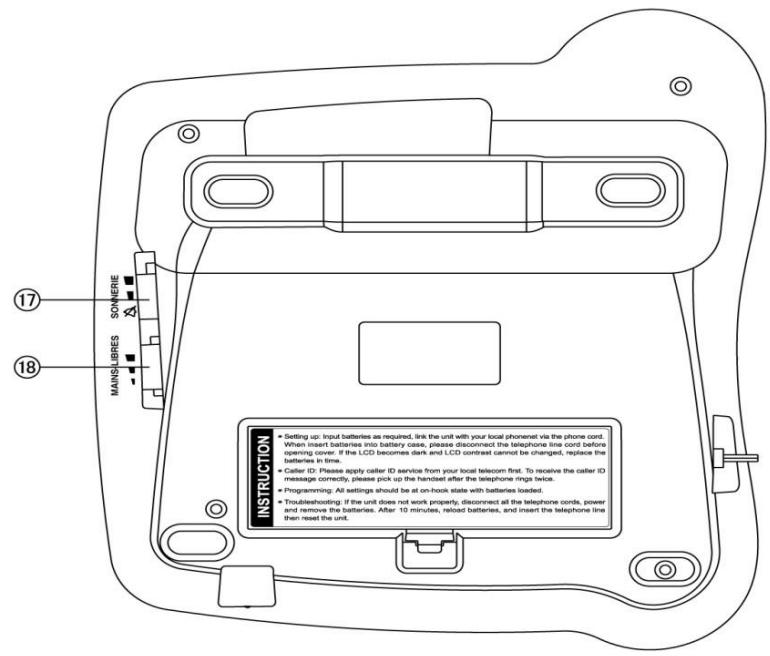
17. RINGER VOLUME
Use to turn off or adjust the ringer volume.
18. HANDSFREE VOLUME
Use to increase or decrease the speaker volume.
Store the number in two-touch memory
- Pre-dial the desired number or checking incoming and outgoing number that you want to store.
- Press FAV key. Press one of digit keys (0-9).
Make a call from two-touch memory
- In on-hook state, press FAV key + digit key (0-9) key, LCD displays the stored number, press or BIS key or pick up the handset to dial it out directly, or press BIS key twice to dial out number ahead with long distance code.
- In off-hook state, press FAV key + digit key (0-9) key, the stored number will be dialed out.
SOS KEY FUNCTION
Store the number in SOS key
- Pre-dial the desired number or checking incoming and outgoing number that you want to store.
- Press FAV key, then press SOS key.
Dial out SOS number
- In idle state, press SOS key, the stored number will be dialed out.
- In on-hook state, press FAV key, then press SOS key, LCD displays the stored number, press or BIS key or pick up the handset to dial it out directly, or press BIS key twice to dial out number ahead with long distance code.
Important note: do not set your numbers of emergency to emergency services (hospitals, firefighters) but rather to your loved ones, or to a hotline number. Indeed, an unintentional emergency call is unnecessarily for the emergency services and your responsibility may be engaged.
HANDSET VOLUME AMPLIFIER FUNCTION
- During a call conversation, press once to increase the volume earpiece by 10dB.
- Press key again. The handset volume will return to previous level.
Remark: The handset volume will return to the previous volume level if there is a new call.
ADJUSTING RINGER VOLUME
Slide SONNERIE to switch the ringer to OFF, middle and high.
ADJUSTING SPEAKERPHONE VOLUME
Slide MAINS-LIBRES to switch the speaker volume to low, middle and high. Remark: During hands-free mode, press or key continuously, LCD display VOL 1, VOL 2, VOL 3 and VOL 4, but this is invalid to adjust speaker volume.
Setting date & time
- In on-hook state, press key, LCD displays SET 1 DATE and press key again, the value of year flashes.
- Press or key to edit the year.
- Press key to confirm and enter the next value month setting.
- Repeat the above steps for month setting.
- Repeat the above steps for date and time setting.
Adjusting LCD Contrast
- In on-hook state, press key and press key three times, LCD displays SET 4 LCD, press key again, LCD displays LCD 5
- Press or key to adjust the LCD contrast, total 8 levels can be selected.
- Press key to confirm and exit.
Shortcut key: At on-hook state, press R key to enter LCD contrast setting directly, then press R key continuously to adjust the LCD contrast
Full instruction manual online
Visit the following internet website to access this device's instruction manual. http://www.thomsonphones.eu
EU Declaration of conformity
This Wired telephone complies with the essential requirements and other provisions of LVD Directive 2014/35/EU & EMC Directive 2014/30/EU.

The European directive 2012/19/EU on Waste Electrical and Electronic Equipment (WEEE), requires that old household electrical appliances must not be disposed in the normal unsorted municipal waste stream.
Old appliances must be collected separately in order to optimize the recovery and recycling of the materials they contain and reduce the impact on human health and the environment. The crossed out "wheeled bin" symbol on the product reminds you of your obligation, that when you dispose of the appliance it must be separately collected. Consumers should contact their local authority or retailer for information concerning the correct disposal of their old appliance.
Imported by ADMEA, 12 Rue Jules Ferry, 93110 Rosny sous bois, France.
THOMSON is a trademark of Technicolor SA used under license by ADMEA
- Contenu
- Mise en route
- Important safety instructions
- Package contents
- Important:
- YOU ARE USING A BROADBAND OR ADSL LINE
- Installation
- Getting to know your phone
- NEW CALL LED
- SOS
- FAV
- R-FLASH
- BIS - REDIAL NUMBER
- HANDSFREE
- HANDSET AMPLIFIER
- NUMBERIC KEYS
- TELEPHONE RJ11 CABLE
- EXT RJ11 CABLE
- RINGER VOLUME
- HANDSFREE VOLUME
- Store the number in two-touch memory
- Make a call from two-touch memory
- SOS KEY FUNCTION
- Store the number in SOS key
- Dial out SOS number
- HANDSET VOLUME AMPLIFIER FUNCTION
- ADJUSTING RINGER VOLUME
- ADJUSTING SPEAKERPHONE VOLUME
- Setting date & time
- Adjusting LCD Contrast
- Full instruction manual online
- EU Declaration of conformity
Brand : THOMSON
Model : SCREENY
Category : Cordless phone