
HI WAY 2 - Car seat BRITAX - Free user manual and instructions
Find the device manual for free HI WAY 2 BRITAX in PDF.
User questions about HI WAY 2 BRITAX
0 question about this device. Answer the ones you know or ask your own.
Ask a new question about this device
Download the instructions for your Car seat in PDF format for free! Find your manual HI WAY 2 - BRITAX and take your electronic device back in hand. On this page are published all the documents necessary for the use of your device. HI WAY 2 by BRITAX.
USER MANUAL HI WAY 2 BRITAX
natural_image
Illustration of a gray baby car seat with a black seatbelt and red cushion (no text or symbols)
text_image
Warning sign with red exclamation mark inside a triangle, commonly used to indicate caution or hazard.You must ensure that you follow these instructions carefully and correctly. If this seat is not fitted securely and your child is not strapped in correctly, your child and other passengers are at serious risk of injury in the event of an accident
Please read this User Guide carefully BEFORE trying to install your child car seat.
The Hampshire Trading Standards Authority and Britax advise that child car seats should not be bought or sold second-hand. Please dispose of your child seat safely. Do not sell or pass it on.
After an accident, the child seat and your car seat belts should be replaced. Although they may look undamaged, if you were to have another accident the child seat and your car seat belts may not be able to protect your child as well as they should.
No child seat is escape proof
Harness systems cannot be designed to be completely “child proof” and yet comply with the legal requirements of European Standard ECE R44. The harness must be fastened and adjusted correctly at all times and children encouraged to remain within the harness system.
Looking after your child seat
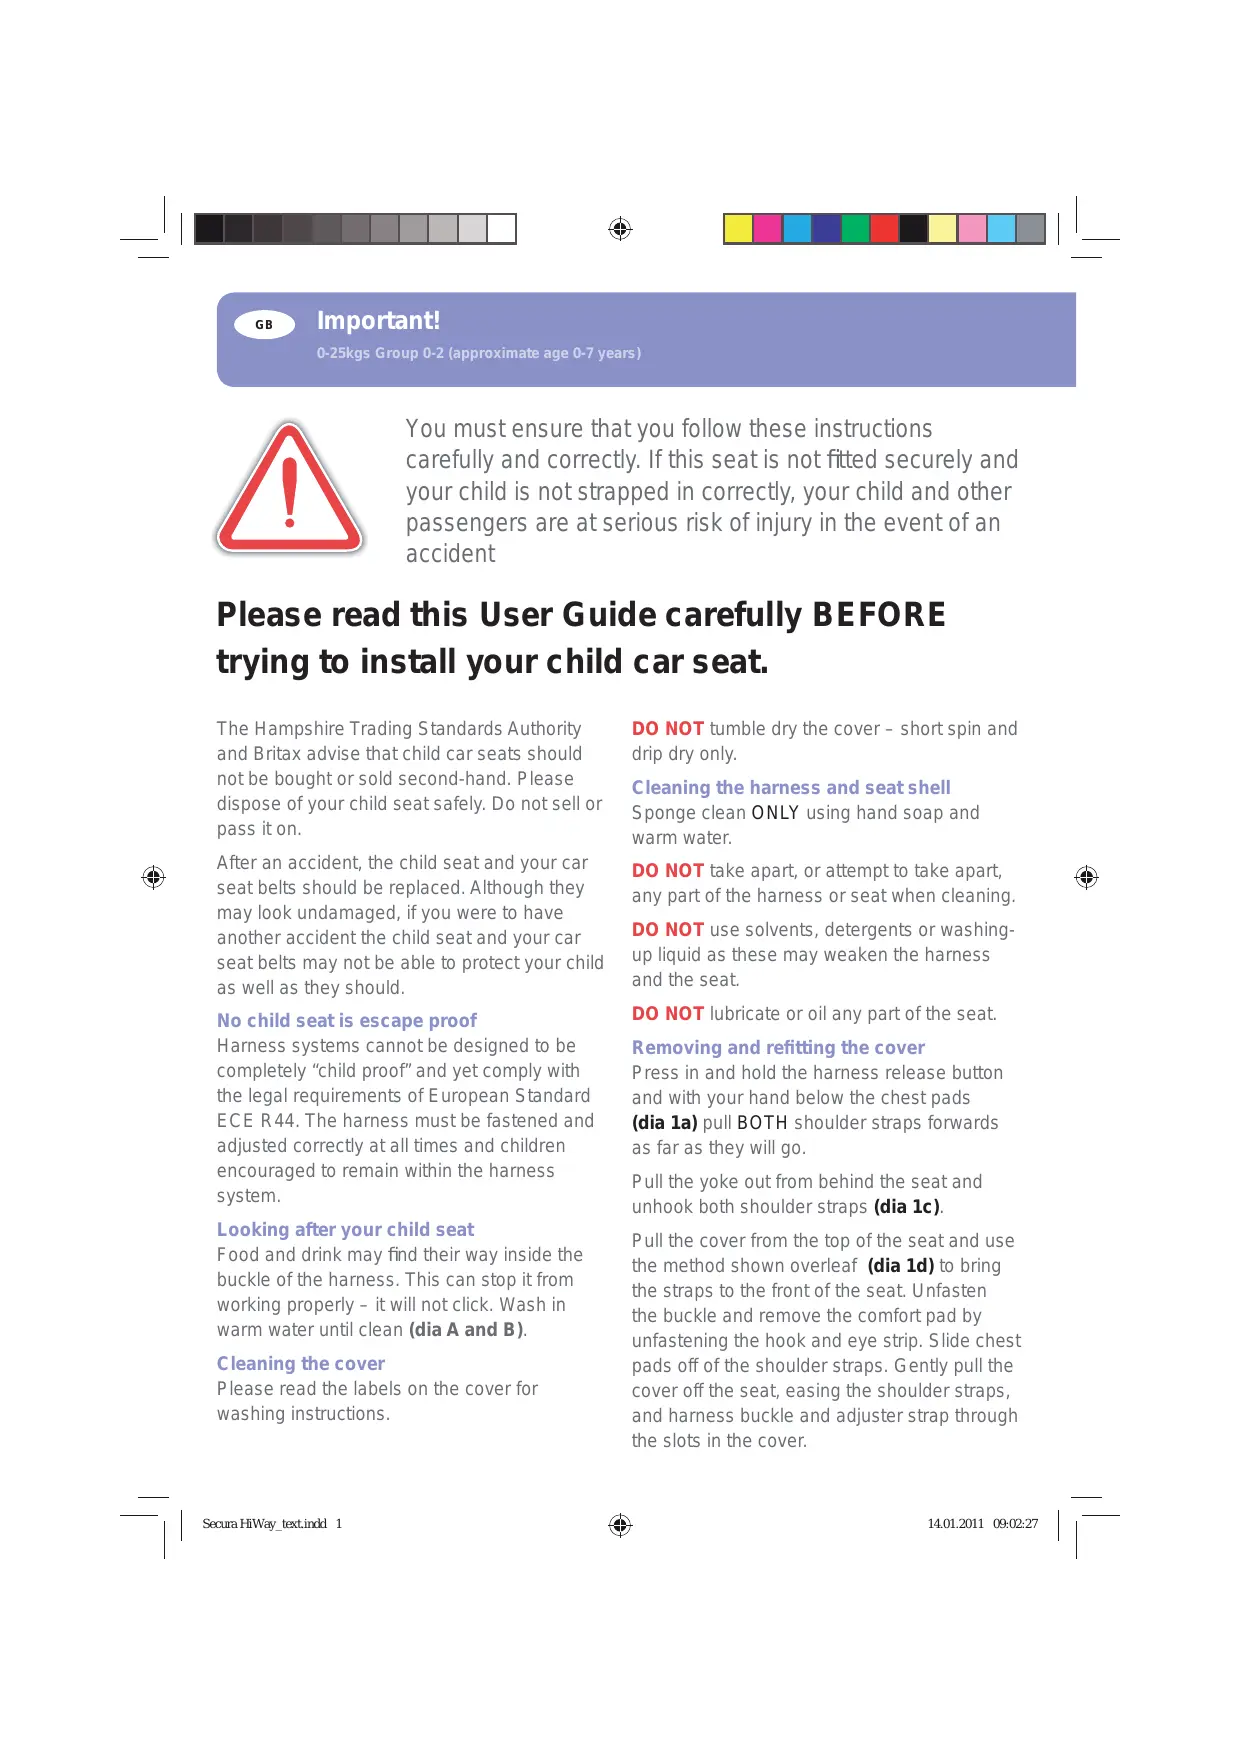
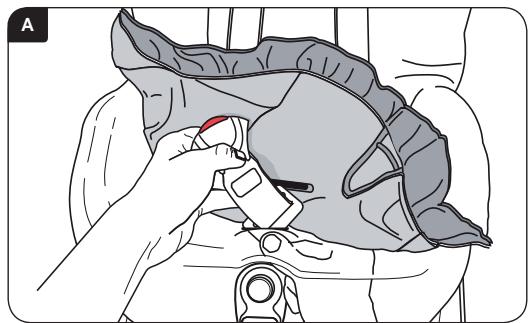
Food and drink may find their way inside the buckle of the harness. This can stop it from working properly – it will not click. Wash in warm water until clean (dia A and B).
Cleaning the cover
Please read the labels on the cover for washing instructions.
DO NOT tumble dry the cover – short spin and drip dry only.
Cleaning the harness and seat shell
Sponge clean ONLY using hand soap and warm water.
DO NOT take apart, or attempt to take apart, any part of the harness or seat when cleaning.
DO NOT use solvents, detergents or washing-up liquid as these may weaken the harness and the seat.
DO NOT lubricate or oil any part of the seat.
Removing and refitting the cover
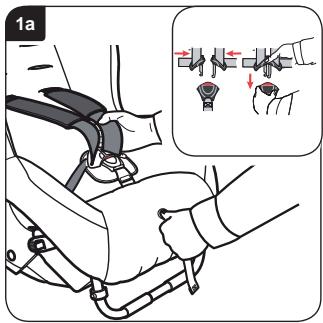
Press in and hold the harness release button and with your hand below the chest pads (dia 1a) pull BOTH shoulder straps forwards as far as they will go.
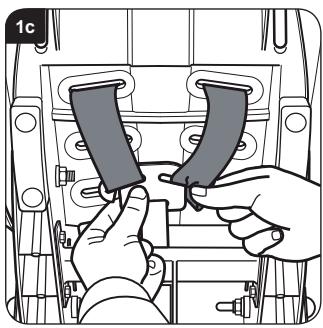
Pull the yoke out from behind the seat and unhook both shoulder straps (dia 1c).
Pull the cover from the top of the seat and use the method shown overleaf (dia 1d) to bring the straps to the front of the seat. Unfasten the buckle and remove the comfort pad by unfastening the hook and eye strip. Slide chest pads off of the shoulder straps. Gently pull the cover off the seat, easing the shoulder straps, and harness buckle and adjuster strap through the slots in the cover.
To refit the cover, use the method shown overleaf (dia 1d).
Make sure the straps are not twisted.
IMPORTANT – The cover and chest pads are a safety feature. NEVER use the child seat without them. Don’t put your child’s safety at risk by using other makes of replacement cover, they could stop the child seat from protecting your child as well as it should.
A replacement cover is available from your Britax stockist or contact Britax Customer Service Department on +46 8564 841 00.
Guarantee
All Britax products are carefully designed, manufactured and tested. However, should this product prove faulty within 24 months of purchase due to a materials or manufacturing fault please return it to the original place of purchase. We will then, at our discretion, either repair it free of charge or replace it with the same or a similar product.
For guarantee purposes proof of purchase will be required. We recommend that you retain your receipt and attach it to this user guide and store in the seat.
Britax does not accept liability for damage arising from abuse, misuse or negligence. This guarantee is not transferable and therefore does not apply to second-hand products.
Your statutory rights are not affected by this guarantee.
If in doubt
Not all car seats fit all cars. For advice as to the suitability of this restraint for your car please use on our website at www.britax.eu, call our Customer Service Helpline on +46 8564 841 00 or email helpline@uk.britaxeurope.com.
natural_image
Medical illustration showing a hand adjusting a medical device on a patient's head (no text or symbols present)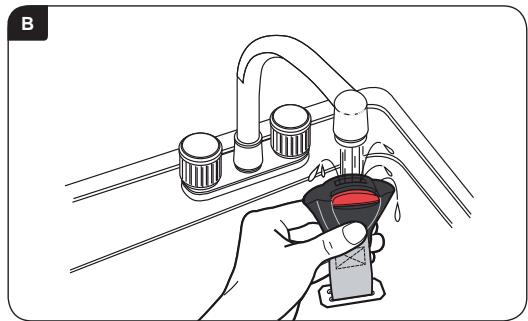
natural_image
Illustration of a hand holding a water tap with a red liquid level, no text or symbols present
text_image
Diagram showing traffic congestion with no sign, smiling faces, and sad faces on a car aheadEXTREME HAZARD!
DO NOT under any circumstances use a rearward facing child seat on a passenger seat fitted with an active airbag.
DO NOT use a forward facing child seat on a passenger seat fitted with an active airbag unless your vehicle manufacturer confirms that it is safe.
DO NOT use the child seat on side facing or rearward facing vehicle seats.
DO NOT use anything, such as a cushion or coat, to raise the child seat off the passenger seat. In an accident the child seat and your car seat belts would not be able to protect your child as well as they should.
DO NOT use the child seat in the home. It has not been designed for home use and should only be used in your car.
DO NOT attempt to dismantle, modify or add to any part of the child seat or change the way its harness or your car seat belts are made or used. The official approval is no longer valid if modifications are made.
NO modifications may be made to the child seat other than by the manufacturer.
DO NOT leave children alone in your car, even for a short time.
DO NOT leave loose objects, such as luggage or books, in the back of your car. They must be properly secured, because if you have to stop your car suddenly loose objects will keep moving and can then cause serious injuries. Large and heavy loose objects are a particular risk.
DO NOT leave folding passenger seats unlatched. If you have to stop your car suddenly a loose seat back could injure your child.
DO NOT allow children to play with or adjust the child seat.
DO keep this user guide in the user guide storage slot.
DO cover the child seat if your car is left in direct sunlight. Fittings can become hot to touch in sunny weather and the cover may become faded.
DO make sure that the child seat does not become trapped by a folding passenger seat or in the door of your car.
DO make sure that you adjust the harness to fit the clothes your child is wearing before each journey – a fitting for winter clothes may be too slack for a child wearing summer clothes.
DO store the child seat in a safe place when it is not being used. Avoid placing heavy objects on top of it and do not store near direct heat sources or in direct sunlight.
DO always keep the child seat secure, even if it is not being used by your child.
DO make sure that all occupants in the vehicle have their seat belts fastened.
Britax, whilst taking into account child car seat contact with vehicle seats throughout the development of new products, cannot accept responsibility for damage occurring to vehicle seats or seat belts.
IMPORTANT – The child seat MUST only be used with a lap or a lap and diagonal seat belt (approved to UN/ECE Regulation no. 16 or other equivalent standards).
text_image
Diagonal Lap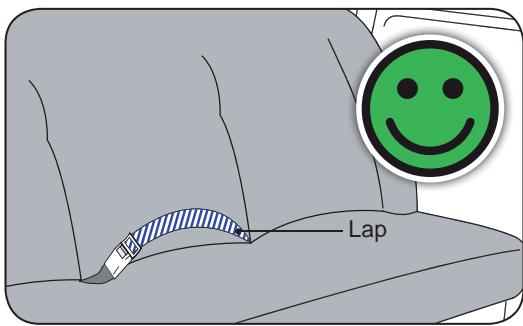
text_image
Lap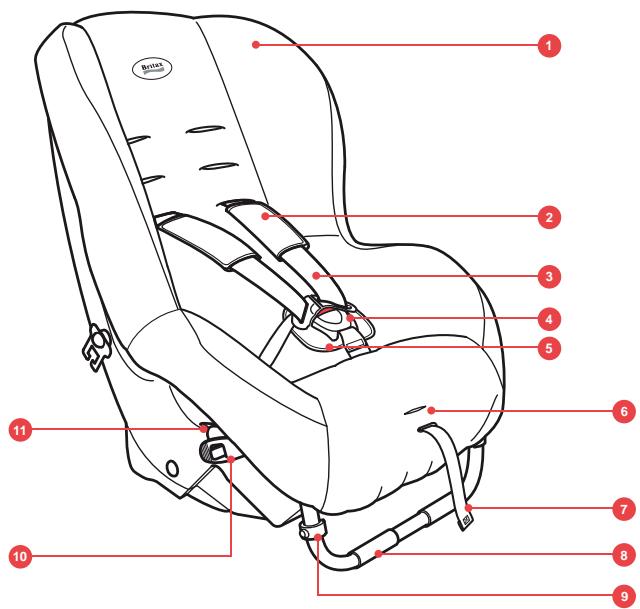
text_image
1 2 3 4 5 6 7 8 9 10 0 BOTA SARAT SARAT- Seat cover
- Shoulder pads
- Harness straps
- Harness buckle
- Comfort pad
- Harness adjuster button
- Harness adjuster strap
- Support leg
- Support leg clip
- Lock-off arm
- Belt routing slot
natural_image
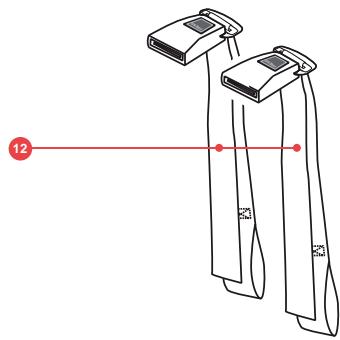
Line drawing of two fabric or garment items with a red measurement line and number 12 (no text or symbols on the items)- Tether straps
- Tether strap buckle tongue
- Footprop tether
- Shoulder strap slots
- User guide storage (not shown)
- Yoke (hidden)
- Footprop release buttons
- Footprop
text_image
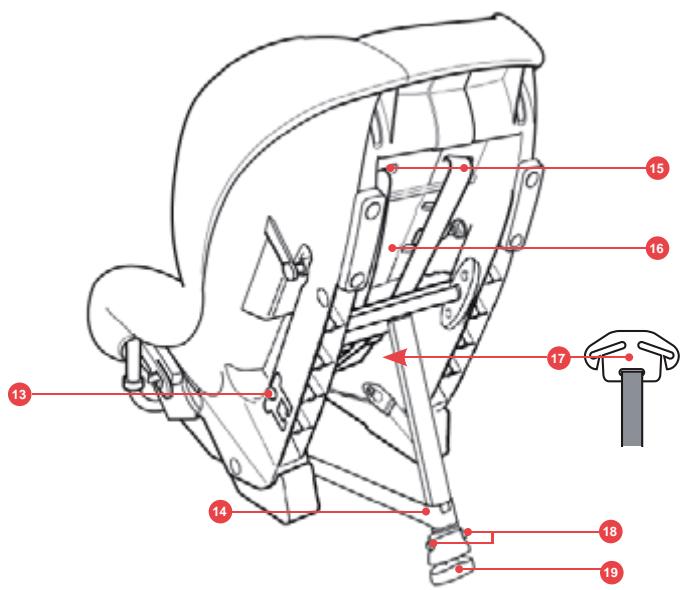
Technical diagram of a car seat assembly with numbered parts and red annotations indicating specific components.1. Adjusting the child seat to suit the weight of your child
IMPORTANT - This child seat has been designed to perform safely and independently of further external restraint.
text_image
1aAdjusting the Harness
Press in and hold the harness release button and with your hands below the chest pads (dia 1a) pull BOTH shoulder straps forward as far as they will go. Unfasten the buckle by pressing the red harness buckle button. Fit the harness around your child. To fasten the buckle; first fit the two upper sections together (inset), then push them firmly into the lower section until you hear a positive click. Gently pull the harness up to tighten the lap sections to fit. Pull the adjuster strap forward making sure the harness is a comfortable but FIRM fit around your child. Make sure the harness straps are not twisted.

text_image
1b 0-25kgIMPORTANT - You must adjust the height of the shoulder straps to the correct position for your child BEFORE installing the child seat in a car. The chest pads must sit high on the child's shoulders as shown (dia 1b).
The shoulder straps MUST be threaded through the slots in the cover and shell nearest the top of your child's shoulders. If in any doubt use the slot just below the shoulder rather than above it (dia 1b).
Once you reach the top slots your child may continue to use the seat until their eye line is above the top of the seat shell.
natural_image
Illustration of hands installing or adjusting a mechanical component with two blades (no text or symbols visible)Changing the height of the shoulder straps
To loosen the harness, press in and hold the harness release button and with your hand below the chest pads (dia 1a) pull BOTH shoulder straps forwards as far as they will go. Pull the yoke out from behind the seat and unhook one shoulder strap (dia 1c). Pull the cover from the top of the seat so that you can see the slots in the seat shell. Pull the shoulder strap through to the front of the seat.
natural_image
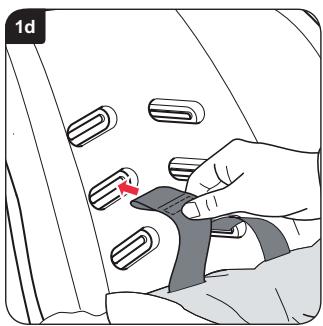
Illustration of a hand adjusting a seatbelt with a red arrow indicating the adjustment (no text or symbols present)Pass the shoulder strap though the chosen slot and hook the shoulder strap back onto the yoke (dia 1d). Repeat with the other shoulder strap.
Make sure that the straps are not twisted.
natural_image
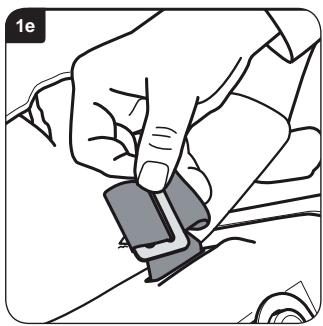
Illustration of a hand using a small mechanical component to press or install a piece, no text or symbols presentRotate the exposed metal strap adjuster (dia 1e) and push it through the slot in the cover and through to the underside of the seat shell. Ensure that it rests horizontally so that it cannot be pulled back through the shell. Pull on the buckle to make sure that it is secure and that the strap adjuster does not come back through.
text_image
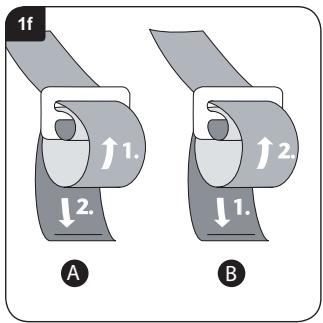
1f ↑1. ↓2. A ↑2. ↓1. BAdjusting the crotch strap
IMPORTANT - The buckle should always be positioned low down on your child's body. You must adjust the crotch strap to the correct length for your child BEFORE installing the child seat as it cannot be adjusted in the car.
a. The crotch strap should only be extended when normal harness adjustment is not enough, i.e. shoulder straps are at full extension.
b. Always return the crotch strap to its original, shorter length when using the seat with a smaller baby.
c. DO NOT attempt to remove the crotch strap from the adjuster. Adjustment is made by feeding the crotch strap through the adjuster (dia 1f).
Press the harness adjuster tab with one hand. With your other hand pull the shoulder straps forward as far as possible to loosen the harness.
The adjuster at the end of the crotch strap is found under the front edge of the child seat. To change the length of the crotch strap thread it through the adjuster in the direction of the arrows shown (dia 1f).
A – Shortening crotch strap
B – Lengthening crotch strap
2. Installing your child seat (rearward facing) in rear side seat
IMPORTANT - This child seat has been designed to perform safely and independently of further external restraint.
natural_image
Illustration of two car seats with a red rotation arrow indicating movement (no text or symbols)IMPORTANT - The child seat MUST only be used with a lap and diagonal seat belt.
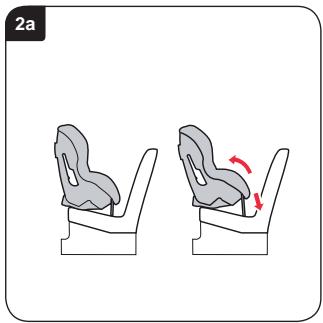
The child seat has an adjustable support leg (dia 2a). The smaller the child the more reclined the seat must be.
natural_image
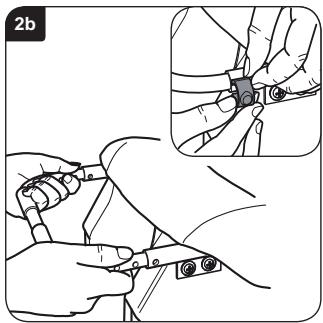
Illustration of hands using a tool to adjust or install a cable, with an inset showing magnified detail (no text or symbols)The larger the child the more upright the seat must be. To change the position (if required) pull the support leg clips off of either side and slide the telescopic leg in or out (dia 2b). Once satisfied with the position of the support leg, refit the clips in the holes (inset). Make sure the hole positions chosen are the same on both sides.
natural_image
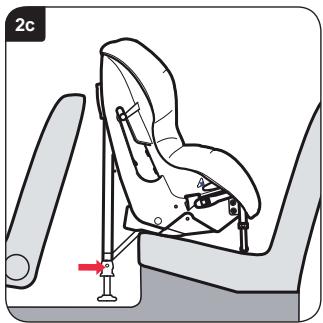
Diagram of a car seat assembly with a red arrow indicating a specific seat (no text or labels present)Place the child seat rearward facing on the car seat. After installation the gap between the seat in front and child seat should be a minimum of 10mm. It must NOT rest against the car seat. If it does then adjust the car seat in front without making the driver or passenger sit in an uncomfortable position. If not try another seating position in the car (dia 2c).
Extend the footprop fully by pressing the two release Buttons. Make sure that the footprop tether brackets are facing forwards and that the straps are not twisted. Lower the footprop and adjust the height so that it is within approximately 30mm of the floor
(dia 2c). Use the ruler printed on the back page of this manual to get the correct distance from the footprop to the floor.
natural_image
Top-down architectural sketch of a vehicle showing structural components (no text or symbols)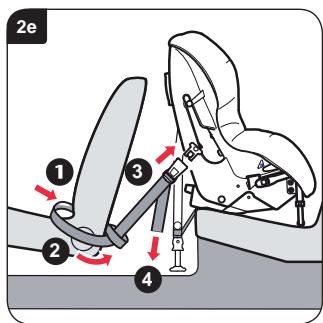
text_image
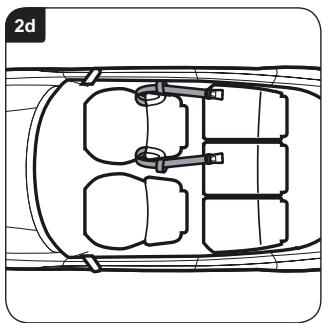
2e ① ② ③ ④Slide the loop ends of the tether straps between the front car seat and back as shown (dia 2d & ① dia 2e). Bring the buckle ends of the tether straps around the outside of the car seat and feed through the loops ②. Snap the buckles of the tether straps onto the tongues on the sides of the child seat ③. Provisionally tighten the tether straps by pulling the loose ends downwards ④.
natural_image
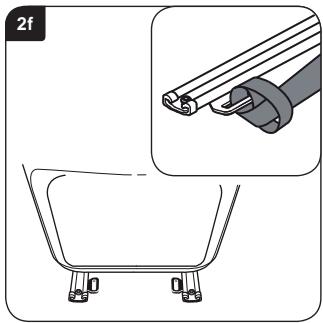
Diagram showing a bicycle seat with four legs and a close-up of a cable being inserted (no text or symbols)If your car is equipped with a runner loop on the seat runners, these may be used as an alternative (see detail 2f).
IMPORTANT - Do not install the tether straps using the Luggage loops.
natural_image
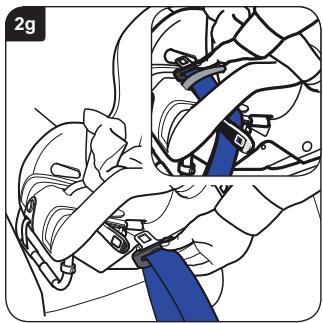
Illustration of a person adjusting a blue belt, showing mechanical components and hands (no text or symbols)Pull off sufficient lap and diagonal belt (approx.600-900mm). Open the lock-off arm on the side opposite the seat belt buckle. Pull back the child seat cover to reveal the crotch strap. Feed the belt through the lock-off belt guide and seat shell slot (dia 2g), up on to the top face of the seat base, behind the crotch strap (inset) and down through the slot on the other side of the child seat.
Open the other lock-off arm, feed the seat belt under the lock-off arm and attach the tongue into the buckle (dia 2h).
natural_image
Illustration of a person's seatbelt being adjusted for 2 hours (no text or symbols)
text_image
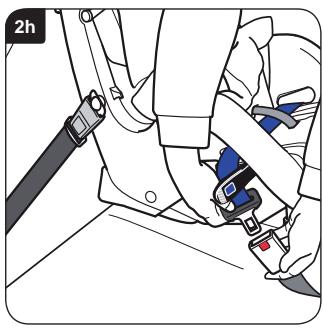
2iPull all of the seat belt slack through the child seat ensuring the seat belt is not twisted (dia 2i). When the belt is as tight as possible, close the lock-off arms on BOTH sides of the seat ensuring that they click into place.
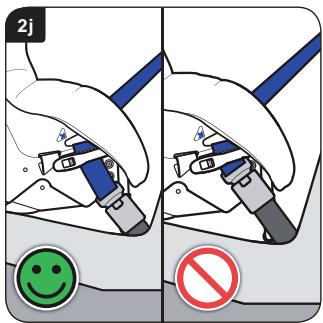
If the buckle now lies in the position marked as wrong with a ⏻ and the seat belt cannot be correctly tightened (dia 2j), try another seating position in the car.
text_image
2j 😊 No
natural_image
Illustration of a mechanical device with a lever and adjustment knob, no text or symbols presentFinally tighten the tether straps by pulling the loose ends downwards (dia 2k) until the footprop touches the floor. The footprop must rest on a solid floor - not on lids of storage boxes or similar.
Once firmly strapped in, test the child seat by trying to move it back and forth and side to side. If it seems loose, you must re-install until firmly installed.
DO NOT rest the back of the child seat against the driver or front passenger seats.
3. Installing your child seat (rearward facing) in rear middle seat
IMPORTANT - This child seat has been designed to perform safely and independently of further external restraint.
natural_image
Illustration of hands using a tool to adjust or install a small mechanical component, with an inset showing close-up details (no text or symbols present)IMPORTANT - The child seat can be used with either a lap or a lap and diagonal seat belt.
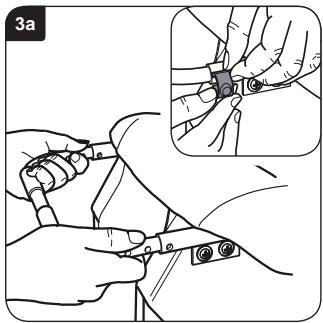
The child seat has an adjustable support leg (dia 3a). The smaller the child the more reclined the seat must be. The larger the child the more upright the seat must be. To change the position (if required) pull the support leg clips off of either side and slide the telescopic leg in or out (dia 3a). Once satisfied with the position of the support leg, refit the clips in the holes (inset). Make sure the hole positions chosen are the same on both sides.
natural_image
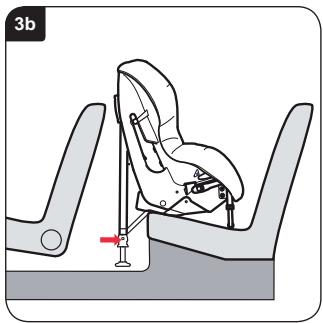
Illustration of a car seatbelt device with a red indicator finger and label '3b' (no text or symbols on the diagram itself)Place the child seat rearward facing with the back of the child seat positioned centrally between the driver and passenger seat.
Extend the footprop fully by pressing the two release Buttons. Make sure that the footprop tether brackets are facing forwards and that the straps are not twisted. Lower the footprop and adjust the height so that it is within approximately 30mm of the floor
(dia 3b). Use the ruler printed on the back page of this manual to get the correct distance from the footprop to the floor.
natural_image
Diagram of a vehicle's rear suspension system with four compartments and connecting rod (no text or labels)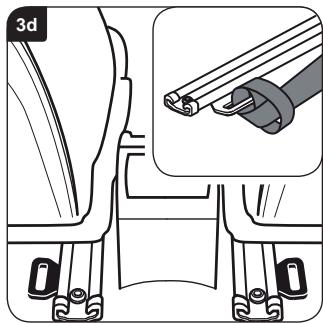
natural_image
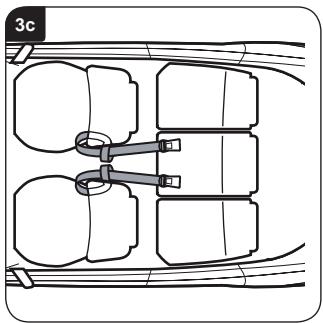
Technical diagram of a car seat assembly with a close-up inset showing cable fastening (no text or symbols)Loop a tether strap around both the front driver and passenger seat as shown (dia 3c).
If your car is equipped with a runner loop on the seat runners, these may be used as an alternative (see detail 3d).
IMPORTANT - Do not install the tether straps using the Luggage loops
text_image
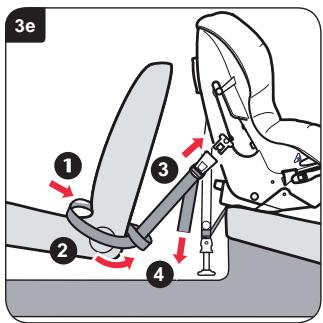
3e ① ② ③ ④Slide the loop ends of the tether straps between the front car seat and back ① as shown (dia 3e). Bring the buckle ends of the tether straps around the outside of the car seat and feed through the loops ②. Snap the buckles of the tether straps onto the tongues on the sides of the child seat ③. Provisionally tighten the tether straps by pulling the loose ends downwards ④.
natural_image
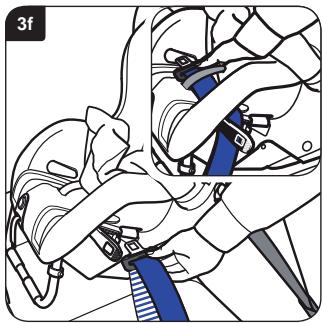
Illustration of a person wearing a helmet and harness, holding a blue tool (no text or symbols visible)Pull off sufficient lap and diagonal belt (approx.600-900mm). Open the lock-off arm on the side opposite the seat belt buckle. Pull back the child seat cover to reveal the crotch strap. Feed the belt through the lock-off belt guide and seat shell slot (dia 3f) on to the top face of the seat base, behind the crotch strap (inset) and down through the slot on the other side of the child seat.
natural_image
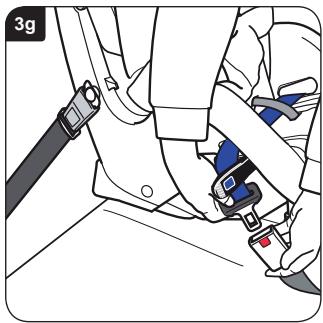
Illustration of a car seatbelt mechanism with blue and red buttons (no text or symbols)Open the other lock-off arm, feed the seat belt under the lock-off arm and attach the tongue into the buckle (dia 3g).
text_image
3h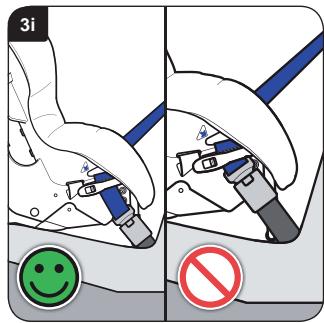
text_image
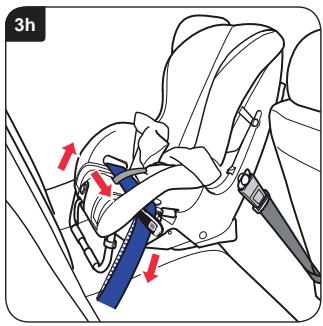
3i 😊 NoPull all of the seat belt slack through the child seat ensuring the seat belt is not twisted (dia 3h). When the belt is as tight as possible, close the lock-off arms on BOTH sides of the seat ensuring that they click into place.
If the buckle now lies in the position marked as wrong with a ⏻ and the seat belt cannot be correctly tightened (dia 3i), try another seating position in the car.
natural_image
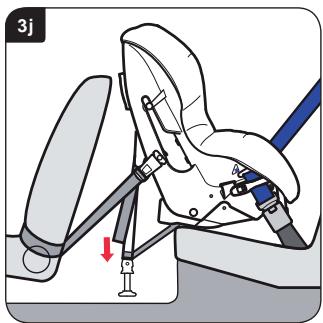
Mechanical assembly diagram showing a hand operating a seatbelt with a blue lever and red arrow indicating motion (no text or symbols)Finally tighten the tether straps by pulling the loose ends downwards (dia 3j) until the footprop touches the floor. The footprop must rest on a solid floor - not on lids of storage boxes or similar.
Once firmly strapped in, test the child seat by trying to move it back and forth and side to side. If it seems loose, you must re-install until firmly installed.
DO NOT rest the back of the child seat against the driver or front passenger seats.
4. Installing your child seat (rearward facing) in front seat
IMPORTANT - This child seat has been designed to perform safely and independently of further external restraint.
natural_image
Illustration of two car seats with red arrows indicating rotation (no text or symbols)IMPORTANT - The child seat MUST only be used with a lap and diagonal seat belt.
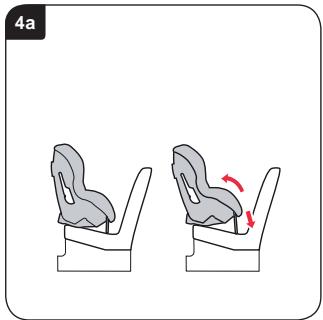
The child seat has an adjustable support leg (dia 4a). The smaller the child the more reclined the seat must be. The larger the child the more upright the seat must be.
natural_image
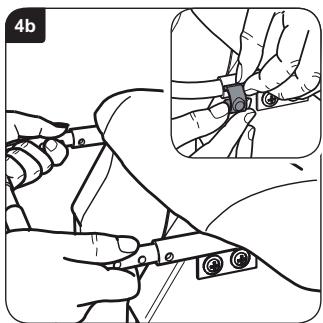
Illustration of hands using a tool to adjust or install a mechanical component, with an inset showing close-up details (no text or symbols present)To change the position (if required) pull the support leg clips off of either side and slide the telescopic leg in or out (dia 4b). Once satisfied with the position of the support leg, refit the clips in the holes (inset). Make sure the hole positions chosen are the same on both sides.
Push the vehicle front seat back to accommodate the child seat ensuring that any passenger directly behind will still be able to sit in a comfortable position. The larger your child, the more upright the sitting position should be.
natural_image
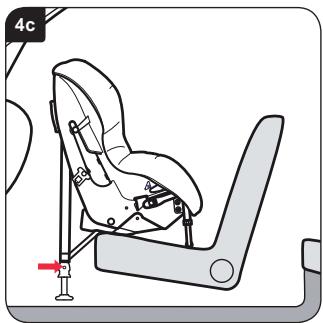
Line drawing of a car seat assembly with no text or symbolsPlace the child seat rearward facing and push firmly into the car seat (dia 4c).
IMPORTANT - DO NOT rest the back of the child seat on the dashboard or close to the windscreen.
Extend the footprop fully by pressing the two release Buttons. Make sure that the footprop tether brackets are facing forwards and that the straps are not twisted. Lower the footprop and adjust the height so that it is within approximately 30mm of the floor
(dia 4c). Use the ruler printed on the back page of this manual to get the correct distance from the footprop to the floor.
natural_image
Top-down schematic of a boat hull with multiple compartments and side seating (no text or labels)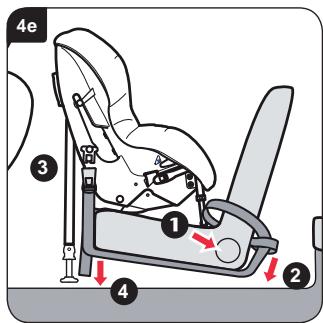
text_image
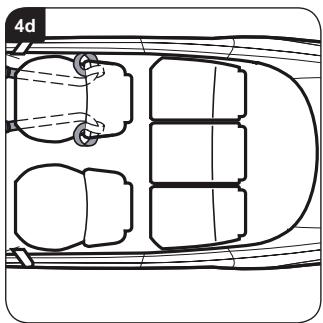
4e ③ ① ② ④Slide the loop ends of the tether straps between the front car seat and back ① as shown (dia 4d). Bring the buckle ends of the tether straps around the outside of the car seat and feed through the loops ②. Slide the buckle ends under the seat. Snap the buckles of the tether straps onto the tongues on the sides of the child seat ③. Provisionally tighten the tether straps by pulling the loose ends downwards ④.
natural_image
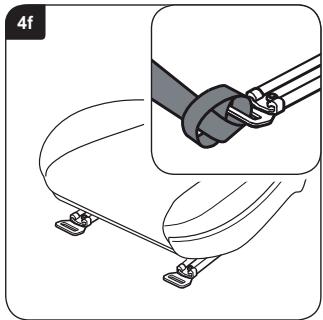
Illustration of a bicycle seatbelt being adjusted for a cable, showing the bracket and seat (no text or symbols)If your car is equipped with a runner loop on the seat runners, these may be used as an alternative.
IMPORTANT - Do not install the tether straps using the Luggage loops.
natural_image
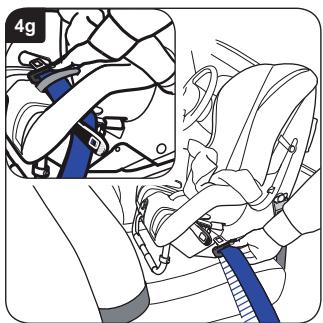
Illustration of a hand using a blue tool to lift a helmet, showing the grip and seat assembly (no text or symbols)Pull off sufficient lap and diagonal belt (approx.600-900mm). Open the lock-off arm on the side opposite the seat belt buckle. Pull back the child seat cover to reveal the crotch strap. Feed the belt through the lock-off belt guide and seat shell slot (dia 4g), up on to the top face of the seat base, behind the crotch strap (inset) and down through the slot on the other side of the child seat.
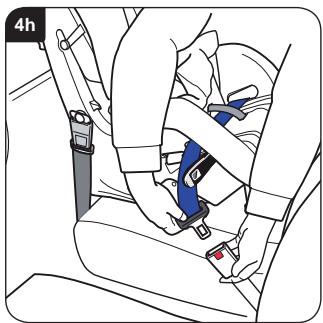
Open the other lock-off arm, feed the seat belt under the lock-off arm and attach the tongue into the buckle (dia 4h).
natural_image
Line drawing of a car seatbelt buckle assembly (no text or symbols)
text_image
4iPull all of the seat belt slack through the child seat ensuring the seat belt is not twisted (dia 4i). When the belt is as tight as possible, close the lock-off arms on BOTH sides of the seat ensuring that they click into place.
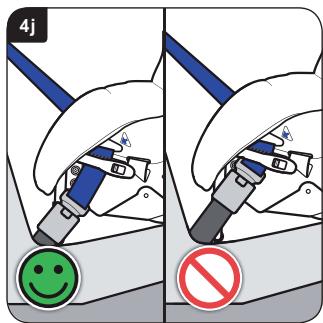
If the buckle now lies in the position marked as wrong with a ⏻ and the seat belt cannot be correctly tightened (dia 4j), try another seating position in the car.
text_image
4j 😊 No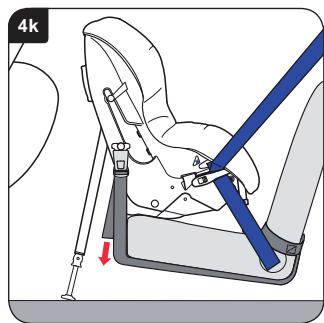
text_image
4kFinally tighten the tether straps by pulling the loose ends downwards (dia 4k) until the footprop touches the floor. The footprop must rest on a solid floor - not on lids of storage boxes or similar.
Once firmly strapped in, test the child seat by trying to move it back and forth and side to side. If it seems loose, you must re-install until firmly installed.
DO NOT rest the back of the child seat on the dashboard or close to the windscreen.

text_image
Warning sign with red exclamation mark inside a trianglenatural_image
Medical illustration showing a hand adjusting a medical device on a patient's head (no text or symbols present)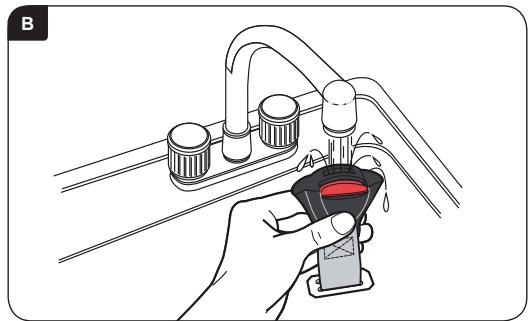
natural_image
Illustration of a hand using a tool to clean or adjust a red liquid level on a kitchen sink (no text or symbols)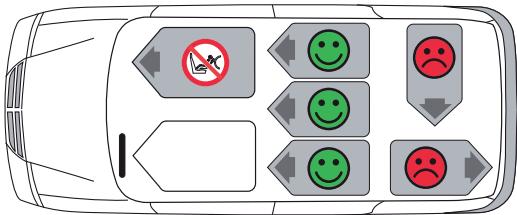
text_image
Diagram showing traffic congestion with no sign, smiling faces, and sad faces on a car aheadALVORLIG FARE!
natural_image
Line drawing of two fabric or garment items with a red measurement line and number 12 (no text or symbols on the items themselves)natural_image
Illustration of hands installing or adjusting a device panel inside a vehicle (no text or symbols visible)natural_image
Hand inserting a belt into a device panel (no text or symbols visible)natural_image
Illustration of a hand using a small mechanical component to lift a piece of material (no text or symbols visible)natural_image
Illustration of two car seats with red curved arrows indicating rotation (no text or symbols)natural_image
Illustration of hands holding a small mechanical component, with an inset showing close-up details (no text or symbols)natural_image
Line drawing of a car seat assembly with no text or symbolsnatural_image
Top-down architectural sketch of a vehicle showing structural components (no text or symbols)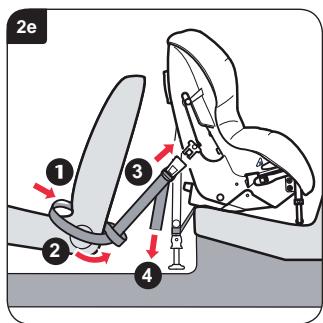
text_image
2e 1 2 3 4natural_image
Diagram showing a bicycle seat with four legs and a close-up of a cable being inserted into it (no text or symbols present)natural_image
Illustration of a person adjusting a blue belt, showing mechanical components and hands (no text or symbols)natural_image
Illustration of a person's seatbelt fastening technique, showing clamps and gaskets (no text or symbols)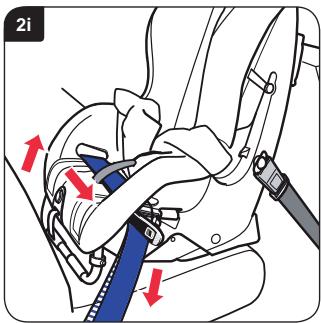
text_image
2inatural_image
Illustration of hands using a tool to adjust or trim a piece, with an inset showing close-up details (no text or symbols)natural_image
Illustration of a car seat assembly with a seatbelt and seatbelt device (no text or symbols)natural_image
Diagram of a mechanical assembly with four components and connecting rods, no text or symbols present
natural_image
Diagram of a car seat assembly with a close-up inset showing cable attachment (no text or symbols)natural_image
Illustration of a person wearing a helmet and harness, holding a blue tool (no text or symbols visible)natural_image
Close-up of a car seatbelt buckle assembly (no text or symbols visible)natural_image
Mechanical assembly diagram showing a hand operating a seatbelt with a blue lever and red arrow indicating motion (no text or symbols)natural_image
Illustration of two car seats with red curved arrows indicating rotation (no text or symbols)natural_image
Illustration of hands using a tool to adjust or install a component, with an inset showing close-up details (no text or symbols present)natural_image
Line drawing of a car seat assembly with no text or symbolsnatural_image
Top-down schematic of a boat hull with four compartments and side seating (no text or labels)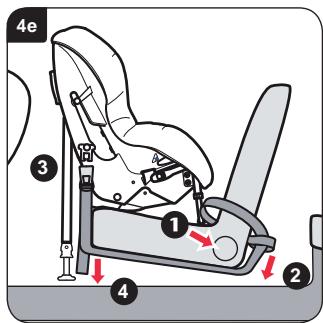
text_image
4e ① ② ③ ④natural_image
Illustration of a bicycle seatbelt being adjusted for a cable, showing the bracket and seat (no text or symbols)natural_image
Illustration of a hand using a blue tool to connect a helmet and harness (no text or symbols present)natural_image
Illustration of a person's seatbelt and seatbelt buckle assembly (no text or symbols)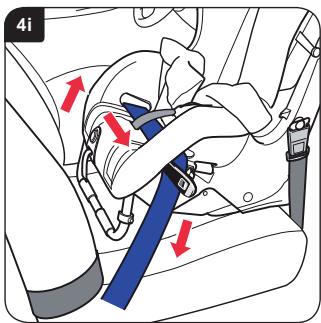
text_image
4itext_image
Warning sign with red exclamation mark inside a trianglenatural_image
Illustration of a person adjusting a medical device on a patient's head (no text or symbols present)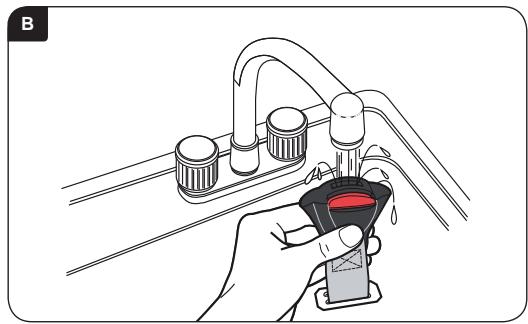
natural_image
Illustration of a hand holding a test tube with liquid, mounted on a curved surface (no text or symbols)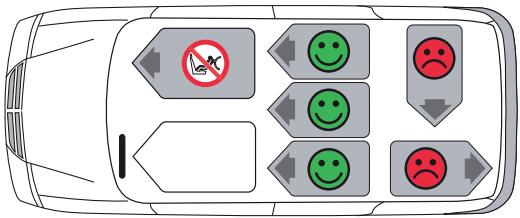
text_image
Diagram showing traffic sign placement on a car with no traffic, smiling faces, and sad facesERITTÄIN TÄRKEÄÄ!
natural_image
Line drawing of two fabric or garment pieces with a numbered label (12) and a red line pointing to a detail, no text or symbols present.natural_image
Line drawing of hands installing or adjusting a device panel inside a vehicle (no text or symbols visible)natural_image
Close-up of a hand using a tool to adjust or install a component, with no visible text or symbols.natural_image
Illustration of a hand using a small mechanical component to lift a piece of material (no text or symbols visible)natural_image
Illustration of two car seats with red arrows indicating rotation (no text or symbols)natural_image
Illustration of hands using a tool to adjust or install a component, with an inset showing magnified detail (no text or symbols)natural_image
Illustration of a car seatbelt with adjustable arm and seat, no text or symbols presentnatural_image
Top-down architectural sketch of a vehicle showing structural components (no text or labels)
text_image
2e 1 2 3 4natural_image
Diagram showing a bracket with four legs and a close-up of a cable or cable attachment (no text or symbols)natural_image
Illustration of a person adjusting a blue belt, no text or symbols presentnatural_image
Illustration of a person wearing a seatbelt and using a cable to adjust or install a device (no text or symbols visible)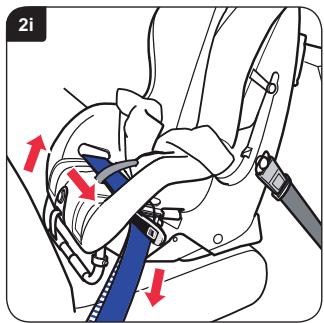
text_image
2inatural_image
Illustration of a car steering wheel assembly with a blue tool, showing no text or symbolsnatural_image
Illustration of hands using a tool to adjust or install a small mechanical component, with an inset showing close-up details (no text or symbols present)natural_image
Illustration of a car seatbelt device with a red indicator finger and label '3b' (no text or symbols on the diagram itself)natural_image
Diagram of a mechanical assembly with four components and connecting rods, no text or symbols present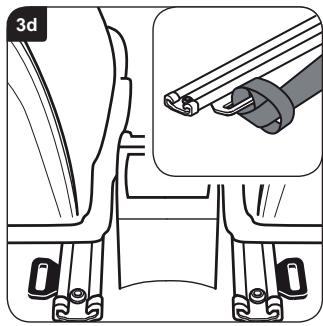
natural_image
Diagram of a car seat assembly with a close-up inset showing cable attachment (no text or symbols)natural_image
Illustration of a person wearing a helmet and harness, holding a blue tool (no text or symbols visible)natural_image
Illustration of a car seatbelt mechanism with blue and red buttons (no text or symbols)natural_image
Illustration of a person's seatbelt device with a blue lever and red arrow indicating rotation (no text or symbols)natural_image
Illustration of two car seats with red arrows indicating rotation (no text or symbols)natural_image
Illustration of hands using a tool to adjust or install a mechanical component, with an inset showing close-up details (no text or symbols present)natural_image
Line drawing of a car seat assembly with no text or symbolsnatural_image
Top-down schematic of a boat hull with multiple compartments and side seating (no text or labels)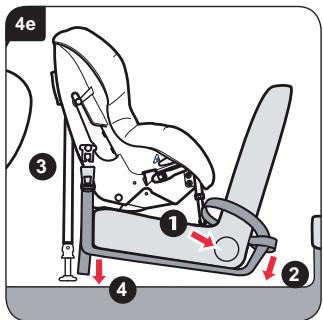
text_image
4e ③ ① ② ④natural_image
Illustration of a bicycle seatbelt being adjusted for a cable, showing the bracket and seat (no text or symbols)natural_image
Illustration of a hand using a blue tool to connect a helmet and gear (no text or symbols present)natural_image
Illustration of a person's seatbelt and seatbelt buckle assembly (no text or symbols)
text_image
4itext_image
Warning sign with red exclamation mark inside a trianglenatural_image
Illustration of a person adjusting a medical device on a patient's head (no text or symbols visible)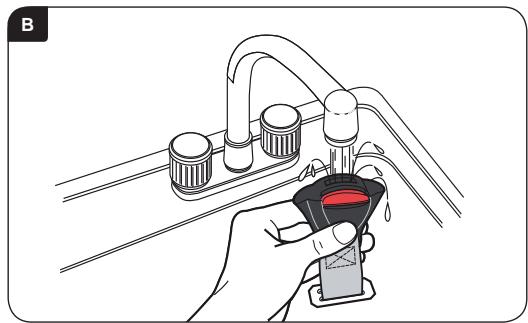
natural_image
Illustration of a hand holding a water tap with liquid, no text or symbols present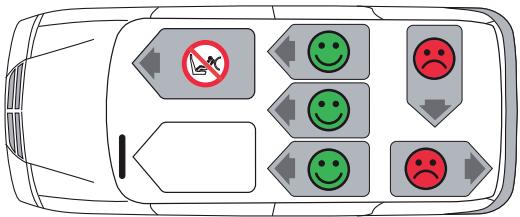
text_image
Diagram showing traffic sign placement with no stop sign, smiling and sad face indicators on a car aheadFARE!
natural_image
Line drawing of two fabric or garment items with a red measurement line and number 12 (no text or symbols on the items themselves)natural_image
Illustration of hands installing or adjusting a component with two blue bands (no text or symbols visible)natural_image
Illustration of a hand adjusting a seatbelt with a red arrow indicating the adjustment (no text or symbols present)natural_image
Illustration of a hand using a small mechanical component to lift a piece of material (no text or symbols visible)natural_image
Illustration of two car seats with a red curved arrow indicating rotation (no text or symbols)natural_image
Illustration of hands using a tool to adjust or install a small mechanical component, with an inset showing close-up details (no text or symbols present)natural_image
Illustration of a car seat assembly with a red indicator finger and label '2c' (no text or symbols on the diagram itself)natural_image
Top-down schematic of a boat's interior layout with compartments and handles (no text or symbols)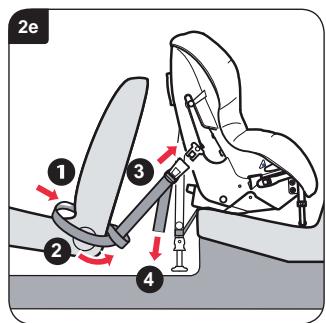
text_image
2e 1 2 3 4natural_image
Diagram showing a bicycle seat with four legs and a close-up of a cable being inserted into it (no text or symbols present)natural_image
Illustration of a person adjusting a blue belt, showing mechanical components and hands (no text or symbols)natural_image
Illustration of a person wearing a seatbelt and harness, adjusting the seatbelt with a blue belt (no text or symbols visible)
text_image
2inatural_image
Illustration of a car steering wheel assembly with a blue clip and red arrow indicating motion (no text or symbols)natural_image
Illustration of hands using a tool to adjust or install a mechanical component, with an inset showing magnified detail (no text or symbols)natural_image
Illustration of a car seat assembly with a red indicator finger and label '3b' (no text or symbols on the diagram itself)natural_image
Diagram of a mechanical assembly with four components and connecting rods, no visible text or symbols
natural_image
Diagram of a car seat assembly with a close-up inset showing cable attachment (no text or symbols)natural_image
Illustration of a person wearing a helmet and harness, holding a blue tool (no text or symbols visible)natural_image
Illustration of a car seatbelt mechanism with blue and red buttons (no text or symbols)natural_image
Illustration of a person's seatbelt mechanism with a blue belt and red arrow indicating force (no text or symbols)natural_image
Illustration of two car seats with a red rotation arrow indicating movement (no text or symbols)natural_image
Illustration of hands adjusting a mechanical component with an inset showing close-up details (no text or symbols)natural_image
Line drawing of a car seat assembly with no text or symbolsnatural_image
Top-down schematic of a boat hull with four compartments and side seating (no text or labels)
text_image
4e ① ② ③ ④natural_image
Illustration of a bicycle seatbelt being held by a cable, showing the handle and seat (no text or symbols)natural_image
Illustration of a hand using a blue tool to lift a helmet, showing the grip and seat assembly (no text or symbols)natural_image
Illustration of a car seatbelt with blue straps and a black belt, no text or symbols present
text_image
4itext_image
4j Green No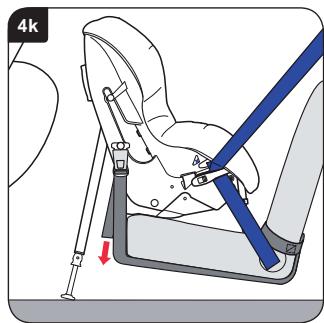
text_image
4ktext_image
Warning sign with red exclamation mark inside a trianglenatural_image
Medical illustration showing a hand adjusting a medical device on a patient's head (no text or symbols present)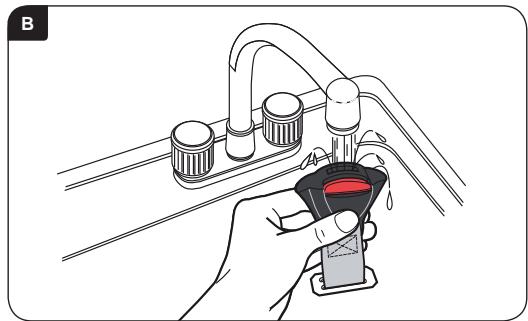
natural_image
Illustration of a hand holding a water tap with red liquid, no text or symbols present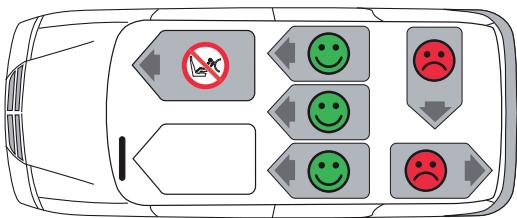
text_image
Diagram showing traffic congestion with no sign, smiling and sad face icons arranged in a grid layoutEXTREM FARA!
natural_image
Line drawing of two fabric or garment pieces with a numbered label (12) pointing to each, no text or symbols present.natural_image
Illustration of hands installing or adjusting a mechanical component with two blades (no text or symbols visible)natural_image
Hand adjusting a car seatbelt with a red arrow indicating the adjustment (no text or symbols present)natural_image
Illustration of a hand using a small mechanical component to press or install a piece, no text or symbols presentnatural_image
Illustration of two car seatbelt covers with a red arrow indicating rotation (no text or symbols)natural_image
Illustration of hands using a tool to adjust or install a mechanical component, with an inset showing close-up details (no text or symbols)natural_image
Line drawing of a car seat assembly with a red indicator arrow and label '2c' (no text or symbols on the diagram itself)natural_image
Top-down architectural floor plan of a boat or vessel with compartments and structural elements (no text or labels)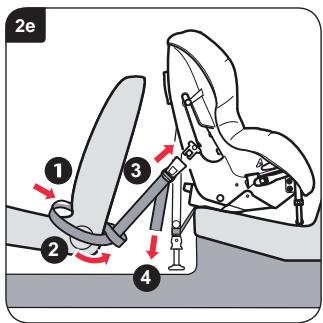
text_image
2e ① ② ③ ④natural_image
Diagram showing a bracket with four legs and a magnified inset of a cable or rod assembly (no text or symbols)natural_image
Illustration of a person adjusting a blue belt, showing mechanical components and hands (no text or symbols)natural_image
Illustration of a person wearing a seatbelt and harness, adjusting a blue seatbelt (no text or symbols visible)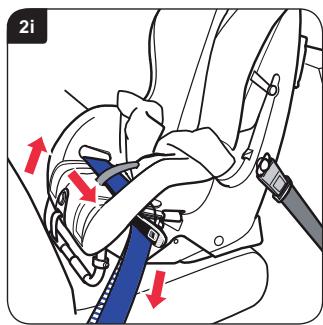
text_image
2inatural_image
Illustration of a mechanical device with a lever and adjustment knob, no text or symbols presentnatural_image
Illustration of hands using a tool to adjust or install a mechanical component, with an inset showing close-up details (no text or symbols present)natural_image
Illustration of a car seat assembly with a seatbelt and seat, no text or symbols presentnatural_image
Diagram of a vehicle's rear suspension system with four compartments and connecting rod (no text or labels)
natural_image
Diagram of a car seatbelt showing two side seats with a magnified inset highlighting the cable attachment (no text or symbols present)natural_image
Illustration of a person wearing a helmet and harness, holding a blue tool (no text or symbols visible)natural_image
Illustration of a car seatbelt mechanism with blue and red buttons (no text or symbols)natural_image
Illustration of a car seatbelt mechanism with a blue belt and red arrow indicating force (no text or symbols)natural_image
Illustration of two car seats with a red rotation arrow indicating movement (no text or symbols)natural_image
Illustration of hands using a tool to adjust or install a mechanical component, with an inset showing close-up details (no text or symbols present)natural_image
Line drawing of a car seat assembly with no text or symbolsnatural_image
Top-down schematic of a boat hull with four compartments and side seating (no text or labels)
text_image
4e ① ② ③ ④natural_image
Illustration of a bicycle seatbelt being adjusted for a cable, showing the bracket and seat (no text or symbols)natural_image
Illustration of a hand using a blue tool to lift a helmet, showing the grip and seat assembly (no text or symbols)natural_image
Line drawing of a car seatbelt with blue accents and a black belt, no text or symbols present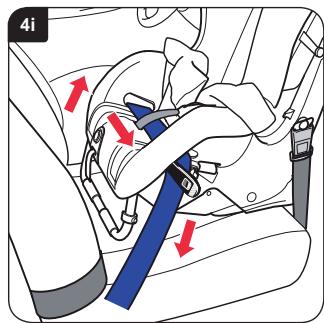
text_image
4inatural_image
Illustration of a car seatbelt with a blue belt and red arrow indicating a force or motion (no text or symbols)

GB
Britax Excelsior Limited
1 Churchill Way West
Andover
Hampshire SP10 3UW
United Kingdom
Tel:01264386034
www.britax.eu
Britax is a registered trademark of Britax Childcare
DK
F. Bülow & Co. ApS
Baldersbuen 37-39
DK-2640 Hedehusene
Tlf: 46 59 11 55
Fax: 46 59 11 66
- Only suitable if the approved vehicles are fitted with lap/3 point/static/with retractor safety-belts, approved to UN/ECE Regulations No. 16 or other equivalent standards.
- This Child Restraint is classified for Semi-universal use and is suitable for fixing into the seat position of the following cars:
Please refer to vehicle list
Seat position in other cars may also be suitable to accept this child restraint. If in doubt, consult either the child restraint manufacturer or the retailer.
- Do not use rearward facing in seating positions where there is an active airbag installed.