
GOURMET XL OC7868 30 - Cooking appliance ROWENTA - Free user manual and instructions
Find the device manual for free GOURMET XL OC7868 30 ROWENTA in PDF.
| Product type | Freestanding oven |
| Brand | Rowenta |
| Model | GOURMET XL OC7868 30 |
| Net weight | 15 kg |
| Power supply | 220-240 V |
| Manual cooking modes | Fan forced, Natural convection, Pastry, Grill, Defrost |
| Number of automatic programs | 28 (meats, fish, desserts, bread, low temperature, simmering, steam) |
| Automatic keep warm | Yes, up to 10 hours |
| Delayed start cooking | Yes, up to 24 hours |
| Independent timer | Yes |
| Child lock | Yes, button lock |
| Interior lighting | Yes, manual control, automatic shut-off after 15 minutes |
| Accessories included | Grid, drip tray, 3-in-1 steam cooker accessory (non-stick dish, steam basket, glass lid) |
| Grill type | Fold-down top heating element |
| Maximum temperature | 240 °C (manual mode) |
| Cleaning | Smooth enamel sole, non-stick walls, removable double-glazed door |
| Interior bulb | 15 W, 220/230 V, 300 °C, replaceable |
| Warranty | For household use only |
Frequently Asked Questions - GOURMET XL OC7868 30 ROWENTA
User questions about GOURMET XL OC7868 30 ROWENTA
0 question about this device. Answer the ones you know or ask your own.
Ask a new question about this device
Download the instructions for your Cooking appliance in PDF format for free! Find your manual GOURMET XL OC7868 30 - ROWENTA and take your electronic device back in hand. On this page are published all the documents necessary for the use of your device. GOURMET XL OC7868 30 by ROWENTA.
USER MANUAL GOURMET XL OC7868 30 ROWENTA
1·High-end Rowenta Gourmet 57
2·My Rowenta Oven at a glance 57
DESCRIPTION 59
GENERALUSE
1·Features 60
2·Before use 60
3·Using the Oven 60
4·General Advice 62
DISCOVERING YOUR OVEN! 63
MANUAL MODE
1·Description of "MANUAL" Mode 63
2·Using"MANUAL"Mode 63
USEFUL TIPS 65
AUTOMATIC MENU MODE
1·Description of "AUTOMATIC MENUS" mode 66
2·Using"AUTOMATICMENUS"mode 67
COMFORT MODE
1·Automatic Keep Warm 68
2·Delayed start 69
3·Independent timer 69
4·Child safety 69
5·Inside lighting 70
6·3-in-1 steam cooker accessory* 70
CLEANING AND MAINTENANCE
1·Instructions 71
2·Maintenance 72
3·Troubleshooting guide 73
GUARANTEE 73
ENVIRONMENT 73
INTRODUCTION
1·Gammu gourmet de Rowenta
1 · Oven assortment van Rowenta
1·Rowenta Gourmet Range
Rowenta has developed for you a range of refined integrated modes of cooking in the world of counter-top ovens, in particular low temperature cooking, stew, bread mode to accelerate the rising of dough, steam cooking...
This range of ovens was particularly developed to offer you optimum comfort usage (easy display, very intuitive), advanced technology and optimal safety.
The following detailed instructions will help you easily discover all the features of these ovens, along with many culinary tips to guide you every day.
Enjoy your meal!
EN
2·My Rowenta Oven at a glance

* depending on model
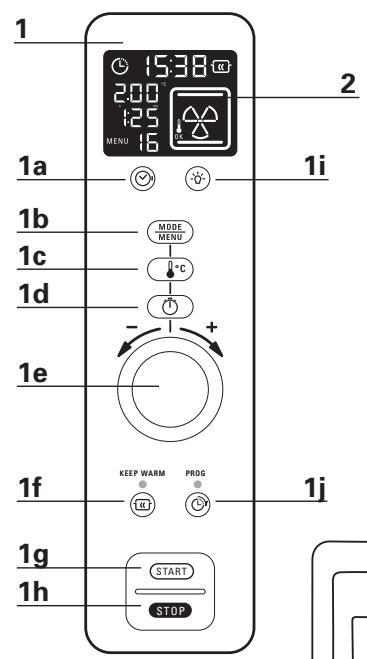
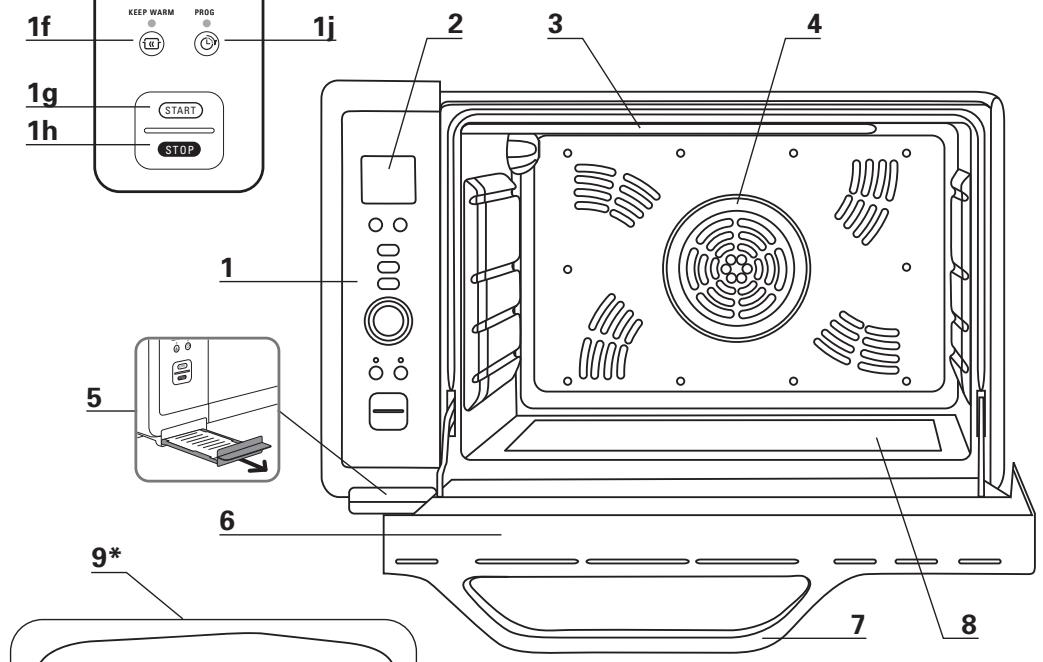
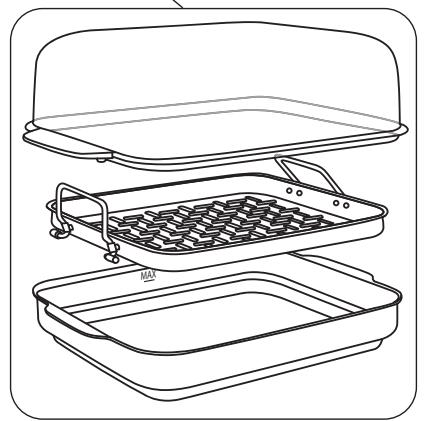
DESCRIPTION
1 Control Panel
a Setting the clock / independent timer
b Selection manual mode/ automatic menus (pre-programmed recipes)
c Cooking temperature selector
d Cooking time selector
e Rotating knob (selector) tuning (mode, time, temperature)
f Activation of the automatic keep warm at the end of cooking
g Confirm / start cooking
h Stop /standby
Light without cooking
j Delayed activation of start cooking
2 Digital display
a Time
b Delayed start
c Temperature
d Cooking time
e Menus
Automatic keep warm
g Mode of cooking
- Fan heat
- Natural convection / traditional
- Pastry
- Grill
- Defrosting
h Independent timer
i Reheating
3 Foldable upper element
4 Fan heat
5Drawer "getting started guide"
6 Glass door
7 Handle
8 Smooth base
9 Accessory steam casserole dish 3 in 1^
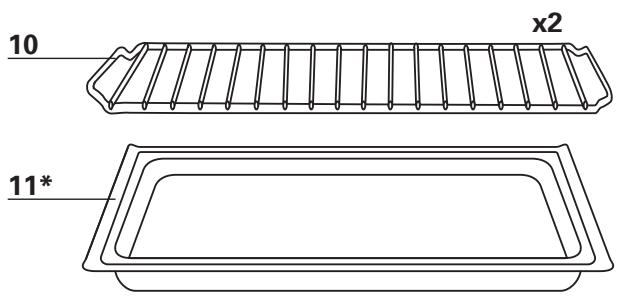
10 Grilling rack
11 Oven trays
- depending on model
GENERAL USE
1. Characteristics
NOTE that the net weight of the appliance is 15kg . Place it on a surface able to support this weight.
2·Before Use
2.1 • Unpacking (Reminder)
Unpack your oven based on the following procedure:
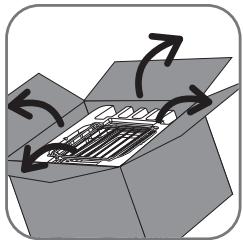
Remove the tape and open the flaps
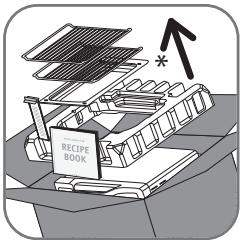
Remove the 2 grilling racks, take out the recipe book and remove the oven tray*. Remove the top section of packaging and take out the "start guide" drawer.
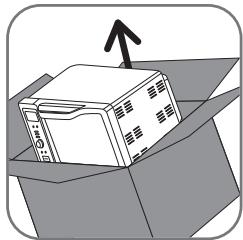
2 people required to remove the oven but do not pull on the handle.
Keep your guarantee card. Read your manual and keep it carefully.
Check that the appliance is not damaged. If it is, immediately contact the seller or after-sales service.
Place your oven on a stable surface. Remove all stickers and protection both inside and outside of your oven.
Remove all accessories from the oven (3 in 1 steam dish)*.
Packaging is recyclable and it may be useful to use it to carry or return the oven to an approved service station.
3·Use
3.1 · Setting up

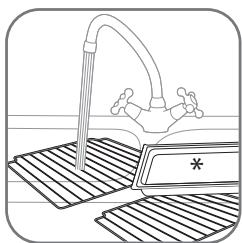
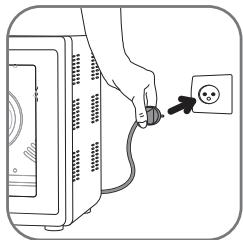
Clean the door, coated or painted surfaces, accessories and transparent parts with a damp sponge and mild detergent. Dry well. Close the door. Pull down the cord. Plug into earthed power outlet.
WARNING do not allow water to flow over the display.
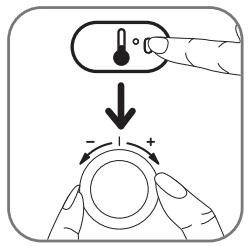
3.2 · Setting the timer
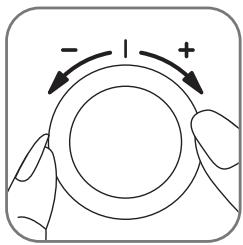
After plugging in the oven, the digital display indicates default clock "00:00" with flashing hours.
Using the rotating knob (1e), turn it clockwise direction to move forward or in the opposite direction to go backward until the display of the appropriate time.
Press the key to validate and move to the adjustment of the minutes. Using the rotating knob (1e), turn it clockwise direction to move forward or in the opposite direction to go backward until the display of the correct minutes. Press again key to confirm: your clock is set.
Change the clock setting: press and hold the knob "clock", the digital display indicates the clock "00:00". Set the clock according to the above paragraph.
3.3 • First use empty
Operate your oven empty (without the accessories inside) in order to eliminate any manufacturing residue and new odours.
- Press once on MODE key and select the mode of cooking natural convection with the help of the rotating knob (1e).
- Press once on ^ key and set to 240^ with the help of the rotating knob (1e).
- Press once on key and set to 45 min (time will display hour, 0 h 45-minute).
- Press on START key to start the oven.
IMPORTANT A smoke may appear, this is quite normal and will disappear quickly after use.
3.4 • Stopping the oven
Regardless of the mode of cooking, the oven can be stopped before the end of the cooking time. To do this, press the STOP key. Pressing and holding the STOP key change the oven to standby mode.
3.5·Quick start
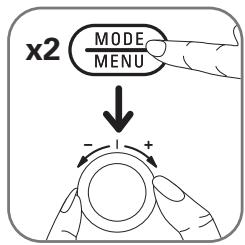
The oven has 2 modes of programming:
2 quick successive pushes on the MODE key allows you to switch from manual to automatic modes and vice versa.
REMEINDER if the oven is in standby mode, pressing a key, the oven recalls the last program.
3.6·Quick start guide
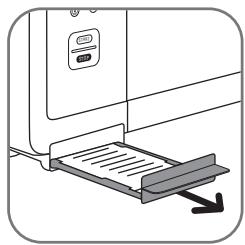
To install your start guide:
- Remove the drawer from the upper section of packaging.
- Cut out the instructions in the language of your choice.
- Slide the instructions into the drawer.
-
Fit the drawer into the slot under the display (5):
-
on the front, you'll find instructions for cooking in manual mode.
- on the back, instructions for cooking in automatic menus mode, as well as the list of programs.
4·General Advice
4.1 • The dishes
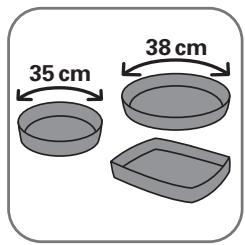
To choose dishes and tins: consider the internal dimensions of your oven.
For a round dish, the diameter should not exceed 35~cm
For a rectangular/oval dish, it should not exceed 38~cm and can be placed diagonally.
WARNING The glass lid on the 3 in 1 steam dish must not be used as a cooking plate.
4.2 Cooking time (1)
It can vary from 1 minute to 8 hours.
For safety reasons, the grill mode cannot be used for more than 1 hour and 30 minutes.
4.3 · Setting the Rotating Knob (selector)
The knob may be used in both directions of rotation. This will facilitate the choice of automatic menus, cooking methods or settings (weight, temperature, timer).
The selector can also determine the weight of the preparation for the automatic recipes (see paragraph "2.3 • weight selection /number of people").
4.4·Internal lighting & sound
- During cooking or defrosting, the internal light is turned on.
The remaining cooking time appears on the screen. It progresses minute by minute. - A beep indicates the end of the cooking time. The internal light turns off after 10 minutes and the oven stops automatically.
- If you selected keeping warm option, the oven and light stay on until the end of the cycle.
4.5·Non-scheduled operations
In the event of power failure, all programmed data are lost.
If there is an anomaly in the operation or display of your oven, unplug the appliance for at least 40 seconds then plug it back in again.
Cooking temperature: It is not possible to set the temperature in grill mode, keeping warm, automatic modes and defrosting.
DISCOVERING YOUR OVEN!
Your electronic gourmet oven has two modes of programming to facilitate your daily cooking, MANUAL mode and AUTOMATIC MENUS mode.
- In manual method, you select the cooking method yourself (5 available methods of cooking), the time and the cooking temperature.
- In automatic menus method, you have up to 28 pre-programmed menus* that were developed to help you with elaborate dishes. All you need to do is to indicate the weight or the number of guests, and your Gourmet oven recommends the method, the time and the cooking temperature. As you require, the cooking time can be adjusted manually.
Your Gourmet oven facilitates your daily life thanks to the comfort features that includes:
Automatic keep warm for 10 hours at the end of cooking
- Delayed cooking programme
- Child safety SECU mode
- Independent timer
MANUAL MODE
1·"Manual" method

Fan/circulating heat: the heat generated is circulated by a fan placed at the back of the oven, which assures an exceptional consistency of cooking in every corner. This cooking method is ideal to cook several dishes at the same time, or a large dish, the circulating air allowing cooking these dishes in a uniform way.

Natural convection (or traditional oven): heat is generated by the upper and lower oven elements: this traditional way of cooking is used to cook meat, fish and desserts.

Pastry baking: this particular feature combines fan heat, fan positioned at the rear of the oven and lower element, both providing excellent uniformity of cooking achieving the crispiness of the crust: particularly suited for savoury or sweet tarts.

Grill (upper element): heat is generated by the upper element of the oven: it allows to grill / traditional barbecue and baking of your dishes.

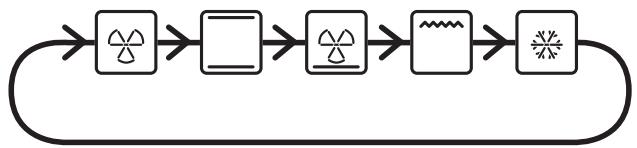
Defrosting: this is a special function. The fan is placed at the back of the oven in order to accelerate the time of defrosting of the ingredients that you will place in your oven, without cooking risk. The temperature is pre-set (cannot be adjusted).
2·Usage of"Manual"method
2.1 · Selection of cooking method
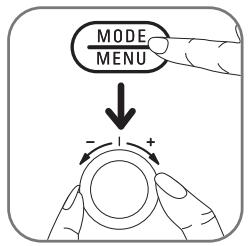
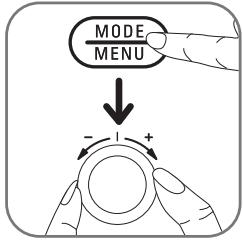
To choose the mode of cooking, press MODE key. Select the mode of cooking by turning the rotating knob (1e).
2.2 · Selection of temperature
Press ① key. Set the desired temperature by turning the selector for the desired temperature from 80^ to 240^
2.3 · Selection of cooking time

Press key. Set the duration of cooking by turning the selector until the desired time. The digital display tells you the time in hours and minutes (e.g.: 0:45).
Press key if you wish to start cooking immediately.
NOTE After 30 seconds without pressing a key, the oven goes on standby mode. At any time, you can correct your programming by pressing one of the MODE or keys. Press and hold STOP key, puts your oven on standby, but the program remains in the memory.
2.4 · Cooking
Once settings are done, press START key. The oven starts up. Internal light switches on.
The sign 0k flashes in the digital screen during the preheat and becomes fixed once the desired temperature is reached and for the rest of the cooking. The countdown is done minute by minute. At the end of the scheduled time, a beep indicates the end of cooking. The oven stops heating. Internal light switches off after 10 minutes.
2.5·Stop cooking
Regardless of the mode of cooking, the oven can be stopped before the end of cooking time. To do this, press the STOP key:
- Stop cooking with a quick press.
-
Sleep mode with an extended press.
-
depending on model
USEFUL TIPS
Fan heat mode
- If you want to use 2 trays, place them in a way leaving a sufficient space in between preparations in order for the heat to circulate and to obtain a uniform cooking.
- Push the grill racks well to the back of the oven and place your dishes in the centre of the grill racks.
- Never place the plate directly on enameled smooth base.
Grill mode
- You have a grill to hold your meat or brown the top of your dish.
- Consider preheating
- Place your dish or meat on the grill 4cm away from the grill element. No food should be in contact with the element.
- Place the oven tray * with a little water on the lower shelf to collect grease or cooking juice, close the door.
- For your meat, it is necessary to grill halfway through the cooking (sausages, pork...).
REMEMBER It is not possible to regulate the temperature in Grill Mode.
Defrosting mode
- To accelerate the natural thawing of your food.
- Place the tray on the lowest shelf. Put the frozen products on a plate. Put the plate on the tray. Close the oven.
- You cannot adjust the temperature mode while defrosting (it is set automatically to 40^ ).
IMPORTANT During certain types of cooking there might be steam released around the oven door : this is completely normal. Be careful as this may be hot.
AUTOMATIC MENUS MODE
1·Description of"Automatic MENUS" modes
Your oven has pre-programmed menus: it will automatically determine mode, time and temperature based on the weight or number of guests you are having. It also manages the keep warm cycle at the end of cooking or grilling.
Meat / fish: programs 1 to 8
Pre-programmed menus to ensure fast, perfect cooking of meat and fish (rare or well done beef, roasted veal, pork, lamb, chicken, whole fish,...).
Your oven will determine the mode, temperature and cooking time depending on the weight of the meat / fish.
Desserts: programs 9-13
Programs tailored to delicate cooking (portion of soufflé, whole soufflé, fruit, tarts, quiches, crèmes caramel, crèmes brûlées, meringue...) and very fine precision control (from 5 to 10^ ), as well as an even distribution of temperature.
Your oven will determine the mode, temperature and cooking time based on the number of guests.
Bread mode (rising / dry heat /baking): 14-16 programs
3 programs cooking:
- Rising: menu created only for lifting the dough.
- Bread: menu combining the different phases of raising the flour, resting and baking the bread.
- Brioche: menu combining the different phases of raising, resting and baking the buns.
Your oven will determine the mode, temperature and cooking depending on the weight of your ingredients.
Slow cooking temperature (between 80 and 120^ ): 17-22 programs
These programs are especially recommended for meat and fish fillets, sealing in the tenderness and juices of meat and retention of flavours. These are long cooking hours - between 2h 30 and 4 hours in general and up to 7 hours for the 7 hours lamb program.
Your oven will determine the mode, temperature and cooking time depending on the weight of the meat / fish.
Although taking a very long time, slow cooking at low temperature consumes less energy than traditional cooking.
Stew / Braising: program 23*.
The Mijotage menu is for use with the 3 in 1 steam dish accessory without the steam basket. Giving you access to the preparation of dishes such as stew, braised dishes, preserves, tajines or sauces, carrots, beef dishes, beef bourguignon, clay pot cooking...
Your oven will determine the mode, temperature and cooking time depending on the weight of the food. The use of any other type of cooking accessory may mean that you have to adjust the cooking time manually.
Steam cooking: programs 24 to 28^*
The steaming menus are associated with the use of the 3 in 1 steam dish accessory adapted to traditional steaming recipes (for example: fish, thick or fragile vegetables / starches, but also fruit, white meat...).
Pour in the water up to the MAX level indicated, check ingredients to be cooked on the steaming basket and select one of the 5 dedicated cooking menus.
2·Use"Automatic MENUS"modes
2.1·Menu List
| Weight adjustments/ Number of people/ Browning | 7 5 6 4 2 0 | |||
| meat / fish | menu 1 | Weight (kg) | rare beef | 4 |
| menu 2 | Weight (kg) | well done beef | 4 | |
| menu 3 | Weight (kg) | roasted veal | 4 | |
| menu 4 | Weight (kg) | roasted pork | 4 | |
| menu 5 | Weight (kg) | chicken | 2 | |
| menu 6 | Weight (kg) | Medium done Lamb | 2 | |
| menu 7 | Weight (kg) | Well done Lamb | 2 | |
| menu 8 | Weight (kg) | whole fish | 4 | |
| Desserts | menu 9 | Number of people (p) | Portions of soufflé | 1 |
| menu 10 | Number of people (p) | entire soufflé | 1 | |
| menu 11 | Number of people (p) | fruit tarts / quiches | 1 | |
| menu 12 | - | crème caramel / brûlée | 3 | |
| menu 13 | Browning (d) | meringue | 1 | |
| Bread | menu 14 | - | drying / bread rising | 1 |
| menu 15 | Weight (kg) | bread | 1 | |
| menu 16 | Weight (kg) | brioche | 1 | |
| low heat | menu 17 | Weight (kg) | low heat - rare beef | 4 |
| menu 18 | Weight (kg) | low heat - well done beef | 4 | |
| menu 19 | Weight (kg) | low heat - veal | 4 | |
| menu 20 | Weight (kg) | low heat - pork | 4 | |
| menu 21 | Weight (kg) | low heat - fish fillets | 5 | |
| menu 22 | - | 7 hours lamb | 2 | |
| Stew* | menu 23 | - | cooked casserole | 0 |
| steam* | menu 24 | Weight (kg) steam: hard vegetables(1) / gluten | 0 | |
| menu 25 | Weight (kg) steam: soft vegetables(2) | 0 | ||
| menu 26 | Weight (kg) steam: fish fillets | 0 | ||
| menu 27 | Weight (kg) steam: poultry fillets | 0 | ||
| menu 28 | Weight (kg) steam: fruits | 0 | ||
(1) Potatoes, peppers, beans, small artichokes...
(2) Broccoli, cauliflower, courgettes, carrots...
2.2 · Menu Selection
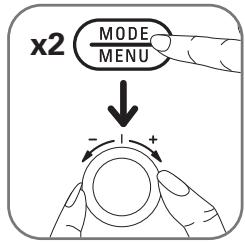
Press twice consecutively on the button (MODE) to change from manual mode to automatic menu mode. The digital display indicates MENU and 01 flashes. Choose the menu you want from the rotating knob (1e).
Confirm your choice by pressing MODE key once. If you want to revert to manual mode, press MODE key twice successively.
2.3·Weight Selection/number of people/browning level
Turn the selector to set the weight, the number of people or the browning level and confirm by pressing (MOB) or the (START) button.
Once confirmed, the time, temperature, and cooking method are automatically determined: you can manually change the pre-programmed cooking time. To do so, press key and specify your choice using the selector (1e). Check by pressing again on the button . Press . The oven starts up.
At any time, you can, through the STOP key:
- Stop cooking with a quick press.
- Implement pause / standby mode with an extended press.
IMPORTANT Menu 13 (meringue), you have the choice between 3 browning modes: white "D", golden "2D" Golden or amber "3D".
NOTES Some menus are pre-set regardless of the number of guests (menus 12, 14, 22, 23). It is, however, possible to change the cooking time according to your preference. This may vary depending on size, thickness, freshness and initial temperature of the food to be cook. Using pre-programmed menus, you have the choice to adjust the cooking time. They can be increased or reduced depending on the preference of everyone.
IMPORTANT For the automatic meat menus and beef in particular, if the size (length is greater than the diameter) and the piece is thick, it is necessary to slightly increase the recommended cooking time.
COMFORT MODE
1·Automatic Keep Warm

Your oven has the function to keep food warm at the end of the cooking period: Your food will be automatically maintained at an appropriate temperature for up to 10 hours without cooking.
To enable/disable keep warm function, press key. This feature may be enabled or disabled before or during cooking. The green light indicates that the feature is activated.
Also the flashes during cooking and becomes fixed at the stage of keeping warm.
It is possible to keep warm without prior cooking (for example to heat up), in this case press key when the oven is on standby.
CAUTION Maintaining keep warm function for an extended time may dry up some dishes.
- depending on model
2·Start-Delayed cooking

Thanks to this feature, you can choose to delay the end of your cooking time.
After completing your settings (mode, temperature...), press the key. A light will appear and will appear at the top of the screen that displays the end time of set cooking time.
Set the time you want your cooking ends with the rotating knob. Example: Set at 20:00, if you wish that your cooking finishes at 20:00. Then press START key to confirm your setting. The oven will be on standby. sign will flash on the screen to indicate that a delayed start program has been scheduled.

Note for this function:
- You can defer the end of cooking 24 hours maximum
-
When the oven is on standby and waiting to start:
-
If you want to check your settings or the end of cooking, time press MODE key: oven displays your settings for 5 seconds.
- If you want to change your settings or the end of cooking time, press STOP key. Change your settings. You will need to press the key and set your end of cooking time again. Confirm with START key.
3·Independent timer
You can use the timer that is independent of your oven. This is very useful to monitor the cooking of your pasta, rice and boiled eggs.
A quick press on the clock will allow you to view the pattern on the screen indicating 0 min: 00 "cooking time" on the screen. To set the time, turn the rotating knob (1e), and start the countdown by pressing the START key. At the end of the countdown, the oven will ring for 3 seconds. The sign will switch off.
A quick press on the STOP key will pause the count. An extended press will stop the independent timer.
4·Child safety

This function is an added security to prevent your children from unexpectedly operating the oven.
In standby mode, the child safety keeps the oven on standby even if the keys are pressed or rotating knob turned.
Activated during cooking, the function prevents the any change in settings: only the STOP key keeps its function to stop cooking for safety reasons.
To enable and disable this feature, press for 5 seconds on the lighted key until the oven sounds: "SECU" pattern will appear on the screen. When the function is active, "SECU" appears on the screen as a reminder whenever a locked key is pressed.
5·Internal lighting
To facilitate the withdrawal of your dishes and cleaning of your oven.
You can turn on and turn off the oven light without cooking, by pressing the key.
To turn off the lamp, press the key again.
In the event that you forget, the light will automatically switch off within 15 minutes.
6·3-in-1 steam cooker accessory*
With this accessory, you can use your oven for:
- Traditional cooking (gratins, roasts...) in non-stick plate.
- Steaming vegetables, fruit, fish and meat, in the plate with the non-stick metal steaming basket and its glass lid, for the steam menus 24 to 28^* .
6.1 · Using the dish in the traditional way
Put your food on the non-stick metal plate.
Place a tray on one of the oven shelves.
Place the dish on the tray.
Select the appropriate menu or mode.
RECOMMENDATIONS
- For cooking tasty meat, we recommend that you cover your preparation using aluminum foil which prevents evaporation.
- Never put the plate on the top cover of the oven or on the glass door.
- Never place the dish directly on the bottom of the oven.
Never use the glass lid of the 3-in-1 cooker accessory for cooking in the traditional way.
6.2 · Using the plate in Stewart mode
Put your food on the non-stick metal plate.
Close with glass lid.
Place a tray on one of the oven shelves.
Place the dish in the centre of the tray and close the door.
Select the menu 23 and set the weight of your preparation.
6.3 · Using steam plate mode*
Pour water at room temperature in the dish to the MAX (600 ml) level mark.
Place the steam plate in the dish.
Place to cook food.
Close with glass lid.
Place the oven tray directly on the bottom of the oven.
* depending on model
Place the dish in the centre of the tray and close the door.
Select the menu (menu 24 to 28) appropriate steam and the weight of your preparation.
6.4·End cooking
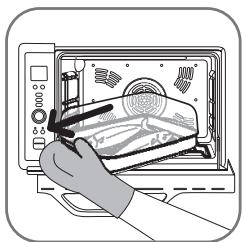
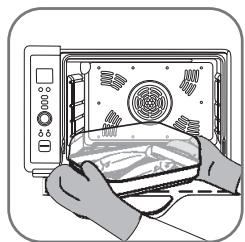
Rotate the dish 45^ to access the handle and pull on the rack with a hand up so that you have access to the second handle.
RECOMMENDATIONS
- Do not put more than 2.5kg of food on the steam plate.
- For best efficiency, centre the dish in the centre of the oven.
- Do not use the dish in any other way other than prescribed (eg Do not put directly on the base of the oven, use without plate, without cover, without water...).
- The steam menus use particular temperatures and a heating mode. Do not use the 3-in-1 steam cooker accessory for steam cooking except for these automatic menus: the result of cooking will be disappointing and may damage the dish.
- Never put the plate on the top cover of the oven or on the glass door.
- Never use the dish directly on the base of the oven.
- Use oven gloves to retrieve your dish from the oven.
- The glass lid must not be used as a cooking plate.
- It is strongly recommended not to open the oven door or the lid of the 3-in-1 steam cooker while steam cooking.
- Never use alcohol for steam cooking.
- Never pour water on the glass lid when it is still hot.
- Steam can condense on the oven door while cooking in steam mode. It will disappear during the cooking.
- Do not use metal utensils on the coated plate and steaming basket.
6.5 · Maintenance of the dish
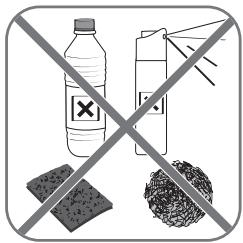
- The dish and steam plate have a non-stick coating: clean with a damp sponge with mild detergent. Do not use abrasive maintenance products (including corrosive based soda) or sponge scrapers or abrasive buffers.
- The cover is made of high-strength glass: we recommend not to pour water on glass lid if it is still hot. Clean it up only after it is cool.
CLEANING AND MAINTENANCE
1· Instructions
We recommend you to clean the oven each time you use it so that particles of burnt grease are not left inside the oven.
For easier maintenance, your oven has a smooth enamel base that covers the lower element. The wall is covered with non-stick coating, foldable grill elements.
Your oven door is double layered: it was designed so as not to require special maintenance: it is however possible to dismantle the inner glass for drips between the two panes.
Do not let the grease accumulate in the oven.
Let the oven cool down before doing any maintenance or cleaning.
Press the key for better visibility of the inside of the oven.
Clean the outside of the oven with a simple damped sponge.
Do not use specific metal based maintenance products for cleaning (copper stainless steel,...).
Clean the door, enameled surfaces and translucent parts with a damp sponge and a mild detergent.
Do not use abrasive maintenance products (including corrosive based soda) or scraper sponges or abrasive buffers.

The upper element is foldable but not removable. Never use force to manipulate the elements.
The interior of the oven has an enamelled floor and the walls have a non-stick coating which can be cleaned easily with soapy water.
All the accessories can be cleaned with water containing a little detergent.
The grilling racks, the tray and the glass panel can be washed in the dish-washer.
2 · Maintenance
2.1 · Changing the internal bulb

To replace the bulb:
- unplug the oven and allow it to cool down for at least 1 hour,
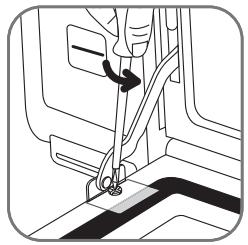
- turn the porthole quarter of a circle anti-clockwise,
- clean the outside surface of the window using warm soapy water. Dry it thoroughly,
- unscrew the bulb and replace (15W - 220/230V 300^ C),
- Replace the window by rotating it through 90^ in the clockwise direction.
2.2 · Dismantling the door
Open the door. Make sure that it is placed on a stable surface: turn your oven by 90^ .
Unscrew the 2 screw fixture at the door support links.
Remove the two flanges.
NOTE When handling the window avoid any impact against the glass pane. In the event of major impact against the glass pane, the glass could break afterwards.
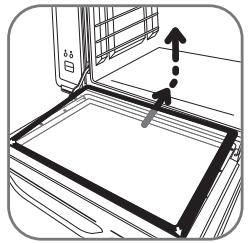
The inner glass must be lifted partly from below for a better grip. Slide the glass towards the back of the oven to release it from the notches which hold it in place.
Remove the inner glass and clean it using soapy water.
You then have access to the inner face of the external glass surface. Then clean it.

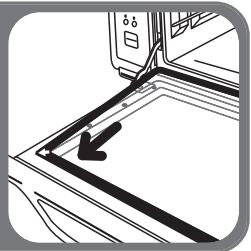
Replace the inner pane (check that the markings are on the inner surface of the door). Take care to position the glass correctly: the rounded corners should be on the lower side (near the door hinges). Fit the upper corners into the notches (see arrows). Replace the mounting flanges. Screw it back loosely.
3·Troubleshooting guide
If you are having trouble with your oven, try the following.
| Problems | Possible causes | Resolution |
| Black screen display. | The oven is not connected. | Check the connection of the oven. |
| The lamp does not work. | The bulb is blown. | Change the light bulb. |
| The oven beeps continuously and displays "Err". | Initialisation error. | Unplug the appliance for 30 seconds and plug it in again. |
If a problem persists, send your oven to the nearest approved Rowenta Service Centre. See the list of Rowenta authorized service centres or contact the Rowenta consumer service: www.rowenta.com
GUARANTEE
- This product has been designed for domestic use only. Any commercial use, inappropriate use or failure to comply with the instructions, the manufacturer accepts no responsibility and the guarantee will not apply.
- Please read instructions before the first use of your oven: usage not in accordance with the instruction manual will indemnify Rowenta from liability.
ENVIRONMENT
- In accordance with the regulations, any obsolete appliance should be rendered permanently unusable: unplug and cut the cable before disposing of the appliance.
Environment: Directive 2002/95/EC.

Environment protection first!
① Your appliance contains valuable materials which can be recovered or recycled.
Leave it at a local civic waste collection point. If you have any product problems or queries, please contact our Customer Relations Team 0845 602 1454 - UK (01) 677 4003 - Ireland or consult our website: www.tefal.co.uk
GUIDE DE CUISSON - BEREIDINGSGIDS - GARZEITENTABELLE - COOKING GUIDE
| 7 5 3 1 6 4 2 0 | °C | |||
| X 2 | 3 | 210° | 20 min | |
| 1,6 kg | 2 | 180° | 1h20 | |
| 1050 g | 2 | 200° | 1h00 | |
| 1080 g | 2 | 220° | 30 min | |
| 950 g | 2 | 200° | 45 min | |
| 2 | 220° | 30 min | ||
| X 12 | 4* | 220° | 25 min | |
| 2 | 200° | 12 min | ||
| 4 | 210° | 18 min |
- Lèche frites - Braadslee - Auffangschale - Oven trays
| 7 135 6 4 2 0 | 8°C | |||
| 2 | 180° | 1h30 | ||
| 4 | 190° | 50 min | ||
| 4 | 180° | 40 min | ||
| 4 | 180° | 30 min | ||
| 2 | 200° | 40 min | ||
| 2 | 180° | 50 min | ||
| 2 | 160° | 50 min | ||
| 2 | 190° | 50 min | ||
| 2 | 200° | 35 min | ||
| 600 g | 4* | 210° | 20 min | |
| 800 g | 4* | 200° | 20 min |
- Lèche frites - Braadslee - Auffangschale - Oven trays

: www.rowenta.com
| 1 | |||
| ALGERIA | GROUPE SEB EXPORT Chemin du Petit Bois, Les 4M 69130 ECULLY - FRANCE | 213-41-28-18-53 | 1 year |
| ARGENTINA | GROUPE SEB ARGENTINA S.A. Billinghurst 1833 3° C1425DTK Capital Federal Buenos Aires | 0800-122-2732 | 2 años |
| 2U3UUSUL ARMENIA | «Ч painsнисту «Unnunл»ФФС, 119180 Unulqlu, «ншшшшшш Unupnunutunluh lpp., un.14, 2-2 | (010) 55-76-07 | 2 unuiph/ years |
| AUSTRALIA | GROUPE SEB AUSTRALIA PO Box 7535, Silverwater NSW 2128 | 02 97487944 | 1 year |
| OSTERREICH | SEB OSTERREICH HmbH Campus 21 - Businesspark Wien Süd Liebermannstr. A02 702 2345 Brunn am Gebirge | 01 866 70 299 00 | 2 Jahre |
| BELGIQUE / BELGIE | GROUPE SEB BELGIUM SA NV 25 avenue de l'Espérance - ZI 6220 Fleurus | 32 70 23 31 59 | 2 ans / years |
| БЕЛAPΥSB / BELARUS | 3AO «Грульna СEB-Bocstok», 119180 Мсква, Россь Старомонетné лес. д.14 сч.2 | 017 2239290 | 2roids/ years |
| BOSNA I HERCEGOVINA | SEB DÉveloppement Predstavnišvo u BiH Vrazova B/II 71000 Sarajevo | Info-linija za potrošće 033 551 220 | 2 godine |
| BRASIL | GRUPO SEB DO BRASIL PRODutos DOMESTICOS LTDA Avenida Arno, 146 Mooca 03108-900 São Paulo SP | 0800-119933 | 1 ano |
| БылгAPIЯ/ BULGARIA | ГУП CBБ БИЛГАРЯ EOOD Уng. Бороб 52 Г, etc. 1, офис 1, 1680 София | 0700 10 330 | 2 rogenи |
| CANADA | GROUPE SEB CANADA 345 Passmore Avenue Toronto, ON M1V 3N8 | 1-800-418-3325 | 1 year |
| CHILE | GROUPE SEB CHILE Comercial Ltda Avda. Nueva Los Leones 0252 Providencia, Santiago | +56 2 232 77 22 | 2 años |
| COLOMBIA | GROUPE SEB COLOMBIA Apartado Aeroe 172, Kilometro 1 Via Zipaquira Cajica Cundinamarca | 18000919288 | 2 años |
| HRVATSKA Croatia | SEB DÉveloppement S.A.S. Vodnjanska 26 10000 Zagreb | 01 30 15 294 | 2 godine |
| ČESKA REPUBLICI /CZECH REPUBLIC | GROUPE SEB ČR spel. s r.o. Jankovcova 1569/2c 170 00 Praha 7 | 731 010 111 | 2 roky |
| DENMARK | GROUPE SEB NORDIC AS Tempovej 27 2750 Ballerup | 44 663 155 | 2 År |
| DEUTSCHLAND | GROUPE SEB DEUTSCHLAND GmbH / KRUPS GmbH Herrnainweg 5 63067 Offenbach | 0212 387 400 | 2 Jahre |

: www.rowenta.com
| 1 | |||
| EESTI/ ESTONIA | GROUPE SEB POLSKA SP Z O.O. ul. Ostrobramska 79 04-175 Warszawa | 5 800 3777 | 2 aastat |
| SUOMI / FINLAND | GROUPE SEB Finland Kutojantie 7 02630 Espoo | 09 622 94 20 | 2 Vuotta |
| FRANCE Inclus Martinique, Guadeloupe, Réunion & St. Martin | GROUPE SEB France SAS Place Ambroise Courtois 69355 Lyon Cedex 08 | 09 74 50 36 23 | 1 an |
| GREECE / ΕλλΑΔΑ | SE B GROUPE ΕλλΑΔΟ Ε.A. Οδός Φαργκοκλησιας 7 T.K. 151 25 Παρόδειοιας Αμαρουσίου | 2106371251 | 2 χρόνια |
| HONG KONG | SEB ASIA Ltd. Room 901, 9/F, North Block, Skyway House 3 Sham Mong Road, Tai Kok Tsui, Kowloon | 852 8130 8998 | 1 year |
| MAGYARORSZÄG/ Hungary | GROUPE SEB CENTRAL-EUROPE Kft. Taviro koz 4 2040 Budaörs | (1) 8018434 | 2 év |
| INDONESIA | GROUPE SEB Indonesia (Representative office) Sudirman Plaza, Plaza Marein 8th Floor JL Jendral Sudirman Kav 76-78, Jakarta 12910, Indonesia | +62 21 5793 6881 | 1 year |
| ITALIA | GROUPE SEB ITALIA S.p.A. Via Montefeltro, 4 20156 Milano | 199207815 | 2 anni |
| JAPAN | GROUPE SEB JAPAN Co. Ltd. 1F Takanawa Muse Building, 3-14-13, Higashi Gotanda, Shinagawa-Ku, Tokyo 141-0022 | 0570-077772 | 1 year |
| KA3AKCTAH KAZAKHSTAN | «Гушина СБВ-BOSTOK»ЖAK, 119180 Мэckeу, Ресей Старомонэнтой түйык көш, 14-у,,2-кръльс | 727 378 39 39 | 2 жыл / years |
| KOREA | (辱)그름 сеньbrand Кени: 서울지 챢료구 썻리드 88 썻리 bdentity 3 chq 110-790 | 1588-1588 | 1 year |
| LATVJA / LATVIA | GROUPE SEB POLSKA SP Z O.O. ul. Ostrobramska 79 04-175 Warszawa | 6 716 2007 | 2 gadi |
| LIETUVA/ LITHUANIA | GROUPE SEB POLSKA SP Z O.O. ul. Ostrobramska 79 04-175 Warszawa | 6 470 8888 | 2 metai |
| MACEDONIA | GROUPE SEB Bulgaria EOOD Office 1, floor 1, 52G Borovo St., 1680 Sofia - Bulgaria Груп CBБ Бльгий Д氧ел Ул. Боров 52 Г., on. 1, onfcic 1, 1680 Соби, Бльларя | (0)2 20 50 022 | 2 rogeni / years |
| MALAYSIA | GROUPE SEB MALAYSIA SDN. BHD Lot No.C/3A/001 & 002, Block C, Kelana Sq. No.17, Jalan SS7/26, 47301 Kelana Jaya Petaling Jaya, Selangor | 65 6550 8900 | 1 year |
| MEXICO | G.S.E.B. MEXICANA, S.A. de C.V. Goldsmith 38 Desp. 401, Col. Polanco Delegacion Miguel Hidalgo 11 560 Mexico D.F. | (01800) 112 8325 | 1 años |

: www.rowenta.com
| MOLDOVA | TOB «Гун СEB Украіпа» Byл. Драхоманова 31 Б, офic 1 02068 КИВ, Украіна | (22) 929249 | 2 ani / years |
| NEDERLAND | GGROUPE SEB NEDERLAND BV Generatorstraße 6 3903 LJ Veenendaal | 0318 58 24 24 | 2 jaar |
| NEW ZEALAND | GROUPE SEB NEW ZEALAND Unit E, Building 3, 195 Main Highway, Ellerslie, Auckland | 0800 700 711 | 1 year |
| NORGE | GROUPE SEB NORDIC AS Tempovej 27 2750 Ballerup DANMARK | 815 09 567 | 2 âr |
| PERU | GROUPE SEB COLOMBIA Av. Camino Real № 111 of. 805 B San Isidro - Lima - Perú | +511 441 4455 | 1 âños |
| POLSKA/ POLAND | GROUPE SEB POLSKA SP Z O.O. ul. Ostrobramska 79 04-175 Warszawa | 0801 300 422 koszt jak za polączenia lokalne | 2 lata |
| PORTUGAL | GROUPE SEB IBÉRICA SA Urb. da Matinha Rua Projectada à Rua 3 Bloco1 - 3° B/D 1900 - 796 Lisboa | 808 284 735 | 2 âos |
| REPUBLIC OF IRELAND | GROUPE SEB IRELAND Unit B3 Aerodrome Business Park, College Road, Rathcoole, Co. Dublin | 01 677 4003 | 1 year |
| ROMÁNÍA/ ROMANIA | GROUPE SEB ROMÁNÍA Str. Daniel Constantin nr. 8 010632 București | 0 21 316 87 84 | 2 âni |
| POCCNÍA/ RUSSIA | ЗАО «Грушина СEB-BocstOK», 119180 Мсква, Россья старочины пет. д. 14ст.2 | 495 213 32 37 | 2 roda/ years |
| SRBIJA Serbia | SEB DevelopPMENT Antifasisticke borbe 17/13 11070 Novi Beograd | 060 0 732 000 | 2 godine |
| SINGAPORE | GROUPE SEB SINGAPORE Pty Ltd. 59 Jalan Pemipin, #04-01/02 L&Y Building Singapore 577218 | 65 6550 8900 | 1 year |
| SLOVENSKO/ SLOVAKIA | GROUPE SEB SLOVENSKO s.r.o. Rybnica 40 831 07 Bratislava | 233 595 224 | 2 roky |
| SLOVENIJA | SEB d.o.o Gregorčiceva ulica 6 2000 MARIBOR | 02 234 94 90 | 2 leti |
| ESPÁÑA | GROUPE SEB IBÉRICA S.A. Almogâvres, 119-123, Complejo Ecouurban 08018 Barcelona | 0902 31 25 00 | 2 âños |
| SVERIGE | TEFAL SVERIGE SUBSIDIARY OF GROUP SEB NORDIC Truckvägen 14 A, 194 52 Upplands Väšby | 08 594 213 30 | 2 âr |
| SUISSE SCHWEIZ | GROUPE SEB SCHWEIZ GmbH Thurgauerstrasse 105 8152 Glattbrugg | 044 837 18 40 | 2 ans / Jarhre |
| TAIWAN | SEB ASIA Ltd. Taipei International Building, Suite B2, 6F-1, No. 216, Tun Hwa South Road, Sec. 2 Da-an District Taipei 106, R.O.C. | 886-2-27333716 | 1 year |

: www.rowenta.com
| THAILAND | GROUPE SEB THAILAND 2034/66 Italthai Tower, 14th Floor, n° 14-02, New Phetchburi Road, Bangkok, Huaykwang, Bangkok, 10320 | 02723 4488 | 2 years |
| TÜRKIYE | GROUPE SEB ISTANBUL AS Beybi Giz Plaza Dereboyu Cad. Meydan Sok. No: 28 K.12 Maslak | 216 444 40 50 | 2 YIL |
| U.S.A. | GROUPE SEB USA 2121 Eden Road Millville, NJ 08332 | 800-769-3682 | 1 year |
| Украінa/ UKRAINE | TOB «Грун СБ Украінa» Вун. Дароманова 31 Б, офic 1 02068 Ків, Украінa | 044 492 06 59 | 2 рoked/ years |
| UNITED KINGDOM | GROUPE SEB UK Ltd. 11-49 Station Road Langley, Slough Berkshire SL3 8 DR | 0845 602 1454 | 1 year |
| VENEZUELA | GROUPE SEB VENEZUELA Av Eugenio Mendoza, Centro Letonia, Torre ING Bank, Piso 15, Ofc 155 Urb. La Castellana,Caracas | 0800-7268724 | 2 anno |
| VIETNAM | GROUPE SEB VIETNAM (Representative office) 127-129 Nguyen Hue Street District 1, Ho Chi Minh City, Vietnam | +84-8 3821 6395 | 1 year |
FR p. 6 - 22
GUIDE DE CUISSON p. 74 - 75
NL p. 23 - 39
BEREIDINGSGIDS p. 74 - 75
DE p. 40 - 56
GARZEITENTABELLE p. 74 - 75
EN p. 57 - 73
COOKING GUIDE p.74-75