
MD764BLHA - Fridge HOTPOINT - Free user manual and instructions
Find the device manual for free MD764BLHA HOTPOINT in PDF.
User questions about MD764BLHA HOTPOINT
0 question about this device. Answer the ones you know or ask your own.
Ask a new question about this device
Download the instructions for your Fridge in PDF format for free! Find your manual MD764BLHA - HOTPOINT and take your electronic device back in hand. On this page are published all the documents necessary for the use of your device. MD764BLHA by HOTPOINT.
USER MANUAL MD764BLHA HOTPOINT
m = 311 ;
10. Multi-section koken
BAJHbIE NHCTPYKcN INO 6E30PACHOCTU
ПЕДУПЕЖДЕНЕ
Bo n36exkHne BO3ropaHnay, ydapOB TOKOM, npuHHeHnay uZepeBa JIOJAM nIIN BO3DeiCTBnA CnIbHOrO CBU-n3JyuYeHnay npn IcNoJIb30BaHnBaWero n3JeJIyCleDyIte OCHOHBIM npaBnIam 6e3OpacHocTn, BKJIouyac SNeDuOUsne:
- Празупждени: Heьзя pa30гравь си КОCTи И дугne npodуКтыВ reрметично 3akpbITOn Iocyd, TAK KaK 3TO MoKeT npuBecTN K B3PbIBy.
2.Преупждени:Любoe tex.обслуживане Или ремont Изделя,ТребуошeeСнгту Кожуха Neу,преoxpanяЮцero OT CBU-ИЗлунец,ДОЛЖНО Вынолнятбя TOЛьКО KOMпЕТHTьIMTEXHINKOM. - Празупждени: He pa3peшаite DeTЯM ICSNoJIb3OBAtB Neych, He npOnHCTpyKTInpOBaB IX O npaBnIax 6e3OpacHOJ 3KcPnyaTaUIN PeuN IO6 ONaCHOCTeX, CBra3aHHbIX C HeIpaBnJIbHbIM ICSNoJIb3OBAHHeM.
4.Предупждени: При ИСПОЛьЗОВАнIN ПechиВ КOMБИНРОВАнHOM ржиме ТребуETсЯ КОHTрOBДЕТeн CO СТОРОны ВЗPoCSЛBX ПО причиHe ВыICOKОI TemпераТурbl. (TOЛьКО сериСгрлem). -
Исторьштою ведя CBU-пech. <|im_start|>assistant Исторьштою ведя CBU-пech.
-
Perynapno moTe neyb n ydaJnTe OCTaTKn NUsI.
- Празиайец сеюшемправлио:"ПРЕДОCTОPOЖHOCTN ДЛЯ ПРЕДOTВРАSUЕнь BO3ДЕИCTВИ CBU-ИЗЛУЧЕНЯ".
- Пп разогревани eды в пл actikobои сиьбумжног посуde седnte 3a pechbO BO n36жанe BO3MOxHOrO BO3rOpaHЯ.
- B clyuae nOyBHeHnIa bIMa, BbIKJIOUHTe NpeYbN BblHbTe ee 1TcEJIbHyU BNJKy N3 CeTeBOI p03ETK, He OTKpbIBaIte DBepCy neu IJRASeHnI BO3MOxHOro PJaMeHn.
- He neperpebaite eyu.
- He ucnpoJb3yIte neYb dIy XpaHEnn yero-Jn6o. He xpaHnte XJIe6, neYeHbe n IIOJIoBHOe BHyTpN peuN.
12.СнHMITE npOBOLUKNIMetaJIInueCKne puKn c 6yMaJHOnIINII pIaCTIKOBOI NocuIbI/naKeTObIpePeIx NOMeUeHNEm B neYb. - YctahOBHTe neyb B COOTBETCTBnC HNCTpyKzmaMn.
-
He harpeBaIte B CBU-Neu n cbipbIe IINBapeHbIe RaIca B CkOpLyne, TAK KaK OHI MOrUT B3OpBaTbcS DaJKe N0 3aBepSeHn CBU-HarpeBaHnIy.
15.ИспользуйTe n3дeлге TOлькВ bцелЯx,ОписанныхВ NaCTОяшnx ИНСТРУКцЯХ. He ИспользуйTe KOPP03иВиБiE XIMNUYeCKne BeшecTBA ИПи nap ДЯ ухODa 3a ИЗдeлпeM.Данная Neчб Cпeциально ПрEDнAЗHAЧЕна ДЯ наHarpeBaHnY. Ee HeЛьзЯ ИСПОЛьЗOBaТь BnpOMblIshJIeHNOCTN ИПи В la6opaTopryx. -
B cIyuae IOBpeKdEHHa CeTeBOrO npoBoDa n3JeHnIPOpyuHTe erO 3aMeHy npOn3BOAnTEJIa, MaRa3HNy IIN KBAJIHΦNcIPoBaHOMy 3JIeKTPNKU BO n36eJxHHe ONaCHOCTH.
- He xpaHnTe n He nCNoJIb3yIte n3dJIne Ha yJInce.
- He nCpOJIb3yIe 3TO n3dJIepePraDOM C BOIOJ, Ha MOKPOI NOBepxHOCTN IJIIN PRADOM C 6aIcSeHOM.
19.Приинспользовани песи ee NOBepxHOCTN MOrUT CINbHO HaRpeTbcI. Приинспользовани песи ee NOBepxHOCTN OБычHO CINlbHo HArpeBaHTcI.Дерхinte cTeBOI pOBoD n3dJIIna IODaJIbWe OT HArpeTbIX NOBepxHOCTeI He 3akpbIbAitte KaKne-JIb6O qacTn peuN. - Ceteboi npoBOi n3eJIy He DoJxKeH CBeuINBaTbC8 C KpaI CTOJa IJI IN CTOJIeUHnUbl.
- HecoblndenHe IHcTpyKuN no yxOdy 3a nebIOMoKet npVBecTN K NOBpeJdeHnIIO NOBepXHOCTN I COKpaNTb cPOK cLyK6bl n3dJIyA, a TAKKe pNBecTN K ONaCHbIM cnTyauCnYAM.
- Copejxmoe Detcknx 6ytbIIOuek I
6aHoucek C DeTCKIM NITaHnEM
Heo6xoJIMO B36OJTatb IJI
IepemeShaTb I npOBepntb erO
TeMnpaTpy BO n36exKaHne
OKeROB. -
Пи НагpeBE HaNTKOB CBU-ИЗЛучЕнем OН MOrTy HEOXиДaHNO BCKINETb, NO3TOMy BblHIMaIte Ix I3 NeuOCTOpOJHO.
-
3a npeucaetcnsnoB3OBaHne n3dennn IucaMn(BKJIIOUyAJeTe) C OrpaHnueHHbIMN fH3nueckmN, CeHCOPhIMN uIN yMCTBeHHbIMN cNooc6CHOCTaM NIn IucaMn, He IMeIoUzMMn OnbTa N 3HaHn, 6e3 KOHTpOJn ININ oByeHnN POJIb3OBaHnIO n3dEJIneM CO CTOpOHbl IuC, OTBETCTBeHHbIX 3a INX 6e30NaChOCTb.
- He pa3pe7aTe DeTЯm ngpaTb C n3dJIeHem.
- CBU-пechь HeIb3я yCTaHaBJIbBaTb B shkaΦ, ecII OHa He IpeДHa3HauYeHa ДЯ BCTpoEHHOrO MOHTaJaВ B shkaΦ.
- Издени He paботаet C BHeшнм TaIMePOM ИЛС OТДeЛьнБIMC NICTeMaMn ДИCTaHцINHOrOупавленья.
- ПЕДУПЕЖДЕНЕ: убeДиTeсь, уTOБы n3deЛпe 6bIло ВВИКЛЮчЕНО, перд 3aMeHо ЛaMпы BO n3бжане уdapa TOKOM.
- Доступные detаи могут harpeься ри паво te Идени. He pa3peшай Te MaJIeньКIM DeTЯM приблжakъся К ИЗдению.
- 3aPpeucaetcIncnoJIb3OBaTb napOBbie arperaTbIДЛЯЧИстКИ n3dEJIЯ.
- Поверхноctь Кладовки может HarpeТбя.
-
He IncnoJb3yIte JceTKeJe abpa3nBhIe rY6Kn IIn NocTpblc MeTaJIInueckNe cKpe6Kn DJIa YNCTKN CTekJIaHHoN DBepZbI neu, TaK KaK OHN MOrYT NOUapanaTb ee NOBepXHOCTb, YTO MOKeT PpNBecTN K TpeuHAm B CTeKJIe.
-
При пабо-te n3делине harpeBaetcЯ. Прогьлайт e OCTOPOЖHOCt b BO n36жанe kacahn ropaynx 3JIemENTOB BHyTpNi peuN.
- История Терmonотр-шун,праздноаизауньй Дли Дадноюпechи (Для пechey, ИмецхВОЗМожноctь История ВОЗМожноctь Tерmonotр-шун).
- Припэрвом Включени пechи
MOЖНО
ПОЧВСТВОВАТБ
СпeцфчесКи 3aanax, Вbl3BaHньI
MaconlOM, НаhecсEHьIM Ha 3aBOde
ДЯ ПpedoхpaHene HeKOTOpbIX
KOMПЛЕКТуЮцИX.
36.Данныnpибор MOжET 3KcПуaTnpoBaTbCS YeTbMn CTapwe 8Iet NJIucaMn C OrpaHnueHHbIMN Φn3nueckmN, CeHCOPHbIMnIy MCTBeHHbIMN CNoOCbHOCTaMn I C HeIOCTaTOUhBIM ONbITOM INI 3HaHnAMyN IOd HabIoJDeHnE MIN Pocne POnLyeHnA COOTBcTCTByIOxN INCtpyKcN, PO3BOJIAOUsM IM 6e3OpacHo 3KcPnyaTnPOBaTb Ppi6op N DaIOxN IM PpeDcTaNJIeHne O6 ONaCHoCTN, COpRJaEHHoN C erO 3KcPnyaTaUeN. He nO3BOJYte DeTAM INrPaTb C npi6bOpom. OuNTka N DOCTynHoe NOIb3OBaTeJIIO TEXHnueCKOE 06CnJXnVBaHne He DOnJXhbl Ipn3BOIDITbcS JETbMn 6e3 npinCMOTpa. -
XpaHnTe npnbop n erO shHyp BHe doCraemocTn DeTeMnaDme 8 JeT.
-
ΘTOTПриборпраздна3наченДлЯ ИСПОЛБЗВАНЯВ хОЗЯСТBE ПОДОБнБIX обlaСТЯХПрIMMeHENHA, ТAKNXΚА: -ШТаTHьЕ КУХОнHBe ЗОнБI В Магa3иHax,ОфиCSbl И ДPyги равоче MeCTa; -ДПЯ KЛиЕNTOBВ ГROCTиHицAx, MOTeJIAX И ДPyги МecTax ПpoЖИВаня; -На ФерMax; -В ПОЛуПансIOHax.
-
BHIMAHNE: Bo Время paбовыnpибори erо DoCTyньieЧастиharpeBaIoTcЯ. He ДOTparИВaIteСьdo HarpeBaIOUxxCЯ эЛemEHTOB.He podnyckaite K npi6bopy DeTeMmadaшe 8 leTe ecn OHn HeHaxOДЯПОД pOCTOЯHHbIMHa6JIHODeHnEM.
BHHMaTeIbHo npOHTe n COxpaHnte IJra daJIbHeJWeRo NcPOnIb3OBaHnA
Bo n36exaHne HeCuaCTHbIX cIyuaEB YcTaHOBka 3a3eMJIeHnIa
Данhoeи3делпуждаетьВзадмлгИ.Bo ибекане корOTKOrOЗамыканязадмлгпссррааet рисудраТКOM3aСЧETпpoBOda pa3рЯдэлaktpuueckoroTOka.DaHhoeи3delenyukOMnEKTOBaHO npoBOdom,BKNIOAUOIMBce6I npoBOJ3aEMNeHnC 3a3emJIauOSeBnIKoI.HTeNCEJBHЯBnIKAdoJnxHa 6bITbCoEDINHeHcPpABINbHOyCTaHOBNEHOni 3a3emJIENHOcTeBOIp03ETKOJ.
HJXHO MOUHOCTN, INI KAKDOM HAKATNI HA DNCJIeE NOBJIOTc: “P100”, “P80” “P50”, “P30” uN“P10”.
3aTeM HaxKMnTe KHOIpKy “START”ДЯ NOДТВерЖдЕнЯ
I NOBepHnTE peryIaTOp "”,ДЯВыCTaBHeNIA
IpoJIoJIxNITeJIbHOCTn_OT 0:05 do 95:00.
Haxmnte KhONky "START" euple pa3 dIy hauana nprirotobJIeHnIa.
Пример:ЕспВамТребуETСИСПОЛБЗOBaТь80%CBU-МоцноCTи ДдЯ пи��TOВЛЕняВ TeueHne 20 MInHyT,ВылONHHTe CNeДУЮШе ИСТPyКЦИ:
1) HaxmTe KhoNky " 0OnH pa3. Ha dinCnlee nokaibBaetcP100".
2) Haxmnte KhoNky " eue pa3 nIIOBepHnTe pepyTOp " dIy BbIbopa 80% CBU-MOuHOCTn.
3) HaxmTe KhONKy " (START) "ДЯ NOДТВержденя.
Ha dinCJIeE nOKa3bIbAeTcR "P 80".
4)Повернite рergyтор "сдя ВьICTаВленя
празолжnteьhoeсти пи��тobленья до появленья на
диспee“20:00”.
5) HaxmTe KhoNky “START” Дя NaJa npriroTOBJeHnIa.
Moxho 3aadaTb He 60nbIe 2-x pexKIMOB npiroTOBJIeHnA. BpeKIMe MHOrO3TaIHoro npiroTOBJIeHnA, eCNI OJHM n3 peXIMOB YBJIeTCra pa3MopaxINBaHne, OH DOJIKeH 6bITb nepBbIM 3TaIOM.
Пример: Eси Требуетя разморозиь пpoДуКВ Teчене 5 мнут, a 3aTeM пи�罗TOВиТь пи моцноCTи 80% в тeчене 7 мнут:
1) Hαχmnte Khoŋky “ Ⓞ/♂ ”Двajды, на диспjee noяВNTcЯ “dEF2”;
2)ПовернITEpergуларop"ДпяНастрочи
IpoDOKHTeBHOCTNa3MOPaXnBaHn, Noka Ha DnCnnee He NoBNTcra 5:00
3) HaxmTe KhoNkY " 0dH pa3. Ha dncnlee nokaabaetcra P100".
4) Haxmnte KhoNky " 3 3 3 3 3 3 3 3 3 3 3 3 3 3 3 3 3 3 3 3 3 3 3 3 3 3 3 3 3 3 3 3 3 3 3 3 3 3 3 3 3 3 3 3 3 3 3 3 3 3 011 NOBepHnTe peYJrTOp " h" dIy BbIbopa 80% CBU-MOuHOCtN.
5) Haxmte KhONky " START"ДЯ NOdTBePxdeHn. Ha dinCnlee noka3bIbAeTcra "P 80".
6) Повернite ретуларог "Дя ВьICTаВпеня
пюдожительноctи пи��тOBпеня до появпеня на
диспee "07:00".
7) HαχmιTe KhONkγ “START” ДЯ Naуа прiroTOBneHЯ,
BKNIOHTcO OINH 3ByKOBoN CnIHAn DnIa
IePBOrO 3TaNa, HauHnaETcO6paTHbI OTCuET BpeMeHN
pa3MopaxNbAHNA. BKnIOHTcE eUe OINH 3ByKOBoN
CnIRHaJI DnI HaJana BTOPOrO 3TaNa. ITo 3aBePeHmN
PiNROTOBJIeHNA BKNIOHTcR PANTb 3ByKOBbIX CnIHAnOB.
11.ФункцязацHTHо6JIOKnPOBKN
- BCTaBbTe peuB b HnIy.
-Пюоверъп,чтобьзаднячacьпechибыla3abknopoBaHa ckoбо.
-CeteBOI npoBOD He doJXeH 6bItb cKaT nIIN coHyT.
- OtkpoTe DBepu; npKpeHnTe neB K Hnue LlpyPOM B B COOTBeTCTBnC KpeNExhBIM OTBepCTnEM.
PL

Italiano

Français

Espanol

Portuges

Nederlandst

Deutsch

Pyccknn

Poliski

English
Spis tresci
Zalecenia i srodki ostroznosci, 93
m = 311 ;
Precautions and suggestions, 106
Oven installation, 110
Operating instructions, 111
Troubleshooting, 115
Installation, 116

Hotpoint
ARISTON
Read these instructions carefully before using your microwave oven, and keep it carefully.
If you follow the instructions, your oven will provide you with many years of good service.
SAVE THESE INSTRUCTIONS CAREFULLY
PRECAUTIONS TO AVOID POSSIBLE EXPOSURE TO EXCESSIVE MICROWAVE ENERGY
GB
(a) Do not attempt to operate this oven with the door open since this can result in harmful exposure to microwave energy. It is important not to break or tamper with the safety interlocks.
(b) Do not place any object between the oven front face and the door or allow soil or cleaner residue to accumulate on sealing surfaces.
(c) WARNING: If the door or door seals are damaged, the oven must not be operated until it has been repaired by a competent person.
ADDENDUM
If the apparatus is not maintained in a good state of cleanliness, its surface could be degraded and affect the lifespan of the apparatus and lead to a dangerous situation.
Specifications
| Model: | FMO 122.1 X |
| Rated Voltage: | 230V~50Hz |
| Rated Input Power (Microwave): | 1250W |
| Rated Output Power (Microwave): | 800W |
| Rated Input Power (Grill): | 1000W |
| Oven Capacity: | 20 L |
| Turntable Diameter: | Ø 245mm |
| External Dimensions: | 594x343.5x388mm |
| Net Weight: | Approx. 15.4Kg |
IMPORTANT SAFETY INSTRUCTIONS
WARNING
To reduce the risk of fire, electric shock, injury to persons or exposure to excessive microwave oven energy when using your appliance, follow basic precautions, including the following:
- Warning: Liquids and other foods must not be heated in sealed containers since they are liable to explode.
- Warning: It is hazardous for anyone other than a competent person to carry out any service or repair operation that involves the removal of a cover which gives protection against exposure to microwave energy.
- Warning: Only allow children to use the oven without supervision when adequate instructions have been given so that the child is able to use the oven in a safe way and understand the hazards of improper use.
- Warning: When the appliance is operated in the combination mode, children should only use the oven under adult supervision due to the temperatures generated. (only for grill series).
- Only use utensils suitable for use in microwave ovens.
-
The oven should be cleaned regularly and any food deposits should be removed.
-
Read and follow the specific:"PRECAUTIONS TO AVOID POSSIBLE EXPOSURE TO EXCESSIVE MICROWAVE ENERGY".
- When heating food in plastic or paper containers, keep an eye on the oven due to the possibility of ignition.
- If smoke is observed, switch off or unplug the appliance and keep the door closed in order to stifle any flames.
- Do not overcook food.
- Do not use the oven cavity for storage purposes. Do not store items, such as bread, cookies, etc. inside the oven.
- Remove wire twist-ties and metal handles from paper or plastic containers/bags before placing them in the oven.
- Install or locate this oven only in accordance with the installation instructions provided.
- Eggs in the shell and whole hard-boiled eggs should not be heated in microwave ovens since they may explode, even after microwave heating has ended.
-
Use this appliance only for its intended uses as described in manual. Do not use corrosive chemicals or vapors in this appliance. This oven is especially designed to heat. It is not designed for industrial or laboratory use.
-
If the supply cord is damaged, it must be replaced by the manufacturer, its service agent or similarly qualified persons in order to avoid a hazard.
- Do not store or use this appliance outdoors.
- Do not use this oven near water, in a wet basement or near a swimming pool.
- The temperature of accessible surfaces may be high when the appliance is operating. The surfaces are liable to get hot during use. Keep cord away from heated surface, and do not cover any events on the oven.
- Do not let cord hang over edge of table or counter.
- Failure to maintain the oven in a clean condition could lead to deterioration of the surface that could adversely affect the life of the appliance and possibly result in a hazardous situation.
- The contents of feeding bottles and baby food jars shall be stirred or shaken and the temperature checked before consumption, in order to avoid burns.
-
Microwave heating of beverages can result in delayed eruptive boiling, therefore care must be taken when handling the container.
-
The appliance is not intended for use by persons (including children) with reduced physical, sensory or mental capabilities, or lack of experience and knowledge, unless they have been given supervision or instruction concerning use of the appliance by a person responsible for their safety.
- Children should be supervised to ensure that they do not play with the appliance.
- The microwave oven shall not be placed in a cabinet unless it has been tested in a cabinet.
- The appliances are not intended to be operated by means of an external timer or separate remote-control system.
- WARNING: Ensure that the appliance is switched off before replacing the lamp to avoid the possibility of electric shock.
- Accessible parts may become hot during use. Young children should be kept away.
- Steam cleaner is not to be used.
- Surface of a storage drawer can get hot.
-
Do not use harsh abrasive cleaners or sharp metal scrapers to clean the oven door glass since they can scratch the surface, which may result in shattering of the glass.
-
During use the appliance becomes hot. Care should be taken to avoid touching heating elements inside the oven.
- Only use the temperature probe recommended for this oven.(for ovens provided with a facility to use a temperature-sensing probe.)
- During the first use there is a particular smell due to production oils to protect some components.
- This appliance can be used by children aged from 8 years and above and persons with reduced physical, sensory or mental capabilities or lack of experience and knowledge if they have been givensupervision or instruction concerning useof the appliance in a safe way andunderstand the hazards involved. Children shall not play with the appliance.Cleaning and user maintenance shallnot be made by children unless they are older than 8 and supervised.
-
Keep the appliance and its cord out of reach of children less than 8 years.
-
This appliance is intended to be used in household and similar applications such as:
-
staff kitchen areas in shops, offices and other working environments;
- by clients in hotels, motels and other residential type environments;
- farm houses;
-bed and breakfast type environments.
- WARNING: The appliance and its accessible parts become hot during use. Care should be taken to avoid touching heating elementsChildren less than 8 years of age shall be kept away unless continuously supervised.
READ CAREFULLY AND KEEP FOR FUTUREREFERENCE
To Reduce the Risk of Injury to Persons Grounding Installation
This appliance must be grounded. In the event of an electrical short circuit, grounding reduces the risk of electric shock by providing an escape wire for the electric current. This appliance is equipped with a cord having a grounding wire with a grounding plug. The plug must be plugged into an outlet that is properly installed and grounded.
Consult a qualified electrician or serviceman if the grounding instructions are not completely understood or if doubt exists as to whether the appliance is properly grounded. If it is necessary to use an extension cord, use only a 3-wire extension cord.
- A short power-supply cord is provided to reduce the risks resulting from becoming entangled in or tripping over a longer cord.
- If a long cord set or extension cord is used:
1) The marked electrical rating of the cord set or extension cord should be at least as great as the electrical rating of the appliance.
2) The extension cord must be a grounding type 3-wire cord.
3) The long cord should be arranged so that it will not drape over the counter top or tabletop where it can be pulled on by children or tripped over unintentionally.
DANGER
Electric Shock Hazard
Touching some of the internal components can cause serious personal injury or death. Do not disassemble this appliance.
WARNING
Electric Shock Hazard
Improper use of the grounding can result in electric shock. Do not plug into an outlet until appliance is properly installed and grounded.
CLEANING
Be sure to unplug the appliance from the power supply.
- Clean the inside of the oven after using with a slightly damp cloth.
- Clean the accessories in the usual way in soapy water.
- The door frame and seal and neighboring parts must be cleaned carefully with a damp cloth when they are dirty.
Two-round-pin plug
UTENSILS
See the instructions on "Materials you can use in microwave oven or to be avoided in microwave oven." There may be certain non-metallic utensils that are not safe to use for microwaving. If in doubt, you can test the utensil in question following the procedure below.
Utensil Test:
- Fill a microwave-safe container with 1 cup of cold water (250ml) along with the utensil in question.
- Cook on maximum power for 1 minute.
- Carefully feel the utensil. If the empty utensil is warm, do not use it for microwave cooking.
- Do not exceed 1 minute cooking time.
CAUTION
Personal Injury Hazard
It is hazardous for anyone other than a competent person to carry out any service or repair operation that involves the removal of a cover which gives protection against exposure to microwave energy.
GB
Materials you can use in microwave oven Utensils Remarks
| Aluminum foil | Shielding only. Small smooth pieces can be used to cover thin parts of meat or poultry to prevent overcooking. Arcing can occur if foil is too close to oven walls. The foil should be at least 1 inch (2.5cm) away from oven walls. |
| Browning dish | Follow manufacturer's instructions. The bottom of browning dish must be at least 3/16 inch (5mm) above the turntable. Incorrect usage may cause the turntable to break. |
| Dinnerware | Microwave-safe only. Follow manufacturer's instructions. Do not use cracked or chipped dishes. |
| Glass jars | Always remove lid. Use only to heat food until just warm. Most glass jars are not heat resistant and may break. |
| Glassware | Heat-resistant oven glassware only. Make sure there is no metallic trim. Do not use cracked or chipped dishes. |
| Oven coking bags | Follow manufacturer's instructions. Do not close with metal tie. Make slits to allow steam to escape. |
| Paper plates and cups | Use for short–term cooking/warming only. Do not leave oven unattended while cooking. |
| Paper towels | Use to cover food for reheating and absorbing fat. Use with supervision for a short-term cooking only. |
| Parchment paper | Use as a cover to prevent splattering or a wrap for steaming. |
| Plastic | Microwave-safe only. Follow the manufacturer's instructions. Should be labeled “Microwave Safe”. Some plastic containers soften, as the food inside gets hot. “Boiling bags” and tightly closed plastic bags should be slit, pierced or vented as directed by package. |
| Plastic wrap | Microwave-safe only. Use to cover food during cooking to retain moisture. Do not allow plastic wrap to touch food. |
| Thermometers | Microwave-safe only (meat and candy thermometers). |
| Wax paper | Use as a cover to prevent splattering and retain moisture. |
Materials to be avoided in microwave oven
| Utensils | Remarks |
| Aluminum tray | May cause arcing. Transfer food into microwave-safe dish. |
| Food carton with metal handle | May cause arcing. Transfer food into microwave-safe dish. |
| Metal or metaltrimmed utensils | Metal shields the food from microwave energy. Metal trim may cause arcing. |
| Metal twist ties | May cause arcing and could cause a fire in the oven. |
| Paper bags | May cause a fire in the oven. |
| Plastic foam | Plastic foam may melt or contaminate the liquid inside when exposed to high temperature. |
| Wood | Wood will dry out when used in the microwave oven and may split or crack. |
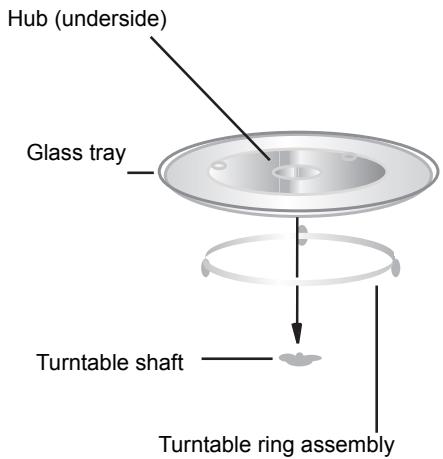
Names of Oven Parts and Accessories
Remove the oven and all materials from the carton and oven cavity.
Your oven comes with the following accessories:
Glass tray 1
Turntable ring assembly 1
Instruction Manual 1
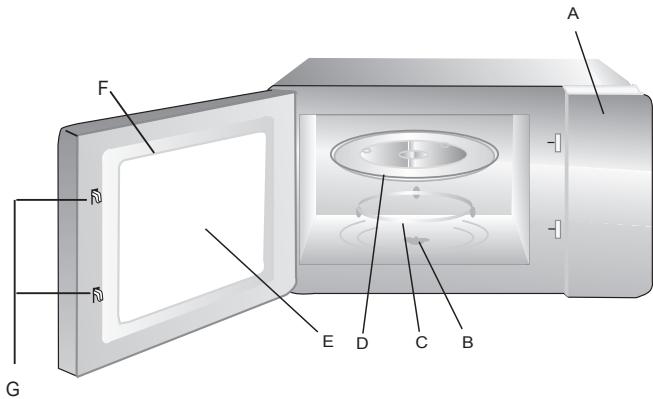
Grill Rack(Only for Grill series)
A) Control panel
B) Turntable shaft
C) Turntable ring assembly
D) Glass tray
E) Observation window
F) Door assembly
G) Safety interlock system
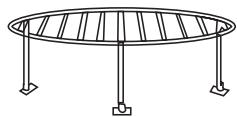
Turntable Installation
a. Never place the glass tray upside down. The glass tray should never be restricted.
b. Both glass tray and turntable ring assembly must always be used during cooking.
c. All food and containers of food are always placed on the glass tray for cooking.
d. If glass tray or turntable ring assembly cracks or breaks, contact your nearest authorized service center.
Installation and connection
- This appliance is only intended for domestic use.
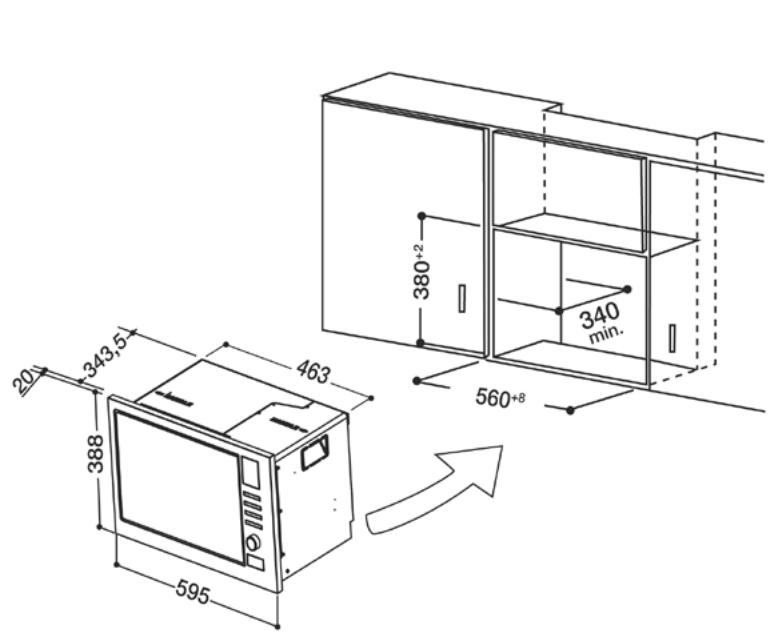
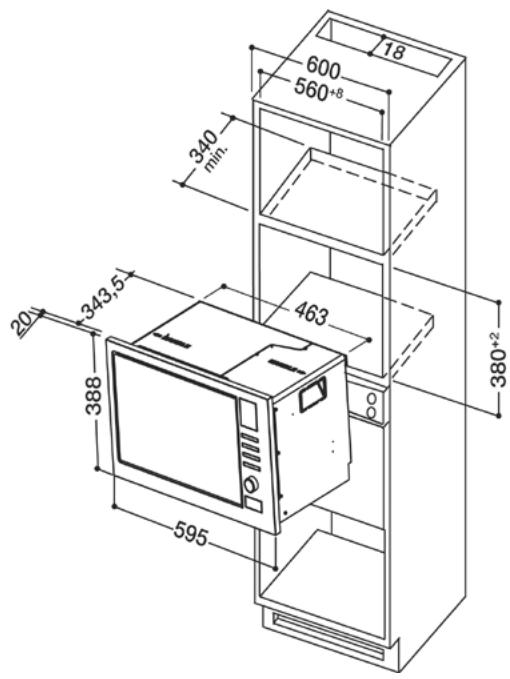
- This oven is intended for built-in use only. It is not intended for counter-top use or for use inside a cupboard.
- Please observe the special installation instructions.
- The appliance can be installed in a 60cm wide wall-mounted cupboard (at lease 55cm deep and 85cm off the floor).
- The appliance is fitted with a plug and must only be connected to a properly installed earthed socket.
- The mains voltage must correspond to the voltage specified on the rating plate.
- The socket must be installed and connecting cable must only be replaced by a qualified electrician. If the plug is no longer to accessible following installation, an all-pole disconnecting device must be present on the installation side with a contact gap of at lease 3mm.
- Adapters, multi-way strips and extension leads must not be used. Overloading can result in a risk of fire.
The accessible surface may be hot during operation.
1.Clock Setting
When the microwave oven is electrified, the oven will display "0:00", buzzer will ring once.
1) Press “ / ” once. “00:00” displays.
2) Turn "..." to adjust the hour figures, the input time should be within 0--23(24-hour).
3) Press “ / ”, the minute figures will flash.
4) Turn "..." to adjust the minute figures, the input time should be within 0--59.
5) Press “ Q /“ to finish clock setting. “:” will flash.
Note: 1) If the clock is not set, it would not function when powered.
2) During the process of clock setting, if you press “PAUSE”, the oven will go back to the previous status automatically.
2. Microwave Cooking
Press " 三 ” the LED will display
"P100". Press " 三 3 3 3 3 3 3 3 3 3 3 3 3 3 3 3 3 3 3 3 3 3 3 3 3 3 3 3 3 3 3 3 3 3 3 3 3 3 3 3 3 3
turn “” to choose the power you want, and “P100”, “P80” “P50”, “P30” or “P10” will display for each added press. Then press “~~ ~ ” to confirm, and turn “~” to set cooking time from 0:05 to 95:00.
Press " START" again to start cooking.
Example: If you want to use 80% microwave power to cook for 20 minutes, you can operate the oven as the following steps.
1) Press "START" once, the screen display "P100".
2) Press "~~" once again or turn
"h" to choose 80% microwave power.
3) Press "START" to confirm, and the screen displays "P 80".
4) Turn "®" to adjust the cooking time until the oven displays "20:00".
5) Press “ _START ” to start cooking.
3. Grill or Combi. Cooking
Press “ ” the LED will display
"G", and press the same button for times or turn the
"..." to choose the power you want, and "G", "C-1" or
"C-2" will display for each added press. Then press
" (START) " to confirm, and turn " h " to set
cooking time from 0:05 to 95:00. Press “ ” again to start cooking.
Example: If you want to use 55% microwave power and 45% grill power(C-1) to cook for 10 minutes, you can operate the oven as the following steps.
1) Press " 三 三 三 三 三 三 三 三 三 三 三 三 三 三 三 ” once, the screen display "P100".
2) Press " ≈ ” for timers or turn “” to
choose combi. 1 mode.
3) Press "C-1".
4) Turn "h" to adjust the cooking time until the oven displays "10:00".
5) Press " to start cooking.
Note: If half the grill time passes, the oven sounds twice, and this is normal. In order to have a better effect of grilling food, you should turn the food over close the door, and then press
"START" to continue cooking. If no operation, the oven will continue working.
4. Quick Start
1) In waiting state, Press “ ( ) ” to start cooking with 100% power, each added press will increase 30 seconds cooking time up to 95 minutes.
2) In microwave cooking or time defrost state, each press of “ ( START STOP ) ” can increase 30 seconds of cooking time.
3) In waiting state, turn “ ” left to set cooking time with 100% microwave power, then press “ ” to start cooking.
5. Defrost By Weight
1) Press “ / ” once, and the oven will display “dEF1”.
2) Turn "..." to select the weight of food from 100 to 2000 g.
3) Press "START" to start defrosting.
”Pad instructions
| Order | Display | Microwave Power | Grill Power |
| 1 | P100 | 100% | |
| 2 | P80 | 80% | |
| 3 | P50 | 50% | |
| 4 | P30 | 30% | |
| 5 | P10 | 10% | |
| 6 | G | 0% | 100% |
| 7 | C-1 | 55% | 45% |
| 8 | C-2 | 36% | 64% |
6. Defrost By Time
1) Press “ / ” twice, and the oven will display “dEF2”.
2) Turn "..." to select the defrost time. The MAX time is 95 minutes.
3) Press " START" to start defrosting.
The defrost power is P30, and it will not be changed.
7. Kitchen Timer
(1) Press “ / ” twice, LED will display 00:00, timer indicator will light.
(2) Turn "h" to enter the correct time. (The maximum cooking time is 95 minutes.)
(3) Press "START" to confirm setting, timer indicator will be lighted.
(4) When the kitchen time is reached, timer indicator will go out. The buzzer will ring 5 times. If the clock be set (24-hour system), LED will display the current time.
Note: The kitchen Time is differ from 24-hour system. Kitchen Timer is a timer.
8. Inquiring Function
(1) In states of microwave, grill and combination cooking, press “ ≈ ” the current power will be displayed for 3 seconds. After 3 seconds, the oven will turn back to the former state;
(2) In cooking state, press “ / ” to inquire the time and the time will display for 3 seconds.
9.Auto Menu
1) Turn "O" right to choose the menu, and "A-1" to "A-10" will display.
2) Press " START" to confirm.
3) Turn “h” to choose the default weight as the menu chart.
4) Press "START" to start cooking. Example: If you want to use "Auto Menu" to cook fish for 350g.
1) Turn " ” clockwise till “A-4” display.
2) Press " START" to confirm.
3) Turn "to select the weight of fish till "350" display.
4) Press “ ” to start cooking.
10. Multi-section cooking
At most 2 sections can be set for cooking. In multi-section cooking, if one section is defrosting, then defrosting shall be placed in the first section.
Example: If you want to defrost food for 5 minutes and then cook with 80% microwave power for 7 minutes, operate it as the following:
1) Press " Ⓞ/Ω ×" twice, and the oven will display "dEF2".
2) Turn "h" to select the defrost time till "5:00" display.
3) Press " ” once, the screen display "P100".
4) Press "~~" once again or turn "~~" to choose
80% microwave power.
5) Pres "P 80".

” to confirm, and the screen displays
6) Turn "b" to adjust the cooking time till the oven displays "7:00".
7) Press " " to start cooking, and buzzer will sound once for the first section, defrosting time counts down; buzzer will sound once again entering the second cooking. when cooking finish, buzzer sounds five times.
11. Lock-out Function for Children
Lock: In waiting state, press "PAUSE" for 3 seconds, there will be a long beep denoting entering the children-lock state and current time will display if the time has been set, otherwise, the LED will display "C--J". Lock quitting: In locked state, press "PAUSE" for 3 seconds, there will be a long "beep" denoting that the lock is released.
The menu chart:
| Menu | Weight (g) | Display |
| A1 PIZZA | 200 g | 200 |
| 400 g | 400 | |
| A2 Potato | 200 g | 200 |
| 400 g | 400 | |
| 600 g | 600 | |
| A3 Meat | 250 g | 250 |
| 350 g | 350 | |
| 450 g | 450 | |
| A4 Fish | 250 g | 250 |
| 350 g | 350 | |
| 450 g | 450 | |
| A5 Vegetable | 200 g | 200 |
| 300 g | 300 | |
| 400 g | 400 | |
| A6 Beverage | 1 cup (120 ml) | 1 |
| 2 cups (240 ml) | 2 | |
| 3 cups (360ml) | 3 | |
| A7 Pasta | 50g(with 450 ml cold water) | 50 |
| 100g(with 800 ml cold water) | 100 | |
| A8 Popcorn | 50 g | 50 |
| 100 g | 100 | |
| A9 Chicken | 400 | 400 |
| 800 | 800 | |
| 1200 | 1200 | |
| A-10 Reheat | 200 | 200 |
| 400 | 400 | |
| 600 | 600 | |
| Normal | ||
| Microwave oven interfering TV reception | Radio and TV reception may be interfered when microwave oven operating. It is similar to the interference of small electrical appliances, like mixer, vacuum cleaner, and electric fan. It is normal. | |
| Dim oven light | In low power microwave cooking, oven light may become dim. It is normal. | |
| Steam accumulating on door, hot air out of vents | In cooking, steam may can out of food. Most will get out from vents. But some may accumulate on cool place like oven door. It is normal. | |
| Oven started accidentally with no food in. | It is forbidden to run the unit without any food inside. It is very dangerous. | |
| Trouble | Possible Cause | Remedy |
| Oven cannot be started | (1) Power cord not plugged in tightly | Unplug. Then plug again after 10 seconds. |
| (2) Fuse blowing or circuits breaker works. | Replace fuse or reset circuits breaker (repaired by professional personnel of your company) | |
| (3) Trouble with outlet | Test outlet with other electrical appliances. | |
| Oven does not head | (4) Door not closed well | Close door well |
| Glass turntable makes noise when microwave oven operates | (5) Dirty roller rest and oven bottom | Refer to “Maintenance of Microwave” to clean dirty parts. |
According to Waste of Electrical and Electronic Equipment (WEEE) directive, WEEE should be separately collected and treated. If at any time in future you need to dispose of this product please do NOT dispose of this product with household waste. Please send this product to WEEE collecting points where available.
Please Read the Manual Carefully Before Installation
Please Note
Electrical connection
The oven is fitted with a plug and must be only connected to a properly installed earthed socket. In accordance with the appropriate regulations, the socket must only be installed and the connecting cable must only be replaced by a qualified electrician.
If the plug is no longer accessible following installation and all-pole isolating switch must be present on the installation side with a contact gap at least 3mm.
The fitted cabinet must not have a back wall behind the appliance.
Minimum installation ventilation slots and suction holes.
Note:
Do not trap or bend the power cable.
A. Built-in furniture
B.Prepare the cabinet
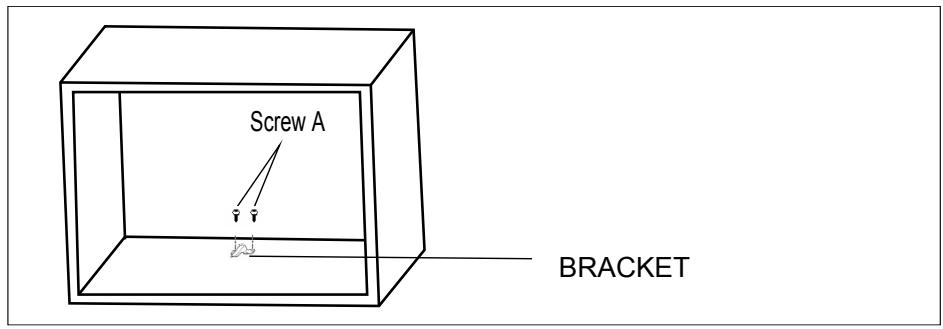
- Read the instruction on the BOTTOM CANINET TEMPLATE, put the template on the bottom plane of cabinet.
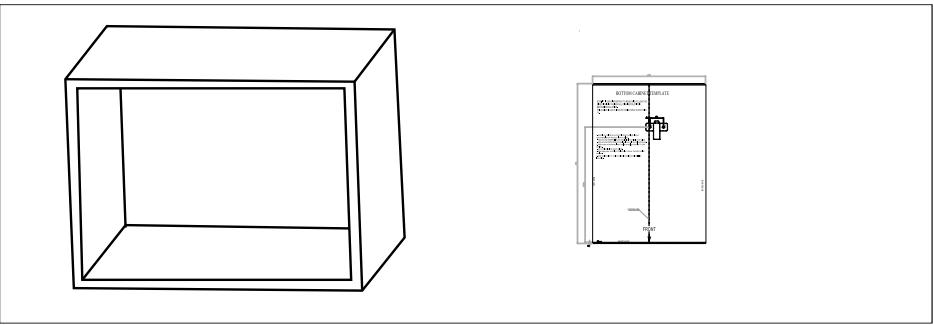
- Make the marks on the bottom plane of cabinet according to marks" a " of of the template
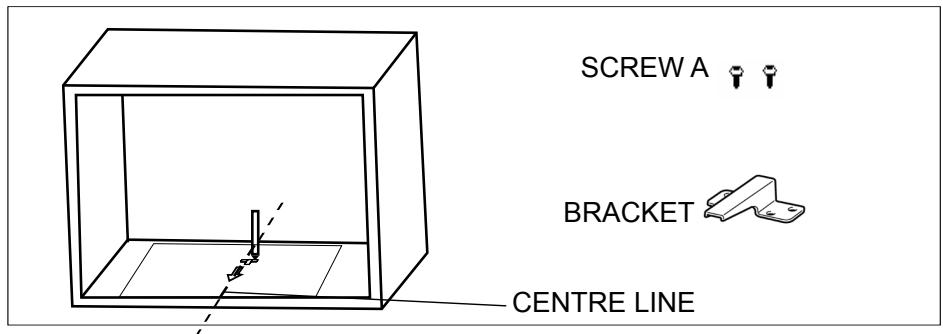
- Remove the bottom cabinet template and fix the bracket with screw A.
C.Install the oven
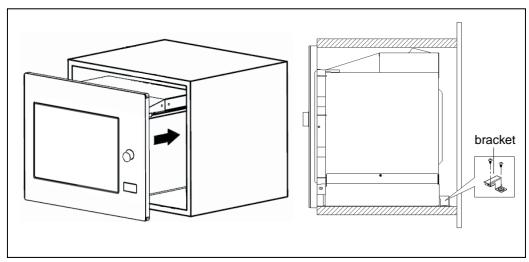
-
Install the oven to the cabinet
-
Make sure the back of the oven is locked by bracket.
-
Do not trap or kink the power cord.
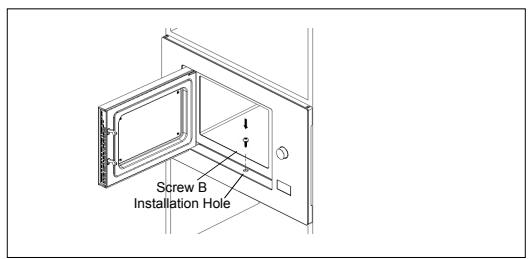
-
Open the door, fix the oven to the cabinet with Screw B, at the installation hole.