
DEDICA ARTE EC885.GY - Coffee machine DELONGHI - Free user manual and instructions
Find the device manual for free DEDICA ARTE EC885.GY DELONGHI in PDF.
| Product Type | Espresso Coffee Machine |
| Brand | De'Longhi |
| Model | DEDICA ARTE EC885.GY |
| Color | Gray |
| Power Supply | 120 V ~ 60 Hz, 1450 W |
| Water Tank Capacity | 1 L |
| Pressure | 15 bars |
| Usable Coffee Types | Ground coffee, ESE pods |
| Main Functions | Espresso, cappuccino, latte, hot water, steam |
| Included Filters | 1 cup, 2 cups, pod filter |
| Integrated Cup Warmer | Yes |
| Adjustable Steam Wand | Yes |
| Control Panel | 1 cup, 2 cups, steam, on/off buttons |
| Indicator Lights | Heat, steam, descaling, drip tray full |
| Removable Drip Tray | With level indicator |
| Safety | Auto shut-off, overheat protection, polarized plug |
| Maintenance | Programmed descaling, regular cleaning of filters and steam wand |
| Dimensions (L x H x D) | 33 x 29 x 15 cm |
| Weight | 4.2 kg |
| Repairability | Spare parts available, authorized service centers |
Frequently Asked Questions - DEDICA ARTE EC885.GY DELONGHI
User questions about DEDICA ARTE EC885.GY DELONGHI
0 question about this device. Answer the ones you know or ask your own.
Ask a new question about this device
Download the instructions for your Coffee machine in PDF format for free! Find your manual DEDICA ARTE EC885.GY - DELONGHI and take your electronic device back in hand. On this page are published all the documents necessary for the use of your device. DEDICA ARTE EC885.GY by DELONGHI.
USER MANUAL DEDICA ARTE EC885.GY DELONGHI
Instructions for use. Keep these instructions
Visit www.delonghi.com
for a list of service centers near you.
ELECTRIC CHARACTERISTICS
120V 60Hz1450W
MACHINEÀCAFÉ
When using electrical machines, basic safety precautions should always be followed, including the following:
- Read all instructions.
- Use this machine only as described in this instruction manual.
As with any electrical machine, the instructions aim to cover as many situations as possible. Caution and common sense should be used when operating and installing this machine. - To protect against fire, electrical shock and personal injury, do not immerse cord, plug or machine in water or other liquid.
- Never allow the machine to be used by children.
- Unplug from the outlet when not in use and before cleaning. Allow to cool before fitting or taking off parts, and before cleaning the machine.
- Do not operate with a damaged cord or plug, or after the machine malfunctions, or has been damaged in any manner. Return the machine to the nearest authorized service facility for examination, repair or adjustment.
- The use of accessory attachments or spare parts not recommended by the machine manufacturer may result in fire, electrical shock or personal injury.
Do not use outdoors. - Do not let the cord hang over the edge of the table or counter, or touch hot surfaces.
- Do not place on or near a hot gas or electrical burner, or in a heated oven.
Plug cord into the wall outlet. To disconnect, turn any control to "off", then remove plug from wall outlet. - Do not use the machine for other than the intended use. This machine is to be utilized for domestic use only. Any other use is to be considered improper and therefore, dangerous.
WARNING: To reduce the risk of fire or electric shock, do not remove the exterior of the unit or the cover. Don't attempt to repair or modify the machine, doing so will void the warranty. Repair should be done by authorized service personnel only!
SAVE THESE INSTRUCTIONS
THIS PRODUCT IS FOR HOUSEHOLD USE ONLY
SHORT CORD INSTRUCTIONS
- A short power cord is provided to reduce risks resulting from becoming entangled in or tripping over a longer cord.
- Longer, detachable power supply cords or extension cords are available and may be used if care is exercised in their use.
- If an extension cord is used, the marked electrical rating should be at least as great as the electrical rating of the machine. If the machine is provided with 3- wire, grounding type cord, the extension should be a GROUNDING TYPE 3 - WIRE CORD. The longer cord should be arranged so that it will not drape over the counter-top or table top where it can be pulled on by children or tripped over.
- Your product is equipped with a polarized alternating current line plug (a plug having one blade wider than the other). This plug will fit into the power outlet only one way. This is a safety feature. If you are unable to insert the plug fully into the outlet, try reversing the plug. If the plug should still fail to fit, contact your electrician to replace your obsolete outlet. Do not defeat the safety purpose of the polarized plug.
1. DESCRIPTION
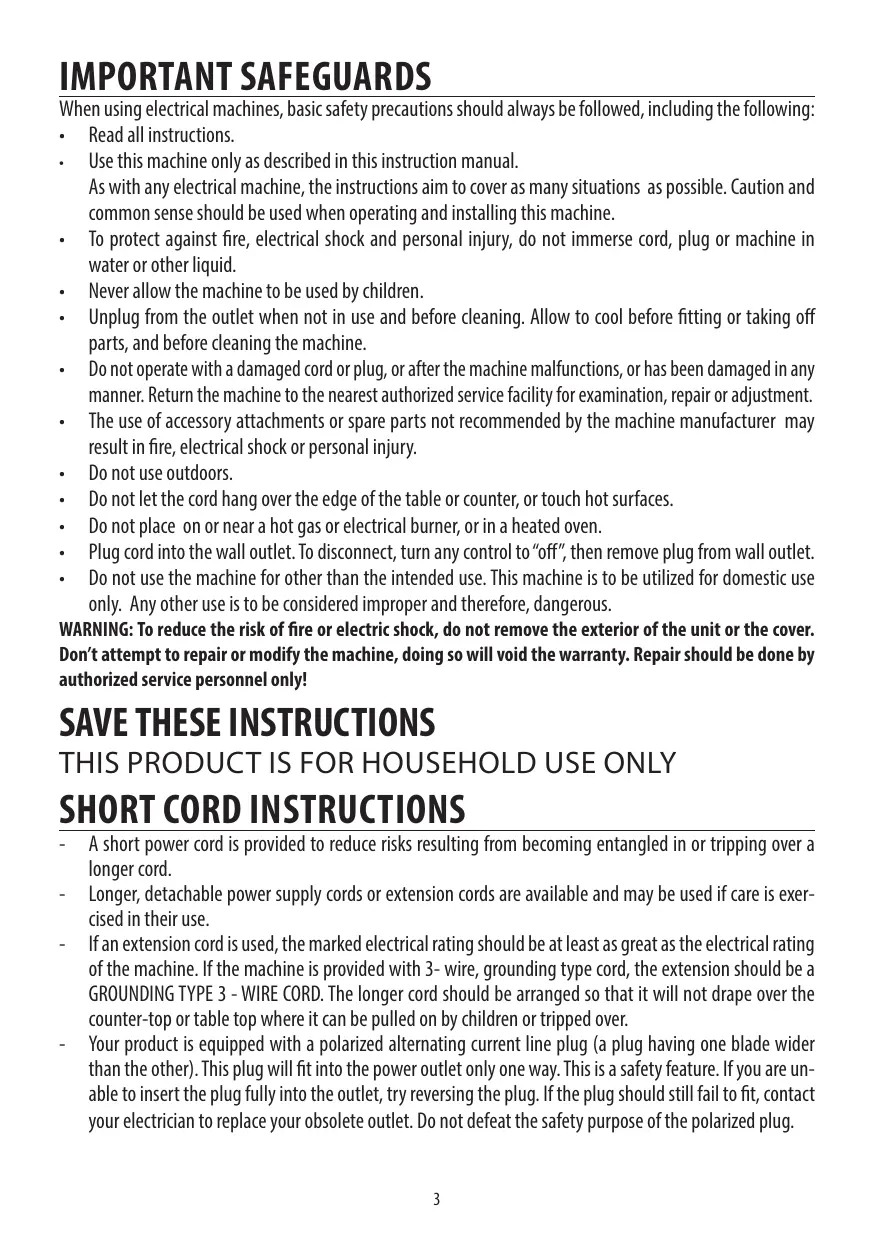
1.1 Description of appliance - A
A1. Water tank lid
A2. Tank extraction handle
A3. Water tank
A4. Cup warmer
A5. Brewing unit
A6. ON/OFF switch
A7. Cup tray
A8. Drip tray full indicator
A9. Drip tray
A10. Mugs or glasses tray
A11. Steam wand
A12. Steam dial
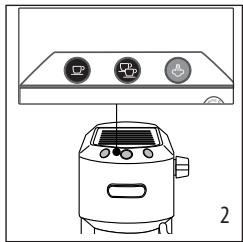
1.2 Description of control panel - B
B1. One cup button
B2. ON light on button (white)
B3. Two cups button
B4. ON light on button (white)
B5. Steam button
B6. ON light on button (white)
B7. Descale light (orange)
1.3 Description of accessories - C
C1. Portafilter
C2. 1 cup filter (symbol under filter)
C3. 2 cup filter (symbol under filter)
C4. Pod filter (symbol under filter)
C5. Measuring scoop/pressor
C6. Tamper
C7. Cleaning needle
C8. Water hardness test
C9. Descaler
1.4 Recommended optional accessories
Visit Delonghi.com for more information.

Water hardness filter
EAN:8004399327252
2. PREPARING YOUR MACHINE FOR FIRST USE
- Wash and dry all accessories (including water tank (A3)) with warm water and mild detergent.
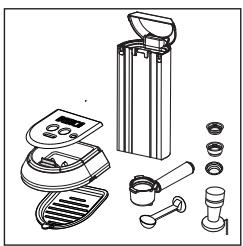
- Extract the tank by pulling it upwards.
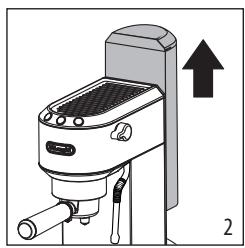
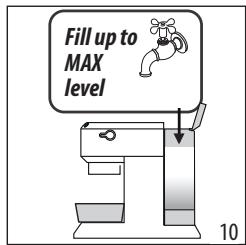
- Open the lid and fill the tank with fresh clean water, taking care not to exceed the MAX level.
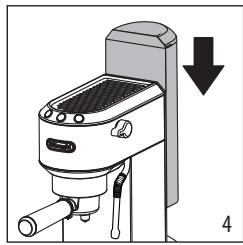
- Put the tank back in the machine, pressing lightly to open the valves located on the bottom of the tank.

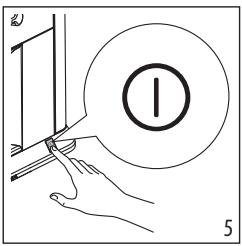
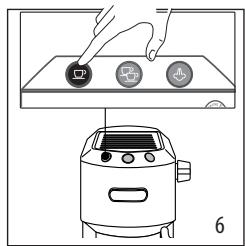
- Turn the machine on by pressing the ON/OFF switch (A6).
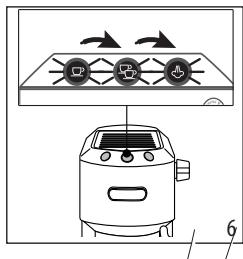
- The machine performs a self-diagnosis cycle, indicated by sequential flashing of the three buttons.
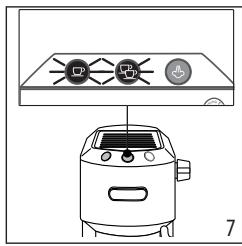
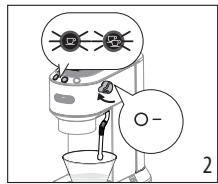
- The and lights flash to indicate the machine is heating up. When the lights stop flashing and remain on steadily, the machine is ready for rinse.
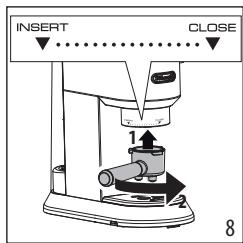
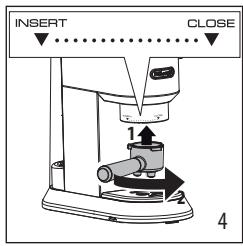
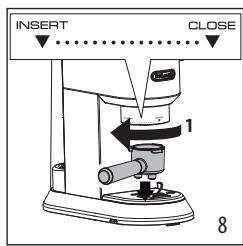
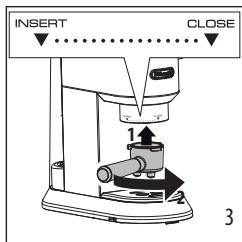
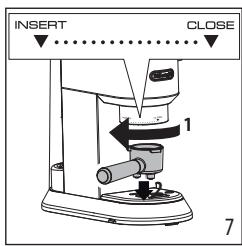
- Attach the portafilter to the machine aligning the portafilter handle with "INSERT", then turning the handle to the right until it is aligned in the "CLOSE" position.
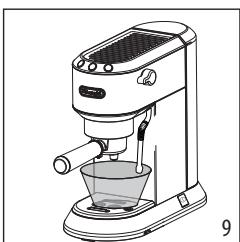
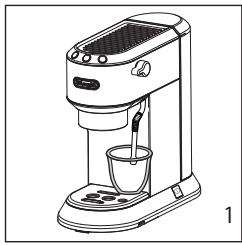
- Place a container with a minimum capacity of 500 ml (17 fl oz) under the brewing unit (A5) and steam wand (A11).
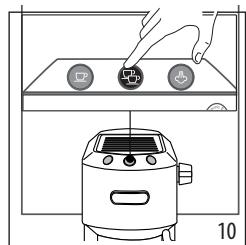
- Press the button. Repeat this operation 5 times.
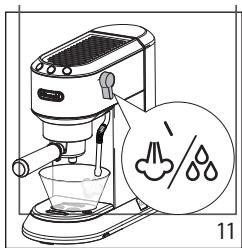
- Turn the hot water/ steam dial to the position and deliver to empty the water tank; then turn the knob to the 0 position. This is to purge the steam circuit before frothing or steaming your milk.
Please note:
- Never operate the machine without water in the tank or without the tank.
It is normal for there to be water in the space under the tank. This should therefore be dried regularly with a clean sponge.
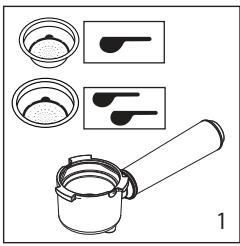
- Place the coffee filter (C2) for single espresso or (C3) for double espresso in the portafilter (C1).
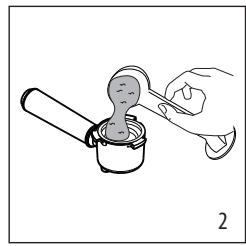
- Fill the coffee filter with ground coffee. Make sure that you are using a fine grind, specific for espresso.
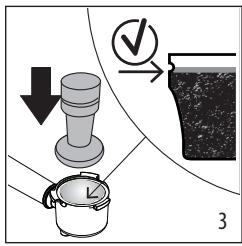
- Distribute the pre-ground coffee evenly and press with the tamper (C6). Make sure the coffee is at the recommended dose level after tamping. You may need to add some coffee.
- Remove any excess coffee from the rim of the portafilter and attach the portafilter to the machine.

- Place the cup or cups under the portafilter spouts.
- Make sure the lights corresponding to the coffee buttons are on, then press the or

coffee button.
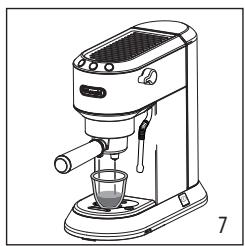
- The machine proceeds to make the coffee and delivery is interrupted automatically.
- To remove the portafilter, turn the handle from right to left.
Please note:
Before filling the coffee filter with pre-ground coffee, make sure there are no coffee residues left in the filter from the last time you made coffee.
While the machine is making coffee, delivery can be interrupted at any moment by pressing the coffee button pressed previously.
- At the end of delivery (within 3 seconds), to increase the amount of coffee in the cup, press and hold the coffee button pressed previously. Delivery is automatically interrupted after a few seconds.
- To avoid splashes, never remove the portafilter while the machine is delivering coffee. Always wait for a few seconds after delivery.
3.1 Tamping the coffee:
Correct pressing of the pre-ground coffee is essential to obtain a correctly extracted espresso.
If you press too lightly or unevenly, the coffee will be delivered quickly and will be weak and under-extracted
3.2 Tips for a hotter coffee
- You are recommended to warm the cups before making coffee by rinsing them with a little hot water.
- Attach the portafilter (C1) to the machine with the filter (C2) or (C3) in place but without adding coffee. Using the same cup as will later be used to make the coffee, press the 1 cup button and deliver hot water into the cup to heat it.
- Raise the infusion temperature in the settings menu (see section "9. Menu settings").
- Rest the cups you will be using on the cup warmer (A4) which becomes hot during operation.
- Place the filter for coffee pods (C4) in the portafilter.

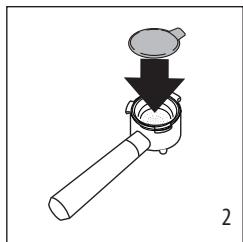
- Insert the pod, centring it as far as possible on the filter. Always follow the instructions on the pod pack to position the pod on the filter correctly.
- Attach the portafilter to the machine.
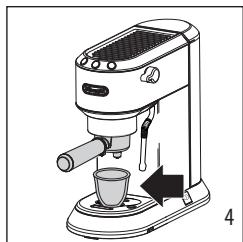
- Place the cup under the portafilter spouts.
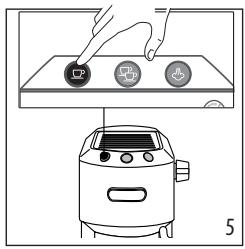
- Make sure the lights corresponding to the coffee buttons are on, then press the coffee button.
- The machine proceeds to make the coffee and delivery is interrupted automatically.
- To remove the portafilter, turn the handle from right to left.
4.1 Choose the pods

Use pods conforming to the ESE standard, indicated on the pack by the corresponding symbol.
The ESE standard is a system accepted by leading pod producers and enables espresso
coffee to be prepared simply and cleanly.
Please note:
-
When using pods, you can brew 1 cup of coffee only.
While the machine is making coffee, delivery can be interrupted at any moment by pressing the coffee button pressed previously. -
At the end of delivery (within 3 seconds), to increase the amount of coffee in the cup, press and hold the coffee button pressed previously. Delivery is automatically interrupted after a few seconds.
- To avoid splashes, never remove the portafilter while the machine is delivering coffee. Always wait for a few seconds after delivery.
See section "3.2 Tips for a hotter coffee".
5. PROGRAMMING THE QUANTITIES OF COFFEE IN THE CUP
The machine is set by default to automatically deliver standard quantities. To change these quantities, proceed as follows:
- Place one or two cups under the portafilter spouts.
- Press and hold the button you want to programme (or
- The coffee maker starts delivering coffee and the other coffee button flashes to indicate that the machine is in programming mode.
- Once the required quantity of coffee has been delivered into the cup, release the button. Delivery stops and the light flashes to indicate that the quantity has been saved correctly.
| Default quantity | Programmable quantity | |
| ○ | 35 ml (1.18 fl oz) | from ≈15 to ≈90 ml (from ≈0.51 to ≈3.04 fl oz) |
| ○ | 70 ml (2.37 fl oz) | from ≈30 to ≈180 ml (from ≈1.01 to ≈6.09 fl oz) |
6. MAKING CAPPUCCINO
- To use tall glasses, remove the drip tray (A9) and stand the glasses on the glasses tray (A10)
- Prepare the espresso coffees as described in the previous sections, using sufficiently large cups.
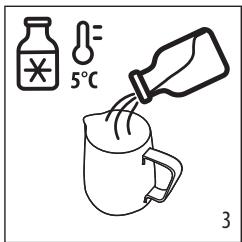
- Fill a milk pitcher with fresh cold milk. Milk will up to triple in volume.
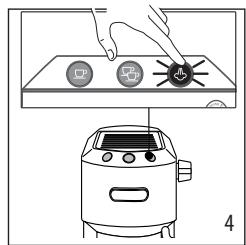
- Press the button. The light flashes. When the light comes steady, the appliance is ready to deliver steam.
Tips for best results:
Recommended milk quantity for cappuccino: 100ml/3.5 fl oz.
- For a denser more even froth, you must use milk at refrigerator temperature (about 5^ C / 41^ F ).
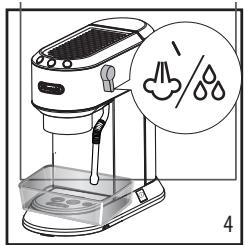
- When steam is ready, before frothing milk, position an empty container under the frother and open the dial for a few seconds to eliminate any air left in the circuit. Close the dial again and proceed.

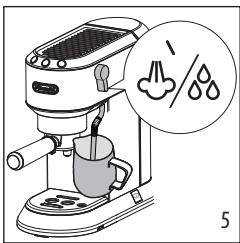
- Place the milk pitcher under the steam wand (A11): immerse the frother and turn the dial to the position.
- To make the froth, put the nozzle on the surface of the milk and air will catch by the mixing of milk and steam.
- Keep the steam nozzle just on the surface, careful not to make big bubbles by letting too much air in.
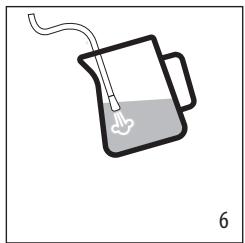
-
Insert the steam nozzle just under the milk: this create a vortex.
-
Once the desired temperature is reached, turn the steam knob off and wait till steam stops completely before removing the milk pitcher
- Pour the frothed milk into the cups containing the espresso coffee prepared previously. The cappuccino is ready. Sweeten to taste and if desired, sprinkle the froth with a little cocoa powder.
Please note:
To prepare more than one cappuccino, first make all the coffees then at the end prepare the frothed milk for all the cappuccinos.
To exit the steam function, press any button. The and lights flash to indicate that the Cooling Cycle is required.
- You should not deliver steam for more than 60 seconds.
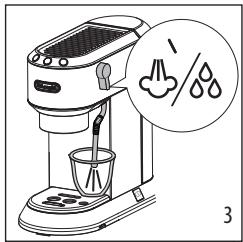
Cleaning the steam wand
- After every use, remove with a soft damp cloth any milk residues from the steam wand. For perfect cleaning, we recommend Eco Multi-Clean: it ensures hygiene by removing milk proteins and fats and can be used to clean the whole machine.
- Use the steam for a deeper cleaning.
- Wait that the steam wand cool down and open the hole of the nozzle with the cleaning needle (C7).
6.1 Cooling Cycle
After having used the steam wand and exited the steam function, the two lights and on the front of the machine will flash simultaneously indicating that the boiler needs to be cooled off in order to reach the precise espresso brewing temperature. Simply proceed as follows:
-
place a container under the cappuccino maker;
-
open the steam dial to deliver steam and hot water: the light flashes;
-
when both lights ( and ) flash the boiler is cool: close the steam dial. (when the boiler is cool, the pump stops operating and no more water is delivered).
The coffee maker is now ready for use.

7. MAKING HOT WATER
1. Place a container under the steam wand.
2. Wait for the coffee lights to come on steadily.
3. Turn the dial to the position. Hot water is delivered from the steam wand.
You should not deliver hot water for more than 60 seconds.
- To stop hot water delivery, close the dial.
8. MEASURING WATER HARDNESS
The descending alarm is displayed after a period of time established according to water hardness. The machine can also be programmed according to the hardness of the water supply in the various regions. Softer water requires less frequent descending.
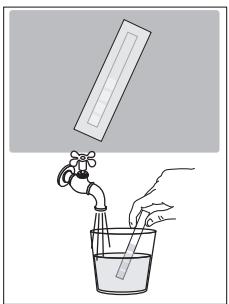
- Remove the indicator paper from its packaging.
- Immerse the paper completely in a glass of water for about one second.
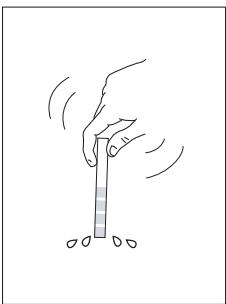
3. Remove the strip from the water and shake lightly. After about a minute, 1, 2, 3, or 4 red squares appear, depending on the hardness of the water. Each square corresponds to one level.
See instructions in section "9. Menu settings" to set the machine.
| Total Hardness Test | Hardness |
| Soft | |
| Medium | |
| High |
9. MENU SETTINGS
1. Enter the menu
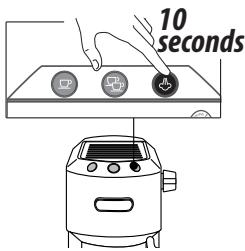
Press and hold the

button for 10 seconds until
the three buttons flash in sequence:

| 2. Set the machine | |
| Infusion temperature | Press for Low temperature |
| This temperature refers to the water inside the thermoblock. This differs from the temperature of the beverage in the cup or the temperature measured when the beverage comes out from the portafilter spouts. | Press for Medium temperature |
| Press for High temperature | |
| Water hardness | Press for Soft water |
| Press for Medium water | |
| Press for High water | |
| Auto-off | Press for 9 minutes |
| Press for 30 minutes | |
| Press for 3 hours | |
| 3. Exit the menu | |
| Exit the settings menu by waiting for 15 seconds. Please note: · The setting is automatically confirmed and it is highlighted by a quick flashing of the light relative to the selection. · If no selections are made for 15 seconds, the machine automatically exits programming and is ready for use again. | |
11. DEFAULT VALUES (RESET)
This resets all menu settings and programmed quantities back to the default values.
To reset the default values, proceed as follows:
- Position the steam spout over the drip tray;
- Enter the settings menu;
- Turn the steam dial to the position;
- Press the button. The three lights flash simultaneously to confirm that the original settings have been restored.
- The and lights flash to indicate that the steam dial must be closed again ( symbol).
When the steam dial has been closed, the machine is ready for use.
12. CLEANING THE MACHINE
The following parts of the machine must be hand cleaned regularly:
the drip tray (A9)
the coffee filters (C2), (C3) and (C4);
the brewing unit (A5);
the water tank (A3);
the steam wand (A11) as described in section "Cleaning the steam wand";
Important!
None of the components or accessories is dishwasher safe.
- Do not use solvents, abrasive detergents or alcohol to clean the coffee machine.
- Do not use metal objects to remove encrustations or coffee deposits as they could scratch metal or plastic surfaces.
If the machine is not used for more than one week, before using it again, we strongly recommend you perform a rinse cycle as described in section "2. Preparing your machine for first use".
Danger!
While cleaning, never immerse the coffee maker in water. It is an electrical machine.
Before cleaning the outside of the machine, turn it off, unplug from the main socket and allow to cool.
12.1 Cleaning the drip tray
Important!
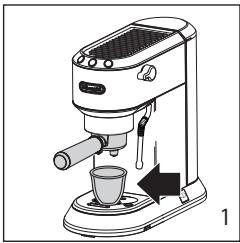
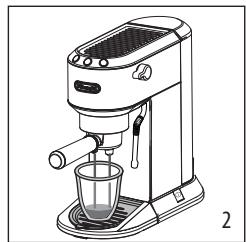
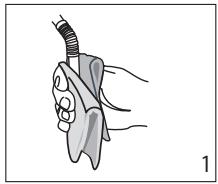
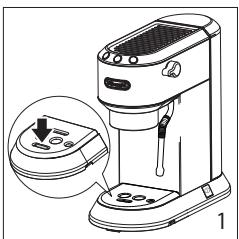
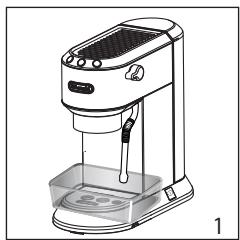
The drip tray is fitted with a level indicator (red) showing the level of water it contains. Before the indicator protrudes from the cup tray (fig. 1), the drip tray must be emptied and cleaned otherwise the water may overflow the edge and damage the machine, the surface it rests on or the surrounding area.
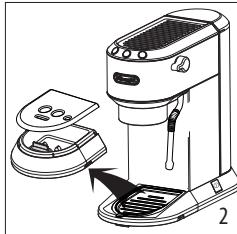
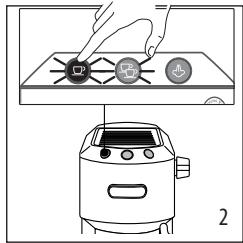
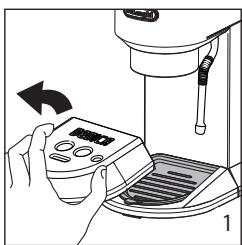
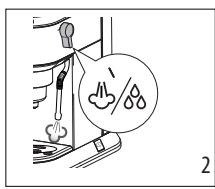
- Remove the drip tray (A9) (fig. 2).
- Remove the cup tray (A7), empty the water and clean the drip tray with a cloth, then reassemble the drip tray. Extract the mugs or glasses tray (A10), clean with water, dry and put back in the machine;
- Put the drip tray back in place.
12.2 Cleaning the coffee filters
The coffee filters are designed to obtain the best possible coffee crema. For best results, the filters must always be clean and free from all coffee residues.
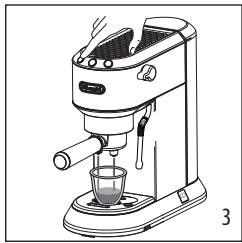
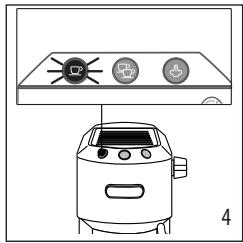
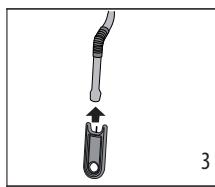
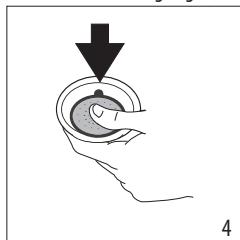
After using the appliance, always rinse the filters under abundant running water (fig. 3), pushing the perforated filter to make sure it is always correctly inserted in its housing (fig.4);

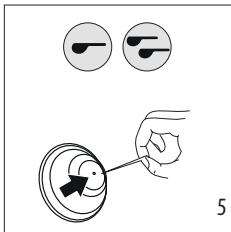
make sure the hole underneath (shown in fig. 5) is free from all residues.
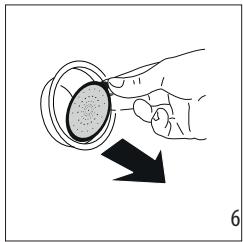
If still dirty, and in any case always at least once a month, clean the coffee filters thoroughly:
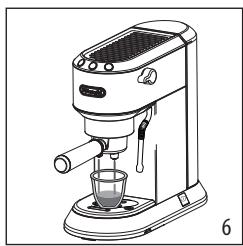
- Extract the perforated filter by pulling the tab (fig. 6).
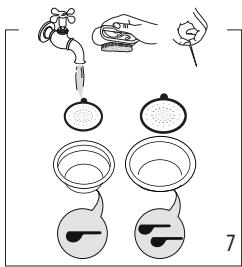
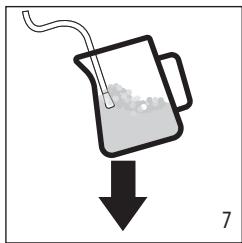
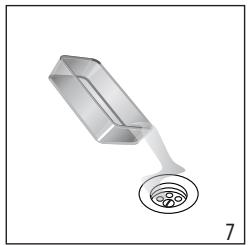
- Rinse the filters under running water (fig. 7).
- Make sure the holes are not clogged. If necessary, clean with a pin (fig. 5-7).
- Dry all the components with a cloth.
- Put the perforated filter back in the housing and press as far as it will go (fig. 4).
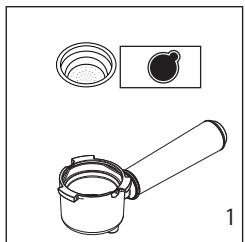
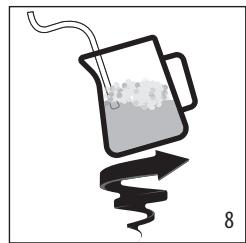
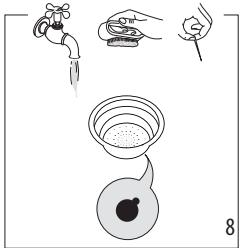
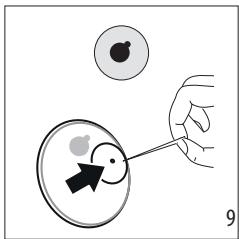
Pod filter
Rinse under running water. Make sure the holes are not clogged. If necessary, clean with a pin (figs. 8-9).
12.3 Cleaning the brewing unit
After every 200 coffees, rinse the brewing unit by delivering about 0.5l of water from the brewing unit (press the coffee button without using ground coffee).
12.4 Other cleaning operations
- Do not use solvents or abrasive detergents to clean the coffee maker. Use a soft damp cloth only.
- Clean the portafilter cup.
12.5 Cleaning the water tank
- Clean the water tank regularly (about once a month) and whenever you replace the water softener filter (if present) with a damp cloth and a little mild washing up liquid;
- Remove the filter (if present) and rinse with running water;
- Put the filter (if provided) back in the machine, fill the tank with fresh water and replace the tank;
- (If water filter is present) Deliver about 100ml of water.

Before use, read the instructions and the labelling on the descaler pack.
It is important to use De'Longhi descaler only. Using unsuitable descaler and/or performing descaling incorrectly may result in faults not covered by the manufacturer's guarantee.
- Descaler could damage delicate surfaces. If the product is accidentally spilt, dry immediately.
IF PRESENT,REMOVE THE WATER SOFTENER FILTER.
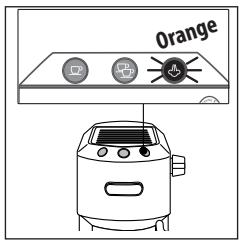
Descale the machine when the orange light on the button flashes.
Setting the water hardness (see Section 8) will increase (harder water) or decrease (softer water) the frequency of the need to descale the machine.
- Make sure the portafilter is not attached and position a container under the hot water spout and brewing unit

- Fill the tank with the descaler solution, obtained by diluting the descaler provided with water (fill the water tank up to the MAX level).
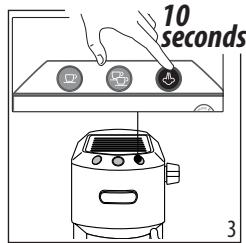
- Press and hold the button for 10 seconds until the three buttons flash in sequence.
4. Turn the steam dial to the position.
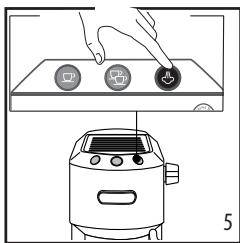
Press the button to start descending
- The descale programme starts and the descaler liquid comes out of the steam wand and brewing unit. The descale program removes limescale deposits from inside the appliance by automatically performing a series of rinses and pauses until the tank is empty.
Please note:
During descending, to clean the brewing unit, close the steam dial from time to time to deliver small quantities of descaler from the brewing unit.
Delivery stops and the orange light continues to flash, indicating that descending is still underway.
This indicates that it is necessary to proceed with rinsing: see next steps.
- Empty the container used to collect the descaler solution and replace it empty.
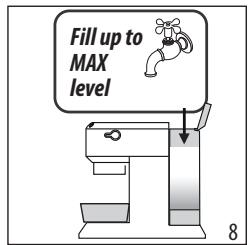
- The machine is now ready for rinsing through with clean water. Extract the water tank, empty, rinse under running water, fill with fresh water up to the MAX level and put back in the machine.
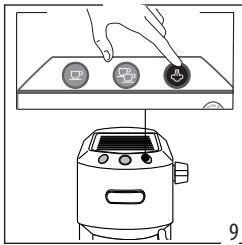
- Make sure the steam dial is in the position, then press the button to start rinsing. During rinsing, to clean the brewing unit, close the steam dial from time to time to deliver small quantities of water from the brewing unit.
-
Make a second rinse from step 7 to 9 inserting the water filter hardness (if previously installed).
-
When the water tank is empty, the orange light goes out and
descaling is complete. The and lights flash. - Close the steam dial turning it to 0 position.
- Fill the water tank with fresh water.
Now the appliance is ready to use.
Please note
- EXPLANATION OF LIGHTS
| Lights | Operation | Explanation of lights |
| The ON/OFF button is turned on | The machine performs a self-diagnosis cycle, indicated by sequential flashing of the lights | |
| When the machine is turned on | Flashing lights: the machine is heating up to make coffee Lights on steadily: the machine is ready to make coffee | |
| Steam dial open | Flashing lights: close the steam dial | |
| Cleaning & Cooling Cycle required | Activate the Cleaning & Cooling Cycle as described in section "6.1 Cooling Cycle". | |
| → | ||
| The tank is empty or the machine will not make coffee | The lights flash rapidly. See the section “2. Preparing your machine for first use” | |
| The steam function is required | Flashing light: the machine is heating up to deliver steam Light on steadily: the machine is ready to deliver steam | |
| orange flashing | The machine needs descaling | Descale the machine, the operation is complete when the light goes off. |
15. TROUBLESHOOTING
| Problem | Cause | Solution |
| No espresso coffee is delivered | No water in the tank | Fill the tank |
| The holes in the portafilter are clogged | Clean the portafilter spout holes | |
| The filter is clogged of the perforated filter is missing | Clean as described in section “12.2 Cleaning the coffee filters” | |
| The tank has been inserted incorrectly and the valves on the bottom are not open | Press the tank down lightly to open the valves on the bottom | |
| Limescale in the water circuit | Descale as described in section “13. Descaling” | |
| The espresso coffee drips from the edges of the portafilter rather than the holes | The portafilter has been inserted incorrectly or is dirty | Attach the portafilter correctly and rotate firmly as far as it will go |
| The espresso boiler gasket has lost elasticity or is dirty | Have the espresso boiler gasket replaced by Cus-tomer Services | |
| The holes in the portafilter spouts are blocked | Clean the portafilter spout holes | |
| The filter is clogged or the perforated filter is missing | Clean as described in section “12.2 Cleaning the coffee filters” | |
| The portafilter cannot be at-tached to the machine | Too much coffee has been placed in the filter | Use the measure supplied and make sure you are using the correct filter for the type of preparation |
| → | ||
| The coffee crema is too light (delivered from the spout too fast) | The pre-ground coffee is not pressed down firmly enough | Press the pre-ground coffee more firmly |
| There is not enough pre-ground coffee | Increase the quantity of pre-ground coffee | |
| The pre-ground coffee is too coarse | Use only pre-ground coffee for espresso coffee makers | |
| The wrong type of pre-ground coffee is being used | Change the type of pre-ground coffee | |
| The coffee crema is too dark (delivered from the spout too slowly) | There is not enough pre-ground coffee | Reduce the quantity of pre-ground coffee |
| The espresso coffee outlet is blocked | Clean as described in section “12.3 Cleaning the brewing unit” | |
| The filter is blocked | Clean as described in section “12.2 Cleaning the coffee filters” | |
| The pre-ground coffee is too fine | Use only pre-ground coffee for espresso coffee makers | |
| The pre-ground coffee is too fine or damp | Use pre-ground coffee for espresso coffee makers only and make sure it is not too damp | |
| Limescale in the water circuit | Descale as described in section “13. Descaling” | |
| After delivering coffee, the filter remains attached to the brewing unit | Insert the portafilter again, deliver coffee, then remove the portafilter | |
| The machine will not make any drink and all the lights flash for a few seconds | No water in the tank | Fill the tank with water |
| The tank has been inserted incorrectly and the valves on the bottom are not open | Press the tank down lightly to open the valves on the bottom | |
| The brewing unit is clogged | Clean as described in section “12.3 Cleaning the brewing unit” | |
| The filter is clogged | Clean as described in section “12.2 Cleaning the coffee filters” | |
| Limescale in the water circuit | Descale as described in section “13. Descaling” | |
| The machine does not function and all the lights flash | Disconnect the machine immediately and contact authorised Customer Services. | |
| No milk froth is formed when making cappuccino | Milk not cold enough | Always use milk at refrigerator temperature |
| Brother dirty | Clean as described in section “Cleaning the steam wand” | |
| Limescale in the water circuit | Descale as described in section “13. Descaling” | |