USER MANUAL DH 60 EX 756C - DH 60 EX 756C VALBERG
This product is guaranteed for a period of 2 years from the date of purchase* against any failure resulting from a manufacturing or material defect. This warranty does not cover defects or damage resulting from incorrect installation, improper use or abnormal wear of the product.
*as shown on the sales receipt.
CONDITION DE GARANTIE
Thank you for choosing this VALBERG product.
Chosen, tested and recommended by ELECTRO DEPOT,
the products of the VALBERG brand are easy to use,
reliable and of an impeccable standard.
Thanks to this appliance, you can be sure that each
use will bring you satisfaction.
Welcome to ELECTRO DEPOT.
Visit our website: www.electrodepot.fr
A Before using the appliance

Before using the appliance
Safety information

Overview of the appliance
Description of the appliance Technical Information

Using the appliance
Preparation before installation
Installation (external outlet)
Installation in the chimney
Installation (internal outlet)
Replacing the bulb

Practical information
Maintenance Troubleshooting Packaging and the environment Disposing of your old appliance
Thank you for choosing this extractor hood. This instruction manual has been designed to provide you with all the necessary instructions linked to the installation, use and maintenance of you appliance. Please read this instruction manual carefully before installing and using the device to ensure that it is used correctly and safely.
The extractor hood is made from high-quality materials and has a simple design. It is fitted with a powerful electric motor and centrifugal fan and also offers a great extraction capacity, silent operation, non-stick grease filters and easy assembly.
Children must never be allowed to use the appliance.
- The extractor hood is intended for domestic use only. It is not suitable for use with barbecues, professional grills or any other commercial equipment.
- The extractor hood and its filters must be cleaned regularly to keep them in good working order.
- Clean the extractor hood according to the instruction manual ensuring that there is no risk of burning. Cleaning the appliance without observing the instructions could present a fire hazard.
- Direct cooking on a gas cooker is prohibited.
- Make sure that the kitchen is always well ventilated.
- If the power cable is damaged, it must be replaced by the manufacturer, one of their technicians or another similarly qualified party to avoid all risks.
- The room must be well ventilated when using the extractor hood at the same time as appliances which run on the combustion of gas or other fuels.
- Air must not be discharged in a conduit used for the extraction of vapour coming from appliances operating on the basis of the combustion of gas or other fuels.
- You must respect the regulations relating to the evacuation of air.
- This appliance may be used by children over the age of 8 and people with physical, sensory or mental disabilities or a lack of experience or knowledge provided that they are supervised or have received instructions for using the appliance safely and that they understand the risks involved.
- Children should be supervised to ensure that they do not play with the appliance.
- Cleaning and user maintenance should not be carried out by children without supervision.

WARNING
Accessible parts may become hot when used with cooking appliances.
- Food must not be flambéed under the extractor hood.
- The warnings to be taken into consideration feature in the same section of the instruction manual as those relating to assembling the appliance.

WARNING
Risk of electric shock
- Only connect the appliance to a properly earthed socket. In case of doubt, contact a duly qualified professional for advice.
- Failure to comply with these instructions could lead to risks of death, fire or electric shock.
WARNING: Failure to follow instructions for the installation of screws of attachment devices could create electrical hazards.
For instructions on installing and cleaning the device, refer to the following paragraph of the manual.
Description of the appliance
Touch controls T001

On/Off button
It's used for turning on/off the fan.

Speed decrease button
For decreasing the speed of the fan.

Digital display
Fan speed display: "1" for Low speed, "2" for Medium speed, "3" for High speed. "4" for booster function.

Speed plus button
For increasing the speed of the fan

Light button
Booster function
Press + to speed 4, enter into highest speed while the hood is in use and it will increase speed for 5 minutes, after that slowing down again.
According to regulations EU 65/2014 and the harmonised standards in force.
| Trademark | Valberg |
| Product code | 970142 |
| Model reference | DH 60 EX 756C (v2) |
| Annual energy consumption in kWh/a (AEChotte) | 10.4 |
| Energy efficiency class | A++ |
| Fluid-dynamic efficiency (FDEhotte) | 35.5 |
| Fluid-dynamic efficiency class | A |
| Light efficiency in lux/Watt | 23.3 |
| Light efficiency class | B |
| Grease filtration efficiency in % | 74.0 |
| Grease filtration efficiency class | D |
| Air flow in m³/h at minimum speed during normal operation (Qmin) | 265.7 |
| Air flow in m³/h at maximum speed during normal operation (Qmax) | 467.2 |
| Air flow in m3/h in intensive or “boost” mode if included (Qboost) | 676.5 |
| Acoustic air emissions weighted against value A in dB at minimum speed during normal operation | 50 |
| Acoustic air emissions weighted against value A in dB at maximum speed during normal operation (Lwa) | 62 |
| Acoustic air emissions weighted against value A in dB at intensive or “boost” speed if included | 68 |
| Energy consumption in W in “standby” mode (Ps) | / |
| Energy consumption in W in “stop” mode (Po) | 0.45 |
| Additional information according to regulation EU 66/2014 and standards in force. Growth factor over time (f) | 0.7 |
| Energy efficiency index (EEIhotte) | 30.0 |
| Air flow in m3/h measured at maximum efficiency point (Qbep) | 214.9 |
| Air pressure in Pa measured at maximum efficiency point (Pbep) | 192 |
| Electric power input in W measured at maximum efficiency point (Wbep) Nominal | 35.5 |
| power in W of lighting system (Wl) | 3.0 |
| Average brightness in lux of lighting system on cooking surface (Emoyen) | 70 |
Technical features
| Rated supply (voltage in V, type of current & frequency in Hz) | 220-240 ~ 50 |
| Electrical protection class | Class I |
| Rated motor supply in W | 85 |
| Number and type of lights | 2 x LED modules |
| Lighting power in W by light / total | 1.5 / 3 |
| Lights replaceable by the user | No |
| Total rated power in W | 88 |
| Maximum air flow in m³/h | 513.6 |
| Lighting | |
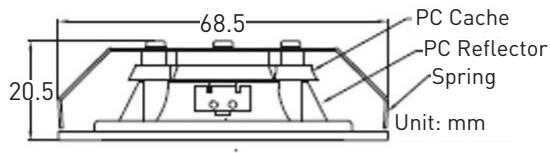
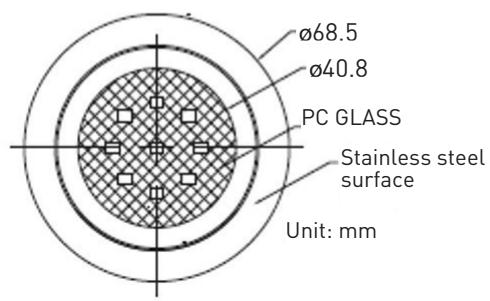
| Code ILCOS D | DSR-1.5-S-68 (12 V) |
Diagram
Preparation before installation
Diagram
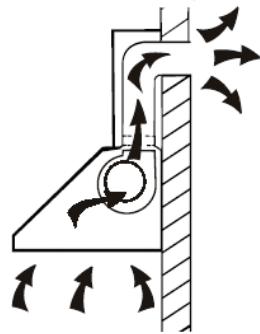
- If you have an external outlet, you can connect your extractor hood as illustrated below using an extraction conduit (flexible tube made from aluminium, enamel or other non-flammable material tube with an internal diameter of 150mm ).
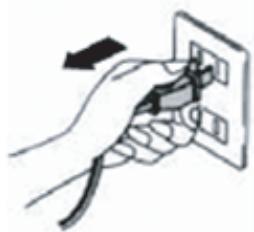
- Power down the appliance and disconnect from the mains prior to installation.
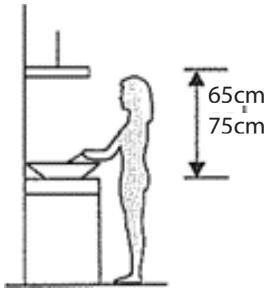
- For optimum results, the extractor hood should be installed at a distance of 65 to 75cm above the cooking hob.
Installation (external outlet)

WARNING
Please refer to the warnings on the instruction sheet concerning the operation of the appliance when air is evacuated outside the room.
When the extractor hood and appliances supplied with energy sources other than electricity are operating at the same time, the negative pressure in the room must not exceed 4 Pa (4 x 10⁻⁵ bar).
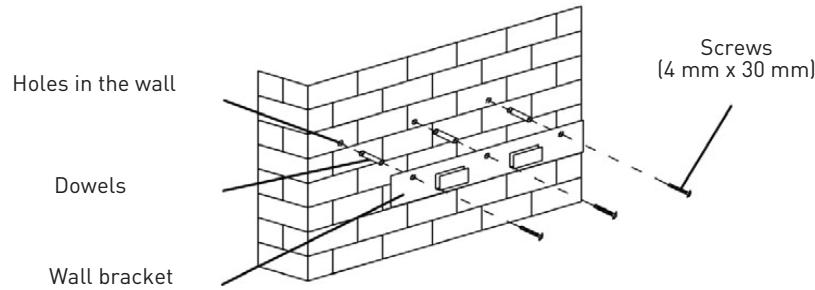
Make three 8 mm holes in which to house the bracket. Screw in and tighten the bracket into the wall using the screws and dowels provided.
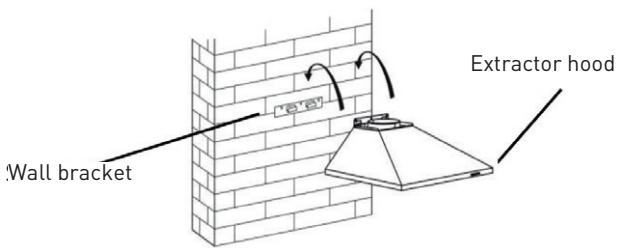
Raise the extractor hood so that it can be attached to the wall bracket.
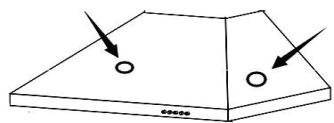
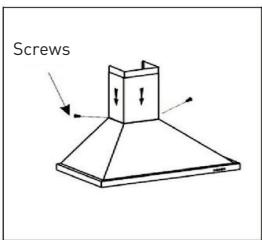
Once the extractor hood is suspended on the wall bracket, remove the grease filters and draw 2 marker points inside the hood so that holes can be made for the safety screws. Remove the hood, make the two corresponding holes and insert 2 wall dowels. Finally fix the safety screws in place using 2 screws (ST4 x 30 mm).
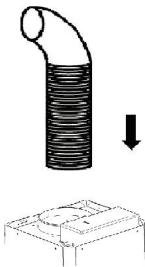
Attach the check valve to the air outlet on the extractor hood. Then connect the evacuation tube to the check valve as illustrated below.
Installation in the chimney
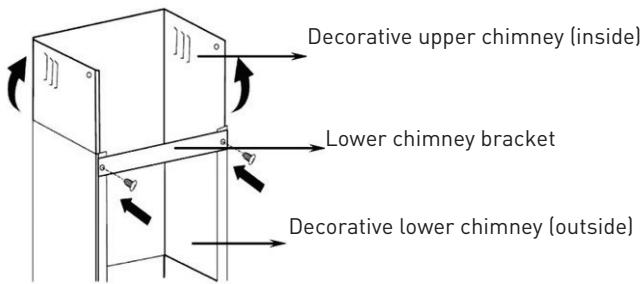
Insert the upper chimney into the lower chimney and use two 8 mm ST4 screws to attach the lower and upper chimneys together.
Before attaching the bracket to the chimney, determine the position of the lower chimney bracket by creating holes so that it can be attached at a later stage.

NB
Do not tighten the screws too much and make sure that you can adjust the upper chimney by sliding it in after assembly.
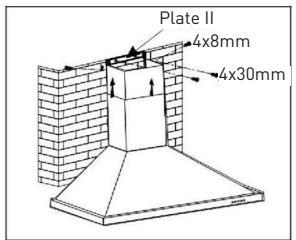
Make two 8 mm holes in which to house plate II. Screw in and tighten plate II to the wall using two of the screws and dowels provided. Slide the upper chimney upwards and attach it to plate II using two 8 mm ST4 screws.
Attach the lower chimney to the hood using two 8 mm ST4 screws.
Installation (recycling mode)
Recycling version
Ask your salesperson to provide you with some active charcoal filters to transform the hood from the evacuation version to the recycling version.
Install the active charcoal filter (cassette)
- The aluminium filter must be removed to install the active charcoal filter.
- Open the grating, press the locking device and pull the filter downwards.
- Place the active charcoal filter inside the appliance and attach it by turning anticlockwise.
- Replace the grating in its original position.
Install the active carbon filter (cut out)
- The aluminium filter must be removed to install the active charcoal filter.
- Place the precut filter on top of the aluminium filter.
- Replace the aluminium filter.
- We recommend running the hood for a few minutes before starting to cook. We also recommend switching it off 15 minutes after cooking has finished to eliminate odours as much as possible and remove bad air.

NB
Make sure that the filter is properly fixed in place Otherwise it could work looseand present a hazard .
The installation of a carbon filter reduces the extraction power of the hood.
Maintenance
Before cleaning switch the unit off and pull out the plug.
I. Regular Cleaning
Use a soft cloth moistened with hand-warm mildly soapy water or household cleaning detergent. Never use metal pads, chemical, abrasive material or stiff brush to clean the unit.
II. Monthly Cleaning for Grease Filter
ESSENTIAL: Clean the filter every month can prevent any risk of fire.
The filter collects grease, smoke and dust....so the filter is directly affecting the efficiency of the cooker hood. If not cleaned, the grease residue (potential flammable) will saturate on the filter. Clean it with household cleaning detergent.
III. Annual Cleaning for Activated Carbon Filter
Apply SOLELY to unit that installed asa recirculation unit (not vented to the outside). This filter traps odours and must be replaced at least once a year depending on how frequent the cooker hood used.
Troubleshooting
| Problem | Cause | Solution |
| The lights comes on but the fan is not working. | The fan blade is stuck. | Switch off the appliance and contact a qualified maintenance engineer to have it repaired. |
| The lights comes on but the fan is not working. |
| The light and the fan are not working. | The bulb has burned out. | Replace the bulb with a bulb with a suitable wattage. |
| The power cable is not property connected. | Reconnect it to the mains. |
| The appliance is vibrating a great deal. | The fan blade is damaged. | Switch off the appliance and contact a qualified maintenance engineer to have it repaired. |
| The fan motor has not been properly tightened. | Switch off the appliance and contact a qualified maintenance engineer to have it repaired. |
| The appliance is not properly attached to the bracket. | Remove the appliance and check its position on the bracket. |
| The extraction power is not sufficient. | There is too much distance between the appliance and the cooking surface. | Readjust to distance to 65-75 cm. |
Packaging and the environment
DISPOSING OF PACKAGING MATERIALS
Packaging materials protect your appliance from damage that may occur during transport. These materials are environmentally friendly since they are recyclable. Recycling materials both saves raw materials and reduces waste production.
Disposing of your old appliance
SELECTIVE COLLECTION OF ELECTRICAL AND ELECTRONIC WASTE
This device bears the WEEE symbol (Waste Electrical and Electronic Equipment), meaning that at the end of its life, it should not be thrown away with household waste, but dropped off at your local sorting centre. Waste recovery helps preserve our environment.
ENVIRONMENTAL PROTECTION - DIRECTIVE 2012/19/EU
To protect the environment and our health, electrical and electronic appliances should be disposed of at the end of their lifespan according to precise rules requiring the involvement of everyone concerned, from the supplier to the user.
This is why your appliance, as indicated by the symbol on its nameplate or on the packaging, should under no circumstances be thrown into a public or private bin intended for household waste. The user has the right to take the device to public collection points which selectively sort waste to be either recycled or reused for other applications in accordance with the directive.
For the safety of children, store your old appliances in a safe place until they are disposed of, outside your home.

Our packaging may come with sorting instructions.
Further information can be obtained from: www.consignesdetri.fr
Merci!
Installation (mode recyclage)
Versionrecyclage