USER MANUAL PURISTA MELITTA
natural_image
Exterior view of a Purista coffee machine with two glass cups and a digital counter (no visible text or symbols on main components)
Inhaltsverzeichnis
1 Geräteübersicht 5
Abb. 4: "Ein/Aus"-Taste
natural_image
Technical line drawing of a mechanical device with no visible text or symbols
1 Overview of the appliance....31
1.1 Appliance at a glance ....31
1.2 Overview of the control panel....32
2 For your safety....33
2.1 Proper use....33
2.2 Danger from electric current....33
2.3 Risk of burns and scalds....34
2.4 Other dangers 34
3 First steps....34
3.1 Unpacking the appliance 34
3.2 Installing the appliance....34
3.3 Connecting the appliance....35
3.4 Switching on the appliance for the first time....35
4 Basic operation 35
4.1 Switching the appliance on and off 35
4.2 Filling coffee beans into the bean container....36
4.3 Filling with water....37
4.4 Adjusting the outlet for coffee beverages 37
4.5 Emptying the drip tray and coffee grounds container....37
5 Preparing beverages 38
5.1 Setting the coffee strength....38
5.2 Setting the coffee quantity....38
5.3 Preparing the coffee beverage....39
5.4 Programming your favourite coffee 39
5.5 Stopping coffee preparation....39
5.6 Preparing two coffee beverages simultaneously 39
6 Changing basic settings....40
6.1 Service mode 1....40
6.2 Setting Auto OFF 40
6.3 Setting the water hardness....41
6.4 Activating/deactivating switch-off rinsing 41
6.5 Setting the brewing temperature....42
6.6 Service mode 2....42
6.7 Resetting the appliance to the factory settings....43
6.8 Setting the grinding fineness 43
7 Care and maintenance....44
7.1 General cleaning....44
7.2 Cleaning the brewing unit....44
7.3 Running the cleaning programme 45
7.4 Running the descaling programme 46
7.5 Using a water filter....48
8 Transport, storage and disposal 49
8.1 Venting the appliance ....49
8.2 Transporting the appliance 50
8.3 Disposing of the appliance....50
9 Technical data....51
10 Troubleshooting....51
1 Overview of the appliance
1.1 Appliance at a glance
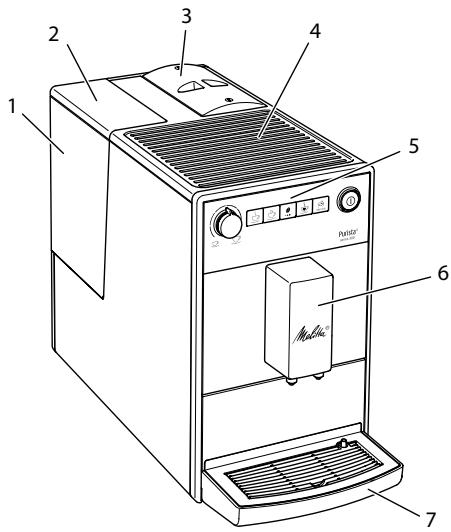
Fig. 1: Front left of the appliance
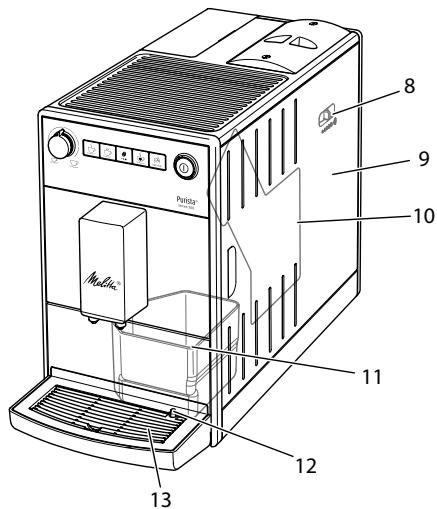
Fig. 2: Front right of the appliance
1 Water tank
2 Water tank lid
3 Bean container with lid
4 Cup rest
5 Control panel
6 Outlet with 2 coffee nozzles for coffee beverages
7 Drip tray
8 "Grinding fineness adjustment" lever (inner)
9 Cover
10 Brewing unit (inner)
11 Coffee grounds container (inner)
12 Float
13 Cup plate
1.2 Overview of the control panel
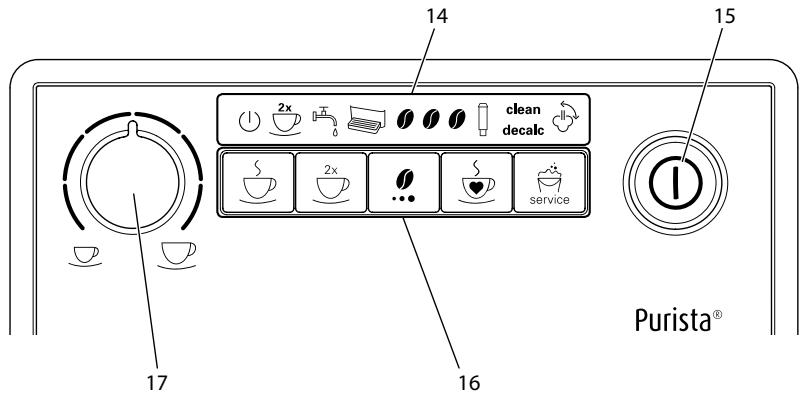
Fig. 3: Control panel
14 Indications
15 ON/OFF button
16 Buttons
17 "Coffee quantity" rotary regulator
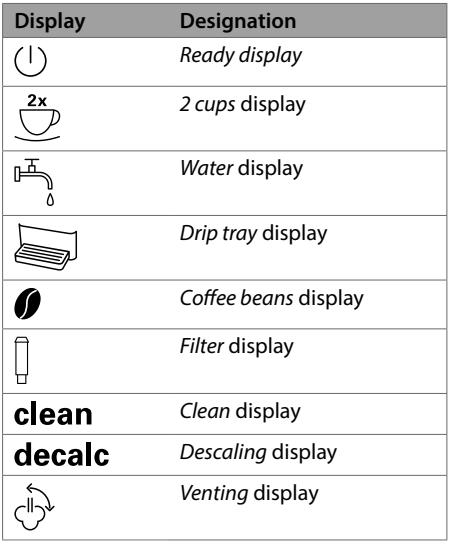
| Control | Designation |
 | "Coffee" direct key |
 | "2 cups" button |
 | "Coffees strength" button |
 | "Favourite coffee" button |
 | "Service" button |
Dear Customer,
Thank your for purchasing the Melitta® Purista® fully automatic coffee maker.
The operating instructions will help you discover the diverse options offered by the appliance and enjoy your coffee to the full.
Read through the operating instructions carefully. This helps avoid personal injury and material damage. Store the operating instructions carefully. If you pass on the appliance, include the operating instructions with it.
Melitta accepts no liability for damage caused by failure to observe the operating instructions.
If you require further information or have any questions on the appliance, contact Melitta or visit our website at: www.international.melitta.de
We hope you enjoy using your appliance.
2 For your safety
CE The appliance conforms to the relevant European directives and has been built using the latest technology. Nevertheless, some residual dangers remain.
Observe the safety instructions to avoid dangers. Melitta accepts no liability for damage caused by failure to observe the safety instructions.
2.1 Proper use
The appliance is used to prepare beverages made from coffee beans.
The appliance is intended for use in private households.
Any other use is regarded as improper and may lead to personal injury and material damage. Melitta accepts no liability for damage that arises due to improper use of the appliance.
2.2 Danger from electric current
If the appliance or the power cable is damaged, there is a risk of fatal electric shock.
Observe the following safety instructions to avoid danger from electric current:
- Do not use a damaged power cable.
- A damaged power cable may only be replaced by the manufacturer or its customer service or service partner.
- Do not open any covers firmly screwed onto the appliance housing.
- Only use the appliance when it is in a technically flawless condition.
- A defective appliance may only be repaired by an authorised workshop. Do not repair the appliance yourself.
- Do not make any changes to the appliance, its components or its accessories.
- Do not immerse the appliance in water.
- Do not let the power cable come into contact with water.
2.3 Risk of burns and scalds
Escaping fluids and steam may be very hot. Parts of the appliance can also become very hot.
Observe the following safety instructions to avoid scalds and burns:
- Avoid escaping fluids and steam coming into contact with the skin.
- Do not touch the nozzles on the outlet during and immediately after dispensing a beverage. Wait until the components have cooled down.
2.4 Other dangers
Observe the following safety instructions to avoid personal injury and material damage:
- Do not operate the appliance in a cabinet or similar.
- Do not reach into the interior of the appliance during operation.
- Keep the appliance and its power cable out of the reach of children under 8 years of age.
-
This appliance may be used by children over 8 years of age and by persons with reduced physical, sensory or mental capabilities or a lack of experience and knowledge if they are supervised or have been instructed in using the appliance safely and understand the resulting risks.
-
Children must not play with the appliance. Cleaning and maintenance must not be undertaken by children younger than 8 years of age. Children over 8 years of age must be supervised during cleaning and maintenance.
- Disconnect the appliance from the power supply when left unsupervised for a long time.
- The appliance must not be operated at altitudes over 2000 m.
- Please observe the instructions in the corresponding section when cleaning the appliance and its components (Care and maintenance on page 44).
3 First steps
This chapter describes how to prepare your appliance for use.
3.1 Unpacking the appliance
- Unpack the appliance. Remove the packaging material, the adhesive strips and the protective films from the appliance.
- Keep the packaging material for transport and any return shipments.
The appliance may contain traces of coffee and water. The appliance has been tested in the factory to ensure that it functions perfectly.
3.2 Installing the appliance
Observe the following instructions:
- Do not install the appliance in damp rooms.
- Install the appliance on a stable, flat and dry surface.
- Do not install the appliance in the vicinity of sinks or the like.
- Do not install the appliance on hot surfaces.
- Install the appliance at a sufficient distance (approx. 10 cm) from the wall and other objects. The space above the appliance should be at least 20 cm.
- Route the power cable so it cannot be damaged by edges or hot surfaces.
3.3 Connecting the appliance
Observe the following instructions:
- Check that the supply voltage matches the operating voltage specified in the technical data (see table Technical data on page 51).
- Only connect the appliance to a properly installed earthing contact socket. If in doubt, consult a specialist electrician.
- The earthing contact socket must have a fuse of at least 10 A.
3.4 Switching on the appliance for the first time
Once you switch on the appliance for the first time, the appliance performs automatic rinsing. Hot water flows out of the outlet. The appliance is vented.
- We recommend pouring away the first two cups of coffee after initial start-up.
- If you want to use a water filter, only insert this after starting up for the first time.
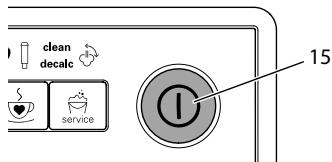
Fig. 4: ON/OFF button
Requirement: The appliance has been installed and connected.
- Place a vessel beneath the outlet.
- Press the ON/OFF button (15).
» ⏻ The Ready display lights up briefly.
» The Water display lights up and requests you to fill the water tank.
- Open the lid of the water tank and pull the water tank upwards out of the appliance by the handle.
- Rinse out the water tank with clean water. Fill the water tank with fresh water.
- Insert the water tank into the appliance from above and close the lid.
» The Vent display lights up and requests you to vent the appliance.
- ⚠️ Press the "Coffee strength" button.
» Water flows into the drip tray.
» The appliance heats up and hot water flows out of the outlet.
-
Once no more water flows out of the outlet, the Coffee bean display lights up. » The appliance is vented.
-
Fill coffee beans into the bean container (see section 4.2 Filling coffee beans into the bean container on page 36).
- As required, you can now either
a) set the water hardness (see section 6.3 Setting the water hardness on page 41) or
b) screw in a water filter (see section 7.5 Using a water filter on page 48).
4 Basic operation
4.1 Switching the appliance on and off
Before switching on after starting up the appliance for the first time, read section 3.4 Switching on the appliance for the first time on page 35.
- When switched on and off, the appliance performs automatic rinsing.
– During rinsing, rinsing water is also conducted into the drip tray.
Switching on the appliance
- Place a vessel beneath the outlet.
- Press the "ON/OFF" button (15).
» The appliance heats up and performs automatic rinsing.
» The appliance is ready for operation.
If the appliance was only switched off briefly, there is no automatic rinsing after switching on.
Switching off the appliance
- Place a vessel beneath the outlet.
- Press the "ON/OFF" button (15).
» The appliance performs automatic rinsing.
» The appliance switches off.
- The appliance switches off automatically when it is not operated for a long time. Automatic rinsing is also carried out in this case.
- You can set the off time in Service mode 1 (see section 6.2 Setting Auto OFF on page 40).
- If no beverage has been prepared since switching on or if the water tank is empty, no rinsing takes place.
4.2 Filling coffee beans into the bean container
Roasted coffee beans lose their aroma. Only fill the bean container with as many coffee beans as you will consume over the next 3 to 4 days.
ATTENTION
The use of unsuitable types of coffee can lead to clogging of the grinder.
- Do not use freeze-dried or caramelised coffee beans.
- Do not use any coffee powder or instant products.
When changing the type of beans, remains of the old type of beans can still be in the grinder.
Even if the bean container runs empty and a new type of bean is filled in, there are still remains of the old type of bean in the grinder. For this reason, the first two coffees dispensed can contain remains of the old type of bean.
The flashing Coffee bean display requests you to refill coffee beans.
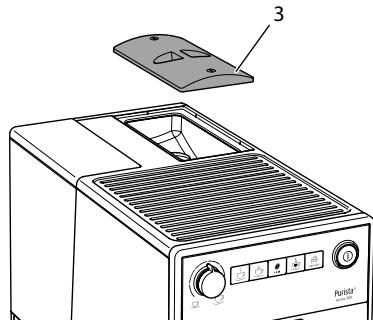
Fig. 5: Opening the lid of the bean container
- Open the lid of the bean container. (3).
- Fill coffee beans into the bean container.
- Close the lid of the bean container. The next time a coffee is dispensed, the display no longer flashes.
If the bean container runs empty during beverage preparation, output is interrupted and the Coffee bean display flashes. When you fill the bean container with coffee beans, the display will initially continue to flash. After pressing a direct key, coffee beans fall into the grinder. Coffee is
prepared and the display stops flashing. The Ready display and the Coffee beans display light up.
4.3 Filling with water
Only use fresh, cold water without carbon dioxide for optimum coffee enjoyment. Change the water daily.
The quality of the water largely determines the flavour of the coffee. Therefore, use a water filter (see section 6.3 Setting the water hardness on page 41 and section 7.5 Using a water filter on page 48).
The Water display lights up and requests you to refill water.
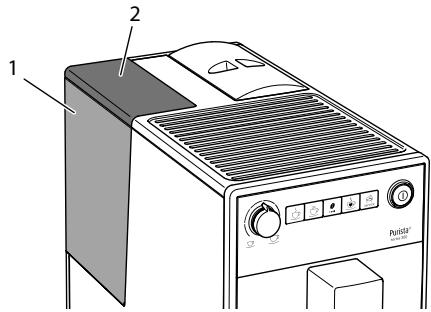
Fig. 6: Removing the water tank
- Open the lid (2) of the water tank (1) and pull the water tank upwards out of the appliance by the handle.
- Fill the water tank with water.
- Insert the water tank into the appliance from above and close the lid.
4.4 Adjusting the outlet for coffee beverages
The outlet (6) is height-adjustable. Set the greatest possible distance between the outlet and the vessel. Depending on the vessel, push the outlet up or down.
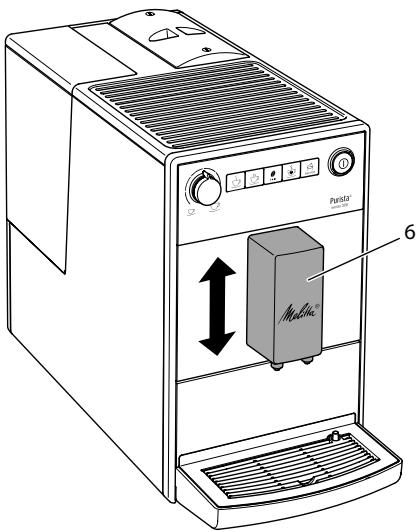
Fig. 7: Adjusting the outlet for coffee beverages
4.5 Emptying the drip tray and coffee grounds container
When the drip tray (7) and the coffee grounds container (11) are full, the Drip tray display lights up and requests you to empty the container The display appears after preparing approx. 8 beverages.
The projecting float (12) also indicates that the drip tray is full.
Always empty both containers. When the drip tray is pulled out, the Drip tray display flashes.
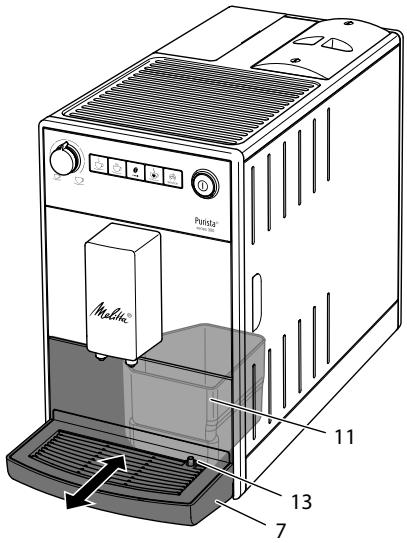
Fig. 8: Emptying the drip tray and coffee grounds container
- Pull the drip tray (7) forwards out of the appliance.
- Remove the coffee grounds container (11) and empty it.
- Empty the drip tray.
- Insert the coffee grounds container.
- Push the drip tray into the appliance up to the stop.
If you empty the drip tray and the coffee grounds container while the appliance is switched off, the appliance does not register this process. Therefore, it is possible that you are requested to empty the containers although the drip tray and the coffee grounds container are not yet full.
5 Preparing beverages
Please note:
- There should always be sufficient water in the water tank. If the filling level is too low, the appliance requests you to refill it.
- There should always also be sufficient coffee beans in the bean container. If
there are no longer any coffee beans present, the appliance stops the preparation of a coffee beverage.
- The vessels for the beverages should be sufficiently large.
The maximum coffee quantity is 220 ml.
5.1 Setting the coffee strength
As soon as the appliance is ready for operation, it displays the current setting of the coffee strength.
The following settings for the coffee strength are possible:
| Display | Coffee strength |
| Mild |
| Normal |
| Strong |
You can adjust the coffee strength by pressing the "Coffee strength" button one or more times.
You can adjust the coffee strength before the beverage is dispensed or during the grinding process.
When switching off the appliance, the last set coffee strength is stored.
5.2 Setting the coffee quantity
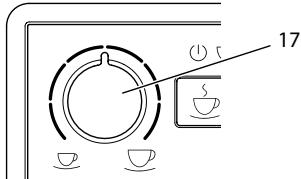
Fig. 9: Setting the coffee quantity
You can set the coffee quantity with the "Coffee quantity" (17) rotary regulator.
You can adjust the coffee quantity before the beverage is dispensed or during the grinding process.
Coffee quantities are continuously adjustable between 25 ml and 220 ml.
5.3 Preparing the coffee beverage
Requirement: The appliance is ready for operation.
- Place a vessel beneath the outlet.
- 📐 🌘 Press one of the direct keys.
» The grinding process and beverage dispensing start.
» Beverage dispensing ends automatically.
- Remove the vessel.
5.4 Programming your favourite coffee
You can permanently store your preferred coffee strength and quantity using the "Favourite coffee" button.
The settings are made during the preparation of a coffee.
Requirement: The appliance is ready for operation.
- 🖼️ Press the "Favourite coffee" direct key for more than 2 seconds.
» ⏻ The Ready display and the Coffee beans display flash rapidly.
-
☐ Press the "Coffee strength" button one or more times to set your preferred coffee strength.
-
🏠️ Press the "Favourite coffee" direct key.
» The grinding process starts. You can change the coffee strength again during the grinding process.
» Beverage dispensing starts.
- 🏠️ Press the "Favourite coffee" button during beverage dispensing when your
preferred coffee quantity has been reached.
» Beverage dispensing stops.
» The settings are stored.
If beverage preparation is stopped with the "Coffee" direct key, the coffee quantity and the coffee strength are not stored.

Press the "Favourite coffee" button to are a coffee with the stored coffee length and quantity.
5.5 Stopping coffee preparation
If you want to stop the preparation of a coffee beverage prematurely, press the direct key again.
5.6 Preparing two coffee beverages simultaneously
You can prepare two coffee drinks simultaneously with the "2 cups" button. For two-cup dispensing, the appliance carries out two grinding processes.
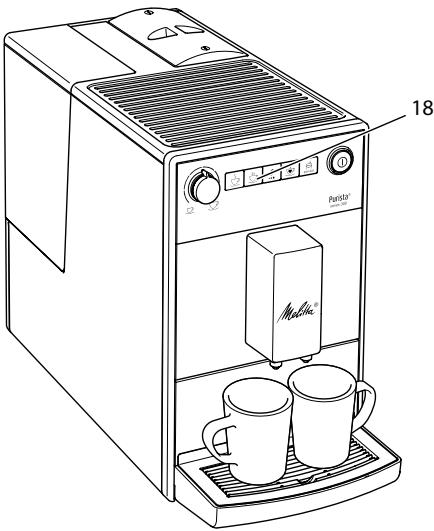
Fig. 10: Two-cup dispensing
- Place two vessels beneath the outlet.
- Press the"2 cups" button (18).
» The 2 cups display lights up.
- 📐 🎋 Press a direct key.
» The grinding process and beverage dispensing start.
» Beverage dispensing ends automatically.
- Remove both vessels.
- The setting only applies to the single beverage that is prepared.
- If a coffee beverage is not prepared within 1 minute, the appliance switches to single-cup dispensing.
6 Changing basic settings
You can change the basic settings of the appliance with several functions. The functions are divided into two service modes.
6.1 Service mode 1
Each function is assigned a display.
| Service mode 1 |
| Display | function |
| Auto OFF |
| Water hardness |
| Switch-off rinsing |
| Filter programme |
| clean | Cleaning programme |
| decalc | Descaling programme |
| Brewing temperature |
To call up Service mode 1, proceed as follows:
Requirement: The appliance is ready for operation.
- Press the "Service" button for more than 2 seconds to call up Service mode 1.
» ⏻ 2x The Ready display flashes rapidly and the 2 cups button lights up.
- Press the "Service" button one or more times to access the desired function.
» A display lights up according to the function selected, see Service mode 1 table.
» The number of lit bean symbols indicates the current setting of the function.
Press the "Coffee" direct key to exit the service mode without saving the settings.
If no further input is made within 1 minute, the appliance returns to Ready mode.
6.2 Setting Auto OFF
If you do not operate the machine for a long time, it initially switches to energy save mode. After a further preset time, the appliance switches off.
The following settings are possible:
| Display | Energy save mode after: | Switch off after: |
| 3 minutes | 30 minutes |
| 10 minutes | 1 hour |
| 20 minutes | 4 hours |
| 30 minutes | 8 hours |
Press any button to exit Energy Save mode.
Requirement: The appliance is ready for operation.
-
Service Press the "Service" button for more than 2 seconds to call up Service mode 1.
-
Service 2x Press the "Service" button repeatedly until the display for the Auto Off function appears.
- ⚠️ Press the "Coffee strength" button repeatedly until the desired time is set.
- You can call up the next function or exit Service mode:
a) Briefly press the "Service" button to navigate to the next function.
b) Press the "Service" button for more than 2 seconds to save the setting and exit the service mode.
6.3 Setting the water hardness
Setting the water hardness regulates how frequently you are requested to descale the appliance. The harder the water, the more frequently the appliance has to be descaled.
Water hardness cannot be set while using a water filter (see section 7.5 Using a water filter on page 48).
Determine the water hardness with the enclosed test strip. Observe the instructions on the test strip packaging and in the table Water hardness range on page 51.
The following settings are possible:
| Display | Water hardness |
| soft, descale after 150 litres |
| medium, descale after 100 litres |
| hard, descale after 70 litres |
| very hard, descale after 30 litres |
| no coffee beans | A water filter is used. No adjustment is possible. |
Requirement: The appliance is ready for operation.
- Press the "Service" button for more than 2 seconds to call up Service mode 1.
- Service Press the "Service" button repeatedly until the display for the Water hardness function appears.
- ☐ Press the "Coffee strength" button repeatedly until the desired water hardness is set.
- You can call up the next function or exit Service mode:
a) Briefly press the "Service" button to navigate to the next function.
b) Press the "Service" button for more than 2 seconds to save the setting and exit the service mode.
6.4 Activating/deactivating switch-off rinsing
Rinsing is always carried out immediately after switching on the coffee system. Only switch-off rinsing can be activated/deactivated. If it is activated, the coffee system is rinsed after being switched off.
We recommend that you do not permanently deactivate switch-off rinsing, because switch-off rinsing cleans the coffee system.
The following settings are possible:
| Display | Switch-off rinsing |
| activated |
| no coffee beans | deactivated |
Requirement: The appliance is ready for operation.
-
Service Press the "Service" button for more than 2 seconds to call up Service mode 1.
-
Press the "Service" button repeatedly until the display for the Switch-off rinsing function appears.
- ☐ Press the "Coffee strength" button repeatedly until switch-off rinsing is activated or deactivated.
- You can call up the next function or exit Service mode:
a) Briefly press the "Service" button to navigate to the next function.
b) Press the "Service" button for more than 2 seconds to save the setting and exit the service mode.
6.5 Setting the brewing temperature
The brewing temperature influences the flavour of the coffee beverage.
The following settings are possible:
| Display | Brewing temperature |
| Low |
| Medium |
| High |
Requirement: The appliance is ready for operation.
- 📋 Service Press the "Service" button for more than 2 seconds to call up Service mode 1.
- 📋 Press the "Service" button repeatedly until the display for the Brewing temperature function appears.
- ☐ Press the "Coffee strength" button repeatedly until the desired brewing temperature is set.
- You can call up the next function or exit Service mode:
a) Briefly press the "Service" button to navigate to the next function.
b) Press the "Service" button for more than 2 seconds to save the setting and exit the service mode.
6.6 Service mode 2
Each function is assigned a display.
| Service mode 2 |
| Display | function |
| 2x | Factory settings |
 | Venting |
To call up Service mode 2, proceed as follows:
Requirement: The appliance is ready for operation.
-
📋️ 📋️ Press the "Service" button as well as the "Coffee" direct key for more than 2 seconds to enter Service mode 2.
» 🔊 The Ready display and the 2 cups display flash rapidly.
-
📋 Service Press the "Service" button one or more times to access the desired function.
» A display lights up according to the function selected, see Service mode 2 table.
» The number of lit bean symbols indicates the current setting of the function.
Press the "Coffee" direct key to exit the service mode without saving the settings.
If no further input is made within 1 minute, the appliance returns to Ready mode.
6.7 Resetting the appliance to the factory settings
The appliance can be reset to the factory settings. When resetting, your settings in the functions will be lost. The coffee strength and quantity stored with the Favourite coffee function will also be lost.
Requirement: The appliance is ready for operation.
- 📋 🌐 Press the "Service" button as well as the "Coffee" direct key for more than 2 seconds to enter Service mode 2.
- Service 2x Press the "Service" button repeatedly until the display for the Factory settings function appears.
- ☐ Press the "Coffee strength" button repeatedly until the display of one coffee bean appears.
- Press the "Service" button for more than 2 seconds to reset the appliance to the factory settings and exit the service mode.
6.8 Setting the grinding fineness
The grinding fineness of the coffee powder influences the flavour of the coffee.
If the grinding fineness is set finer, the coffee flavour is stronger.
ATTENTION
Very finely ground coffee powder can clog the brewing unit.
- The grinding fineness has been optimally set prior to delivery. Adjust grinding fineness at the earliest after about 100 coffees are dispensed (after approx. 1 month, depending on coffee consumption).
- Do not set the grinding fineness too fine. The grinding fineness is optimally set when the coffee flows evenly out of the outlet and a fine, dense crema appears.
Adjust the grinding fineness while the grinder is running.
Requirement: The appliance is ready for operation.
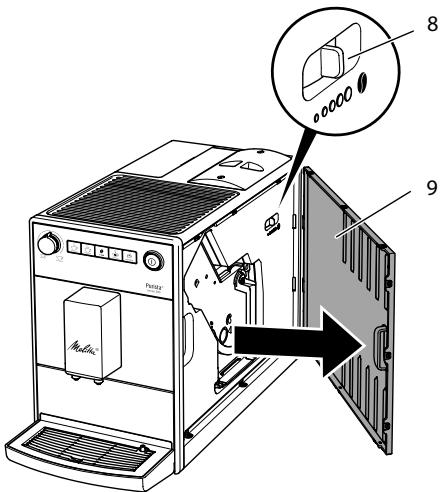
Fig. 11: Setting the grinding fineness
- Open the cover (9). To do this, reach into the recess on the right of the appliance and pull the cover off sideways.
- Prepare a coffee.
- Move the lever (8) to the left or right while the grinder is running.
To the left = grinding fineness finer
To the right = grinding fineness coarser
- Insert the cover (9) sideways until it engages.
7 Care and maintenance
Regular care and maintenance of the appliance ensure the consistent high quality of your beverages.
7.1 General cleaning
Clean the appliance regularly. Immediately remove external soiling caused by coffee.
ATTENTION
The use of unsuitable cleaning agents may lead to scratched surfaces.
- Do not use any abrasive cloths, sponges or cleaning agents.
Requirement: The appliance is switched off.
- Clean the outside of the appliance with a soft, damp cloth and normal washing-up liquid.
- Rinse off the drip tray, the coffee container and the cup plate. Use a soft, damp cloth and normal washing up liquid for this.
The coffee container is dishwasher-safe.
- Clean the bean container with a soft, dry cloth.
7.2 Cleaning the brewing unit
To avoid damage to the appliance, we recommend cleaning the brewing unit once a week.
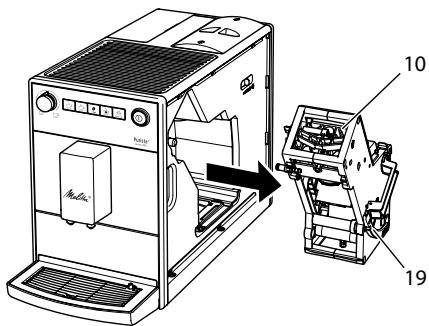
Fig. 12: Removing the brewing unit
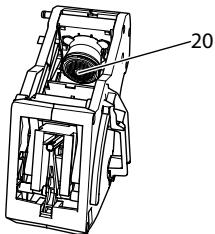
Fig. 13: Cleaning the brewing unit
Requirement: The appliance is switched off.
- Open the cover (9). To do this, reach into the recess on the right of the appliance and pull the cover off sideways.
- Press and hold the red lever (19) on the brewing unit handle (10) and turn the handle clockwise until it engages at the stop.
- Pull the brewing unit out of the appliance by the handle.
- Rinse the entire brewing unit thoroughly from all sides under running water. In particular, make sure that coffee residues are removed from the sieve (20).
- Allow the brewing unit to drip dry.
- Use a soft, dry cloth to remove coffee residues from the surfaces inside the appliance.
- Insert the brewing unit into the appliance. Press and hold the red lever on the handle of the brewing unit and turn the handle anticlockwise until it engages at the stop.
- To do this, insert the cover sideways until it engages.
When the appliance is switched on, an alternating flashing of the Ready display and the Clean display indicates a missing brewing unit. After the brewing unit has been inserted, the appliance switches to Ready mode.
7.3 Running the cleaning programme
This cleaning programme is used to remove residues and coffee oil residues with the aid of fully automatic coffee maker cleaning agents.
To avoid damage to the appliance, we recommend running the cleaning programme every 2 months or as requested by the appliance.
clean The Clean display light requests you to clean the unit.
CAUTION
- Observe the processing instructions on the packaging of the fully automatic coffee maker cleaning agent.
ATTENTION
The use of unsuitable fully automatic coffee maker cleaning agent can damage the appliance.
Only use Melitta® PERFECT CLEAN cleaning tablets for fully automatic coffee machines.
The cleaning programme takes approx.
15 minutes and should not be interrupted.
The cleaning programme runs in several stages. Progress is indicated by the number of coffee beans displayed.
The appliance performs several rinsing operations during the cleaning programme. The drip tray is also rinsed.
Requirement: The appliance is ready for operation.
- Service Press the "Service" button for more than 2 seconds to call up Service mode 1.
- clean Press the "Service" button repeatedly until the display for the cleaning programme appears.
- Press the "Service" button for more than 2 seconds to start the cleaning programme.
» clean The Clean display flashes until the cleaning programme is finished.
The first stage of the cleaning programme starts. One coffee bean lights up.
» The Drip tray display lights up and requests you to empty the drip tray and the coffee grounds container.
- Empty the drip tray and the coffee grounds container.
- Insert the drip tray without the coffee grounds container.
- Place the coffee grounds container beneath the outlet.
» The appliance rinses twice.
» clean The Clean display flashes rapidly and requests you to remove the brewing unit and insert a cleaning tablet.
- Remove the brewing unit. Do not switch off the appliance.
- Rinse the brewing unit under running water (see section 7.2 Cleaning the brewing unit on page 44).
- Place a cleaning tablet in the brewing unit. Insert the brewing unit into the appliance.
natural_image
Technical line drawing of a mechanical device with a circular component and directional arrows (no text or symbols)
Fig. 14: Placing a cleaning tablet in the brewing unit.
The second stage of the cleaning programme starts. Two coffee beans light up.
» The appliance performs several rinsing operations.
» The Drip tray display lights up and requests you to empty the drip tray and the coffee grounds container.
The third stage of the cleaning programme starts. Three coffee beans light up.
- Empty the drip tray and the coffee grounds container.
- Insert the drip tray without the coffee grounds container.
The fourth stage of the cleaning programme starts. The three coffee beans flash.
12. Place the coffee grounds container beneath the outlet.
» The appliance performs several rinsing operations.
» The Drip tray display lights up and requests you to empty the drip tray and the coffee grounds container.
-
Empty the drip tray and the coffee grounds container.
-
Insert the drip tray and the coffee grounds container.
» The cleaning programme is finished.
» The Clean display goes out.
» The appliance is ready for operation.
If the cleaning programme has been interrupted, e.g. because you unintentionally switched off the appliance, you must switch the appliance on again and follow the instructions from step 10. The appliance is then ready for operation, even if it has not been completely cleaned. For complete cleaning, you must run the cleaning programme from the beginning.
7.4 Running the descaling programme
The descaling programme is used to remove limescale deposits in the interior of the appliance with fully automatic coffee maker descaling agents.
To avoid damage to the appliance, we recommend running the descaling programme every 3 months or as requested by the appliance, unless you regularly use a water filter.
decalc The Descaling display light requests you to descale the appliance.
CAUTION
Contact with descaling agent may lead to eye and skin irritation.
- Observe the processing instructions on the packaging of the descaling agent.
ATTENTION
Use of unsuitable descaling agents and failure to observe the processing instructions may damage the appliance.
- Only use Melitta® ANTI CALC liquid descaling agent for fully automatic coffee machines.
- Observe the processing instructions on the packaging of the descaling agent.
ATTENTION
A water filter may be damaged if it is screwed in during the descaling programme.
■ Remove the water filter (see Fig. 15 on page 48).
- Place the water filter into a vessel filled with tap water during the descaling programme.
- The water filter can be reinserted and reused when the descaling programme is complete.
The descaling program lasts approx.
25 minutes and should not be interrupted.
The descaling programme runs in several stages. Progress is indicated by the number of coffee beans displayed.
The appliance performs several rinsing operations during the descaling programme. The drip tray is also rinsed.
Requirement: The appliance is ready for operation.
- Press the "Service" button for more than 2 seconds to call up Service mode 1.
- decalc Press the "Service" button repeatedly until the display for the Descaling function appears.
- 📋 Press the "Service" button for more than 2 seconds to start the descaling programme.
» decalc The Descaling display flashes until the descaling programme is finished.
The first stage of the descaling programme starts. One coffee bean lights up.
» The Drip tray display lights up and requests you to empty the drip tray and the coffee grounds container.
- Empty the drip tray and the coffee grounds container.
- Insert the drip tray.
» The Water display lights up and requests you to fill the water tank with descaling fluid.
- Remove the water tank.
- Fill 0.5 litres of descaling fluid into the water tank. Observe the corresponding instructions for use of the fully automatic coffee maker descaling agent.
- Insert the water tank again.
The second stage of the descaling programme starts. Two coffee beans light up.
The descaler needs approx. 20 minutes to take effect, Several rinsing operations are carried out during this time.
» The Drip tray display lights up and requests you to empty the drip tray and the coffee grounds container.
-
Empty the drip tray and the coffee grounds container.
-
Insert the drip tray.
» The Water display lights up and requests you to fill the water tank.
-
Remove the water tank.
- Thoroughly rinse out the water tank and fill it with fresh water.
- Insert the water tank.
The third stage of the descaling programme starts. Three coffee beans light up.
» Hot water flows into the drip tray.
» The Drip tray display lights up and requests you to empty the drip tray and the coffee grounds container.
- Empty the drip tray.
- Insert the drip tray and the coffee grounds container.
» The descaling programme is finished.
» The Descaling display goes out.
» The appliance is ready for operation.
If the descaling programme has been interrupted, e.g. by unintentionally switching the appliance off, you must switch the appliance on again and follow the instructions from step 9. The appliance is then ready for operation, even if it has not been completely descaled. For complete descaling, you must run the descaling programme from the beginning.
7.5 Using a water filter
The use of a water filter extends the service life of the appliance and the appliance has to be descaled less frequently. The water filter filters calcium and other pollutants out of the water.
Only use Melitta® Pro Aqua filter cartridges for fully automatic coffee machines. Observe the processing instructions on the packaging of the water filter.
When using and regularly replacing the Melitta® Pro Aqua filter cartridge, the appliance only needs to be descaled once a year.
This information is based on an average of 6 coffee beverages with 120 ml per day and 6 filter changes per year.
Fig. 15: Screwing/Unscrewing the water filter
The water filter (21) is screwed into and unscrewed from the thread (22) on the base of the water tank (1).
The water filter should not be left standing dry for a long period of time. When it is not used for a long time, we recommend storing the water filter in a vessel filled with tap water in the refrigerator.
Inserting the water filter
Requirement: The appliance is ready for operation.
- Service Press the "Service" button for more than 2 seconds to call up Service mode 1.
- ☐ Press the "Service" button repeatedly until the display for the Filter function appears.
- ⚠️ Press the "Coffee strength" button until one bean lights up.
- Follow the instructions from step 3 in section Changing the water filter.
Changing the water filter
In order to maintain a constant effect of the water filter, we recommend changing the water filter every 2 months – or when the device requests you to do so.
The Filter display light requests you to change the water filter.
- The water hardness cannot be set if you use a water filter. The water hardness is automatically set to soft (see section 6.3 Setting the water hardness on page 41).
- Place the water filter into a vessel filled with fresh tap water for a few minutes before inserting it.
Requirement: The appliance is ready for operation.
-
Press the "Service" button for more than 2 seconds to call up Service mode 1.
-
Service Press the "Service" button repeatedly unit the display for the filter programme appears.
» One bean lights up.
- Press the "Service" button for more than 2 seconds to start the filter programme.
» The Filter display flashes until the filter programme is finished.
» The Drip tray display lights up and requests you to empty the drip tray and the coffee grounds container.
-
Empty the drip tray and the coffee grounds container.
-
Insert the drip tray without the coffee grounds container.
-
Place the coffee grounds container beneath the outlet.
» The Water display lights up and requests you to remove the water tank and insert the water filter.
-
Remove the water tank.
-
Empty the water tank.
-
Insert a new filter in the water tank (see Fig. 15).
-
Fill the water tank.
-
Insert the water tank again.
» The filter is rinsed with water.
» Water flows into the drip tray.
-
Empty the drip tray and the coffee grounds container.
-
Insert the drip tray and the coffee grounds container.
» The filter programme is finished.
» The Filter display goes out.
» The appliance is ready for operation.
Permanently de-registering the water filter
If you have removed an inserted water filter and want to continue operating the appliance without a water filter, deactivate the water filter on the appliance:
- Remove the water tank.
- Empty the water tank.
- Remove the water filter (see Fig. 15).
- Fill the water tank.
-
Insert the water tank again.
-
📧 Press the "Service" button for more than 2 seconds to call up Service mode 1.
-
☐ Press the "Service" button repeatedly until the display for the Filter function appears.
-
⚠️ Press the "Coffee strength" button repeatedly until no coffee beans are lit.
-
Service Press the "Service" button for more than 2 seconds to save the setting and exit the service mode.
» The water filter is de-registered.
» The water hardness is reset to the water hardness that the appliance had stored prior to inserting a water filter.
- Adjust the water hardness if necessary (see section. 6.3 Setting the water hardness on page 41).
8 Transport, storage and disposal
8.1 Venting the appliance
We recommend venting the appliance when it is not used for a long period, prior to transport and when there is a risk of frost.
During venting, residual water is removed from the appliance.
If you put the appliance back into operation, automatic rinsing is carried out after switching on and the appliance vented
(see section 3.4 Switching on the appliance for the first time on page 35).
Requirement: The appliance is ready for operation.
- 📋 Service 🌐 Press the "Service" button as well as the "Coffee" direct key for more than 2 seconds to enter Service mode 2.
- Service Press the "Service" button repeatedly until the display for the Venting function appears.
- Press the "Service" button for more than 2 seconds to start venting.
» ⏻ The Ready display flashes until venting is ready to start.
» The Water display lights up and requests you to remove the water tank.
- Remove the water tank and empty it.
» The appliance is vented and switches off automatically.
8.2 Transporting the appliance
ATTENTION
Freezing residual water can damage the appliance.
■ Prevent the appliance from being exposed to temperatures below 0 °C.
Transport the appliance in the original packaging. This avoids damage in transit.
Before transporting the appliance, carry out the following activities:
- Vent the appliance (see section 8.1 Venting the appliance on page 49).
- Empty the drip tray and the coffee grounds container.
- Empty the water tank.
- Empty the bean container.
- Clean the appliance (see section 7.1 General cleaning on page 44).
- Package the appliance.
- When sending the appliance to Melitta's service centres, it is not necessary to send in the cup plate. This prevents scratches during transport.
- Do not use commercially available adhesive and packing tapes to attach loose parts. When detached, adhesive residues remain on the appliance which are difficult to remove.
8.3 Disposing of the appliance

Appliances marked with this symbol are subject to European Directive 2002/96/EC for WEEE (Waste Electri-nd Electronic Equipment).
Electrical appliances do not belong in domestic waste.
Dispose of the appliance in an environmentally friendly manner via suitable collection systems.
9 Technical data
| Technical data |
| Operating voltage | 220 V – 240 V, 50 Hz – 60 Hz |
| Power consumption | 1450 W |
| Pump pressure | max. 15 bar |
| Dimensions | |
| Width | 200 mm |
| Depth | 460 mm |
| Height | 334 mm |
| Capacity | |
| Bean container | 125 g |
| Water tank | 1.2 l |
| Weight (empty) | 7.9 kg |
| Ambient conditions | |
| Temperature | |
| Relative humidity | 10 °C – 32 °C |
| 30 % – 80 % (non-condensing) |
| Water hardness range | °dH | °e | °fH |
| Soft | 0 to 10 | 0 to 13 | 0 to 18 |
| Medium | 10 to 15 | 13 to 19 | 18 to 27 |
| Hard | 15 to 20 | 19 to 25 | 27 to 36 |
| Very hard | >20 | >25 | >36 |
10 Troubleshooting
If the actions listed below fail to rectify the problems or other problems not listed here occur, contact our hotline (local rate).
You will find the hotline number in the lid of the water tank or in the Service section on our website.
| Problem | Cause | Action |
| Coffee only emerges from the outlet in drips. | Grinding fineness is too fine. | Set a coarser grinding fineness (see section 6.8 on page 43). |
| Appliance is soiled. | Clean the brewing unit (see section 7.2 on page 44).Run the cleaning programme (see section 7.3 on page 45). |
| Appliance is covered inside with limescale. | Run the descaling program (see section 7.4 on page 46). |
| Coffee does not flow. | Water tank is not filled or is not correctly inserted. | Fill the water tank and ensure it is positioned correctly (see section 4.3 on page 37). |
| Brewing unit is clogged. | Clean the brewing unit (see section 7.2 on page 44). |
| Although the bean container is full, the appliance indicates that coffee beans must be filled. | Coffee beans do not drop into the grinder. | Press a direct key.Tap lightly on the bean container.Clean the bean container.Coffee beans are too oily. Use different coffee beans. |
| Loud grinder noise. | Foreign objects in the grinder. | Contact the hotline. |
| Brewing unit cannot be inserted after removing. | Handle for the locking mechanism of the brewing unit is not in the correct position. | Check that the handle for the locking mechanism is correctly engaged (see section 7.2 on page 44). |
| Drive is not in the correct position. | Press the "Coffee" direct key and the "2 cups" button simultaneously for more than 2 seconds.The appliance initialises. |
| Rapid alternate flashing of the displays:➊➁ | Software problem. | Switch the appliance off and on again (see section 4.1 on page 35).Contact the hotline. |
| Rapid alternate flashing of the displays:➌clean | Brewing unit is not inserted. | Insert and lock the brewing unit. |
| The display lights up without having been activated:[book] | Appliance is not fully vented. | Vent the machine, fill the water tank if necessary and then press the "Coffee" and "Favourite coffee" direct keys simultaneously.Water flows into the drip tray when doing so. The appliance is ready for operation.Clean the brewing unit (see section 7.2 on page 44). |
Sommaire
natural_image
Technical line drawing of a mechanical device with no visible text or symbols
(Waste Electrical and Electronic Equipment).
www.melitta.nl of www.melitta.be
natural_image
Line drawing of a milk tea machine with two cups and control panel (no text or symbols)
natural_image
Technical line drawing of a mechanical device with no visible text or symbols
Fig. 4: Tasto "ON/OFF"
natural_image
Technical line drawing of a mechanical device with no visible text or symbols
natural_image
Technical line drawing of a mechanical device with no visible text or symbols
natural_image
Technical line drawing of a mechanical device with a circular component and directional arrow (no text or symbols)
(Waste Electrical and Electronic Equipment).
Bild 4: PÅ/AV-knapp
Bild 12: Demontera bryggenheten

natural_image
Technical line drawing of a mechanical device with a circular component and directional arrow (no text or symbols)
Fig. 4: "På-/Av"-knapp
Fig. 11: Stille inn malegrad
Fig. 12: Demontere kokegruppe
natural_image
Technical line drawing of a mechanical device with a circular component and directional arrow (no text or symbols)
Sette inn vannfilter
Forutsetning: Apparatet er driftsklart.
for WEEE (Waste Electrical and Electronic Equipment).
natural_image
Line drawing of a milk tea machine with two cups on the tray (no text or symbols)
natural_image
Mechanical assembly diagram showing a rotating device with a circular component and directional arrow (no text or labels)
natural_image
Line drawing of a coffee maker with two mugs and control panel (no text or symbols)
natural_image
Technical line drawing of a mechanical device with a circular component and directional arrows (no text or symbols)
natural_image
Technical line drawing of a mechanical device with a circular component and directional arrow (no text or symbols)
natural_image
Technical line drawing of a mechanical device with a circular component and directional arrow (no text or symbols)
Pav. 4: Pagrindinis jungiklis
natural_image
Technical line drawing of a mechanical device with a circular component and directional arrow (no text or symbols)
Joon. 5: Ubade mahuti kaane avamine
natural_image
Line drawing of a milk tea machine with two cups on the front (no text or symbols)
Joon. 11: Jahvatusastme seadmine
natural_image
Mechanical device diagram showing a rotating component with a circular head and directional arrow (no text or symbols)
Joon. 14: Puhastustableti panemine tömbekambrisse.
Att. 4: Taustiņš "lesl./lzsl."
natural_image
Technical line drawing of a mechanical device with a circular component and directional arrow (no text or symbols)
uz WEEE (Waste Electrical and Electronic Equipment).
Obr. 6: Vyjmutí nádoby na vodu
natural_image
Mechanical assembly diagram showing a device with a circular component and directional arrow (no text or symbols)
Obr. 4: tlačidlo "zap/vyp"
natural_image
Line drawing of a coffee machine with two cups and a milk carton (no text or symbols)
Obr. 12: Vymontovanie sparovacej jednotky
natural_image
Technical line drawing of a mechanical device with a circular component and directional arrow (no text or symbols)
Obr. 14: Vloženie čistiacej tablety do sparovacej jednotky.
Division Household Products
Ringstr. 99
D-32427 Minden
Germany
www.melitta.de
Editorial department:
ZINDEL AG
www.zindel.de