
YC-MS51ES - YC-MS51E-S - YC-MS51E-W - Microwave SHARP - Free user manual and instructions
Find the device manual for free YC-MS51ES - YC-MS51E-S - YC-MS51E-W SHARP in PDF.
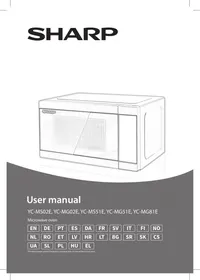

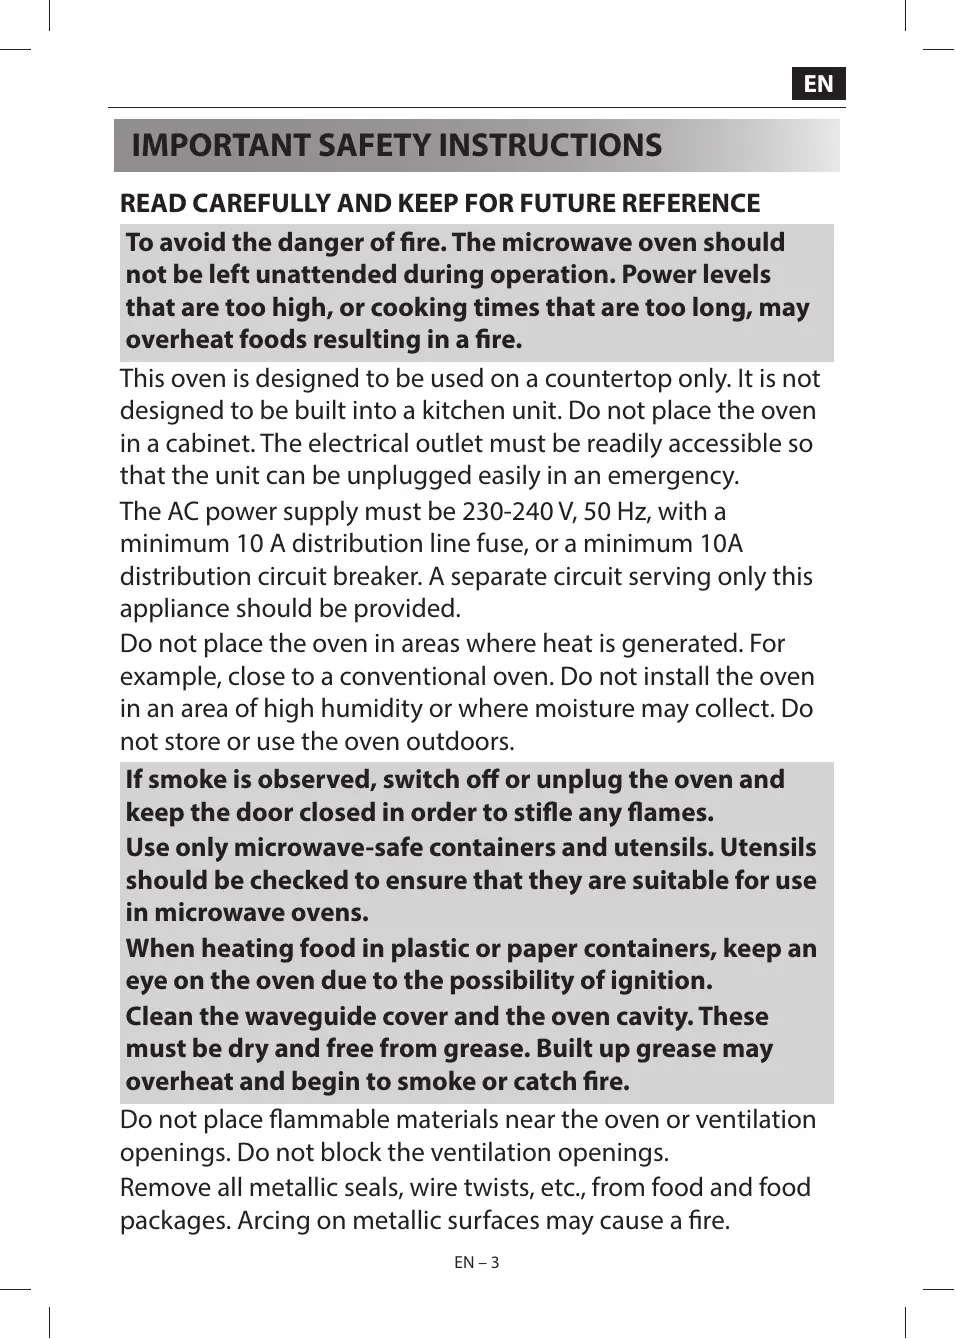


| Product Type | Microwave with Grill |
| Brand | Sharp |
| Compatible Models | YC-MS51ES, YC-MS51E-S, YC-MS51E-W |
| External Dimensions (W x H x D) | 513 x 306 x 394 mm |
| Cavity Dimensions (W x H x D) | 328 x 206 x 368 mm |
| Capacity | 25 liters |
| Net Weight | Approx. 14.5 kg |
| Power Supply | 230 V / 50 Hz, single phase |
| Recommended Fuse / Circuit Breaker | 10 A minimum |
| Total Power Consumption | 1450 W |
| Microwave Power | 900 W (11 levels) |
| Grill Power | 1100 W |
| Microwave Frequency | 2450 MHz |
| Standby Consumption | < 1.0 W (eco mode: < 0.5 W) |
| Turntable Diameter | 315 mm |
| Interior Light | LED 1.5 W |
| Main Functions | Microwave cooking, grill, combined (microwave + grill), defrost by weight/time, automatic menu (popcorn, potatoes, pizza, frozen vegetables, reheat tea/coffee, meal tray), sequential cooking (2 stages), quick start +30s, kitchen timer |
| Included Accessories | Glass tray, roller ring, tray coupling, metal grill rack (for grill) |
| Installation Type | Countertop (do not built-in) |
| Cleaning and Maintenance | Wipe with a damp cloth and mild detergent; do not use abrasive cleaners; easy cleaning with half lemon and water (10-12 min at 100%) |
| Safety | Door safety lock, child lock, automatic shutdown in case of malfunction, arc protection |
| Special Features | 24-hour clock, eco mode, LED display, door open button |
Frequently Asked Questions - YC-MS51ES - YC-MS51E-S - YC-MS51E-W SHARP
User questions about YC-MS51ES - YC-MS51E-S - YC-MS51E-W SHARP
0 question about this device. Answer the ones you know or ask your own.
Ask a new question about this device
Download the instructions for your Microwave in PDF format for free! Find your manual YC-MS51ES - YC-MS51E-S - YC-MS51E-W - SHARP and take your electronic device back in hand. On this page are published all the documents necessary for the use of your device. YC-MS51ES - YC-MS51E-S - YC-MS51E-W by SHARP.
USER MANUAL YC-MS51ES - YC-MS51E-S - YC-MS51E-W SHARP
Your product is marked with this symbol.
It means that used electrical and electronic products should not be mixed with general household waste. There is a separate collection system for these products.
www.sharpconsumer.com/contact/
www.sharpconsumer.com/support/
www.conformity.com
A. Information on Disposal for Users (private households)
1. In the European Union
Attention: If you want to dispose of this equipment, please do not use the ordinary dustbin!
Used electrical and electronic equipment must be treated separately and in accordance with legislation that requires proper treatment, recovery and recycling of used electrical and electronic equipment.
Following the implementation by member states, private households within the EU states may return their used electrical and electronic equipment to designated collection facilities free of charge*.
In some countries* your local retailer may also take back your old product free of charge if you purchase a similar new one.
*) Please contact your local authority for further details.
If your used electrical or electronic equipment has batteries or accumulators, please dispose of these separately beforehand according to local requirements. By disposing of this product correctly you will help ensure that the waste undergoes the necessary treatment, recovery and recycling and thus prevent potential negative effects on the environment and human health which could otherwise arise due to inappropriate waste handling.
2. In other Countries outside the EU
If you wish to discard this product, please contact your local authorities and ask for the correct method of disposal.
For Switzerland: Used electrical or electronic equipment can be returned free of charge to the dealer, even if you don't purchase a new product.
Further collection facilities are listed on the homepage of www.swico.ch or www.sens.ch.
B. Information on Disposal for Business Users
1. In the European Union
If the product is used for business purposes and you want to discard it: Please contact your SHARP dealer who will inform you about the take-back of the product. You might be charged for the costs arising from take-back and recycling. Small products (and small amounts) might be taken back by your local collection facilities.
For Spain: Please contact the established collection system or your local authority for take-back of your used products.
2. In other Countries outside the EU
If you wish to discard of this product, please contact your local authorities and ask for the correct method of disposal.
PRECAUTIONS TO AVOID POSSIBLE EXPOSURE TO MICROWAVE ENERGY
- Do not attempt to operate this oven with the door open as this can result in harmful exposure to microwave energy. It is important not to defeat or tamper with the safety interlocks.
- Do not insert anything between the oven front face and the door or allow debris or cleaner residue to accumulate on sealing surfaces.
- Do not operate the oven if it is damaged. It is very important that the oven door closes properly and that there is no damage to the door, hinges, latches or door seals and sealing surfaces.
- Do not attempt to repair or adjust the oven.
CONTENTS
IMPORTANT SAFETY INSTRUCTIONS 3 INSTALLATION 10 SPECIFICATIONS 11 OVEN AND ACCESSORIES 12 CONTROL PANEL. 13 BEFORE OPERATION 14 SETTING THE CLOCK. 14 MICROWAVE POWER LEVEL 15 MANUAL OPERATION 16 MICROWAVE COOKING 17 GRILL COOKING/MIX GRILL COOKING* 18 OTHER CONVENIENT FUNCTIONS 19 TIME DEFROST AND WEIGHT DEFROST OPERATION 20 AUTO MENU OPERATION 21 AUTO MENU CHART 22 SUITABLE OVENWARE 23 CLEANING AND CARE 24 MICROWAVE COOKING ADVICE 25 DEFROSTING ADVICE 27 REHEATING ADVICE 28 TROUBLESHOOTING 29 BEFORE CALLING FOR ASSISTANCE 30
IMPORTANT SAFETY INSTRUCTIONS
READ CAREFULLY AND KEEP FOR FUTURE REFERENCE
To avoid the danger of fire. The microwave oven should not be left unattended during operation. Power levels that are too high, or cooking times that are too long, may overheat foods resulting in a fire.
This oven is designed to be used on a countertop only. It is not designed to be built into a kitchen unit. Do not place the oven in a cabinet. The electrical outlet must be readily accessible so that the unit can be unplugged easily in an emergency.
The AC power supply must be 230-240 V, 50 Hz, with a minimum 10 A distribution line fuse, or a minimum 10A distribution circuit breaker. A separate circuit serving only this appliance should be provided.
Do not place the oven in areas where heat is generated. For example, close to a conventional oven. Do not install the oven in an area of high humidity or where moisture may collect. Do not store or use the oven outdoors.
If smoke is observed, switch off or unplug the oven and keep the door closed in order to stifle any flames.
Use only microwave-safe containers and utensils. Utensils should be checked to ensure that they are suitable for use in microwave ovens.
When heating food in plastic or paper containers, keep an eye on the oven due to the possibility of ignition.
Clean the waveguide cover and the oven cavity. These must be dry and free from grease. Built up grease may overheat and begin to smoke or catch fire.
Do not place flammable materials near the oven or ventilation openings. Do not block the ventilation openings.
Remove all metallic seals, wire twists, etc., from food and food packages. Arcing on metallic surfaces may cause a fire.
Do not use the microwave oven to heat oil for deep frying. The temperature cannot be controlled and the oil may catch fire.
To make popcorn, use only special microwave popcorn makers.
Do not store food or any other items inside the oven.
Check the settings after you start the oven to ensure the oven is operating as desired.
Do not leave the oven unattended while it is operating.
To avoid overheating and fire, special care must be taken when cooking or reheating foods with a high sugar or fat content, for example, sausage rolls, pies, or Christmas pudding. See the corresponding hints in the user manual.
To avoid the possibility of injury. WARNING:
Do not operate the oven if it is damaged or malfunctioning.
Check the following before use:
a) Make sure the door closes properly and ensure it is not misaligned or warped. b) Check to make sure the hinges and safety door latches are not broken or loose. c) Ensure that the door seals and sealing surfaces have not been damaged. d) Make sure inside the oven cavity or on the door are no dents. e) Ensure that the power supply cord and plug are not damaged.
If the door or door seals are damaged, the oven must not be operated until it has been repaired by a competent person.
Never adjust, repair, or modify the oven yourself. It is hazardous for anyone other than a competent person to carry out any service or repair operation which involves the removal of a cover which gives protection against exposure to microwave energy.
Do not operate the oven with the door open or alter the door safety latches in any way. Do not operate the oven if there is an
object between the door seals and sealing surfaces.
Do not allow grease or dirt to build up on the door seals and adjacent parts. Clean the oven at regular intervals and remove any food deposits.
Follow the instructions for "Care and Cleaning". Failure to maintain the oven in a clean condition could lead to a deterioration of the surface that could adversely affect the life of the appliance and possibly result in a hazardous situation.
Individuals with PACEMAKERS should check with their doctor on the manufacturer of the pacemaker for precautions regarding microwave ovens.
To avoid the possibility of electric shock.
- Under no circumstances should you remove the outer cabinet.
- Never spill or insert any objects into the door lock openings or ventilation openings. In the event of a spill, turn off and unplug the oven immediately, and call an authorized SHARP service agent.
- Do not immerse the power supply cord or plug in water or any other liquid.
- Do not let the power supply cord hang over the edge of a table or work surface.
- Keep the power supply cord away from heated surfaces, including the rear of the oven.
- Keep the appliance and its cord out of reach of children less than 8 years.
- Do not attempt to replace the oven lamp yourself or allow anyone who is not an electrician authorized by SHARP to do so. If the oven lamp fails, please consult your dealer or an authorized SHARP service agent.
- If the power supply cord is damaged, it must be replaced by an authorized SHARP service agent.
WARNING: Liquids and other foods must not be heated in sealed containers since they are liable to explode. Microwave heating of beverages can result in delayed eruptive boiling; therefore, care must be taken when handling the container. To avoid the possibility of explosion and sudden boiling:
Never use sealed containers. Remove seals and lids before use. Sealed containers can explode due to a build-up of pressure even after the oven has been turned off. Take care when microwaving liquids. Use a wide mouthed container to allow bubbles to escape.
Never heat liquids in narrow necked containers such as baby bottles, as this may result in the contents erupting from the container when heated and cause burns.
To prevent sudden eruption of boiling liquid and possible scalding:
- Do not use excessive amount of time.
- Stir liquid prior to heating/reheating.
- It is advisable to insert a glass rod or similar (not metal) into the liquid whilst reheating.
- Let liquid stand for at least 20 seconds in the oven at the end of cooking time to prevent delayed eruptive boiling.
Do not cook eggs in their shells, and whole hard-boiled eggs should not be heated in microwave ovens since they may explode even after microwave cooking has ended. To cook or reheat eggs which have not been scrambled or mixed, pierce the yolks and the whites. Shell and slice hard boiled eggs before reheating them in the microwave oven.
Pierce the skin of such foods as potatoes, sausages and fruit before cooking, or they may explode.
WARNING: The contents of feeding bottles and baby food jars must be stirred or shaken and the temperature checked before consumption, in order to avoid burns. Use
pot holders or oven gloves when removing food from the oven to prevent burns. To avoid the possibility of burns:
- Always open containers, popcorn makers, oven cooking bags, etc., away from the face and hands to avoid steam burns and eruption of boiling. To avoid burns, always test food temperature and stir before serving and pay special attention to the temperature of food and drink given to babies, children or the elderly. Accessible parts may become hot during use. Young children should be kept away.
- Temperature of the container is not a true indication of the temperature of the food or drink; always check the food temperature.
- Always stand back from the oven door when opening it to avoid burns from escaping steam and heat.
- Slice stuffed baked foods after heating to release steam and avoid burns.
- Keep children away from the door to prevent them burning themselves.
WARNING: Only allow children aged from 8 years and above to use the oven without supervision when adequate instructions have been given so that the child is able to use the oven in a safe way and understands the hazards of improper use.
When the appliance is operated in the GRILL, MIX GRILL, CONVECTION, MIX CONVECTION and AUTO MENU mode (mode applicable to model), children should only use the oven under adult supervision due to the temperature generated.
This appliance is not intended for use by persons (including children) with reduced physical, sensory or mental capabilities, or lack of experience and knowledge, unless they have been given supervision or instruction concerning use of the appliance by a person responsible
for their safety.
Children should be supervised to ensure that they do not play with the appliance. Cleaning by children should be monitored.
Models with an electronic touch panel are equipped with a child lock mode.
Do not lean on or swing on the oven door. Do not play with the oven or use it as a toy.
Children should be taught all important safety instructions: use of pot holders, careful removal of food coverings - paying special attention to packaging (e.g., self-heating materials) designed to make food crisp, as they may be extra hot.
Other warnings
Never modify the oven in any way.
Do not move the oven while it is in operation.
This appliance is intended for household use. This oven is for home food preparation and may only be used for cooking food and beverages. Drying of food or clothing and heating of warming pads, slippers, sponges, damp cloth and similar may lead to risk of injury, ignition or fire. It is not suitable for commercial or laboratory use.
To promote trouble-free use of your oven and avoid damage.
Never operate the oven when it is empty. When using a browning dish or self-heating material, always place a heat-resistant insulator such as a porcelain plate under it to prevent damage to the oven base due to heat stress. The preheating time specified in the dish's instructions must not be exceeded.
Do not use metal utensils, which reflect microwaves and may cause electrical arcing. Do not put cans in the oven.
To prevent the turntable or base of the oven breaking:
a) Before cleaning with water, leave to cool. b) Do not put hot or cold foods or hot utensils on a cold
turntable/oven base.
c) Do not place anything on the outer cabinet during operation.
NOTE:
Do not use plastic containers for microwaving if the oven is still hot from using a combination mode (oven model dependent) because they may melt.
Plastic containers must not be used during the above modes unless the container manufacturer says they are suitable.
If you are unsure how to connect your oven, please consult an authorized, qualified electrician.
Neither the manufacturer nor the dealer can accept any liability for damage to the oven or personal injury resulting from failure to observe the correct electrical connection procedure.
Water vapor or drops may occasionally form on the oven walls or around the door seals and sealing surfaces. This is a normal occurrence and is not an indication of microwave leakage or a malfunction.
This appliance is intended for use in household and similar applications such as: kitchen areas reserved for staff in stores, offices, and other professional environments; farms; use by clients of hotels, motels, and other residential type environments; bed and breakfast type environments.

This symbol means that the surfaces are liable to get hot during use.
INSTALLATION
- Remove all packing materials from the inside of the oven cavity and remove any protective film found on the microwave oven cabinet surface.
- Check the oven carefully for any signs of damage.
- Place the oven on a secure, level surface, strong enough to take the oven weight, plus the heaviest item likely to be cooked in the oven. Do not place the oven in a cabinet.
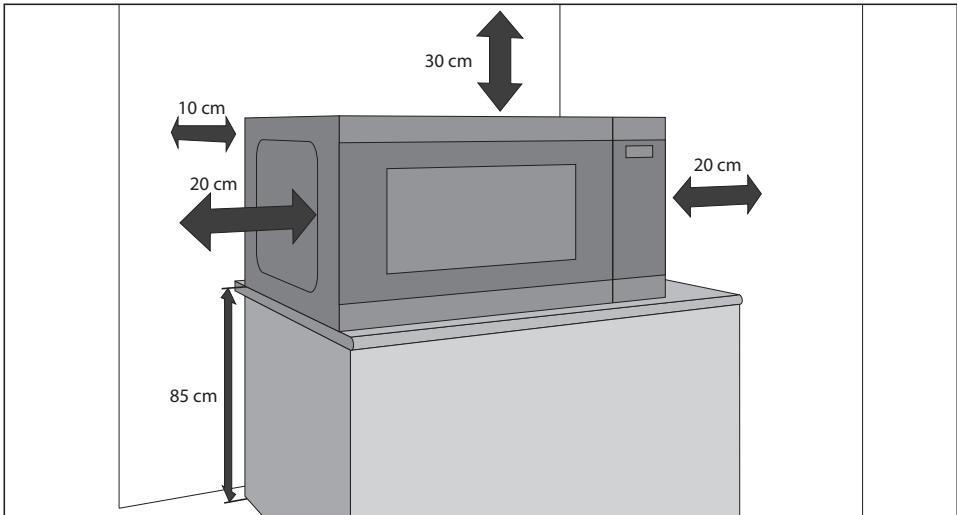
- Select a level surface that provides enough open space for the intake and/or outlet vents. See picture on the first page. The rear surface of the appliance can be placed against a wall.
- The minimum installation height is 85 cm.
- A minimum space of 20 cm is required between the sides of the microwave oven and any adjacent walls or objects.
- Leave a minimum space of 30 cm above the oven.
- Do not remove the feet from the bottom of the oven.
- Blocking the intake and/or outlet openings can damage the oven.
- Place the oven as far away from radios and TV as possible. Operation of microwave oven may cause interference to your radio or TV reception.
- Securely connect the plug of the oven to a standard earthed (grounded) household electrical outlet.
WARNING:
Do not place the oven where heat, moisture or high humidity are generated, (for example, near or above a conventional oven) or near combustible materials (for example, curtains).
Do not block or obstruct air vent openings.
Do not place objects on top of the oven.
Do not touch the exterior of the microwave oven during or shortly after operation as it will be hot.
SPECIFICATIONS
| Model name | YC-MS02E | YC-MG02E | YC-MS51E | YC-MG51E | YC-MG81E | |
| AC Line Voltage | 230 V/50 Hz single phase | |||||
| Distribution line fuse/circuit breaker | 10 A | 10 A | 10 A | 10 A | 10 A | |
| AC Power required | 1270 W | 1270 W | 1450 W | 1450 W | 1450 W | |
| Output power: | Microwave | 800 W | 800 W | 900 W | 900 W | 900 W |
| Grill | 1000 W | 1000 W | 1100 W | |||
| Standby | < 1,0 W | < 1,0 W | < 1,0 W | < 1,0 W | < 1,0 W | |
| Energy Save Mode | < 0,5 W | < 0,5 W | < 0,5 W | < 0,5 W | < 0,5 W | |
| Microwave Frequency | 2450 MHz* | 2450 MHz* | 2450 MHz* | 2450 MHz* | 2450 MHz* | |
| Outside Dimensions (W) x (H) x (D) mm | 440 x 258 x 324 | 440 x 258 x 324 | 513 x 306 x 394 | 513x 306 x 394 | 512 x 300 x 396 | |
| Cavity Dimensions (W) x (H) x (D)** mm | 306 x 205 x 304 | 306 x 205 x 304 | 328 x 206 x 368 | 328 x 206 x 368 | 348 x 240 x 356 | |
| Oven Capacity | 20 litres** | 20 litres** | 25 litres** | 25 litres** | 28 litres** | |
| Grill Rack Size (Diameter x Height in mm) | 315 x 308 | 315 x 308 | 315 x 308 | 315 x 308 | 315 x 308 | |
| Turntable (Diameter in mm) | 255 | 255 | 315 | 315 | 315 | |
| Weight (kg) | approx. 11,3 kg | approx. 11,9 kg | approx. 14,5 kg | approx. 15,4 kg | approx. 15,8 kg | |
| Oven Bulb (LED type) | 1,5 W | 1,5 W | 1,5 W | 1,5 W | 1,5 W | |
- This Product fulfils the requirement of the European standard EN55011. In conformity with this standard, this product is classified as group 2 class B equipment. Group 2 means that the equipment intentionally generates radio-frequency energy in the form of electromagnetic radiation for the heat treatment of food. Class B equipment means that the equipment is suitable to be used in domestic establishments. **- Internal capacity is calculated by measuring maximum width, depth and height. Actual capacity for holding food is less. AS PART OF A POLICY OF CONTINUOUS IMPROVEMENT, WE RESERVE THE RIGHT TO ALTER DESIGN AND SPECIFICATIONS WITHOUT NOTICE.
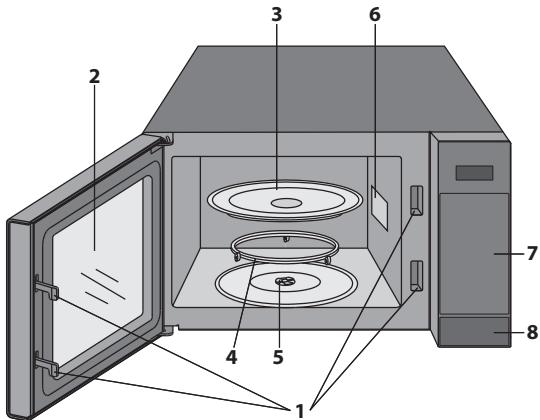
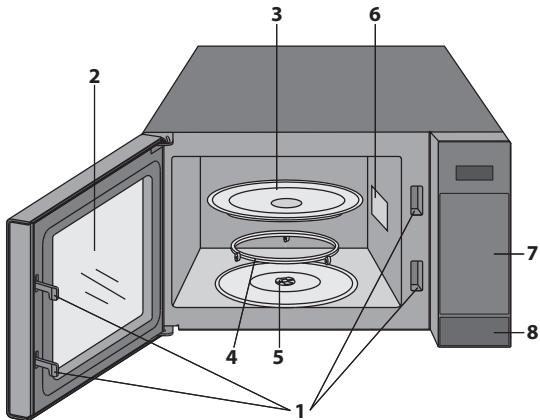
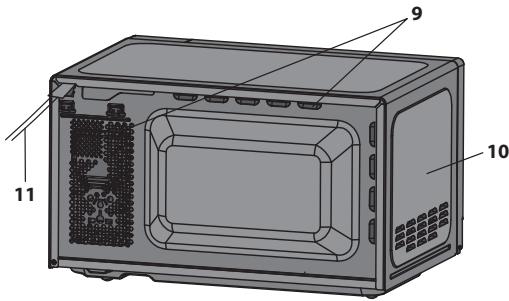
OVEN AND ACCESSORIES
- Door Safety Lock System
- Oven Window
- Glass Tray
- Roller Ring
- Turntable Coupling
- Waveguide Cover (Do Not remove)
- Power and Time controls
- Door opening button
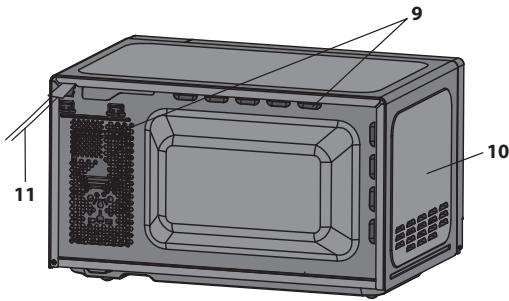
- Ventilation openings
- Outer cabinet
- Power supply cord
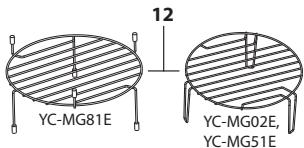
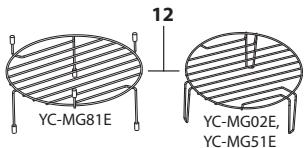
- Grill rack
Check to make sure the following accessories are provided: Roller Ring, Turntable Coupling and Glass Tray
Grill ovens only:
- Grill Rack - for use when cooking on the grill function only.
- The Grill Rack is designed for use with grill ovens only. DO NOT use the rack when using the microwave function.
- For use of the Grill Rack refer to the GRILL sections of this User Manual.
Never touch the grill when it is hot.
NOTE: When you order accessories, please mention two items: part name and model name.
NOTES:
- The waveguide cover is fragile. Care should be taken when cleaning inside the oven to ensure that it is not damaged.
- After cooking fatty foods without a cover, always clean the cavity and especially the grill heating element thoroughly, these must be dry and free from grease. Built-up grease may overheat and begin to smoke or catch fire.
- Always operate the oven with the turntable and turntable support fitted correctly. This promotes thorough, even cooking. A badly fitted turntable may rattle, may not rotate properly and could cause damage to the oven.
- All food and containers of food are always placed on the turntable for cooking.
- The turntable rotates clockwise or anti-clockwise. The rotary direction may change each time you start the oven. This does not affect cooking performance.

WARNING: This symbol means that the surfaces are liable to get hot during use. The door, outer net, oven cavity, accessories and dishes will become very hot during operation. To prevent burns, always use thick oven gloves.
CONTROL PANEL
- DISPLAY - Cooking time, power, indicators and clock time are displayed.
- WEIGHT DEFROST - Press once to defrost based on weight.
- TIME DEFROST - Press to select defrosting by time.
- AUTO MENU - Press to select auto cooking menu.
- TIME - Set the clock and timer.
- MICROWAVE POWER LEVEL - Press to select microwave power level.
- GRILL - Press to set grill cooking program.
- COMBI. - Press to set up combination (Microwave and Grill) cooking.
- WEIGHT/PORTION - Use these buttons to select weight or portions.
- KITCHEN TIMER - Press to use as a minute timer, or to programme standing time.
- SET CLOCK - Use to set clock time.
- START/+30s - Start button. Press once to cook for 30 seconds on full power.
- STOP/ECO - Press once to pause cooking or twice to cancel operation. Also used to set ECO mode.
Microwave solo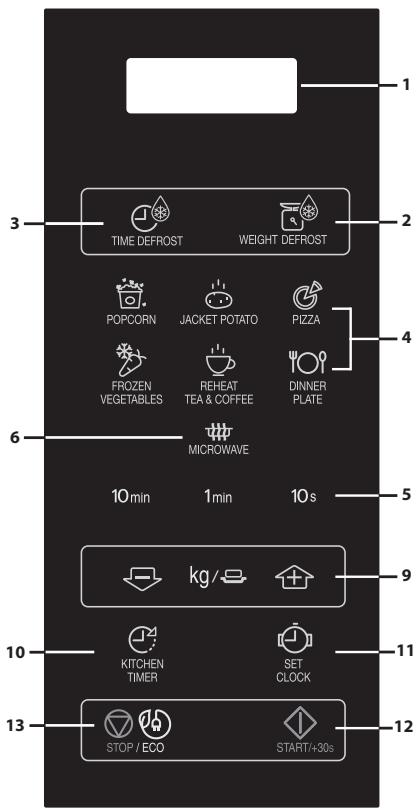
Microwave + grill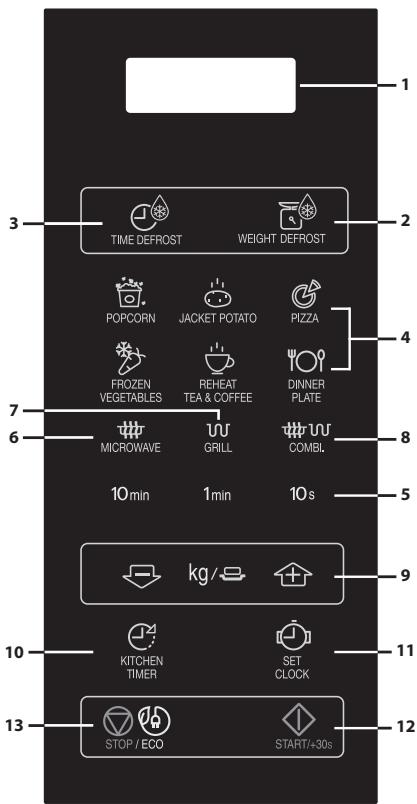
BEFORE OPERATION
- Plug in the oven. The oven display will display: "0:00", an audible signal will sound once.
- This model has a clock function and the oven uses less than 1.0 W in standby mode. To set the clock, see below.
SETTING THE CLOCK
Your oven has a 24 hour clock mode.
- Press the CLOCK SET key once and "00:00" will flash.
- Press the time keys and enter the current time. Enter the hours by pressing the 10 min key and enter the minutes by pressing the 1 min and 10 s keys.
- Press the CLOCK SET key to finish clock setting.
NOTES:
- If the clock is set, when cooking is complete, the display will show the correct time of day. If the clock has not been set, the display will only show "0:00" when cooking is complete.
- To check the time of day during a cooking process, press CLOCK SET key and the LED will display the time of day for 2-3 seconds. This does not affect the cooking process.
- While in the clock setting mode, if the STOP key is pressed or if there is no operation within 1 minute, the oven will go back to the former setting.
- If the electrical power supply to your microwave oven is interrupted, the display will intermittently show "0:00" after the power is reinstated. If this occurs during cooking, the programme will be erased. The time of day will also be erased.
- Your oven has 11 power levels, as shown.
- To change the power level for cooking, press the MICROWAVE POWER LEVEL key until the display indicates the desired level. Set up the desired cooking time by pressing time keys. Press the START key to start the oven.
- To check the power level during cooking, press the MICROWAVE POWER LEVEL key.
As long as your finger is pressing the MICROWAVE POWER LEVEL key the power level will be displayed. The oven continues to count down although the display will show the power level.
- If "0P" is selected, the oven will work with fan for no power. You can use this level to remove any odours.
Generally the following recommendations apply:
100P/90P - (HIGH) used for fast cooking or reheating e.g. for casseroles, hot beverages, vegetables etc.
80P/70P - (MEDIUM HIGH) used for longer cooking of dense foods such as roast joints, meat loaf and plated meals, also for sensitive dishes such as sponge cakes. At this reduced setting, the food will cook evenly without over cooking at the sides.
60P/50P - (MEDIUM) for dense foods which require a long cooking time when cooked conventionally, e.g. beef casserole, it is advisable to use this power setting to ensure the meat will be tender.
40P/30P - (MEDIUM LOW) to defrost, select this power setting, to ensure that the dish defrosts evenly. This setting is also ideal for simmering rice, pasta, dumplings and cooking egg custard.
20P/10P - (LOW) For gentle defrosting, e.g. cream, gateaux, or pastry.
MANUAL OPERATION
Opening the door:
To open the oven door, press door opening button.
Starting the oven:
Prepare and place food in a suitable container onto the turntable or place directly onto the turntable.
Close the door and press the START/◇ +30s key after selecting the desired cooking mode. You may extend the desired cooking time during manual cooking by pressing TIME keys or START/◇ +30s key.
START/+30s
Once the cooking programme has been set and the START/◇ +30s key is not pressed in 1 minute, the setting will be cancelled.
The START/+30s key must be pressed to continue cooking if the door is opened during cooking. The audible signal will sound once when the button is pressed in the correct manner.
Use the STOP key to:
- Erase a mistake during programming.
- Stop the oven temporarily during cooking.
- Cancel a programme during cooking, press the STOP key twice.
- To set and to cancel the child lock.
STOP / ECO
NOTE
- If the Microwave is not used for a period of 5 minutes (and the door is closed) the safety lock will automatically activate. The keypad will no longer operate. To turn the safety lock off simply open the door to the Microwave and the keypad will become active again.
MICROWAVE COOKING
Your oven can be programmed for up to 99 minutes 50 seconds (99.50).
MANUAL COOKING/MANUAL DEFROSTING
- Enter the cooking time and use microwave power levels 100P to 10P to cook or defrost.
- Stir or turn the food, where possible, 2 - 3 times during cooking. After cooking, cover the food and leave to stand, where recommended.
- After defrosting, cover the food in foil and leave to stand until thoroughly defrosted.
Example:
To cook 2 minutes and 30 seconds on 70% microwave power.
| 1. Input the power level by pressing the MICROWAVE POWER LEVEL key 4 times for 70 P. | 2. Enter the cooking time by pressing the 1 min key twice and then the 10 s key 3 times. | 3. Press the START/◇ +30s key to start the timer. (The display will count down through the set cooking/defrosting time.) |
| 7:0P | 2:30 | 2:30 |
NOTE:
- When the oven starts, the oven lamp will light and the turntable will rotate clockwise or anticlockwise.
- If the door is opened during cooking/defrosting to stir or turn over food, the cooking time on the display stops automatically. The cooking/defrosting time starts to count down again when the door is closed and the START key is pressed.
- When cooking/defrosting is complete, open the door or press STOP key and the time of day will reappear on the display, if the clock has been set.
- If you wish to know the power level during cooking, press the MICROWAVE POWER LEVEL key. As long as your finger is pressing the MICROWAVE POWER LEVEL key, the power level will be displayed.
IMPORTANT:
- Close the door after cooking/defrosting. Please note that the light will remain on when the door is open, this is for safety reason to remind you to close the door.
- If you cook food for more than the standard time (see chart below) using the same cooking mode, the oven's safety mechanisms automatically activate. The microwave power level will be reduced or the grill heating element will turn on and off.
| Cooking Mode | Standard time |
| Microwave 100 P | 30 minutes |
| Grill cooking* | Intermittent operation, temperature controlled |
| Mix grill cooking* | 99 mins 50 sec |
The grill at the top of the oven cavity has one power setting only. The grill is assisted by the turntable which rotates simultaneously to ensure even browning. Use the rack for grilling small items of food such as bacon, gammon and teacakes. Food can be placed either directly onto the rack, or into a flan dish/heat-resistant plate on the rack.
Example:
To grill for 20 minutes, using GRILL key.
| 1. Press GRILL key once. ∞ x1 | 2. Enter the required heating time by pressing the 10 min key twice. | 3. Press the START/◇ +30s key to start the grilling. (The display will count down through the set grilling time.) |
| G | 20:00 | 20:00 |
MIX GRILL combines microwave power with the grill. MIX means to cook by Microwave power and Grill power alternately.
The combination of microwave power with the grill reduces cooking time and provides a crisp, brown finish.
There are 2 choices for the combination:
COMBINATION 1 (Display: C-1)
55% time for microwave power, 45% time for grill cooking. Use for fish and au gratin.
COMBINATION 2 (Display: C-2)
36% time for microwave cooking, 64% time for grill cooking. Use for pudding omelets, and poultry.
Example:
To cook for 15 minutes, using MIX GRILL with 55% time microwave power and 45% grill power (C-1).
| 1. Press MIX GRILL key once. ∞ x1 | 2. Enter the required heating time by pressing the 10 min key once and the 1 min key 5 times. | 3. Press the START/◇ +30s key to start the cooking. (The display will count down through the set cooking time.) |
| C-1 | 15:00 | 15:00 |
NOTES for GRILL and MIX GRILL COOKING:
It is not necessary to preheat the grill. - When browning foods in a deep container, place on the turntable. - You may detect smoke or a burning smell when using the grill for the first time. This is normal and not a sign that the oven is faulty. To avoid this problem, when first using the oven, heat the oven without food for 20 minutes on grill.
IMPORTANT: During operation, to allow smoke or smells to disperse open a window or switch the kitchen ventilation on.
NOTE: When using the grill function, the grill will turn on and off at regular intervals to prevent overheating.

WARNING: The door, outer cabinet, oven cavity and accessories will become very hot during operation. To prevent burns, always use thick oven gloves.
* - Only for models with Grill.
OTHER CONVENIENT FUNCTIONS
1. SEQUENCE COOKING
This function allows you to cook using up to 2 different stages which can include manual cooking time and mode and/or time defrost as well as weight defrost function. Once programmed there is no need to interfere with the cooking operation as the oven will automatically move onto the next stage. The audible signal will sound once after the first stage.
Note: Auto menu cannot be set as one of the multiple sequences.
Example: If you want to defrost the food for 5 minutes, then to cook with 80P microwave power for 7 minutes.
The steps are as follows:
- Press the TIME DEFROST key once, in the LED display will appear dEF2.
- Enter the cooking time by pressing the 1 min key 5 times.
- Input the power level (80P) by pressing the MICROWAVE POWER LEVEL key 3 times.
- Enter the cooking time by pressing the 1 min key 7 times.
- Press the START key once to start cooking.
2. +30s FUNCTION (Auto-start)
The +30s key allows you to operate the two following functions:
a. Direct start
You can directly start cooking on 100P microwave power level for 30 seconds by pressing the +30s key.
b. Extend the cooking time
You can extend the cooking time during manual cooking, time defrost and auto menu operation for multiples of 30 seconds if the +30s key is pressed while the oven is in operation. You may extend the desired cooking time also by pressing TIME keys "10min", "1min", "10s". During the weight defrost, the cooking time cannot be increased.
NOTE: The cooking time may be extended to a maximum of 99 minutes 50 seconds.
3. KITCHEN TIMER FUNCTION:
You can use the kitchen timer for timing where microwave cooking is not involved, for example, to time boiled eggs cooked on a conventional hob or to monitor the standing time for cooked/defrosted food.
Example:
To set the timer for 5 minutes.
| 1. Press the KITCHEN TIMER key once. | 2. Enter the desired time by pressing the 1 min key 5 times. | 3. Press the START/◇ +30s key to start the timer. | 4. Check the display. (The display will count down through the set cooking/defrosting time.) |
When the timer time arrives, the audible signal will sound 5 times and the LED will display the time of day.
You can enter any time up to 99 minutes, 50 seconds. To cancel the KITCHEN TIMER while counting down, simply press the STOP key.
NOTE: The KITCHEN TIMER function cannot be used while cooking.
4. CHILD LOCK:
Use to prevent unsupervised operation of the oven by little children.
a. To set the CHILD LOCK:
Press and hold the STOP key for 3 seconds, a long bleep will be heard and the display will indicate "LOC". The oven is now in the CHILD LOCK mode. While in this mode, the display will show the clock; if any key is pressed or the door is opened, "LOC" will be seen for ten seconds.
b. To cancel the CHILD LOCK:
Press and hold the STOP key for 3 seconds until a long beep sound.
5. ECO MODE:
In standby mode, press the "ECO" button once, the LED display will be off and the microwave oven will enter ECO mode. Any operation can light the LED display again, and the microwave oven will return to standby mode.
STOP / ECO
TIME DEFROST AND WEIGHT DEFROST OPERATION
1. TIME DEFROST
This function quickly defrosts food while enabling you to choose a suitable defrost period, depending on the food type. Follow the example below for details on how to operate this function. The time range is 0:10 - 99:50.
Example: To defrost the food for 10 minutes.
| 1. Select the menu required by pressing the TIME DEFROST key once. x1 | 2. Enter the cooking time by pressing the 10 min key once. | 1. Press the START/◇+30s key to start the defrosting. |
| the display will show: dEF2 | 10:00 |
Notes for Time Defrost:
- After cooking the audible signal will sound five times and the LED will display the time of day, if the clock has been set. If the clock has not been set, the display will only show "0:00" when cooking is complete.
- The preset microwave power level is 30P and cannot be changed.
2. WEIGHT DEFROST
The microwave oven is pre-programmed with a time and power level so that the following food is defrosted easily: Pork, beef and chicken. The weight range for this food is from 0.1 kg to 2 kg in 0.1 kg steps.
Follow the example below for details on how to operate these functions.
Example: To defrost a meat joint weighing 1.2 kg using WEIGHT DEFROST.
Place the meat in a flat dish or microwave oven defrost rack on the turntable.
| 1. Select the menu required by pressing the WEIGHT DEFROST key once. x1 | 2. Enter the weight by pressing the WEIGHT/PORTION keys until the desired weight is displayed | 3. Press the START/◇ +30s key to start the defrosting. (The display will count down through defrosting time) |
| the display will show: dEF1 | kg/◇ display: 1.2 |
Frozen foods are defrosted from -18°C.
NOTES FOR WEIGHT DEFROST:
- Before freezing foods, ensure food is fresh and of good quality.
- Food weight should be rounded up to the nearest 0.1 kg, for example, 0.65 kg to 0.7 kg.
- If necessary, shield small areas of meat or poultry with flat pieces of aluminium foil. This will prevent the areas from becoming warm during defrosting. Ensure the foil does not touch the oven walls.
AUTO MENU OPERATION
The AUTO MENU keys automatically work out the correct cooking mode and cooking time for the foods. Follow the example below for details on how to operate this function.
Example: To cook two jacket potatoes (0.46 kg) by using the AUTO MENU function.
| 1. Select the menu required by pressing the Jacket Potato key once. x1 | 2. Press WEIGHT/PORTION UP/DOWN keys or continue to press the Jacket Potato key to choose the required number of potatoes (up to 3). | 3. Press the START/◇ +30s key to start the cooking. (The display will count down through cooking time) |
| the display will show: 1 | kg/2 display: 2 |
NOTES:
- The weight or quantity of the food can be input by pressing the WEIGHT/PORTION UP/DOWN keys until the desired weight/quantity is displayed. Enter the weight of the food only. Do not include the weight of the container.
- For food weighing more or less than the weights/quantities given in the AUTO MENU chart.
AUTO MENU CHART
| Auto Menu | WEIGHT/ PORTION / UTENSILS | Procedure |
| Popcorn | 0.05kg, 0.1kg | Place the popcorn bag directly on the turntable. (Please see the note below: 'Important Information About Microwave Popcorn Feature') |
| Jacket Potato | 1, 2, 3 potatoes (pieces) 1 potato = approx. 0.23kg (initial temp. 20°C) | Please use potatoes with a similar size of approx. 230g. Pierce each potato in several places and place towards the edge of the turntable. Turn over and re-arrange halfway through cooking. Stand for 3 - 5 minutes before serving. |
| Pizza | 0.1kg, 0.2kg, 0.4kg (initial temp 5°C) Plate | Place the Pizza on a plate in the centre of the turntable. Do not cover. |
| Frozen vegetable e.g. Brussel sprouts, green beans, peas, mixed vegetables, broccoli | 0.15kg, 0.35kg, 0.5kg (initial temp -18°C) Bowl and lid | Place vegetables in a suitable container. Add 1 tbsp of water per 100g of vegetables, cover the dish and place on the turntable. Stir halfway through cooking and after cooking. |
| REHEAT TEA & Coffee (120ml/ cup) | 1, 2, 3 (initial temp. 5°C) Cup | Place the cup(s) on the turntable and stir after heating. |
| Dinner Plate | 0.25kg, 0.35kg, 0.5kg (initial temp. 5°C) Plate | Place the plate in the centre of the turntable. Do not cover. Stir after cooking. |
Notes:
- The final temperature will vary according to the initial food temperature. Check food is piping hot after cooking. If necessary, you can extend the cooking time manually.
- The results when using auto cook depend on variances such as the shape and size of the food and your personal preference as regards cooking results. If you are not satisfied with the programmed result, please adjust the cooking time to match your requirement.
Important Information about Microwave Popcorn Feature:
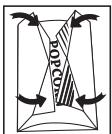
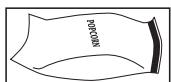
- When selecting 100 grams of popcorn, it is suggested that you fold down a triangle on each corner of the bag before cooking. Refer to the picture at right.
- If/When the popcorn bag expands and no longer rotates properly, press the STOP key once, open the oven door, and adjust the bag position to ensure even cooking.
SUITABLE OVENWARE
To cook or defrost food in a microwave oven, the microwave energy must be able to pass through the container to penetrate the food. Therefore, it is important to choose suitable cookware. Round or oval dishes are preferable to square or oblong ones, as the food in the corners tends to overcook. A variety of cookware can be used as listed below.
| Cookware | Microwave Safe | Grill | Comment |
| Aluminium foil Foil Containers | ✓/× | ✓ | Small pieces of aluminium foil can be used to shield food from overheating. Keep foil at least 2 cm from the oven walls, as arcing may occur. Foil containers are not recommended unless specified by the manufacturer, e.g. Microfoil®, follow instructions carefully. |
| Browning dishes | ✓/× | × | Always follow the manufacturers instructions. Do not exceed heating times given. Be very careful as these dishes become very hot. |
| China and ceramics | ✓/× | × | Porcelain, pottery, glazed earthenware and bone china are usually suitable, except for those with metallic decoration. |
| Glassware e.g. Pyrex® | ✓ | ✓ | Care should be taken if using fine glassware as it can break or crack if heated suddenly. |
| Metal | × | ✓ | It is not recommended to use metal cookware as it will arc, which can lead to fire. |
| Plastic/Polystyrene e.g fast food containers | ✓ | × | Care must be taken as some containers warp, melt or discolour at high temperatures. |
| Cling film | ✓ | × | It should not touch the food and must be pierced to let the steam escape. |
| Freezer/Roasting bags | ✓ | × | Must be pierced to let steam escape. Ensure bags are suitable for microwave use. |
| Paper - Plates, cups and kitchen paper | ✓ | × | Do not use plastic or metal ties, as they may melt or catch fire due to the metal 'arcing'. |
| Straw and wooden Containers | ✓ | × | Only use for warming or to absorb moisture. Care must be taken as overheating may cause fire. |
| Recycled paper and newspaper | × | ✓ | Always attend the oven when using these materials as overheating may cause fire. May contain extracts of metal which will cause 'arcing' and may lead to fire. |
NOTE: Do not leave your oven unattended while in use.

WARNING: When heating food in plastic or paper containers, monitor the oven due to the possibility of ignition.
CLEANING AND CARE
CAUTION: DO NOT USE COMMERCIAL OVEN CLEANERS, STEAM CLEANERS, ABRASIVE, HARSH CLEANERS, ANY THAT CONTAIN SODIUM HYDROXIDE, OR SCOURING PADS ON ANY PART OF YOUR MICROWAVE OVEN.
Before cleaning, make sure the oven cavity, door, oven cabinet, and accessories are completely cool. CLEAN THE OVEN AT REGULAR INTERVALS AND REMOVE ANY FOOD DEPOSITS. Keep the oven clean, or the oven could lead to a deterioration of the surface. This could adversely affect the life of the appliance and possibly result in a hazardous situation.
NOTE: When cooking, condensation can build up inside the oven cavity, cavity face, and door. The amount of condensation will depend upon the temperature of the oven surfaces and the moisture content of the food being microwaved. Ensure that when you have finished cooking, any moisture that collects on these surfaces is wiped away with a soft, moisture-absorbent cloth.
Oven exterior
The outside of your oven can be cleaned easily with mild soap and water. Make sure the soap is wiped off with a moist cloth, and dry the exterior with a soft towel.
Control panel
Open the door before cleaning to de-activate the control panel. Care should be taken in cleaning the control panel. Using a cloth dampened with water only, gently wipe the panel until it becomes clean.
Avoid using excessive amounts of water. Do not use any sort of chemical or abrasive cleaner.
Oven Interior
- For cleaning, wipe any splatters or spills with a soft damp cloth or sponge after each use while the oven is still warm.
For heavier spills, use a mild soap and wipe several times with a damp cloth until all residues are removed.
Built-up splashes may overheat and begin to smoke or catch fire, and cause arcing. Do not remove the waveguide cover.
- Make sure that mild soap or water does not penetrate the small vents in the walls which may cause damage to the oven.
- Do not use spray type cleaners on the oven interior.
- Heat up your oven regularly by using the grill and heat the oven without food for 20 minutes on grill. Remaining food or fat splashed can cause smoke or bad smell.
Keep the waveguide cover clean at all times.
The waveguide cover is constructed from a fragile material and should be cleaned with care (follow the cleaning instructions above).
NOTE: Excessive soaking may cause disintegration of the waveguide cover.
The waveguide cover is a consumable part and without regular cleaning, will need to be replaced.
Accessories
The accessories like turntable, turntable support and rack should be washed in a mild washing up liquid solution and dried. They are dishwasher safe.
Door
To remove all trace of dirt, regularly clean both sides of the door, the door seals and adjacent parts with a soft, damp cloth. Do not use abrasive cleaner.
NOTE: A steam cleaner should not be used.
Cleaning tip - For easier cleaning of your oven:
Place half a lemon in a bowl, add 300 ml (1/2 pint) water and heat on 100% for 10 - 12 minutes. Wipe the oven clean using a soft, dry cloth.
Microwaves cook food faster than conventional cooking. It is therefore essential that certain techniques are followed to ensure good results. Many of the following techniques are similar to those used in conventional cooking.

WARNING: Liquids and foods must not be heated in sealed containers or jars/containers with lids on, as pressure will build up inside and may cause the jar/container to explode.
COOKING ADVICE NOTES:
Always attend the oven when in use. - Ensure that the utensils are suitable for use in a microwave oven. - Refer to the charts in the cookbook section for recommended cooking times and power levels. - Only use microwave popcorn within the recommended packaging (follow the manufacturers instructions). Never use oil unless specified by the manufacturer and never cook for longer than instructed.

WARNING: Follow instructions in the SHARP operation manual at all times. If you exceed recommended cooking times and use power levels that are too high, food may overheat, burn and, in extreme circumstances, catch fire and damage the oven.
Arrange
Place the thickest parts of food towards the outside of the dish. e.g. Chicken drumsticks.
Foods that are placed towards the outside of the dish will receive more energy, so cook quicker, than those in the centre.
Cover
Certain foods benefit from being covered during microwave cooking.
Use vented microwave cling film or a suitable lid.
Pierce
Foods with a shell, skin or membrane must be pierced in several places before cooking or reheating as steam will build up and may cause food to explode. e.g. Potatoes, Fish, Chicken, Sausages.
NOTE: Eggs should not be heated using microwave power as they may explode, even after cooking has ended. e.g. poached, fried, hard boiled.
Stir, turn and rearrange
For even cooking it is essential to stir, turn and rearrange food during cooking. Always stir and rearrange from the outside towards the centre.
Stand
Standing time is necessary after cooking so it enables the heat to disperse equally throughout the food.
| Food Characteristics | |
| Composition | Foods high in fat or sugar (e.g. Christmas pudding, mince pies) require less heating time. Care should be taken as overheating can lead to fire. Bones in food conduct heat, making the food cook more quickly. Care must be taken so that the food is cooked evenly. |
| Density | Food density will affect the amount of cooking time needed. Light porous foods, such as cakes or bread, cook more quickly than heavy, dense foods, such as roasts and casseroles. |
| Quantity | The number of microwaves in your oven remains the same regardless of how much food is being cooked. The cooking time must be increased as the amount of food placed in the oven increases. e.g. Four potatoes will take longer to cook than two. |
| Size | Small foods and small pieces cook faster than large ones, as microwaves can penetrate from all sides to the centre. For even cooking make all the pieces the same size. |
| Shape | Foods which are irregular in shape, such as chicken breasts or drumsticks, take longer to cook in the thicker parts. For even cooking, place the thickest parts to the outside of the dish where they will receive more energy. Round shapes cook more evenly than square shapes when microwave cooking. |
| Temperature of food | The initial temperature of food affects the amount of cooking time needed. Chilled foods will take longer to cook than food at room temperature. The temperature of the container is not a true indication of the temperature of the food or drink. Cut into foods with fillings, for example jam doughnuts, to release heat or steam. |

WARNING: Face & Hands: Always use oven gloves to remove food or cookware from the oven. Stand back when opening the oven door to allow heat or steam to disperse. When removing covers (such as cling film), opening roasting bags or popcorn packaging, direct steam away from face and hands.

WARNING: Check the temperature of food and drink, stir before serving. Take special care when serving to babies, children or the elderly. The contents of feeding bottles and baby food jars are to be stirred or shaken and the temperature is to be checked before consumption to avoid burns.
DEFROSTING ADVICE
Using your microwave oven is the quickest defrosting method. It is a simple process but the following instructions are essential to ensure the food is thoroughly defrosted.
- Remove all packaging and wrapping before defrosting.
- To defrost food, use the Medium/Low or Defrost microwave power setting.
- Please refer to the further information below.
Rearrange
Foods that are placed towards the outside of the dish will defrost quicker than foods in the centre. It is therefore essential that the food is rearranged up to 4 times during defrosting.
Move closely packed pieces from the outside to the centre and rearrange over-lapping areas.
This will ensure that all parts of the food defrosts evenly.
Separate
Foods may be stuck together when removed from the freezer. It is important to separate foods as soon as it is possible during defrosting.
e.g. bacon rashers, chicken fillets.
Shield
Some areas of food being defrosted may become warm. To prevent them becoming warmer and starting to cook, these areas can be shielded with small pieces of foil, which reflect microwaves, e.g. legs and wings on a chicken.
Stand
Standing time is necessary to ensure food is thoroughly defrosted.
Defrosting is not complete once the food is removed from the microwave oven. Food must stand, covered, for a length of time to ensure the centre has completely defrosted.
Turn over
It is essential that all foods are turned over up to 4 times during defrosting.
This is important to ensure thorough defrosting.
REHEATING ADVICE
For the reheating of foods, follow the advice and guidelines below to ensure food is thoroughly reheated before serving.
Plated meals
Remove any poultry or meat portions, reheat these separately, see below.
Place smaller items of food to the centre of the plate, larger and thicker foods to the edge. Cover with vented microwave cling film and reheat on the Medium/Low microwave power level stir/rearrange halfway through reheating.
NOTE: Ensure the food is thoroughly reheated before serving.
Sliced meat
Cover with vented microwave cling film and reheat on the Medium/Low microwave power level. Rearrange at least once to ensure even reheating.
NOTE: Ensure the meat is thoroughly reheated before serving.
Poultry portions
Place thickest parts of the portions to the outside of the dish, cover with vented microwave cling film and reheat on the Medium microwave power level.
Turn over halfway through reheating.
NOTE: Ensure the poultry is thoroughly reheated before serving.
Casseroles
Cover with vented microwave cling film or a suitable lid and reheat on the Medium/Low microwave power level. Stir frequently to ensure even reheating.
NOTE: Ensure the food is thoroughly reheated before serving.
To achieve the best results when reheating, select a suitable microwave power level appropriate to the type of food. e.g. A bowl of vegetables can be reheated using the High microwave power level while a lasagne which contains ingredients that cannot be stirred, should be reheated using power level the Medium/Low microwave power level
NOTES:
- Remove food from foil or metal containers before reheating.
- Reheating times will be affected by the shape, depth, quantity and temperature of food together with the size, shape and material of the container.

WARNING: Never heat liquids in narrow-necked containers, as this could result in the contents erupting from the container and may cause burns.
- To avoid overheating and fire, special care must be taken when reheating foods with a high sugar or fat content, e.g. mince pies or Christmas pudding.
- Never heat oil or fat for deep frying as this may lead to overheating and fire.
- Canned potatoes should not be heated in the microwave oven, follow the manufacturer's instructions on the can.

WARNING: The contents of feeding bottles and baby food jars are to be stirred or shaken and the temperature is to be checked before consumption to avoid burns.
TROUBLESHOOTING
If you think the oven is not working properly there are some simple checks you can carry out yourself before calling an engineer. This will help prevent unnecessary service calls if the fault is something simple.
Follow this simple check below:
Place half a cup of water on the turntable and close the door. Set the timer knob to cook for 1 minute using the High microwave power level.
- Does the oven lamp come on when it is cooking?
- Does the cooling fan work? (Check by placing your hand above the air vent openings).
- After 1 minute does the audible signal sound?
- Is the water in the cup hot?
If you answer "NO" to any question first check that the oven is plugged in properly and the fuse has not blown. If there is no fault with either, check against the troubleshooting chart below.

WARNING: Never adjust, repair or modify the oven yourself. It is hazardous for anyone other than a SHARP trained engineer to carry out servicing or repairs. This is important as it may involve the removal of covers that provide protection against microwave energy.
- The door seal stops microwave leakage during oven operation, but does not form an airtight seal. It is normal to see drops of water, light or feel warm air around the oven door. Food with a high moisture content will release steam and cause condensation inside the door which may drip from the oven.
- Repairs and Modifications: Do not attempt to operate the oven if it is not working properly.
- Outer Cabinet & Lamp Access: Never remove the outer cabinet. This is very dangerous due to high voltage parts inside which must never be touched, as this could be fatal.
Your oven is not fitted with a lamp access cover. If the lamp fails, do not attempt to replace the lamp yourself, call a SHARP approved service facility.
TROUBLESHOOTING CHART
| QUERY | ANSWER |
| Draught circulates around the door. | When the oven is working, air circulates within the cavity. The door does not form an airtight seal so air may escape from the door. |
| Condensation forms in the oven, and may drip from the door. | The oven cavity will normally be colder than the food being cooked, and so steam produced when cooking will condense on the colder surface. The amount of steam produced depends on the water content of the food being cooked. Some foods, such as potatoes have a high moisture content. Condensation trapped in the door glass should clear after a few hours. |
| Flashing or arcing from within the cavity when cooking. | Arcing will occur when a metallic object comes into close proximity to the oven cavity during cooking. This may possibly roughen the surface of the cavity, but would not otherwise damage the oven. |
| Arcing potatoes. | Ensure all "eyes" are removed from the potatoes and that they have been pierced, place directly onto the turntable or in a heat resistant flan dish or similar. |
| Oven does not work when the timer control is turned away from 0. | Check the door is closed properly. |
| Oven cooks too slowly. | Ensure correct power level has been selected. |
| Oven makes a noise. | The microwave energy pulses ON and OFF during cooking/defrosting. |
| Outer cabinet is hot. | The cabinet may become warm to the touch - keep children away. |
BEFORE CALLING FOR ASSISTANCE
Before asking for service, please check each item below:
- Check to ensure that the oven is plugged in securely. If it is not, remove the plug from the outlet, wait 10 seconds, and plug it in again securely.
- Check for a blown circuit fuse or a tripped main circuit breaker. If these seem to be operating properly, test the outlet with another appliance.
- Check to ensure that the power and timer knobs are set correctly.
- Check to ensure that the door is securely closed engaging the door safety lock system. Otherwise, the microwave energy will not flow into the oven
IF NONE OF THE ABOVE RECTIFIES THE SITUATION, THEN CONTACT A QUALIFIED TECHNICIAN. DO NOT TRY TO ADJUST OR REPAIR THE OVEN YOURSELF.
www.sharpconsumer.com/support/
www.conformity.com
www.sharpconsumer.com/support/
www.conformity.com
CLEANING AND MAINTENANCE
WARNING: DO NOT USE COMMERCIAL OVEN CLEANERS, STEAM CLEANERS, ABRASIVE OR ROUGH CLEANERS, THOSE CONTAINING SODIUM HYDROXIDE, OR SCOURING PADS ON ANY PART OF YOUR MICROWAVE OVEN.
www.sharpconsumer.com/support/
www.conformity.com
Remove, turn, and replace
www.sharpconsumer.com/support/
www.conformity.com
A. Disposal information for users (private households)
1. EU
SPECIFICATIONS
| Modelavn | YC-MS02E | YC-MG02E | YC-MS51E | YC-MG51E | YC-MG81E | |
| Vekselstrømsspænding | 230 V~, 50 Hz, enkelfaset | |||||
| Strømsikring/overstrømsbeskyttelse | 10 A | 10 A | 10 A | 10 A | 10 A | |
| Krævet vekselstrømseffekt | 1270 W | 1270 W | 1450 W | 1450 W | 1450 W | |
| Udgangseffekt: | Mikrobølge | 800 W | 800 W | 900 W | 900 W | 900 W |
| Grill | 1000 W | 1000 W | 1100 W | |||
| Standby | < 1,0 W | < 1,0 W | < 1,0 W | < 1,0 W | < 1,0 W | |
| Energisparetilstand | < 0,5 W | < 0,5 W | < 0,5 W | < 0,5 W | < 0,5 W | |
| Mikrobølgefrekvens | 2450 MHz* | 2450 MHz* | 2450 MHz* | 2450 MHz* | 2450 MHz* | |
| Udvendige mål (B) x (H) x (D) mm | 440 x 258 x 324 | 440 x 258 x 324 | 513 x 306 x 394 | 513 x 306 x 394 | 512 x 300 x 396 | |
| Ovnummets mål (B) x (H) x (D)** mm | 306 x 205 x 304 | 306 x 205 x 304 | 328 x 206 x 368 | 328 x 206 x 368 | 348 x 240 x 356 | |
| Ovnkapacitet | 20 liter** | 20 liter** | 25 liter** | 25 liter** | 28 liter** | |
| Grillrist størrelse (Diameter x højde i mm) | 315 x 308 | 315 x 308 | 315 x 308 | 315 x 308 | 315 x 308 | |
| Drejetallerken (Diameter i mm) | 255. | 255. | 315. | 315. | 315. | |
| Vægt (kg) | ca. 11,3 kg | ca. 11,9 kg | ca. 14,5 kg | ca. 15,4 kg | ca. 15,8 kg | |
| Ovnlampe (LED-type) | 1,5 W | 1,5 W | 1,5 W | 1,5 W | 1,5 W | |
MANUAL DEFROSTING/MANUAL THAWING
1. DEFROSTING BY TIME
GOOD ADVICE ABOUT DEFROSTING
www.sharpconsumer.com/support/
www.conformity/
MANUAL OPERATION
www.sharpconsumer.com/support/
www.conformity/
2. +30s FUNCTION (Auto-start)
BEFORE CALLING FOR SERVICE
Before requesting service, check each item below:
www.sharpconsumer.com/support/
www.sharperconsumer.com/documents-of-conformity/
www.sharpconsumer.com/support/
www.conformity.com
COOKING WITH MICROWAVES
MANUAL COOKING / MANUAL DEFROSTING
1. COOKING USING GRILL ONLY
MANUAL COOKING / MANUAL DEFROSTING
- Set the cooking time and use microwave power levels 100P to 10P to cook or defrost. Stir or turn the food 2-3 times during the cooking time where possible.
- Cover the food and let it rest after cooking where recommended.
- After defrosting, cover the food with foil and let it stand until completely thawed.
Example:
2. +30s FUNCTION (Auto-start)
DEFROSTING BY TIME OR BY WEIGHT
1. DEFROSTING BY TIME
This function quickly defrosts food while allowing you to select a suitable defrosting period, depending on the type of food. Follow the example below for details on how to use this function. The time range is 0.10 - 99.50.
Example: To defrost food for 10 minutes.
| 1. Velg ønsket meny ved ø trykke TINING PÅ TID-tasten en gang. x1 | 2. Still inn tilberedningsstiden ved ø trykke 10 min-tasten en gang. | 1. Trykk START/◇+30s-tasten for ø starte opptiningen. |
| Displayet vil vise: dEF2 | 10:00 |
2. TRAINING AND HOLDING TO WEIGHT
CLEANING AND MAINTENANCE
Warning: Do not use commercial oven cleaners, steam cleaners, abrasive, harsh cleaning agents, detergents containing sodium hydroxide, or steel wool on any part of the microwave oven.
For cleaning, make sure that the oven cavity, door, oven cabinet, and other accessories are completely cooled down. CLEAN THE OVEN REGULARLY AND REMOVE FOOD RESIDUES - Keep the oven clean. Otherwise, the surfaces may be damaged. This can negatively affect the oven's lifespan and lead to dangerous situations.
OTHER HANDY FUNCTIONS
1. COOKING IN STAGES
2. +30s FUNCTION (Auto-start)
3. KITCHEN TIMER FUNCTION:
MANUAL COOKING / MANUAL DEFROSTING
IMPORTANT SAFETY INSTRUCTIONS
READ CAREFULLY AND KEEP FOR FUTURE REFERENCE
www.sharpconsumer.com/support/
www.conformity/
A. Information on disposal for users (private households)
1. In the European Union
Attention! If you wish to dispose of this device, please do not throw it in the ordinary trash!
www.sharpconsumer.com/support/
www.conformity/
IMPORTANT SAFETY INSTRUCTIONS
READ CAREFULLY AND KEEP FOR FUTURE USE
To avoid fire, do not leave the microwave oven unattended during operation. Too high power or too long cooking time can overheat food, which may result in fire.
www.sharpconsumer.com/support/
www.conformity/
www.sharpconsumer.com/support/
www.sharperconsumer.com/documents-of-conformity/
A. Information for private households
1. In the European Union
Attention: If you wish to dispose of this product, do not dispose of it with normal household waste.
Used electrical and electronic equipment must be disposed of separately, in accordance with legislation that requires proper treatment, recovery, and recycling of used electrical and electronic equipment.
Following the practice on the labels, private households in the EU can return their used electrical and electronic equipment free of charge to designated collection points.
In some countries, your local retailer may take back your old product free of charge when you purchase a new one.
*) For more information, please contact your local authorities. If your electrical and electronic equipment has batteries or accumulators, you must remove them before disposal, in accordance with local requirements. By properly disposing of this product, you help to ensure that waste is treated, recovered, and recycled correctly. This helps to prevent potential negative effects on the environment and human health, which could otherwise arise from incorrect disposal.
2. In countries outside the EU
If you wish to dispose of this product, please contact your local authorities to find out the correct disposal method.
For Switzerland: Used electrical and electronic equipment can be returned to retailers free of charge, even without purchasing a new product.
Further collection points can be found at www.swico.ch or www.sens.ch.
5. Information on disposal and recycling for commercial users
1. In the European Union
If the product was used for business purposes and you wish to dispose of it:
Information regarding the return of this product can be found at the nearest Sharp representative. You may be taxed for expenses, arising from the return and recycling. Some products (or some quantities) may be taken back by the local collection point.
For more information, contact the established collection system, or contact the local authorities for the return of your used products.
2. Disposal of waste electrical and electronic equipment (WEEE)
If you wish to dispose of this product, please contact the local authorities to learn about the disposal regulations.
SAFETY MEASURES AGAINST MICROWAVE ENERGY LEAKAGE
- Do not operate the oven with the door open. This may lead to exposure to microwave energy. Keep the safety interlocks in good condition and do not tamper with them.
- Do not place any object between the front face and the oven door; do not allow soil or cleaner residue to accumulate on the sealing surfaces.
- Do not use the oven if it shows signs of malfunction. The oven door must close properly and be in good condition, together with the hinges, locking mechanism, and sealing surfaces.
- Do not attempt to repair or modify the oven yourself.
CONTENTS
IMPORTANT SAFETY INSTRUCTIONS 3 INSTALLATION 11 SPECIFICATIONS 12 OVEN AND ACCESSORIES 13 CONTROL PANEL 14 BEFORE OPERATION 15 SETTING THE CLOCK 15 MICROWAVE POWER LEVELS 16 COOKING MODES 17 MICROWAVE COOKING 18 COOKING WITH GRILL/MICROWAVE GRILL 19 OTHER CONVENIENT FUNCTIONS 20 DEFROSTING BY TIME AND DEFROSTING BY WEIGHT 21 AUTO MENU MODE 22 AUTO MENU TABLE 23 COOKING TIPS 24 CARE AND MAINTENANCE 25 MICROWAVE COOKING PREPARATION 26 PREPARATION FOR DEFROSTING 28 TROUBLESHOOTING 29 CONTACTING CUSTOMER SUPPORT 31
IMPORTANT SAFETY INSTRUCTIONS
PLEASE READ AND KEEP FOR FUTURE REFERENCE
Do not place the oven near other heat sources, such as a conventional oven. Do not place the oven in high humidity or in places where moisture may collect. Do not use or store the oven outdoors.
If you notice any damage, unplug the oven and do not open the door, to prevent exposure to microwave energy.
Do not place the appliance near heat sources and do not use it as a toy.
All important safety instructions must be explained to the children, namely: using kitchen appliances, carefully handling the food packaging - special attention should be paid to the packaging (for example, self-igniting materials) intended to keep food fresh, as they can be very hot.
Other restrictions.
Never, under any circumstances, modify the appliance.
Do not move the appliance while it is operating.
This product is intended for household use. This appliance is intended solely for domestic food and beverage preparation. Food heating and reheating, as well as defrosting of frozen foods, dishes, plates, liquids, and similar, may lead to a risk of burns. Use in commercial or laboratory conditions is not recommended.
Accessories, model-dependent
Spare parts: Name of part, Name of model.
NOTES:
The lid of the cooking pot is fragile. Care must be taken not to damage it when placing it inside the appliance. After cooking fatty foods without the lid, clean the interior thoroughly, especially the heating element, which must be clean and free of grease. Residual grease on it may overheat, ignite, or cause smoke. Always operate the appliance with the turntable and tray correctly positioned. This helps during cooking. An incorrectly positioned turntable may wobble, not rotate properly, and cause damage to the appliance. - When cooking all packaged foods, place the package on the turntable. The turntable can rotate clockwise or counterclockwise. The direction of rotation may change when starting the appliance. This is related to food preparation.
WARNING: This symbol indicates that surfaces (door, housing, interior of the appliance and accessories) may become hot during operation. To prevent burns, use oven mitts or gloves.
CONTROL PANEL
- DISPLAY - Shows cooking time, power, indicators, and current time.
- WEIGHT DEFROST (Defrost by weight) - Press briefly to select the defrost by weight function.
- TIME DEFROST (Defrost by time) - Press briefly to select the defrost by time function.
- AUTOMATIC MENU - selection for automatic menu for cooking.
- TIME - setting the exact time and timer.
- MICROWAVE POWER LEVEL - selection of microwave power level.
- GRILL - setting for grilling with grill. 8.COMBI. (Combined cooking) - program for combined cooking with microwave energy and grill.
- TURN/NOTION - button for selecting TURN or NOTION.
- KITCHEN TIMER - can be used as a minute timer or for programming and setting the rest time.
- SET CLOCK - setting the exact time.
- START/+30s - button for starting the program. Press briefly for cooking with a duration of 30 seconds at full power.
- STOP/ECO (Stop / Energy saving mode) - with a brief press the program is paused; after a second press the program is cancelled. Used for setting the energy saving mode.
Standalone microwave cooking/defrosting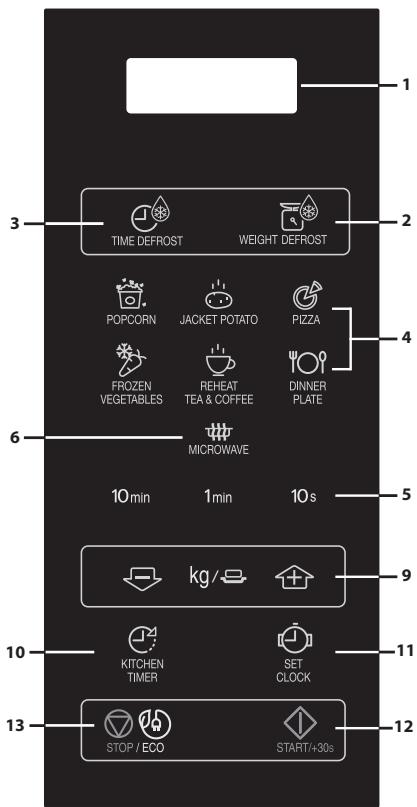
Microwave cooking + grill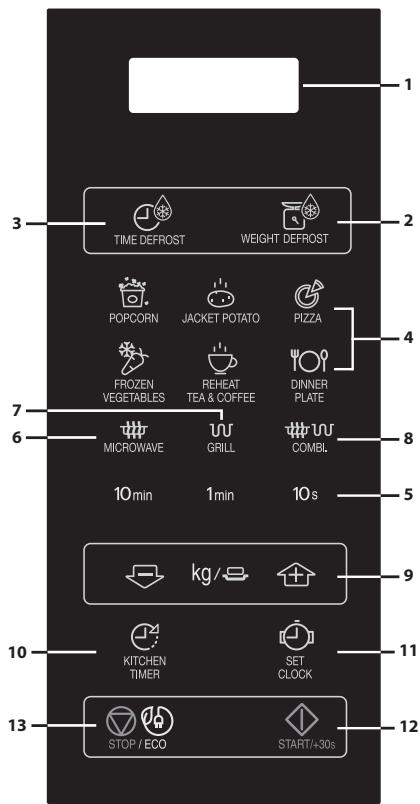
BEFORE FIRST USE
Plug in the appliance. The display shows "0:00" and a sound signal is heard. This model is equipped with a clock, so the energy consumption in standby mode is less than 1 W. For more details regarding the clock setting, see below.
SETTING THE CLOCK
Your oven has a clock with a 24-hour mode.
- Press the CLOCK SET button [I]. The display will show "0:00".
- Set the exact time using the buttons - 10 min per hour and 1 min per 10 sec per minute.
- Press the CLOCK SET button again to confirm the setting.
NOTE:
If the clock is set correctly, after the cooking is finished, the display will show the exact time. Otherwise, after the cooking is finished, the display will show "0:00". To check the exact time during cooking, press the CLOCK SET button. The exact time will be displayed on the display for 2-3 seconds. This does not affect the cooking process. - If during the clock setting the STOP button is pressed or no action is taken for more than one minute, the oven will return to the previous settings. If the electrical power cord is disconnected, reconnect it and the display will show "0:00". If this happens during cooking, the program will be erased. The time of day will be erased.
MICROWAVE POWER LEVEL
Close the door, select the desired cooking time using the START/◇ +30s button. When
the cooking time is set, it can be increased with the TIME button or
START/◇+30s.

START/+30s
After the cooking program is set, if the START/ 心 +30s button is not pressed within 1 minute, the setting will be cancelled.
If the door is opened during cooking, the START/+30s button must be pressed to
continue the program. When the button is pressed, a short beep will sound.
The STOP button can be used for:
1. Erasing the time setting. 2. Temporarily stopping the oven during cooking. 3. To cancel the program during cooking, press the STOP button twice. 4. Setting and cancelling the child lock function.

STOP / ECO
MICROWAVE OVEN
If the microwave oven is not used for 5 minutes and the door is closed, the child safety lock function will be activated automatically. The control panel will stop being active. To deactivate the child safety lock function, it is necessary only to open and close the door. After this action, the control panel can be used again.
MICROWAVE COOKING
Your oven can be programmed for up to 99 minutes and 50 seconds (99.50).
MANUAL COOKING / MANUAL DEFROSTING
Set the time and power level from 100P to 10P for cooking or defrosting. Stir and turn the food when possible, 2-3 times during cooking. After cooking, cover the food and let it stand when recommended. - For defrosting, cover the food with foil and let it stand until fully defrosted.
Example:
To cook for 2 minutes 30 seconds at microwave power 70%
To cook a chicken for 20 minutes using the GRILL button.
| 1. Hatис Hedge ednokpaTHO 6byToH GRILL. ∞x1 | 2. Бъединения Нeo6хoДМOTO врeme 3a награване чрз дуКраТно натискане на 6byToH 10 min. | 3. Hatис Hedge 6byToH START/+ +30s, за старurate ргILA. (Bьрух диспля有很大бъde показано образно овsprяваи на зада徵�TO врeme.) |
| G | 20:00 | 20:00 |
Cleaning the oven
The outside of your oven should be cleaned carefully with a soft cloth and water. Make sure the cloth is damp and then dry it afterwards.
Control panel
Open the door first to activate the control panel, while being careful with its cleaning. Use only a damp cloth, carefully wiping the panel while it is being cleaned. Avoid using excessive amounts of water. Do not use any chemical or abrasive cleaners.
Inside of the oven
1. Before use, wipe all parts and surfaces with a damp cloth. Do not use while the oven is still hot.
If the oven is frozen, do not use the appliance. Wipe it several times until the freezing is eliminated. The remaining food or grease may catch fire, emit smoke, or ignite. Do not use sharp objects or knives.
- Make sure the ventilation openings are not blocked by water or food debris. This could cause damage. Do not use aerosol sprays for cleaning the interior of the oven.
- Heat the oven empty for 20 minutes using the grill. Food residues or grease may catch fire, emit smoke, or cause damage.
Check the condition of the oven door seal regularly. The door seal is made of delicate material and must be handled carefully (follow the cleaning instructions above).
WARNING: Improper cleaning may cause damage to the door seal.
The door seal is non-replaceable and without regular cleaning, it must be replaced.
Accessories
Accessories such as the grill rack, baking tray, etc. must be cleaned with mild cleaning agents and dried. They are dishwasher safe.
Door
Remove the oven door by lifting it off its hinges. Clean the glass panels, the hinges, the spaces for the hinges, and the adjacent parts with a mild and damp cloth. Do not use abrasive cleaning agents.
WARNING: Do not clean with steam.
Tips for cleaning your oven:
Put lemon slices in a bowl, add 300 ml of water, and heat at 100% power for 10-12 minutes.
Wipe the oven with a damp cloth and dry it.
When using microwave ovens, food is prepared faster, compared to conventional cooking.
It is important to follow the instructions to determine the principles, so that the food prepared in the microwave is well cooked. Many of these principles differ from conventional cooking.

Piercing: Foods with skin or shell should not be cooked in a closed container or in containers with a lid, as they may explode due to the pressure that builds up.
COOKING TIPS:
Always watch the oven while it is in use. - Make sure the utensils are suitable for use in a microwave oven. See the table in the section with recommended time and power level for cooking food. - Use only microwave-safe utensils with the recommended lid (follow the manufacturer's instructions). Never use metal, unless specified by the manufacturer, and never cook for longer than the indicated time.

WARNING: Follow all instructions in the operating manual for SHARP. If you exceed the recommended cooking time or use excessively high power levels, the food may overcook, burn, or catch fire and damage the oven.
Correcting
Arrange the thicker parts of the food (e.g., chicken legs) away from the center of the dish. Food placed away from the center of the dish receives more microwave energy, i.e., it cooks faster than those in the center.
Covering
Some foods cook better in the microwave if they are covered. Use a ventilated microwave-safe lid or suitable plastic wrap.
Piercing
Foods with skin, peel, or membrane (e.g., potatoes, fish, chicken, sausages) must be pierced in several different places before cooking or reheating, as steam forms and the buildup of pressure may cause the food to explode.
- Remove the food from its packaging of foil or plastic before heating.
The heating time depends on the format, depth, quantity, and temperature of the food, as well as the size, shape, and material of the dish.

WARNING: Never fill the oven with hot oil, as this may lead to ignition and fire.
To prevent a fire, great care must be taken when frying foods with high fat or sugar content, for example chips or sausages. Never fill the oven with oil for deep frying, as this may lead to fire. Preserved potatoes should not be filled in the microwave oven. Follow the manufacturer's instructions printed on the packaging.

INSTRUCTIONS: To ensure even cooking, it is essential that the food and the glass turntable are at room temperature before use, and the temperature is checked.
TROUBLESHOOTING
If you have problems, before contacting a specialist, perform some simple checks. This may prevent unnecessary calls to technical support.
Perform the following elementary check:
Place half a glass of water on the turntable and close the door. Using the timer control, set the oven to cook for 1 minute at high microwave power.
- Does the interior light of the oven activate during cooking?
- Do the cooling fans activate? (Check by placing your hand over the ventilation openings).
- Does the turntable rotate for 1 minute?
- Is the water hot?
If the answer to any of the above questions is "NO", check that the oven is properly connected to the electrical supply, and also check the fuses. If both are in order, consult the troubleshooting table below.

WARNING: Never carry out repairs, adjustments, or modifications to the oven yourself. Performing any repair work is dangerous, unless carried out by a technician trained by SHARP. This is especially important, as removing the cover exposes the protection against microwave radiation.
- The door seals prevent microwave leakage, but do not provide a hermetic seal. It is normal for water droplets, light, or a slight draft to be present around the oven door. Foods with high water content release steam and create condensation inside the door. This condensation may drip from the oven.
- Repairs and modifications: Do not attempt to operate the oven if you notice it is not functioning properly. Never remove the outer casing. This is very dangerous, as it contains components that operate at high voltage and should never be touched, as there is a risk of fatal consequences.
The oven is not connected to the power supply. If the lamp is broken, do not attempt to replace it yourself, but contact the service center authorized by SHARP.
TROUBLESHOOTING TABLE
| Сьмн EHINE | OTTOBOP |
| Hаичие на Вьздушно туени Okоло вразата. | Дожато Фурнata работи, ВьздухьтВ Heйнatable Вьтrewhoct сиркунлра. Улльтэнята на вразата не заразяпс? Бьзможно ИЗпучке на Вьздух на Вьн. |
| Вьфурнata ce образува Конден3, кочо e Вьзможно да покале о Вразатa. | Овикновeto Вьзгшостета на Фурнata и по-stудана о поит�огьната xраha, тaka че парata, поучеса по говенeto, се поелва поформatura на Конден3 Вьху по-stуданыnotьхост. Колочевто на парata зависи о Тьдьржанению на Вoda в пиг罗тьната xраha. Няковхраши (нарр.kартофи) сьдьржат ВИСОКО кOLINHECTBO Вoda. Конден3ы, ЗатборенВ СтБКЛOTO на Вразата, Трава на ИЗчесны do Няковко уаса. |
| Посвettingае пліи Искрениоу Вьтream�остета на Фурнatura по Вразе на rotbehene. | При пблінжавае на метален obsekt до Вьтrewhoctета на Фурнatura по Вразе на разobota Вьзнikьва Искрени. Вьзможно о Това на hapрави поьчхостета по-груба, но не си р徳иЗвикало nobpeda в самота Фурна. |
| Искр squи картофи. | Уberete ce, che BCNUKNI Kьнlovesе са остсанени, a karpofoite ca поучени, поставени діректно Вьху Вьtrightцата униня пілв В对接moустий CBД. |
| Фурнata не пботи, korato приборьт за ураление на Вразemtraеньeto e постaven н поэция разлuchа оТ 0. | Пожерete дали вразата e пообerte заразенha. |
| Готvebeneto ce ИЗвршва празалених sabано. | Уberete ce, che e ИЗбарно правлиною НИВо на мошноct. |
| Фурнata Издаваш汞. | Прожete на rotbehene/размразявае мінковьловата enehmerі поточа на Инмпунс. |
| Вьшниот кадak e haropeшen. | Ка takът може да се наropeши. Дръжто Deцата настара. |
BEFORE REQUESTING SERVICE
Before requesting service for repair and maintenance, check the following:
- Check that the oven is properly plugged into the electrical outlet. If not, unplug it, wait 10 seconds, and plug it back in. - The circuit breaker may have tripped or there may be a power outage. If everything looks normal, plug another appliance into the same outlet to test if it works. - The controls for microwave power and timer are in the correct position. The door is closed properly, and the locking system is activated. Otherwise, the oven will not function.
IF NONE OF THE ABOVE CONDITIONS SOLVE THE PROBLEM, CONTACT A QUALIFIED TECHNICIAN. DO NOT ATTEMPT TO REPAIR OR MODIFY THE OVEN YOURSELF.
Attention:
www.sharpconsumer.com/support/
www.conformity/
A. Information on disposal for users (private households)
1. In the European Union
Attention: If you wish to dispose of this equipment, please do not use a regular trash bin!
Used electrical and electronic equipment must be disposed of separately in accordance with regulations that require proper use, repair, and recycling of used electrical and electronic equipment.
As is the case for Member States, private households within EU countries can return their used electrical and electronic equipment to authorized collection points for this equipment free of charge*.
IMPORTANT SAFETY INSTRUCTIONS
READ CAREFULLY AND KEEP FOR FUTURE REFERENCE
Avoid the risk of fire. Do not leave the microwave oven unattended during operation. Power levels that are too high, or cooking times that are too long, may overheat food and lead to fire.
This oven is designed for use only on a work surface. It is not designed to be built into a kitchen unit. Do not place the oven in a cabinet. The electrical outlet must be accessible so that the unit can be unplugged easily in case of emergency.
The AC power supply must be 230-240 V, 50 Hz, with a 10 A fuse for the distribution line, or a distribution circuit breaker of at least 10 A. A separate circuit serving only this appliance must be provided.
Do not place the oven in areas where heat accumulates. For example, near a conventional oven. Do not install the oven in areas of high humidity or where moisture may collect. Do not store or use the oven outdoors.
www.sharpconsumer.com/support/
www.conformity/
IMPORTANT SAFETY INSTRUCTIONS
READ CAREFULLY AND KEEP FOR FUTURE REFERENCE
TROUBLESHOOTING TABLE
www.sharpconsumer.com/support/
www.conformity/
www.sharpconsumer.com/support/
www.sharperconsumer.com/documents-of-conformity/
Do not use the device if it is damaged or malfunctioning. Do not use it with a damaged cord or plug, and do not operate it in a damp place.
It is necessary to familiarize children with all important safety rules: use the handles of the device, carefully remove the packaging from the products, pay special attention to packaging materials (for example, materials capable of self-ignition) intended for preserving the freshness of products, as they can be very dangerous.
Precautions
Do not attempt to repair the appliance yourself.
Do not immerse the appliance in water.
Do not use metal utensils, as they can cause microwaves to spark. Do not place canned food in the oven.
Preserving the safety of the turntable for the oven:
a) First wash the turntable in warm water, then dry it. b) Do not place hot food or hot utensils on the cold turntable. c) During operation, do not place any objects on the outer casing of the oven.
NOTE:
Do not use microwave-safe plastic containers that have not cooled after operation in combined mode (depending on the oven model): they may crack.
This symbol indicates that surfaces may become hot during operation of the appliance.
INSTALLATION
- Remove all packaging materials from the inside of the oven and remove the protective film from the surface of the microwave oven body.
- Carefully inspect the appliance for any damage.
- Place the appliance on a horizontal surface, the place that allows you to keep the device together with the item to be heated, which can be heated in it. Do not place it on the floor.
- Choose a horizontal surface, the place where there is enough space for the necessary clearance around the inlet and/or outlet ventilation openings. See the figure on the first page. The appliance can be placed close to the wall. The minimum installation height is 85 cm. The distance between the side walls of the microwave oven and adjacent walls or other objects must be at least 20 cm. The height of the free space above the oven must be at least 30 cm.
- Do not place the oven on the floor.
- Blocking the inlet and/or outlet openings may cause the oven to overheat.
- Place the oven away from radio and television receivers. Using a microwave oven may cause interference with radio and television reception.
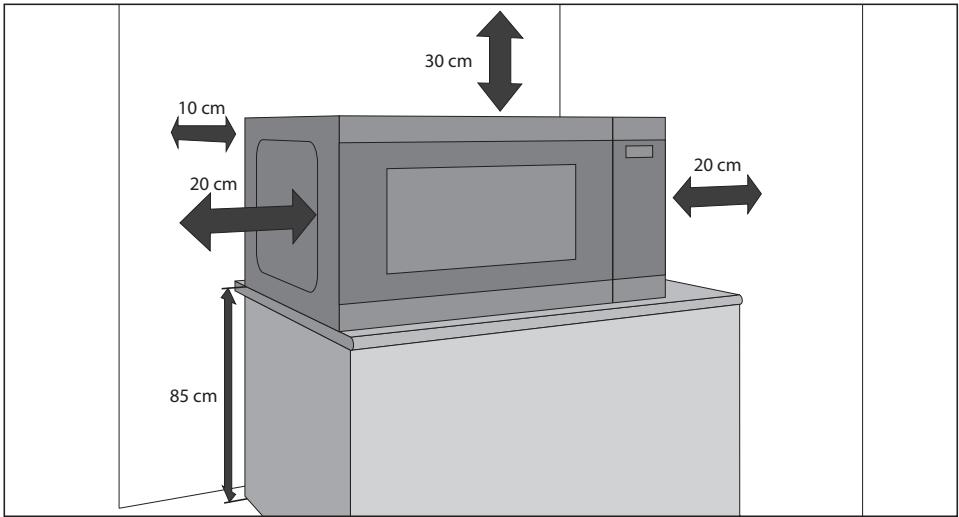
- Connect the oven plug to a standard grounded household electrical outlet.
WARNING!
Do not place the oven near sources of heat, water, or in wet places (for example, near a regular washing machine), as well as near flammable materials (for example, curtains).
Do not cover the ventilation openings.
Do not place objects on the oven.
During operation and for some time after the microwave oven is turned off, do not touch its casing: it may be hot.
TECHNICAL SPECIFICATIONS
Do not forget to check the presence of the following accessories: roller ring, turntable coupling, and glass tray.
Only for grilling:
- Grill rack - only for cooking grilled dishes.
- The grill is intended only for use in food preparation. Do not use the grill while using the microwave. The operating instructions for the grill are described in the "Grill" section of the operating manual.
Never touch the grill heating element.
Grill: To order spare parts, specify the name of the part and the model of the device.
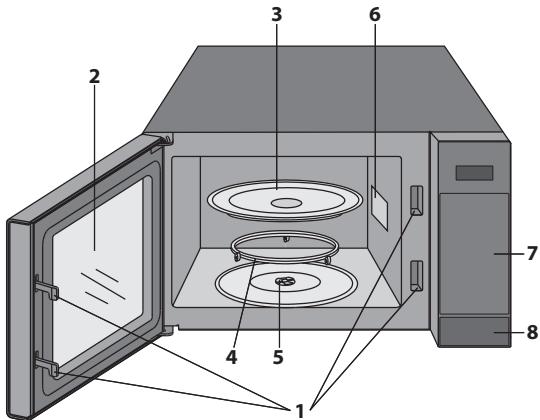
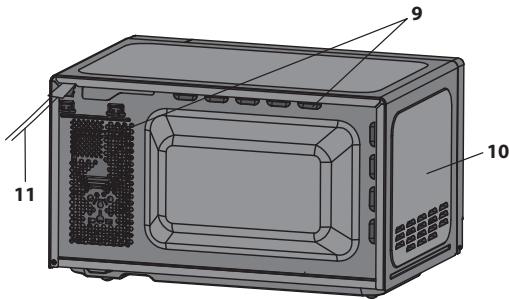
NOTES:
Before using the device, read the instructions carefully to avoid damaging the microwave oven. After unpacking, carefully inspect the inner chamber and the heating element of the grill. They must always be clean and dry. Overheating of the device may cause damage to the appliance. - Before using the device, make sure that the turntable and its support are installed correctly. This ensures thorough and even cooking. An incorrectly installed turntable during operation may wobble, rotate poorly, or even break. - For cooking food and containers with it, always place them on the turntable. - The turntable rotates clockwise and counterclockwise. The rotation direction changes each time the device is turned on. This does not affect the cooking process.
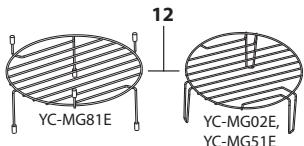
WARNING: The symbol indicates that surfaces may become hot during operation. During operation, the door, outer casing, inner chamber, accessories, and dishes may become very hot. To avoid burns, use thick oven mitts.
CONTROL PANEL
- Display - shows cooking time, power, indicators, and time of day.
- WEIGHT DEFROST - For defrosting by weight, press once.
- TIME DEFROST - For defrosting by time.
- AUTO MENU - Select automatic cooking menu.
- TIME - Select time and timer.
- MICROWAVE (MICROWAVE POWER) - Select microwave power level.
- GRILL (GRILL) - Set grilling program. 8. COMBI (COMBI) - Select combined cooking mode (microwave and grill).
- WEIGHT/CLOCK - Select weight or set the clock.
- KITCHEN TIMER (KXYOHHNI TAIMEP) - KHONika Do3BOLJIe KOPINCTyBaTnCSa TIaMePOM 3aDaTIc npInroTyaBHnA.
- SET CLOCK (HAJAWTYBATN FOINHHNK) - KONka DO3BOJAE HanaWyTBaTu Yac 3a FOINHHKOM.
- START/+30s (CTAPT/+30cek) - KhoNka nycky. HaTncHyBn Odn pa3, moXHa roTyBaTn npotrrom 30 ha nobHi nOtuyXHocti.
- STOP/ECO (CTON/EKO): odHOKpaTHe HaTNCaHHa OZBOJIa TUMcAso BO pIpIINHTn PnpIOTyBaHHa, a DbOKpaTHe — cKacyBaTn Ioro. TaKoX BVKOpncSTOBYeTcB dIra HanaStyBaHHa peXmMy eKOHOMii eheprii.
JIiue mikpoxBnIbOba nii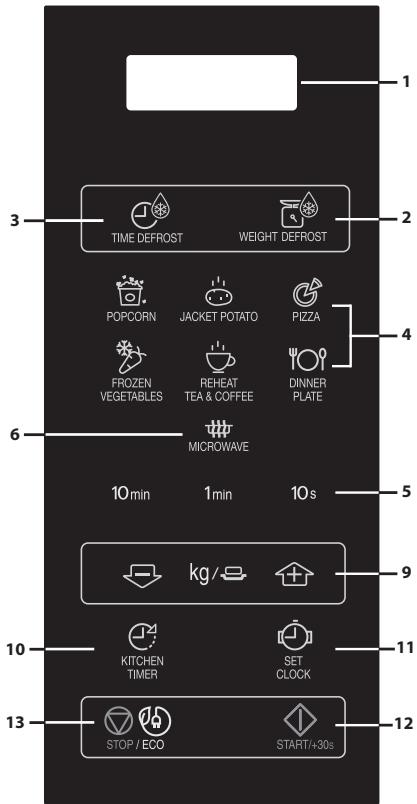
Mikpoxbilboba niu i3 rpnneM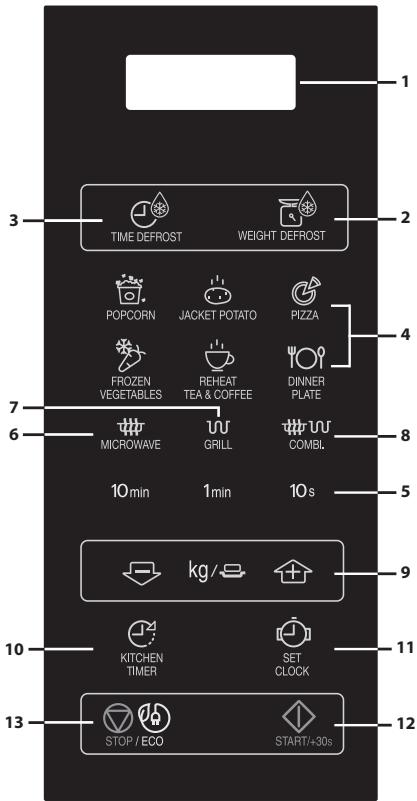
ПЕPS HIX PO3ПОЧАТЕКСПЛУATAЦИ
- Ybimkhitb niu. Ha dincnnie 3'raBnTbcaac "0:00", i niu BnuDactb oDhopa3OBn 3ByKOBn CnHaJ.
- Lma moelb maé yhkuio roHHnka, a B pexmi ouikybaHn cnoxnbAe MeHs k 1,0 Bt. Ipo hanauTyBaHHra oHHnka dNB. HNkye.
HAJIASTYBAHHI ROINHHNKA
ToDHHNKe nei npaioe B 24-roHHOMy pexmMi.
- HataHcHb Odn Hpa3 KhoNky «3AaATn YAc» [O] Yac «00:00» NoUHe 6IImaTn.
- HATNCKAQUH KONKN HAJIaSTyBaHHaCay, BBeiTb IotouHn qac. BBeiTb roHN, HATNCKAQUH KNONKY 10 min, Ta XBNJINH, HATNCKAQUH KONKN 1 min Ta 10 s.
- HataChitb KhoNky 3ADATU YAC, 100 3aKiHHTn HaJauTbAHHa rOuHHnka.
ПРМITКИ:
- If the appliance is not installed, the display will show the correct time. If the appliance is not installed, the display will show the time as 0:00
- To set the cooking time, press the button SET CLOCK - then the time will appear on the display for 2-3 seconds. This does not affect the cooking process. - If the clock is in the recommended mode, press the STOP button or if within 1 minute no button is pressed, the previous settings will be restored.
- In case of power failure, the display will show the message "0:00" for a few seconds. If this happens during cooking, the program will be cancelled. The cooking time will also be reset.
POWER LEVEL OF MICROWAVE FIELD
| Ровенnotужност | НатOMICity Кнолку RIBEHb ПOTУЖHOCTI MIKPOXBUNьОВОЕ EHEPП. | Ди检пел Прочent |
| ВИСOKИ | x1 | 100P |
| x2 | 90P | |
| ПOMIPHO ВИСOKИ | x3 | 80P |
| x4 | 70P | |
| CEPEДNII | x5 | 60P |
| x6 | 50P | |
| ПOMIPHO ИЗБКА (POЗМОЮЖУBAHNЯ) | x7 | 40P |
| x8 | 30P | |
| ИЗБКА | x9 | 20P |
| x10 | 10P | |
| x11 | 0P |
- As shown, there are 11 power levels. To select the power level for cooking, press the "POWER LEVEL" button until the desired power level is displayed. Enter the desired cooking time using the SET TIME button. To start cooking, press the "START" button.
- To check the power level during cooking, press the "POWER LEVEL" button. While this button is pressed, the power level will be displayed on the screen. At the same time, the power level will be displayed on the screen.
- If you select the "OR" level, the appliance will operate with the fan on, but with zero power. This mode can be used for airing the oven.
In most cases, it is recommended to use the following power levels:
100P/90P - (HIGH) Used for quick cooking of roasts, for example, roasts, poultry, and vegetables.
80P/70P - (MEDIUM HIGH) Used for longer cooking of products with a dense consistency, such as minced meat, meatloaf, and stews in pots, as well as side dishes, for example, biscuits. All modes with reduced power are cooked without supervision.
60P/50P - (MEDIUM) For products with a thick consistency that require longer cooking, when cooked in the traditional way, for example, for dishes with fish. It is recommended to use this mode so that the meat is not tough.
40P/30P - (MEDIUM LOW) Used for defrosting; select the power for even defrosting. It is also ideal for sauces, custards, and preparing custard cream.
20P/10P - (LOW) Used for slow defrosting, for example, cream cakes or pastries.
To open the door, press the door opening button.
Starting the oven:
Plug the product into the outlet. Select the cooking mode, set the time and press the "START/+30s" button. After the cooking process is complete, the device can be turned off.

START/+30s
Set the time by pressing the "TIME COOK" button or the "START/+30s" button.
If you set the cooking program but do not press the "START/+30s" button, the program will be paused after 1 minute.
The "START/+30s" button must be pressed if the door was opened during cooking. If the button is pressed correctly, it will be accompanied by a single beep.
Use the "STOP" button to:
- Correct a mistake during programming;
- Pause cooking at any time;
- Cancel the program during cooking; To do this, press the "STOP" button twice;
- Turn off the child lock.

STOP / ECO
NOTE:
If the microwave is not used for 5 minutes (and the door is closed), the child lock is automatically activated. To deactivate the child lock, simply open the door - then the keypad will work again.
There are two options for setting the modes:
COMBI 1 (on the display: C-1)
PIMITKA: The "KXYOHHNI TAIMER" function cannot be used during cooking.
4. BLOCKING FUNCTION:
Used to prevent accidental use.
Example: Defrost 1.2 kg of meat by weight.
Place the meat on the plate or on the rack for defrosting, then place it on the turntable.
NOTES ON DEFROSTING BY WEIGHT:
- Before freezing, check that the product is fresh and acidic. Round the weight of the dish to the nearest 0.1 kg, for example, 0.65 kg rounds to 0.7 kg. If necessary, cover the edges with small pieces of aluminum foil. This prevents overheating during defrosting. Make sure the foil does not touch the oven walls.
WORKING IN AUTO MODE
The AUTO MENU button automatically sets the appropriate cooking mode (see UA-4 and UA-23 for details). To understand how this function works, do the following example.
Example: Cook 0.46 kg of potatoes in the microwave without using the AUTO MENU function.
TROUBLESHOOTING
www.sharpconsumer.com/support/
www.conformity.com
www.sharpconsumer.com/support/
www.conformity.com
www.sharpconsumer.com/support/
www.sharpconsumer.com/documents-of-conformity/
MICROWAVE POWER LEVEL
1. MOD (Display: C-1)
2. MOD (Display: C-2)
www.sharpconsumer.com/support/
www.sharpconsumer.com/documents-of-conformity/
Sharp Consumer Electronics Poland sp. z o.o.
Ostaszewo 57B, 87-148 Lysomice, Poland
SHARP CORPORATION
1 Takumi-cho, Sakai-ku
Sakai City, Osaka
590-8522, Japan
SDA/MAN/0213
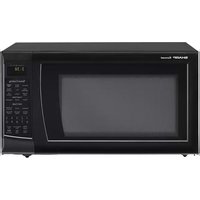
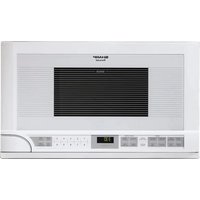
- INFORMATION ON DISPOSAL FOR USERS (PRIVATE HOUSEHOLDS)
- IN THE EUROPEAN UNION
- IN OTHER COUNTRIES OUTSIDE THE EU
- INFORMATION ON DISPOSAL FOR BUSINESS USERS
- PRECAUTIONS TO AVOID POSSIBLE EXPOSURE TO MICROWAVE ENERGY
- CONTENTS
- IMPORTANT SAFETY INSTRUCTIONS
- READ CAREFULLY AND KEEP FOR FUTURE REFERENCE
- TO AVOID THE POSSIBILITY OF INJURY. WARNING
- TO AVOID THE POSSIBILITY OF ELECTRIC SHOCK
- POT HOLDERS OR OVEN GLOVES WHEN REMOVING FOOD FROM THE OVEN TO PREVENT BURNS. TO AVOID THE POSSIBILITY OF BURNS
- WARNING: ONLY ALLOW CHILDREN AGED FROM 8 YEARS AND ABOVE TO USE THE OVEN WITHOUT SUPERVISION WHEN ADEQUATE INSTRUCTIONS HAVE BEEN GIVEN SO THAT THE CHILD IS ABLE TO USE THE OVEN IN A SAFE WAY AND UNDERSTANDS THE HAZARDS OF IMPROPER USE
- OTHER WARNINGS
- TO PROMOTE TROUBLE-FREE USE OF YOUR OVEN AND AVOID DAMAGE
- NOTE
- INSTALLATION
- WARNING
- OVEN AND ACCESSORIES
- GRILL OVENS ONLY
- NEVER TOUCH THE GRILL WHEN IT IS HOT
- NOTES
- CONTROL PANEL
- BEFORE OPERATION
- SETTING THE CLOCK
- MANUAL OPERATION
- OPENING THE DOOR
- STARTING THE OVEN
- USE THE STOP KEY TO
- MICROWAVE COOKING
- MANUAL COOKING/MANUAL DEFROSTING
- EXAMPLE
- IMPORTANT
- COMBINATION 1 (DISPLAY: C-1)
- COMBINATION 2 (DISPLAY: C-2)
- NOTES FOR GRILL AND MIX GRILL COOKING
- OTHER CONVENIENT FUNCTIONS
- SEQUENCE COOKING
- THE STEPS ARE AS FOLLOWS
- S FUNCTION (AUTO-START)
- DIRECT START
- EXTEND THE COOKING TIME
- KITCHEN TIMER FUNCTION
- CHILD LOCK
- TO SET THE CHILD LOCK
- TO CANCEL THE CHILD LOCK
- ECO MODE
- TIME DEFROST AND WEIGHT DEFROST OPERATION
- TIME DEFROST
- NOTES FOR TIME DEFROST
- WEIGHT DEFROST
- NOTES FOR WEIGHT DEFROST
- AUTO MENU OPERATION
- AUTO MENU CHART
- IMPORTANT INFORMATION ABOUT MICROWAVE POPCORN FEATURE
- SUITABLE OVENWARE
- CLEANING AND CARE
- OVEN EXTERIOR
- OVEN INTERIOR
- ACCESSORIES
- DOOR
- CLEANING TIP - FOR EASIER CLEANING OF YOUR OVEN
- COOKING ADVICE NOTES
- ARRANGE
- COVER
- PIERCE
- STIR, TURN AND REARRANGE
- STAND
- DEFROSTING ADVICE
- REARRANGE
- SEPARATE
- SHIELD
- TURN OVER
- REHEATING ADVICE
- PLATED MEALS
- SLICED MEAT
- POULTRY PORTIONS
- CASSEROLES
- WARNING: NEVER HEAT LIQUIDS IN NARROW-NECKED CONTAINERS, AS THIS COULD RESULT IN THE CONTENTS ERUPTING FROM THE CONTAINER AND MAY CAUSE BURNS
- WARNING: THE CONTENTS OF FEEDING BOTTLES AND BABY FOOD JARS ARE TO BE STIRRED OR SHAKEN AND THE TEMPERATURE IS TO BE CHECKED BEFORE CONSUMPTION TO AVOID BURNS
- TROUBLESHOOTING
- BEFORE CALLING FOR ASSISTANCE
- CLEANING AND MAINTENANCE
- REMOVE, TURN, AND REPLACE
- DISPOSAL INFORMATION FOR USERS (PRIVATE HOUSEHOLDS)
- EU
- SPECIFICATIONS
- MANUAL DEFROSTING/MANUAL THAWING
- DEFROSTING BY TIME
- GOOD ADVICE ABOUT DEFROSTING
- BEFORE CALLING FOR SERVICE
- COOKING WITH MICROWAVES
- MANUAL COOKING / MANUAL DEFROSTING
- COOKING USING GRILL ONLY
- DEFROSTING BY TIME OR BY WEIGHT
- TRAINING AND HOLDING TO WEIGHT
- OTHER HANDY FUNCTIONS
- COOKING IN STAGES
- READ CAREFULLY AND KEEP FOR FUTURE USE
- INFORMATION FOR PRIVATE HOUSEHOLDS
- IN COUNTRIES OUTSIDE THE EU
- INFORMATION ON DISPOSAL AND RECYCLING FOR COMMERCIAL USERS
- DISPOSAL OF WASTE ELECTRICAL AND ELECTRONIC EQUIPMENT (WEEE)
- SAFETY MEASURES AGAINST MICROWAVE ENERGY LEAKAGE
- PLEASE READ AND KEEP FOR FUTURE REFERENCE
- OTHER RESTRICTIONS
- BEFORE FIRST USE
- MICROWAVE POWER LEVEL
- START/◇+30S
- MICROWAVE OVEN
- CLEANING THE OVEN
- INSIDE OF THE OVEN
- TIPS FOR CLEANING YOUR OVEN
- COOKING TIPS
- CORRECTING
- COVERING
- PIERCING
- WARNING: NEVER FILL THE OVEN WITH HOT OIL, AS THIS MAY LEAD TO IGNITION AND FIRE
- INSTRUCTIONS: TO ENSURE EVEN COOKING, IT IS ESSENTIAL THAT THE FOOD AND THE GLASS TURNTABLE ARE AT ROOM TEMPERATURE BEFORE USE, AND THE TEMPERATURE IS CHECKED
- BEFORE REQUESTING SERVICE
- ATTENTION
- PRECAUTIONS
- TECHNICAL SPECIFICATIONS
- ONLY FOR GRILLING
- NEVER TOUCH THE GRILL HEATING ELEMENT
- ПЕPS HIX PO3ПОЧАТЕКСПЛУATAЦИ
- HAJIASTYBAHHI ROINHHNKA
- ПРМITКИ
- POWER LEVEL OF MICROWAVE FIELD
- COMBI 1 (ON THE DISPLAY: C-1)
- BLOCKING FUNCTION
- NOTES ON DEFROSTING BY WEIGHT
- WORKING IN AUTO MODE
- MOD (DISPLAY: C-1)
- MOD (DISPLAY: C-2)
Brand : SHARP
Model : YC-MS51ES - YC-MS51E-S - YC-MS51E-W
Category : Microwave