DSN15420 - DSN15420X - Dishwasher BEKO - Free user manual and instructions
Find the device manual for free DSN15420 - DSN15420X BEKO in PDF.
Questions des utilisateurs sur DSN15420 - DSN15420X BEKO
0 question sur cet appareil. Repondez a celles que vous connaissez ou posez la votre.
Poser une nouvelle question sur cet appareil
Download the instructions for your Dishwasher in PDF format for free! Find your manual DSN15420 - DSN15420X - BEKO and take your electronic device back in hand. On this page are published all the documents necessary for the use of your device. DSN15420 - DSN15420X by BEKO.
USER MANUAL DSN15420 - DSN15420X BEKO
Before you start, please read this user manual!
Dear Customer,
We hope you will get the best results from our product which is made using the advanced technologies and top quality materials. We therefore recommend that before using this product, you carefully read this manual and all the other documents supplied and keep them carefully for future reference. If you give the product to someone else, remember to also give them the user manual. Be sure to follow the guidelines and instructions in the user manual.
Remember that this user manual also corresponds to several other models.
This manual marks the differences between the models.
Explanation of symbols
Throughout this User Manual, the following symbols will be used:
VS Important information or useful tips for use
AT situations in terms of the safety of people and property

Warning in case of electric shock

The product packaging is made from recyclable materials, in accordance with our National environmental regulations.
Do not dispose of the packaging elements with household waste and other waste. Drop them off at one of the packaging collection points indicated by the local authority on which you depend.

This product has been manufactured in accordance with the latest ecological conditions.
Dishwasher
Manual

FR
Before you start, please read this user manual!
Dear Customer,
We hope you will get the best results from our product which is made using the advanced technologies and top quality materials. We therefore recommend that before using this product, you carefully read this manual and all the other documents supplied and keep them carefully for future reference. If you give the product to someone else, remember to also give them the user manual. Be sure to follow the guidelines and instructions in the user manual.
Remember that this user manual also corresponds to several other models.
This manual marks the differences between the models.
Explanation of symbols
Throughout this User Manual, the following symbols will be used:
VS Important information or useful tips for use
AT situations in terms of the safety of people and property

Warning in case of electric shock

The product packaging is made from recyclable materials, in accordance with our National environmental regulations.
Do not dispose of the packaging elements with household waste and other waste. Drop them off at one of the packaging collection points indicated by the local authority on which you depend.
1 RELATED INSTRUCTIONS TO SAFETY AND THE
ENVIRONMENT 4
General safety 4
Intended use 5
Child safety 5
Disposal of packaging materials .5
Transporting the device 6
Compliance with the WEEE Directive and disposal of
waste from the device 6
Compliance with the RoHS Directive 6
Description of packaging 6
2 DISHWASHERS 7
Presentation 7
Fan Drying System 8
Technical Specifications 8
3 INSTALLATION 9
Appropriate installation location 9
Connecting the water supply 9
Adjusting the feet 10
Aquasafe+ 11
Electrical connection 11
First use 12
4 PREPARATION 13
Tips for saving energy 13
Water softening system 13
Adjusting the water softening system. 13
Adding salt 15
Detergent 16
Tablet detergents 17
Rinse aid 18
Items not to be washed in the dishwasher. 19
Arranging the dishes in the dishwasher. 19
Cutlery basket 21
Cutlery basket 21
Lower Rack Retractable Rods 22
Lower Rack Retractable Rods 22
Drip pan support. 23
Special Lens Support 23
Retractable Stemware Holder 23
Lower rack multi-function/adjustable height support 24
Lower Rack Bottle Stem 25
Height-adjustable upper rack support 25
Multi-function upper rack support 25
Adjusting the height of the upper basket 26
Upper Rack Retractable Rods. 27
Adjusting the height of the empty basket 27
Upper cutlery basket 28
Upper cutlery basket 28
Keys 29
Preparing the device 29
Selecting programs 29
Additional functions 31
Programming the washing time 31
Starting the program 32
Program Progress Tracking 33
Canceling the program 33
Salt indicator 33
Rinse aid indicator 33
Adjusting the amount of rinse aid 33
End of the program 34
6 CARE AND CLEANING 35
Washing the outer surface of the product. 35
Washing the inside of the appliance. 35
Cleaning the filters. 35
Cleaning the Hose Filter 36
Cleaning the propellers 37
Lowerpropeller 37
Upper propeller 37
7 TROUBLESHOOTING
38
1 Safety and environmental guidelines
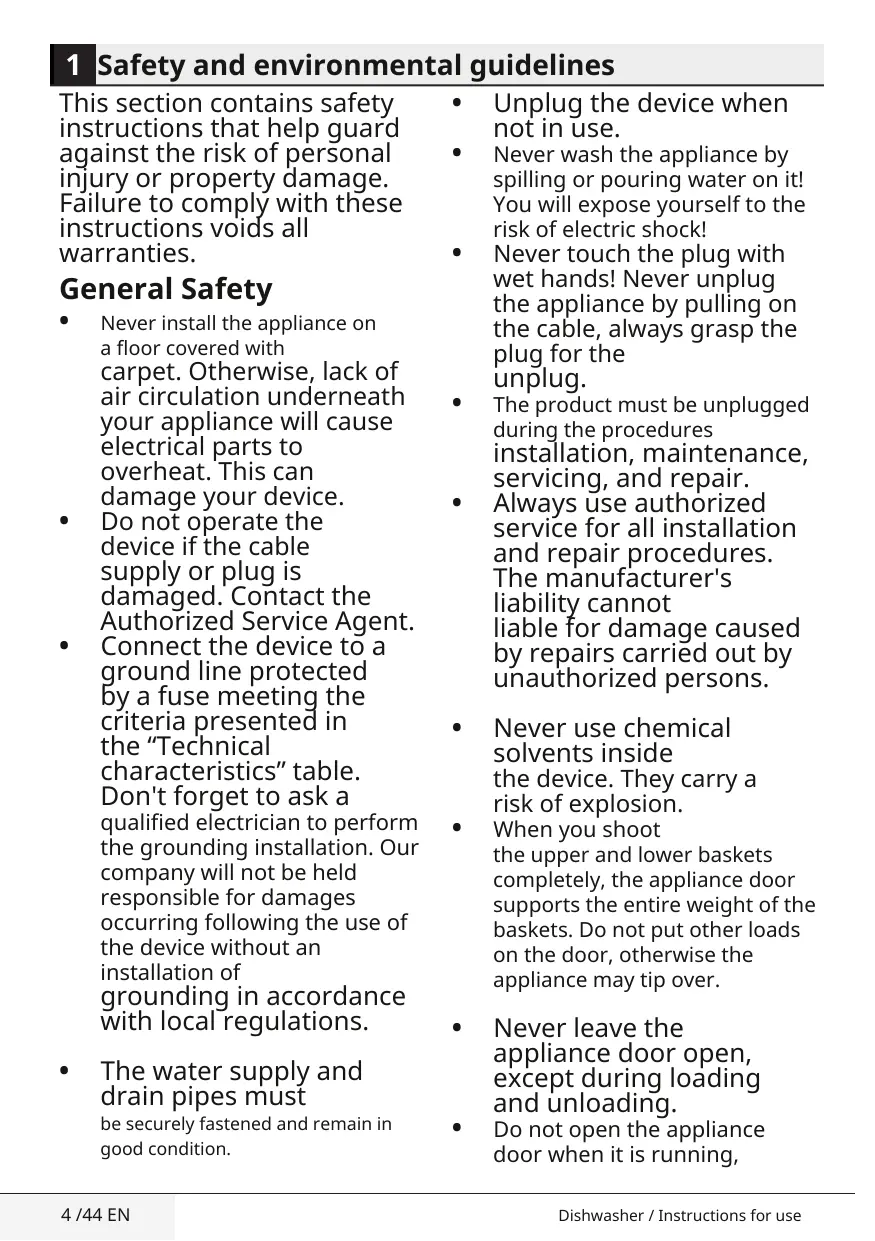
This section contains safety instructions that help guard against the risk of personal injury or property damage. Failure to comply with these instructions voids all warranties.
General Safety
- Never install the appliance on a floor covered with carpet. Otherwise, lack of air circulation underneath your appliance will cause electrical parts to overheat. This can damage your device.
- Do not operate the device if the cable supply or plug is damaged. Contact the Authorized Service Agent.
- Connect the device to a ground line protected by a fuse meeting the criteria presented in the "Technical characteristics" table. Don't forget to ask a qualified electrician to perform the grounding installation. Our company will not be held responsible for damages occurring following the use of the device without an installation of grounding in accordance with local regulations.
-
The water supply and drain pipes must be securely fastened and remain in good condition.
-
Unplug the device when not in use.
- Never wash the appliance by spilling or pouring water on it! You will expose yourself to the risk of electric shock!
- Never touch the plug with wet hands! Never unplug the appliance by pulling on the cable, always grasp the plug for the unplug.
- The product must be unplugged during the procedures installation, maintenance, servicing, and repair.
Always use authorized service for all installation and repair procedures. The manufacturer's liability cannot be liable for damage caused by repairs carried out by unauthorized persons. - Never use chemical solvents inside the device. They carry a risk of explosion.
- When you shoot the upper and lower baskets completely, the appliance door supports the entire weight of the baskets. Do not put other loads on the door, otherwise the appliance may tip over.
- Never leave the appliance door open, except during loading and unloading.
- Do not open the appliance door when it is running,
except when necessary. Pay attention to the rush of hot steam when you have to open the door.
Intended use
This appliance has been designed for household use.
- It should only be used for household type dishes.
This device has been manufactured to be used as both in domestic applications and in those similar to it, namely:
-
staff kitchens in shops, offices and other working environments;
-
country houses;
- customers in hotels, motels and other residential type environments;
-
bed and breakfast type environments.
-
Only safe dishwasher detergents, rinse aids and additives may be used.
-
The manufacturer declines all responsibility for any problem arising from incorrect use or transport of the device.
- Genuine spare parts are available for 10 years from the date of purchase of the product
- This appliance can be used by children 8 years of age and over and people whose physical abilities,
sensory or mental skills are reduced or lack sufficient experience or knowledge if a person in charge of safety supervises them or teaches them to use the product safely and with awareness of the dangers related thereto. Children should not play with the device. Cleaning and maintenance of the appliance should not be carried out by children without supervision.
Child Safety
- Electrical appliances are dangerous for children. Keep them away from the machine when it is running. Do not let them play near the machine.
- Remember to close the loading door when leaving the machine room.
- Store all detergents and additives carefully, out of reach of children.
Disposal materials packing
The packaging materials are dangerous for children. Keep all packing materials in a safe place, out of the reach of children.
The packaging materials for your product are manufactured in
from recyclable materials. Dispose of them properly and sort them according to the waste recycling instructions. Do not dispose of these materials with normal household waste.
Transporting the device
AT
If you need to move the device, place it in a vertical position and hold it by the sides. Tilting the product forward may wet its components electronics and cause damage.
- Unplug the product before transporting it.
- Remove the water inlet and drain connections.
- Completely drain the remaining water from the unit.
Compliance with WEEE Directive and disposal of waste from
the device
This product complies with the WEEE Directive of the European Parliament (2012/19/EU). This
device bears a classification symbol for Waste Electrical and Electronic Equipment (WEEE). It was made with top quality parts and materials, reusable and suitable for the
recycling. At the end of its life, do not dispose of it with household waste. On the contrary, have it disposed of at a collection point reserved for the recycling of appliances electrical and electronic. Please contact your local authorities to Find out about collection points in your area.
Compliance with RoHS directive
The device you have purchased complies with the European Parliament RoHS Directive (2011/65/EU). It does not contain harmful and prohibited materials, as specified in the said Directive.
Description of conditioning
Product packaging is made from recyclable materials in accordance with our National Environmental Regulations.
Do not dispose of the packaging elements with household waste and other waste. Put them in one of the collection points for packaging elements indicated to you by the local authority on which you depend.
2 Dishwasher
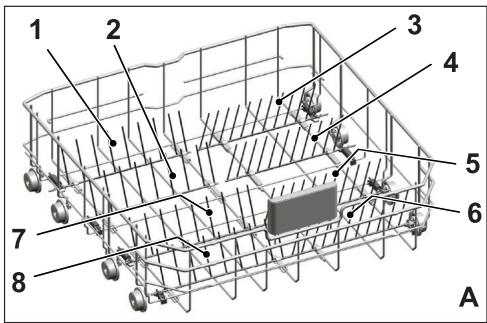
Presentation
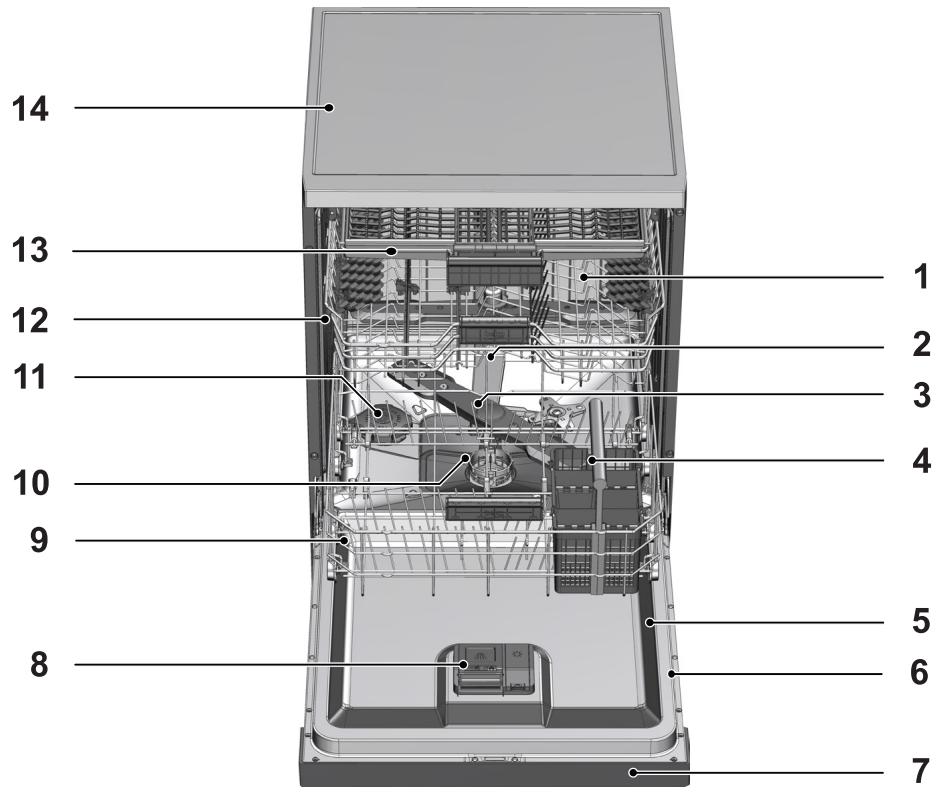
- Upper basket
- Upper helix
- Lower propeller
- Cutlery basket
- Door
- Rating label
- Control panel
- Detergent dispenser
- Lower basket
- Filters
- Salt reservoir cover
- Upper rack rail
- Upper cutlery basket (varies by model)
- Tabletop (varies by model)
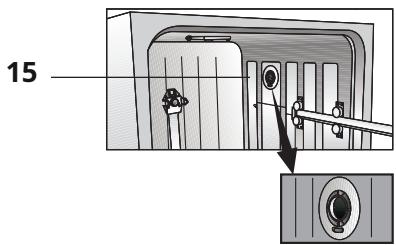
- Ventilation drying system (depending on the model)
Technical specifications

Compliance with standards and test data / EC Declaration of Conformity
This product complies with the following EU directives:
The stages of design, production and sale of this product are in compliance with the safety rules of all European Union regulations.
2014/35/EU, 2014/30/EU, 93/68/EC, IEC 60436/DIN 44990, EN 50242
| Power circuit | 220-240 V, 50 Hz (see rating label) |
| Total energy consumption | 1800-2100 W (see rating label) |
| Heating electricity consumption | 1800 W (see type label) |
| Total intensity (varies by model) | 10 A (see type label) |
| Drain electricity consumption | 30 W (see type label) |
| water pressure | 0.3 -10 bar (= 3 – 100 N/cm2 = 0.01-1.0 Mpa) |

Technical details may be changed without notice to improve product quality.

The figures in the manual are schematic and may not correspond exactly to the product.

The values presented on the product labels or in the documentation supplied with the product, have been obtained in the laboratory by applying the corresponding standards. These values may change depending on the operating conditions and environment of the product.
Fan drying system
(dependently on the model)
The fan drying system ensures efficient drying of your dishes. It is normal to hear noise other than the wash cycle during fan operation.
Notes for survey establishments:
Data required for performance testing can be provided upon request. Requests can be sent to the following address:
dishwasher@standardloading.com
Do not forget to indicate the product code, stock and serial numbers of the product to be tested in your email, as well as your contact details. Product code, stock and serial numbers are provided on the label affixed to the side of the door.
3 Installation
Consult the nearest Authorized Service Agent for installation of your product. To make your machine ready for use, please check that the electricity, drainage and water supply system are adequate before calling an authorized service. If not, contact a qualified technician and plumber to have the arrangements necessary are carried out.

The preparation of the location as well as the electrical, water tap and waste water installations at the installation site are the responsibility of the customer.
B
The installation and the electrical connections to the appliance must be made by the authorized service agent. The manufacturer will not be held liable for damage resulting from processes carried out by unauthorized persons.
AT
Before proceeding with the installation, check whether the product has any defects. If so, don't have it installed. Damaged products pose risks to your safety.
VS
Check that the water inlet and drain hoses are not kinked, pinched, or crushed when replacing the product after installation or cleaning procedures.
When placing the appliance, be careful not to damage the floor, walls, piping, etc. Avoid moving the appliance by holding it by the door or the panel.
Suitable installation location
- Place the product on solid, level ground with sufficient load-bearing capacity!. The appliance must be installed on a flat surface so that the door can be closed easily and securely.
- Avoid installing the product in places where the temperature is likely to drop below 0^ C .
- Place the product at least 1 cm away from other furniture.
Install the product on solid ground. Do not place it on carpet or similar surfaces.
B
Do not install the product on the power cable.
- Be sure to choose a location that will allow you to charge and unload the dishes in a fast and comfortable way.
Install the product in a location close to the tap and drain pipe Choose the location considering that it cannot be changed once the connections have been made.
Connecting the water supply
VS
We recommend fitting a filter to the house/ apartment water inlet to protect the machine from damage that may be caused by impurities (sand, dust, rust, etc.) coming from the system city water supply or your own water system, as well as to prevent problems
such as yellowing or soil buildup at the end of the wash.
Permissible water temperature: up to 25^
It is not recommended to connect the dishwasher to open water heaters or continuous flow water heaters.
- Do not use an old or used water inlet hose on your new product. Use the new water inlet hose supplied with the product.
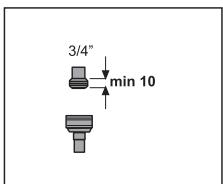
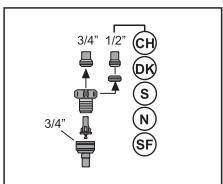
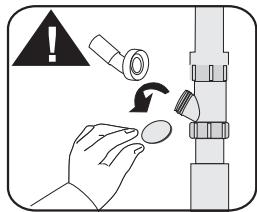
- Connect the water inlet hose directly to the water tap. The pressure coming from the valve must be at least 0.3 and at most 10 bars. If the water pressure is higher than 10 bar, a pressure reducer must be fitted between the two.
- Fully open the taps after making the connections to check for water leaks.
VS
Use a hose connector wrench to connect the water inlet hose to the water faucet with a 3/4 foot outside wire. If necessary, use a filter to filter the residue from the pipes.
AT
For your safety, completely close the water inlet tap after the end of the washing programme.
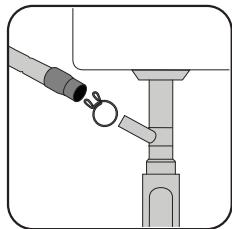
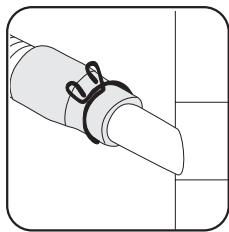
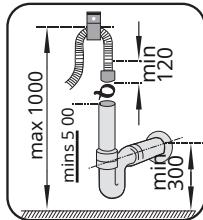
Connecting the drain pipe The water drain pipe can be connected directly to the drain pipe or to the sink drain. The length of this
connection must be at least 50~cm and at most 100~cm from the ground. A drain hose longer than 4 meters may cause faulty washing.
Attach the water drain hose to the drain hose without bending it. Secure the drain hose to the drain hose tightly to prevent the drain hose from moving during product operation.
VS
The drain hose must be connected to the sewer and must not be connected to surface water.
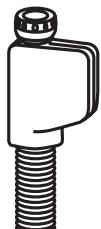
Leg adjustment
If the product door cannot be closed tightly or the product rocks when you push it lightly, you need to adjust its feet. Adjust the feet of the product as shown in the installation manual supplied with the product.
AT
The dishwasher door must be properly aligned to prevent hot steam from escaping! Risk of severe burns, other types of injury or damage to furniture.
Aquasafe+
(dependently on the model)
Protect the Aquasafe+ system against water leaks that may occur at the inlet of the hose. Water contact with the system valve housing should be avoided.
Otherwise, the electrical system will be damaged. If the Aquasafe+ system is damaged, unplug the unit and call your authorized agent.

As the entire hose contains electrical connections and parts, you should not shorten or lengthen the hose with extension cords.

Electrical connection
Connect the device to a ground line protected by a fuse meeting the criteria presented in the "Technical characteristics" table. Our company will not be held responsible for any damage caused by using the device without an earthing installation in accordance with the local regulations in force.
-
The connection must comply with the regulations in force in your country.
-
The power cable socket must be easily accessible after installation.
B
Unplug the appliance after the end of the washing programme.
- The permitted voltage and protection of the fuse or circuit breaker are specified in the "Technical data" section. If the current rating of your home fuse or circuit breaker is less than 16 amps, have a qualified electrician install a 16 amp fuse.
The voltage specified must be equal to that of your electrical network. - Do not make connections using extension cords or multiple sockets.
B
Damaged power cables must be replaced by the Authorized Service.
B
If your dishwasher has an internal light, have the bulb replaced only by an Authorized Service Agent in the event of any faults involving the bulb.
B
If the product encounters a problem, do not use it unless it has been repaired by the authorized service agent! You will expose yourself to the risk of electric shock!
First use
Before you start using your device, make sure that all preparations have been made in accordance with the instructions given in the "Important safety instructions" and "Installation" sections.
- To prepare the appliance for washing, first run it empty on the shortest program with detergent. For the first use, fill the salt reservoir with 1 liter of water before filling it with salt.
A small amount of water may remain in the unit after factory quality control testing. This poses no danger to the device.
4 Preparation
Tips for saving energy
The following information will help you use the product in an environmentally friendly and energy efficient way.
Remove all caked on food residue from the dishes before placing them in the appliance.
Operate the product after filling it completely.
When selecting a programme, consult the table of "Programme data and average consumption values".
Do not add more detergent than suggested on the detergent package.
Water softening system
The product is equipped with a water softening system which reduces the hardness of incoming water. This system softens the water entering the appliance to a level that will allow the dishes to be washed at the required quality.
VS
The hardness of the water in your supply must be softened if it is above 7^ dH. Otherwise, the hardness-causing ions will accumulate on the dishes and may decrease the washing, rinsing and drying performance of the machine.
System setting water softening
The cleaning, rinsing and drying performance of your dishwasher increases when the water softening system is properly adjusted.
Set the new water hardness level following the hardness instructions provided in this manual.
Use the test strip supplied with the product, following the steps given below, to determine the water hardness level.
| a remove the strip sound test packaging. | b Open the faucet of water and let sink about one minute. | c maintain the test strip in the water for about one second. | d remove the test strip of water and shake. | e Wait a minute. | f The strip trial shows you the level of hardness. |
After determining the water hardness level:
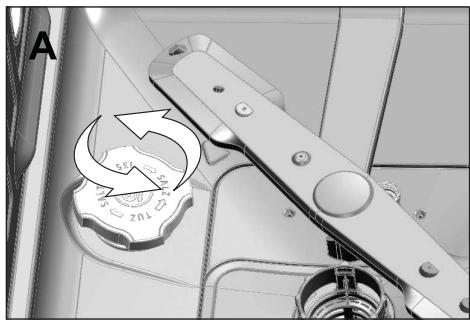
- When the program selection knob is in the "Off" position, press and hold the Start/Pause/Cancel button and turn the program selection knob to the "1" position within 5 seconds. After this time, the machine will go into regeneration setting mode.
- The regeneration level inside the memory lights up for 5 seconds once the regenerator setting mode is activated.
- To adjust the water hardness level, move the program selection button to the position suitable for your hydraulic network. (see the "Water hardness level setting table"
- Press the Play/Pause/Cancel button once to save the level you have selected. The machine returns to normal operating mode once the new setting has been saved.
- Program selection knob rotates in 5 increments, independent of machine programs.
- Press the "Start/Pause/Cancel" button once to save the level you have selected.
Water hardness level setting table
| Level of hardness | English degree hardness of water °dE | German degree hardness of water °dH | French degree hardness of water °dF | Location of button selection of program* | Witness of water hardness level |
| Level 0 | 0-5 | 0-4 | 0-8 | 1 | The panel wash light comes on. |
| First level | 6-9 | 5-7 | 9-13 | 1 | |
| Second level | 10-15 | 8-12 | 14-22 | 2 | The panel drying light comes on. |
| Third level | 16-19 | 13-15 | 23-27 | 3 | The end indicator of the panel lights up. |
| Fourth level | 20-24 | 16-19 | 28-34 | 4 | The washing, drying and end indicators light up on the panel. |
| Fifth level | 25-62 | 20-50 | 35-90 | 5 | The washing, drying and end indicators flash at one second intervals on the panel. |
If the water hardness level is above 90^ or if you use well water, it is recommended to use special water purification devices and filters.
If the hardness level of the water you are using is below 13^ , you do not have to
use salts in your dishwasher. In this case, the "no salt indicator" (if fitted) lights up continuously on the machine panel.
If the water hardness level is set to level 1, the "No salt indicator" will light up continuously even if no salts are needed. If you use salts in this case, the salt will not be used and the salt indicator will not light up.
VS If you move, it is necessary to readjust the water hardness level of the appliance taking into account the information provided above, according to the water hardness level of your new home. Your machine will display the last hardness level setting.
Adding salt
The water softening system needs to be regenerated so that the app always provides the same performance. Dishwasher salt is used for this
VS Use only softening salts intended specifically for the dishwasher
VS It is recommended to use softening salts formed granules or powders in the water softening system. Do not use salts that do not dissolve completely in water such as salt or coarse salt in the appliance you do, the performance of the system may deteriorate over time.
The salt reservoir fills with water when you start the appliance. Therefore, add salt before using the machine.
- Start by taking out the lower basket
- Add 1 liter of water to the salt reservoir of the device only when using it for the first time.


You can pour about 2kg of softening salt into the salt reservoir.
- Replace the lid and screw it tight when the tank is full.

It is necessary to add salt just before switching on the appliance. Therefore, the excess salt water will be drained immediately, thus preventing any risk of corrosion of the device. If you do not want to start washing immediately, run the appliance empty with the shortest programme.

Different brands of salt on the market have different particle sizes and the water hardness may vary. Dissolving the salt in the water can therefore take several hours. The Salt light may stay on for a while after adding salt to the appliance.
Detergent
You can use powder, liquid/gel or tablet detergent in the machine.

Use only detergents designed especially for dishwashers. We advise you not to use detergents containing chlorine and phosphate insofar as these agents are harmful to the environment.
Adding detergent

Carefully read the warnings on the detergent package for best washing and drying results. Contact the detergent manufacturer for other questions.

Do not put solvents in the detergent dispenser. There is a risk of explosion!
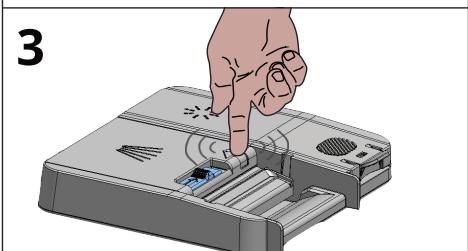
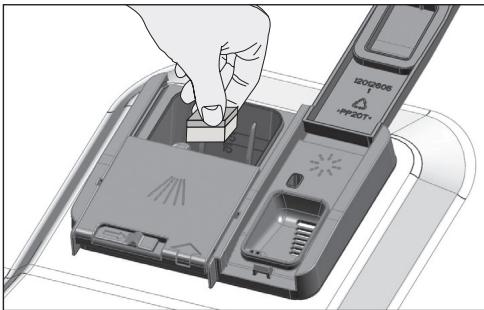
Place detergent in the detergent dispenser just before turning on the machine as shown below.
- Push the lever to the right to open the detergent dispenser cover (A).
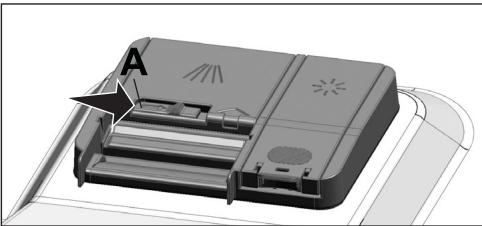
- Put the recommended amount of powder, liquid/gel or tablet detergent into the tank.

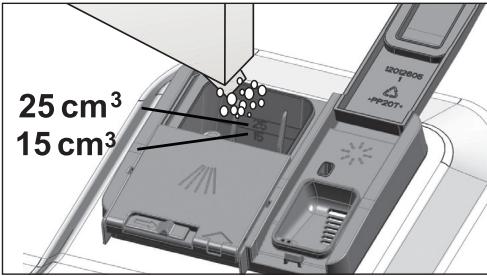
The detergent dispenser contains level indicators to help you use the correct amount of powder detergent. When full, the detergent dispenser can hold 45cc of detergent. Fill the detergent dispenser
up to the 15 ~cm^3 or 25 ~cm^3 level depending on how full the machine is and/or how dirty the dishes are. One tablet is enough if you use tablet detergent.
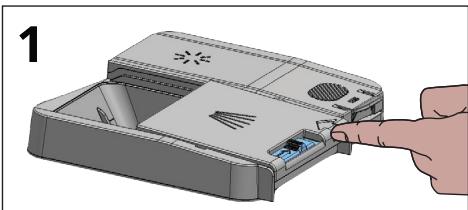
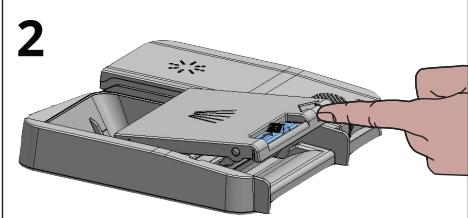
- Push the detergent dispenser cover to close it. A You will hear a "click" when the lid will be closed.
VS Use the powder or liquid/ gel detergent in short programs without pre-wash, as the solubility of tablet detergent changes with temperature and time.
Tablet detergents
In addition to conventional tablet detergents, there are also tablet detergents on the market which have the effect of a regenerating salt and/or a rinse aid. Some types of these detergents contain special components like stainless steel or glass protectors. These tablets show their effectiveness up to a certain degree of water hardness (21^) . Regenerating salt and rinse aid should also be used with the detergent if the water hardness level is above the level mentioned.
VS
The best washing results in the dishwasher are obtained by separately using a detergent, a product of
VS
Follow the detergent manufacturer's instructions on the package when using tablet detergents.
VS
Contact the detergent manufacturer if your dishes are wet and/or if you notice deposits limescale, especially on glasses, after washing with tablet detergent.
Changing from powder detergent to tablet detergent:
- Check that the salt and rinse aid reservoirs are full.
- Set the water hardness to its maximum level and run the machine empty.
- After the empty wash cycle, read the user manual and adjust the water hardness level according to the water supplied to you.
- Make the appropriate flush settings.
Rinse aid

The rinse aid used in dishwashers is a special formula used to improve drying efficiency and prevent streaks from limestone on the washed elements. Therefore, be sure to use rinse aid in the rinse aid container and rinse aids made specifically for dishwashers.
- Open the lid of the rinse aid container using the lever.
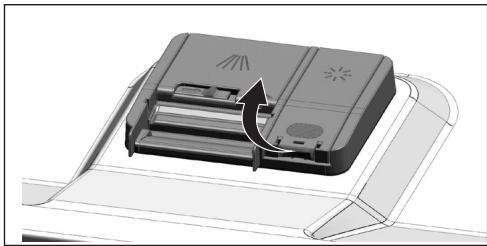
- Fill the reservoir to the "MAX" level.

- Lightly press point (B) on the tank lid to close it.
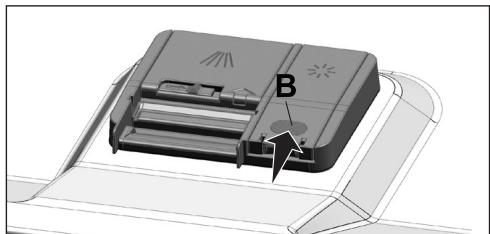
- If there are stains on the cutlery after washing, the level should be increased, and if you observe a blue trace after wiping it by hand, it should be decreased. It is set to level 3 as factory setting.

Adjusting the rinse aid is described in the section "Adjusting the amount of rinse aid" in the machine operation section.

Wipe the rinse aid that has overflowed out of the tank. Rinse aid that has accidentally overflowed will cause foaming and possibly decrease washing performance.
Items not to be washed in the dishwasher
- Never wash dishes with cigarette ashes, remnants of candles, varnish, dye, chemicals in your dishwasher.
- Do not wash cutlery and knives with wooden or bone handles, or non-heat resistant parts, such as copper or pewter dishes in the dishwasher.
VS
The decorative patterns of the porcelain elements, as well as those made of aluminum or silver, may be discolored or become dull after washing in the dishwasher, as can happen when washing by hand. Certain types of delicate glass and crystals may become dull over time. We strongly recommend that you check whether the tableware you are going to buy is suitable for the dishwasher.
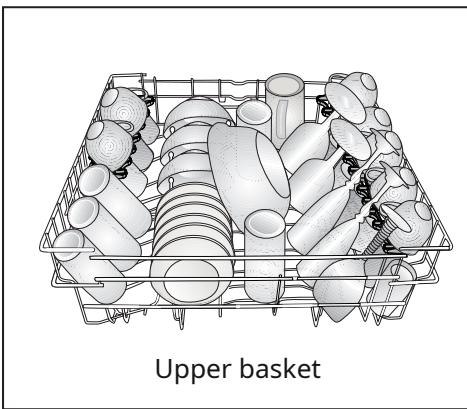
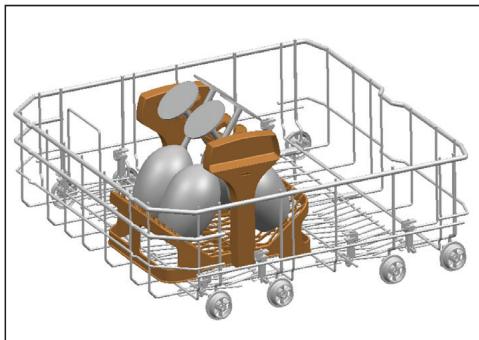
Arrangement of dishes in the dishwasher
You can use your dishwasher optimally in terms of energy consumption and washing and drying performance only if you arrange the dishes in an orderly manner.
- Remove all food remains from the dishes (bones, crumbs, etc.) before putting them in the appliance.
-
Arrange thin, narrow pieces in the center sections of baskets, if possible.
-
Place heavily soiled and large items in the lower rack and smaller, delicate and light items in the upper rack.
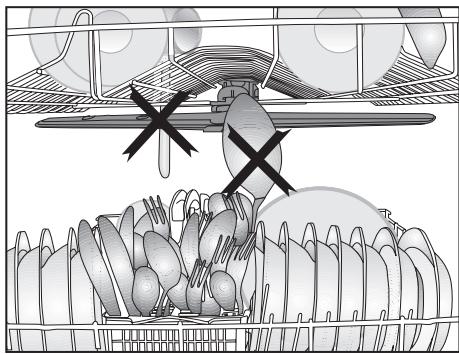
- Place hollowware such as bowls, glasses and pans upside down in the dishwasher. The accumulation of water in the containers is thus avoided.
AT
To avoid possible injury, always place sharp and pointed cutlery, especially forks or bread knives upside down with their point down or horizontal in the cutlery basket .
First unload the dishes from the lower basket, then those from the upper basket.
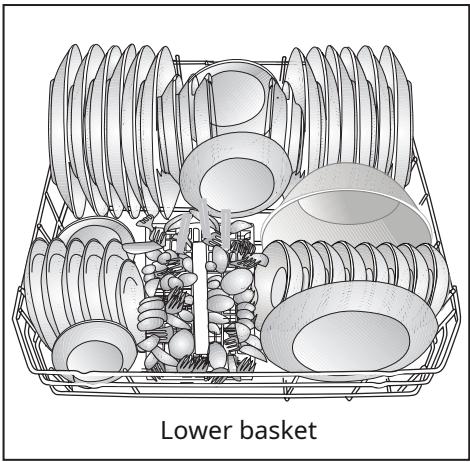
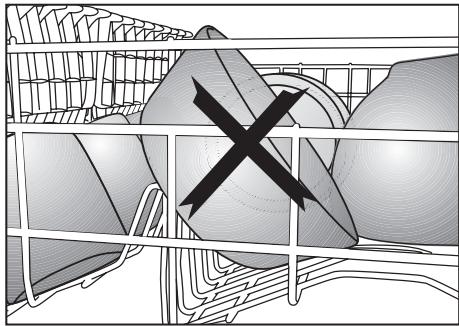
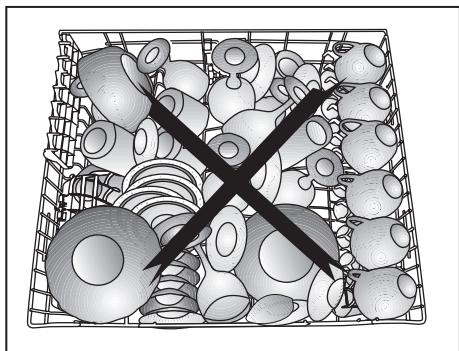
Dishwasher Loading Suggestions

Incorrect loading of the dishwasher
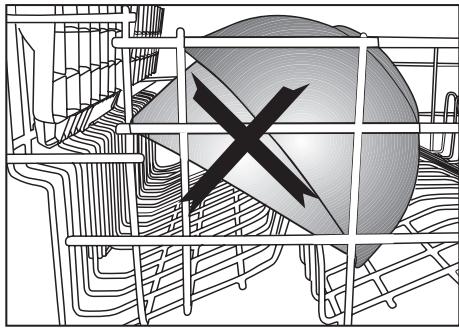
Incorrect loading of the dishwasher
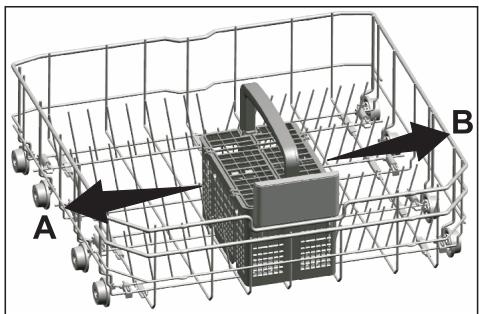
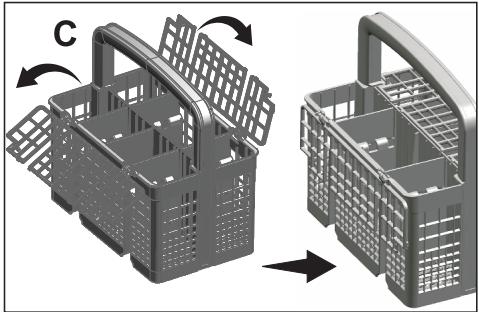
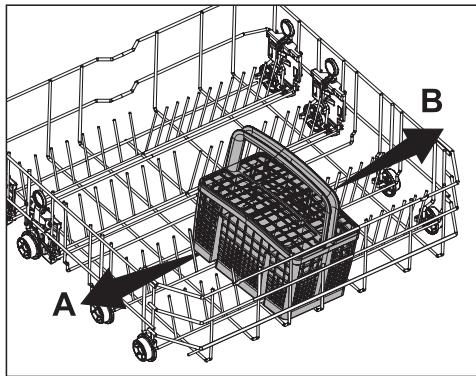
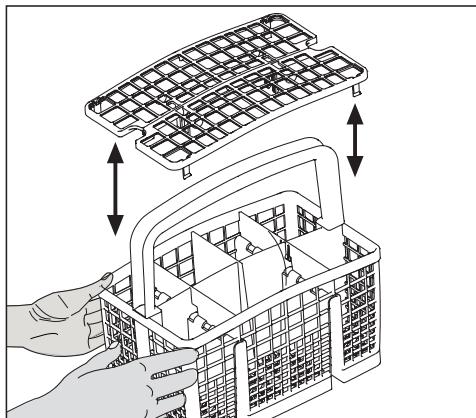
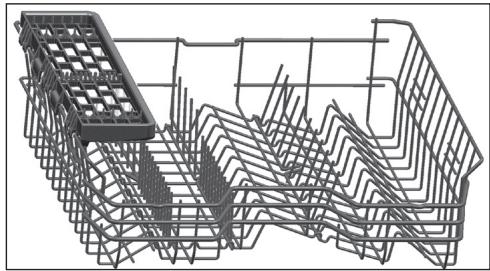
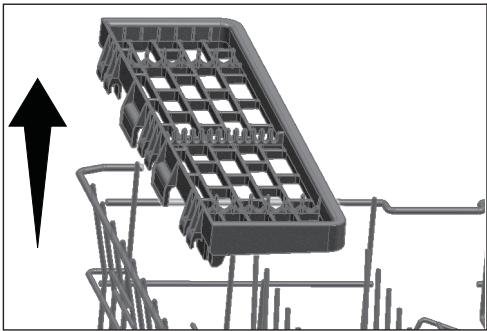
Cutlery basket
(dependently on the model)
The cutlery basket is designed to clean your cutlery such as knives, forks, spoons, etc. in a cleaner way.
As the cutlery basket is removable (A, B), you can create a wider space when placing your dishes in the lower basket, and free up space for your dishes of different sizes.
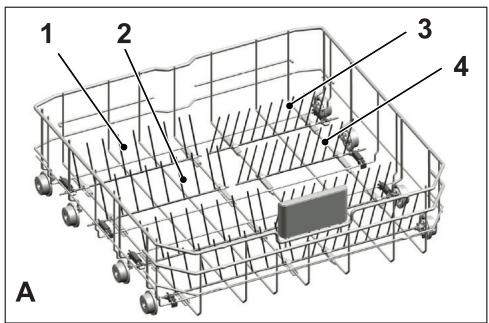
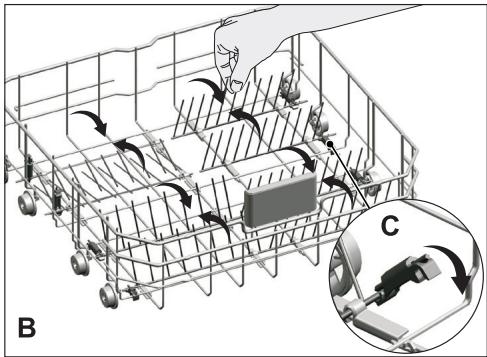
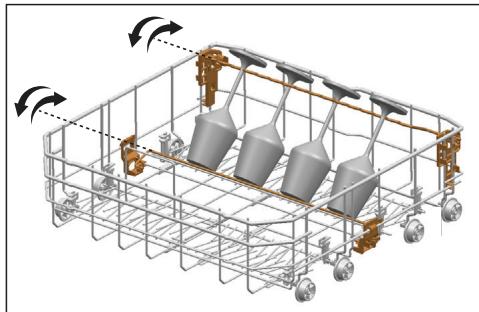
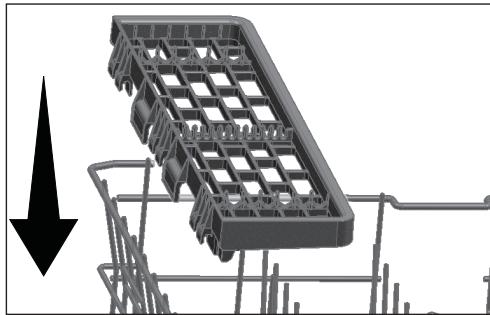
Lower basket retractable rods
Depending on the model) The six retractable rods (A) located in the lower basket of the machine are designed to facilitate the storage of bulky items such as saucepans, salad bowls, etc. You can create larger spaces by folding each of the rods separately or all at once.
Po
po had
and B).
Po ale,
con are
re
in the latch (C).

Putting the rods in a horizontal position by holding them by the ends can cause them to bend. Therefore, it would be convenient to arrange the middle rods in a horizontal or vertical position by holding them by their sleeves and pushing them in the direction of the arrow.
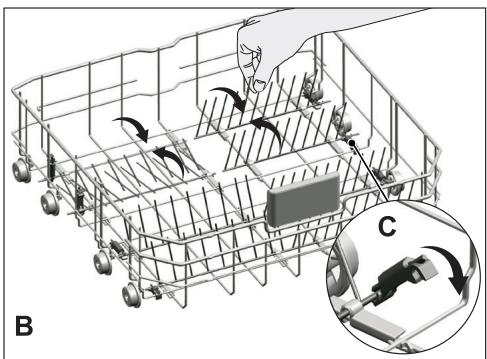
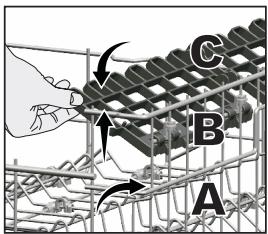
Lower basket retractable rods
Depending on the model) The six retractable rods (A) located in the lower basket of the machine are designed to facilitate the storage of bulky items such as saucepans, salad bowls, etc. You can create larger spaces by folding each of the rods separately or all at once.
To put the retractable rods in a horizontal position, hold them in the middle and push them in the direction of the arrows (B). To return the rods to the upright position, simply straighten them. The retractable rods will snap back into the latch (C).
P
VS
Putting the rods in a horizontal position by holding them by the ends can cause them to bend. Therefore, it would be convenient to arrange the middle rods in a horizontal or vertical position by holding them by their sleeves and pushing them in the direction of the arrow.
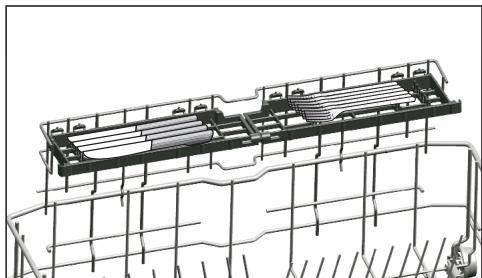
Drip tray support
(dependently on the model)
Use the supports to wash the trays located at the bottom of the basket.
Refer to the Additional Functions section to select the appropriate program or function.
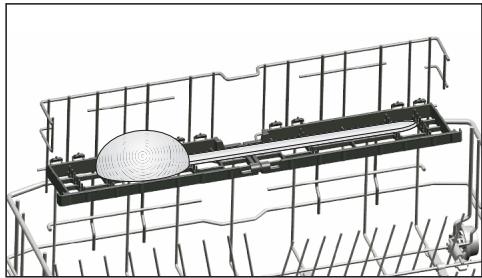
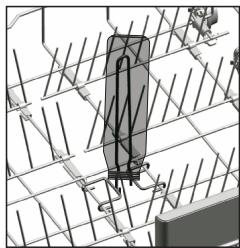
Special Glass Holder
(dependently on the model)
The Special Glass Rack found in the lower basket of your machine guarantees safe washing of your fragile glasses.
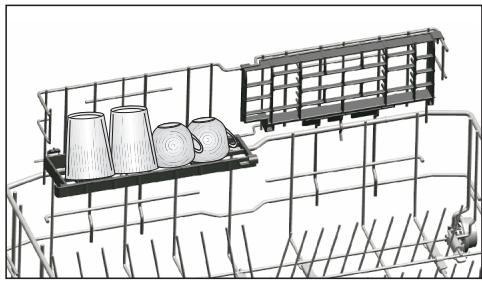
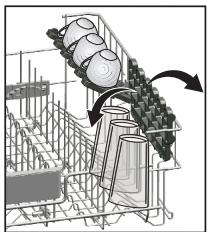
Retractable stemware holder
(dependently on the model)
Retractic Stemware Rack found in the lower rack of your machine ensures safe washing of your oversized glasses and tall glasses.
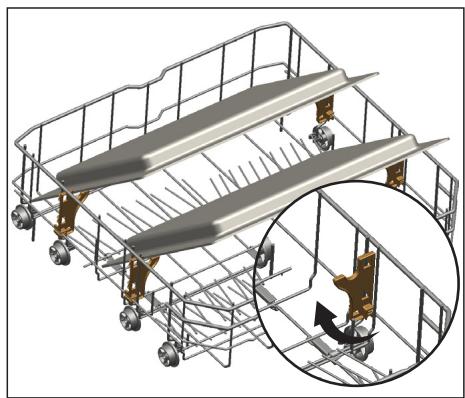
Multi-function/height-adjustable lower basket support
(dependently on the model)
This accessory located in the lower basket of the appliance allows you to easily wash items such as extra glasses, large ladles and bread knives.
VS
You can use the racks as needed by moving them up or down, or close them to create more space in your lower basket.

Take care that the propeller does not touch the dishes placed on the racks.
To close the supports: 1.
Fold the support (A).
- Slide the stand up (B).
- Put the stand in upright position (VS).
- Slide the stand down and lock it with the latches (D).
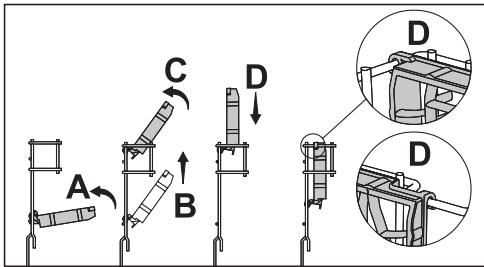

You can open the brackets by following the same procedure in reverse.
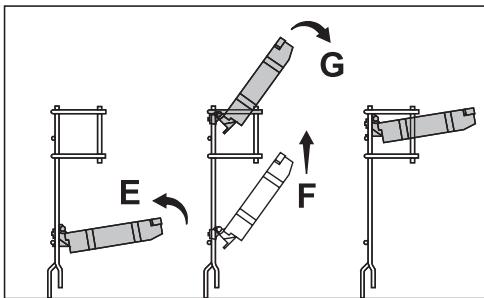
To adjust the size of the supports:
- Fold the support (E).
- Slide the bracket up (F).
- Open the support to the desired level (G).
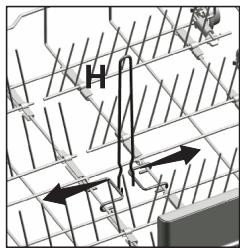
Lower basket bottle rod
(dependently on the model)
The bottle stem is designed for easier washing of long items with wide openings. You can remove the bottle rod from the basket when it is not in use by pulling it from the sides (H).
Height-adjustable upper basket support
(dependently on the model)
Use the lower and upper parts of the adjustable height supports in the upper basket of the appliance by sliding them up and down according to the height of glasses, cups, etc. (A,B,C).
Upper basket multifunction support
(dependently on the model)
This accessory located in the upper basket of the appliance allows you to easily wash items such as very large ladles and bread knives.
You can lift the upper rack multi-purpose rack to remove it if you don't want to use it.
If you want to reuse the upper basket's multi-function holder, you can easily attach it to the side section of your upper basket.
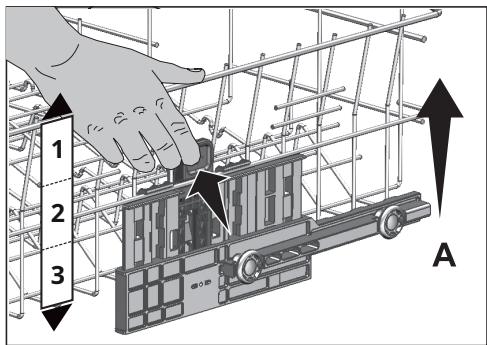
Upper basket height adjustment
(dependently on the model)
The upper basket height adjustment mechanism has been designed so that you can create large spaces in the lower or upper sections of your machine to suit your needs by adjusting the height up or down whether your basket is empty or loaded.
Thanks to this
mechanism, v use your basket in different:
lower, m upper (1, 2, 3).
- To lift your upper basket rods hands ensuring you are in position pull them up
- You will hear one of the mechanics of indicating that the pan
not
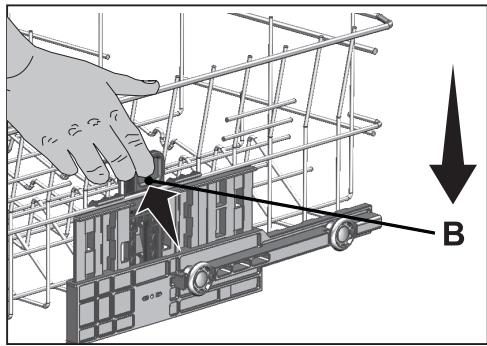
To lower the basket, while it is in the highest position;
- Hold the upper basket rods with with both hands, lift it slightly, simultaneously push and release the latches shown in the figure (B).
- Lower the basket from its current position to the lower position.
- Release the basket once it goes to a lower level.
is not
VS
Travel mechanism may not work correctly if the upper basket is overloaded or if the weight distribution is not balanced. With very heavy loads, the basket may fall to a lower level.
VS
Make sure the adjustment mechanism matches the positions on the right and left sides of the upper rack.
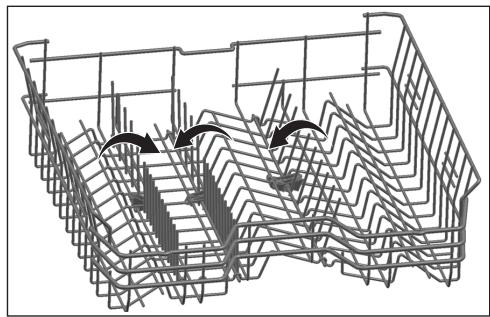
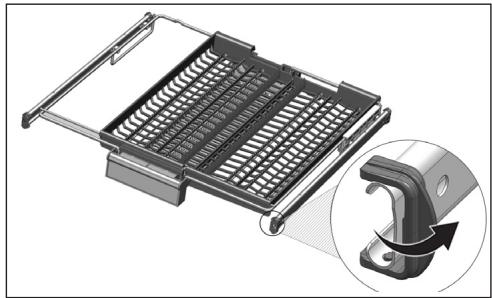
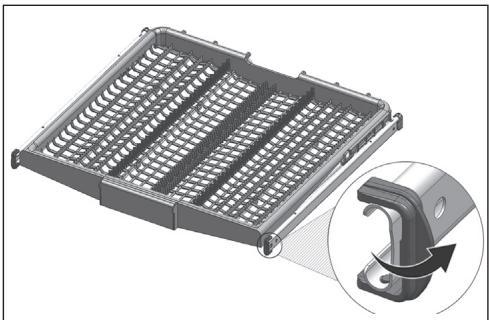
Retractable upper basket rods
(dependently on the model)
You can use retractable rods when you want to create more space for your dishes in the upper basket of your machine.
To put the retractable rods in a horizontal position, hold them in the middle and push them in the direction of the arrow shown in the figure. Place your bulky dishes in the cleared space. To return the rods to an upright position, simply straighten them.
VS
Putting the rods in a horizontal position by holding them by the ends can cause them to bend. Therefore, you must hold the rods by their sleeves while bringing them back to the horizontal or vertical position.
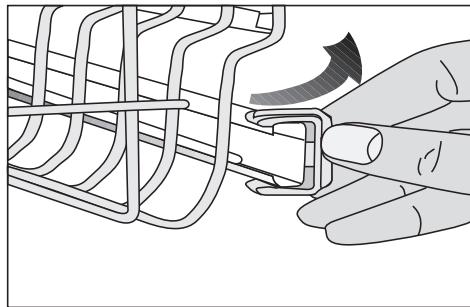
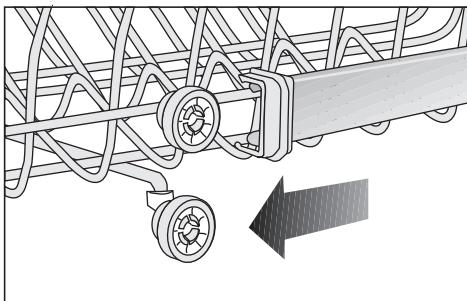
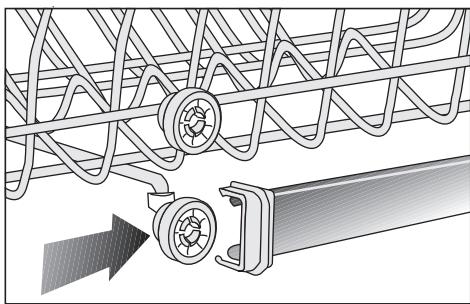
Empty basket height adjustment
(dependently on the model)
In this model, the adjustment of the height of the upper basket can be by means of the wheels mounted at two different heights.
Release the latches attached to the right and left runners of the upper rack by pushing them outwards
Pull out the basket completely. Replace the basket on the runners at the desired height
Return the latches to the correct position.
Upper cutlery basket
(dependently on the model)
The upper cutlery basket is designed to clean your cutlery such as forks, spoons, etc. by placing them between the bars of the basket.
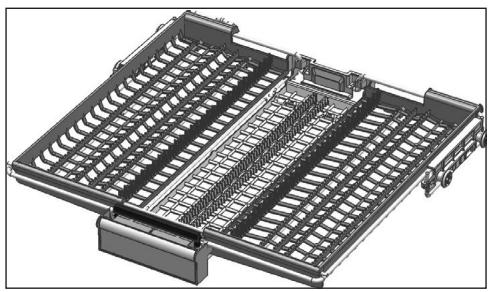
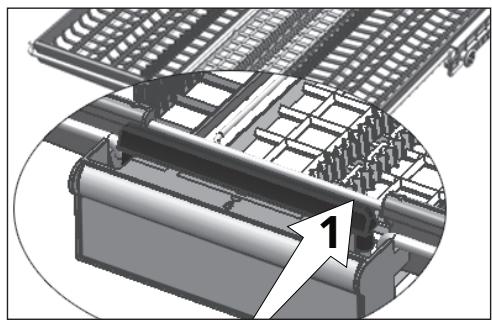
In models with partial movement function, when you push the bar (1) on the handle, the central tray of the basket moves to the lower position and the system unlocks. Thus, the trays on the right and left can be used as moving parts.
The free space left by the side trays makes it possible to load long pieces into the upper basket.
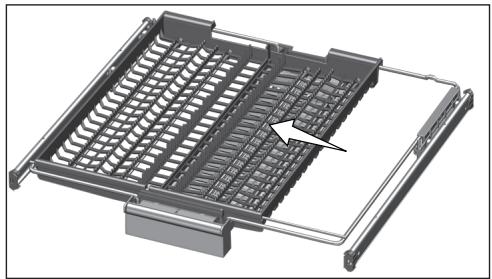
When the central tray is in the lower position, you can load long and tall objects such as coffee cups, ladles, etc. on the tray. When the side trays rest on two side walls, you can pull the handle to allow the middle tray to lift up and lock the system.
Upper cutlery basket
(dependently on the model)
The upper cutlery basket is designed to clean your cutlery such as forks, spoons, etc. by placing them between the bars of the basket.
5 Device Operation

1- On / Off / Program selection button
2-Rinse aid indicator Salt
3- indicator
4- On/Off control light 5- Time
delay indicator 6- Time delay button
7- Handle
8- Program progress monitoring lights 9-
Start / Pause / Cancel button
10- Half load function
Keys
On / Off / Program selection button
When you use the On / Off /
Program Selection button to select a program, the On control warning light comes on. It turns off when you switch to the Off position.
Start / Pause / Cancel key
Used to start, pause or cancel the program.
Delay key
It is used to set the delay time.
Preparing the device
- Open the dishwasher door.
-
Place the dishes according to the instructions in the user manual.
-
Check that the upper and lower propellers rotate freely.
- Place a sufficient amount of detergent in the detergent compartment.
- Check the salt and rinse aid indicators and add them if necessary.
- Close the dishwasher door.
Program selection
- Press the On / Off / Program selection button to switch on the machine.
- Refer to the "Table of programs and average consumption values" to select a washing program suitable for your dishes.
- Use the program selection button to select the desired program.
| Programming Chart | |||||
| Program number | 1 | 2 | 3 | 4 | 5 |
| Program name | Economy * | Intensive | Day-to-day | Quick&Shine | Mini |
| Cleaning temperature | 50°C | 70°C | 65°C | 60°C | 35°C |
| Degree of dirt | The program of washing the most economical for medium dishes dirty dirty that are kept on hold. | Suitable for very dirty and pots and pans. | Program of daily washing for items with a degree of soiling normal. | Program of daily washing and fast for items with a degree normal dirt. | Suitable for lightly soiled daily dishes which has been pre-cleaned. |
| Average | Raised | Average | Average | Weak | |
| Prewash | + | + | - | - | - |
| Washing | + | + | + | + | + |
| Drying | + | + | + | + | - |
| Duration (min) | 210 | 120 | 120 | 58 | 30 |
| Water (l) | 11.5 | 17.6 | 16.2 | 11.8 | 11.8 |
| Energy (kWh) | 1.03 | 1.65 | 1.38 | 1.20 | 0.80 |
The consumption values given in the table were determined under standard conditions. However, differences may occur in practice. * Reference program of test organizations Tests according to EN 50242 must be carried out under the following conditions: salt tank full of water softener, tank full of rinse aid and test program.
Sensitivity: Audience
Additional functions
The wash programs in your machine are designed to achieve the best possible wash, taking into account the type of soil, the degree of soiling and the characteristics of the dishes to be washed.
The additional functions are provided to help you save time, water and energy for more satisfactory washing results.
VS Additional functions may change the program duration.
VS The additional functions are not suitable for all wash programs. The indicator of the additional function not compatible with the program remains inactive.
To add additional functions to the program:
- Select the desired washing program by pressing the program selection button.
- In the selected washing program, if the auxiliary function is selected, then its symbol appears on the display. If you press the function key again, this symbol disappears and the selection is cancelled.
Half load function
Used to operate the machine without fully loading it.
- Load the dishes into the appliance at your convenience.
-
Switch on the machine using the On/Off button.
-
Select the desired program and press the Half Load button. The Half Load indicator lights up on the selected function indicator display.
- Start the program by pressing the Start / Pause / Cancel button.
VS With the half-load function, you can save water and energy by using the lower and upper baskets of the appliance.
Programming the washing time
Timeout
You can use the delay button to delay the start of the selected program for up to 9 hours. Press the key
Start / Pause / Cancel after setting delayed start. After the delay, the selected program will start automatically.
The 3-6-9 o'clock lights flash respectively each time you press the time delay button. When the Start/ Pause/Cancel key is pressed while the selected delay light is flashing, the delay light will turn on and the countdown will start. After the delay, the delay light goes out and the washing program
selected starts.
VS If you press the Time Delay button when the 9 hour time delay light is flashing, the time delay lights will turn off. If you press the Start/Pause/ Cancel button when the indicator lights timer are off, the selected program starts without delay.
VS You can check the remaining time of the timer from the indicators of delay. For example: When you select the 9 hour delay, the 6 hour light comes on although the remaining time is 6 hours until the start of the washing programme.
Canceling the timer function
Press and hold Start/Pause/Cancel key for 3 seconds. Once the override process is initiated, the machine discharges for 30 seconds and the timeout function is overridden.
Program start
To start the device after selecting the program and auxiliary functions, press the Start / Pause / Cancel key.
Your machine launches water softening according to the hardness level of the water supply. Due to the water softening process, program duration may vary. The total time may also vary during the program function depending on the ambient temperature of the room where your machine is installed, the water temperature and the amount of dishes.
Be careful not to open the door when the machine is in operation. Stop the machine by pressing the Start/Pause/Cancel key if you need to open the door. Then open the door of the machine. Steam may be released when the door is opened; so be careful. Close the door and press the Start/ Pause/Cancel button again. The program resumes its course.
After the rinsing phase, the machine remains silent in Pause mode for a while to drain the water remaining in the machine, on the dishes and to clean the water softener. Then operation resumes in Drying mode.
Program progress tracking
You can check the current phase of the selected program from the program phase indicators on the control panel.
When the Drying light comes on, the machine is drying quietly for 30-60 minutes. At the end of this period, the Drying light goes out and the End light comes on.
The End indicator lights up when the selected washing program ends.
Cancellation of the program
- Press and hold the Start/Pause/Cancel button for 3 seconds to cancel the program.
- Release it when the Washing and Drying lights flash. The water in the machine will be drained in 45 seconds. When the Washing and Drying lights go out and the End light comes on, it means that the program has been cancelled. You can then choose and start a new program.
Detergent or rinse aid residue may remain in the machine and/or on the dishes being washed depending on the stage at which the program was cancelled.
When the program selection knob is in the "Stop" position, the washing program stops and the machine is ready for a new program selection. If you stop the wash cycle this way, the water and detergent can remain in the machine.
Salt indicator
Please check the salt indicator to see whether there is enough softener salt in your dishwasher or not. You must refill the salt reservoir each time the no salt warning symbol lights up.
Setting the water hardness level is explained in the Water softening system section.
Rinse aid indicator
Please check the rinse aid indicator to see if there is enough rinse aid in your dishwasher or not. You must refill the rinse aid dispenser each time the warning indicator comes on.
Adjusting the amount of rinse aid
- With the program selector knob in the "Off" position, press and hold the function button for 2 seconds, then simultaneously turn the program selector knob one level, in the
clockwise. After this time, the machine switches to rinse aid setting mode.
- After the machine enters the Rinse Aid Setting Mode, the rinse aid level will be displayed on the Program Progress LED Indicators for 5 seconds.
- To change the rinse aid setting, adjust the rinse aid knob. program selection at the corresponding position.
- Press the Play/Pause/Cancel button once to save the level you have selected.
- When you turn the program selection knob back to the "Off" position, the machine goes into normal mode.
| Quantity of product of rinsing | Location of button selection of programs | Rinse Aid Setting Indicator |
| 1 scoop of product of rinse is distributed. | 1 | The washing indicator lights up on the○ panel. |
| 2 doses of product of rinse are distributed. | 2 | The witness of○ drying lights○ on the panel. |
| 3 doses of product of rinse are distributed. | 3 | The end indicator○ lights up on the○ panel. |
| 4 doses of product of rinse are distributed. | 4 | The witnesses of• washing, drying• and end lights up• on the panel. |
| No dose of product rinsing distributed when the program of washing is activated. | 5 | The witnesses of• washing, drying• and end flash at• intervals of one second on the panel. |
End of program
The end of program indicator lights up when the washing program is finished. 1. Press the On / Off / Program selection button to stop the machine.
- Close the faucet.
- Unplug the machine from the outlet.
VS
Leave the dishes in the machine for about 15 minutes after washing, to allow them to cool. Your dishes will take less time to dry if you leave the machine door ajar during this time. This action improves the drying efficiency of the machine.
The life of the product is extended and frequently encountered problems are reduced if it is cleaned regularly.
AT Unplug the product and turn off the tap before beginning cleaning procedures.
VDo not use abrasive substances for cleaning.
VS Clean the filter and the propellers at least once a week for the device to work properly.
Washing the outer surface of the product
Wipe the exterior surface and door handles of the product gently with a mild cleaning agent and a damp cloth. Wipe the "control panel" with a slightly damp cloth.
Washing the inside of the device
Clean the inside of the machine and the tank by running a program with or without detergent, depending on the degree of dirt.
- If there is still water in the machine, drain the water following the procedure described in the section "Cancelling a programme". If the water cannot be drained, remove the filters as specified in the "Cleaning the Filters" section and check if deposits have accumulated at the bottom of the machine, blocking the water channel. Clean if necessary.
Filter cleaning
Clean the filters at least once a week for the device to work properly. Check for food residue on the filters. If there are food residues on the filters, remove them and clean them well under running water. 1. Turn the micro-filter (1) and large filter (2) assembly counter-clockwise and remove it from its location.
2. Remove the metal/plastic filter (3) from its seat.
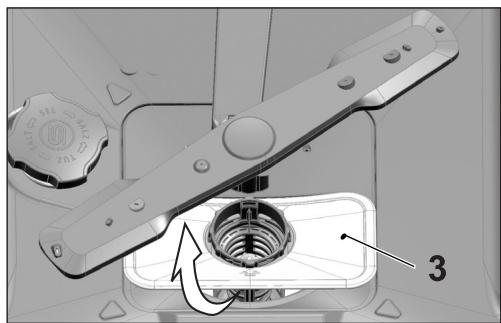
3. Press the two pawls of the large filter inward and separate the large filter from the assembly.
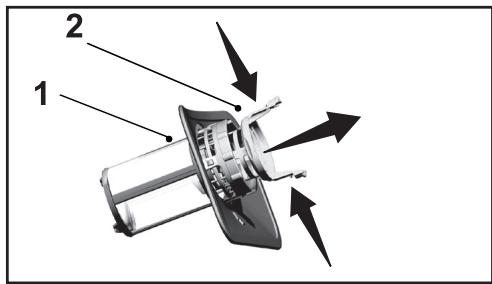
- Clean the three filters under the tap using a brush.
- Place the metal/plastic filter.
- Place the large filter in the micro filter. Make sure it is installed suitable way. Turn the large filter clockwise until you hear a "click".


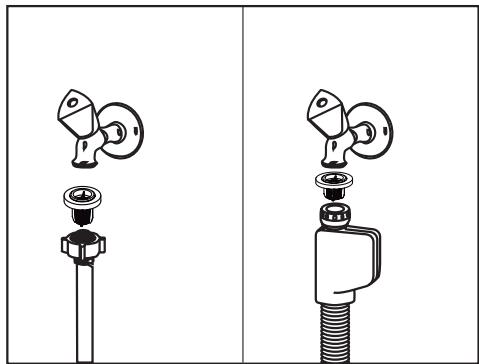
Cleaning the pipe filter
Damage to the appliance caused by impurities from mains water or your own water installation (e.g. sand, dust, rust, etc.) can be avoided by to the filter attached to the water inlet valve. Regularly check the filter and the hose and clean them if necessary.
- Close the tap and remove the hose.
- After taking out the filter, wash it under running water
- Replace the cleaned filter in its place in the pipe.
- Attach the hose to the faucet. (varies by model)
Propeller cleaning
Clean the propellers at least once a week to keep the device working properly.
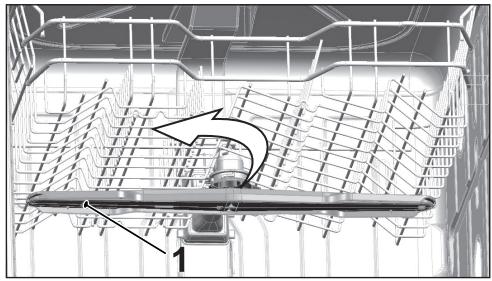
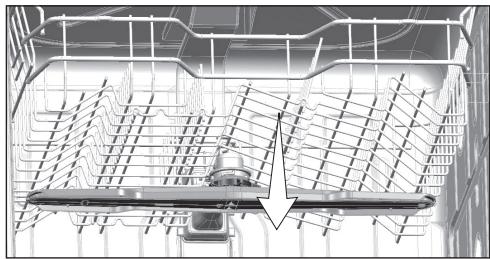
Lower propeller
Check if the holes in the lower propeller (1) are blocked. If they are, remove the dirt and clean the propeller. You can lift the lower propeller to remove it.
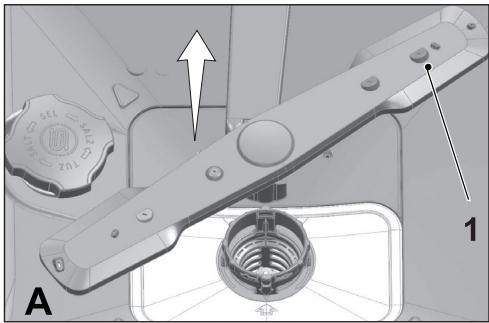
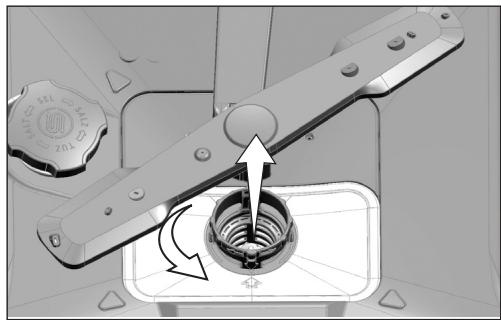
upper propeller
Check whether the holes in the upper propeller (1) are blocked. If they are, remove the dirt and clean the propeller. Turn its nut to the left to remove the upper propeller.
Make sure the nut is tight q
7 Repair
The device does not start.
- The electric cable is disconnected. >>> Check if the power cable is connected.
The fuse has blown. Check the fuses in your house. - The water is off. >>> Check that the water inlet tap is open.
- The appliance door is open. >>> Check that you have closed the appliance door.
- The On/Off button is not engaged. >>> Check that you have turned on the device by pressing the On/Off button.
The dishes do not come out of the machine clean
- The dishes are not sorted in order in the machine. >>>> Load the dishes as described in the user manual.
- The selected program is not suitable. Select a program with a higher temperature and a longer cycle.
- The propellers are blocked. Before starting the program, spin the upper and lower propellers with your hand to make sure they spin freely.
- The propeller ports are clogged. >>>> The openings of the lower and upper propellers can be clogged with leftover food, such as lemon pips. Periodically clean the propellers as shown in the "Cleaning and Maintenance" section.
- The filters are clogged. >>> Check if the filter system is clean. Periodically clean the filter system as shown in the "Cleaning and Maintenance" section.
- Filters are not placed correctly. >>> Check the filter system and make sure it is installed correctly.
- The baskets are overloaded. >>> Do not overload the baskets beyond their capacity.
- The detergent is stored under unsuitable conditions. If you use powder detergent, do not store the detergent package in humid places. Store it in a closed container if possible. To facilitate storage, we recommend using detergent tablets.
- There is not enough detergent. If using powder detergent, adjust the amount of detergent according to how dirty your dishes are and/or program definitions. We recommend using tablet detergents for best results.
- There is not enough rinse aid. >>> Check the rinse aid indicator and add rinse aid if necessary. Increase the rinse aid setting if there is enough rinse aid in the machine.
- Detergent dispenser cover left open. Make sure the detergent dispenser lid is securely closed after adding detergent.
The dishes are not dry at the end of the cycle
- The dishes are not sorted in order in the machine. Place the dishes in such a way that water does not accumulate between the plates.
- There is not enough rinse aid. >>> Check the rinse aid indicator and add rinse aid if necessary. Increase the rinse aid setting if there is enough rinse aid in the machine.
- The machine is unloaded just at the end of the program. Do not unload your machine right after the washing process is finished. Open the door slightly and wait for the contained steam to escape for a while. Take the dishes out when they have cooled down enough to be touched without risk. Begin unloading with the lower basket. Thus, water remaining on the dishes in the upper basket is prevented from dripping onto the dishes in the lower basket.
- The selected program is not suitable. Since the rinse temperature is low in the short programmes, the drying performance will be too. Select longer programs for higher drying performance.
- The surface quality of cookware is deteriorated. Desired washing performance cannot be obtained on cookware with deteriorated surface and it is not hygienically desirable to use such utensils. Water cannot flow easily over deteriorated surfaces. It is not recommended to wash such utensils in the dishwasher.

It is normal for drying issues to occur with Teflon cookware. This is related to the structure of Teflon. Since the surface tension of Teflon is different from that of water, the water drops remain like beads hanging on the Teflon surface.
Tea, coffee or lipstick stains remain on the dishes.
- The selected program is not suitable. Select a program with a higher temperature and a longer cycle.
- The surface quality of cookware is deteriorated. Tea or coffee stains or other traces of dye may not be removed by the dishwasher if they have penetrated into deteriorated surfaces. The desired washing performance cannot be obtained on cookware whose surface is deteriorated and it is undesirable from a hygienic point of view to use such utensils. It is not recommended to wash such utensils in the dishwasher.
- The detergent is stored under unsuitable conditions. If you use powder detergent, do not store the detergent package in humid places. Store it in a closed container if possible. To facilitate storage, we recommend using detergent tablets.
Limescale remains on dishes and glass looks dull
- There is not enough rinse aid. >>> Check the rinse aid indicator and add rinse aid if necessary. Increase the rinse aid setting if there is enough rinse aid in the machine.
- Water hardness setting is low or salt level is insufficient Measure supply water hardness and check water hardness setting.
- There are salt leaks. Be careful not to spill salt around the salt filling hole when adding salt. Always make sure the lid of the salt container is properly closed after filling. Run the pre-wash program to remove the salt scattered in the appliance. As the remaining salt granules under the lid will be dissolved during the prewash and loosen the lid, check the lid again at the end of the programme.
There is a peculiar smell in the machine

"A new machine has a specific smell. It will fade after a few washes."
- The filters are clogged. >>> Check if the filter system is clean. Periodically clean the filter system as shown in the "Cleaning and Maintenance" section.
- Dirty dishes stay in the dishwasher for 2-3 days. >>>If you do not start the appliance immediately after putting the dishes in, remove the remains on the dishes and run a Prewash program without detergent every 2 days. In these cases, do not completely close the door of the machine to prevent odors from arising. You can also use commercially available odor removers or machine cleaners.
Rust, discoloration or surface deterioration damages dishes
- There are salt leaks. Salt can cause deterioration and oxidation of metal surfaces. Be careful not to spill salt around the salt filler hole when adding salt. Always make sure the lid of the salt container is properly closed after filling. Run the pre-wash program to remove the salt scattered in the appliance. As the remaining salt granules under the lid will be dissolved during the prewash and loosen the lid, check the lid again at the end of the programme.
- Salty food remnants remained on the dishes for a long time. If cutlery soiled by this kind of food is left in the machine, the dirt must be removed by pre-washing or the dishes must be washed immediately.
-
The electrical installation is not earthed. >>>Check that the dishwasher is connected to the ground line. Otherwise, static electricity created on the product will cause arcs on the surfaces of metal parts by forming pores, removing the protective layers from the surface and causing discoloration.
-
Heavy duty detergents like bleach are used. >>> The protective coating of metal surfaces is damaged and loses its effectiveness over time when it comes into contact with detergents such as bleach. Do not wash your dishes with bleach.
Metal elements, such as knives, are used outside of their normal function. >> The protective coating on the corners of knives can be damaged when they are used for purposes such as opening tin cans. Do not use metal cooking utensils beyond their intended use.
Cutlery is poor quality stainless steel. Corrosion of such products is inevitable, they should not be washed in the dishwasher. - Already corroded kitchen utensils are washed in the dishwasher. Rust from a corroded item can pass onto other stainless steel surfaces and cause corrosion on those surfaces as well. Such items should not be washed in the dishwasher.
Detergent remains in the detergent dispenser.
- The detergent dispenser was wet when detergent was added. >>> Make sure the detergent drawer is completely dry before filling it.
- Detergent is added long before washing. Be sure to add the detergent can before washing starts.
- The detergent dispenser lid cannot be opened during washing. >> Place the dishes so as not to prevent the lid of the detergent dispenser from opening and the water from entering the machine through the propellers.
- The detergent is stored under unsuitable conditions. If you use powder detergent, do not store the detergent package in humid places. Store it in a closed container if possible. To facilitate storage, we recommend using detergent tablets.
- The propeller ports are clogged. The openings of the lower and upper propellers can be clogged with leftover food, such as lemon pips. Periodically clean the propellers as shown in the "Cleaning and Maintenance" section.
The decorations and ornaments of the kitchen utensils are erased.

- Decorated glasses and porcelain should not be washed in the dishwasher. The manufacturers of glass and porcelain items also recommend that such kitchen utensils not be washed in the dishwasher.
The dishes are scratched.

Cookware that contains aluminum or is made of aluminum should not be washed in the dishwasher.
- There are salt leaks. Be careful not to spill salt around the salt filling hole when adding salt. Scattered salt can cause scratches. Always make sure the lid of the salt container is properly closed after filling. Run the pre-wash program to remove the salt scattered in the appliance. As the remaining salt granules under the lid will be dissolved during the prewash and loosen the lid, check the lid again at the end of the programme.
- Water hardness setting is low or salt level is insufficient Measure supply water hardness and check water hardness setting.
- The dishes are not sorted in order in the machine. When placing the glasses and other glass dishes in the basket, do not lean them against other dishes but against the corners or supports of the basket or the support rod for the glasses. The impact of glasses with each other or with other dishes due to the impact of water during washing can break them or scratch their surface.
A film similar to a milk stain remains on the glasses and does not disappear when wiped off with the hand. There is a bluish / rainbow appearance when the glass is turned towards the light.
- Too much rinse aid is used. >>> Reduce the rinse aid setting. Clean up rinse aid that overflows when adding rinse aid.
- Corrosion occurs on glass due to soft water. Water hardness setting is low or salt level is insufficient Measure supply water hardness and check water hardness setting. If your water is soft (<5dH), do not use salts. Choose programs that wash at higher temperatures (eg 60 - 65^ ). You can also use commercially available glass cleaners.
Foam forms in the machine.
- Dishes are hand washed with hand wash detergent but not rinsed before being placed in the machine. >>>Hand dishwashing products do not contain anti-foaming agents. It is not necessary to hand wash the dishes before placing them in the machine. Removing the bulk of the dirt with a paper towel or a fork is sufficient.
- Rinse aid overflowed into machine when added. Be careful not to overflow the rinse aid into the machine when filling it. Clean up the spilled product with a paper towel.
- The lid of the rinse aid container is left open. >>>> Make sure the rinse aid container lid is closed after adding rinse aid.
Kitchen utensils are broken.
- The dishes are not sorted in order in the machine. >>>> Load the dishes as described in the user manual.
- The baskets are overloaded. >>> Do not overload the baskets beyond their capacity.
Water remains in the dishwasher at the end of the programme.
- The filters are clogged. >>> Check if the filter system is clean. Periodically clean the filter system as shown in the "Cleaning and Maintenance" section.
- The drain hose is clogged/blocked. >>> Check the drain hose. If necessary, remove the drain hose, unblock it and reattach it as shown in the user manual.
VS
If you cannot solve the problem by following the instructions in this section, consult your supplier or Authorized Agent. Never attempt to repair a defective product yourself.