DD 407G - Hand blender MOULINEX - Free user manual and instructions
Find the device manual for free DD 407G MOULINEX in PDF.
User questions about DD 407G MOULINEX
0 question about this device. Answer the ones you know or ask your own.
Ask a new question about this device
Download the instructions for your Hand blender in PDF format for free! Find your manual DD 407G - MOULINEX and take your electronic device back in hand. On this page are published all the documents necessary for the use of your device. DD 407G by MOULINEX.
USER MANUAL DD 407G MOULINEX
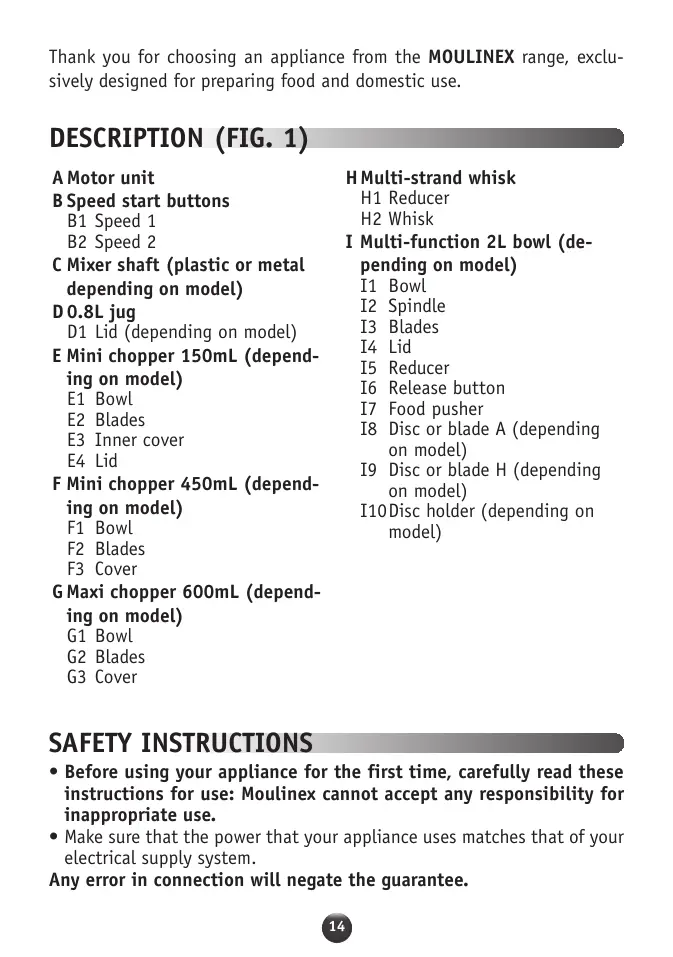
C Mixer shaft (plastic or metal depending on model)
D 0.8L jug
D1 Lid (depending on model)
E Mini chopper 150mL (depending on model)
E1 Bowl
E2 Blades
E3 Inner cover
E4 Lid
F Mini chopper 450mL (depending on model)
F1 Bowl
F2 Blades
F3 Cover
G Maxi chopper 600mL (depending on model)
G1 Bowl
G2 Blades
G3 Cover
H Multi-strand whisk
H1 Reducer
H2 Whisk
I Multi-function 2L bowl (depending on model)
I1 Bowl
I2 Spindle
I3 Blades
I4 Lid
I5 Reducer
I6 Release button
I7 Food pusher
I8 Disc or blade A (depending on model)
I9 Disc or blade H (depending on model)
I10Disc holder (depending on model)
SAFETY INSTRUCTIONS
- Before using your appliance for the first time, carefully read these instructions for use: Moulinex cannot accept any responsibility for inappropriate use.
- Make sure that the power that your appliance uses matches that of your electrical supply system.
Any error in connection will negate the guarantee.
- This product has been designed for domestic use only. Any commercial use, inappropriate use or failure to comply with the instructions, the manufacturer accepts no responsibility and the guarantee will not apply.
- Always unplug the appliance when you have finished using it and when you are cleaning it.
- Do not use the appliance if it is not working properly or if it has been damaged. In this case, contact an authorised service centre (see the list in the service booklet).
- All maintenance other than cleaning and everyday upkeep by the customer must be performed by an authorised service centre.
- Do not touch any moving parts (blades, etc.). FIG 3
- Do not touch the blades of the mixer shaft (C) even when it is stopped, it is extremely sharp. FIG 3
- Handle the blades (E2, F2, G2, I3) of the choppers with care, they are extremely sharp.
- Do not immerse the appliance, power cord or plug in any liquid.
- Ensure that long hair is tied back and that any scarves or ties do not come into contact with the moving parts of your appliance.
- Do not leave the power cord hanging within reach of children.
- Do not allow children to use the appliance unless they are supervised.
- Do not leave the power cord close to or in contact with the hot parts of the appliance, near a source of heat or a sharp angle.
- Do not use the appliance if the power cord or plug have been damaged. To avoid all danger, have them replaced by an authorised service centre (see the list in the service booklet).
- For your safety, only use spare parts and accessories that are approved for your appliance.
- This appliance is not intended for use by persons (including children) with reduced physical, sensory or mental capabilities, or lack of experience and knowledge, unless they have been given supervision or instruction concerning use of the appliance by a person responsible for their safety.
- Children should be supervised to ensure that they do not play with the appliance.
- If your appliance "jams" during processing, switch it off and check that the accessory used is not overloaded with ingredients. Carefully remove the ingredients obstructing the blades.
-
Your appliance is equipped with a device to protect against overheating. If your appliance overheats, it will switch itself off. Leave it to cool down for about 20 minutes then start using it again.
-
Switch off the appliance and unplug it from the electrical power supply before changing the accessories or handling the parts which move when in operation.
USING THE APPLIANCE
- Before using your appliance for the first time, clean the accessories using warm water and washing-up liquid. Rinse and dry them carefully.
- Ensure that your work top is stable and dry.
- Place the ingredients in a container that is tall enough to avoid splashing.
- Do not fill the cup to more than 500 ml (18 fl oz) to avoid splashing.
- Mixer shaft: FIG 4 & 1
- Screw the blender shaft (C) onto the motor unit (A), and ensure that the shaft is screwed on completely before plugging in the appliance. FIG 4
- Insert the blender shaft (C) halfway down into the container and press the speed start button (B1 or B2). The preparation must at least cover the hand blender head to ensure efficient operation of the appliance.
IMPORTANT: Do not operate the appliance when empty.
- Before mixing hot preparations, remove the container from the heat source. For best results, there is no need to move the blender shaft around in the preparation. Instead insert the shaft in the centre of the container with the blender head submerged halfway down in the food. FIG 6
- For stringy ingredients (leeks, celery, etc.), clean the shaft regularly during the preparation, ensuring that you follow the safety instructions for dismantling and cleaning the appliance.
- When making fruit-based preparations, slice the fruit and remove the cores and any stones beforehand.
- Do not use the appliance to prepare hard ingredients (sugar, chocolate, coffee, etc.).
- Mini chopper 150mL (depending on model): FIG E & 7
- Fit the blades (E2) onto the drive pin of the bowl (E1).
-
Place the ingredients in the bowl (E1) then fit the inner cover (E3) then the lid (E4).
-
Fit the motor unit (A) onto the lid (E4).
- Plug in the motor unit (A) and press the speed start button (B1 or B2) and process food.
- Remove the motor unit (A) then the lid (E4) then the inner cover (E3).
- Remove the blades (E2), holding it by its plastic part.
- After use, remove the ingredients.
- Do not operate this accessory when empty or for more than 10 seconds.
- Mini chopper 450mL (depending on model): FIG F & 8
- Fit the blades (F2) onto the drive pin of the bowl (F1).
- Place the ingredients in the bowl (F1) then fit the cover (F3).
- Fit the motor unit (A) onto the cover (F3).
- Plug in the motor unit (A) and press the speed start button (B1 or B2).
- Remove the motor unit (A) then the cover (F3).
- Remove the blades (F2) holding it by its plastic part.
- After use, remove the ingredients.
- Do not operate this accessory when empty.
- Maxi chopper 600mL (depending on model): FIG G & 9
- Fit the blades (G2) onto the drive pin of the bowl (G1).
- Place the ingredients in the bowl (G1) then fit the cover (G3).
- Fit the motor unit (A) onto the cover (G3).
- Plug in the motor unit (A) and press the speed start button (B1 or B2).
- Remove the motor unit (A) then the cover (G3).
- Remove the blades (G2) holding it by its plastic part.
- After use, remove the ingredients.
- Do not operate this accessory when empty.
- Multi-function 2L bowl (depending on model): Fig I
Allows you to prepare from 150 to 500g - Volume of bowl: 2 litres.
1) Mincing and chopping Fig 10:
- Place the spindle (I2) in the centre of the bowl (I1).
- Fit the blades (I3) onto the spindle (I2).
- Fit the reducer (I5) onto the lid (I4).
- Fit and lock the cover in place.
- Fit the motor unit (A) onto the reducer (I5).

In 15 to 20 seconds, you can mince or chop 150 to 500g of ingredients: hard ingredients (cheese, dry fruits), hard vegetables (carrots, celery, etc.), soft vegetables (onions, spinach, etc.), raw and cooked meat (with bones and sinew removed and diced into 1cm cubes), raw or cooked fish. Do not chop or mince ingredients that are too hard (ice, sugar) or which need to be finely ground (wheat, coffee, hard spices).
2) Grating and slicing Fig 11:
- Place the spindle (I2) in the centre of the bowl (I1).
- Fit the disc (I8) onto the spindle (I2).
- Fit the reducer (I5) onto the lid (I4) and lock it in place.
- Fit the motor unit (A) onto the reducer (I5).
- Insert the ingredients into the tube and guide them with the food pusher (I7). Do not push the ingredients with your fingers or any other tool.
- Multi-strand whisk (depending on model): Fig H & 12
- Fit the multi-strand whisk (H2) onto the reducer (H1).
- Fit the reducer (H1) onto the motor unit (A).
- Turn until it is locked in place.
- After use, unscrew the reducer (H1) and remove the whisk (H2).
CLEANING
- All of the parts and accessories of your mixer can be cleaned in the dishwasher except for the motor unit (A) and the reducers (F3, G3, H1, I5), they can only be cleaned with a damp sponge.
- Unplug the appliance from the electrical power supply before cleaning.
- Do not use abrasive scourers or objects containing metal parts.
- Do not immerse the motor unit (A1) in water. Wipe it clean with a dry or slightly damp cloth.
- If your accessories are discoloured by food (carrots, oranges, etc.) rub them with a cloth soaked in cooking oil and then clean them as usual.
- Handle the blades with care; they are extremely sharp.
RECIPES
Mixer shaft FIG 4:
Vegetable soup:
500g potatoes, 400g carrots, 1 leek, salt, pepper, 1.8L water.
Cut vegetables into 25mm pieces. Boil for 10-15 minutes or until soft.
Process for about 45 seconds or until smooth.
Mix for 45 seconds.
- Mayonnaise:
Place 1 egg yolk, 1 tablespoon mild mustard, 1 tablespoon wine vinegar, salt, pepper, 250 ml olive or sunflower oil in a 1L jug.
Mix for 15 seconds.
Tip: All the ingredients should be at room temperature.
Mini chopper 150mL (depending on model) FIG E:
- With this accessory, you can mince or chop:
Garlic, Fresh herbs, Onions.
60g of beef with the sinew removed cut into 1 cm square cubes in 3 seconds.
Multi-strand whisk (depending on model) Fig. H:
Whisked egg whites.
4 egg whites in 3 minutes.
Mini chopper 450mL (depending on model) FIG F:
- With this accessory, you can mince or chop:
Garlic, Fresh herbs, Onions.
200g of beef with the sinew removed cut into 1 cm square cubes in 10 seconds.
Maxi chopper 600mL (depending on model) FIG G:
- With this accessory, you can mince or chop:
Garlic, Fresh herbs, Onions.
250g of beef with the sinew removed cut into 1 cm square cubes in 15 seconds.

Multi-function bowl 2L (depending on model) FIG I:
- With this accessory, you can mince or chop:
Meat with the sinew removed cut into 1 cm square cubes (500g beef) in around 20 seconds, vegetables, cheese, bread.
- You can also chop, mince or slice
up to 700g of vegetables (carrots), cheese, etc...
IF YOUR APPLIANCE WILL NOT WORK, WHAT SHOULD YOU DO?
- Check:
That your appliance is plugged in correctly to the mains.
That the power cord is in good condition.
Your appliance is equipped with a device to protect against overheating.
If your appliance overheats, it will switch itself off. In this case, leave it to cool down for about 20 minutes then start using it again.
Your appliance will still not work?
Contact an authorised service centre (see the list in the service booklet).
HELPLINE:
If you have any product problems or queries, please contact our Customer Relations Team first for expert help and advice:
0845 602 1454 - UK
(01) 677 4003 - Ireland
or consult our website - www.moulinex.co.uk
ACCESSIONS
- You can purchase the following accessories from your dealer or an authorised service centre (see the list in the service booklet):
Mini chopper 150 ml: ref MS_0695652.
With this accessory, you can mince 60g beef in 3 seconds.
Mini chopper 450ml: ref MS_0695653.
With this accessory, you can mince 200g beef in 10 seconds.
Maxi chopper 600ml: ref MS_0695654.
With this accessory, you can mince 250g beef in 15 seconds.
Environment protection first!

① Your appliance contains valuable materials which can be recovered or recycled.
Leave it at a local civic waste collection point.

BESCHRIJVING (AFB. 1)
A Motorblok
B Bedieningsknoppen
B1 Stand 1
B2 Stand 2
4 eiwitten in 3 minutes.
WAT KUNT U DOEN ALS UW APPARAAT NIET FUNCTIONERT?
- Controller:
BESKRIVELSE (FIGUR 1)
A Motordel
B Startknap
G1 Taça
G2 Lamina
G3 Reductor
H Batedor de arame
BIInktpa evepyoinoic
B1 Taxutnta 1
B2 Taxutnta 2