
CF 246 E W742C - TV VALBERG - Free user manual and instructions
Find the device manual for free CF 246 E W742C VALBERG in PDF.

| Product type | Freezer / Refrigerator combined |
| Brand | VALBERG |
| Model | CF 246 E W742C |
| Dimensions (L x P x H) | 954 x 616 x 1500 mm (model 977613) / 1090 x 620 x 1550 mm (model 977614) |
| Climate class | SN (10°C to 32°C), N (16°C to 32°C), ST (16°C to 38°C), T (16°C to 43°C) |
| Power supply | See rating plate (grounded outlet required) |
| Temperature setting | From MIN to MAX, with SUPER freezing mode |
| Freezing capacity | Maximum in 12 hours indicated on the rating plate |
| Super Freezing function | Yes, activation via SET button, automatic stop after 52 hours |
| Interior lighting | LED, energy efficiency class G, replacement by a professional |
| Probe fault alarm | Yes, temperature bar flashing |
| Included accessories | External handle, adjustable wheels or feet, baskets, drain plug |
| Cleaning | Lukewarm water and mild soap, do not use steam cleaners |
| Defrosting | Manual, via interior drain plug and exterior drain knob |
| Warranty | 2 years from the date of purchase upon presentation of the receipt |
| Energy consumption | Not specified (see rating plate) |
Frequently Asked Questions - CF 246 E W742C VALBERG
User questions about CF 246 E W742C VALBERG
0 question about this device. Answer the ones you know or ask your own.
Ask a new question about this device
Download the instructions for your TV in PDF format for free! Find your manual CF 246 E W742C - VALBERG and take your electronic device back in hand. On this page are published all the documents necessary for the use of your device. CF 246 E W742C by VALBERG.
USER MANUAL CF 246 E W742C VALBERG
This product has a 2-year warranty as of the date of purchase*, covering any fault resulting from a manufacturing or material defect. This warranty does not cover defects or damage resulting from incorrect installation, improper use or abnormal wear of the appliance.
*upon presentation of the sales receipt.
CONDITION DE GARANTIE
FR
Thank you for choosing this VALBERG product.
Chosen, tested and recommended by ELECTRO DEPOT,
the products of the VALBERG brand are easy to use,
reliable and of an impeccable standard.
Thanks to this appliance, you can be sure that each
use will bring you satisfaction.
Welcome to ELECTRO DEPOT.
Visit our website: www.electrodepot.fr

Preview of the appliance
Description of the appliance

Using the appliance
Installation
Daily Use

Useful information
Helpful hints and tips
Cleaning and care
Troubleshooting
Description of the appliance
External handle
Wheel (or adjustable foot)
3 Basket
4 Control panel
5 Drain hole
This refrigerating appliance is not intended to be used as a built-in appliance. The picture is for reference only. Real appliance probably is different.
Installation
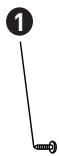
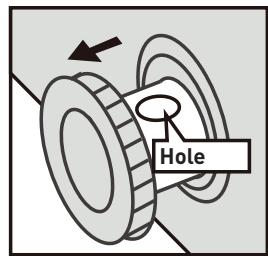
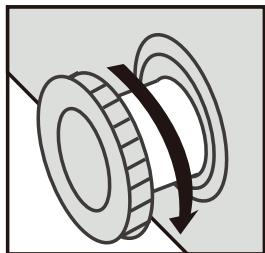
Install door external handle (if external handle is present).
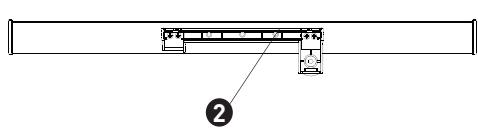
Take out 4 screws ① and handle base ② from accessory bag. Then fix the handle base ② with door by 4 screws ① .
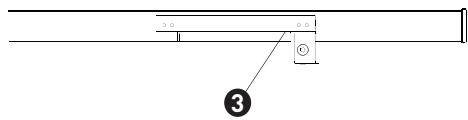
Insert handle cover 3 in the handle base 2 until a click.
Space requirement
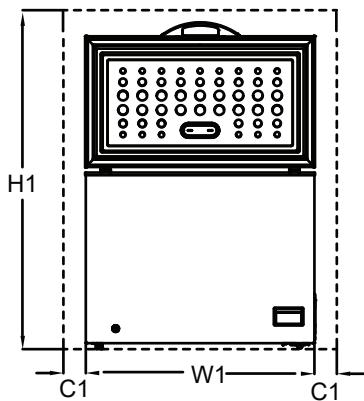
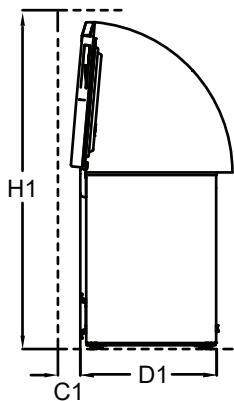
| Space required in use | ||||
| Model | W1 / mm (Product width) | D1 / mm (Product Depth) | H1 / mm (Minimum Height) | C1 / mm (Minimum Clearance) |
| 977613 | 954 | 616 | 1500 | 100 |
| 977614 | 1090 | 620 | 1550 | 100 |
| Remark: D1 doesn’t contain the external handle size. | ||||
Positioning
Install this appliance at a location where the ambient temperature corresponds to the climate class indicated on the rating plate of the appliance:
For refrigerating appliances with climate class:
- extended temperate: 'this refrigerating appliance is intended to be used at ambient temperatures ranging from 10^ to 32^ (SN);
- temperate: 'this refrigerating appliance is intended to be used at ambient temperatures ranging from 16^ C to 32^ C (N);
- subtropical: 'this refrigerating appliance is intended to be used at ambient temperatures ranging from 16^ to 38^ (ST);
- tropical: 'this refrigerating appliance is intended to be used at ambient temperatures ranging from 16^ to 43^ (T);
Location
The appliance should be installed well away from sources of heat such as radiators, boilers, direct sunlight etc. Ensure that air can circulate freely around the back of the cabinet.
To ensure best performance, if the appliance is positioned below an overhanging wall unit, the minimum distance between the top of the cabinet and the wall unit must be at least 100mm . Ideally, however, the appliance should not be positioned below overhanging wall units. Accurate leveling is ensured by one or more adjustable feet at the base of the cabinet.
WARNING
It must be possible to disconnect the appliance from the mains power supp- ly; the plug must therefore be easily accessible after installation.
Electronical connection
Before plugging in, ensure that the voltage and frequency shown on the rating plate correspond to your domestic power supply. The appliance must be earthed. The power supply cable plug is provided with a contact for this purpose. If the domestic power supply socket is not earthed, connect the appliance to a separate earth in compliance with current regulations, consulting a qualified electrician.
The manufacturer declines all responsibility if the above safety precautions are not observed. This appliance complies with the E.E.C. Directives.
Daily use
Cleaning the interior
Before using the appliance for the first time, wash the interior and all internal accessories with lukewarm water and some neutral soap so as to remove the typical smell of a brand new product, then dry thoroughly.
IMPORTANT
Do not use detergents or abrasive powders, as these will damage the finish.
Electrical connection
When the appliance is plugged in, all LED indicator lights will flash once. Then the appliance will resume the mode previously set before the electrical outage.
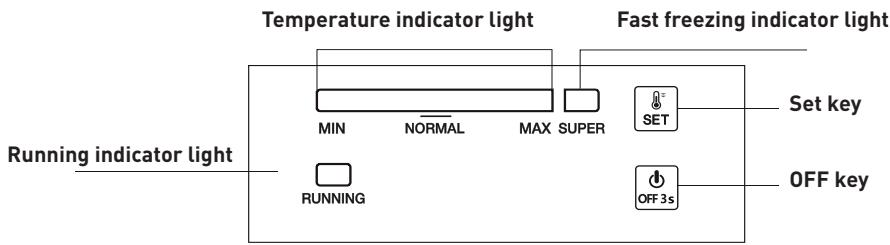
Temperature setting
Setting
- Press «SET» button, enter the temperature setting mode. The temperature indicator bar goes up a scale by each press. This setting runs in cycles.
- Temperature can run from Scale MIN to Scale MAX. Scale MAX is the coldest.
The temperature is automatically set in 5 seconds after the press.
TIP
Normally, it's recommended to set the temperature to «NORMAL» or colder for optimum food preservation. The longest storage time in this situation is no more than 1 month. Not set recommended setting may reduce the storage time.
| Thermostat setting for ambient T°C: NORMAL ≈ +24°C (± 4°C) | |
| Thermostat setting for ambient T°C: COLD ≈ +16°C (± 4°C) | |
| Thermostat setting for ambient T°C: HOT ≈ +32°C (± 4°C) |
Super Freezing
- Press «SET button consecutively to enter «SUPER» freezing mode from Scale MAX, the indicator bar on the left hereby will turn dark whereas the indicator light of «SUPER» turns on. This mode is automatically set in 5 seconds after last press.
The compressor keeps working in «SUPER» freezing mode. - If the «SUPER» mode keeps running for 52 hours and not stopped manually, the system will automatically cut out this mode, with the temperature back on Scale 5.
Power ON and Power OFF
If the appliance is working, press 0N / 0FF for 3 seconds to turn off. If the appliance is off, press 0N / 0FF for 3 seconds to turn on.
Indicator lights
Temperature Indicator Light (Bright blue)
To adjust the temperature from Scale MIN to Scale MAX. MAX is the coldest.
Super Freezing Indicator Light (Bright blue)
Light on = in «SUPER» mode, light off = compressor stops.
Running Indicator Light (Bright green)
Light on = compressor working, light off = compressor off.
30 minutes after the last operation, the indicator light will be on in half luminance.
Resumption function
The appliance will automatically resume the mode previously set before the electrical outage.
Temperature sensor fault alarm
When there is a disconnection or short out of the temperature sensor, as a fault alarm, the temperature indicator bar will flash from left to right every 0,5 second.
Freezing fresh food
- The freezer compartment is suitable for freezing fresh food and storing frozen and deep-frozen food for a long time.
- Place the fresh food to be frozen in the bottom compartment.
The maximum amount of food that can be frozen in 12 hours is specified on the rating plate.
The freezing process lasts 12 hours: during this period do not add other food to be frozen.
Storing frozen food
When first starting-up oraftera period out of use. Before putting the product in the compartment let the appliance run at least 2 hours on the higher settings.
IMPORTANT
In the event of accidental defrosting, for example the power has been off for longer than the value shown in the technical characteristics chart under «rising timefl, the defrosted food must be consumed quickly or cooked immediately and then re-frozen (after cooked).
Thawing
Deep-frozen or frozen food, prior to be used, can be thawed at room temperature, depending on the time available for this operation.
Small pieces may even be cooked still frozen, directly from the freezer. In this case, cooking will take longer.
Helpful hints and tips
Hints for freezing
To help you make the most of the freezing process, here are some important hints:
- The maximum quantity of food which can be frozen in 12 hrs.is shown on the rating plate;
- The freezing process takes 12 hours. No furtherfood to be frozen should be added during this period;
- To start the SUPER function 24 hours before placing food in appliance can help the best freezing capacity;
- Only freeze top quality, fresh and thoroughly cleaned, foodstuffs;
- Prepare food in small portions to enable it to be rapidly and completely frozen and to make it possible subsequently to thaw only the quantity required;
- Wrap up the food in aluminium foil or polythene and make sure that the packages are airtight;
- Do not allow fresh, unfrozen food to touch food which is already frozen, thus avoiding a rise in temperature of the latter;
- Lean foods store better and longer than fatty ones; salt reduces the storage life of food;
- Water ices, if consumed immediately after removal from the freezer compartment, can possibly cause the skin to be freeze burnt;
- It is advisable to show the freezing in date on each individual pack to enable you to keep tab of the storage time.
Hints for the storage of frozen food
To obtain the best performance from this appliance, you should:
- Make sure that the commercially frozen foodstuffs were adequately stored by the retailer;
- Be sure that frozen foodstuffs are transferred from the food store to the freezer in the shortest possible time;
- Not open the door frequently or leave it open longer than absolutely necessary.
- Once defrosted, food deteriorates rapidly and cannot be refrozen.
- Do not exceed the storage period indicated by the food manufacture
Cleaning and care
For hygienic reasons the appliance interior, including interior accessories, should be cleaned regularly.
CAUTION
The appliance may not be connected to the mains during cleaning. Danger of electrical shock! Before cleaning switch the appliance off and remove the plug from the mains, or switch off or turn out the circuit breaker or fuse. Never clean the appliance with a steam cleaner. Moisture could accumulate in electrical components, danger of electrical shock! Hot vapors can lead to the damage of plastic parts. The appliance must be dry before it is placed back into service.
IMPORTANT
Ethereal oils and organic solvents can attack plastic parts, e.g. lemon juice or the juice form orange peel, butyric acid, cleanser that contain acetic acid.
- Do not allow such substances to come into contact the appliance parts.
- Do not use any abrasive cleaners
- Remove the food from the freezer. Store them in a cool place, well covered.
- Switch the appliance off and remove the plug from the mains, or switch off or turn out the circuit breaker of fuse.
- Clean the appliance and the interior accessories with a cloth and lukewarm water. After cleaning wipe with fresh water and rub dry.
Defrosting of the freezer
The freezer, however, will become progressively covered with frost. This should be removed. Never use sharp metal tools to scrape off frost from the evaporator as you could damage it. However, when the ice becomes very thick on the inner liner, complete defrosting should be carried out as fellows:
- Unplug the unit. Remove the drain plug from the inside of the freezer. Defrosting usually takes a few hours. To defrost faster, keep the freezer door open.
- For draining, place a tray beneath the outer drain plug. Pull out the drain dial.
- Rotate the drain dial 180 degree. This will let the water flow out in the tray. When done, push the drain dial in. Replug the drain plug inside the freezer compartment. Monitor the container under the drain to avoid overflow.
- Wipe the interior of the freezer and replace the electrical plug in the electrical outlet.
- Reset the temperature control to the desired setting.
Troubleshooting
CAUTION
Before troubleshooting, disconnect the power supply. Only a qualified electrician of competent person must do the troubleshooting that is not in this manual.
IMPORTANT
There are some sounds during normal use (compressor, refrigerant circulation).
| Problem | Possible cause | Solution |
| Appliance dose not work | Mains plug is not plugged in or is loose | Insert mains plug. |
| Fuse has blown or is defective | Check fuse, replace if necessary. | |
| Socket is defective | Mains malfunctions are to be corrected by an electrician. | |
| The food is not frozen enough | Temperature is not properly adjusted. | Please look in the initial Temperature Setting section. |
| Door was open for an extended period. | Open the door only as long as necessary. | |
| A large quantity of warm food was placed in the appliance within the last 24 hours. | Turn the temperature regulation to a colder setting temporarily. | |
| The appliance is near a heat source. | Please look in the installation location section. | |
| Appliance freezes too much | Temperature is set too cold or the appliance runs at “7” setting. | Turn the temperature regulator to a warmer setting temporarily. |
| Unusual noises | Appliance is not level. | Check the appliance and level it by some articles. |
| The appliance is touching the wall or other objects. | Move the appliance slightly. | |
| A component, e.g. a pipe, on the rear of the appliance is touching another part of the appliance or the wall. | If necessary, carefully bend the component out of the way. | |
| Heavy build-up of frost on the door seal. | Door seal is not air-tight. | Carefully warm the leaking sections of the door seal with a hair dryer (on a cool setting). At the same time shape the warmed door seal by hand such that it sits correctly. |
If the malfunction shows again, contact the Service Center.
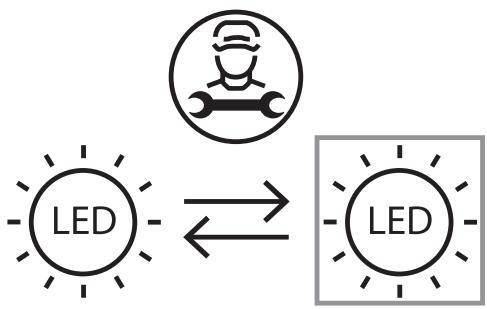
Replacing the lamp
The switch of LED lamp is gravity controlled, when the angle of the door-opening is bigger than 30 degrees, it will switch on and off when the angle is smaller than 30 degrees.
- This product contains a light source of energy efficiency class G.
- Light source in this product can only be replaced by qualified professionals.
- Please contact after-sales service if the light source fails.
- The light source shall be removed at the end of the product's useful life, with sorting and recycling done separately.
Notice
When LED lamp does not work when door is open, pleased be released and check as below steps:
- Firstly, loosen screws on the lamp cover
- Secondly, loosen screws fixed on the lamp electronic parts
- Thirdly, check the cable terminals of electronic parts and terminals of contacting lines for door lamp is loosening or not. Please fix them if they are not fixed. Then, check the light is on or not. If the lamp is switch on, please install the lamp cover. If not, please further check the electronic part is intact or not. If necessary, please replace the electronic part to check the lamp is on or not. If the lamp still does not work, please contact the after-sale staff for assistance.
Merci!
Lieud'st installation
- CONDITION DE GARANTIE
- FR
- Description of the appliance
- Installation
- Space requirement
- Positioning
- Location
- WARNING
- Electronical connection
- Daily use
- Cleaning the interior
- IMPORTANT
- Electrical connection
- Temperature setting
- Setting
- TIP
- Super Freezing
- Power ON and Power OFF
- Indicator lights
- Resumption function
- Temperature sensor fault alarm
- Freezing fresh food
- Storing frozen food
- Thawing
- Helpful hints and tips
- Hints for freezing
- Hints for the storage of frozen food
- Cleaning and care
- CAUTION
- Defrosting of the freezer
- Troubleshooting
- Replacing the lamp
- Notice
- Merci!
- Lieud'st installation
Brand : VALBERG
Model : CF 246 E W742C
Category : TV