AC1900 NIGHTHAWK X10 AD7200 - Wi-Fi Router NETGEAR - Free user manual and instructions
Find the device manual for free AC1900 NIGHTHAWK X10 AD7200 NETGEAR in PDF.
| Product type | 4G LTE Mobile Wi-Fi Router (hotspot) |
| Brand | NETGEAR |
| Model | AC1900 NIGHTHAWK X10 AD7200 |
| Category | Wi-Fi Router |
| Display | Touchscreen LCD |
| Power | Rechargeable battery, charging via Micro-USB cable (computer or USB charger) |
| SIM card type | Micro SIM (3FF) |
| Mobile network | 4G LTE, HSPA+, HSPA, UMTS |
| WiFi | Dual-band WiFi, secure by default, WPS compatible |
| Default WiFi network name (SSID) | Displayed on the LCD screen and under the battery |
| Default WiFi password | Displayed on the LCD screen and under the battery (case-sensitive) |
| Management web page | http://netgear.aircard |
| Default admin password | password |
| Features | Touchscreen, Jump Boost (power surplus), airplane mode, USB connectivity, SMS management |
| Security | Secure WiFi network by default, changeable admin password |
| Support | Product registration at https://my.netgear.com, support at http://support.netgear.com |
| Software | Updates available via the hotspot's web page |
| Jump Boost | Use the Jump Boost cable to charge another device |
| Data usage | Display details on the LCD screen |
| Compatibility | Computers, tablets, smartphones, WPS compatible WiFi devices |
| Warranty | Registration required for phone support |
Frequently Asked Questions - AC1900 NIGHTHAWK X10 AD7200 NETGEAR
User questions about AC1900 NIGHTHAWK X10 AD7200 NETGEAR
0 question about this device. Answer the ones you know or ask your own.
Ask a new question about this device
Download the instructions for your Wi-Fi Router in PDF format for free! Find your manual AC1900 NIGHTHAWK X10 AD7200 - NETGEAR and take your electronic device back in hand. On this page are published all the documents necessary for the use of your device. AC1900 NIGHTHAWK X10 AD7200 by NETGEAR.
USER MANUAL AC1900 NIGHTHAWK X10 AD7200 NETGEAR
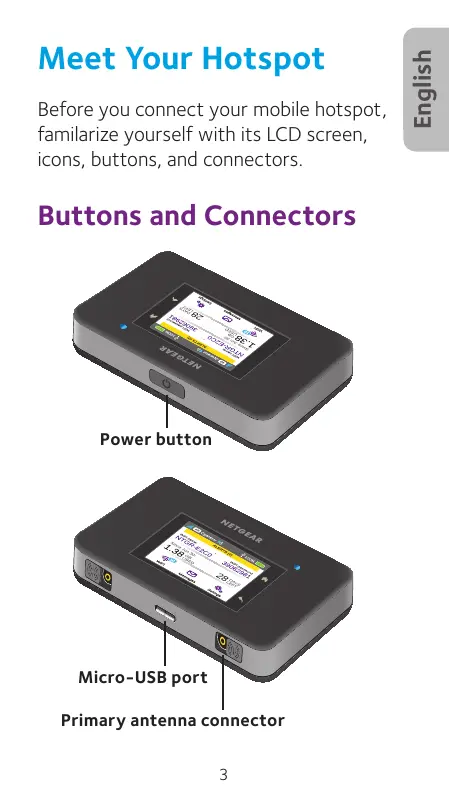
Before you connect your mobile hotspot, familiarize yourself with its LCD screen, icons, buttons, and connectors.
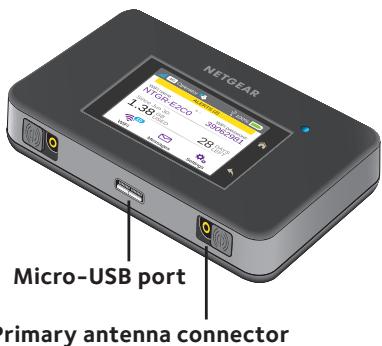
Buttons and Connectors
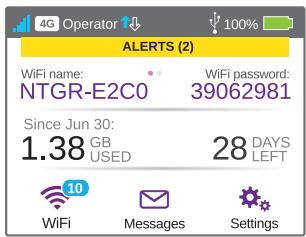
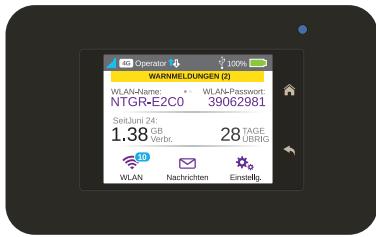
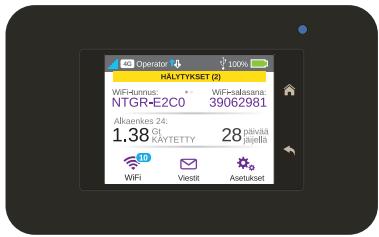
LCD Screen
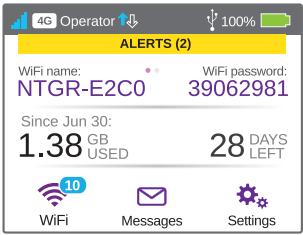
You can use the touch screen icons and other screen elements to view the mobile hotspot's status, configure WiFi band settings, view data usage details, and view system alerts.
You can also view alerts and notifications by swiping downward from the ALERTS icon at the top of the screen. Scroll across to view multiple alerts.
| Icon | Description | |
| Signal strength | 5 bars. Excellent. 1 bar. Low level. | |
| Network type | 4G. An LTE network is available. H+. DC-HSPA+ HSPA+/DC HSPA. H. HSPA. 3G. UMTS. | |
| Traffic | Outline. Connected. Solid. Sending or receiving. None. Not connected. | |
| Cradle | Appears when the hotspot is docked in a cradle (sold separately). | |
| Battery level | 5 bars. Fully charged. 1 bar. Battery low. | |
WiFi Name and WiFi Password
You can change the WiFi name (SSID) and WiFi password (security key) to your own preferences by tapping the WiFi icon on your mobile hotspot's screen or through the mobile hotspot web page.
| Quick Reference Section | |
| Default WiFi name (SSID) | Displayed on the front screen of your mobile hotspot when it is powered on, and under the battery. |
| Default WiFi password (security key) | Case-sensitive and displayed on the front screen of your mobile hotspot when it is powered on, and under the battery. |
| Mobile hotspot web page | http://netgear.aircard |
| Mobile hotspot web page password | password |
Getting Connected
Before you connect to your mobile hotspot, you must insert a micro-SIM card (3FF), install the battery, power on the mobile hotspot, and charge your battery.
Note: To obtain a micro-SIM card, contact your Internet service provider.
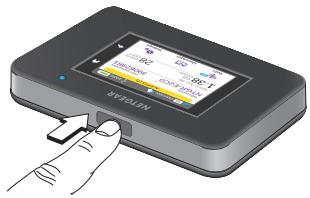
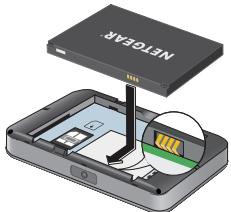
To insert the micro-SIM card:
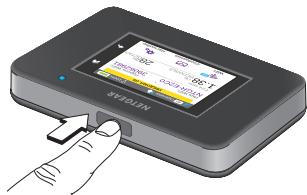
- Remove the back cover using the thumb catch on the corner of the mobile hotspot.
- Remove the battery.
- Slide the micro-SIM card into the slot with the gold colored contacts facing down.
- Ensure that the micro-SIM card is seated securely.
- Reinsert the battery.
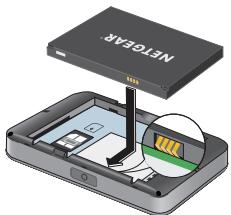
- Replace the cover.
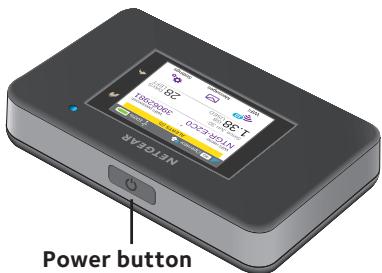
To power on your mobile hotspot:
Press and hold the Power button until the LCD screen lights.
To connect to your mobile hotspot:
- Ensure that WiFi is enabled on your computer or other device.
- On your computer or other device, search for wireless networks:
For Windows devices, click the Internet Access icon.
For Mac devices, from the WiFi menu, select the network.
- For tablets, look for a settings option.
- Select the WiFi name displayed on your LCD screen.
- Enter the WiFi password exactly as it appears on the LCD screen.
Passwords are case-sensitive.
When a computer or mobile device connects to the mobile hotspot, a 1 displays beside the WiFi icon on the LCD screen.
Note: For you to connect to the mobile broadband network, your SIM account must be active. If you use a prepaid or pay-as-you-go micro-SIM, the account must show a positive balance.
- Launch your browser and, if desired, visit the Mobile Hotspot web page http://netgear.aircard to personalize your settings.
Your mobile hotspot is ready to use out of the box. You probably don't need to personalize any settings.
The mobile hotspot is completely secure using its default security settings.
Note: If you see a message indicating that a mobile connection was not made, you might need to add an APN. For information about adding APNs, refer to the user manual.
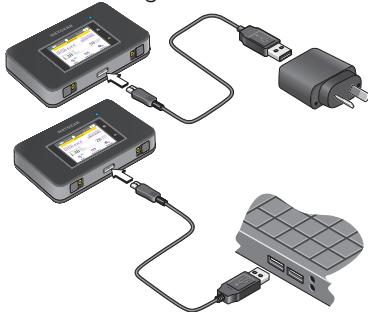
Recharging Your Battery
Your battery comes partially charged.
To recharge your battery:
- Connect the micro-USB cable to your mobile hotspot.
- Connect the other end of the cable to the USB port on your computer or to the USB charger.
Connect Devices
You can add devices to your network using a WiFi network manager or WPS if the device can use WPS.
Note: WPS enables you to connect WPS-enabled devices to a WiFi network without entering a WiFi password using a keyboard.
To connect additional WiFi-capable devices:
- Open the WiFi network manager on your computer or other WiFi device (such as smartphone, tablet, media players, cameras, and so on).
- Select the WiFi network name displayed on the LCD screen.
- Enter the WiFi password displayed on the LCD screen.
- Launch your browser.
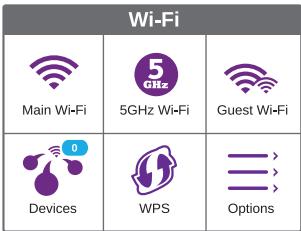
To connect devices using WPS:
- Press the Power button to awaken the LCD screen.
- Tap the Wi-Fi icon. The Wi-Fi window displays.
- Tap the WPS icon. The WPS window displays.
- Tap the Pair with Main Wi-Fi button.
- Within two minutes, press the WPS button on the device that you want to connect to your WiFi network.
The mobile hotspot and the wireless device automatically communicate and establish a secure connection.
Using the Touch Screen
WiFi
You can manage your WiFi settings by tapping the Main Wi-Fi icon.
You can also manage your WiFi settings from your Mobile Hotspot web page.
Note: The mobile hotspot resets when you change WiFi settings. Connected devices are disconnected.
Messages
The Messages icon shows the number of unread SMS messages received by your device.
To read messages:
- On the home screen, tap the Messages icon.
- Tap a message line.
| Messages ① | Compose |
| (555) 555-5555 Test... | 24/6/15 12:34 PM |
| (555) 555-5555 @,?I'm in... | 12/6/15 2:55 PM |
| (555) 555-5555 fafafaifa... | 10/6/15 4:39 PM |
| (555) 555-5555 fafafaifa... | 10/6/15 4:37 PM |
Settings
You can customise other settings as well.
To customise your hotspot's settings:
- On the home screen, tap the Settings icon.
- Tap any one of the icons to adjust a setting.
The following table describes the icons that display on the Settings window.
| Icon | Description |
| Display | Configure the touchscreen display (brightness, time-out, display of WiFi credentials, status LED display). |
| Network | Choose the network types to use, set roaming rules, display network connection details. |
| Jump Boost | Use your mobile hotspot to give a boost to another device's battery using the jump boost cable provided with your device. |
| Airplane Mode | Disable the mobile hotspot's WiFi and cellular radios while on an airplane or in areas where WiFi is restricted. The jump boost feature can still be used in this mode. |
| USB Tether | Connect to the Internet from supported computers with a USB cable, and charge your device at the same time. |
| More | See information about the device including software updates, factory reset, and tutorial. |
Mobile Hotspot Web Page
Use the mobile hotspot web page to view or change your mobile hotspot's settings.

To access your mobile hotspot web page:
- Launch an Internet browser from a computer or wireless device that is connected to the network.
- Enter http://netgear.aircard.
- Enter the administrator login password. The default password is password. The mobile hotspot web page displays.
Change Security Settings
The WiFi network name and admin password provide security. Your mobile hotspot comes with a randomly generated and secured WiFi network name (SSID) and password that you can continue to use as is. Read the following procedure if you want to change your security settings.
To change the WiFi network name or WiFi password:
- Launch an Internet browser from a computer or wireless device that is connected to the mobile hotspot.
- Enter http://netgear.aircard.
- Enter the administrator login password. The default password is password. The mobile hotspot web page displays.
- Select WiFi > OPTIONS.
The WiFi Options page displays.
- To change the WiFi network name, enter a new WiFi network name.
- To change the WiFi password, enter a new WiFi password.
If you change your password, be sure to keep a record of it and store it in a safe place.
- Click the Submit button.
Support
Thank you for purchasing this NETGEAR product.
After installing your device, locate the serial number on the label of your product and use it to register your product at https://my.netgear.com.
You must register your product before you can use NETGEAR telephone support. NETGEAR recommends registering your product through the NETGEAR website.
For product updates and web support, visit http://support.netgear.com.
NETGEAR recommends that you use only the official NETGEAR support resources.
You can get the user manual online at http://downloadcenter.netgear.com or through a link in the product's user interface.
Trademarks
© NETGEAR, Inc., NETGEAR and the NETGEAR Logo are trademarks of NETGEAR, Inc. Any non-NETGEAR trademarks are used for reference purposes only.
Compliance
For the current EU Declaration of Conformity, visit http://support.netgear.com/app/answers/detail/a_id/11621/.
For regulatory compliance information, visit http://www.netgear.com/about/regulatory/.
See the regulatory compliance document before connecting the power supply.
Kurzanleitung
AirCard 790
Mobiler Hotspot
Ihr Hotspot
https://my.netgear.com.
http://support.netgear.com/app/answers/detail/a_id/11621/.
http://www.netgear.com/about/regulatory/.
IpeepTeM KAK NOKJIIOUaTbC K MObINbHOI TOKe DOCTyNa, Heo6XoDmO BCTaBnTB BHee KapTy MInkpo-SIM (3FF), yCTaHOBnTB aKKMyJITOP, NOKJIIOUHTb NITaHne I 3aprAnTb aKKMyJITOp.
PpIMeuaHne.ДЯpoLuyehnKaTbMI NKPO-SIM obpaTuTeCb K CBOEmyonepatopy cotoboi CBa3N.
》ДяуctaHOBKn KapTbI MmKpo-SIM BblONHnTE CJeDyUOJIne DeiCTBnA:
- CHIMITE 3aДHIOKpbIUKy,INCNoIb3yra 3aUeIKy,pacnoJIOKeHHUHOHa yrNy MOBnJIbHoT OTOKN IOCTyna.
- N3BNeKeNTe aKKyMnyTOp.
- BcTaBbTe KapTy MmKpo-SIM B cNoT, paCnOIOXINB ee TaKIM Oba3OM, UTo6bl I03OIOUeHHbIe KOHTaKTbI 6blI IOpaueHbI BH13.
- Y6eIITecb B TOM, UTO KApTa MmKpo-SIM HAdexHNO BCTaHa Ha CBOE MeCTO.
- YctahOBInTe aKkyMnyTOp Ha MeCTO.
- YctaHOBInTe KpbIiKy Ha MeCTO.
》ДяВКПЮЧЕнЯ ПИТАнЯМОБЛьНОI TOUKNdoCTyna BbINONHITe CNeДуюше DeiCTBnI:
Haxmnte u yedeXmbaTe KhONky nTaHnIdo Tex np, noka KK-dncnne He hauhet CBETNbC.
》 IINIPOKJIIOUeHnKMO6NlBHOJ TOUKe DOCTyNa BbIIONJHnTe CNeDyUoJne DeiCTBnJ:
- YbEaTeCb TOM, YTo Ha KOMNbIeTepe NnN dpYrO m yCTpOJCTBe BKJIouCh WiFi.
- Ha KOMMbIOpTe IINI dpyrom ycTpoiCtBe BbIOnJIHInTe NOnCK 6ecnpOBoDhbIX cTei:
Ha yctpoCTbax nOy npaBneHem Windows haxmTe Ha 3naOK Internet Access (OocTyB IVHTepHET).
Ha yctpoiCTbax noj ynpaBneHnem Mac nepeyndTe B MeHIO WiFi n Bbl6epnte 6ecnpoBDHyO ceTb.
Ha nlaanwe tax nepeienTe B pa3denn HactpoeK.
-
Bb6epnte cetb WiFi, mMa KOTopoYyKa3aHO Ha JKK-dncnnee.
-
BVeDInTe napOnb WiFi B ToUHocTn TaK, KaK OH oTo6paXaETcNa Ha KK-dIcnPJIee.
PnBBOe npoJI Heo6xOJMo yuHTbIBaTb perncTp.
Korda KOMNbHOTep INM MOBnIbHOe yCTPOcTBO NOKJIIOHTcK MOBnIBHOJ TOChE DOCTyna, Ha JKK-3kpaHe pIaOM co 3HauchKOM WiFi OTO6pa3NTcraΦpa "1".
MoBnIbHaT OToKa DoCTyna Rotoba K
NcNoJIb3OBAHnIO Cpa3y JKe NocLe BKnIouHeHn.
BepoTHo, Bam He Notpe6ByeTcN 13MeHnTb
KaKne-Ⅱn60 HAcTPOkN.
3auiTa MoBnIbHOn TOnKn DoCTyna
PONHOCTbIO ObecneuBaETc PnN
NCpONb3OBAHm NapaMeTPOB 6e3OpaCHOCTn
No yMOJIuaHIO.
PpmeHne. EcIn OTo6paKaetc Coo6eHne o TOM,чTo MObIbHOe COeINHeHne He 6blIO yCTaHOBLeHO, BO3MOxHO, NOTpe6yEtCBAECTn IMAr APN. INΦopMaunO BBODe HOBOrO IMeHi APN npedctabHeA BpyKOBODCTBe NOJb3OBATeJI.
UnpabnTb HacToPoukAmu WiFi MoXHo TaXKe CBe6-CTpaHnCtblMOBnLbHO ToQKn DoCTyNa.
Примочаим. Ппи Изmedени Насток WiFi npoICxOДNT CBpOC napaMeTPOB MObINьно TOUKN DoCTyna. ПОДКПIOUeHHbIe yCTpoiCTBa OTKJIQUaIOTcR.
Messages (CoobüeHna)
PraDM CO 3NaKOM Messages (Coo6eHn) yka3bIbaetcKaONuYeCTBO HenpoHTaHHbIX SMScoo6eHn, nOlyeHHbIX yCTpOiCTBOM.
》ДЯчTeHnA COO6eHnBbINOJIHnTe CNeDyUoNHe DeIcTBnA:
- Hā rīnabHOM əkpaHé KocHInTeCb 3HaUka Messages (CoO6üeHn).
- KocHTecb CTpOKn TEKCTa COOcheHna.
| Сообъединя ① | Составить |
| (555) 555-5555 T T... | 19/5/15 17:25 PM |
| (555) 555-5555 Nnn... | 15/5/15 13:38 PM |
| (555) 555-5555 Yo... | 15/5/15 13:37 PM |
| (555) 555-5555 O.o... | 15/5/15 13:36 PM |
Settings (HactrpoiKn)
Moxho hactpoonb TaKKe i npytne npaMeTpbl.
》Дянсatroйп napametpoBTockNdoctyna BbINONHIne CneDyUOuineDeiCTBnI:
- Ha rnaBHom 3kpaHe KOCHNTecb 3HaYka Settings (HacTpoMn).
2.ДЯИЗМЕHEHЯHACTPOnKIN KOCHTeCb IHO6OroI33HaUKOB.
B npedctablenHHo Hnke Ta6nue npnbOuNTc8 OnncHne 3NaKOB,OTobpaKaembIX B OkHe Settings (HaCtpoKn).
EcnBbI n3MeHnIN CBOI npOJIb, He 3a6yDBeTe erO 3aPiNCaTb I COxpaHHTb BHaJExKHom MeCTe.
- Haxmnte KhoNkY Submit (OtnpaBtB).
PoiDepKka
COOTBETCTBNE cTaHdaptTAM
Tekyaця Версь ТекстдЕкларачи O COOTBETCTBn
стандтам EC npedctabneHa Na Be6-стпчile
http://support.netgear.com/app/answers/detail/a_
id/11621/.
Информачи O COOTBETCTBn HOPMaTbAm
npedctabneHa no anpecy http://www.netgear.com/about/
regulatory/.
PpeIe PIOKJIIOUHeHMe ITOCHNIGA PIITAHNA BHIMATEJIbHO O3HaKOMTeBc C DOKUMEHTAMN O COOTBETCTBNH HOPMATINBAM.
AirCard 790
Mobiilitukiasema
Tukiaseman esittely
http://support.netgear.com/app/answers/detail/a_id/11621/.