
FJ144TF2R2 FREEJET - Cordless vacuum HOOVER - Free user manual and instructions
Find the device manual for free FJ144TF2R2 FREEJET HOOVER in PDF.
| Product type | Canister vacuum cleaner with bag |
| Brand | HOOVER |
| Model | FJ144TF2R2 FREEJET |
| Power supply | Mains (power cord) |
| Bag system | With dust bag (microfiber or paper depending on version) |
| Bag full indicator | Red indicator light |
| Filters | Pre-motor filter (sponge), exhaust filter (sponge and exhausted filter) |
| Tube | Telescopic with height adjustment |
| Suction control | On the hose handle |
| Power adjustment | Control on the vacuum body |
| Floor selector | Carpet / Hard floor (GP, HF or CA brush) |
| Cord rewinder | Automatic rewinding pedal |
| Included accessories | Flat nozzle, small nozzle, furniture brush, mini turbo brush (pet hair), mini turbo brush (allergens), parquet brush |
| Storage station | Temporary parking and permanent storage |
| Maintenance | Clean filters with lukewarm water every 5 bag changes; wash permanent bag every 5 empties |
| Safety | Thermal circuit breaker in case of overheating; automatic shut-off |
| Spare parts | Available from Hoover; use original parts |
| Warranty | According to conditions of country of sale |
| Compliance | European directives 2006/95/EC, 2004/108/EC, 2011/65/EU |
Frequently Asked Questions - FJ144TF2R2 FREEJET HOOVER
User questions about FJ144TF2R2 FREEJET HOOVER
0 question about this device. Answer the ones you know or ask your own.
Ask a new question about this device
Download the instructions for your Cordless vacuum in PDF format for free! Find your manual FJ144TF2R2 FREEJET - HOOVER and take your electronic device back in hand. On this page are published all the documents necessary for the use of your device. FJ144TF2R2 FREEJET by HOOVER.
USER MANUAL FJ144TF2R2 FREEJET HOOVER
Certain Models Only *Nozzle design may vary according to models
INSTRUCTIONS FOR SAFE USE
This appliance should only be used for domestic cleaning, as described in this user guide. Please ensure that this guide is fully understood before operating the appliance.
Do not leave the appliance plugged in. Always switch off and remove the plug from the socket after use, or before cleaning the appliance or any maintenance task.
This appliance can be used by children aged from 8 years and above and persons with reduced physical, sensory or mental capabilities or lack of experience and knowledge if they have been given supervision or instruction concerning use of the appliance in a safe way and understand the hazards involved. Children shall not play with the appliance. Cleaning and user maintenance shall not be made by children without supervision.
If the power cord is damaged stop using the appliance immediately. To avoid a safety hazard, an authorised HOOVER service engineer must replace the power cord.
Keep hands, feet, loose clothing and hair away from rotating brushes.
Use only attachments, consumables or spares recommended or supplied by HOOVER.
Static electricity: Some carpets can cause a small build up of static electricity. Any static discharge is not hazardous to health.
Do not use your appliance out of doors or on any wet surface or for wet pick up.
Do not pick up hard or sharp objects, matches, hot ashes, cigarette ends or other similar items.
Do not spray with or pick up flammable liquids, cleaning fluids, aerosols or their vapours.
Do not run over the power cord when using your appliance or remove the plug by pulling on the power cord.
Do not continue to use your appliance if it appears faulty.
HOOVER service: To ensure the continued safe and efficient operation of this appliance we recommend that any servicing or repairs are only carried out by an authorised HOOVER service engineer.
Do not stand on or wrap the cord around arms or legs when using your appliance.
Do not use the appliance to clean animals or people.
Do not position the appliance above you when cleaning the stairs.
The Environment
The symbol on this appliance indicates that this appliance may not be treated as household waste. Instead it must be handed over to the applicable collection point for the recycling of electrical and electronic equipment. Disposal must be carried out in accordance with local environmental regulations for waste disposal.
For more detailed information about treatment, recovery and recycling of this appliance, please contact your local city office, your household and waste disposal service or the shop where you purchased the appliance.

This appliance complies with the European Directives 2006/95/EC, 2004/108/EC and 2011/65/EU.
HOOVER Limited, Pentrebach, Merthyr Tydfil, Mid Glamorgan, CF48 4TU, UK
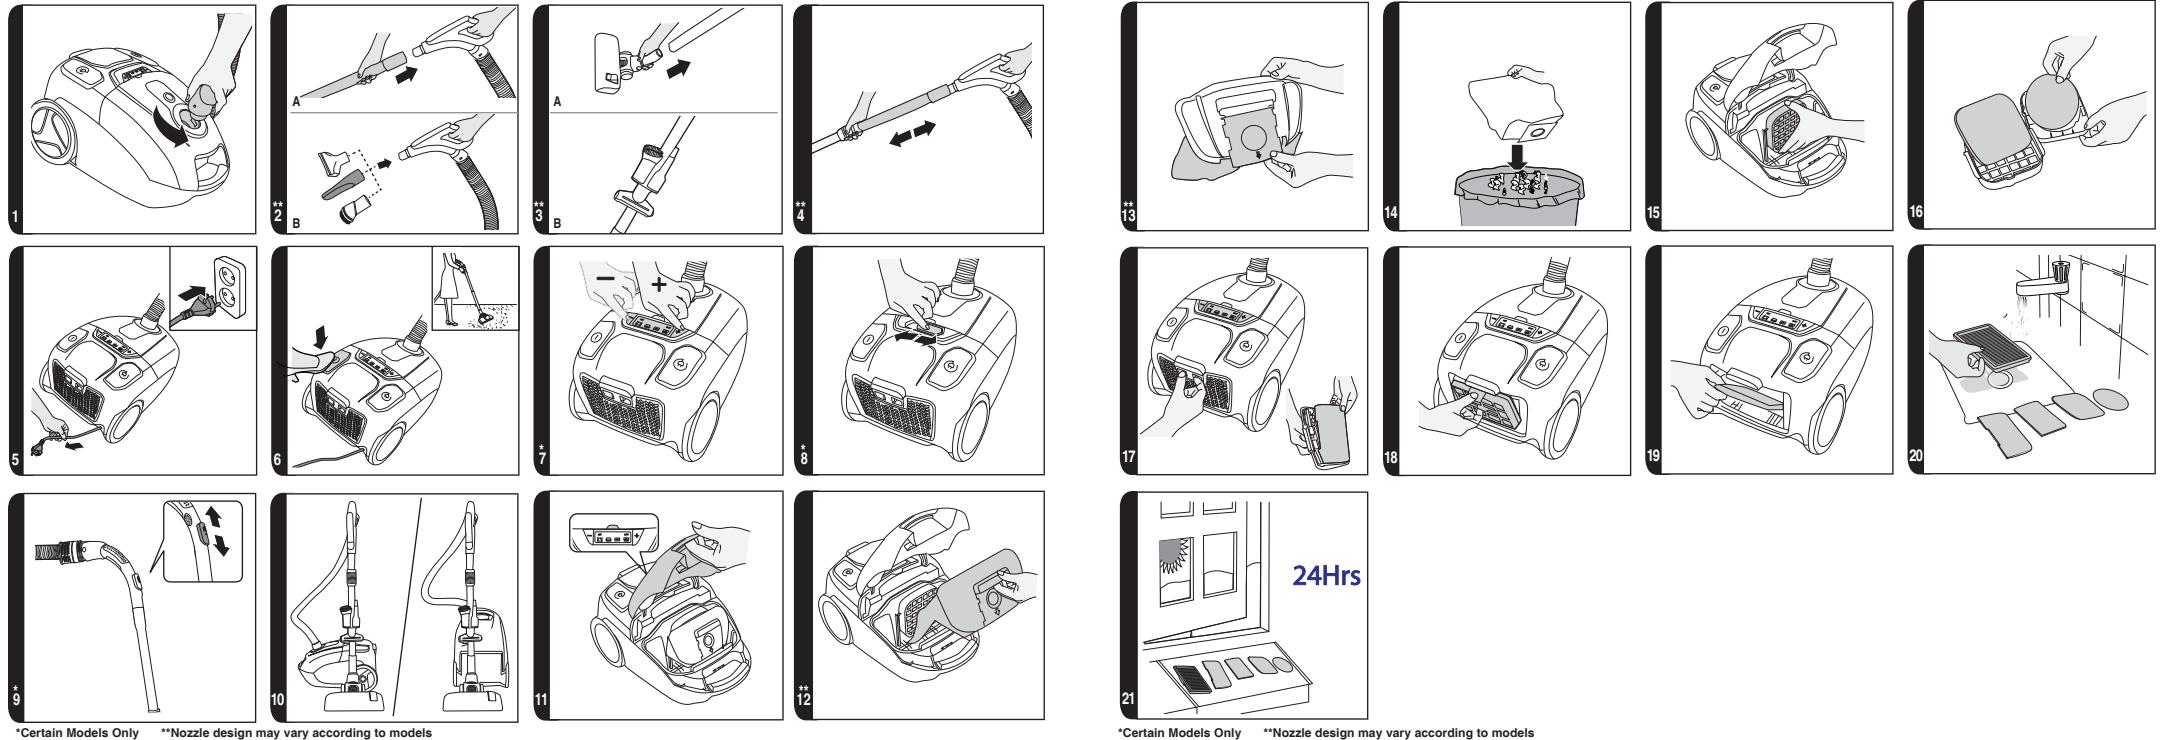
GETTING TO KNOW YOUR CLEANER
A. Main Cleaner
B. Hose
C Hose handle looped (For Acubed Silent Extra model 62 dba)
C Hose handle curved(For Acubed Silent model 69 dba)
D. Suction Regulator
E. Telescopic Tube Button
F. Carry Handle
G. Bag Check Indicator LED
H. On/Off Pedal
I. Cord Reel Pedal
J. LED Display Screen
K. Variable Power Control Button*
K1. Variable Power Control Slider*
L. Tool Bracket
M. Floor type selector
N. Carpet and Floor Nozzle (GP)**
N1. Carpet Nozzle (CA)
N2. Hard Floor Nozzle (HF)
O. Exhausted sponge
P. Exhausted Filter
Q. Bag Door Release Latch
R. Bag Door
S. Pre-motor Filter
T. Bag holder
U. Bag
V. Accessory Set*
V1. Crevice Tool
V2. Furniture Nozzle
V3. Dusting Brush*
W. Pet Hair Remover Mini Turbo Nozzle
X. Allergy Remover Mini Turbo Nozzle
Y. Parquet Nozzle*
Z. Easy Parquet Nozzle
ASSEMBLING YOUR CLEANER
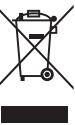
Remove all components from the packaging.
- Connect the hose to the cleaner main body, ensuring it locks into position. [1] To release the hose: rotate the connector counterclockwise and pull it. [2]
*Certain Models Only ** Certain models only, nozzles may vary according to model
- Connect the hose handle to the end of the fixed tube upper end and store the accessories on the tube. [3B]
- Connect the tube lower end to carpet and floor nozzle. [3A]
USING YOUR CLEANER
- Extract power cord and plug it into the power supply. Do not pull the cord beyond the red marker. [5]
- Adjust the telescopic tube to the desired height by moving the telescopic tube adjuster and raise or lower the tube to the most comfortable cleaning position. [4]
- Select Carpet or Floor Nozzle for ideal cleaning mode for the floor type. Hard Floor - Brushes are lowered to protect the floor. Carpet - Brushes are raised for the deepest clean.
- Switch the cleaner on by pressing the on/off Pedal on the cleaner main body. [6]
- Adjust the power level by pressing the variable power control button or by pushing the variable power control slider. [7,8]
- Adjust the suction regulator* to the desired level. [9]
- Switch off at the end of use by pressing the on/off Pedal. Unplug and extract power cord again to wind the power cord back into the cleaner.
- Parking and Storage - The tube can be parked for temporary storage while in use, or in the storage position when not in use. [10]
ACCESSIONS
To obtain the best performance and energy efficiency ^#1 it is recommended that the correct nozzles are used for the main cleaning operations. These nozzles are indicated in the diagrams by the letters GP, HF or CA.
A nozzle type GP can be used to clean both carpet and hard floor.
A nozzle type HF is suitable for use only on hard floor.
A nozzle type CA is suitable for use only on carpet.
The other nozzles are accessories for specialist cleaning tasks and are recommended for occasional use only.
It is important to note that this vacuum cleaner is supplied with an Energy Label as required by European Regulation (EU) 665/2013.
If the label shows a red prohibition circle on the left covering the carpet symbol, then this indicates that the vacuum cleaner is not suitable use on carpets.
If the label shows a red prohibition circle on the right covering the hard floor symbol, then this indicates that the vacuum cleaner is not suitable for use on hard floors.
^#1 NOTE: Dust pick up ability carpet, dust pick up ability hard floor, and energy efficiency in accord with Commission Regulations (EU) 665/2013 and (EU) 666/2013.
All accessories can be fitted to the end of the handle or the end of the telescopic tube.
Accessory Set* - Combines several functions in one, with maximum flexibility by the rotating body. Reach into awkward areas by rotating the body. The 3 in 1 tool can be stored neatly underneath the hose handle.
Crevice Tool* - For corners and hard to reach areas. [V1]
Furniture Nozzle* - For soft furniture and fabrics. [V2]
Dusting Brush* - For bookshelves, frames, keyboards and other delicate areas. To extend the brushes push the button on the body of the tool. [V3]
Parquet Nozzle* - For parquet floors and other delicate floors. [Y]
Pet Hair Remover Mini Turbo Nozzle* - Use the mini turbo nozzle on stairs or for deep cleaning on textile surfaces and other hard to clean areas. Particularly suitable for pet hairs removal. [W]
Allergen Remover Mini Turbo Nozzle* - Use the mini turbo nozzle on stairs or for deep cleaning on textile surfaces and other hard to clean areas, particularly suitable for allergen removal. [X]
IMPORTANT: Do not use mini turbo nozzles on rugs with long fringes, animal hides and carpet pile deeper than 15mm . Do not keep the nozzle stationary while brush is rotating.
CLEANER MAINTENANCE
Replacing the Dust Bag
If the bag check indicator is red please check and, if necessary, replace the bag.
- Lift the bag door release latch to open the bag door, pull the bag holder and pull the pull the bag collar to remove the bag. [11,12]
- Apply the peel and seal sticker, located on the bag collar, to the bag inlet. The full dust bag should be disposed of correctly and carefully. [13,14]
- Fold a new bag as shown on the bag and fit by inserting the collar into the bag holder.
- Refit the bag holder and close the bag door.
WARNING: The bag door will NOT close if the dust bag and/or the bag holder are not assembled to the cleaner. Always ensure the bag and bag holder are present when closing the bag door.
REMEMBER: The bag check indicator LED* may also be lit if an obstruction has occurred. In this case refer to 'remove A Blockage From the System'.
Cleaning the Filters*
To maintain optimum performance of your cleaner, please wash the filters after each 5 bag changes.
*Certain Models Only ** Certain models only, nozzles may vary according to model
Cleaning the pre-motor filter:
- Lift the bag door release latch to open the bag door and remove the bag holder. [12]
- Remove the pre-motor filter frame from the cleaner. [15]
- Remove the filter sponge from the holder. [16]
- Wash it in hand warm water, and allow it to dry thoroughly before replacing to the cleaner. [19,20]
Cleaning the exhausted filter and exhausted sponge:
- To remove the exhaust sponge and the exhaust filter, remove the exhaust sponge 1 from the exhaust cover and unclip the filter pack and remove the other sponge 2. [17,18,19]
- Wash them in hand warm water, and allow them to dry thoroughly before replacing. [20,21]
REMEMBER: Do not use hot water or detergents. In the unlikely event of the filters becoming damaged, fit a Genuine Hoover replacement. Do not try and use the product without a dust bag or filter fitted.
Cleaning the permanent cloth dust bag*
To maintain optimum performance we recommended that you wash the permanent cloth dust bag under warm water after every 5 full bags. Remove excess water and leave to dry fully before replacing.
Removing a blockage from the system (*Certain model only)
If the bag check indicator LED is illuminated or flashing:
- Check if the bag is full. If so refer to 'Replacing The Dust Bag'.
- If it is not full, then;
A. Do the filters need cleaning? If so refer to 'Cleaning the Filter'.
B. Check if there is any other blockage in the system - Use a cord or a pole to remove any blockage from the telescopic tube or flexible hose.
WARNING - The bag check indicator LED will turn on if the cleaner is used when full, if there is a blockage or if the filters are dirty. If the cleaner is used for a significant period of time with the bag check indicator LED is on, a thermal cut out will switch the cleaner off to prevent overheating. The bag check indicator LED turns off once the cleaner has switched off to signal that the thermal cut out has been activated. If this should happen, switch the cleaner off, unplug and correct the fault. It will take about 30 minutes for the cut out to automatically reset.
USER CHECK LIST
Should you have a problem with the product, complete this simple user checklist before calling your local Hoover service.
- Is there a working electricity supply to the cleaner? Please check with another electrical appliance.
- Is the dust bag over-filled? Please refer to 'Cleaner Maintenance'.
-
Is the Filter blocked? Please refer to 'Cleaning the filter'.
-
Is the hose or nozzle blocked? Please refer to 'Removing a blockage from the system'.
- Has the cleaner overheated? If so, it will take approximately 30 minutes to automatically reset.
IMPORTANT INFORMATION
Hoover spares and Consumables
Always replace parts with genuine Hoover spares. These are available from your local Hoover dealer or direct from Hoover. When ordering parts always quote your model number.
For Acubed Silent Extra model 62 dba
Pre Motor & Exhaust Filter Kit U54 35601662
Microfiber Bag (x4) H75 35601663
Complete Flexible Hose D205E 35601664
Carpet & Floor Silent Extra Nozzle G230SEE 35601665
Parquet Extra Nozzle G231EE 35601666
For Acubed Silent model 69 dba
Pre Motor & Exhaust Filter Kit U55 35601667
Paper Bag (x5) H76 35601668
Complete Flexible Hose D206E 35601669
Carpet & Floor Silent Nozzle G232SE 35601670
Parquet Extra Nozzle G231EE 35601666
Hoover Service
Should you require service, spares and consumables at any time, please contact your local Hoover Service Office.
Quality
Hoover's factories have been independently assessed for quality. Our products are made using a quality system which meets the requirements of ISO 9001.
Your Guarantee
The guarantee conditions for this appliance are as defined by our representative in the country in which it is sold. Details regarding these conditions can be obtained from the dealer from whom the appliance was purchased. The bill of sale or receipt must be produced when making any claim under the terms of this guarantee.
Subject to change without notice.
INSTRUCTIONS DE SECURITE D'UTILISATION
Statisk elektrisitet: Enkelte tepper kan bygge opp små mengder statisk elektrisitet. Utladning av statisk elektrisitet er/DD er/DD/DD/DD/DD/DD/DD/DD/DD/DD/DD/DD/DD/DD/DD/DD/DD/DD/DD/DD/DD/DD/DD/DD/DD/DD/DD/DD/DD/DD/DD/DD/DD/DD/DD/DD/DD/DD/DD/DD/DD/DD/DD/DD/DD/DD/DD/DD/DD/DD/DD/DD/DD/DD/DD/DD/DD/DD/DD/DD/DD/DD/DD/DD/DD/DD/DD/DD/DD/DD/DD/DD/DD/DD/DD/DD/DD/DD/DD/DD/DD/DD/DD/DD/DD/DD/DD/DD/DD/DD/DD/DD/DD/DD/DD/DD/DD/DD/DD/DD/DD-DD
VEDLIKEHOLD AV STØVSUGEREN
Bytte stovposen
He paçnbjIyTe nIe He co6bpaIte ropUoyne JxndKoCTn, YnCTaIe cpeDcTba, a3pO30JI nn npOyne napbl.
He nepebo3nte cBoi np6op uepe3 npoBOd nHTaHnI He TAHNTe 3a npoBOd, BbIHMa8 BnKy n3 p03ETKn.
Bcnyae HeicnpaBHOCTn He cIeIyET npOJXaTb NOlb3OBaTbCn np6opom.
CepBnchag cnyk6a HOOVER: Ira rapaHTnn 6e3oNaChoi n HaedxHOBpa60bIdaHHOrOpnp6opamblpeKOMeHNdyemnpurIaShaTb ABTOpN3OBAHHbIX INJKeHepoB cepBnCHOHcnyk6bI HOOVER Ira BbINOJIHeHn TExHnueCKoro 6cnykBaHnI neMoHTa.
He cToIe Ha npOBoJe n He HamaTbIbaIte erO Ha pyKy uJn Hory B npOceCe nCNoJIb3OBaHn y npi6opa.
He noJIb3yI TeCb npI6OpOM dIg OUInCTKJ XINBOTHbIX IJIJI JIOJeI.
He pa3meuTe np6op naCobovBvpeM y6OpKn IecTHnU.
Okpykaioua cpea:
CmBON Ha daHHom npi6ope yka3bIbaet Ha To, qTo ero HeJIb3y yTuInn3IPOBaT BMeCTc 6bIbOMn OTXODAMn. Ero Heo6xOIMMo CdaBaTb B COOTBeTCTByUOuN IyHKT npiEma JIaI daJIbHeIwei nepepa60TK n3JeKTPnuuecknx I 3JeKTPoHNbIX cAteTe. YTuIN3aCiJ IOnJHa npoBOIDtCBsB C COOTBeTCTBn C MeCTbIMn npipOdoOxApaHnteJIbHbIMn IpaBnAmn PO yTuIN3aUu OnTOIOB. 3a 6Olee noPpO6HO uHΦopMaunie N O bpaSeHIO C daHHbIM npi6Opom, eO rYTuIN3aUu i nepepa60Tke o6paTtEcB M CeTbIe OprAhbl Blaactn, B cnJk6y yTuIN3aUuOnTOXoOB uIN B MaarzIN, rDe Bbl npio6peNi daHHbI npi6Op.
C E ΑaHbI npi6op oTbeuaeT Tpe6oBaHnA M EbponeeCKnx InpeKtNB 2006/95/EC, 2004/108/EC n 2011/65/EU.
HOOVER Limited, Pentrebach, Merthyr Tydfil, Mid Glamorgan, CF48 4TU, UK
I03HAKOMbTECb C KOHCTPYKlueB BAUIERO IbJIeCOCA
A. Kopnyc
B. ⅢJanaHr
C RykoTka shaHa r c nTeNei (Дя Acubed Silent Extra, 62 dBa)
C ΙЗOrHyтая руКоЯтka Шанга(Для Acubed Silent, модень 69 ДБа)
D. PerjyIaTOp BcAcbBaHnI*
E. Khonka TeleceKoNueeKoT py6bI**
F. Puyka dans nepenocns
G. CBeToIIOI npOBepK3aOpJIHeHnMeJka
H. KhoNka Bk./BbIKJ.
I. KhoNka KaTyuKn C npOboDom
J. 3KpaH CBeToDnOdHOro DInCnJIeIa*
K. KhoPka peryInpOBKn MOUHOCn*
Bce npHaJnEeKHOCTM mOryT 6bITb yctAHOBJIeHbI Ha pyKOaTke IJIaHra IIN Ha KOHcTe TlneckoNueCKoTpy6bl.
Ha6op npuHaJdIeXHocTei* - CoueTaET B ce6e fynKcunn HeckOJIbKxnpncnOco6JeHn, OTInuAeTcmaKcImaJIbHO rI6KoCTbIO 6laIaOpapra BpaauoUeMycs Kopnycu. JOTrIbBaETcdo HaumHee IOCTyINbIX MeCt 3a Cuet MaHeBpeHHocTI KOpnyca. Hacadka «3 B 1» MoKet aKKypaTHo XpaHHTbcra nO pYkoTkoI ShaHaRa.
UeIeBaHaHacJa* - PpeHa3HaueHa dIy OuHCTKn yrgIOB n TpyHNOOCTynhbx MeCT. [V1]
Me6eJbHnaHa Hacadka* - PpeHa3HaueHa IJn OUcTkn MraKoM Me6eJIn TkaHei. [V2]
UeTka IyaIaIeHn IbIIN* - IpeHa3HaueHa IJyIcSTKn KHNKhbIX NOLOK, paMOK KapTHN, KOMNbIOtePbHbIX KlaBnaIatyp I npOuHX DeJIKAthbIX NOBepxHOCTe. YTo6bl 3aJeIcTBOBaTb UeTkn, HaxMtTe KHONky Ha Kopnyce yCtpoIcTBA. [V3]
HacajkaДЯnapKeTa*-ДяnapKeTHbIX NOLOBиДpyrNIX HAnOJIbHbIX NOKpbITn, Tpe6yUoInx octopoxhoro 6paueHn. [Y]
MmHn Typ6o HacaKa Dnay ydaenHna WepcTn JNWBtBix* - MmHn Typ6o TeKa npedHa3NaeHa dIy ChcTK necTHnC nII nn rny6okO ouncTK nK aHeBbIX NOBepXHOCTe N dpyrnx TpydnoocTyNbIX dIy cNcTK MeC. OcoehHO nOxOuNT dIy ydaJeHna WepcTn JNWBtBix.[W]
MmHn Typ6o HacaKa dny ydaJeHHa anlepreHoB* - NcnoIb3yIte MmHn-Typ6oHaCaKy dnyuCTKn leCTNuc nnn rny60kO oUcTkn TkaHeBbIX NOBepxHOcteN i npYnx CLOXHbIX POKpbTn,OCo6eHHo NOxDxoNDt dny ydaJeHHa anlepreHoB. [X]
BHIMAHHE! 3anpeaetcnaonb3oBaHne MnHnTpy6oHaCaJKn Ha KOBpax C dInHHoB 6axpomoi,Ha shkypax xinBOTbIX n Ha KObpax c BOPcom dInHHee 15 MM.Bo Bpem BpaueHnI 9eTKn He cIeDyET depKaTb HacAdKy 6e3 DeiCTBnI.
TEXHINUeCKOE OBCJNYXUBAHNE IbJIeCOCA
3aMeHa MeuKa Ila c6pa nbIn
Ecni nHdikatop nepenonHeHHa nbIe6OpHka KpaChbI, npOBepbTe coCToHne MeKa, n B clyuae Heo6xOIMOCtN 3aMeHnte erO.
- Повнисту зашику Дерцьдля Meшka, утобь OTKрьть Дерць,notянite за держател MEшka и CHИМITE MaHжET, утобь ChRTь MEшOK. [11,12]
- ПпименITE Лиунчу, Нхаяшюса на.netе мeшka, К BXODHOMY OTBерстю nbilescopнika.Утллзаця пол Horо мeшka дя NBILДdoлжha проньдьсгakkypaTHO и npabinbHo. [13,14]
- CloiKIne HObI MeoK, KaK 3To yKa3aHo Ha HeM, N 3aKePiTe erO nyTem nOmeHnI rOpNoBnHb I DepKaTeIb MeuKa.
*ToIbKO y KOHKpeTHbIX MoJeIeN