NANOSAT SYSTEM - Audio System MIRAGE SPEAKERS - Free user manual and instructions
Find the device manual for free NANOSAT SYSTEM MIRAGE SPEAKERS in PDF.

User questions about NANOSAT SYSTEM MIRAGE SPEAKERS
0 question about this device. Answer the ones you know or ask your own.
Ask a new question about this device
Download the instructions for your Audio System in PDF format for free! Find your manual NANOSAT SYSTEM - MIRAGE SPEAKERS and take your electronic device back in hand. On this page are published all the documents necessary for the use of your device. NANOSAT SYSTEM by MIRAGE SPEAKERS.
USER MANUAL NANOSAT SYSTEM MIRAGE SPEAKERS
Omnipolar Speaker System
owners manual
ENGLISH: Important safety instructions - Read carefully!
Caution: To prevent the risk of electrical shock, match wide blades of plug to wide slot, fully insert.
Read Instructions: All safety and operating instructions should be read before the product is operated.
Retain Instructions: Safety and operating instructions should be retained for future reference.
HeedWarnings: All warnings on the product & operation instructions should be adhered to.
Follow Instructions: All operating and use instructions should be followed.
Cleaning: Unplug the product from the wall before cleaning. Do not use aerosol or liquid cleaners, just a damp cloth.
Attaches: Do not use attachments not recommended by the product manufacturer as they may cause hazards.
Water and Moisture: Do not use this product near water.
Ventilation: Openings in the cabinet are provided for ventilation and to ensure reliable operation and protect it from overheating so they must not be blocked or covered by placing the product on a bed, sofa or other similar surface. This product should not be placed in a built-in installation such as a bookcase or rack unless proper ventilation is provided or the manufacturer's instructions have been adhered to.
Power Sources: This product should be operated only from the type of power source indicated on the marking label. If you are not sure of the type of power supply in your home, call your local power company.
Grounding or Polarization: This product may be equipped with a polarized alternating current line plug. This plug will fit the power outlet in only one way as a safety feature. If you are unable to insert the plug, try reversing it. If the plug should still fail to fit, contact your electrician to replace your outlet. Do not defeat the safety purpose of the plug.
Power Cord Protection: Power supply cords should be routed so that they are not likely to be walked on or pinched by items placed upon or against them, paying particular attention to cords at plugs, convenience receptacles and the point where they exit from the product.
Overloading: Do not overload wall outlets or extension cords, as this can result in a risk of electrical shock.
Object and Liquid Entry: Never push objects of any kind into this product through openings as they may touch dangerous voltage points or short out parts that can result in a fire or electrical shock. Never spill liquid of any kind on the product.
Servicing: Do not attempt to service this product yourself as openings or removing covers may expose you to dangerous voltage or other hazards. Refer all servicing to qualified personnel.
Heat: This product should be situated away from heat sources such as radiators, heat registers, stoves, or other appliances (including amplifiers) that produce heat.
Non-Use Periods: The power cord of the product should be unplugged from the outlet when left unused for a long period of time.
Damage Requiring Service: The product should be serviced by qualified personnel when:
A. The power supply cord or the plug has been damaged; or
B. Objects have fallen, or liquid has been spilled into the appliance; or
C. The product has been exposed to rain; or
D. The appliance does not appear to operate normally or exhibits a marked change in performance; or
E. Product has been dropped, or the enclosure damaged.
F. If the product does not operate normally by following the operating instructions.
Please take the time to read all of the instructions contained in this manual to make certain your system is properly installed and functioning correctly. Please retain the carton and packing materials for this MIRAGE product to protect it in the event it ever has to be shipped to a service center for repairs. Product received damaged by a service center that has been shipped by an end user in anything other than the original packaging will be repaired, refurbished, and properly packaged for return shipment at the end user's expense.
INTRODUCTION
We are proud to welcome you as a new owner of a MIRAGE speaker. The finest components and materials are manufactured to exacting standards and tested with sophisticated manufacturing and quality control techniques to ensure exceptional performance that is superior to systems costing several times their price. This approach to the development of the MIRAGE system has resulted in a significant improvement over other system designs in terms of performance and aesthetics.
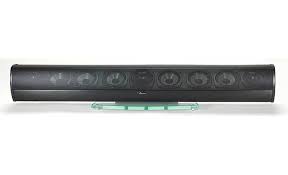
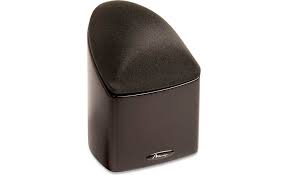
THE NANOSAT SYSTEM
The main goal of this series was to provide a product with the most natural, accurate performance and seamless, home theater blending. This was accomplished by using MIRAGE's proprietary OMNIPOLAR technology in 5 identical satellites. OMNIPOLAR technology produces the same amount of direct and reflected sound as live events for the most realistic experience of either music or home theater. Five identical satellites for the front, center and surround channels guarantee the same tonal and timbre characteristics to further enhance the life-like, OMNIPOLAR experience.
WHAT EXACTLY IS OMNIPOLAR?
OMNIPOLAR technology uses natural room reflections to create a greater sense of realism. This realism is accomplished by recreating the same ratio of direct to reflected sound found in nature, 70% reflected and 30% direct. A traditional speaker can only produce 30% reflected sound. It is the required additional reflected sound provided by an OMNIPOLAR speaker that creates the OMNIPOLAR three-dimensional sound experience.
QUICK SET-UP GUIDE
Recommended Connection for Dolby Digital/DTS/Dolby Prologic II Systems
- Arrange the 5 NANOSATs and NANOSUB in a Home Theater configuration: Use one NANOSAT for the left, center, right, rear left and rear right channels and one NANOSUB. See Diagram 4 and 5
- Connect all five satellites with speaker wire to their respective speaker outputs in back of the amplifier/receiver. Be sure to respect the polarity of the wire. Connect the speaker wire from the positive (RED+) terminal on the receiver/amplifier to the positive (RED+) terminal on the satellite. Connect the negative (BLACK-) terminal on the receiver/ amplifier to the negative (BLACK-) terminal on the satellite. See Diagram 1
- Connect the subwoofer from the Subwoofer Output on the back of the A/V Receiver or processor to the input on the subwoofer. See Diagram 6. Note: if your A/V Receiver is not equipped with a Subwoofer Output, run an additional set of speaker wires from your A/V receiver's Left and Right Front speaker outputs to the High Level Inputs on the back of the subwoofer. See Diagram 6
-
MIRAGE suggests using the Small setting in the bass management set-up of your Dolby Digital system for all speakers.
-
MIRAGE suggests setting the bass management crossover of your A/V Receiver or processor to 120Hz . (Or as close to 120Hz as possible). If your A/V Receiver or processor does not have a variable crossover, please proceed to the next step.
-
Balance the sound output of the speakers by using the pink noise test pattern generated by your A/V Receiver or processor, adjusting the system so all speakers produce the same output level.
- When setting your subwoofer level, be sure that the setting on your A/V Receiver or processor remains as close to flat as possible. Boosting or cutting the subwoofer output on your A/V Receiver or processor may produce poor sound quality. Instead, use volume control on the back of the NANOSUB for fine tuning. You are now ready to enjoy your MIRAGE NANOSAT System.
IN-DEPTH INSTRUCTIONS
CONNECTIONS
Stand Mount Options
This series provides a large choice of installation options to integrate into any decor. The bottom of the NANOSAT is designed to clip onto the optional MS-STB-1 stand. Please refer to the MS-STB-1 owners' manual for more detailed instructions.
Wall Mount Options
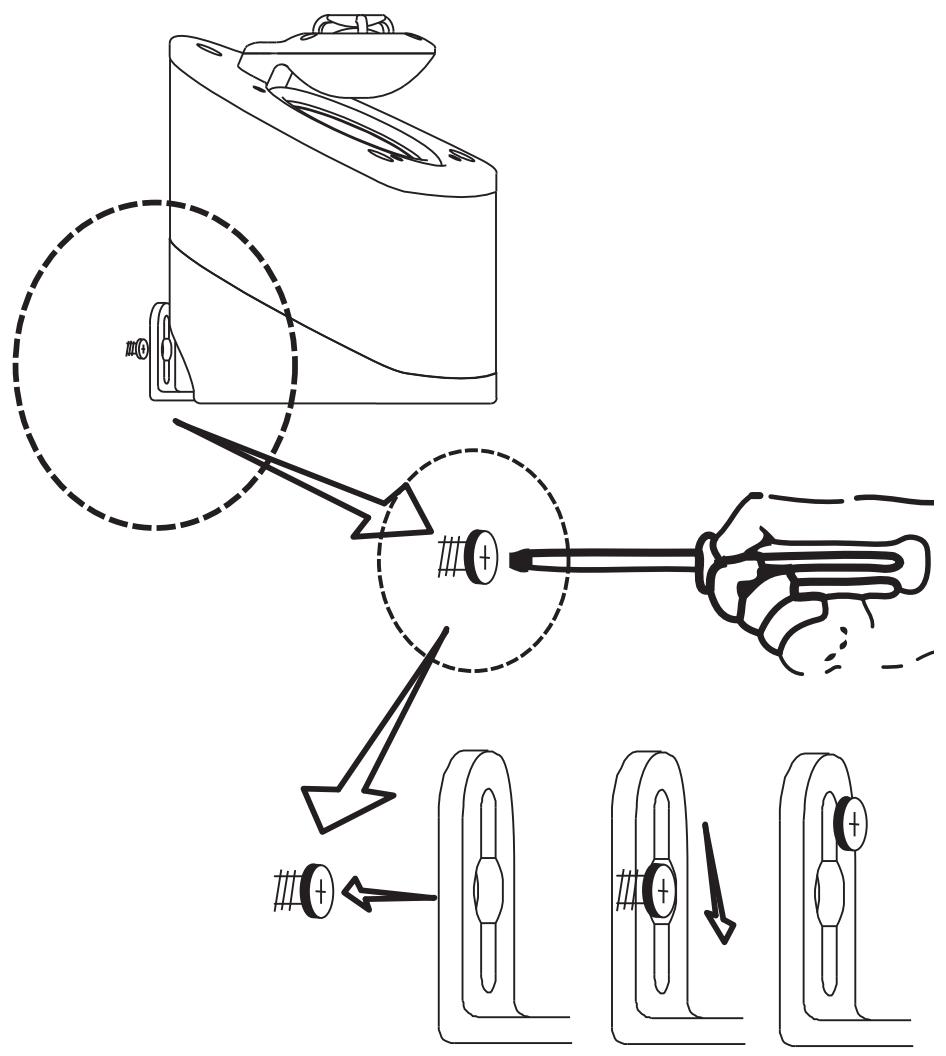
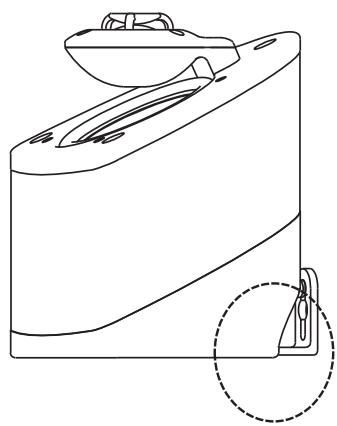
For wall mount installations, the NANOSAT is equipped with a mounting bracket that can be used to mount the speaker securely to a vertical surface. The bracket is shipped already attached to the speaker.
Carefully drive a #8 screw into a stud in the wall, leaving approximately 14 inch of the screw exposed, then mount the NANOSAT like you would a picture. Note: Failure to attach the screw safely to a secure spot on the wall can result in damage or injury. See Diagram 2.
When mounting the speaker at a height of under six feet, orient the NANOSAT in an upright position. Slide the head of the screw into the wide portion of the channel opening and slide the NANOSAT downward until it sits in position. See Diagrams 2, 3
When mounting the speaker at a height of over six feet, orient the NANOSAT in an upside down position so the grill is facing the floor and use the bottom key-way channel. Slide the head of the screw into the wide portion of the channel opening and slide the NANOSAT downward until it sits in position. See Diagrams 2, 3
The speaker can also be angled by slightly loosening the screw on the bottom of the NANOSAT and swiveling the speaker into the desired position.
SPEAKER PLACEMENT
The MIRAGE NANOSAT System has been designed for high performance in a wide variety of settings, but here are a few helpful hints that will help to maximize performance and your enjoyment.
Left and Right Channels
A general guideline for speaker placement is to set up the space between speaker and listener at approximately 1.5 times the distance between the speakers. For example, if the speakers were ideally placed a minimum of 6 feet apart, the best seating position would be 9 feet away. Ideal height would position the speaker at approximately ear level when the listener is in a seated position. This can be accomplished by using the recommended optional MS-STB-1 stand.
Center Channel
A center channel can be expected to reproduce as much as 60% of a movie's soundtrack, most of which is dialogue. In order to maintain the effect of voices emanating from the actor's mouth, the NANOSAT being used as the center channel should be centrally located between the left and right NANOSAT and be placed above or below the television.
Surround Channel
When using the NANOSAT as a surround speaker it should be positioned adjacent to and slightly in front or behind the primary listening area. A general guideline for the recommended height would be approximately 6 feet.
Bookshelf/Entertainment Unit Placement
The small size and OMNIPOLAR dispersion of the versatile NANOSAT permits them to be easily placed, among other places, in a bookshelf. If this is your preferred placement, affix the isolating pads provided to the bottom of the speaker to help isolate the speaker from the shelf and eliminate any transference of resonance. To maximize the OMNIPO-LAR dispersion potential, bring the speaker as close to the front of the cabinet as possible.
The MIRAGE NANOSAT System is equipped with high quality binding posts that permit the use of banana plugs, spades, or a bare wire connection. Connect the speaker wire from the positive (RED+) terminal on the amp to the positive (RED+) terminal on the speaker. Connect the negative (BLACK-) terminal on the amplifier to the negative (BLACK-) terminal on the speaker. See Diagram 1
NANOSUB
Placement
Start off by placing the subwoofer near a corner in the front of the room. This will produce maximum bass output. By moving the subwoofer away from the corner you will eventually find the position that yields maximum bass output without "boominess". Note: it is important to leave approximately 4 inches (10cm) of clearance between the subwoofer and walls or room furnishings.
Connections
- If you are using a digital receiver, connect the subwoofer from the receiver subwoofer preamplifier output to the subwoofer RCA input, with a male to male RCA cable.
- If your receiver does not have an RCA output, connect the speaker wire from the front left and right outputs to the corresponding left and right inputs on the subwoofer, paying particular attention to make sure that the polarities are maintained. Ensure Red (+) to Red and Black (-) to Black connections are maintained.
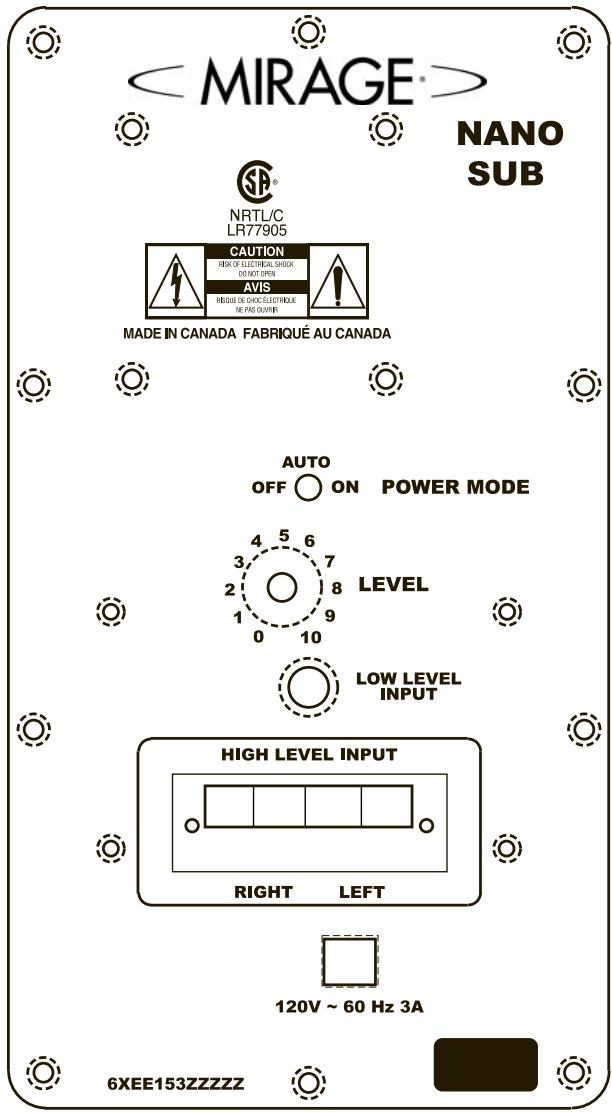
Power Mode
The NANOSUB is equipped with a master power switch which must be engaged prior to use. If the subwoofer will not be in use for extended periods of time, simply select the master power switch "off" position. Next select the position of the Power Mode switch that is located on the back panel of the subwoofer. There are 3 possible modes that the subwoofer can be operated in:
- OFF- Turns Subwoofer Power OFF. The Subwoofer will not operate in this mode. Use this mode if the Subwoofer is inactive for short periods of time. If the subwoofer will not be in use for extended periods of time, unplug the AC cord from the wall receptacle.
- Auto- In this mode the Subwoofer turns ON in the presence of an audio signal then turns OFF with a delay when the audio signal disappears. The indicator light on the front of the subwoofer will specify whether the subwoofer is in standby mode (Glows Red) or in Operational mode (Glows Green). This is the recommended mode for general operation.
- ON- the Subwoofer remains in the operational mode and will not shut off when the audio signal disappears. This position is useful when watching television or satellite TV where low frequency information is not as robust as CD's or DVD's. The Indicator light will permanently glow green in this mode.
WARRANTY OUTSIDE OF THE UNITED STATES
Outside of North America, the warranty may be changed to comply with local regulations. Ask your local MIRAGE dealer for details of the LIMITED WARRANTY applicable in your country.
WARRANTY FOR THE UNITED STATES AND CANADA
Please see the warranty document on the back cover.

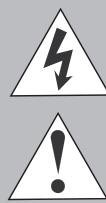
The lightning flash with arrowhead symbol within an equilateral triangle is intended to alert the user to the presence of uninsulated "dangerous voltage" within the products enclosure that may be of sufficient magnitude to constitute a risk of electric shock to persons.
The exclamation point within an equilateral triangle is intended to alert the user to the presence of important operating and maintenance (servicing) instructions in the literature accompanying the appliance.
SNELLE SET-UP HANDLEIDING
GARANTIE BUITEN DEVS:
KpaTkoe PyKOBoIcTBo IJIa YcTHOBKn
PekomehoBauHnoe CoeHHenne TJIa ChCTem BuiHH BHHIIIEpIi-BEBliBuiHH 3KuDnHnC
- B ΑΟΜΑΙΗΜΕ Εατηγεύθουνι Κοῦς Φρυμαιήν 5 NANOSATs H NANOSUB HΠΟλβεύτη Μόπην NANOSAT ΑΓΑ ΜενόΟ, ΠραΒΟ Θ Αδησεν έραβος Μακαλοβον Μ Μίουννι NANOSUB. ΠοςΜΟτρητε ΒιναρμΜβι 4 Ι 5.
- CoeHHHTe BCE 5 caTeJIINT IIOceIcTBOM IIPOBOJa DINHAMKa c COOTBeTCTBYIOUMN HMBbIXOJOM DINHAMKa Ha 3aJHHei CTOPoHe yUHJIHTeJIi IIpHEMHNka. Y6eIHNTecB B COOTBeTCTBHN IOJIARPHOCTH IIPOBOIOB. CoeHHHTe IIPOBOJ DINHAMKa OT IIOJOXHtEJIbHOro (KPACHbIIN0 TepMHHaJa Ha IIpHEMHNKei ycHlHTeJIe K IOIOJXHtEJIbHOMy (KPA-CHbIIN3) TepMHHaNy Ha caTeJIHnTe. CoeHHHTe OTPNIaTeJIbHbI (YEPHB-) TepMHHaJa Ha IIpHEMHNKei ycHlHTeJIe C oTPNIaTeJIbHBIM (YEPHB-) TepMHHaIOM Ha caTeJIHnTe. IocMOTpHte IHaIgPamMy 1.
3.Полсоелнгte ca6byферг ot BbIXOДа Ca6byфера Ha 3aДий CTROPOH E A/V II pIphEMHHKA IIIN IIpoIeCCOPA K BXOДу Ha ca6byfpepe. IocMOTprnE IIHaRpAMMy 6.Ппмчанne: ecIII BAIII A/V IIpHemHK He Cha6JKeH BbIXOДOM ca6byфера, ИСПОЛБ3YIte ДОПОЛHITeJIbHbI N ha6Op IIPOBOJOB IIHaHIMKa. CoeIHNITe BbIXObl IIpHemHKOB BaIIERo JleBORIO IIpaBOrO IIpePeIHeRo IINHAMKc B cBXODAMN BbICOKOrO YpOBHЯ Ha 3aДий CTROPOH eCa6byfpepa. IIocMOTprnE IIHaRpAMMy 6. - Φирma MIRAGE peKOMeHnyet HcIOJIb3OBAt b MaIyUo yCTaHOBky IIprpeRyIINPOBaHN 6aCob, yCTaHOBJIeHHbIX IJI BCEX IINHaMHKO B BAIIeH Dolby Digital ayINO cnCTeme.
- Φирma MIRAGE peKOMeHnyet yctaHaBJIbBaTb peryJInpOBky 6acob CKIbIIMyK Ha BaIIeM A/V IIpHeMHHKe HIN IIpoIeCCope 120 T9JIH NaCKOJIbKO 3TO BO3MOJHO MaKCHMaJIbHO 6JI3KO K 120 T7). EcJN BaIiΦiM IIpHeMHHKe He HmeeT peryJInpyemoro crossover, IIOKaJIyIcTa, IpejIHTe K cIeIyIOIeMy 3TaIY.
- C6aIaHcHpyTe BbIXoJ 3Byka OT INHaMHKa, HcIOJIb3y MoJeIb TecTa yMepeHHoro IyMa, reHepeHypeMOrO BaIIIM A/V IIpHEMHKOM HII INpoIeCCOPOM, peryIInpyIOUIM ChCTemy. TaKHM o6pa3OM BCE INHaMHKN IIPOdyIuPYIOT OINHaKOBbI yPoBeHb BbIXoJa 3Byka.
- Korga yctaHOBJIeH ypoBeHb aIIero ca6Bvpepa, y6eJIHTcB YTO peryIINPOBaHHe bAIErO A/V IIpHemnka HIn IIOeCCopa ocTaJIOcb
6JIH3KO K MHHHMAJIbHOMy, HACKOJIbKO 3TO BO3MOJHO. IOBbIiEHe He IIN CHNKeHHe NaIIpIgKeHnHa BbIXOe ca6Bypepa BaIIeRo A/V IIpHemHnKa IIN IIpoIeCCOPa MOrYT IIPOUHyIPoBaTb 6eIHbI IIO KaYeCTBy 3ByK. BMeTo 3TOrO IJIa XopoIIeero 3ByuAHn HCIOJIb3yIte KOHTPoJIb 3Byka Ha 3aIHe n CTOpOHe NANOSub. TeIepb BbI rOTOBbl HacJaXdTaBcR BaIIeH AyIHO CnCTeMoH MIRAGE NANOSAT.
Bcectopohnne Hnctpykuni
Bo3MOxHOCtB YcTaHOBKn Ha NpOCTaBKe
AkkyctHuecka cnTeMa IIpeIOctabJIeT OPGOMbI BB6Op HnCTaJIINHOHHbIX ONII INIHNHTerpaIIINB JIO6OM IIN3aIIHe KOMHaTbI. HNXJYacTB NANOSAT cIPOeKTHPOBaTa TAK, YTO6bl KpeIKo IprHKpeJIITbcK cToIke MS-STB-1. KOtopyMOxHO IIpNo6pcTeI IOIOJIHTeJIbHO. IooJaIyIcTa, ObaPHTecb K pyKOBIOCTBy IJI BlaJeJIbIa MS-STB-1 cIeJIbIO IIpyEnHbI 6OJIee IeTaJIbHbIX HNCTpyKIIH.
Bo3MOxHOCTb YcTaHOBKn Ha BepXHei YaCTH CTeHbI
JIINHCTaJIaIHHaBepXHeuactnCTeHbI NANOSAT Ochaiieh CIIeHaJIbHbIM KPOHIITeHOM,KOTOpbM MOKeT HcIOJIb3OBaTBcRdJI63OIIaHORO KpeIIeHnIINHAMiKa K BepTHKaJIbHOIOBEpXHOCTH. KPOHIITeHHoCTaJIbETcyaE IIpIKpeIIeHHbIMK DInHAMKy.
OctopoJHO BkpyTHe 8B CTOnKy CteHbI, OCTaBnB He BkpyEHHbIM IIpMepHO 14 IHua IIIpyIIa. IocJIe 3TOr oYCTAHOBHTe NANOSAT IIpMepHO TaK, KaK IOKa3aHO Ha KapTINHe.IIpMeuHaHHe: HeBepHoe 3aKpeIIJeHne IIIpyIIa B 6e3OJaCHOM MeCTe Ha CtHe MoKeT IIpNBecTHN KIOJIOMKe ChCTeMbI HIN TpaBMe. IIOcMOTpHTe DHaIgPamMy 2.
Korda HnHAMNK IOINHrT Ha BbICOTy 6OJIe 6 cyTOB, paCIOJIOXHTe NANOSAT B BepTKaJIbHOI IO3NIIHN. BBBeINTe rOIOBky IuPyIa B IIHPOKY OaCTb BbIpe3a B KpeIIIEHN H OIIyCTHe NANOSAT HeMHORO BH3 IO Tex Iop IOKa OH He CaiET B ChKCHPBOAHHy IO3NIIHO. IocMOTpHTe IIHaPamMy 2,3. DnHAMNK TaKKe MOKeT 6bITb HAKJOHEH IocpeCTBOM IeRKOro pacIIaTBaIBaHHI IOpyIIa Ha HIXKHe YAcTHN NANOSAT H IOB-Opota DnHAMHKa B Heo6xOINMyIO IO3NIIHO.
PacnoJIOJKeHne IHHaMnka
Akkycntuecka cnctema cepHH MIRAGE NANOSAT cnpoeKtnpoBaHaJIy BbICOKOHO HCIOJIHeHnI pI INHPOKOM MHOROooPa3HH yCTaHOBKn. HAnOMHN TOJbKO HeCKoJIbKO IOJIe3HBIX COBEtOB, KOTOpbIE MOrTy coJeCTBOBaTb MaKChMaJIbHOMY BOCIIpOH3BeJeHHIO 3Byka N BaIIeMy HaClJaXDeHHIO.
JIeBbI IpaBbI KaHaJIbI
TlaBHOe ycIOBHe IJI MEcTOIOIOJOKeHn HINHAMKOB 3OyCTaHOBKa Hx Ha pacCToHHNOT CJIYIIATEJb B 1.5 pa3JaIbIIE, Yem pacCToHHne MeKJy DHHAMHKAMn. HanPmep, cJIn HJeaJIbHOE pacCToHHne MEXJy rPOMK- OROBOpHTeJIaMn MHNHMym 6 feet (183 cm), cJIeIOBaTeJIbHO JUyIIIEe pacIOIOJOKeHHe INHAMKOB OT CJIYIIATEJb 6blIO 6bl 9 feet (274 cm). NIEaJIbHa BAICota pACIOIOJOKeHn IINAMHKa IIpH6JIH3NTeJIbHO Ha ypoBHe yxa, KOrJa CJIYIIATEJb HAXOJIHTC B IIO3NIHN CHJIA. 3To MOKeT 6blt bIOCTHIHYTO IOCepeCTBOM peKOMEHHyEMOH IOIcTAbKN MS-STB-1.
IeHTpaJIbHbI KaHaJI
IpeIIIOJIaRaTeTcA YoIeHTpaJIbHbI KaHaJI BOCIIPOH3BOiHT IpiMHepHO 60% 3ByKOBoI DOpOJKN, 6OJIbIHHCTBO H3 KOToBpIX IHaJIOTn. TTo6bl coXpaHHTb eΦeKt rOIoCA, HNyIeero OTO pTa akTepa, peKOMeHNyETcpaIIOlaRbNANOSAT B IeHTpe IO cepEINHe MeJxJIeBbIM I npaBbIM OMNI dHnHAMKaAMn I pa3MeIaTb cBexpy HIn CHN3y OT TeJIeBH3Opa.
Okpjkaioi KanaI
Korda hnoIb3yeteTaNOSAT kaOKpykaIOIIIN IINHAMIK, OH JOJIKeH 6bITb paioIOJKeH pIOM, HEMHO BIIepeIN HIN C3aIN OCHOBHOrO MeCTa IIPOClyIHHBaHN. JIaBHaI peKOMHeIaIIH COCTOH T TOM, YTO BBICOTA IOJIKA 6bITb IIpHMepHO 6 cyTob.
YcTaHOBka B KnHexHom IIIKafoy HIn Me6eJbHoi CTeHKe
MaIbI pa3Mep H OMNIPOLAR pacceHbaHHe MHorocToPOHrero NANO- SAT IIO3BOJIaTe p3MeCTnTb IX IOCTaTOUHO JIERKO B IIObOM MeCTe, B KHNKHM OIIKaCy. EcIN BbI IIpeIIOuHTaTe PaCIOLOXKHTb DInHAMK B KHNKHM IIkaCy, IIprHKPeITNe IIpeJyCMOTpeHHO H3OJIaHOHHO IIpOKJaIKy K INIKHe YCaTHn DInHAMKa DIA TOrO, YTObI IIOMOYb H3OJIHOBaTa DInHAMK OT IIOLKN H UcTpaHHtB IIO6oe BO3HNKHOBeHne pe3OHaHcA. IJIToro YTO6bI IIOTeHuaJI paCCeHbAHnE Omnipolar 6blI MAKcIMaJIbHbIM, IIoCTaBBte INHaMHK KaK MoKHO 6JIHXe K IpepeHne IaCTH IIkaFa.
CoeHHn
IIHAMHKcepHHMIRAGE NANOSAT Cha6XeHb BnHTOBbIM KJIeMMaMH BbICOK- OKaueCTBa,KOTOpbIe IO3BOJIAHO NcIOJIb3OBAtB COeINHeHHe TIIa 6aHaH,IIayK, a TaKxHe HEN3OJIInPOBaAHoe CoeINHeHne. IIOCoEINHeHne IPOBOJ IIHNAMKa OT IOLOXHTeJIbHOrTOpeMHHaJa Ha ycJIInTeJe (KpaCHbI +) KIOLOXHTeJIbHOMy tepMHHaJy Ha IIHNAMKe (KpaCHbI +). CoeINHHTe OTPHIaTEJIbHbI TepMHHaJI (UepHbI - ) Ha ycJIInTeJe c HeRaTHBbIM TepMHHaJIOM (UepHbI - ) Ha IIHNAMKe. IocMToPHTe IIHaPamMy 1
NANOSUB
PacnoJIOJKeHne
HaunHe c pacIOIOJIOKeHnca6bByepa OKIOI yJIa B IpeEINHe qACTN KOMHaTb. 3TO IO3BOJInI pOdyuipOBaTB MaKcHMaJIbHb BIxOJd bAcob. IocpeCTBOM IpeMeJeHnca6bByepa OT yJIa KOMHaTb, Bbl CMOKeTe HAIIT NIO3HIIHO, B KOTopoB 6acbIb6yUT 3bYBaTHb MaKcHMaJIbHo, HO 6e3 rJIKoCTH. IIpMueHaHne: OyeHb BaXHO OCTaHbI pImeHPO 4 Hnca (10 cm) Iyctoro IpoCTpaHCTBa MeJy ca6bByepom I CTeHAMn HIN Me6JIbHO KOMHaTb.
CoedHHennn
- Ecln Bbl HcNoIb3yeTe IuHpOBoII PInHeMHNK, IIOcOeIHHNte Ca6Byep, IIpHMEnHB Ka6JIb RCA cIbYMaBXoJIIHMN IIITEKepaM, COeIHHTe BbIXoI IIpeI yChJIHTeJIem IIpHeMHNKa6Byepa C BXoJOM RCA ca6Byepa.
- EcIIN IIpHemHnK He HmeeT KCF BbIXOJa, coeIHnHTe IPOBOJ INHaAMnKa OT IpeIHeRo JIeBOrO IIpaBOrO BbIXOIOB K COOTBeTCTByIOHM JIeBOMy I IIpaBOMy BXoAMcABByepa. O6paTHte OocObe BHNMaHne Ha IIOJIrpHOCTb TepMNHaIOB. ByIbTe yBepEhbl, YTO KpacHBII (+) coeIHnEH c KpacHBIM (+) TepMNHaIOM n UepHBII (-) coeIHnEH c UepHBIM (-) TepMNHaIOM.
PekHM MoHocTH
NANOSUB cHa6keH OCHOBHbIM IpeEklOuateJeM MOIOHocTH, KOtOpbI J0JIKeH HcIIb3OBAbTcHpeEJ kCIIyataaHne ca6Byfepa. EcIn ca6Byfep He 6yIeT HcIIb3OBAbTcKakoe-To BpEm, C 3ToM cIyuae Bbl6epHTe OIIHIO "BbIKJIOueHO." PocIe 3TOr BO bI6epHTe IO3HINIOpeEklOyuHnHa PeXHM MoIHocTH, KOTOpbI paCIOJIOKeH Ha 3aHNHe NaHEn ca6Byfepa.CuiectbYeTr pIIO3HINn peXhMa, B KOTOpbIX ca6Byfep moKeT pa6oTaTb:
- BbIKJIOUYEHO -ПовернITEpepyJIATOP moIIOHOCTH ca6ByfepeaВ IO3NIIHNO BbIKJIOUEOHO.Ca6Byfepe He 6yJeT pa6OtaTB B 3OTOM pexHMe.ИспОьЗуITEДАнБи ржим, ecJI Na6Byfep HaxoIHTcB H nepa6Ouem COCTOHHNДЛNTeJIbHbI INepNoI BpeMeHn.
- ABTomaTHueckn pexHM - B 3TOM pexHMe ca6Byepe BKJIOaEcT npHaJIuHn yAHyNO cHTHJaI H bIKJIIOuaET CbkOPM BpeMeHH, KOrJa aYHyO cHTHJaI Ncye-3aEt. CBeT INHikKaTopa Ha nepeHne YacTe Ca6Byeapeyka3bIbaeT, TTo ca6Byepe hAxoJIITCBaPe3EBHmpeXMeN 9CBeITCBKpaCHBn0 IINB O nepaIHOHmpeXHMe 9CBeITCB3eJIeHbI0. 3To peKoMeHdyEmb pexHM IJIaKCIiyataiHH.
3.BKJIIOUYEHO-Ca6byfep HaxoHITcBpa6OeMpeXHMHe HbIKJIOUHTcR, KOrJaHCue3HETaynHO CnHJAL.3TaPi03HnIPOJ3Ha,KorJa CMOTprT TEJEBV3Op HINCaTeJIAPtHOpTeJeBnIDHe,IIHn3KO YAcTOnTHaIHΦOpMaHnHe Tpe6yET TaHKNHEpReTHueCckHN 3atpat KaCD,HINDVD.B 3TOM peXHMe CBet HnDnKaTopA 6yJET NocToHHO CBeHTbC3eJIbHbI.
TAPAHTIA BHE COEINHEHHbIX IIIATOB
BHe CeBepHOJ AmePHKJ, rapaHTHJ MOKeT 6bIb H3MeHeHa, YTO6bI COOTBeTCTBOBaTb MeCTbIM 3aOKaHM. O6paTHTeCb K BAIeMMy MeCTHOMy IJIepey fHPMbI MIRAGE OTHOcHTeJIbHO JeTaJIbHO HnΦOpMaunn IO OTPAHNUEHNIO ΓAPAHTNBI B aIIeN cTpaHE.
TAPAHTNYIJIACOEDINHEHHbIX IITATOBNIKAHAdbI
Iopkaanycta, IocmOpnte rapaHTHbI JOKyMeHT Ha opaTHoCTopoHe.
Mngaioi CBeTnHc3NaUOK co cTeJIKO-MOIHNHe BHTprpabHocToOpHoro TpeyOIBNkpeIINAHnIeTO, YTObI pIeynPeIITbIOB3oBaTeIa6 OAnOchToHnENoCpeCTBEHNb 6JIO3nc HEnZOHLIOPAHOHoro OAnCHORo HAnPjKeHnI [BHTprn 3AMKHyTOrpoCTpaHCTBA Ipn6oba] 3To HApJKeHneMoKt b6bIb DoctatoOnHOBeINuHbYTObCo3JaBaTb yRpy03JIeKTPueKcOro UyapaI JIOJeI.
BockJIHnIaTeJIbHbI 3Nak BHyTp nPabHocToPOHrero TpeYroJIbHnKa IpeJHa3- Haueh JIeTO, YTOb6I IpeJyIpeNTbIOJIbSOBaTeJIa O HAJINuBnBAKbHIX HnCTpyKUnH, KacaIOIIxOcOMToPa, TeKyuIero pEmoHTa NTexHHueCOKO O6CbJIKBaHnA IIpHi6Opa, ONiCaHNbH b Eero cOpBoOJIteJIbHbIX kOkyMeHtax.

SPEAKER SWIVELS ON BRACKET BY
LOOSENING SCREW ON BOTTOM
OF CABINET
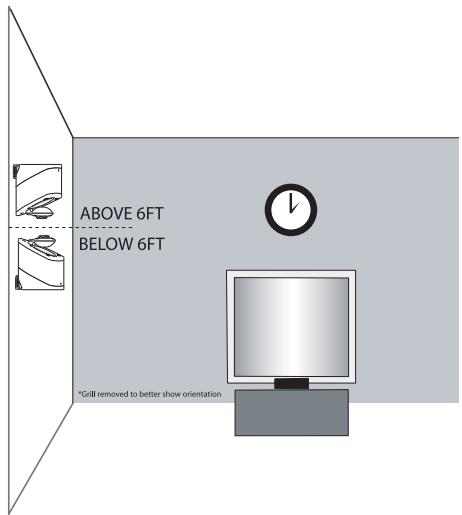
Diagram 3
Diagram 6
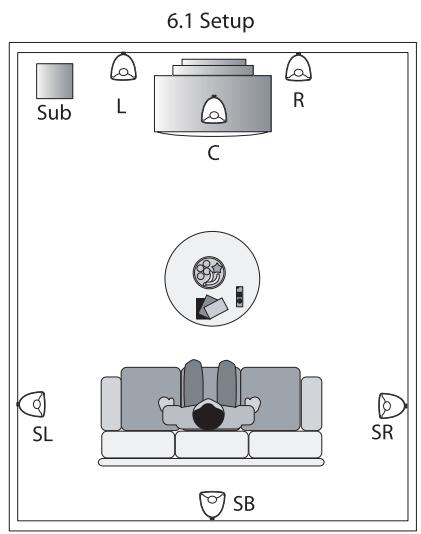
Diagram 4
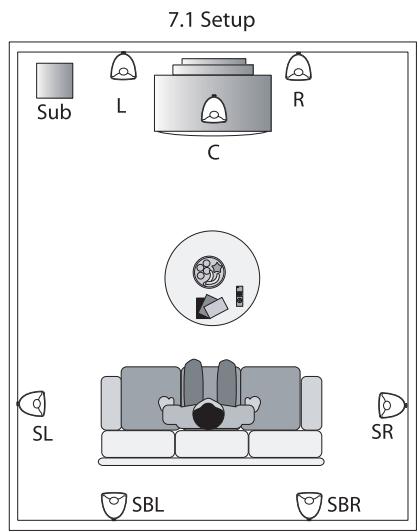
Diagram 5

LIMITED WARRANTY POLICY
IN THE UNITED STATES AND CANADA
MIRAGE warrants this product to the retail purchaser against any failure resulting from original manufacturing defects in work-manship or materials.
The warranty is in effect for a period of:
1) for the Speaker Section, five (5) years, and
2) for the Amplifier Section, one (1) year, from date of purchase by the original owner from an authorized MIRAGE dealer, and is valid only if the original dated bill of sale is presented when service is required. The warranty does not cover damage caused during shipment, by accident, misuse, abuse, neglect, unauthorized product modification, failure to follow the instructions outlined in the owner's manual, failure to perform routine maintenance, damage resulting from unauthorized repairs or claims based upon misrepresentations of the warranty by the seller.
WARRANTY SERVICE
If you require service for your MIRAGE speaker(s) at any time during the warranty period, please contact:
1) the dealer from whom you purchased the product(s),
2) MIRAGE, a division of Klipsch Group Inc. 3502 Woodview Trace, Indianapolis, IN 46268 Tel: 866-428-2122
3) Additional service centers can be found by checking the MIRAGE website: www.miragespeakers.com or, by calling the above number. You will be responsible for transporting the speakers in adequate packaging to protect them from damage in transit and for the shipping costs to an authorized MIRAGE service center or to MIRAGE. The MIRAGE Warranty is limited to repair or replacement of MIRAGE products. It does not cover any incidental or consequential damage of any kind. If the provisions in any advertisement, packing cartons or literature differ from those specified in this warranty, the terms of the Limited Warranty prevail.