
M80 - Audio Amplifier MERIDIAN - Free user manual and instructions
Find the device manual for free M80 MERIDIAN in PDF.

User questions about M80 MERIDIAN
0 question about this device. Answer the ones you know or ask your own.
Ask a new question about this device
Download the instructions for your Audio Amplifier in PDF format for free! Find your manual M80 - MERIDIAN and take your electronic device back in hand. On this page are published all the documents necessary for the use of your device. M80 by MERIDIAN.
USER MANUAL M80 MERIDIAN
Important safety instructions
- Read these instructions.
- Keep these instructions.
Heed all warnings. - Follow all instructions.
- Do not use this apparatus near water.
- Clean only with dry cloth.
- Do not block any ventilation openings. Install in accordance with the manufacturer's instructions.
- Do not install near any heat sources such as radiators, heat registers, stoves, or other apparatus (including amplifiers) that produce heat.
- (North America) Do not defeat the safety purpose of the polarized or grounding-type plug. A polarized plug has two blades with one wider than the other. A grounding type plug has two blades and a third grounding prong. The wide blade, or the third prong are provided for your safety. If the provided plug does not fit your outlet, consult an electrician for replacement of the obsolete outlet.
- Protect the power cord from being walked on or pinched particularly at plugs, convenience receptacles, and at the point they exit from the apparatus.
- Only use attachments/accessories specified by the manufacturer.
- Use only with the cart, stand, tripod, bracket, or table specified by the manufacturer, or sold with the apparatus. When a cart is used, use caution when moving the cart/apparatus combination to avoid injury from tip-over.
- Unplug the apparatus during lightning storms or when unused for long periods of time.
Refer all servicing to qualified service personnel. Servicing is required when
the apparatus has been damaged in any way, such as power-supply cord or plug is damaged, liquid has been spilled or objects have fallen in to the apparatus, the apparatus has been exposed to rain or moisture, does not operate normally, or has been dropped.
- Do not expose the product to dripping or splashing.
- Do not place any object filled with liquid, such as a vase, on the product.
- Do not place naked flame sources, such as lighted candles, on the product.
- Do not expose batteries (battery pack or batteries installed) to excessive heat such as sunshine, fire or the like.
To avoid interference
Do not position the product:
- Near strong magnetic radiation, such as near a power amplifier.
- Near to a television, or where connecting cables may be subject to or cause interference.
WARNING: TO REDUCE THE RISK OF FIRE OR ELECTRIC SHOCK, DO NOT EXPOSE THIS APPARATUS TO RAIN OR MOISTURE
This apparatus has been designed with Class 1 construction and must be connected to a mains socket outlet with a protective earthing connection (the third grounding pin).
This apparatus has no on/off switch. To disconnect this apparatus from power, you must disconnect the power cord. Make sure the power cord is always easily accessible.
To avoid overheating
- Leave at least 10cm around the equipment to ensure sufficient ventilation.
Do not position the product:
- In direct sunlight.
- Near heat sources, such as a radiator.
- Directly on top of heat producing equipment, such as a power amplifier.
- On a soft surface, such as a carpet, which would obstruct the ventilation holes in the base.
The product normally runs warm to the touch.
Remote control safety instructions.
- Never drop the remote control or expose it to moisture.
- If the remote control will not be used for a long time, please remove the batteries.
- Use the batteries correctly to avoid possible leakage and corrosion. Do not leave the batteries exposed to direct sunlight or high temperature environment. Do not heat or expose to flame. Do not mix old and new batteries.
- Do not use batteries of different types at the same time. Do not attempt to recharge the batteries.
- In case battery leakage occurs, do not touch the liquid with bare hands. Wipe out any liquid inside the battery compartment, and insert new batteries.
i80 compatibility
The i80 is fully compatible with the iPod Mini, iPod Nano, iPod Classic, and iTouch.
It may also be usable with the iPhone; when connecting select Airplane Mode to avoid incoming calls and messages interrupting the audio.
FCC Information (USA)
CAUTION:
Changes or modifications not approved by Meridian could void the user's authority to operate the equipment.
FCC Warning
This equipment generates and can radiate radio frequency energy and if not installed and used correctly in accordance with our instructions may cause interference to radio communications or radio and television reception. It has been type-tested and complies with the limits set out in Subpart J, Part 15 of FCC rules for a Class B computing device. These limits are intended to provide reasonable protection against such interference in home installations. However, there is no guarantee that interference will not occur in a particular installation. If this equipment does cause harmful interference to radio or television reception, which can be determined by turning the equipment off and on, the user is encouraged to try to correct the interference by one or more of the following measures:
- Reorient or relocate the receiving antenna.
- Increase the separation between the equipment.
- Connect the equipment into an outlet on a circuit different from that to which the receiver is connected.
- Consult the dealer or an experienced radio/TV technician for help.
Acknowledgements
BoothroydlStuart Meridian, Meridian, and Meridian Digital Theatre are registered trademarks of Meridian Audio Ltd.
Dolby and the double-D symbol are trademarks of Dolby Laboratories.
iPhone and iPod are trade marks or registered trade marks of Apple Inc.
The product incorporates FreeRTOS Version v3.0.0 under the terms and conditions of the GNU General Public License at:
http://www.freertos.org/a00114.html
DOLBY: Manufactured under license from Dolby Laboratories.
MACROVISION: This product incorporates copyright protection technology that is protected by method claims of certain U.S. patents and other intellectual property rights owned by Macrovision Corporation and other rights owners. Use of this copyright protection technology must be authorised by Macrovision Corporation, and is intended for home and other limited viewing uses only unless otherwise authorised by Macrovision Corporation. Reverse engineering or disassembly is prohibited.
Copyright
Copyright © 2007-2010 Meridian Audio Ltd
Meridian Audio Ltd
Latham Road
Huntingdon
Cambridgeshire
PE29 6YE, England
See: http://www. meridian-audio.com/
Part no: M80/1 (P85626)
Designed and manufactured in the UK by Meridian Audio Ltd. Meridian Audio reserves the right to make changes and improvements to any of the products described in this document without prior notice.
This guide was produced by: Human-Computer Interface Ltd, http://www.interface.co.uk/
Welcome to the M80 Compact Entertainment System
This section explains how to set up your product in six simple steps.
1 Unpack the product
Your M80 is supplied with the following components:
Power cord.
Rod antenna.
- DAB-optimised coil antenna.
Wire antenna.
- Remote control.
- Meridian i80 iPod Dock.
i80 iPod Dock cable.
- This User Guide.
If any of these items are missing please contact your supplier.
We recommend you retain the packaging in case you need to transport the unit at a later date.
Before you begin
Before you begin installation you should ensure that your product is set to the correct voltage for your local supply, as indicated by the label on the back panel next to the power input.
If it is not, do not try to use the unit, and contact your dealer.
2 Position the product
Although you can position your product almost anywhere convenient, for best results bear the following considerations in mind:
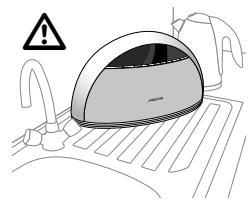
Avoid wet locations
The product is an electrical appliance, and so should not be positioned in a location where it may get splashed or wet, such as in a bathroom or on a kitchen sideboard.
Avoid direct sunlight or carpets
The product includes a powerful amplifier, which needs adequate ventilation. Avoid positioning the product in direct sunlight, such as in a window, or on a pile carpet.
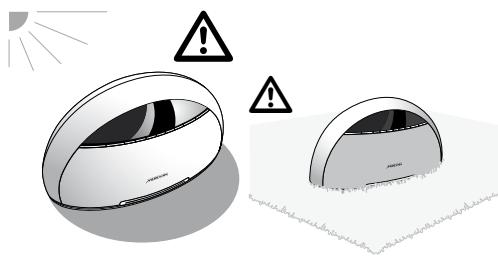
If the product overheats, protection circuits switch it off until it has cooled down.
3 Connect an antenna
The product includes an internal antenna, and in areas of strong reception this will be sufficient to receive a good signal on the DAB and FM bands.
If you do not achieve good results with the internal antenna, you may use one of the external antennas supplied, or connect another suitable external (eg cable or outdoor) antenna, as follows:
Telescopic rod antenna
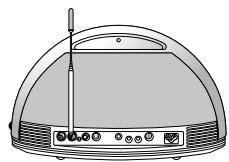
The telescopic antenna provides very good reception for FM, AM, and DAB.
- Attach the rod antenna to the socket marked Ant. 1.
- Extend it to its full extent.
Wire antenna
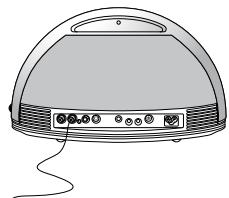
If you prefer not to have the antenna visible, the wire antenna can be draped behind furniture, or run up a wall.
The wire antenna provides very good reception for FM, AM, and DAB, but experiment with the lay of the wire to get the best signal strength.
- Attach the wire antenna to the socket marked Ant. 1
DAB-optimised coil antenna
A UK DAB-optimised coil antenna may be included.
- Attach the antenna to the socket marked Ant. 1.
Cable or external antenna
In difficult reception areas (eg some high-rise or shielded buildings) it may be necessary or preferable to connect an external antenna, or a radio feed provided by a Cable supplier or in the building infrastructure.
- Attach the antenna cable to the socket marked Ant. 1.
Change the antenna setting
If you have fitted an external antenna, you need to change the antenna setting for the band you want to use; see To set up the antennas, page 15.
Note: In some circumstances you may want to use more than one external antenna to get the best reception on two or three bands. Meridian provides an FAQ on this subject on their website:
http://www. meridian-audio.com/apps/ant80.htm
4 Connect power
- Plug one end of the power cord supplied with the product into the power connector on the back panel.
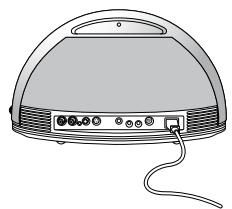
- Connect the other end to a wall socket.
5 Listen to the radio
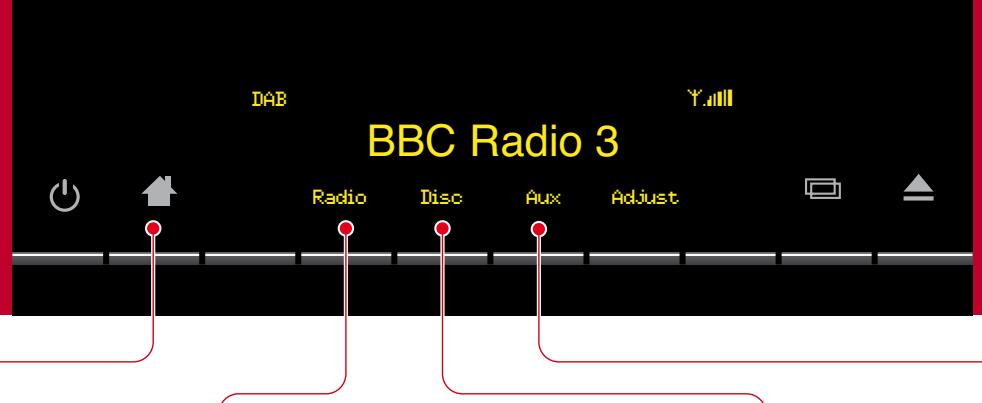
- Press the Home key, marked
The Home menu will be displayed:

- Press the key labelled Radio.
- Press the key labelled Band to select the waveband.
If you select the DAB band (where available) you will be prompted to scan for stations:

- Press followed by Scan to scan for stations.
The radio will then tune to the first station found.
- Press followed by Station or to select a station:

- Adjust the volume by turning the knob to the right of the product, or mute the sound by pressing the knob.
6 Play a CD
- Press the Home key, marked .
The Home menu will be displayed:

- Press the key labelled Disc.
- Insert a CD in the slot, label uppermost, and gently push it into the slot until it is drawn into the drive:
The CD will start playing automatically.
- Adjust the volume by turning the knob to the right of the product, or mute the sound by pressing the knob.
What next?
For more information about playing audio CDs and DVDs see Playing discs, page 7.
For more information about using the Radio see Listening to the radio, page 9.
For more information about playing music from your iPod see Playing your iPod, page 12.
For information about setting up your product the way you want it see Adjusting the product, page 14.
Displaying the Home keys
You operate your product using the keys below the display. These change function depending on what you're doing, as shown by the labels on the bottom line of the display.
Whatever you're doing, you can always display the Home keys.
Press 1.
The Home keys are available even when the product is in standby.
Selecting the radio
To select the radio
Press Radio.
For more information about using the Radio see Listening to the radio, page 9.
Selecting the disc player
To select the disc player
Press Disc.
For more information about playing audio CDs and DVDs see Playing discs, page 7.
Selecting external inputs
To select an external input
- Press Aux.
You can then select one of the external inputs: Aux 1, Aux 2, i80, or Optical.
Adjusting settings
To adjust the settings
- Press Adjust.
For more information see Adjusting the product, page 14.
Displaying the time
To display the time
- Press the key when the product is in standby to display the time, or time and date.
For information about setting the clock see Adjusting the clock, page 14.
Changing the volume and muting the sound
You can adjust the volume between 0dB and 99dB in precise steps of 1dB, where 9dB is equivalent to doubling the loudness.
To change the volume
- Turn the volume knob to the right of the product.
The display shows the current source and volume setting:

To mute the sound
- Press the volume knob.
The display shows Mute:

To unmute the sound
- Press the volume knob again.
Alternatively the sound is unmuted if you increase the volume.
Setting the alarm
The product includes an accurate alarm clock, which you can use to wake you up in the morning or remind you of an appointment with a tone, or the last radio station you were listening to.
Before using the alarm you should set the clock to the correct time; see Adjusting the clock, page 14.
To set the alarm
- Press 4, Adjust, Clock, Alarm to display the ALARM menu.
- Press Alarm to turn the alarm On.
The Alarm display allows you to set the alarm time:

- Press or to set the hours (24-hour clock).
- Press Next.
In a similar way you can adjust the minutes, choose the source from Radio or Tone, and set the volume.
- At any stage press to return to the CLOCK menu with the settings you have chosen.
To unset the alarm
- Press 4, Adjust, Clock, Alarm to display the ALARM menu.
- Press Alarm to turn the alarm Off.
Operating the product with the remote control
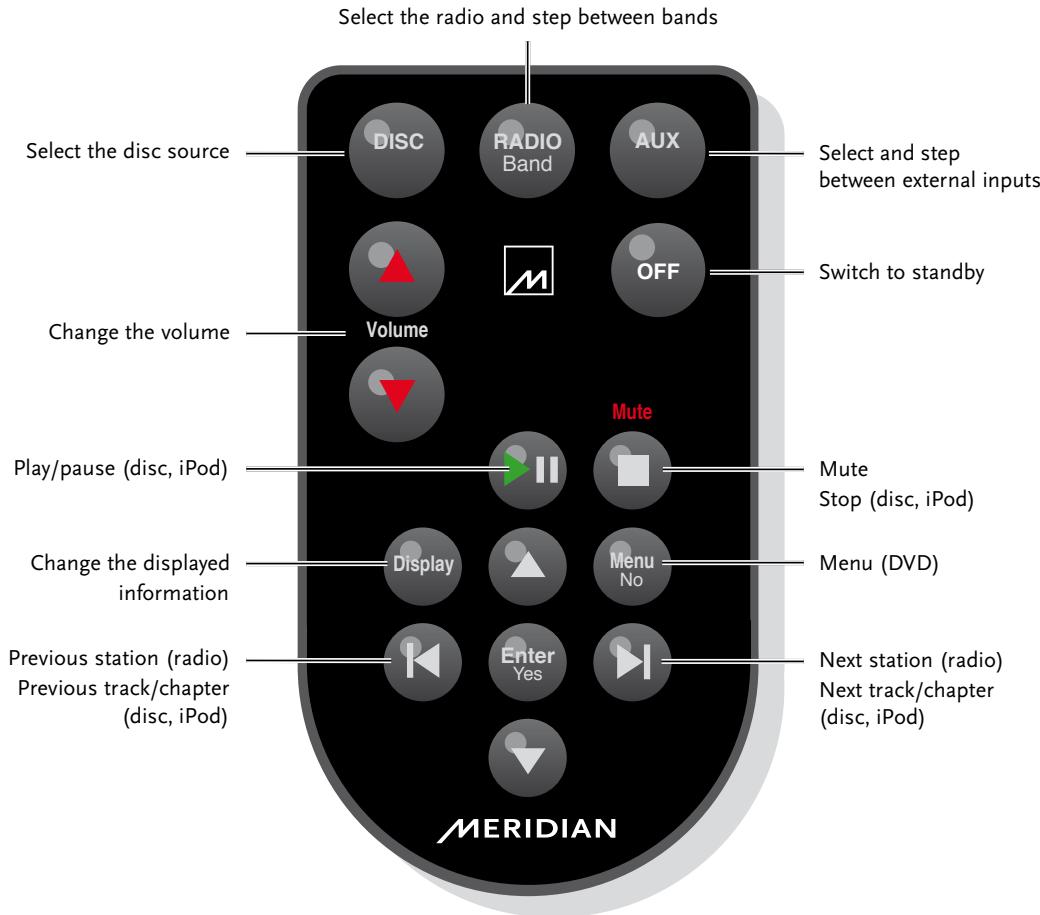
Note: The remote control is supplied with a button cell battery already fitted; pull out the plastic tab to activate the battery.
Playing discs
To see the disc options press followed by Disc.
Playing a disc
The product can play most types of disc, including audio CDs, DVDs, and CD-ROMs containing MP3/WMA files.
To insert a disc
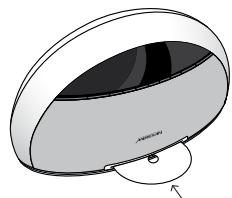
- Insert the disc, label uppermost, into the drive, under the standby light.
The top left of the display shows the type of disc: CD (audio CD), DVD, or MP3/WMA, followed by the bit rate (44.1k or 48k).
To play the disc
Press
Some discs start playing immediately when you insert them.
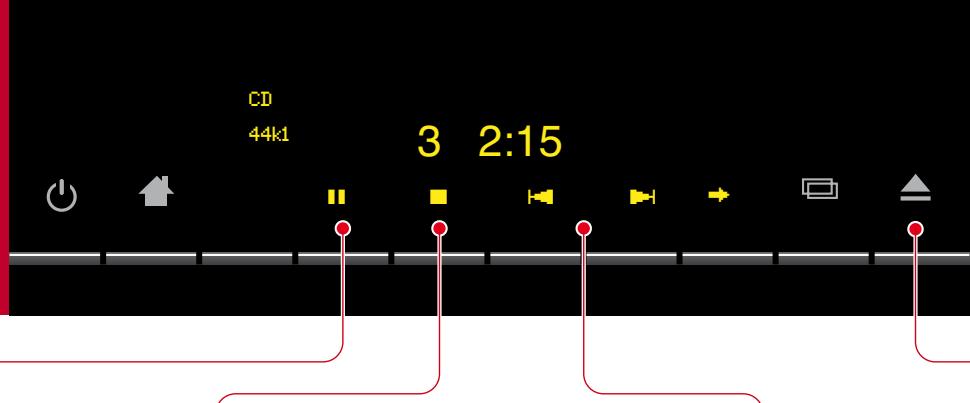
As the disc is playing the display shows the track number (CDs) or chapter number (DVDs), and the elapsed time of the current track (CDs) or whole disc (DVDs).
Pause and stop
When a disc is playing the label changes to
To pause the disc
Press III.
The I label changes to

To resume after pause
Press
To stop the disc
- Press ■.
To resume after stop
Press
The disc will resume playing from the position at which you stopped.
To clear the resume memory
Press twice.
Stepping between tracks
To step to the start of the next track
While the disc is playing:
Press I.
To step to the start of the current track
While the disc is playing:
Press
To select a track
While the disc is playing:
- Press or until the display shows the track number you want to play.
With DVDs these keys step between chapters.
Ejecting the disc
To eject the disc
- Press the key.
You can also eject a disc when another source, such as Radio, is selected.
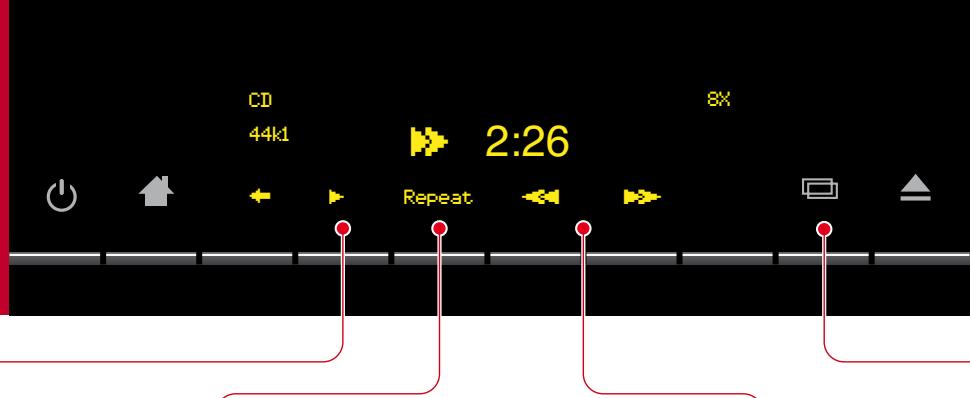
Playing discs
To see the second row of disc options press .
Reverting to normal play
To revert to normal play after scanning
Press
Play resumes from the point you reached.
Repeating a disc
To repeat the current track
- Press Repeat.
The display shows the Repeat Track symbol:

To repeat the disc
- Press Repeat again.
The display shows the Repeat All symbol:

To cancel repeat
- Press Repeat until the repeat indicator disappears.
Scanning through a disc
To scan at faster than normal speed
- Press for reverse or forward.
Each time you press the key the speed steps between 2X, 4X, 8X, 16X, and 32X, as shown at top right of the display.
The display shows or followed by the track time:

- Press to revert to normal play.
Play resumes from the point you reached.
Changing the displayed information
To change the displayed information
- Press the key to step between the following options:
Track number and track time

Track number

Playing DVDs
To see the additional
DVD functions press .
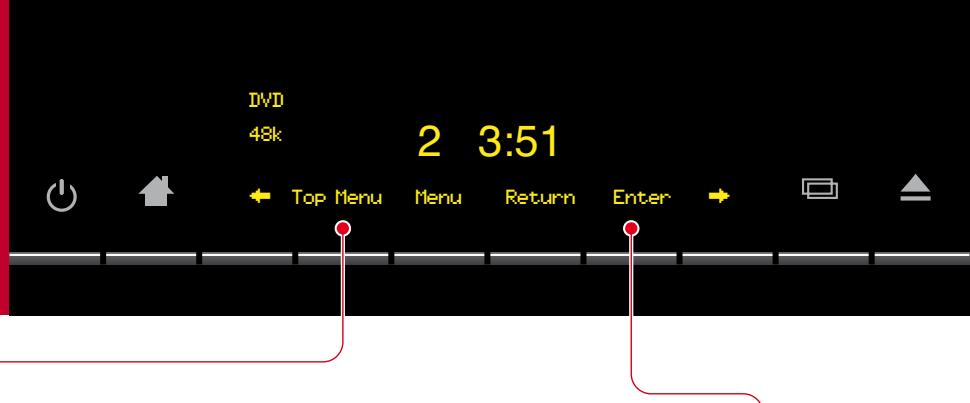
Displaying DVD menus
DVDs generally provide a Top Menu, which provides access to the contents of the disc.
Many DVDs also provide a disc menu, which allows you to select additional sections or special options.
To display the top menu
- Press Top Menu.
To display the disc menu - Press Menu.
Navigating DVD menus
To navigate the DVD menus
- Press to display the menu keys:

- Press , , , or to navigate the menus.
To select a highlighted menu item
- Press to display the Enter key.
- Press Enter.
Selecting items on menus
To select a highlighted menu item
Press Enter.
To return from a menu
- Press Return.
This will exit from the menu without selecting an option.
Changing DVD options
- Press to display the row of functions for changing DVD options:
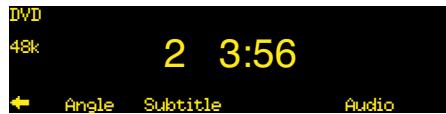
To change the camera angle
- Press Angle while viewing a scene with multiple camera angles.
Each time you press Angle the next camera angle is selected after a short delay.
To change the subtitles
- Press Subtitle.
Each time you press Subtitle the next subtitle language is selected.
To change the audio soundtrack
- Press Audio.
Each time you press Audio the next available soundtrack is selected.
Listening to DAB radio
To see the radio options press Radio.
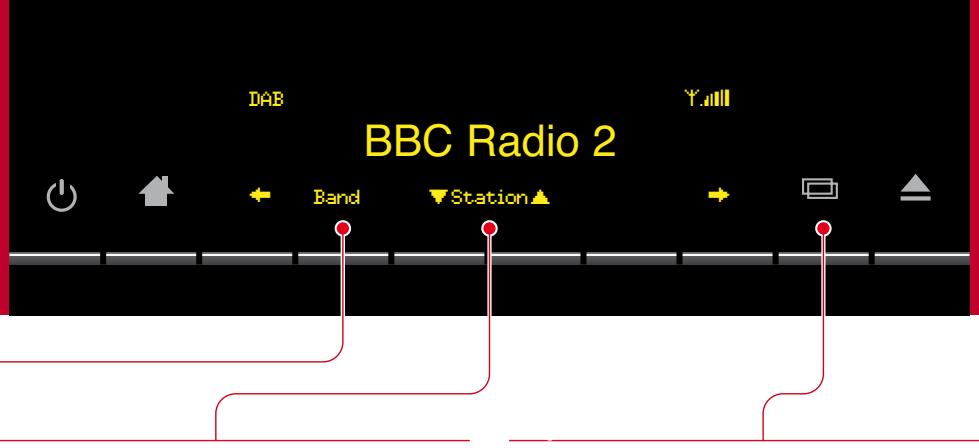
Selecting the band
To select the DAB band
- Press Band until the top left of the display shows DAB.
The radio steps between the wavebands DAB, FM, and AM.
A graphical signal-strength meter is shown at top right of the display. Adjust the antenna for the highest reading.
Note: The DAB band is only available on some models of the product.
Note: Not all radio services may be available in your region. Please check with local broadcasting authorities for more information.
Tuning
To step between stations
- Press Station
On DAB pressing or displays the station names in alphabetical order, and the currently displayed station is selected after a short delay.
Changing the display
To change the DAB information
Press
This steps through the following options:
Normal display

Station name (Long Service Label) and signal strength indicator.
Detailed display
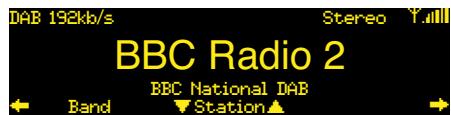
Bit rate (higher is better quality), Stereo/Mono, signal strength indicator, station name, and network or operator name.
Text display

Scrolling information about the programme (Dynamic Label), signal strength indicator, and station name.
Technical display

Information to help you set up an antenna: Ensemble (eg 12B), minimum desired signal-to-noise ratio (eg 230), and actual signal-to-noise ratio of the ensemble (eg 800).
Selecting a preset
When you have defined at least one preset, the preset keys will be displayed first when you select the radio.
To select a preset
- If necessary, press → until the preset names are displayed.
There are four rows of presets.
- Press or to step between rows.
- Press the key corresponding to the station you want to select.
Saving a preset
You can save up to 16 preset stations across all bands so you can select them with a single key press.
Before you have saved any presets the preset keys are labelled 1 to 16:

To save a preset
- Tune to the band and station you want to save.
- Hold down the preset key you want to assign to the station until its label changes to the station name or frequency.
The preset key will be labelled with the name of the station:
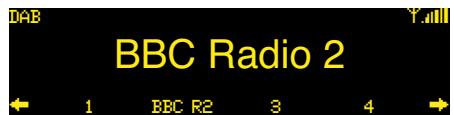
On FM or AM it will be labelled with the frequency if no name is available:

The preset saves the band, frequency, and any audio settings.
Note: If you move location, you will need to resave presets for stations that are on a different frequency in the new location.
Scanning for stations (DAB)
To scan for DAB stations
- Press to display the Scan and Prune options:

Press Scan.
The radio scans for services, and a progress indicator shows the progress of the scan.
To remove inactive services
- Press Prune.
To choose dynamic range control
- Press DRC.
This improves the dynamic range for stations that broadcast dynamic range information.
Listening to FM or AM
The product also provides the FM and AM wavebands.
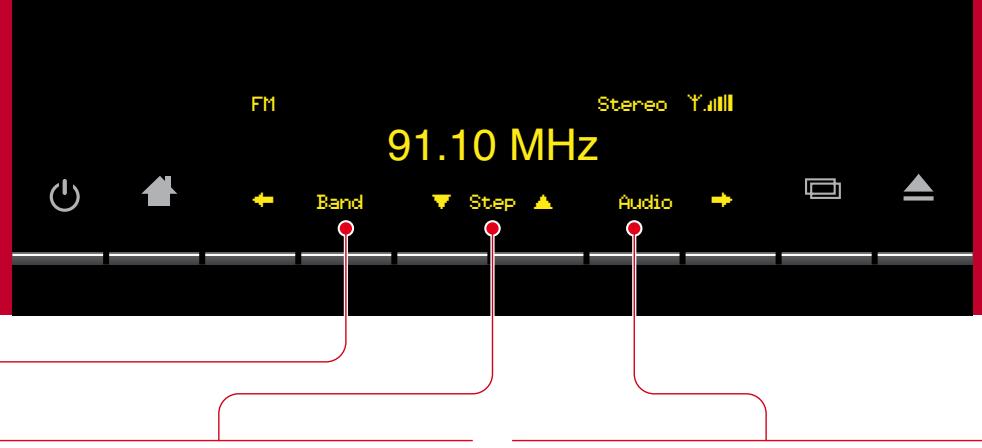
Selecting the band
To select the band
- Press Band until the top left of the display shows FM or AM.
The radio steps between the wavebands DAB, FM, and AM.
On the FM band the product supports RDS (Radio Data System) to display the station name, where available.
Tuning to a station
On FM and AM you have the choice of Tune or Step mode.
Tune mode
- Press Tune or to scan down or up in frequency to the next available station.
Step mode
- Press to display the second row of radio functions.
The and keys change to Step.
- Press Step or to step down or up in frequency
Audio
To change the audio setting
On FM and AM you can change the audio setting for best quality.
- Press to display the second row of radio functions.
- Press Audio to step between the audio options.
The current option is shown at top right of the display.
On FM you can step between Stereo or Mono. Selecting Mono will reduce noise on weak stations.
On AM you can step between Filter Off, Lowpass which removes excess hiss, or Notch which removes 4.5kHz whistle.
Playing your iPod
To see the iPod options press followed by Aux, i80.
Connecting the iPod
The i80 iPod Dock allows you to play the sound from your iPod through the M80. For more information see i80 iPod Dock, page 17.
This section explains how you control the iPod from the M80, using the front panel controls or remote control.
If you prefer to disable iPod control, for example, to view video on the iPod while playing the sound through the product, see To enable/disable iPod control, page 15.
To connect the iPod
- Connect one end of the i80 Dock cable to the connector on the back of the i80 Dock.
- Connect the other end of the cable to the i80 Dock connector on the product.
- Insert the plastic cover supplied with your iPod onto the i80 Dock.
- Mount your iPod on the i80 Dock.
- Select the i80 source by pressing followed by Aux, i80.
After a delay of up to five seconds the iPod displays a message showing that it is connected.
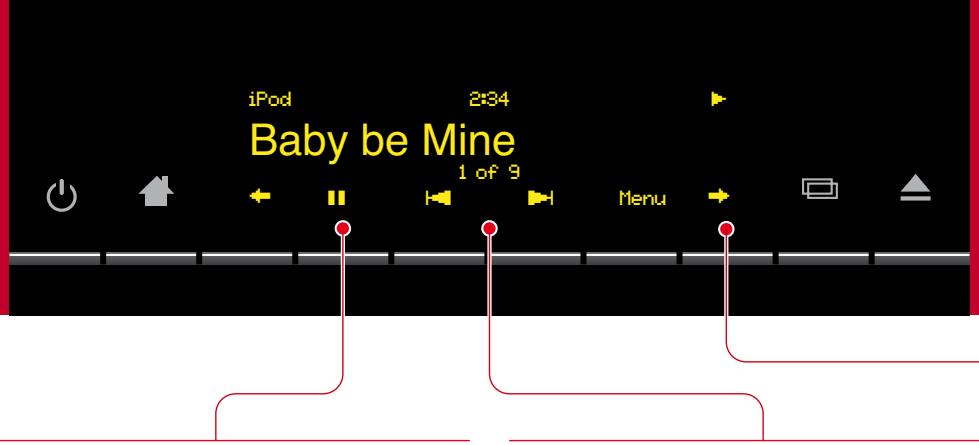
Playing and pausing
To play a track
- Press.
While a track is playing the display shows the elapsed time, the title of the track, and its position in the album or playlist (for example, 1 of 9).
When a track is playing the label changes to.
To pause the track
Press I.
While a track is paused a symbol is displayed at top right of the display and the label changes to:

To resume play
- Press.
Stepping between tracks
You can step between tracks while the iPod is playing or paused.
To step to the start of the next track
Press H.
To step to the start of the current track
Press
To select a track
- Press or until the display shows the track you want to play.
Shuffle and repeat
Press to display the keys for shuffle and repeat:

To shuffle the tracks in the current album/playlist
- Press Shuffle.
To repeat the current track/playlist
- Press Repeat.
Scanning through a track
Press to display the keys for scanning.
To scan at faster than normal speed
- Press for reverse scan or forward scan.
While scanning a scan symbol is shown at top right of the display:

- Press to revert to normal play.
Play resumes from the point you reached.
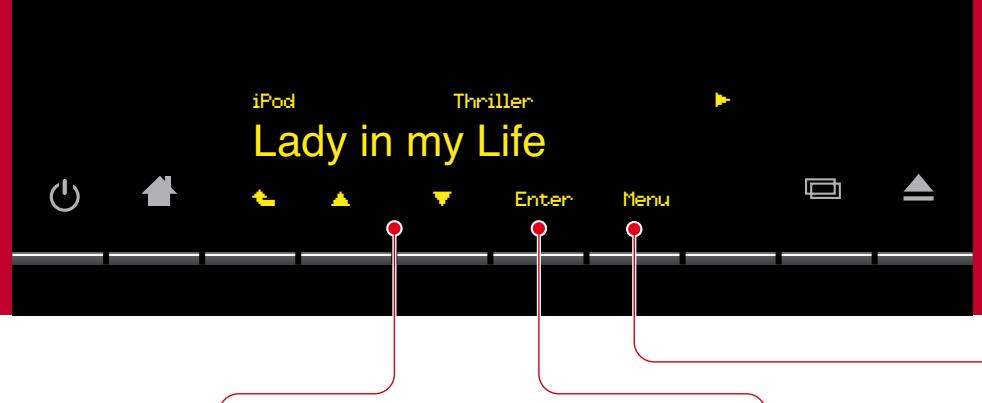
Browsing your music
To browse for music
- Press Menu from the playing screen.
The first time you press Menu you will see the main MUSIC screen with the first menu, Playlists, shown:

- Press or to step between the main menus: Playlists, Albums, Artists, Songs, Genres, Composers, Podcasts, and Audiobooks.
If you subsequently press Menu while music is playing you will return to the last menu item you were looking at.
To return to the playing screen
- Press , or press and hold Menu on the remote control.
Alternatively if you do not press anything the display reverts to the playing screen after 20 seconds.
Navigating the menus
To step between items on the current menu
- Press or
The name of the current menu or category is shown at the top of the display; for example ALBUMS.

Selecting an item
To show the contents of an item
- Select a playlist, album, artist, genre, composer, podcast, or audiobook.
Press Enter.
To play a track
- Select a song.
- Press Enter.
Returning to the previous menu
To return to the previous menu
- Press Menu.
Pressing Menu from the MUSIC screen returns to the playing screen.
Adjusting the product
To display the ADJUST page press , Adjust.
ADJUST


Clock
Audio Brightness Setup


Adjusting the clock
To set the time
- Press Clock to display the CLOCK menu.
- Press Time.
The clock shows the current time, and prompts you to adjust the hours:

- Press or to set the hours to the correct time.
- Press Next.
In a similar way you can adjust the minutes and seconds.
- At any stage press Set to set the time with the settings you have chosen.
To set the date
In a similar way the DATE menu allows you to set the date and day of week.
Adjusting the audio
The AUDIO menu allows you to adjust the sound to your preferences, and to compensate for its position in the room.
To adjust the bass and tilt
- Press Audio to display the first row of the AUDIO menu.
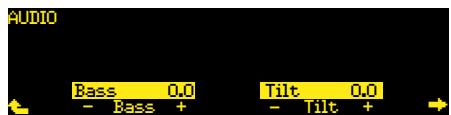
- Press Bass - or + to adjust the bass.
The bass control allows you to adjust the bass response in the room by ± 5dB in 0.5dB steps. - Press Tilt - or + to adjust the tonal balance.
The tilt control tilts the frequency of the response over the entire frequency range to make the sound brighter or dimmer. It can be adjusted between ± 10dB in 0.5dB steps.
Adjusting the location
The second row of options on the AUDIO menu allows you to optimise the sound for the location of the product, and adjust the stereo image width.
To adjust the location
- Press to display the second row of the AUDIO menu.

- Press Location to set the appropriate setting: Table, Shelf, Floor, Corner, or Free.
To adjust the stereo image width
- Press Width - or + to adjust the width of the stereo image between 0 and 6.
Choose a larger value if you are positioned further from the product.
Adjusting the brightness
The BRIGHTNESS menu allows you to adjust the brightness of the front panel display, both in normal operation and in standby.
To adjust the brightness
- Press Brightness to display the BRIGHTNESS menu.

- Press Brightness - or + to adjust the normal brightness between 1 and 12.
- Press Standby - or + to adjust the standby brightness between 1 and 12.
As you adjust each setting the display shows the brightness you have set.
We recommend setting the brightness as low as possible to prolong the life of the display.
Setting up the product
To display the SETUP menus press , Adjust, Setup.

Radio
The SETUP RADIO ANTENNAS menu allows you to choose which antenna is used for each band, and choose which bands are active.
To set up the antennas
The product provides a choice of two antennas, Ant.1 and Ant.2.
Ant. 1 is usually connected to an external rod or wire antenna via the connector on the back panel.
Ant. 2 can be switched between the internal antenna, and a second external antenna.
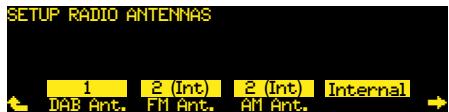
- Press DAB Ant., FM Ant., or AM Ant. to specify the antenna for each band.
- Press Internal or External to switch Ant. 2 between the internal antenna, and a second external antenna.
Examples
To receive DAB and FM in an area with high signal strength on both bands:
- Leave the default settings: Ant. 2 set to Internal, and DAB Ant. and FM Ant. set to 2 (Int).
If the internal antenna does not give good reception:
- Connect the rod or wire antenna to the Ant. 2 socket, set Ant. 2 to External, and leave DAB Ant., FM Ant., and AM Ant. set to 2 (Ext).
To choose which radio bands are active
- Press to display the SETUP RADIO BANDS menu.
- Press DAB, FM, or AM to choose which bands are active.
Disc
The SETUP DISC menu allows you to set up options for playing DVDs.

To set the aspect ratio
- Press Aspect to specify the default aspect ratio as LB (letterbox 4:3), PS (Pan & Scan 4:3), or 16:9.
To correct for video delays
The processing in some displays can delay the video, causing lipsync problems. The AV Sync control allows you to compensate for this.
- Press AV Sync to step between the options SHORT, MED, LONG, or MAX.
Choose the setting that gives correct synchronisation between the sound from the product and the video on your display.
Aux
The SETUP AUX menu allows you to set up the label for each of the auxiliary inputs.
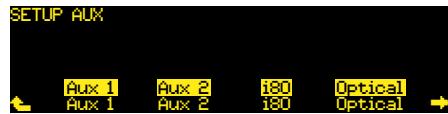
To set auxiliary input labels
- Press Aux 1, Aux 2, Aux 3, or Optical to set the label for the corresponding input.
By default the label is the same as the name of the input (eg Aux 1), but you can set it to any of the following:
iPod, Zune, MP3, MD, or TV.
To enable/disable iPod control
- Press to display the i80 Ctrl option.
You can choose between Enabled, which allows you to control the iPod from the product, or Disabled, which allows you to play the iPod without controlling it.
Info
Displays the version number of your product.
Setting up the product
To display the second row of SETUP menus press from the first row.
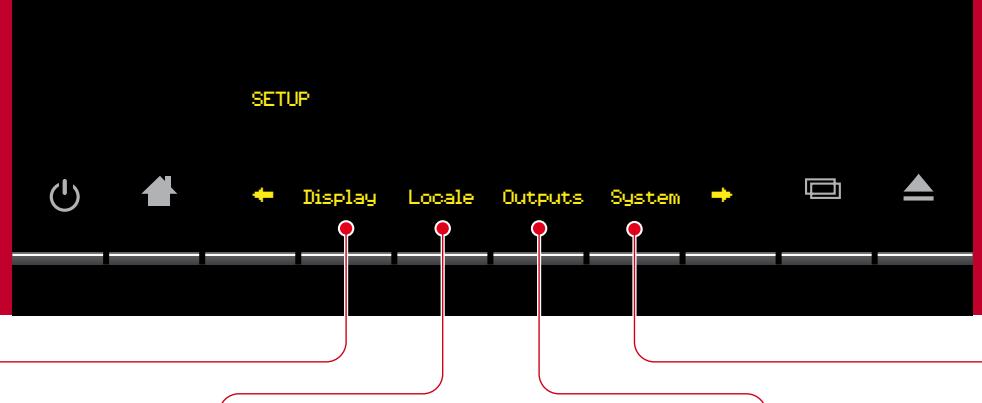
Display
The SETUP DISPLAY menu allows you to choose how the product display behaves.

- Set Blank to Yes to include a blank display in the sequence of displays available with the key.
- Set Dimming to Yes to automatically adjust the display brightness to suit the ambient light.
Locale
The SETUP LOCALE menu allows you to specify the country, for the operation of the radio, and the language of the menus.

- Set Country to the appropriate setting for your location.
- Set Language to the menu language you want to use.
Outputs
The SETUP OUTPUTS menu allows you to mute the speakers when using the headphone output.

- Set Headphone to Mute to mute the speakers when headphones are connected, or No Mute to leave the speakers active when using the headphone output.
- Set Level to Fixed to use headphones with their own volume control.
System
The SETUP SYSTEM menu allows you to use the product with your Meridian System.
- Set MSR(+) to Enabled to operate your product with a Meridian MSR+ system remote.
Further Setup options
- Press to display further Setup options.
Reset
- Press Reset followed by Yes to reset the product to the default settings.
Lock
Allows you to prevent anyone changing settings on the SETUP menus.
To lock the SETUP menus
- Press Lock followed by Yes.
To unlock the SETUP menus
- Hold down Setup for several seconds until the SETUP menus appear.
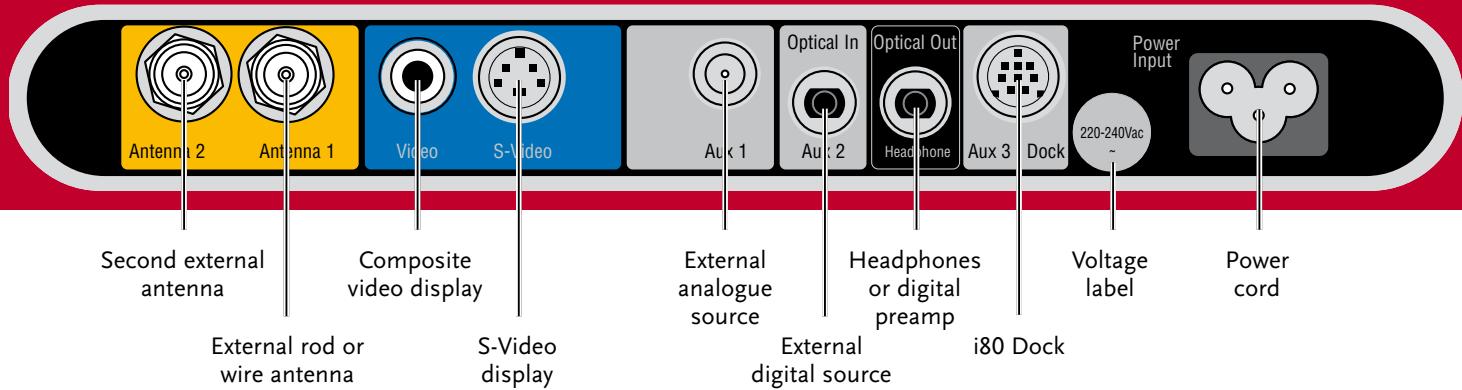
Connecting an antenna
- Connect up to two external antennas for the radio to Antenna 1 or Antenna 2.
For more information see Connect an antenna, page 2.
Connecting to a television or video display
- Connect the Video connector to a display with a composite video input, such as a television.
- Connect the S-Video output to a display with an S-Video input, such as a television or monitor.
Connecting headphones or the optical output
To connect headphones
- Plug headphones (equipped with a 3.5mm mini jack plug) into the Optical Out/Headphones socket.
To connect to the digital output
- Connect the Optical Out/Headphones socket to an optical input on a digital recorder or digital surround processor, using a mini optical cable.
Connecting external sources
To connect an analogue source
- Connect the Aux 1 input to the line output of an audio source, such as a music player, using a mini stereo jack plug.
To connect a digital source
- Connect the Aux 2 input to the optical output of a digital source, such as a digital music player, using a mini optical cable.
To connect an MP3/WMA player
- Connect the Aux 1 or Aux 2 input to an MP3/WMA player, using a suitable cable.
i80 iPod Dock

For information about connecting the i80 iPod Dock see Playing your iPod, page 12.
While connected the iPod battery is recharged from the product.
The USB connector optionally allows you to charge your iPod from an external USB power supply or computer. The i80 light changes from green to red when charging.
Copyright © 2007-2010 Meridian Audio Ltd
Meridian Audio Ltd
Latham Road
Huntingdon
Cambridgeshire
PE29 6YE, Angleterre
Visitez: http://www. meridian-audio.com/
http://www. meridian-audio.com/apps/ant80.htm
http://www. meridian-audio.com/
版权所有 © 2007-2010 Meridian Audio Ltd
http://www. meridian-audio.com/apps/ ant80.htm
4 连接电源
Audio Brightness Setup


调整时钟
设置时间
Huntingdon, Cambridgeshire
PE29 6YE, England
電話+44(0)1480445678
Fax +44 (0)1480 445686
木一ムレ一ジを観くはい:
http://www. meridian-audio.com/
Copyright © 2007-2010 Meridian Audio Ltd
MINTD/1TLEPUL:20W+20Wrms
D拉Y巴二卜
VAs: 159mm x 107mm 才一八4
410mm x 185mm x 230mm (W x D x H)
重量
6.5kg
著作權
This is the second time you're going to use this technique.
1 製品の開梟
http://www. meridian-audio.com/apps/ ant80.htm