
DF-S310 SE - Digital Camera ROLLEI - Free user manual and instructions
Find the device manual for free DF-S310 SE ROLLEI in PDF.
| Product Type | Digital multi-scanner for slides, negatives, and photos |
| Brand | Rollei |
| Model | DF-S310 SE (PDF-S 240 SE) |
| Image Sensor | CMOS 5.1 megapixels |
| Scanning Resolution | 1800 dpi (2400 dpi interpolated) |
| Lens | F = 3.6 ; f = 4.83 |
| Display | 6.1 cm (2.4 inches) TFT-LCD |
| External Memory | SD/SDHC and MMC cards |
| Internal Memory | 8 MB |
| Power Supply | Via USB 5 V or 5 V power adapter (100-240 V~, 50/60 Hz) |
| Interface | USB 2.0 (Mini-USB) |
| Dimensions (H x W x D) | 220 x 208 x 147 mm |
| Weight | Approx. 1200 g |
| Supported Photo Formats | 9 x 13 cm, 10 x 15 cm, 13 x 18 cm |
| Supported Film Type | Slides, color and black & white negatives |
| Settings | Auto color balance, auto and manual exposure (EV -2 to +2), horizontal/vertical flip |
| Playback Functions | Slideshow, single playback, 90° rotation, delete |
| Included Software | BlazePhoto 2.0 (compatible Windows ME/2000/XP/Vista/7) |
| Warranty | 2 years |
| Maintenance and Cleaning | Use a soft cloth, avoid harsh chemicals |
| Safety | Do not immerse, use only with USB 1.1 or higher, unplug during thunderstorms |
| Spare Parts and Repairability | Repairs only by a specialized workshop |
| General Information | Private use, dry rooms, CE and FCC compliance |
Frequently Asked Questions - DF-S310 SE ROLLEI
User questions about DF-S310 SE ROLLEI
0 question about this device. Answer the ones you know or ask your own.
Ask a new question about this device
Download the instructions for your Digital Camera in PDF format for free! Find your manual DF-S310 SE - ROLLEI and take your electronic device back in hand. On this page are published all the documents necessary for the use of your device. DF-S310 SE by ROLLEI.
USER MANUAL DF-S310 SE ROLLEI
natural_image
Two women smiling while using a laptop together, one in red striped top and the other in white striped top (no text or symbols visible)PDF-S 240 SE


I like – on facebook.com/rollei
24
Month Warranty and Replacement
USER GUIDE
FOR ENGLISH | GERMAN | FRENCH
Dear customer,
Congratulations on purchasing a high-quality Rollei product. You have acquired a modern Multi Scanner with excellent technical features and respective accessories, which is particularly easy to operate. Please study this information in detail, observing safety instructions, in particular.
The scanner comes with a 2-year warranty. You will need the enclosed warranty card and your sales receipt in the event of the Multi Scanner developing a fault. Keep these in a safe place together with the instruction manual.
Please include the instruction manual when passing on the scanner to a third party.

Note:
- Only use the scanner for the intended purposes. Where the scanner has been used for other purposes, resulting in damage, the warranty shall be invalidated. Injuries and damage to the environment can also only be avoided if used correctly.
Main features
- Multi scanner with 5.1 megapixels image size
• High scanning quality of 1800 dpi and 2400 dpi (interpolated)
• Digitize slides, negatives and photos in a matter of seconds
• Automatic and manual exposure
• Automatic colour balance
• Power supply via USB cable
Contents of box
The box contains the following components:
- Rollei Multi Scanner PDF-S 240 SE
- 1 x slide holder
- 1 x negative holder
- 3 photo holders (9 x 13 cm, 10 x 15 cm and 13 x 18 cm)
- USB cable
- USB mains adapter
- Software CD
- Instruction manual
- Warranty card
Rollei
Contents
01 Introduction
01 Main features
01 Contents of box
02 Contents
04 1. Safety Instructions
06 2. Overview of device
07 3. Inserting slides
08 4. Inserting negatives
09 5. Inserting photos
10 6. General operation
10 6.1. Quick start
11 6.2. Main menu
12 6.3. Capture
13 6.3.1. Flipping an image
14 6.3.2. Adjusting image brightness and colors
14 6.3.3. Scanning and editing
15 6.3.4. Scanning more images
16 6.3.5. Memory full
16 6.4. Playback
17 6.4.1. Automatic slideshow
17 6.4.2. Individual playback
17 6.4.3. Editing menu
20 6.5. Film type (only in film scanner mode)
21 6.6. Effects (only in photo scanner mode)
21 6.7. Select photo format (only in photo scanner mode)
22 6.8. Set resolution
23 6.9. Language setting
23 6.10.USB mode
24 7. BlazePhoto (image processing software)
24 7.1. Installation
24 7.2. Editing functions
24 7.2.1. Import photos (Get Photo)
25 7.2.2. Preview
26 7.2.3. Edit
28 7.2.4. Create
28 7.2.5. Share
29 8. Disposal
29 9. Warranty and Service
30 10. Conformity
31 11. Technical Specification
32 12. Index
1. Safety Instructions

HAZARD for children
- Children do not recognize the hazards that can result from the incorrect use of electrical equipment. The scanner should consequently be kept away from children.
- Keep children away from packaging material. Danger of suffocation!
ELECTRICAL hazard
- Never immerse the Multi Scanner, the USB connection cable and the USB mains adapter in water, as this may cause an electrical shock.
- Do not touch the scanner with wet hands and do not operate in the open or in rooms with a high humidity.
- Do not place any containers filled with water, such as vases near the scanner. The container may tip over and liquid may impair electrical safety.
- The Multi Scanner may only be connected to a PC with a USB interface from version 1.1 onwards. In the event of a fault, the operation with an USB 1.0 interface may cause a short circuit and fire hazard.
• Always disconnect the Multi Scanner from the mains ...
... if you are not using the device for some time,
... during thunder and lightning,
... prior to cleaning the device and
... in case of malfunctioning during the operation.
When the Multi Scanner is plugged into the socket always pull on the USB mains adapter and not on the USB connection cable.
- Pull USB cable out of the USB socket of the computer to disconnect the device from the PC.
- The connection cable may not be kinked or squashed. Keep connection cable away from hot surfaces and sharp edges.
- Do not operate the scanner if there is any visible damage to the USB connection cable or the USB mains adapter
- Do not make any changes to the scanner. Do not replace the USB connection cable or USB mains adaptor yourself. Repairs on the device should only be carried out by a specialist workshop or by the Service Centre. Incorrect repairs can cause considerable hazards for the user.
- Do not overload the USB connections of your computer. If too many devices are connected to the computer, such as cordless mouse, media player, mobile phones or other USB-operated devices, there may not be sufficient power available to operate the Multi Scanner.
WARNING against injuries
• Install USB connection cable so that it does not become a trip hazard.
CAUTION – material damage
- Place Multi Scanner on a sturdy, level surface.
- Protect the device against moisture, dust, high temperatures and direct sunlight as these may cause malfunctioning and can damage the electronics or housing.
- Ensure that there is enough space for ventilation around the device.
- Keep a safe distance to heat sources, such as hobs or ovens.
- Do not drop the Multi Scanner and do not subject it to strong impacts.
- Do not place any candles or other naked flames close to the device.
- Do not place device close to strong magnetic fields, e.g. loudspeakers, as this may interfere with its functioning.
- Do not use harsh chemicals or aggressive or abrasive cleaning agents.
Purpose of use
The Multi Scanner is intended for private use and not for commercial purposes.
- Overview of device

natural_image
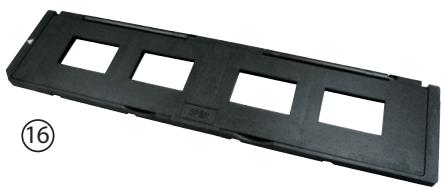
Black plastic tray with four square cutouts, labeled with number 16 (no text or symbols on the tray itself)
natural_image
Black plastic tray component with multiple slots, labeled with number 17 (no text or symbols on the tray itself)
natural_image
Black rectangular device with a grid pattern and a small circular symbol on top, labeled (18) at bottom left (no readable text or symbols on device)
natural_image
Black rectangular object with vertical slats and a small emblem on top, enclosed by a dashed border (no text or symbols)
natural_image
Black rectangular object with vertical slats and a circular top, no visible text or symbols- ON/OFF switch
- Control LED photo scan mode
- Control LED film scan mode
- SCAN button
- Switch for scan mode
- Mini USB 2.0 connection
- SD/SDHC and MMC memory card slot
- Left button ◀
- ENTER button
- Right button ▶
-
MODE button
-
Insertion slot for photo holder
- Slider for selecting scan template
- 6.1 cm TFT-LCD colour monitor
- Slide holder in insertion slot for slides and negatives
- Slide holder
- Negative holder
- Holder for 9 x 13 cm photos
- Holder for 10 x 15 cm photos
- Holder for 13 x 18 cm photos
3. Inserting slides
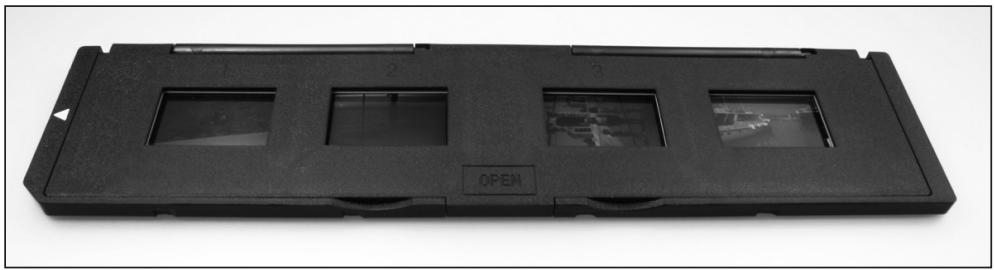
Open the slide holder at the point marked "Open" and place the open holder in front of you as shown below. The slides can now be placed the right way up (not turned and not reversed) in the recesses provided in the holder.
natural_image
Black plastic tray holding multiple square photodisclosures with visible internal screens (no text or symbols)Close the slide holder and press down the edges until they engage.
natural_image
Black rectangular optical flash drive with three slots and an 'OPEN' label, no visible text or symbols on the device itself.Now insert the slide holder from the right into the Multi Scanner's insertion slot for slide and negative holders so that the white triangle marking is facing the front and is visible. Slide the slide holder into the Multi Scanner until it engages noticeably in the first slide position.

Note:
- Caution: Do not insert slide holder from the left side into the insertion slot of the scanner and do not pull the holder out of the right side of the scanner! Any damage resulting from such incorrect handling, is not covered by the warranty!
- Handle slides with due care. Dust, scratches or fingerprints will be visible on the saved image. When working with slides, wear cotton gloves, where possible. Use compressed air for removing dust from slides. Such a device is not included with the Multi Scanner but can be purchased from specialist retailers for office materials or electronic products.
4. Inserting negatives
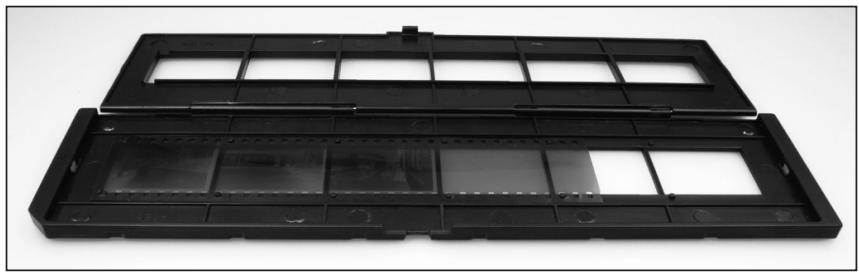
Open the negative holder at the point marked "Open" and place the open holder in front of you as shown below. The negatives can now be placed the right way up (not turned and not reversed) in the recess provided in the holder. You can use the numbers on the negative strip as a guide.
natural_image
Black plastic tray with multiple compartments and mounting holes, no visible text or symbolsClose the negative holder and press down the edges until they engage.
natural_image
Black plastic tray with multiple rectangular slots and a small inset slot, isolated on white background (no text or symbols)Now insert the negative holder from the right into the Multi Scanner's insertion slot for slide and negative holders so that the white triangle marking is facing the front and is visible.
Slide the negative holder into the Multi Scanner until it engages noticeably in the first negative position.

Note:
- Caution: Do not insert negative holder from the left side into the insertion slot of the scanner and do not pull the holder out of the right side of the scanner! Any damage resulting from such incorrect handling, is not covered by the warranty!
- Handle negatives with due care. Dust, scratches or fingerprints will be visible on the saved image. When working with slides, wear cotton gloves, where possible. Use compressed air for removing dust from the negatives. Such a device is not included with the Multi Scanner but can be purchased from specialist retailers for office materials or electronics products.
- The design of the negative holder complies with the ISO standard. In some cases the holes of the negatives do not fit the holder accurately. This is caused by non-standard cameras. In such cases a small black line appears on the edge of the picture, which can be easily removed with an image editing program.
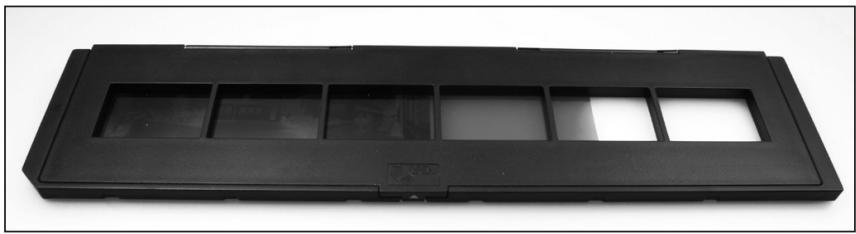
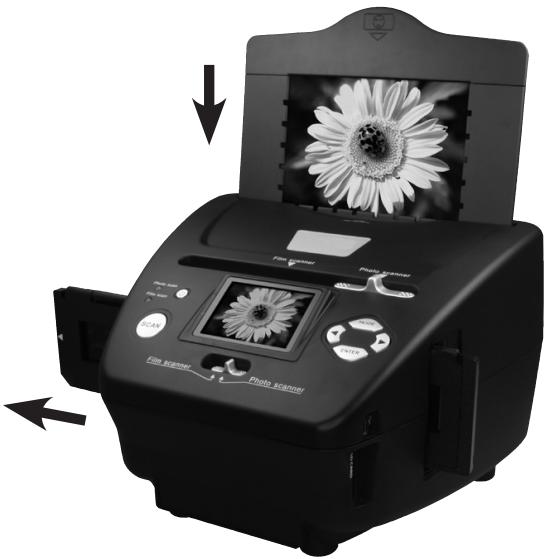
5. Inserting photos
Insert a photo into the photo holder for the respective picture size. The holders are available in sizes 9 x 13 cm (3 ½" x 5"), 10 x 15 cm (4"x6") and 13 x 18 cm (5" x 7").

Note:
- Handle photos with due care. Dust, scratches or fingerprints will be visible on the saved image.
natural_image
Black-and-white photo of a hibiscus framed in a decorative frame, no text or symbols visible.
natural_image
Black-and-white photo of a boat on the water with a framed picture frame on the left (no visible text or symbols)
natural_image
Black-and-white photo of a child wearing headphones, viewed through a tablet device (no text or symbols visible)Insert picture frame into slot in the top of the scanner (see illustration). Prior to scanning photos, ensure that no slide or negative holder has been left in the scanner.
natural_image
Black-and-white photo of a printer with a flower display and control buttons, showing no visible text or symbols on the device itself.
Note:
- Observe that prior to commencing the scanning operation the right image size for the picture holder must be set in the menu.
6. General operation
6.1. Quick start
- To scan slides or negatives, slide the switch at the top for the scan mode and for selecting the insertion slot to the left "Film scanner" position.
To scan photos, slide both switches to the right, to the position "Photo scanner". - Place slide, negative or photo to be scanned in the respective holder.
- Insert the slide or negative holder into the insertion slot on the right of the device or place the photo holder in the slot on the top of the device.
- Place the memory card in the memory card slot.
- Using one of the following two options connect the scanner to power:
- Connect the Multi Scanner to a computer using the USB cable
- Connect the device to the mains using the USB cable and the USB mains adaptor.
- Push the On/Off switch to switch on the Multi Scanner.

Note:
- If the switch for the scan mode and the switch for selecting the insertion slot are in the same position "Film scanner" or "Photo scanner", the respective LED will light up next to the switch-on button.
- For scanning, follow the instructions on screen. Always confirm selection of the function by pressing the ENTER key.
- You can transfer the data from the memory card to the computer via the USB connection. For this purpose, connect the Multi Scanner to the computer using the enclosed USB cable. After selecting the USB mode, the scanner appears as a removable storage device under My Computer.
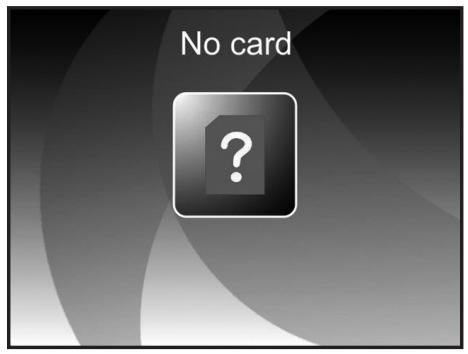
If no memory card is inserted in the device, the following warning appears when the Multi Scanner is switched on. The warning disappears after several seconds.
6.2. Main menu
After switching on the scanner, the main menu of the scan mode appears on the display.
When in submenus, you can return to this Main menu at any time by pressing the MODE key.
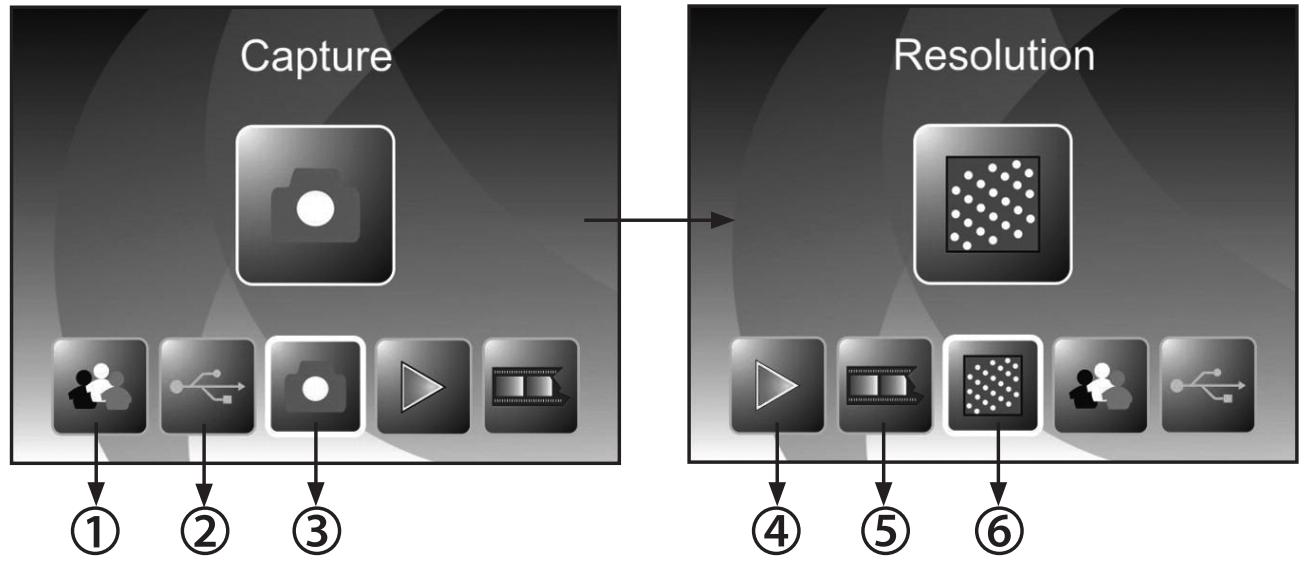
The two illustrations below show the Main menu for the film scanner mode in two different selection conditions with information about the available options.
Main Menu - Film scanner mode
flowchart
graph LR
    A["Capture"] --> B["① User Interaction"]
    A --> C["② USB Interaction"]
    A --> D["③ Image Interaction"]
    A --> E["④ Play Action"]
    F["Resolution"] --> G["④ Display"]
    F --> H["⑤ Broadcast"]
    F --> I["⑥ Image Interaction"]
① Language setting
② USB mode
③ Recording mode
④ Playback
⑤ Film type
⑥ Resolution
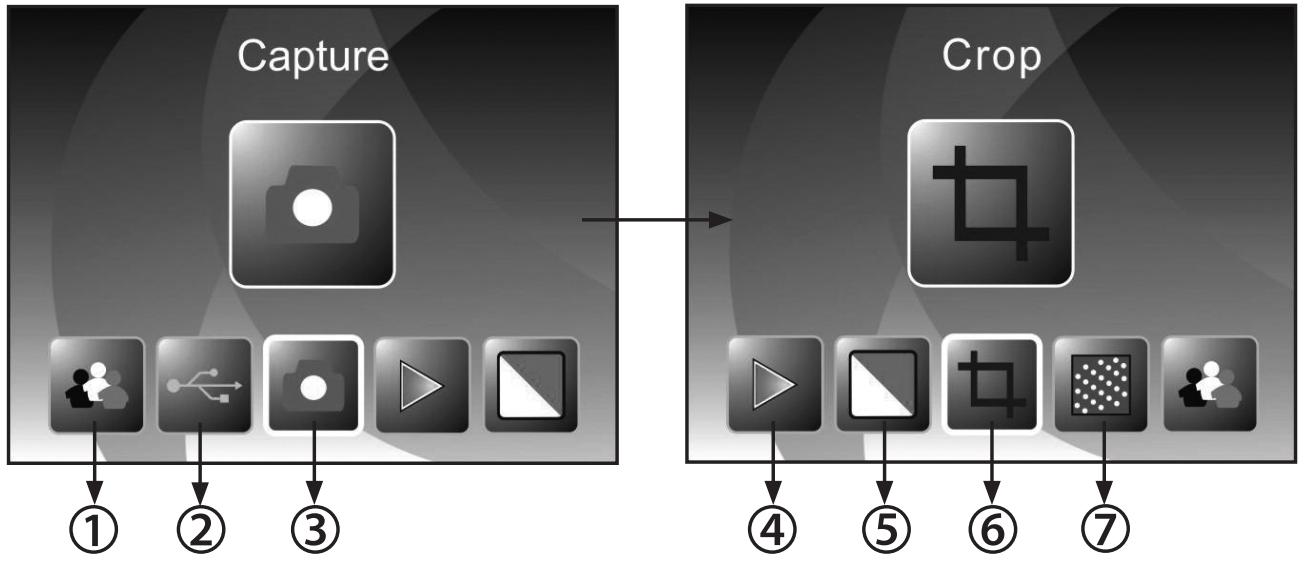
The next two illustrations show the Main menu of the photo scanner mode with information about the available options.
Main Menu - Photo scanner mode
flowchart
graph LR
    A["Capture"] --> B["①"]
    A --> C["②"]
    A --> D["③"]
    E["Crop"] --> F["④"]
    E --> G["⑤"]
    E --> H["⑥"]
    E --> I["⑦"]
① Language setting
② USB mode
③ Recording mode
④ Playback
⑤ Effect (multi-coloured / black & white)
⑥ Image size (9 x 13, 10 x 15, 13 x 18 cm)
⑦ Resolution
The respective option can be selected using the ◀/▶ button in the Main menu; confirm your selection by pressing the ENTER key.
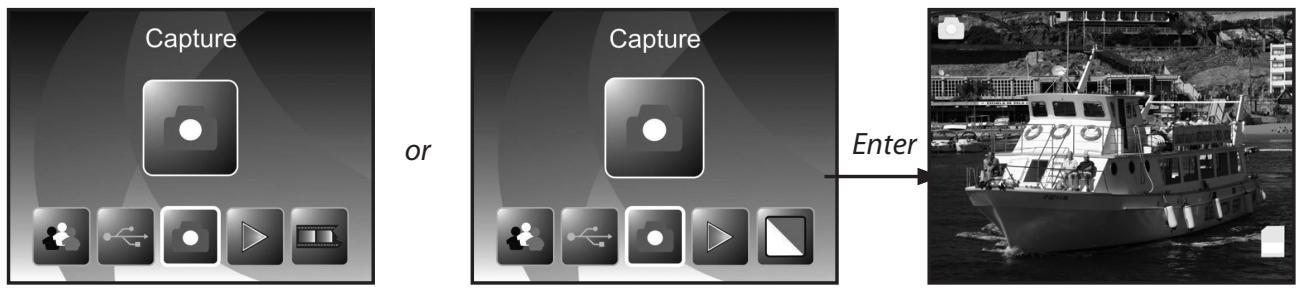
6.3. Capture
Select the option "Capture mode" in the Main menu and start the mode by pressing the ENTER key. In the next step the scan preview of the selected original is shown on the display (Live display). During the scan preview, the live display symbol is shown in the top left corner of the screen. If a memory card has been inserted, the memory card symbol appears in the bottom right corner of the screen.
flowchart
graph LR
    A["Capture"] --> B["or"]
    B --> C["Capture"]
    C --> D["Enter"]
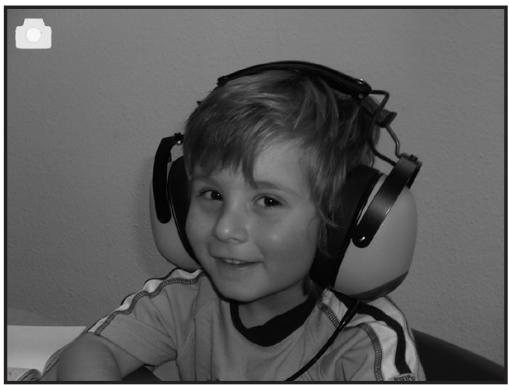
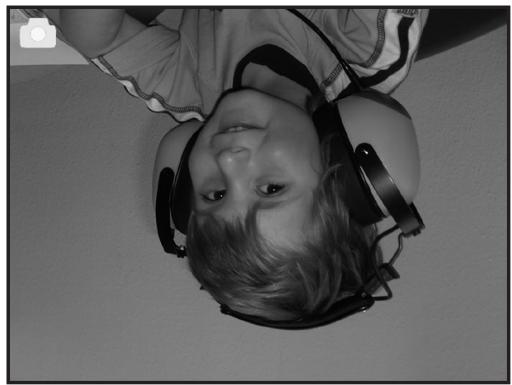
6.3.1. Flipping an image
During the scan preview (live display) you have the option of flipping the image vertically or horizontally prior to scanning. This function can be used to correct the orientation of incorrectly inserted pictures.

Note:
- The set flipped alignment shall also remain if the image is changed or another menu is selected after which scanning is continued. The flipped alignment shall, however, not remain if the Multi Scanner is switched off.

natural_image
Black-and-white photo of a young child wearing headphones, smiling (no text or symbols visible)horizontal
flipping

natural_image
Black-and-white photo of a young child wearing headphones, smiling (no text or symbols visible)Press the ◀ key to flip the image horizontally from left to right.
natural_image
Black-and-white photo of a young child wearing headphones, smiling (no text or symbols visible)vertical flipping
natural_image
Black-and-white photo of a child wearing a helmet and visor, looking upward (no text or symbols visible)Press the ▶ key to flip the image vertically from top to bottom.
Rollei
6.3.2. Adjusting image brightness and colors
During the scan preview you have the option of changing the brightness value (EV) and also the color value.
First press the ENTER button. Now the monitor will display the settings for the brightness and also for the colors red (R), green (G) and blue (B). Choose the desired value by pressing ENTER and MODE and change the settings by pressing ◀ and ▶ within the range of -2 to +2. To apply the changes you have made, press the SCAN button.
The settings will apply separately to slides, negatives and photo prints and will be kept even if the device has been switched off.
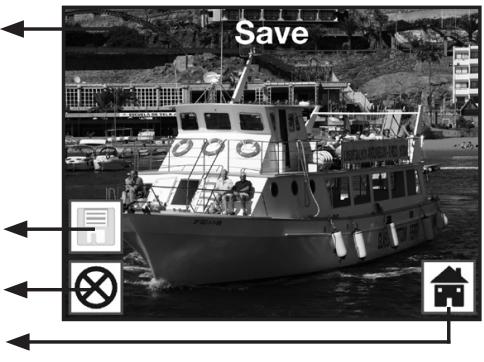
6.3.3. Scanning and editing
Press the SCAN key during the scan preview to scan the image. The image then appears in the edit menu.

Scanned image
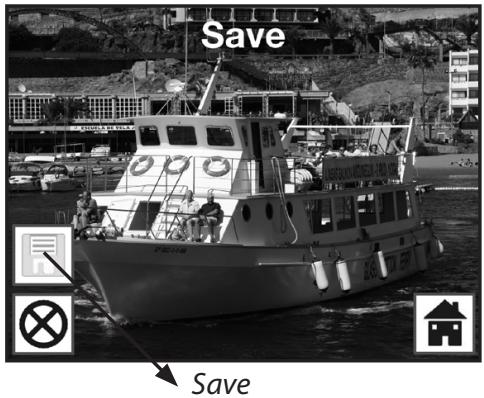
The symbols in the Edit menu have the following meaning:
① Save: Save the recorded image.
② Cancel: Cancel editing of the image.
③ Home: Back to the Main menu.
①
②
③
Save
Use the ◀ / ▶ keys in the Edit menu to select the option "Save" and click on the ENTER key. The recorded image is then saved on the memory card.
The scanner then returns to the scan preview.
Cancel
Using the ◀/▶ buttons select the "Cancel" option and confirm the selection by pressing ENTER. This interrupts the editing of the currently scanned image and returns to the live display function.
Caution: The scanned image will not be saved!

Home
Using the ◀ / ▶ buttons select the "Home" option to return from the edit menu to the Main menu and press ENTER. Alternatively you can press the MODE key.
Caution: The scanned image will not be saved!

After selecting one of the options "Save" or "Cancel", the scanner returns to the scan preview (live display). Push the slide or negative holder to the next image or insert the next photo to continue the scanning process.
Rollei
6.3.5. Memory full
If the SCAN key is pressed in the Recording mode and the following warning appears on the Multi Scanner display, the used memory is full. In this case you will have to first transfer the images to the computer or insert a new memory card before scanning further images.


Note:
- If the memory card is removed or inserted whilst the Multi Scanner is switched on, a warning message that the device has to be restarted, appears on screen. The scanner then switches off automatically. The scanner has to be switched on again to continue scanning.
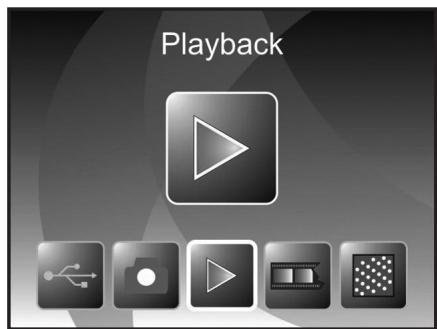
6.4. Playback
Select Playback in the Main menu to view images already scanned. Whilst the scanner is switched on, you can return to the Main menu by pressing the MODE button or the Menu symbol. Using the ◀/▶ buttons in the Main menu, select the "Playback" mode and press the ENTER key.
Film scanner mode
or
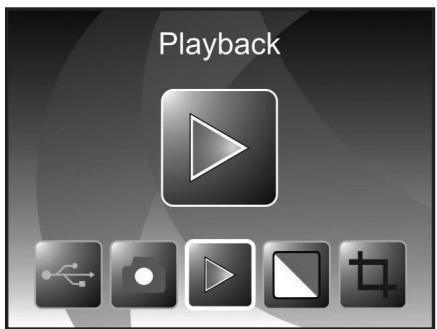
Photo scanner mode
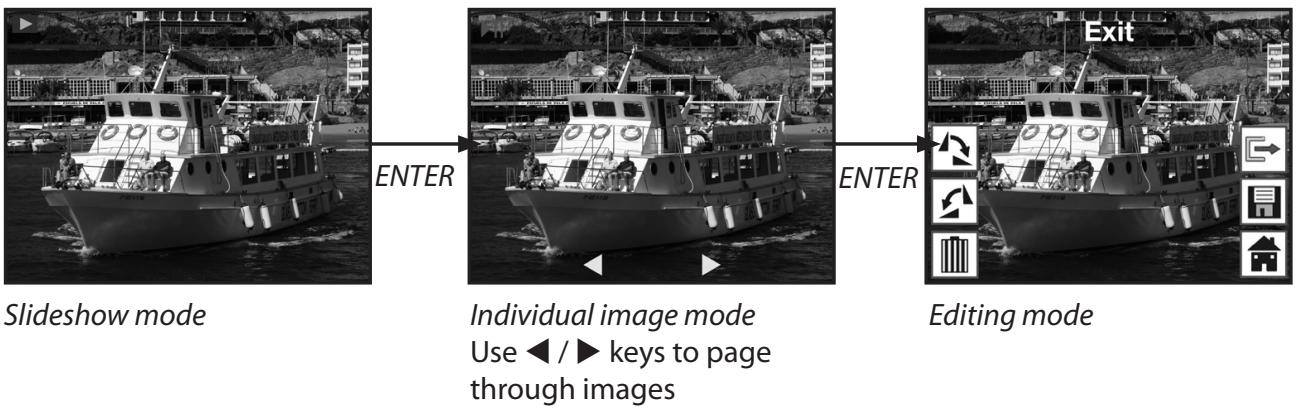
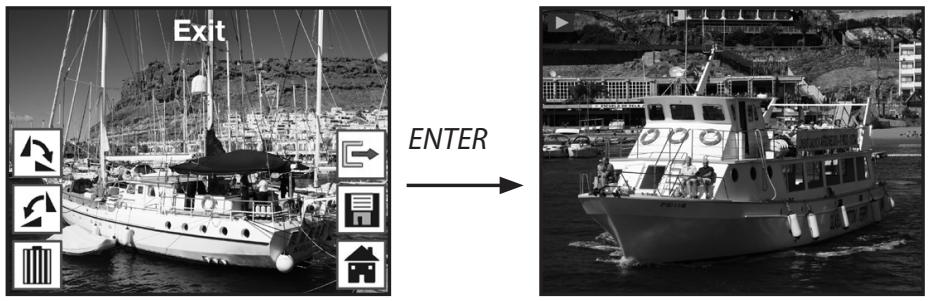
6.4.1. Automatic slideshow
Symbol for slideshow mode
As soon as you have switched on the Playback mode, all images of of the memory card are automatically displayed at 2-second intervals.
Only images scanned by the Multi Scanner will be displayed; images from other sources cannot be played back.
If Playback has been selected but the memory contains no scanned image the display briefly shows the message "No file". The device then returns to the Main menu.

natural_image
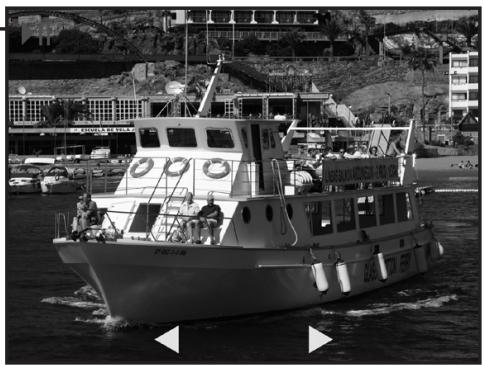
Black-and-white photo of a large boat with crew on deck, sailing on water near a rocky coastline and buildings (no visible text or symbols)6.4.2. Individual playback
Symbol for single image display
If the ENTER key is pressed during the slideshow, the slideshow stops and the last image is permanently displayed. You now have the option to select each last or next image with the ◀ and ▶ keys.
Instead of the symbol for individual picture display the top part of the display now shows the file name of the current image.
natural_image
Black-and-white photo of a boat with crew on deck, docked at a waterfront with buildings and hills in the background (no visible text or symbols)Last image Next image
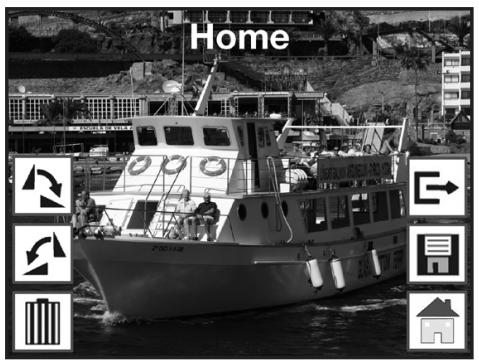
6.4.3. Editing menu
To edit an already scanned image select ENTER once during the automatic slideshow to enter individual playback mode. Using the ◀ or ▶ key to select the image you wish to edit. Select ENTER again to return to the Edit menu.
The symbols in the Edit menu have the following meaning:

① Rotate by +90 degrees: rotate recorded image by +90 degrees (to the right).
② Rotate by -90 degrees: rotate recorded image by -90 degrees (to the left).
③ Delete: delete this image on the memory card.
④ Exit: return to slideshow.
⑤ Save: save edited image to the memory card.
⑥ Home: return to Main menu.
Below is another illustration of the described menu sequences.
Rotate images
Scanned images can subsequently be rotated. To rotate the selected image by 90 degrees clockwise, select the option "Rotate+90°" using the ◀/▶ keys in the Edit menu and click on the ENTER key. You can then continue turning the image or save it. In the same manner you can turn an image counter-clockwise by 90 degrees by selecting the option "Rotate -90°".


Note:
- The rotated image is not automatically saved. This only occurs after the option "Save" has been selected.
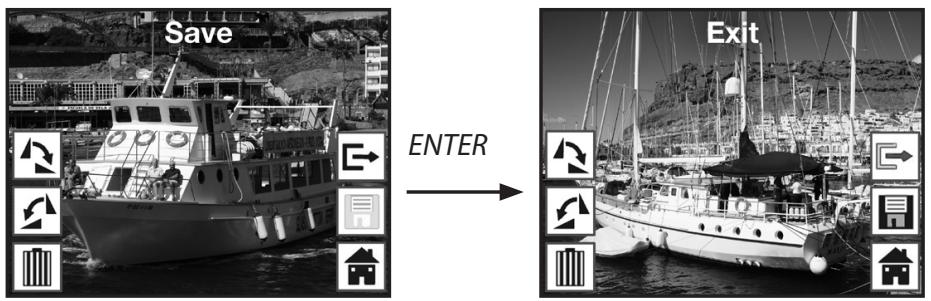
Save
To permanently save an image, first use the ◀ / ▶ keys to select the option "Save". After pressing the ENTER key the image is saved and the next image is shown on the screen.
Delete
To completely delete the shown image, first select the option "Delete" with ◀ / ▶ keys in the Edit menu. After pressing the ENTER key the image is deleted and the next image is shown on the screen. At the same time the selection changes automatically to "Exit". Select "Delete" again to delete more images.
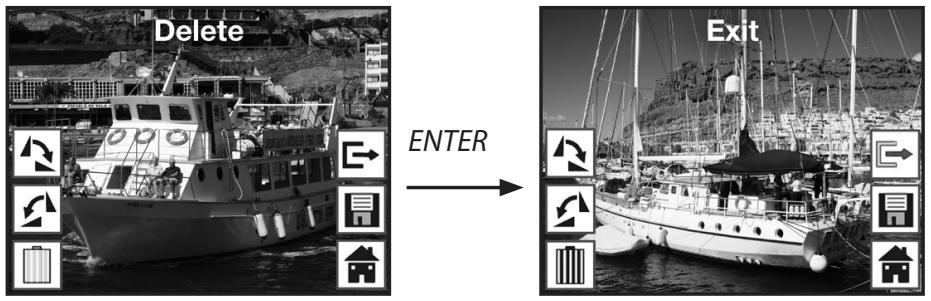

Note:
- Caution: Deleted images cannot be reinstated!
Exit
As soon as the "Exit" function is selected in the Edit menu, the display returns to the slideshow, starting with the first image.
Rollei
Home
To leave the Edit menu and return to the Main menu use the ◀ / ▶ keys to select the option "Home" and press the ENTER key.
You can also change to the Main menu at any time using the MODE key.
No image
If the last remaining image has been deleted in the Playback mode, the display shows the adjacent image, indicating that no photo exists. After several seconds the Multi Scanner changes back to the Main menu.
natural_image
Generic document placeholder icon with a question mark, no text or symbols present6.5. Film type (only in film scanner mode)
Prior to scanning slides or negatives in the film scanner mode, the respective film type must be set. Use the ◀ / ▶ keys in the Main menu to select the option "Film type" and confirm the selection by pressing the ENTER key.
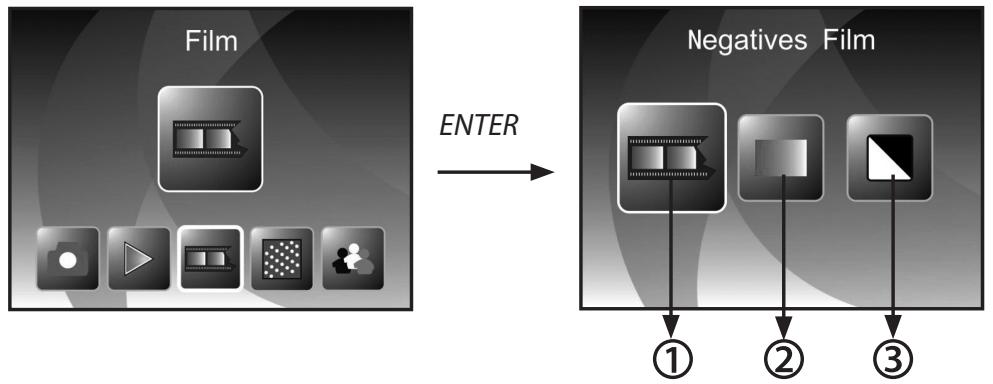
flowchart
graph LR
    A["Film"] -->|ENTER| B["Negatives Film"]
    B --> C["①"]
    B --> D["②"]
    B --> E["③"]
① Negatives Film: this option allows colour negatives to be scanned in as a normal image.
② Slide: select "slide" if you have inserted a slide holder with slides.
③ B&W: this setting is used for scanning black and white negative film.
Use the ◀ / ▶ keys to select the desired film type and confirm by pressing ENTER. The Multi Scanner then changes directly to the capture mode.
6.6. Effects (only in photo scanner mode)
The photo scanner mode allows you to preset whether colour or black and white photos are to be scanned. Use the ◀ / ▶ keys in the Main menu to select the option "Effect" and confirm the selection by clicking on ENTER.
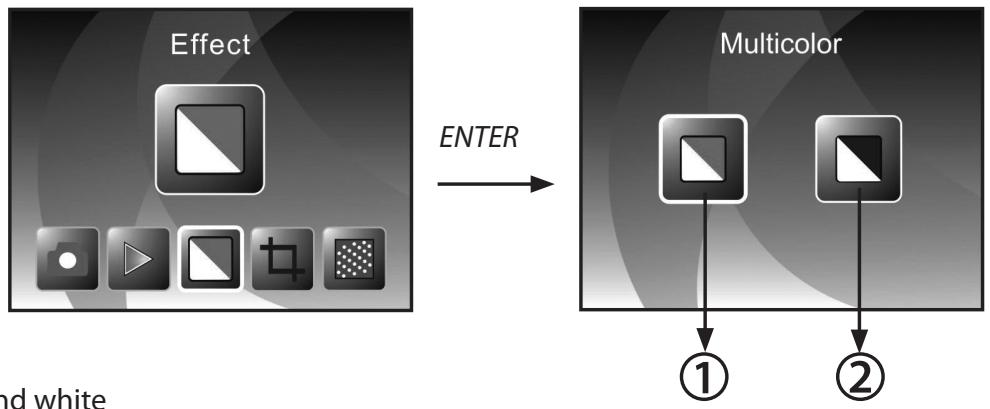
flowchart
graph LR
    A["Effect"] -->|ENTER| B["Multicolor"]
    B --> C["①"]
    B --> D["②"]
① Colour
② Black and white
Use the ◀ / ▶ keys to select the desired colour effect and confirm the selection by clicking on ENTER. The Multi Scanner then changes directly to the capture mode.
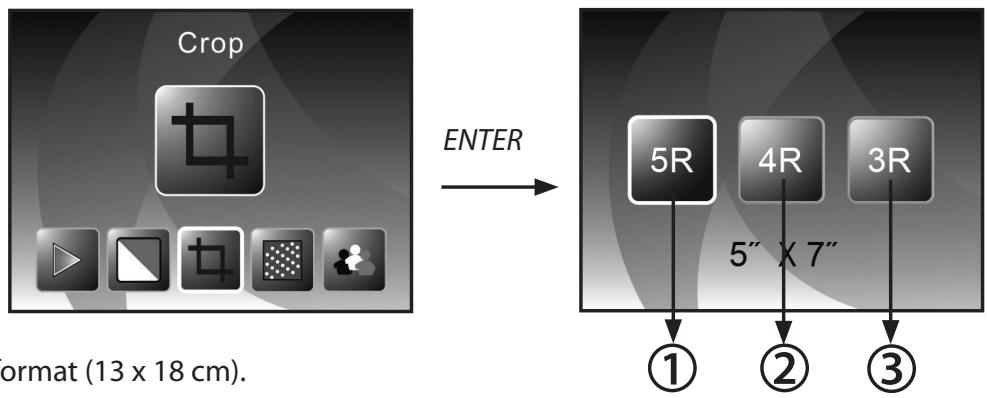
6.7. Selecting the photo format (only in photo scanner mode)
The photo scanner mode allows you to set the Multi Scanner to the size of the inserted photos. Use the ◀/▶ keys in the Main menu to select the option "Image size" and confirm the selection by clicking on ENTER.
flowchart
graph LR
    A["Crop"] -->|ENTER| B["5R"]
    B --> C["4R"]
    C --> D["3R"]
    style A fill:#999
    style B fill:#ccc
    style C fill:#ccc
    style D fill:#ccc
    note1["format (13 x 18 cm)."] --> A
    note2["5" X 7""] --> B
    note3["①"] --> C
    note4["②"] --> D
    note5["③"] --> D
① 5" x 7" format (13 x 18 cm).
② 4" x 6" format (10 x 15 cm).
③ 312 " x 5" format (9 x 13 cm).
Use the ◀ / ▶ keys in the Main menu to select the desired image size and confirm the selection by clicking on ENTER. The Multi Scanner then changes directly to the capture mode.
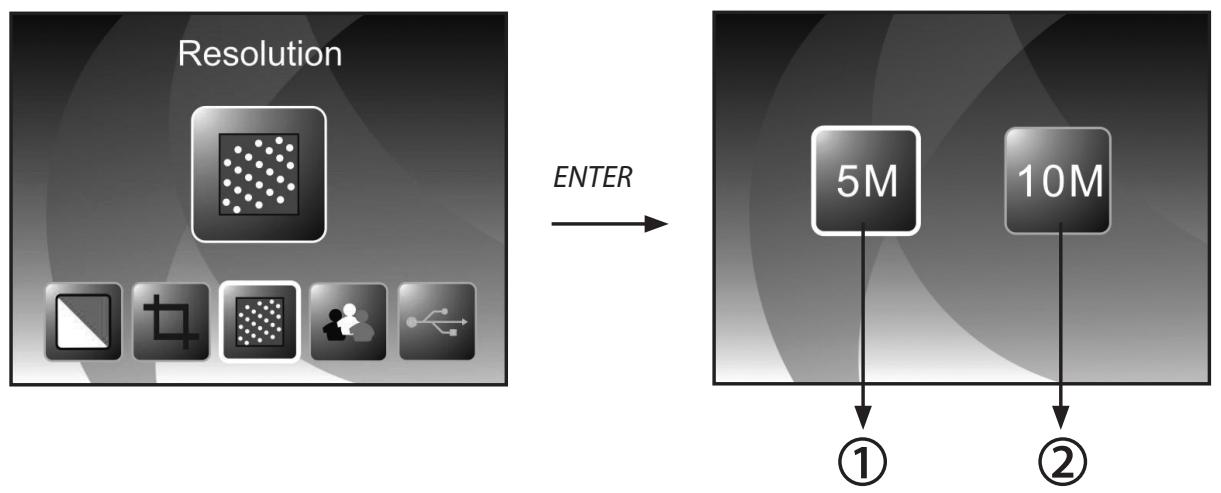
6.8. Setting the resolution
The Multi Scanner contains an image sensor with a 5.1 megapixels resolution. You also have the option of selecting an interpolated resolution of approx. 10 megapixels.
Slides and negatives are recorded at 5 megapixels ("5M") with 2,760 x 1,840 pixels. By selecting the "10M" option, the film scanner mode will produce images with 3,900 x 2,600 pixels.
In the photo scanner mode the resolution differs depending on the setting of the image size. If 5 megapixels have been selected, images with 2,592 x 1,728 (9 x 13 cm), 2,592 x 1,728 (10 x 15 cm) and 2,592 x 1,850 (13 x 18 cm) pixels are produced. If the images are scanned at 10 megapixels, 3,648 x 2,432 (9 x 13 cm), 3,648 x 2,432 (10 x 15 cm) and 3,648 x 2,604 (13 x 18 cm) pixels are produced.
To set the correct resolution, use the ◀/▶ keys in the Main menu to select the option "Resolution" and confirm the selection by clicking on ENTER.
flowchart
graph LR
    A["Resolution"] -->|ENTER| B["5M"]
    B --> C["①"]
    B --> D["②"]
① 5 megapixels resolution
② 10 megapixels resolution (interpolated)
Use the ◀ / ▶ keys to select the desired resolution and confirm the selection by clicking on ENTER. The Multi Scanner then changes directly to the capture mode.
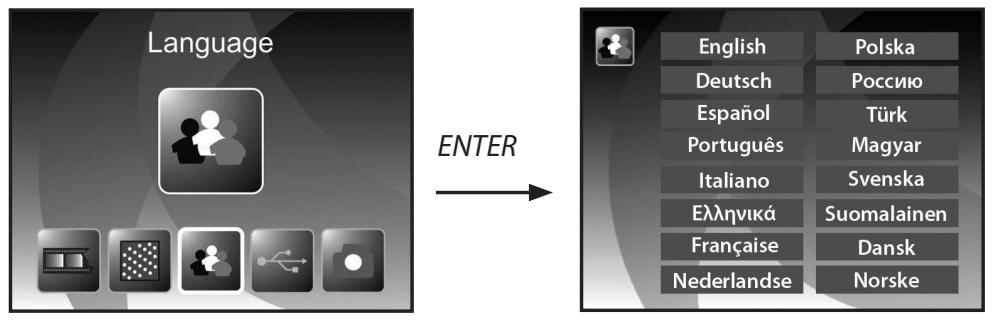
6.9. Language setting
The language setting in the menus can be changed at all times. Use the ◀ / ▶ keys in the Main menu to select the option "Language" and confirm the selection by clicking on ENTER.
flowchart
graph LR
    A["Language"] -->|ENTER| B["English"]
    A -->|ENTER| C["Polska"]
    A -->|ENTER| D["Deutsch"]
    A -->|ENTER| E["Россию"]
    A -->|ENTER| F["Espanol"]
    A -->|ENTER| G["Türk"]
    A -->|ENTER| H["Português"]
    A -->|ENTER| I["Magyar"]
    A -->|ENTER| J["Italiano"]
    A -->|ENTER| K["Svenska"]
    A -->|ENTER| L["Еллгликá"]
    A -->|ENTER| M["Suomalainen"]
    A -->|ENTER| N["Française"]
    A -->|ENTER| O["Dansk"]
    A -->|ENTER| P["Nederlandse"]
    A -->|ENTER| Q["Norske"]
Use the ◀ / ▶ keys to select the desired language and confirm the selection by clicking on ENTER. The Multi Scanner then automatically returns to the Main menu.
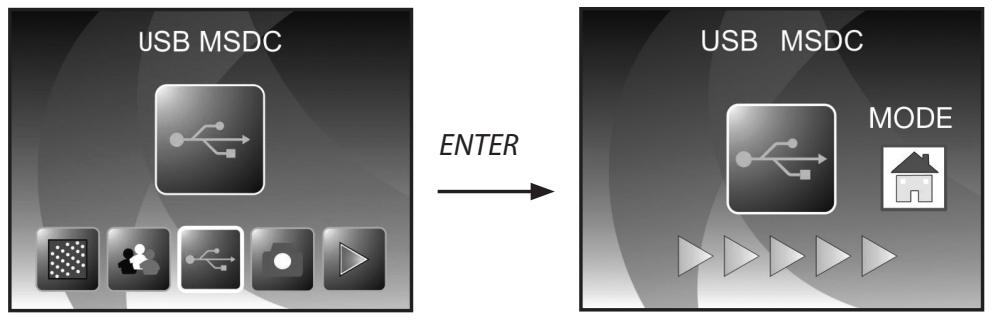
6.10. USB mode
After the scanned images have been saved to a memory card, the card can be removed and the images can be transferred to the computer from a card reader. You can also connect the Multi Scanner directly to the computer to transfer the images from the inserted memory card.
First connect the Multi Scanner to a USB connection of the computer using the USB cable and switch on the device. Use the ◀/▶ keys in the Main menu to select the option "USB MSDC" and confirm the selection by clicking on ENTER. This creates on your computer a new removable disk under "My Computer", allowing to access to the scanned images.
flowchart
graph LR
    A["USB MSDC"] -->|ENTER| B["USB MSDC MODE"]
Click on the MODE button in the USB mode to disconnect the connection to the computer and return to the Main menu.
7. BlazePhoto (image processing software)
The software CD contains the image editing program BlazePhoto. This program offers basic functions for archiving and post processing of photos. The program allows you to improve, change and manage images scanned with the Multi Scanner and burn them to CD/DVD.
7.1. Installation
Insert the supplied software CD in the CD/DVD drive of your computer. The Welcome window appears on the display of your computer. Select the option "Install BlazePhoto 2.0" to install the program. Follow the instructions of the installation program during the installation.

Note:
- You should back up the data on your computer prior to the installation of the supplied software. The manufacturer shall not be liable for any loss of data.
- The BlazePhoto program only operates with Windows 98, ME, 2000, XP, Vista and 7 but not with MAC OS, Linux or other operating systems.
7.2. Editing functions
Images scanned with the Multi Scanner are usually edited in three steps: The images are first imported in the BlazePhoto program. These images can be changed with various functions in the next step. Images can, for instance, be rotated, Red Eye can be removed or text can be inserted. The images can then be arranged in files, burnt to CD/DVD or printed.

7.2.1. Importing photos (Get Photo)
The "Get Photo" menu offers various options for importing images from different sources, such as the Multi Scanner, a digital camera or the hard disk into the program. After clicking on "Get Photo", the following options are available:
When the option Search folder is selected, the drives and folders currently available on the computer are shown in the program section. The folder containing the respective images can then be selected. The images contained therein are then shown in the preview so that you can select individual or all images.
By selecting the menu option Import from photo scanner, images can be directly scanned into the program from a flatbed or special photo scanner, provided the scanner is activated through a TWAIN driver from the computer.
If you wish to import images through a film scanner, allowing scanning directly from the computer, use the option Import from film scanner.
Use the option Camera & removable storage device to import already existing images from storage medium, such as a memory card, a camera, a USB stick, etc. First select the storage medium on which the images are located.
Using the function Search local hard disk images can also be imported from the hard disk of the computer. The program will automatically search the hard disc for existing images.
If the program BlazePhoto is already running and the Multi Scanner is connected (see 6.10. USB mode) a window for importing the images is automatically opened. You can also achieve this at any time by selecting the menu item "Cameras and removable storage devices" in the "Photo imp." menu.
7.2.2. Preview

The Preview function can be used to import images in various ways. You can either view an individual image, thumbnails of all images existing in the selected folder or a mixture of both. By clicking twice on a thumbnail with the left mouse button, the image is displayed.
Preview images can also be displayed individually or as a full-screen slideshow by selecting the options "Full screen view" or "Slideshow" (see above illustration). By pressing the ESC key, the Full screen view and Slideshow mode is ended.
If you have selected a template view of the images, you can also determine the sorting order according to which the images are listed.

The clipboard function allows you to pre-select individual images for further processing. Highlight one or several images in the preview by clicking on them with the left mouse button and selecting the option "Hold". A lock symbol will then be applied to the thumbnails in the template.
In order to remove an individual image again from the Clipboard, click on the image with the right mouse button and select "Delete selection". To remove all images from the Clipboard click on the "Clear" option on the right of the clipboard.
7.2.3. Edit
To edit an image, select the image from the preview and click on Edit using the left mouse button. The image then appears in an enlarged view with the available editing tools.
Accept a change by clicking on "OK" after every change. Click on "Reset" to reject the change.
The general tools allow you to crop or change the orientation of an image. The menu offers the following options:
- Rotate: An image can be rotated in 90-degree increments to the left or right. Select "Rotate" and then "Left" or "Right".
- Flip: Select the "Flip" function to flip an image horizontally along a vertical line or vertically along a horizontal line. Flip the image "horizontally" or "vertically" as desired.
- Resize: You can change the resolution of an image by either manually entering new values or by adapting the image in the Preview accordingly.
- Crop: Select the "Crop" function to crop an image. The image will then display a cropping frame which can be adjusted as required. After confirming by clicking on "OK", the dark image section is cut away.

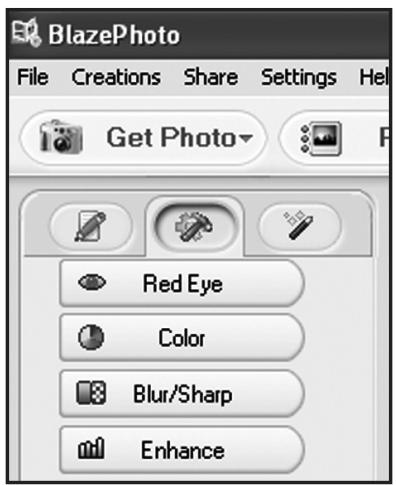
You can improve the overall appearance of an image by changing the colour or sharpness of the image using the following functions:
- Red eye: If a person appears to have red eyes in an image, this can be corrected. Using the mouse, drag a close frame around the eye and then click on "OK". To apply the frame correctly, first enlarge the image using the zoom function above the image.
- Color: In some images the image quality can be improved by adjusting the brightness, contrast, hue or colour saturation. Select the "Color" option for the adjustment options.
- Blur/Sharp: This function allows adjustment of the image sharpness.
- Enhance: By selecting the "Enhance" function, the colours of an image are automatically adjusted. Various types of adjustment are available.
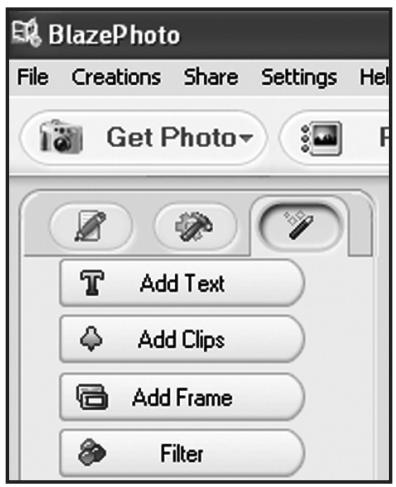
There are also other tools available for correcting or adding to an image. These include:
- Add Text: If you wish to add text to an image, enter the respective text in the text field of the option and position it inside the image using the mouse.
- Add Clips: You can add so-called clip art to an image. First select the respective graphics from the list. Use the mouse to change the size of the graphics and position it inside the image.
- Add Frame: To add a frame around an image, select the respective frame from the provided list.
- Filter: This function can be used to distort an image using different effects. Choose a special effect and view the result.
7.2.4. Create
The BlazePhoto program offers you the option to compile image series and save these for archiving or forwarding on CD or DVD.
- Create disk: Select option "Create disk" to save images to CD or DVD. This will save all images on the CD or DVD.
- Create slideshow DVD: The program offers the option to create and save a set slideshow from the images on the clipboard. The slideshow is initially stored in a file on the hard disk and can then also be burnt to a DVD for playback via a DVD player.
- HTML album: If you wish to collate an image series on an HTML page, first move the images to the clipboard. Next select the option "HTML album" and save the data. The thus generated file and the image files can be directly uploaded to the Internet.
7.2.5. Share
- Export to file: By selecting this option, the resolution and file format of all images on the clipboard are adjusted simultaneously and are stored together in a file.
- Send email to: To send one or several images by email, first move the images to the clipboard. By selecting the option "Send email to...", the images are processed for forwarding and passed on to the email program.
- Print: Images on the clipboard can be printed in various formats. Upon clicking on "Print" a window appears in which the image size, alignment and number of images per page can be set prior to commencing the print operation.
Various functions from sections "7.2.4 Create" and "7.2.5. Share" are also directly available on the standard user interface of the program. You will find these in the bottom right of the program window, as shown below.
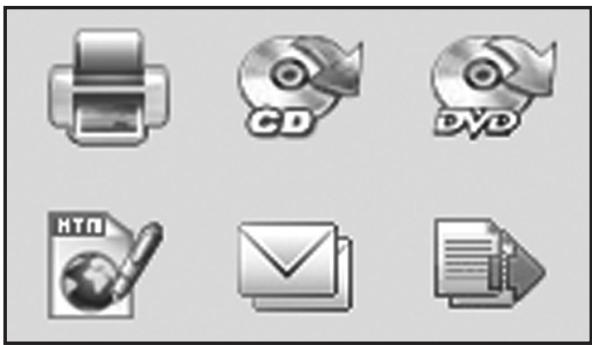
natural_image
Six grayscale icons representing media and document processing functions (no text or symbols)8. Disposal
Dispose of this packaging in the proper manner befitting the relevant materials, and in an environmentally responsible manner, at the collection points provided.
Disposing of this product correctly:
The sign shown opposite indicates that electrical and electronic equipment is not permitted to be disposed of together with normal domestic rubbish/garbage. Please use the return and collection points in your local authority district or consult the retailer from whom the product was bought. This will prevent potential detrimental effects on the environment and on health arising from improper disposal. For more information please consult your local authority district office.

9. Warranty and Service
In the event of problems with the scanner, our Service department will be able to assist with all queries and problems. The scanner comes with a 2-year warranty. For details please see the enclosed warranty card. Please contact our service before returning a defective scanner.
10. Conformity
his device has been tested in accordance with Part 15 of FCC Regulations, and it has been confirmed that the limits applicable to Class B digital devices have been met. These limits are intended to offer reasonable protection against harmful sources of interference when installed in residential premises. Where this equipment is not installed in accordance with the instructions, televisions, radios and radio controlled devices may suffer interference.
The device can be operated provided the following conditions are met:
(1) This device may not cause any harmful interference.
(2) This device must cope with the effect of interference. This includes interference that can impair the function or cause malfunctioning.
In the event of the device causing radio or television interference this can be easily determined by switching the device on and off users should try to remedy the fault using the following measures:
- Turn the receiving aerial into another direction or install it in another position.
- Increase distance between the device and the receiver.
- Contact your dealer or an experienced radio/television technician.
The manufacturer hereby declares that the CE marking was affixed to this device in accordance with the essential requirements and other relevant provisions of the following EU directives:
Low Voltage Directive 2006/95/EC
EMC Directive 2004/108/EC
RTTE Directive 1999/5/EC

The EC declaration of conformity can be requested from the address stated on the warranty card.
- Technical Specification
| Model | PDF-S 240 SE |
| Image sensor | 5.1 megapixels CMOS sensor |
| Lens | F=3,6; f=4,83 |
| LCD | 6,1 cm (2,4") LTPS LCD display |
| Scanner resolution | 1800 dpi and 2400 dpi (interpolated) |
| Exposure control | Automatic |
| Colour balance | Automatic |
| Data conversion | 24 Bit |
| External memory | SD/SDHC and MMC cards |
| Scanning method | Single Pass |
| Light source | 7x 2 white LED/background light (3 white LED) |
| Power supply: | Via USB connection / SV adapter |
| Mains adapter | Input: 100 - 240V~, 50/60 Hz;Output: 5 V = 1A |
| USB interface | USB 2.0 connection |
| Dimensions (HxWxD) | 220 mm (H) x 208 mm (W) x 147 mm (D) |
| Weight | approx. 1200 g |
System requirements for Multi Scanner
Connection via USB 1.1 or higher as mass storage device. Operating system Windows ^® ME, 2000, XP, Vista, Windows ^® 7; Mac OS 8.6 or higher (OS 10.2.8 or higher for USB 2.0).
System requirements of supplied software
Intel Pentium ^® III, 700 MHz, 256 MB RAM, Windows ^® ME, 2000, XP, Vista, Windows ^® 7, at least 500 MB free hard disk space, Direct X 8.1 or higher, CD ROM drive.

Note:
We reserve the right to make technical and optical improvements to the device as part of product improvements.
Rollei
12. Index
Burning images 28
Call-up Main menu 15, 20
Changing exposure value 14
Color setting 14
Conformity 30
Contents of box 1
Delete 19
Disposal 29
Edit menu, BlazerPhoto 24
Edit menu, playback 17
Edit menu, recording 14
Editing software 24
Effects, photo scanner mode 21
EV value 14
Film type 20
Flipping 13
Image sensor 31
Image, delete 19
Image, flip 13
Image, record 14
Image, rotate 18
Image, transmit 23
Individual image mode 17
Insert negatives 8
Insert photos 9
Insert slides 7
Insertion slot photos 9
Insertion slot slides/negatives 6
Installation software 24
Intended use 5
LED film scanner mode 6, 10
LED photo scanner mode 6, 10
Live display 13, 14
Main features 1
Main menu 11
Memory full 16
Menu options film scanner mode 11
Menu options photo scanner mode 12
Negative holder 8
Operating keys 6
Overview of the Device 6
Photo format 21
Photo sizes 9, 21
Playback 16
Post processing 26
Power supply 10
Print 28
Recording mode 14
Remove red eye 27
Resolution 22
Rotate 18
Safety instructions 4
Saving 15, 19
Scan preview 13, 14
Service 29
Set language 23
Slide holder 7
Slide show 17
Store recording 15
System requirements 31
Technical specification 31
USB mode 23
Warranty 29

natural_image
Black plastic tray component with four rectangular slots, labeled with number 16 (no text or symbols on the object itself)
natural_image
Black rectangular object with multiple slots, labeled 'DBILL' and circled number 17 (no other text or symbols)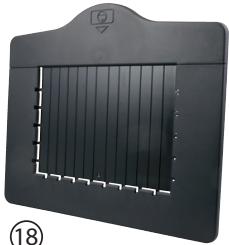
natural_image
Black rectangular panel with vertical slats and a curved top, no visible text or symbols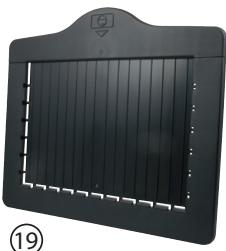
natural_image
Black rectangular electronic device with vertical slats and a top handle, no visible text or symbols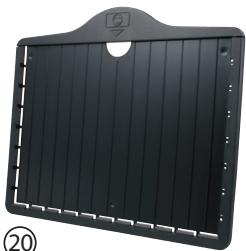
natural_image
Black rectangular object with vertical slats and a circular top, no visible text or symbolsnatural_image
Close-up of hands connecting a black USB port to a black plastic device (no text or symbols visible)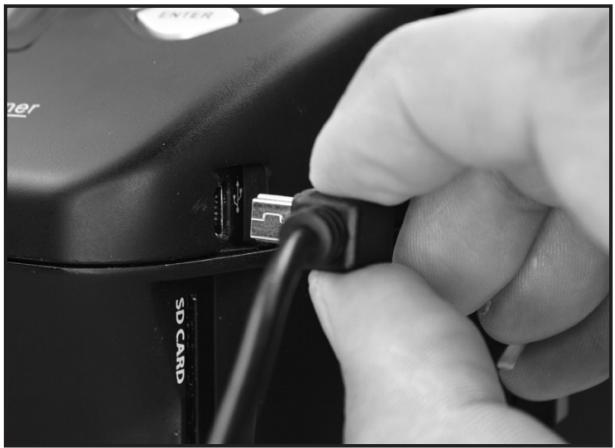
natural_image
Close-up of a hand inserting a USB into a black CD card (no visible text or symbols)Rollei
natural_image
Black plastic slide holder with multiple square cutouts and a central display (no text or symbols visible)natural_image
Black rectangular electronic device casing with three internal slots and a 'OPEN' label, no visible text or symbols on the body itself.natural_image
Black plastic electronic component with multiple slots and mounting holes (no visible text or symbols)natural_image
Black plastic tray with six rectangular slots, no visible text or symbolsnatural_image
Black-and-white photo of a hibiscus flower displayed in a decorative frame (no text or symbols visible)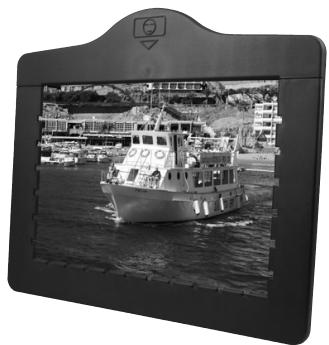
natural_image
Black-and-white photo of a boat on water with boats and buildings in the background (no visible text or symbols)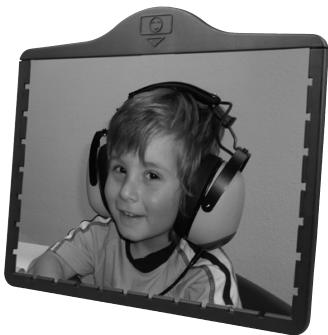
natural_image
Black-and-white photo of a child wearing headphones, smiling (no visible text or symbols)
Hinweis:
natural_image
Black-and-white photo of a printer with a flower wallpaper displayed on its screen, showing control buttons and directional arrows (no text or symbols on the device itself)
Hinweis:
Menü
natural_image
Black-and-white photo of a young child wearing headphones, smiling (no text or symbols visible)natural_image
Black-and-white photo of a young child wearing headphones, smiling (no text or symbols visible)natural_image
Black-and-white photo of a young child wearing headphones, smiling (no text or symbols visible)vertikales Spiegeln

natural_image
Black-and-white photo of a child wearing a full-body medical device, lying down with hands near face (no visible text or symbols)natural_image
Black-and-white photo of a boat with crew on deck, sailing near a coastal cliffside (no visible text or symbols)natural_image
Black-and-white photo of a small boat with crew on deck, sailing near coastal buildings and hills (no visible text or symbols)natural_image
Black-and-white photo of a large boat with crew on deck, docked at a harbor with buildings and hills in the background (no visible text or symbols)natural_image
Black-and-white photo of a large boat with crew and ladders on water, no visible text or symbolsnatural_image
Generic document placeholder icon with a question mark, set against a dark gradient background (no text or symbols)Beenden
natural_image
Six grayscale icons representing different media and document processing functions (no text or symbols)7. Entsorgung
Cher cliente, cher client,
natural_image
Black plastic tray with four square cutouts, labeled with number 16 (no text or symbols on the tray itself)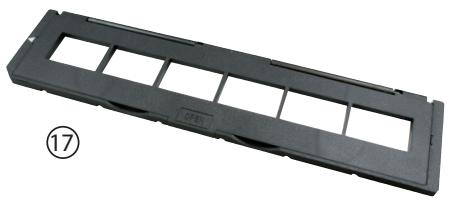
natural_image
Black plastic tray component with multiple slots, labeled with number 17 (no text or symbols on the tray itself)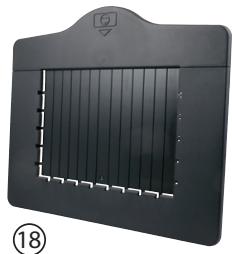
natural_image
Black rectangular object with a grid pattern and a small circular symbol on top, labeled (18) in the corner (no readable text or symbols)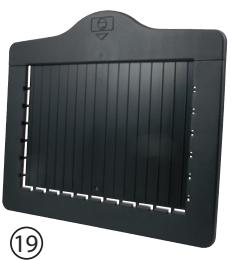
natural_image
Black rectangular object with vertical slats and a curved top, no visible text or symbols
natural_image
Black rectangular object with vertical slats and a circular top, no visible text or symbolsnatural_image
Black plastic tray holding multiple square photodisclosures with visible internal screens (no text or symbols)natural_image
Black rectangular optical flash drive with three slots and a 'OPEN' label, no visible text or symbols on the device itself.natural_image
Black plastic tray with multiple compartments and mounting holes, no visible text or symbolsnatural_image
Black plastic tray with multiple rectangular slots and a small inset slot, shown against a plain white background (no text or symbols visible)natural_image
Black-and-white photo of a hibiscus framed in a decorative frame, no text or symbols visible.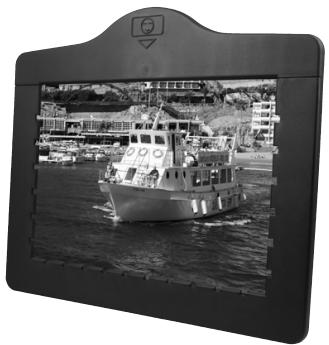
natural_image
Black-and-white photo of a boat on the water with a dock and cityscape in the background (no visible text or symbols)
natural_image
Black-and-white photo of a child wearing headphones, smiling (no text or symbols visible)natural_image
Black-and-white photo of a printer with a flower display and control buttons, showing no visible text or symbols on the device itself.
Remarque :
natural_image
Black-and-white photo of a young child wearing headphones, smiling (no text or symbols visible)Inversion
horizontale
natural_image
Black-and-white photo of a young child wearing headphones, smiling (no text or symbols visible)natural_image
Black-and-white photo of a smiling child wearing a headset, seated indoors (no text or symbols visible)Inversion verticale

natural_image
Black-and-white photo of a child wearing a helmet and visor, looking down at the camera (no text or symbols visible)natural_image
Black-and-white photo of a large boat with crew on deck, sailing on water near a rocky coastline and buildings (no visible text or symbols)natural_image
Black-and-white photo of a small boat with crew on deck, sailing near coastal buildings and hills (no visible text or symbols)
Remarque :
Rollei
Menu
natural_image
Generic document placeholder icon with a question mark, no text or symbols present7.2.1. Importer des photos (Obtenier photo)
natural_image
Six grayscale icons representing media and document processing functions (no text or symbols)8. Élimination
LED mode scanner de films 6, 10
LED mode scanner de photos 6, 10
Subject to technical changes!