MO2549PA CITY SPACE CYCLONIC - With vacuum bag MOULINEX - Free user manual and instructions
Find the device manual for free MO2549PA CITY SPACE CYCLONIC MOULINEX in PDF.
User questions about MO2549PA CITY SPACE CYCLONIC MOULINEX
0 question about this device. Answer the ones you know or ask your own.
Ask a new question about this device
Download the instructions for your With vacuum bag in PDF format for free! Find your manual MO2549PA CITY SPACE CYCLONIC - MOULINEX and take your electronic device back in hand. On this page are published all the documents necessary for the use of your device. MO2549PA CITY SPACE CYCLONIC by MOULINEX.
USER MANUAL MO2549PA CITY SPACE CYCLONIC MOULINEX
city space cyclonic™
natural_image
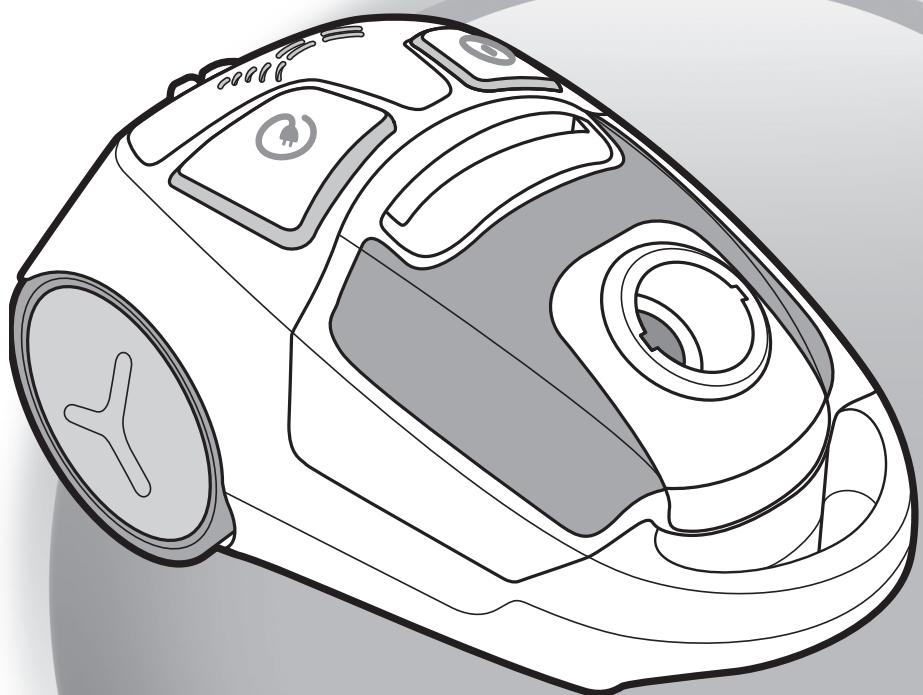
Line drawing of a vacuum cleaner device with control buttons and ventilation slots (no text or symbols)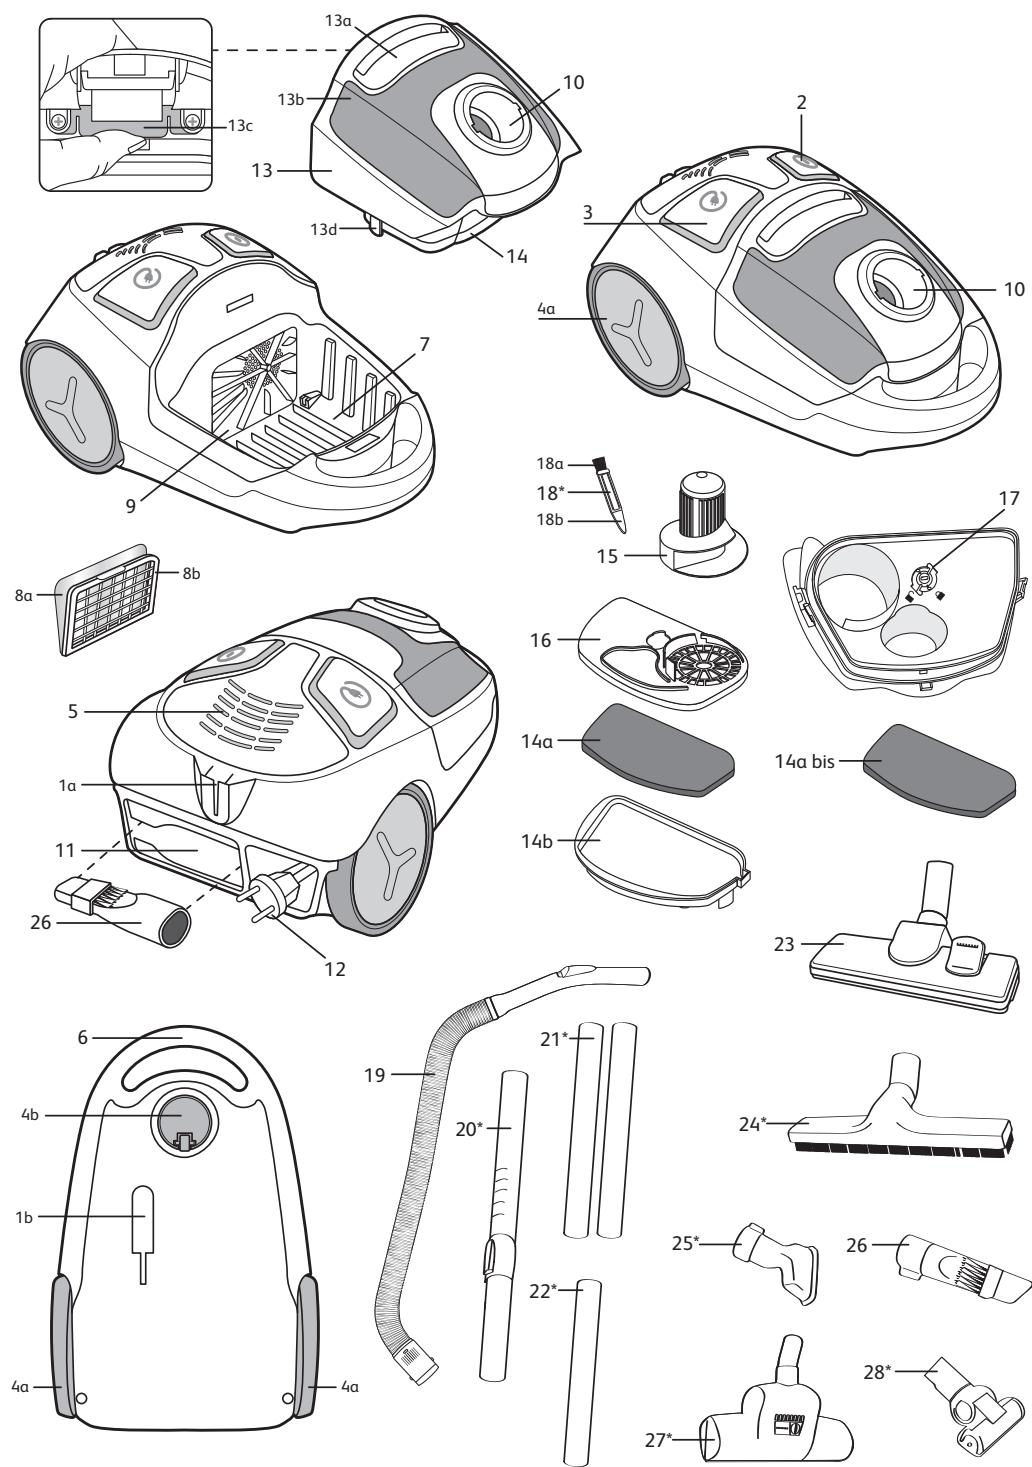
text_image
Diagram of a device with labeled parts, showing a mechanical component and directional arrow indicating rotation or movement.fig. 1
text_image
Diagram of a car engine component with labeled parts 1 and 2, showing internal components and directional arrows.fig. 2
natural_image
Illustration of two hands holding a ruler with a directional arrow indicating measurement (no text or symbols)fig. 3
natural_image
Illustration of two hands holding a wrist with a curved arrow indicating motion or force (no text or symbols)fig. 4
natural_image
Simple line drawing of a mop and cup on a tray, enclosed in a circular frame (no text or symbols)fig. 5
natural_image
Simple line drawing of a broom on tiled floor inside a circular frame (no text or symbols)fig. 6
natural_image
Line drawing of a hand inserting a plug into a device with an arrow pointing to the plug (no text or symbols present)fig. 7
natural_image
Diagram of a device with a plug and ventilation system, no text or symbols presentfig. 8
natural_image
Illustration of two hands in a circular frame with an arrow indicating motion (no text or symbols)fig. 9

natural_image
Diagram of a car being inserted into a plug, showing the plug being inserted (no text or symbols present)fig. 10
natural_image
Illustration of a robotic vacuum cleaner inside a circular frame (no text or symbols)fig. 11
natural_image
Diagram of a vacuum cleaner with a handle and lever mechanism (no text or symbols)fig. 12
natural_image
Diagram of a vacuum cleaner inside a circular frame, showing the brush and handle (no text or symbols)fig. 13
natural_image
Illustration of hands operating a device with an upward arrow indicating motion (no text or symbols present)fig. 14
natural_image
Illustration of a hand holding a small object with an arrow pointing to it, enclosed in a circular frame (no text or symbols)fig. 15a
natural_image
Illustration of a mechanical component being inserted into a housing, showing parts of the engine and casing (no text or symbols present)fig. 15b

natural_image
Illustration of a hand holding a petri dish with a container, surrounded by a circular frame (no text or symbols)fig. 16
text_image
Diagram showing mechanical assembly with numbered components and directional arrows indicating motion or movementfig. 17a
text_image
CLICK!fig. 17b
natural_image
Illustration of a hand pressing down on a mechanical component, with a downward arrow indicating motion (no text or symbols present)fig. 18
text_image
PULL PULLfig. 19
natural_image
Diagram showing a device being cut down into two parts, with arrows indicating downward motion (no text or symbols)fig. 20
natural_image
Illustration of hands cleaning a circular object with a magnified view showing 12h and 3h (no text or symbols)fig. 21
natural_image
Diagram of a device with two stacked compartments and upward arrows indicating motion (no text or symbols)fig. 22
natural_image
Illustration of a hand holding a container with a coiled tube inside a petri dish, enclosed in a circular frame (no text or symbols)fig. 23

text_image
PULL PULLfig. 24
natural_image
Diagram showing a device being cut with arrows indicating downward motion (no text or symbols)fig. 25
natural_image
Illustration of a hand using a tool to inspect or install a fan component, enclosed in a circle (no text or symbols)fig. 26
text_image
OPENfig. 27
natural_image
Illustration of a hand pressing down on a mechanical component with an upward arrow (no text or symbols)fig. 28
text_image
Diagram showing a hand holding a tool with directional arrows and numbered labels ① and ②, likely illustrating a mechanical or process step.fig. 29
natural_image
Illustration of a kitchen utensil with kitchenware and a hand holding a tool (no text or symbols)fig. 30
natural_image
Illustration of a food preparation scene with a hand placing a bowl into a tray, accompanied by a meal kit and a small bowl (no text or symbols visible)fig. 31
text_image
Diagram showing a hand holding a tool with two labeled arrows (① and ②) indicating direction or process steps.fig. 32
natural_image
Illustration of a hand inserting a fan into a machine component (no text or symbols)fig. 33
natural_image
Illustration of a hand using a tool to adjust or install a fan component inside a circular frame (no text or symbols)fig. 34
text_image
CLOSEfig. 35

natural_image
Diagram of a device with two stacked compartments and upward arrows indicating motion (no text or symbols)fig. 36
natural_image
Illustration of hands pouring granular material into a circular container (no text or symbols)fig. 37
natural_image
Diagram showing a hand holding a device with a circular inset highlighting a 24-hour sun (no text or symbols present)fig. 38
natural_image
Illustration of two trash bins with arrows indicating waste or disposal (no text or symbols)fig. 39
natural_image
Diagram of a vacuum cleaner's internal structure with arrows indicating airflow direction (no text or symbols)fig. 40
natural_image
Illustration of hands holding a grid notebook and a flat sheet with a knife, no text or symbols presentfig. 41
natural_image
Illustration of a hand placing a card into a circular container with a downward arrow (no text or symbols)fig. 42
text_image
NEWfig. 43
natural_image
Line drawing of a car's front engine compartment showing internal components (no text or symbols)fig. 44
text_image
CLICK!fig. 45
natural_image
Illustration of a hand using a tool to adjust or install a mechanical component (no text or symbols visible)fig. 46
1. CONSEILS DE SÉCURITÉ
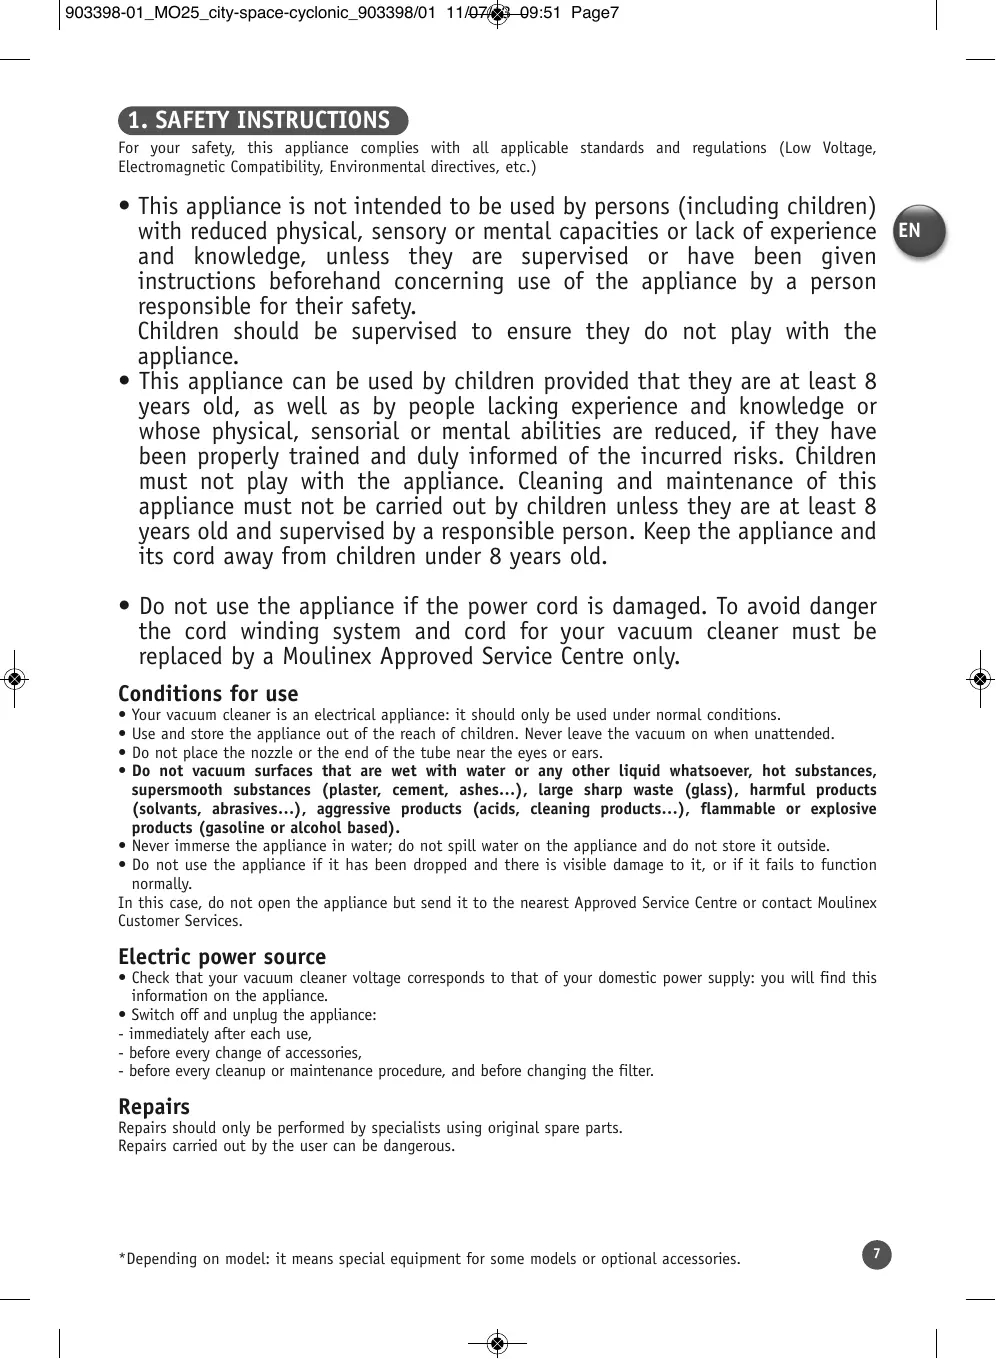
1. SAFETY INSTRUCTIONS
For your safety, this appliance complies with all applicable standards and regulations (Low Voltage, Electromagnetic Compatibility, Environmental directives, etc.)
- This appliance is not intended to be used by persons (including children) with reduced physical, sensory or mental capacities or lack of experience and knowledge, unless they are supervised or have been given instructions beforehand concerning use of the appliance by a person responsible for their safety.
Children should be supervised to ensure they do not play with the appliance. - This appliance can be used by children provided that they are at least 8 years old, as well as by people lacking experience and knowledge or whose physical, sensorial or mental abilities are reduced, if they have been properly trained and duly informed of the incurred risks. Children must not play with the appliance. Cleaning and maintenance of this appliance must not be carried out by children unless they are at least 8 years old and supervised by a responsible person. Keep the appliance and its cord away from children under 8 years old.
- Do not use the appliance if the power cord is damaged. To avoid danger the cord winding system and cord for your vacuum cleaner must be replaced by a Moulinex Approved Service Centre only.
Conditions for use
- Your vacuum cleaner is an electrical appliance: it should only be used under normal conditions.
- Use and store the appliance out of the reach of children. Never leave the vacuum on when unattended.
- Do not place the nozzle or the end of the tube near the eyes or ears.
- Do not vacuum surfaces that are wet with water or any other liquid whatsoever, hot substances, supersmooth substances (plaster, cement, ashes...), large sharp waste (glass), harmful products (solvants, abrasives...), aggressive products (acids, cleaning products...), flammable or explosive products (gasoline or alcohol based).
- Never immerse the appliance in water; do not spill water on the appliance and do not store it outside.
- Do not use the appliance if it has been dropped and there is visible damage to it, or if it fails to function normally.
In this case, do not open the appliance but send it to the nearest Approved Service Centre or contact Moulinex Customer Services.
Electric power source
- Check that your vacuum cleaner voltage corresponds to that of your domestic power supply: you will find this information on the appliance.
- Switch off and unplug the appliance:
- immediately after each use,
- before every change of accessories,
- before every cleanup or maintenance procedure, and before changing the filter.
Repairs
Repairs should only be performed by specialists using original spare parts.
Repairs carried out by the user can be dangerous.
2. DESCRIPTION
-
a - Horizontal parking b - Vertical parking
-
ON/OFF pedal
-
Cord winding pedal
-
a - Wheel b - Multidirectional wheel
-
Air outlet grill
-
Transport handle
-
Dust tray compartment
-
a - Microfilter (ref MT0056.01) b - Motor protection grill
-
Microfilter compartment
-
Vacuum opening
-
Storage compartment for crevice/brush nozzle
-
Power cord
-
Dust tray
a - Dust tray handle
b - Lid
c - Lid opening lever
d - Extraction clips for the HEPA filter case
- HEPA filter case (ref. MT0056.01):
a – Black foam filter (14a bis : replacement black foam filter)
b - HEPA filter
- Air/dust separator
- Air/dust separator base
- Air/dust separator base bolt
- 3 in 1 accessory* (ref. MT0056.01):
a – Air/dust separator cleaning brush
b – HEPA filter scraper + unscrewing accessory for the air/dust separator
Standard accessories :
- Tube with grip and mechanical power control
- Telescopic tube*
- Tubes*
- Tube extension*
- Multi-surface nozzle
- Parquet nozzle*
- Unholstery nozzle*
- Crevice/brush nozzle
- Turbobrush*
- Mini turbobrush*
3. BEFORE FIRST USE
Unpacking
- Unpack your appliance and remove all possible labels.
- Keep your guarantee form and read the instructions carefully before using your appliance for the first time.
Safety precautions
• Each time before use, unwind the power cord completely.
- Do not jam it or allow it to rub against sharp edges.
- If you need to use an extension cord, make sure that it is in perfect condition and that it corresponds to your mains voltage.
- Your vacuum cleaner is fitted with a safety device which prevents the motor from overheating. In certain cases (when used on chairs, sofas, etc.) the safety device may be tripped and the appliance may make an unusual noise that is not serious.
- Do not move the vacuum cleaner by pulling on the power cord, the appliance must only be moved using its transport handle.
- Do not use the power cord to lift the appliance.
- Never unplug the appliance by pulling on the power cord.
- Never activate the vacuum cleaner without its dust tray (13) or without its HEPA filter case (14) (black foam filter (14a) and HEPA filter (14b)).
- Use original Moulinex filters only.
- Use original Moulinex accessories only.
- If you have any difficulties in finding accessories or filters for this vacuum cleaner, contact the Moulinex Customer Service.
- Switch off and unplug your vacuum cleaner each time after use.
- Always switch off and unplug your vacuum cleaner before maintenance or cleaning.
4. USE
Assembling the appliance
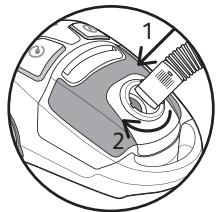
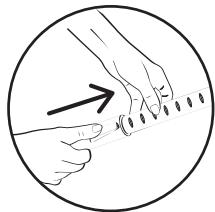
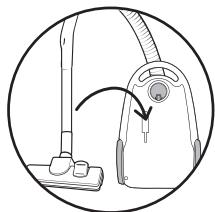
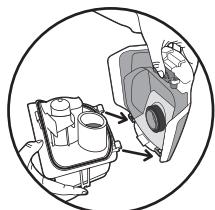
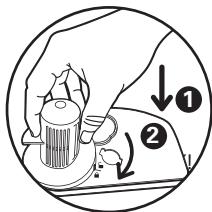
- Firmly place the tube (19) in the vacuum opening (10) and turn to screw on – fig.1. To withdraw the tube, turn in the opposite sense and pull – fig.2.
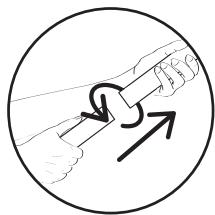
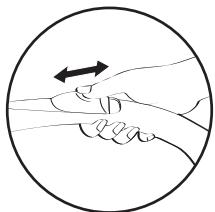
- If your vacuum cleaner is equipped with a telescopic tube* (20): push the adjustment button forward, pull out the tube as much as necessary and then release the button to block it – fig. 3. Otherwise, assemble both tubes* (21) by turning them slightly – fig. 4.
- Attach the tube extension* (22) if necessary.
- Fit the corresponding accessory to the end of the tube or butt:
WARNING: Always switch off and unplug your vacuum cleaner before changing any accessories.
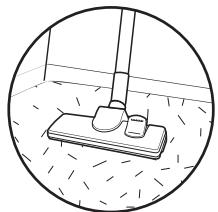
- For rugs and carpets: use the multi-surface nozzle (23) in the retracted brush position (fig. 5) or the Turbobrush* (fibers and animal hairs) (27* or 28*).
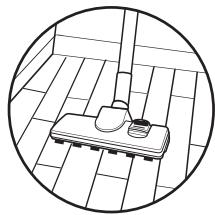
- For wood and hard floors: use the multi-surface nozzle (23) in the exterior brush position (fig. 6) or, for best results, use the parquet nozzle* (24).
- For corners and hard to reach spots: use the crevice/brush nozzle (26) in the flat position.
- For upholstery and delicate surfaces: use the brush side of the crevice/brush nozzle (26) or the upholstery nozzle* (25).
Plugging in the power cord and starting the appliance
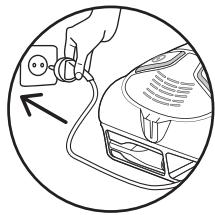
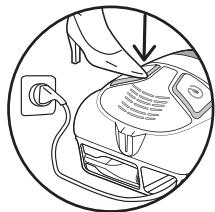
- Unwind the power cord completely, plug in your vacuum cleaner (fig. 7) and press the ON/OFF pedal. On/OFF (2) – fig. 8.
- Set the suction power using the manual power control located on the grip: increase the control opening in order to manually diminish the vacuuming power, for example on fragile surfaces... – fig. 9.
Storing and transporting the appliance
- After use, switch off your vacuum cleaner by pressing the ON/OFF pedal (2) -fig. 8- and unplug it (fig. 10).
- Rewind the power cord by pressing the power cord rewind pedal (3) - fig. 11.
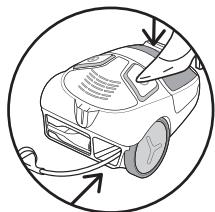
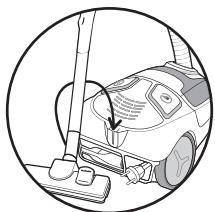
- In the vertical position, place the nozzle (23) in its compartment under the appliance (1b) – fig. 12.
- In the horizontal position, place the nozzle (23) in its compartment at the back of the appliance (1b) – fig. 13.
- Transport your vacuum cleaner easily thanks to its transport handle (6).
5. CLEANING AND MAINTENANCE
Important: Always switch off and unplug your vacuum cleaner before maintenance or cleaning. Warning: remember to stand over a bin every time you clean the dust tray.
Remove the dust tray (13)
- Withdraw the tube (19) from the vacuum opening (10) - Fig.2.
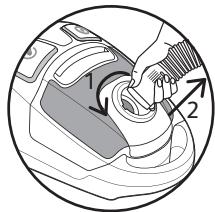
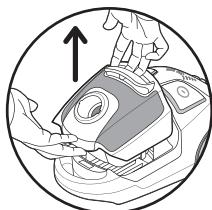
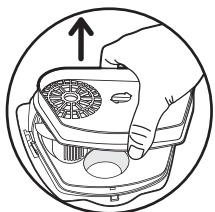
- Remove the dust tray (13) from its housing (7): take the tray handle (13a) and remove the tray – fig. 14.
1. EMPTY THE DUST TRAY
Important: Empty the dust tray (13) after each use.
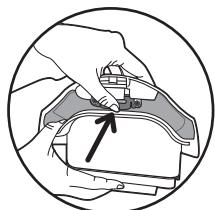
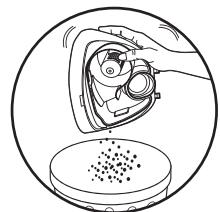
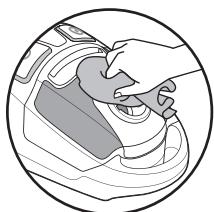
- Press on the opening lever (13c) – fig. 15a—and then remove the lid – fig. 15b.
- Empty the tray over a bin – Fig. 16.
- Make sure that no dust remains inside the tray.
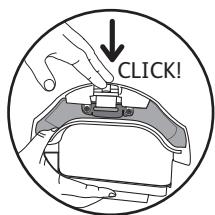
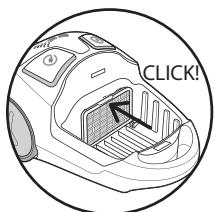
- Place the lid back: place the stops in their slots – fig. 17a – and close the lid – fig. 17b.
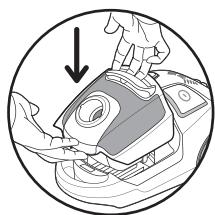
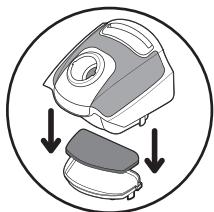
- Replace the tray (13) in its compartment (7) – Fig. 18.
2. CLEANING THE BLACK FOAM FILTER (14a)
Important! To optimise the performance of your vacuum cleaner, make sure you clean the foam (14a) each time you empty the dust tray (13).
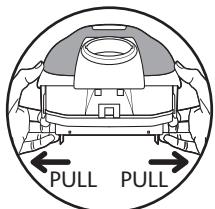
- Pull simultaneously on the opening clips (13d) of the HEPA filter case - Fig.19.
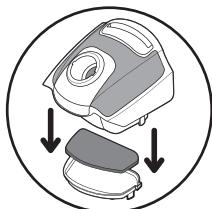
- Separate the black foam filter (14a) from the HEPA filter (14b) - Fig. 20.
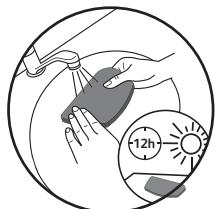
- Wash the black foam filter (14a) under the tap, squeeze it out like a sponge and leave to dry for 12 hours - fig. 21.
*Depending on model: it means special equipment for some models or optional accessories.
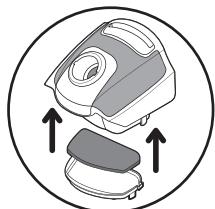
- Once the foam is completely dry, assemble the HEPA filter case (14): black foam filter (14a) and HEPA filter (14b) under the dust tray (13) – Fig. 22, then replace the dust tray inside its compartment (7) – Fig. 18.
Warning!
The black foam filter (14a) should only be put back into the appliance when it is completely dry. You can use your vacuum cleaner while the black foam filter (14a) is drying by using the replacement black foam filter (14abis).
3. CLEAN THE DUST TRAY (13) AND THE AIR/DUST SEPARATOR (15)
Important: Clean the dust tray (13) and the dust separator (15) every month.
- Press on the opening lever (13c) – fig. 15a—and then remove the lid – fig. 15b.
- Empty the tray over a bin – Fig. 23.
- Unlock the HEPA filter case (14) by simultaneously pulling on the opening clips (13d) located at either end of the dust tray – Fig. 24.
- Remove the HEPA filter case (14) – Fig. 25.
- Turn the compartment over and place the accessory (18b) into the lock slot of the air/dust separator base (17) - fig 26.
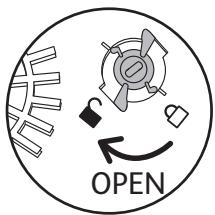
- Open, making sure to turn in the proper sense for unlocking (■) - Fig.27.
- Remove the dust separator base (16) - Fig. 28.
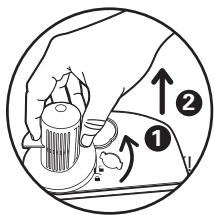
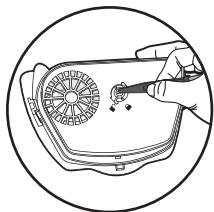
- Unclip then remove the air/dust separator (15) by turning it in the unlocking direction (☐) – Fig.29.
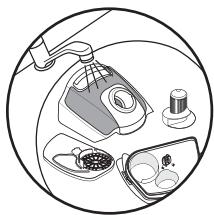
- Then rinse the dust tray (13), the air/dust separator base (16) and the air/dust separator (15) with soapy water – Fig. 30.
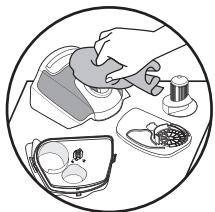
- Dry them with a cloth – Fig. 31.
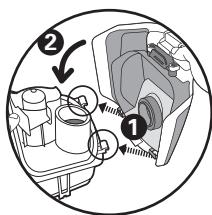
- Once dry, replace then clip the air/dust separator (15) on the air/dust separator base (16), following the right sense for locking (☐) – Fig.32.
- Place them back on the dust tray (13) - fig 33.
- Place the accessory (18b) into the lock slot of the air/dust separator base (16) - fig 34.
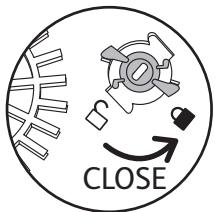
- Close, making sure to turn in the proper sense for locking (☐) – Fig.35.
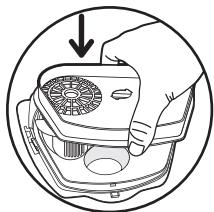
- Clip the HEPA filter case (14) (black foam filter (14a) + HEPA filter (14b)) onto the tray – Fig. 36.
- Replace the tray (13) in its compartment (7) – Fig. 18.
4. CLEANING THE HEPA FILTER (14b)
The air we breathe contains particles that can be allergenic: larva and dust mite faeces, mould, pollen, smoke, and animal waste (hair, skin, saliva, urine). The finest of these particles penetrate deeply into the respiratory system, where they can cause inflammation and alter the respiratory function as a whole.
(H)EPA ([High] Efficiency Air Particle Filter) filters retain even the smallest particles. Thanks to the (H)EPA filter, the air that is expelled back into the room is cleaner than the air vacuumed.
Important!
Remember to clean the HEPA filter case (14) [black foam filter (14a) and HEPA filter (14b)] every month.
- Pull simultaneously on the opening clips (13d) of the HEPA filter case - Fig.19.
- Separate the black foam filter (14a) from the HEPA filter (14b) - Fig. 20.
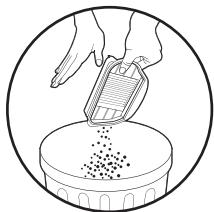
- Turn the HEPA filter (14b) over and tap the dust into a dustbin - fig. 37.
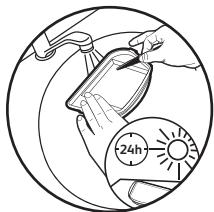
- Then scrape the HEPA filter under warm water using the accessory (18b), then leave the HEPA filter to dry for 24h - Fig. 38.
- Once the foam is completely dry, assemble the HEPA filter case (14): black foam filter (14a) and HEPA filter (14b) under the dust tray (13) – Fig. 22, then replace the dust tray inside its compartment (7) – Fig. 18.
- Ensure that the HEPA filter (14b) is completely dry before you put it back in the appliance.
Warning! Make sure that the whole filter system is well placed before starting your appliance again.
5. REPLACE THE FILTERING SYSTEM
5.1. HEPA FILTER CASE (14) - Ref. MT0056.01
Important: Change the HEPA filter case (14) every 6 months.
The HEPA filter case (ref. MT0056.01 is available at your local retail store or at one of our Authorized Service Centres.
- Pull simultaneously on the opening clips (13d) of the HEPA filter case - Fig.19.
- Separate the black foam filter (14a) from the HEPA filter (14b) - Fig. 20.
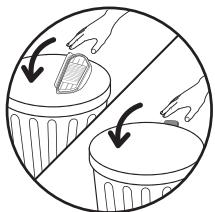
- If the HEPA filter case (14) (black foam filter (14a) and HEPA filter (14b)) is damaged, throw it in the bin – Fig. 39 - and replace it with a new HEPA filter case (ref. MT0056.01).
- Assemble the HEPA filter case (14): black foam filter (14a) and HEPA filter (14b) under the dust tray (13) – Fig. 22, then replace the dust tray inside its compartment (7) – Fig. 18.
5.2. MICROFILTER (8A) - Ref. MT0056.01
Important: Change the microfilter\* every 6 months.
The microfilter ref. MT0056.01 is available at your local retail store or at one of our Authorized Service Centres.
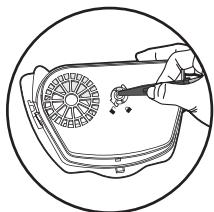
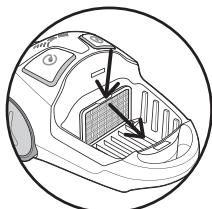
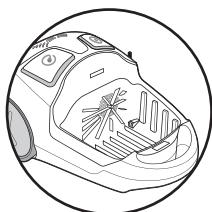
- Remove the motor protection grill (8b) - Fig. 40.
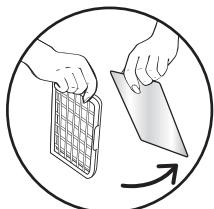
- Remove the microfilter (8a) – Fig. 41 – and keep the motor protection grill (8b).
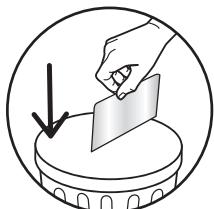
- Throw the microfilter (8a) in the bin – Fig. 42.
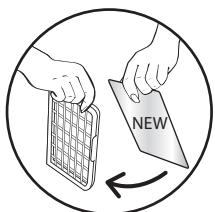
- Place a new microfilter (8a) on the motor protection grill (8b) - Fig. 43.
- Slide the ledges into the slots - fig. 44.
- Screw on the motor protection grill (8b) - Fig. 45.
- Before placing back the dust tray, make sure that the motor protection grill is placed properly.
Cleaning the vacuum cleaner
- Wipe the body of the vacuum cleaner and accessories with a soft damp cloth, then dry.
- Wipe the lid with a dry cloth - fig. 46.
- Do not use any detergents, or corrosive or abrasive products.
6. TROUBLESHOOTING
Important: If you notice that your vacuum cleaner is not operating well, switch it off using the ON/OFF pedal before carrying out any checks.
If your vacuum cleaner will not start
- The appliance is not plugged in : check that the appliance is correctly plugged in.
If your vacuum cleaner has no suction power
- Either an accessory or the hose tube is partially blocked: unblock the accessory or the hose.
- Check that the dust tray is placed properly inside its compartment.
If your vacuum cleaner is not working properly, makes noise or whistles
- Either an accessory or the hose tube is partially blocked: unblock the accessory or the hose.
- The dust tray is full: empty it (see chapter on CLEANING AND MAINTENANCE).
- The filtration system is saturated: clean the HEPA filter case (14) (see chapter on CLEANING AND MAINTENANCE). If the problem persists, change the filtration system (see chapter on CLEANING AND MAINTENANCE).
- Make sure that the dust tray (13) is well positioned in the dust tray compartment (7).
- The manual vacuum power regulator on the grip is open: close it.
If it is difficult to move the nozzle
- Open the regulator on the handle in order to decrease suction power.
- Make sure that the position of the all-surface nozzle (23) corresponds to the floor being vacuumed:
- for rugs and carpets, use the nozzle in the retracted brush position,
- for parquets and smooth grounds, use the nozzle in the exterior brush position.
If the power cord does not wind completely
- The cord slowed down as it was winding up: pull the power cord out again and press the power cord wind button.
If your vacuum cleaner stops during vacuuming
- The thermal security system has been activated. Make sure that the hose or tube are not blocked and that the filters are not saturated. Let cool for 30 minutes before restarting the vacuum cleaner.
If a problem persists, take your vacuum cleaner to your local Moulinex Approved Service Centre or contact a Moulinex customer service office.
GUARANTEE
- This appliance is for domestic use only; any misuse or use that does not conform to the instructions will release the brand from all liability and the guarantee will be cancelled.
-
Always read the instructions carefully before using your appliance for the first time: use that does not conform to the instructions will release Moulinex from all liability.
-
ACCESSORIES*
| ACCESSORIES* | USE | INSTALLING THE ACCESSORY | PLACES OF PURCHASE |
| Upholstery nozzle | For cleaning upholstery. | Fit the upholstery nozzle to the end of the tube. | Authorized Moulinex Service Centres |
| Crevice tool convertible into brush | For corners and hard to reach spots. | Fix the crevice tool convertible into brush to the end of the butt or tube. | |
| Parquet nozzle | For delicate floors. | Fit the parquet nozzle to the end of the tube. | |
| Mini turbo-brush | To deeply clean upholstery fabrics. | Fit the mini turbo-brush to the end of the tube. | |
| Turbo-brush | For removing animal hairs and fibres embedded in rugs and carpets. | Fit the turbo-brush to the end of the tube. |
8. ENVIRONMENT
According to current regulations, every device that is out of use must be made definitively unusable: Therefore, disconnect and cut the cord before throwing out the device.

Think of the environment!
① Your appliance contains valuable materials which can be recovered or recycled.
Leave it at a local civic waste collection point.
1. VEILIGHEIDSVOORSCHRIFTEN
(OFF/ON) "رودش/خاموش" 2
- پدال ماریجی سیم
چرخ - a .4
b - چرخ چند جهته
.5 .کوره خروجی هوا
.6. دسته حمل