
BIBO 562000 - Kettle MORPHY RICHARDS - Free user manual and instructions
Find the device manual for free BIBO 562000 MORPHY RICHARDS in PDF.
| Product type | Multicooker 10-in-1 |
| Brand | Morphy Richards |
| Model | BIBO 562000 |
| Power supply | 220-240 V ~ 50 Hz |
| Adjustable temperature | 37°C to 100°C |
| Timer | Up to 60 minutes |
| Mixing speed | 10 speeds + pulse |
| Main functions | Fry, steam, boil, stew, blend, mix, chop, emulsify, melt, stir |
| Included accessories | Measuring cup, steaming basket, mixing spatula, serrated blade, chopping blade, spatula, cleaning brush |
| Safety | Lid lock, automatic shut-off, overheat protection |
| Maintenance | Hand wash, do not immerse base, do not put in dishwasher |
| Warranty | 2 years |
| After-sales service | Morphy Richards |
Frequently Asked Questions - BIBO 562000 MORPHY RICHARDS
User questions about BIBO 562000 MORPHY RICHARDS
0 question about this device. Answer the ones you know or ask your own.
Ask a new question about this device
Download the instructions for your Kettle in PDF format for free! Find your manual BIBO 562000 - MORPHY RICHARDS and take your electronic device back in hand. On this page are published all the documents necessary for the use of your device. BIBO 562000 by MORPHY RICHARDS.
USER MANUAL BIBO 562000 MORPHY RICHARDS
Supreme Precision Multicooker
Please read and keep these instructions
The use of any electrical appliance requires the following common sense safety rules. Please read these instructions carefully before using the product.
- This appliance can be used by persons with reduced physical, sensory or mental capabilities, or lack of experience and knowledge, if they have been given supervision or instruction concerning the use of the appliance in a safe way and understand the hazards involved.
- Children shall not play with the appliance.
- The appliance shall not be used by children.
- Keep the appliance and cord out of the reach of children.
WARNING: The mixing blades are very sharp. Handle with care when using and cleaning. - For care and cleaning information, see page 27.
- Always disconnect the appliance from the supply if it is left unattended and before assembly, disassembly or cleaning.
- If the supply cable is damaged, it must be replaced with a special cable assembly available from the manufacturer or its service agent in order to avoid a hazard.
- This appliance is not intended to be operated by means of an external timer or separate remote control system.
In addition, we offer the following safety advice.
Location
Always locate your appliance away from the edge of a worktop.
- Ensure that the appliance is used on a firm, flat surface.
- Do not use the appliance outdoors, or near water.
Mains Cable
- The mains cable should reach from the socket to the base unit without straining the connections.
- Do not let the mains cable hang over the edge of a worktop where a child could reach it.
-
Do not let the cable run across an open space e.g. between a low socket and table.
-
Do not let the cable run across a cooker or toaster or other hot area which might damage the cable.
Personal Safety
WARNING: To protect against fire, electric shock and personal injury, do not immerse cord, plug and appliance in water or any other liquid.
WARNING: Avoid contact with moving parts.
Extreme caution must be observed when moving an appliance with hot contents.
- Do not use product with wet or moist hands

Treating Scalds
- Run cold water over the affected area immediately. Do not stop to remove clothing, get medical help quickly.
Other Safety Considerations
If the mains lead of this appliance is damaged do not use it. Telephone Morphy Richards helpline for advice.
- The use of accessory attachments not recommended by the manufacturer may cause damage to the unit.
- Do not place the appliance on or near heat sources such as gas or electric stove, ovens, or burners.
- Keep the appliance and the cable away from heat, direct sunlight, moisture, sharp edges and the like.
- When using the unit, ensure the lid is in place before switching on.
- Do not remove the lid until the blades have stopped.
After one operation cycle, you must allow the appliance to cool down completely, then clean the appliance to revert burning.
- Do not operate the appliance continuously.
- Be careful if hot liquid is poured into your Multicooker as it can be ejected out of the appliance due to sudden steaming.
Electrical Requirements
- Check that the voltage on the rating plate of your appliance corresponds with your house electricity supply which must be A.C. (Alternating Current).
WARNING: THIS APPLIANCE MUST BE EARTHED.
- Should the fuse in the mains plug require changing a 13 amp BS1362 fuse must be fitted.


Introduction
Thank you for your recent purchase of the Morphy Richards Supreme Precision 10 in 1 Multicooker. Please read this instruction booklet carefully before you use your new Multicooker for the first time.
Your Multicooker is designed to allow you to produce a wide range of dishes with minimum fuss. The automatic programmes allow you to make perfect risotto and pasta dishes every time without having to keep a watchful eye over a pan on the hob. It really couldn't be easier!
Remember to visit www.morphyrichards.co.uk to register your product's two year guarantee.
Note
To get the most out of your new Multicooker, please read these instructions thoroughly before use.
Contents
Health And Safety 2
Introduction 15
Product Overview 16
Control Panel 16
Before First Use 16
Getting Started 16
Cookbook 16
Automatic Programmes 16
Manual Programmes 17
To Set-Up Before Use 17
To Attach The Lid 17
Quick Start Recipes 17
Using Automatic Programmes 18
Using Manually 19
Fry or Sauté 19
Steam 19
Boil 19
Fast Stew 20
Mix 20
Blend 20
Chop 21
Emulsify 21
Melt 21
Stir 21
Jug 21
Feature Overview 21
Accessories 22
Lock Ring 23
Care And Cleaning 23
Error Codes 24
Troubleshooting 24
Contact Us 25
Guarantee 25
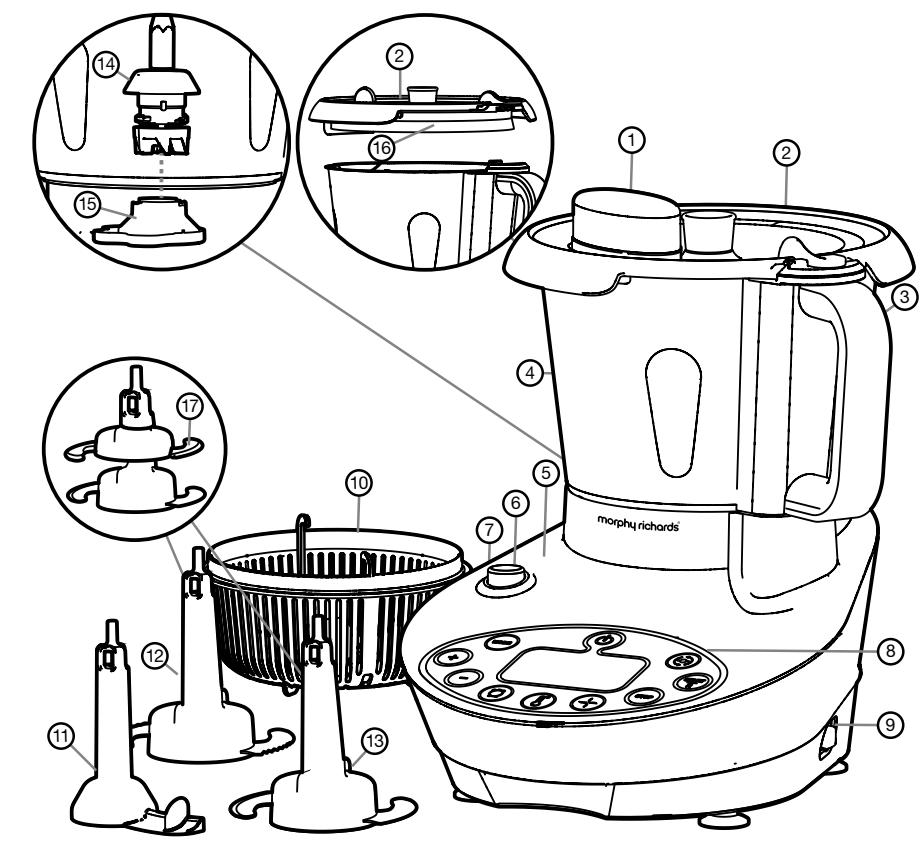
Features
(1) Measuring Cap
(2) Lid
(3) Handle
(4) Jug
(5) Main Unit
(6) Jug Release Button
(7) Cable Socket (on side)
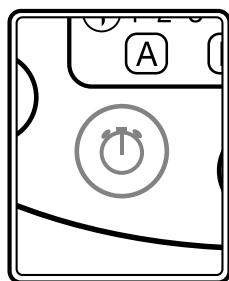
(8) Control Panel (19-35)
(9) On/Off Switch
(10) Steaming Basket
(11) Mixing Paddle
(12) Serrator Blade
(13) Chopping Blade
(14) Drive Shaft
(15) Lock Ring
(16) Lid Gasket
(17) Blade Cover (X2)
(18) Spatula (not shown)
(19) Mains Lead (not shown)
(20) Cleaning Brush (not shown)
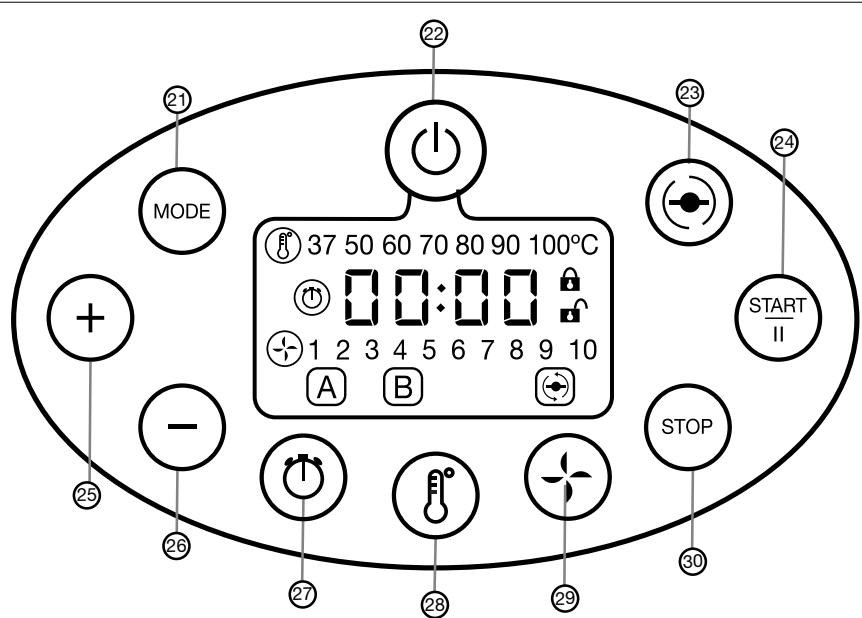
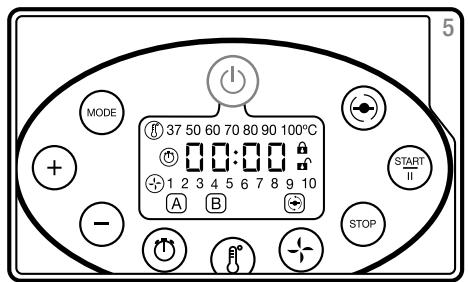
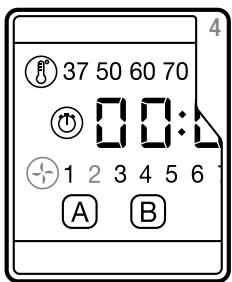
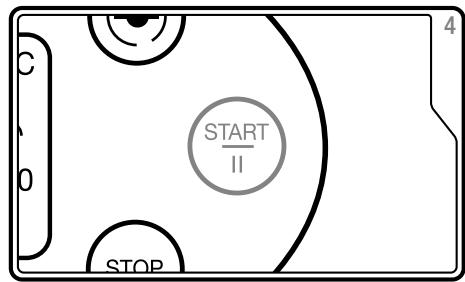
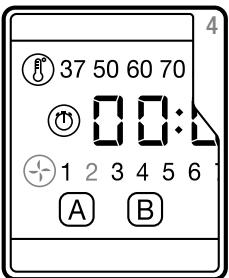
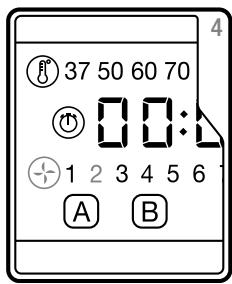
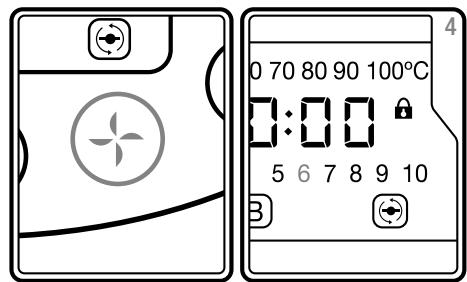
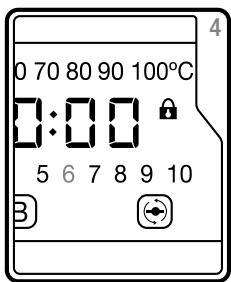
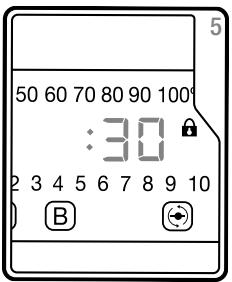
Control Panel
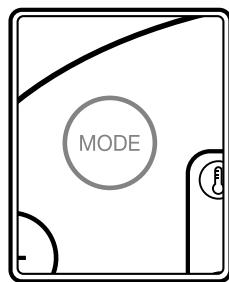
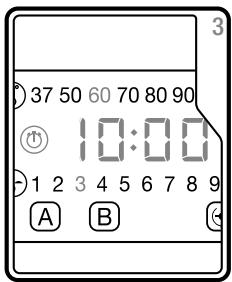
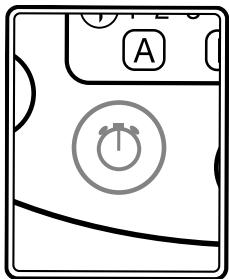
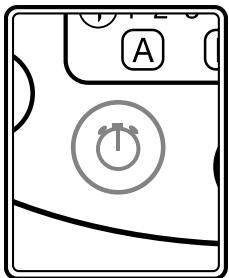
(21) Mode Button
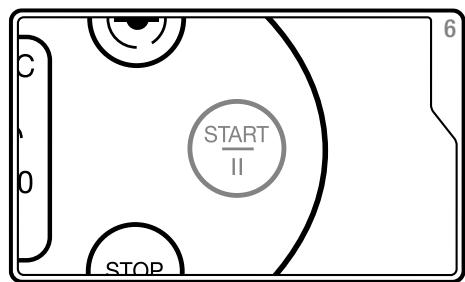
(22) Standby Button
(23) Pulse Button
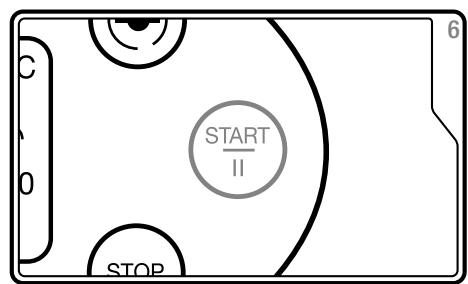
(24) Start Button
(25) Increase Button
(26) Decrease Button
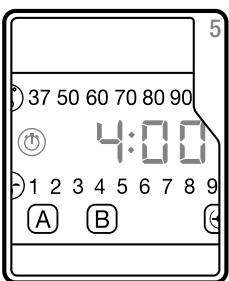
(27) Timer Button
(28) Temperature Button
(29) Mixing Speed Button
(30) Stop Button
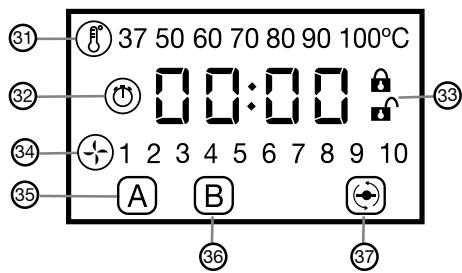
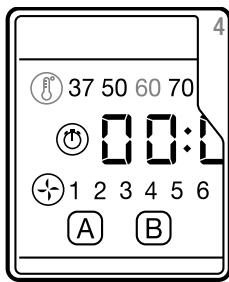
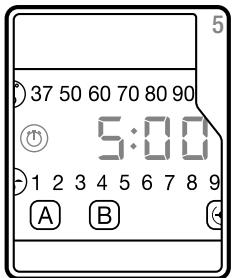
(31) Temperature icon(s)
(32) Timer Icon
(33) Lid Lock Icon(s)
(34) Mixing Speed Icon(s)
(35) AutomaticProgrammeAIcon
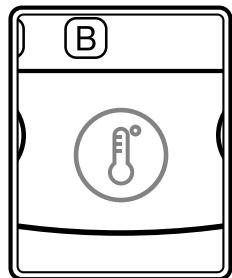
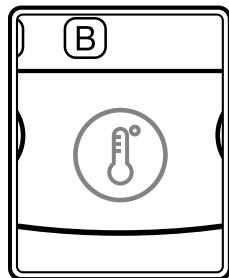
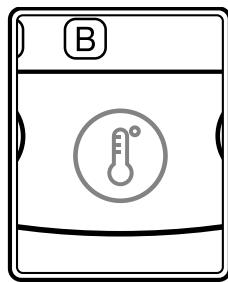
(36) AutomaticProgrammeBIcon
(37) Pulse Icon
Before First Use
It is important to clean your Multicooker before first use or if it has not been used for a long period of time. See the 'Care and cleaning' section for more information.
- Unpack your Multicooker and remove any cardboard inserts or labels from the product.
- Remove the Blade Covers (17) from the Serrator Blade (12) and Chopping Blade (13).
WARNING: BLADES ARE SHARP
- Wash the Measuring Cap (1), Lid (2), Mixing Paddle (11) Steaming Basket (10), Blade Covers (17) and Spatula (18) in warm soapy water. Wash the Chopping and Serrator Blades (12), (13) using the Cleaning Brush (20) and holding them from the top to avoid cutting yourself.
- Rinse the inside of the Jug (4) with warm soapy water. Ensure the contacts on the bottom of the Jug are dry before first use.
With a damp cloth clean the Main Unit. - Carefully dry all the washed parts.
Warning
Do not move your multlcooker while in use.
DO NOT USE METAL UTENSILS IN THE MULTICOOKER, DOING SO MAY DAMAGE THE COOKING SURFACE.
Getting Started
- New kitchen appliances can often seem daunting when you start to use them for the very first time. Your new Multicooker is much easier to use than it may look at first glance. To help you understand the process better, we have included a step by step process for a mushroom risotto recipe on the automatic setting (page 8), and a bechamel sauce on the manual (page 9). For more recipes you can make in your new Multicooker, see the cookbook included in the box.
Cookbook
The cookbook supplied with your new Multicooker contains recipes for both the automatic and manual programmes. We recommend trying a couple of the recipes to 'test' your Multicooker and to help understand its functions and capabilities.
Automatic Programmes
- Your Multicooker has 2 automatic settings. They have been designed with the ideal temperatures, mixing speeds and times to produce perfect rice and pasta dishes every time. How to use the automatic programmes is explained on page 10.
During each programme, your Multicooker will beep at selected points. When instructed by your Multicooker, add the required ingredients to the Jug (4). Refer to the cookbook supplied with your Multicooker for recipes and what should be added at which interval in the selected programme.
Manual Programmes
- Your Multicooker utilises 2 main processes mixing and heating. These coupled with the timer, allow you to use your Multicooker for a wide range of tasks in the kitchen.
- When you have started to get to grips with your Multicooker, you will be able to create and adapt your own recipes. The supplied cookbook also includes a variety of delicious dishes you will be able to make with ease.
Note
Please read this manual fully before using your Multicooker.
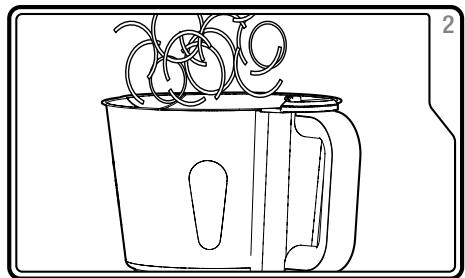
- At certain points, to aid cooking it may be required to scrape the sides of Jug with a spatula to remove any food adhered to the surface.
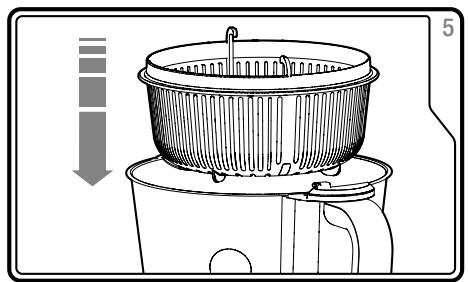
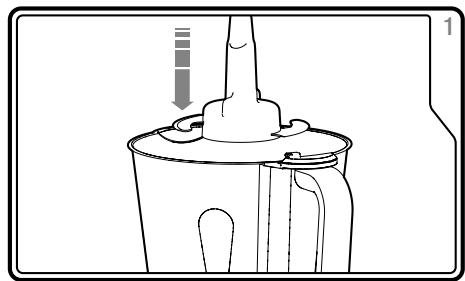
To Set-Up Before Use
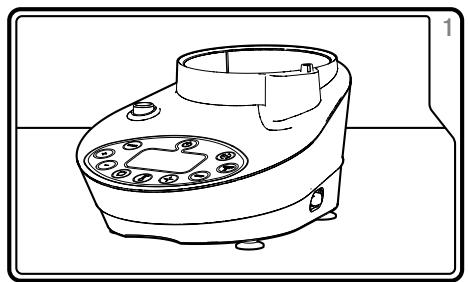
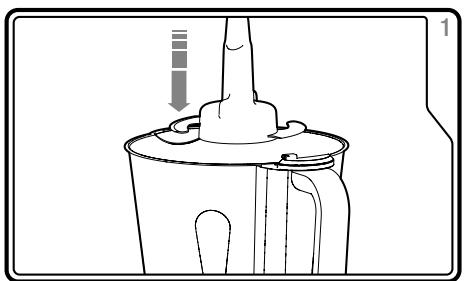
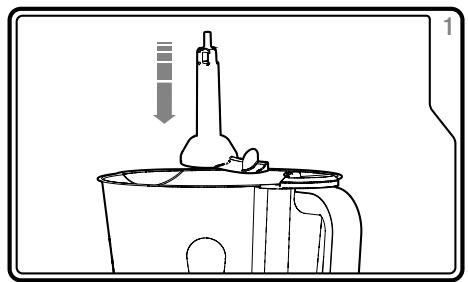
1 Place the Main Unit (5) on a flat, stable surface away from the worktop edge. Ensure your Multicooker is secure and stable before use.
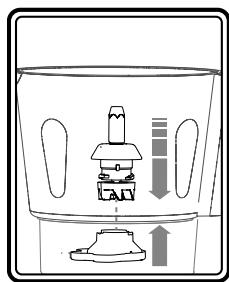
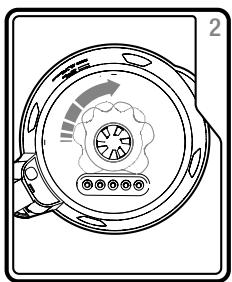
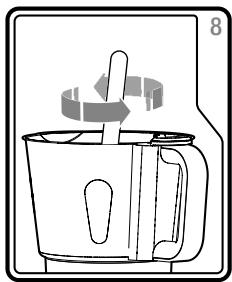
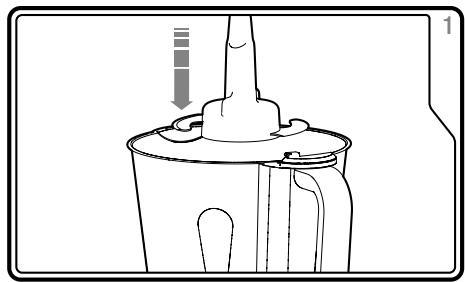
Ensure the Drive Shaft (14) is correctly locked into the Jug (4) using the Lock Ring (15) located on the base of the Jug. Turn the Lock Ring clockwise to secure before using your Multicooker. The Drive Shaft should not be loose.
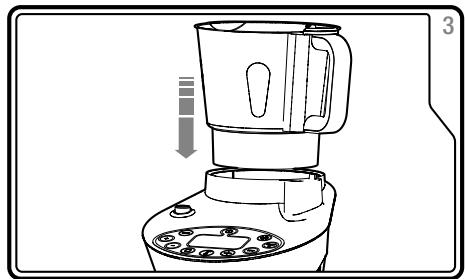
3 Insert the Jug into the Main Unit. Press down
4 Plug your Multicooker into the mains. firmly to lock into place.
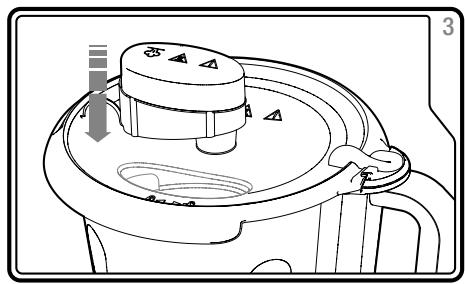
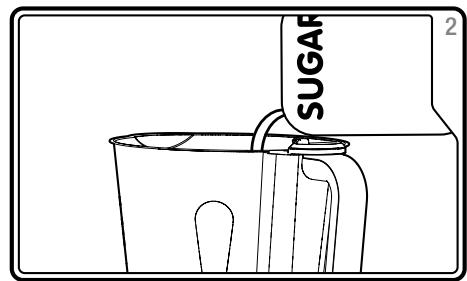
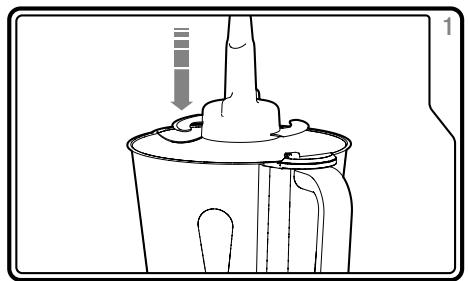
To Attach the Lid
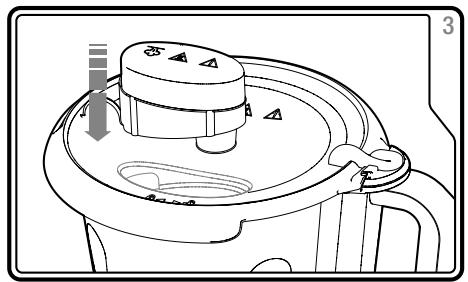
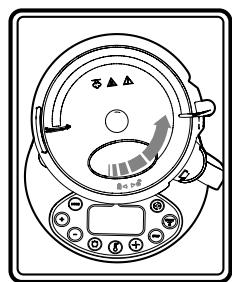
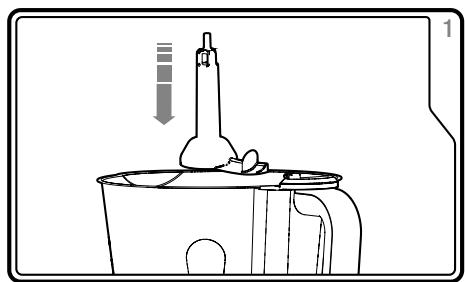
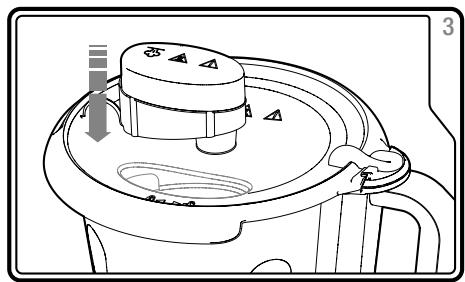
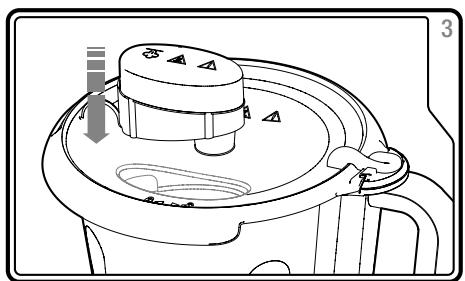
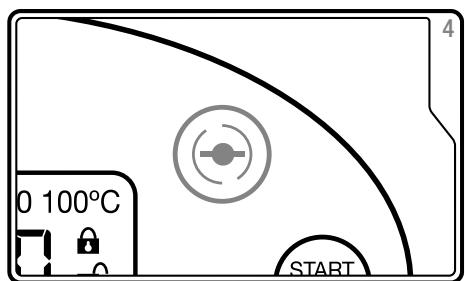
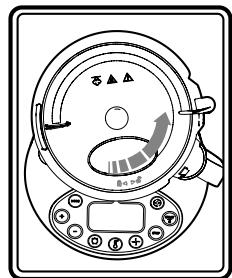
5 Attach the Lid (2), place on top of the Jug with the handle located within the cutout on the Lid. Press down and twist clockwise to lock into place.
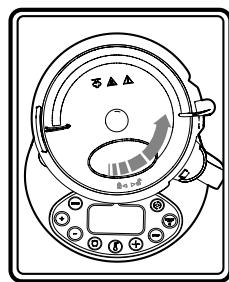
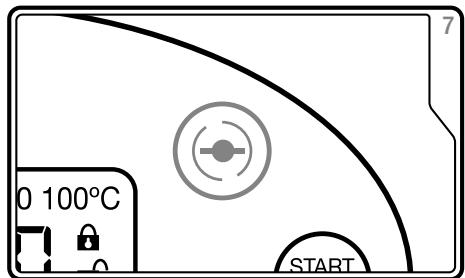
6 When your Multicooker is switched on, if the Lid is not correctly attached to the Jug the Mixing Speed (29) and Pulse (23) Buttons will not be illuminated, and the 'unlocked' Lid Lock Icon (33) will be illuminated.
Quick Start Recipe
Automatic - Mushroom Risotto
We understand that using a product that appears complicated for the first time can often be a daunting experience. Using your new product 'hands on' can often be the best way to learn how to use it.
So to help, we have included these recipes; mushroom risotto on the automatic setting and bechamel sauce on the manual. When you have got to grips with your new Multicooker there are more recipes and dishes for you to try on both the automatic and manual settings in the cookbook supplied with the product.
For more information on how to use your Multicooker on the Automatic setting, see page 10.
Ingredients:
40ml Extra virgin olive oil
30g Shallot, finely chopped
20g White onion finely chopped
Garlic clove, finely chopped
200g Button mushrooms, diced
150g Shiitake mushrooms, diced
300g Risotto rice
40ml Dry white wine
- 630ml Water
Vegetable stock cube
50ml Double cream
40g Butter
- 30g Parmesan cheese, grated
Method:
- Ensure the Drive Shaft (14) and Lock Ring (15) are correctly located and locked into place in the Jug (4).
- Insert the Jug into the Main Unit (5).
- Place the Mixing Paddle (11) onto the Drive Shaft.
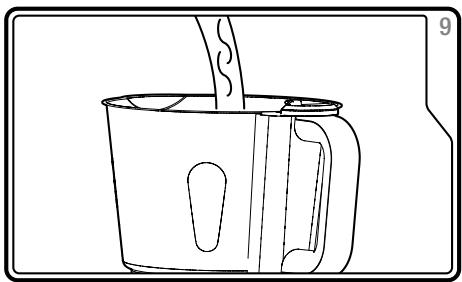
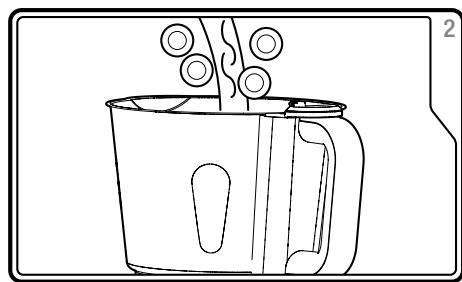
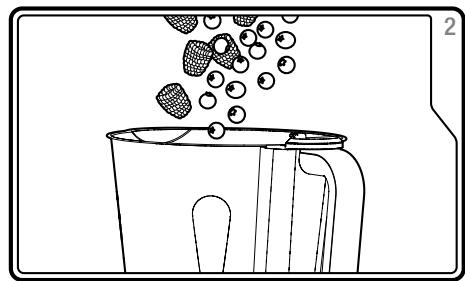
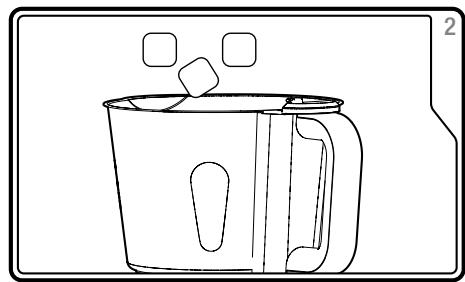
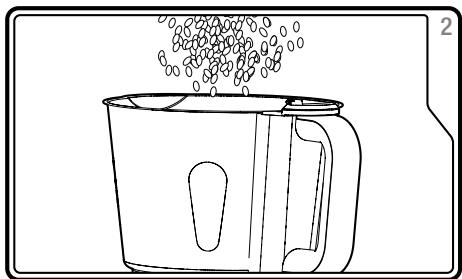
- Add the oil, shallot, white onion, garlic, button and shiitake mushrooms to the Jug.
- Place the Lid (2) on the Jug, press down and twist clockwise to lock into place. Insert the Measuring Cap (1) into the Lid.
- Switch your Multicooker on (9).
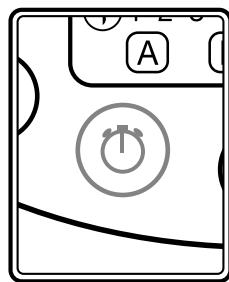
Press the Mode Button (21) once to select programme A (risotto). The Automatic Programme A Icon will illuminate (35)
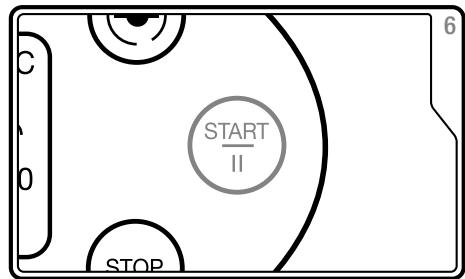
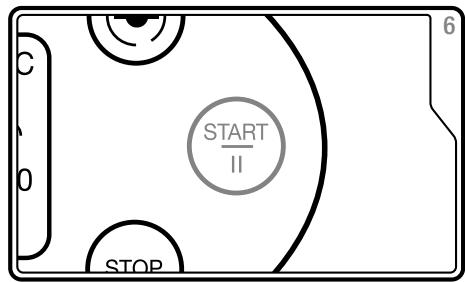
Press the Start Button (24). Your Multicooker will begin to cook.
After 5 minutes your Multicooker will beep twice. Remove the Lid and Measuring Cap. If required, scrape the sides of the Jug with a silicone spatula. - Add the risotto rice to the Jug, after 1 minute add the wine, water and crumble in the stock cube. Replace the Lid, without the Measuring Cap.
After 10 minutes your Multicooker will beep three times. Remove the Lid and add the cream. Replace the Lid.
After 8 minutes your Multicooker will beep four times. Remove the
Lid and add the butter and Parmesan cheese. Replace the Lid.
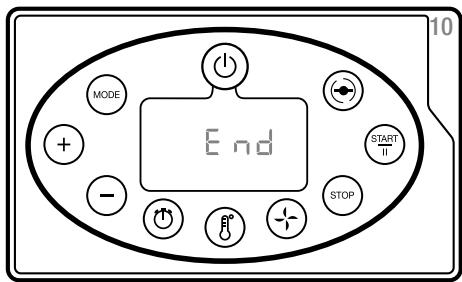
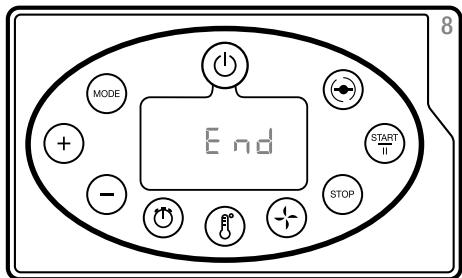
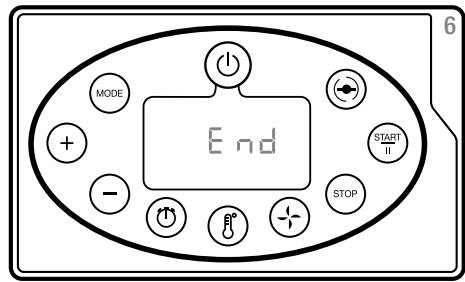
After 4 minutes your Multicooker will beep and Display 'End'.
- Your risotto is ready.
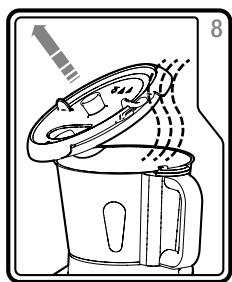
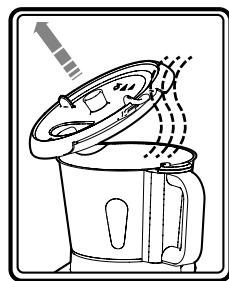
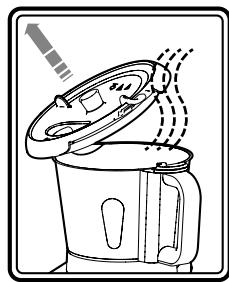
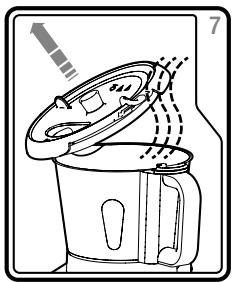
- Carefully twist the Lid anticlockwise and remove, being careful about any hot steam that will escape (angle the Lid away from you for safety). Allow the water collected on the inside of the Lid to fall back into the Jug, to avoid drips onto your Multicooker.
- Give the risotto a stir with a spatula or wooden spoon before serving.
Manual - Bechamel Sauce
Your new Multicooker utilises 2 main processes, mixing and heating. Coupled with a timer this allows you to use your Multicooker for a wide range of processes within your kitchen. How to set up your Multicooker for the different processes are detailed on pages 12-24.
The test recipe below for making a bechamel sauce requires you to set the timer, heating and mixing functions. When you have got to grips with programming the manual settings, you can try many more of the manual recipes supplied within the cookbook, or adapt your own recipes for use within your Multicooker.
Ingredients:
500ml Whole milk
- 50g Butter
40g Plain flour
4g Salt
- Nutmeg, to taste
Method:
- Ensure the Drive Shaft (14) and Lock Ring (15) are correctly located and locked into place in the Jug (4).
- Insert the Jug into the Main Unit (5).
- Place the Mixing Paddle (11) onto the Drive Shaft.
Add all the ingredients (listed left) into the Jug. - Place the Lid (2) on the Jug, press down and twist clockwise to lock into place. Insert the Measuring Cap (1) into the Lid.
- Switch your Multicooker on (9).
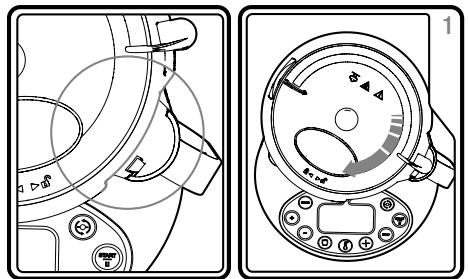
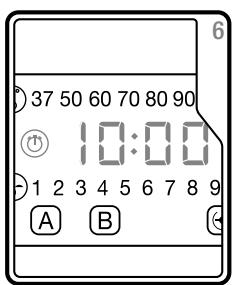
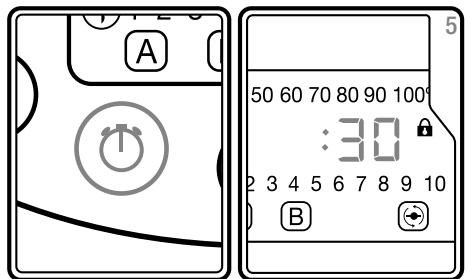
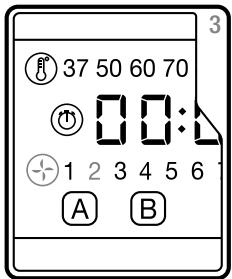
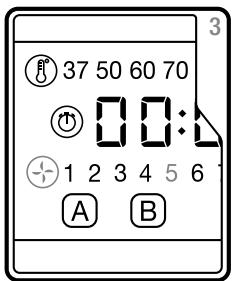
- Press the Mixing Speed Button (29), Use the Increase and Decrease Buttons (25),(26) to set the Mixing Speed Icon (34) to speed 3. The '3' will be flashing.
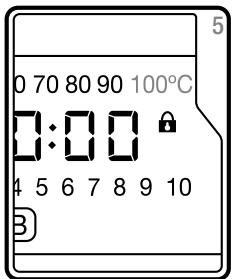
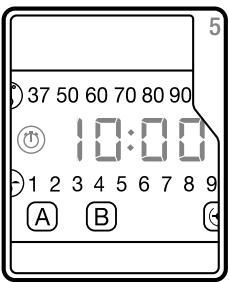
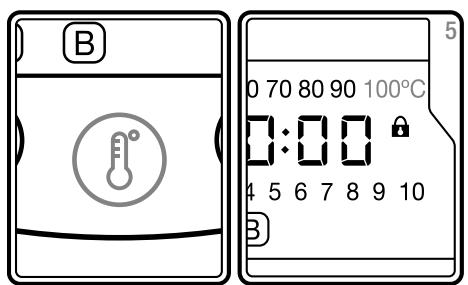
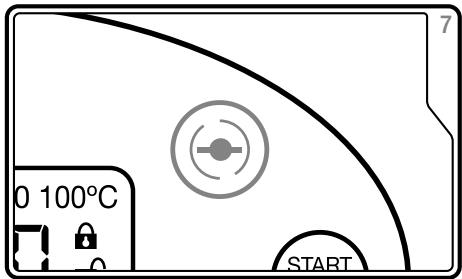
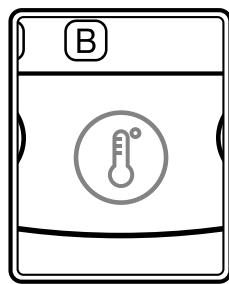
- Press the Temperature Button (28), Use the Increase and Decrease Buttons to set the Temperature Icon (31) to 80^ . The '80' will be flashing.
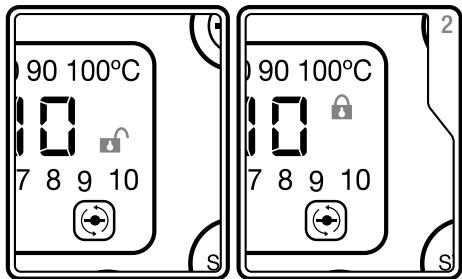
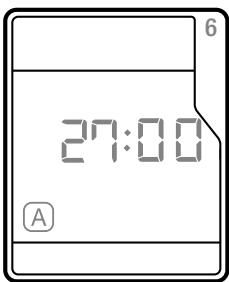
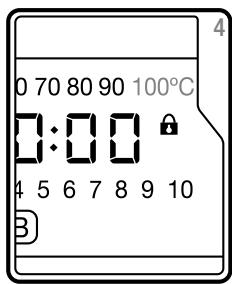
- Press the Timer Button (27) once (to set the minutes section). Use the Increase and Decrease Buttons to set the Timer Icon (32) to 10 minutes. The display will read '10:00'.
The Control Panel (8) should have 10 Minutes, 80^ and Speed 3 selected (flashing).
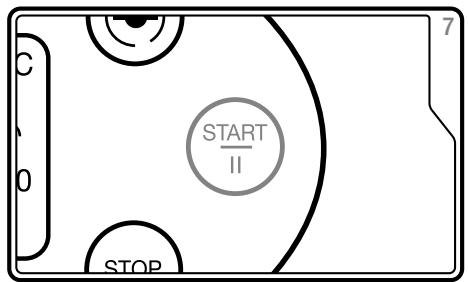
Press the Start Button (24). Your Multicooker will beep and start.
After 10 minutes your Multicooker will beep and Display 'End'. - Your bechamel sauce is ready.
- Carefully twist the Lid anticlockwise and remove, being careful
about any hot steam that will escape (angle the Lid away from you for safety). Allow the water collected on the inside of the Lid to fall back into the Jug, to avoid drips onto your Multicooker.
Give the sauce a stir with a wooden spoon and enjoy.
Using Automatic Programmes
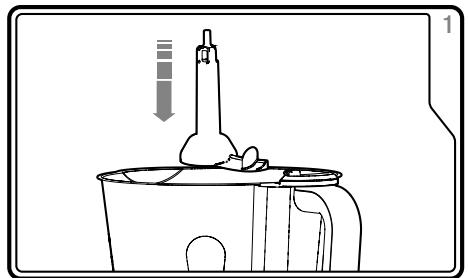
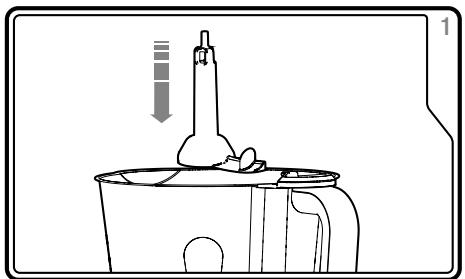
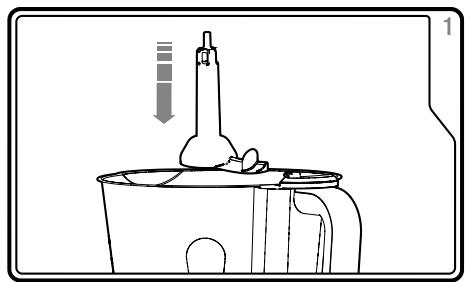
7 Follow the steps in 'To Set-Up Before Use' to set-up your Multicooker. Place the Mixing Paddle (11) onto the Drive Shaft (14).
Refer to the selected recipe and add the first set of ingredients to the Jug (4).
9 Attach the Lid (2), Place the Measuring Cap (1) into the space in the Lid (if stated to do so in the recipe).
10 Switch your Multicooker On (9).
11 The Control Panel (8) will illuminate and your Multicooker will sound. If the Control Panel is not lit, press the Standby Button (22).
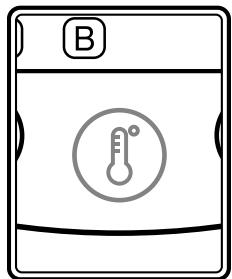
12 Press the Mode Button (21) to highlight programme A (Risotto) (35). Press again to cycle through Mode B (Pasta) (36) and back to the manual setting. The designated letter, A or B will be displayed on the Control Panel.
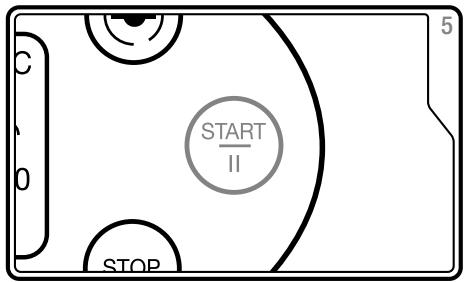
13 Press the Start Button (24), your Multicooker will begin to cook.
14 After 5 minutes your Multicooker will beep twice, this is the first prompt to add the next set of ingredients listed in the recipe. Remove the Lid, add the Ingredients and replace the lid. Your Multicooker will continue to cook.
15 Your Multicooker will prompt another 2 times during the cooking process to add more ingredients (times vary by programme). Refer to the cookbook to add the correct
16 When finished, your Multicooker will sound and display 'END'. Your Multicooker will slow to speed 1 and continue mixing to prevent food from sticking to the base of the Jug. Press the Stop Button (30).ingredients to the Jug.
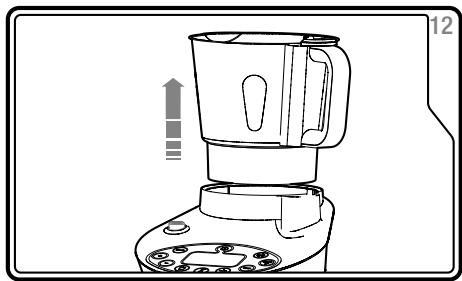
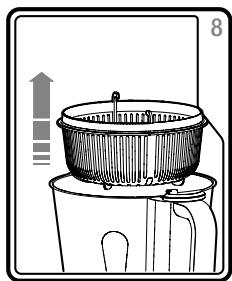
17 Remove the Lid by twisting anticlockwise and then lifting away from the Jug. Angle the Lid away from you when lifting, the contents will be hot. Allow the water collected on the inside of the Lid to fall back into the Jug, to avoid drips onto your Multicooker. Carefully remove the Mixing Paddle from the Jug.
WARNING HOT STEAM
18 Press the Jug Release Button (6) and remove the Jug from the Main unit before serving.
Using Manually
The 10 main functions are explained here, frying/sautéing, steaming, boiling, fast stewing, mixing, blending, chopping, emulsifying, melting and stirring.
- When you have used your Multicooker a few times, you will be able to adapt recipes and create your own delicious dishes.
Fry or Saute
For use in recipes like cottage pie.
19 Follow the steps in 'To Set-Up Before Use' to set-up your Multicooker. Place the Mixing Paddle (11) onto the Drive Shaft (14).
20 Add your ingredients to the Jug and attach the Lid (2).
21 Press the Mixing Speed Button (29), the Icon (34) will flash. Use the Increase and Decrease Buttons (25),(26) to adjust the speed setting. Use a slow speed (1-2) to stir the food while frying and prevent sticking.
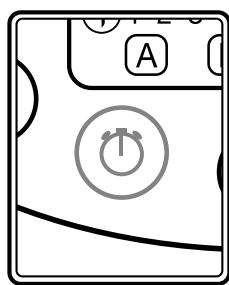
Press the Timer Button (27) (if using) and the first half of the Timer (32) will flash. Use the Increase and Decrease Buttons to adjust the timer in minutes. Press the Timer Button again, the second half of the Icon will flash, use the Increase and Decrease buttons to adjust the timer in seconds. You can use your Multicooker without setting the timer for a maximum of 30 minutes.
Press the Temperature Button (28), the Temperature Icon (31) will flash. Use the Increase and Decrease Buttons to adjust the temperature in celsius up to 100^ .
24 Press the Start Button (24). Your Multicooker will sound and begin the cooking process.
25 When finished, your Multicooker will sound and display 'END'. Your Multicooker will slow to speed 1 and continue mixing to prevent food from sticking to the base of the Jug. Press the Stop Button (30).
26 Remove the Lid by twisting anticlockwise and then lifting away from the Jug. Angle the Lid away from you when lifting, the contents will be hot. Allow the water collected on the inside of the Lid to fall back into the Jug, to avoid drips onto your Multicooker. Carefully remove the Mixing Paddle from the Jug.
WARNING HOT STEAM
Steam
For use in recipes like carrots in parsley butter.
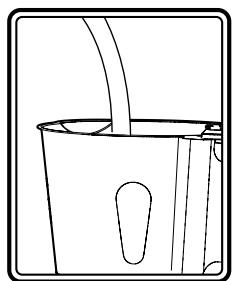
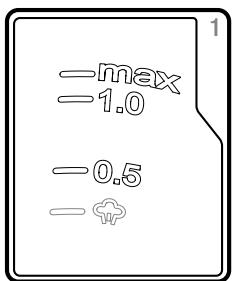
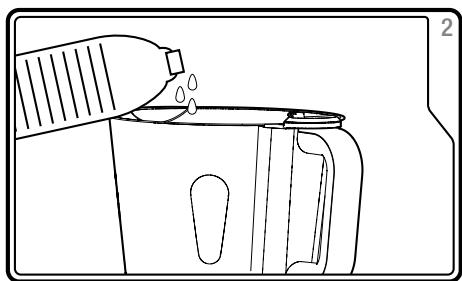
27 Follow the steps in 'To Set-Up Before Use' to set-up your Multicooker. Fill the Jug (4) to the steaming icon marked on the side with cold water (300ml). Do not fill past this level. This is enough water to steam for 60 minutes. Attach the Lid (2).
28 Switch your Multicooker on. Your Multicooker will illuminate and sound. Press the Temperature Button (28), the Temperature Icon (31) will flash. Use the Increase and Decrease Buttons (25),(26) to adjust the temperature to 100^ .
29 Press the Timer Button (27) and use the Increase and Decrease
buttons to adjust the timer. Set your Multicooker to 10 minutes to bring the water to a boil.
Press the Start Button (24). Your Multicooker will begin to heat the water, bringing it to a boil.
31 When the water has reached 100^ , (the icon will stop flashing). Press the Stop Button (30) and remove the Lid. Place the Steaming Basket (10) into the Jug. Add the ingredients to the Steaming Basket.
Replace the Lid, reset the temperature to 100^ and set the timer for the correct length to cook the ingredients in the Steaming Basket. (As per steps 2-4).
Press the Start Button (24). When finished, your Multicooker will sound and display 'END', Press the Stop Button (30).
After cooking, remove the Lid angling away from you, the contents will be hot. Allow the water collected on the inside of the Lid to fall back into the Jug, to avoid drips onto your Multicooker. Carefully remove the Steaming Basket from the Jug.
WARNING HOT STEAM

Boil
For use in recipes like pasta & borlotti beans.
35 Follow the steps in 'To Set-Up Before Use' to set-up your Multicooker. Place the Mixing Paddle (11) onto the Drive Shaft (14).
36 Add your ingredients and water to the Jug (2) and attach the Lid.
Press the Mixing Speed Button (29) (if using), the Icon (34) will flash. Use the Increase and Decrease Buttons (25),(26) to adjust the speed setting. Use a slow speed (1-2) to stir the food while boiling.
Press the Temperature Button (28), the Icon (31) will flash. Use the Increase and Decrease Buttons to adjust the temperature in celsius to 100^ .
Press the Timer Button (27) (if using), and the first half of the Timer (32) will flash. Use the Increase and Decrease Buttons to adjust the timer in minutes. Press the Timer Button again, the second half of the icon will flash, use the Increase and Decrease buttons to adjust the timer in seconds. You can use your Multicooker without setting the timer for a maximum of 30 minutes.
40 Press the Start Button (24). Your Multicooker will sound and begin the cooking process. The ^ C selected on the LCD display will flash until it has reached the desired temperature.
41 When finished, your Multicooker will sound and display 'END'. If you are using a mixing function, your Multicooker will slow to speed 1 and continue mixing to prevent food from sticking to the base of the Jug. Press the Stop Button (30).
42 Remove the Lid by twisting anticlockwise and then lifting away from the Jug. Angle the Lid away from you when lifting, the contents will be hot. Allow the water collected on the inside of the Lid to fall back into the Jug, to avoid drips onto your Multicooker. Carefully remove the Mixing Paddle from the Jug (if using).
WARNING HOT STEAM
Fast Stew
For use in recipes like beef & lentil stew
43 Follow the steps in 'To Set-Up Before Use' to set-up your Multicooker. Place the Mixing Paddle (11) onto the Drive Shaft (14).
44 Add your ingredients to the Jug (4) and attach the Lid (2).
45 Insert the Measuring Cap (1) into the space in the Lid.
46 Press the Mixing Speed Button (29) the Icon (34) will flash. Use the Increase and Decrease Buttons (25),(26) to adjust the speed setting. Use a slow speed (1-2) to stir the food while
47 Press the Temperature Button (28), the Icon (31) will flash. Use the Increase and Decrease Buttons to adjust the temperature in celsius to 100^ . stewing to prevent sticking.
43 Press the Timer Button (27) (if using), the first half of the Timer (32) will flash. Use the Increase and Decrease Buttons to adjust the timer in minutes. Press the Timer Button again, the second half of the Icon will flash, use the Increase and Decrease buttons to adjust the timer in seconds. You can use your Multicooker without setting the timer for a maximum of 30 minutes.
49 Press the Start Button (24). Your Multicooker will sound and begin the cooking process.
50 If required, during stewing, remove the Lid to boil off any excess liquid. With the Lid removed your Multicooker will not stir, so you will need to stir manually using a plastic spatula to prevent food sticking to the Jug.
51 When finished, your Multicooker will sound and display 'END', Press the Stop Button (30). Your Multicooker will slow to speed 1 and continue mixing to prevent food from sticking to the base of the Jug.
52 Remove the Lid by twisting anticlockwise and then lifting away from the Jug. Angle the Lid away from you when lifting, the contents will be hot. Allow the water collected on the inside of the Lid to fall back into the Jug, to avoid drips onto your Multicooker. Carefully remove the Blade or Paddle from the Jug (if using).
WARNING HOT STEAM
Mix
53 Follow the steps in 'To Set-Up Before Use' to set-up your Multicooker. Place the Chopping Blade (13) onto the Drive Shaft (14).
54 Add your ingredients to the Jug (4) and attach the Lid (2).
55 Insert the Measuring Cap (1) into the space in the Lid.
Press the Mixing Speed Button (29), the Icon (34) will flash. Use the Increase and Decrease Buttons (25),(26) to adjust the speed setting.Use a medium speed (5-6).
57 To set the timer, press the Timer Button (27) and the first half of the Timer (32) will flash. Use the Increase and Decrease Buttons to adjust the timer in minutes. Press the Timer Button again, the second half of the Icon will flash, use the Increase and Decrease buttons to adjust the timer in seconds.
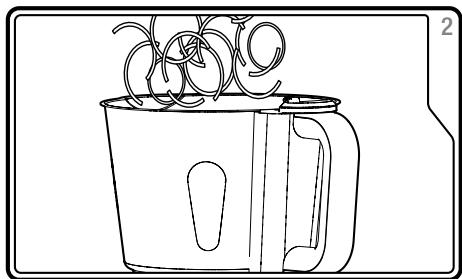
Press the Start Button (24). Your Multicooker will sound and begin to mix.
59 When finished, your Multicooker will sound and display 'END'. Press the Stop Button (30)
60 If required, remove the Lid and add the next set of ingredients to the Jug before repeating the process.
Blend
For use in recipes like raspberry smoothie.
61 Follow the steps in 'To Set-Up Before Use' to set-up your Multicooker. Place the Chopping Blade (13) or Serrator Blade (12) (if using frozen or tough ingredients), onto the Drive Shaft (14).
62 Add your ingredients to the Jug (4) and attach the Lid (2).
63 Insert the Measuring Cap (1) into the space in the Lid.
64 Press the Mixing Speed Button (29), the Icon (34) will flash. Use the Increase and Decrease Buttons (25),(26) to adjust the speed setting.Use a high speed (9-10).
To Set the Timing Function, (if using) Press the Timer Button (27) and the first half of the Timer (32) will flash. Use the Increase and Decrease Buttons to adjust the timer in minutes. Press the Timer Button again, the second half of the Icon will flash, use the Increase and Decrease buttons to adjust the timer in seconds. We do not recommend blending for longer than 1 minute.
66 Press the Start Button (24). Your Multicooker will sound and begin to blend.
67 Alternatively, Press the Pulse Button (23) to blend in short bursts at speed 10.
68 When finished, your Multicooker will sound and display 'END'. Press the Stop Button (30) and remove the Lid.
Chop
For use in recipes like pesto.
69 Follow the steps in 'To Set-Up Before Use' to set-up your Multicooker. Place the Chopping Blade (13) onto the Drive Shaft (14).
70 Add your ingredients to the Jug (4) and attach the Lid (2).
71 Insert the Measuring Cap (1) into the space in the Lid.
72 Press the Mixing Speed Button (29), the Icon (34) will flash. Use the Increase and Decrease Buttons (25),(26) to adjust the speed setting. Use a high speed (7-8).
73 Press the Timer Button (27) and the first half of the Timer (32) will flash. Use the Increase and Decrease Buttons to adjust the timer in minutes. Press the Timer Button again, the second half of the Icon will flash, use the Increase and Decrease buttons to adjust the timer in seconds.
74 Press the Start Button (24). Your Multicooker will sound and begin to chop.
73 Alternatively, Press the Pulse Button (23) to chop in short bursts at speed 10. In-between bursts you may need to scrape the sides of the jug down using a spatula.
76 When finished, your Multicooker will sound and display 'END'. Press the Stop Button (30) and remove the Lid.
Emulsify
77 Follow the steps in 'To Set-Up Before Use' to set-up your Multicooker. Place the Chopping Blade (13) onto the Drive Shaft (14).
78 Add your ingredients to the Jug (4) and attach the Lid (2).
79 Insert the Measuring Cap (1) into the space in the Lid.
Press the Pulse Button (23) to emulsify the oil in short bursts at speed 10. In between bursts you may need to scrape the sides of the jug down using a spatula.
Melt
For use in recipes like carrots in parsley butter.
81 Follow the steps in 'To Set-Up Before Use' to set-up your Multicooker. Place the Mixing Paddle (11) onto the Drive Shaft (14).
82 Add your ingredients to the Jug (4) and attach the Lid (2).
Press the Mixing Speed Button (29), the Icon (34) will flash. Use the Increase and Decrease Buttons (25),(26) to adjust the speed setting.Use a slow speed to stir the food while melting and prevent sticking (1-2).
84 Press the Temperature Button (28), the Icon (31) will flash. Use the Increase and Decrease Buttons to adjust the temperature in celsius to a medium heat, 50 or 60^ .
Press the Timer Button (27), (if using), and the first half of the Timer (32) will flash. Use the Increase and Decrease Buttons to adjust the timer in minutes. Press the Timer Button again, the second half of the Icon will flash, use the Increase and Decrease buttons to adjust the timer in seconds. You can use your Multicooker without setting the timer for a maximum of 30 minutes.
Press the Start Button (24). Your Multicooker will sound and begin the cooking process. The ^ C selected on the LCD display will flash
until it has reached the desired temperature.
87 When finished, your Multicooker will sound and display 'END'. Your Multicooker will slow to speed 1 and continue mixing to prevent food from sticking to the base of the Jug. Press the Stop Button (30).
38 Remove the Lid by twisting anticlockwise and then lifting away from the Jug. Angle the Lid away from you when lifting, the contents will be hot. Allow the water collected on the inside of the Lid to fall back into the Jug, to avoid drips onto your Multicooker. Carefully remove the Mixing Paddle from the Jug (if using).
Stir
89 Follow the steps in 'To Set-Up Before Use' to set-up your Multicooker. Place the Mixing Paddle (11) onto the Drive Shaft (14).
90 Add your ingredients to the Jug (4) and attach the Lid (2).
91 Press the Mixing Speed Button (29), the Icon (34) will flash. Use the Increase and Decrease Buttons (25),(26) to adjust the speed setting.Use a medium speed (5).
(If using), press the Temperature Button (28), the Icon (31) will flash. Use the Increase and Decrease Buttons to adjust the temperature to the required setting.
93 Press the Start Button (24). Your Multicooker will sound and begin to stir.
94 When finished, your Multicooker will sound and display 'END'. Press the Stop Button (30) and remove the Lid.
95 Remove the Lid by twisting anticlockwise and then lifting away from the Jug. If using the heating element, angle the Lid away from you when lifting, the contents will be hot. Allow the water collected on the inside of the Lid to fall back into the Jug, to avoid drips onto your Multicooker. Carefully remove the Mixing Paddle from the Jug.
Jug (4)
The Jug will get hot during use.
- The Jug is not suitable for use in the oven, microwave, freezer or dishwasher.
- You can cook in the Jug without the Lid (2) attached. For safety reasons, the Pulse (23) and Speed (29) settings will be disabled with the lid removed. You may need to stir the food in the Jug manually.
Feature Overview
Standby
After turning your Multicooker on if not used for a few minutes it will automatically go into standby mode. Press the Standby Button (22) to use your Multicooker.
Pause
During use, if you need to open the Lid (2) to check progress or add seasoning, press the Start Button (24) to pause the cooking process. Press the Start Button again to continue. If after 20 minutes the Start Button has not been pressed, or the programme has not been cancelled by pressing the Stop Button (30), your Multicooker will automatically continue.
- If you remove the Lid without pausing, the mixing function will stop automatically for safety reasons. The heating and timer functions will continue as standard. The mixing function will not continue until the Lid has been correctly replaced.
Warming Up
- When adapting your own recipes for use in your Multicooker, you will need to allow time for your Multicooker to reach the selected temperature. The timing function will start counting down from the beginning, not when the jug reaches temperature. While your Multicooker is reaching temperature, the ^10C Temperature Icon (31) will flash. When the selected temperature is reached, the icon will cease flashing. If heating to 100^ the Icon will continue flashing throughout the cooking process as the heating element will be constantly on to maintain the high temperature.
Mixing/Chopping
- Your Multicooker provides continuous mixing from low speeds (ideal for constant stirring), to high speed (chopping/whisking). It also features a Pulse Button (23) allowing for high speed bursts to chop or mix for short periods of time.
- Very hard foods such as nuts or lump sugar should not be any bigger than 1.5cm in diameter. Softer items, such as fruits and vegetables can be larger.
- Your Multicooker is not suitable for chopping hard ingredients such as coffee beans.
- Frozen fruits should be defrosted for 10-15 minutes before processing with the supplied Serrator Blade (12).
- Your Multicooker is also not suitable for kneading heavy dough mixtures (bread, pasta, pastry etc.)
- The Attachments for use with the Mixing process are the Mixing Paddle (11) Serrator (12) and Chopping Blade (13). For ideal usage see the Accessories section on page 26.
Heating
- The heating element within your Multicooker can heat the Jug from 37^ to 100^ . Your Multicooker is not suitable for deep frying.
37^ To heat to body temperature.
50^ - 60^ For warm milk or delicate foods that would burn or separate at a higher temperature, such as chocolate or butter.
70^ - 80^ To heat milk, melt cheese or dissolve sugar. For cooking sauces, creams or puddings made with eggs.
90^ - 100^ To pan fry, simmer, boil or steam.
Heating in the Jug (4) is usually combined with the mixing function to prevent food from sticking to the bottom of the Jug.
Using the heating function and the supplied Steaming Basket (10) you can use your Multicooker as a steamer.
Note: you can heat without the Lid (2) attached, but for safety the mixing function will be disabled. The Mixing Speed Button (29) will only illuminate on the Control Panel (8), when the Lid is correctly attached to the Jug.
While your Multicooker is reaching temperature, the ^ C Temperature Icon (31) will flash. When the selected temperature is reached, the icon will cease flashing. If heating to 100^ the Icon
will continue flashing throughout the cooking process as the heating element will be constantly on to maintain the high temperature.
Pulse
- To use the Pulse function, ensure the Blade (12) or (13), Lid (2) and Measuring Cap (1) are properly attached. Press and hold the Pulse Button (23) for 2-3 seconds and release.
You can use the Pulse function repeatedly until the desired consistency is achieved.
The Pulse setting cannot be used while a preset programme is running, or while your Multicooker is heating.
Timer
The maximum time that may be set on the timer is 60 minutes.
Adjusting Manual Settings
- You can change the mixing speed, cooking temperature or timer while your Multicooker is in use manually. Press the desired function button, (either the Timer (27), Temperature (28) or Mixing Speed (29) Button), The corresponding icon will flash on the Control Panel (8) and you can use the Increase and Decrease Buttons (25),(26) to amend the setting.
Accessories 93
Your Multicooker comes with a Measuring Cap, Steaming Basket, Mixing Paddle, 2 Blades and Spatula. Each are used for different purposes.
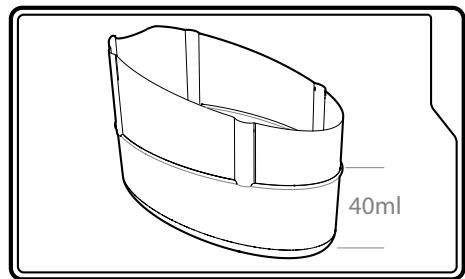
Measuring Cap (1)
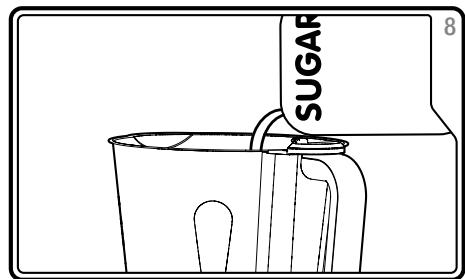
The Measuring Cap supplied with your Multicooker has 2 uses:
It is a 40ml measuring cap, ideal for measuring liquids, such as oil or wine.
It also acts as a 'cap' to the Lid (2).
With the cap removed from the Lid, the Lid acts similar to when a lid is partly covering a pan on the stove, allowing the steam to escape.
With the Measuring Cap in place, the Lid acts like a closed pan lid, trapping the steam and moisture within the Jug (4).
Note: the Measuring Cap should always be attached to the Lid when you are blending or mixing at high speed in the Jug. When the Jug is full, blending at high speed can cause liquid to be ejected from the Measuring Cap hole in the Lid if the Measuring Cap is not in place.
Steaming Basket (10)
For steaming vegetables or other foods within your Multicooker. Follow the instructions on page 13 for use.
Mixing Paddle (11)
The mixing paddle is used to mix or stir foods while cooking in the jug. It should not be used with the Pulse Function or on speeds above 5 to avoid splashing and vibration.
- Speed 1-3 For mixing food gently during cooking without damage or breaking up. (rice, mushrooms, vegetables etc).
- Speed 4-5 For emulsifying and mixing sauces.
Serrator Blade (12)
The Serrator blade is for use with frozen fruit (after defrosting for
10-15 minutes) or ice and should be used only with the Measuring Cap (1) inserted into the Lid (2) to prevent splashing.
Speed 6-10 / Pulse For crushing ice, frozen fruit or for ice cream.
Chopping Blade (13)
The Chopping Blade is ideal for use with a wider range of foods than the Serrator blade, at higher speeds it should be used with the Measuring Cap (1) inserted into the Lid (2) to prevent splashing.
- Speed 4-5 For mixing cake mix, whisking/mixing batters etc.
- Speed 6-8 For blending various foods.
- Speed 9-10 For chopping hard, dry food (e.g. Parmesan cheese, biscuits or dry bread), or for blending or mixing.
- Pulse For chopping foods while controlling the size of the dice.
Spatula (18)
During normal use, food may adhere to the sides of the Jug. It may be necessary to scrape the sides of the Jug down partway through cooking using a silicone spatula, wooden spoon or the plastic spatula supplied with your Multicooker.
DO NOT USE METAL UTENSILS IN THE MULTICOOKER, DOING SO MAY DAMAGE THE COOKING SURFACE.
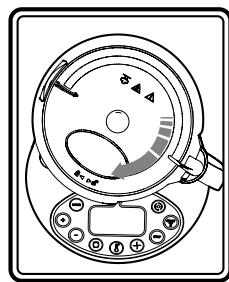
Lock Ring 23
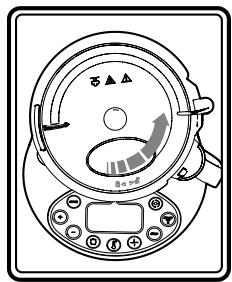
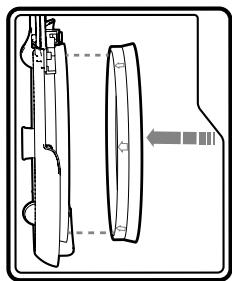
- The Drive Shaft (14) within the Jug can be removed for ease of cleaning and to prevent food from sticking underneath the seal within the base of the Jug (4). The Drive Shaft is locked into place using a Lock Ring (15).
To remove:
- Ensure there are no attachments in the Jug, and the jug is cool to touch.
- Turn the Jug upside down and turn the lock ring anti clockwise.
- After the first 'click' hold the drive shaft and continue to twist the Lock Ring 45 degrees and remove. The Drive Shaft can now be removed from the Jug for cleaning.
To replace insert the Drive Shaft into place and replace the Lock Ring underneath the Jug. Twist clockwise until it clicks' and the Drive shaft is locked into place.
Care And Cleaning 97
- Allow the Jug (4) and any accessories used to cool completely before cleaning.
- The Lock Ring (15) and Drive Shaft (14) can be removed as detailed above for easy cleaning.
If any residue remains in the Jug, with the Drive Shaft in place, insert hot soapy water and leave to soak for 15 minutes. - Important: Do not submerge the outer base of the Jug in water.
If attached, remove the Blade Covers (17) from the Serrator Blade (12) and Chopping Blade (13).
WARNING: BLADES ARE SHARP
- Wash the Measuring Cap (1), Lid (2), Mixing Paddle (11) Steaming Basket (10), Lid Gasket (16), Blade Covers (17) and Spatula (18) in warm soapy water. Wash the Serrator and Chopping Blades (12), (13) using the Cleaning Brush (20) and holding them from the top to avoid cutting yourself.
- Carefully wash the inside of Jug (4) and Drive Shaft (14) with warm soapy water.
Dry carefully.
DO NOT SUBMERGE THE JUG IN WATER OR WET THE CONTACTS ON THE BOTTOM OF THE JUG. - Wipe the Main unit with a damp cloth.
Dry carefully all the washed parts.
No parts are dishwasher safe.
Replacing the Lid Gasket (16)
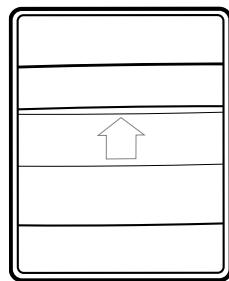
During cleaning you may need to remove the Lid Gasket from the Lid. Simply grip the silicone Lid Gasket and gently pull to remove.
To replace, ensure the arrows that are moulded on the Lid Gasket are directed towards the lid. Push around the outside of the moulded ring on the underside of the Lid, until fully located in the groove.
The Lid Gasket may discolour during use.
Error Codes
| Error Code | Cause | Solution |
| E1 | The motor is overloaded. the Jug (4). Remove any food residue from the Paddle (11), or Blades (12),(13). | Reduce the amount of food in |
| E3 | The Jug (4) is not correctly inserted into the Main Unit (5). The Jug was removed during use. | Insert or replace the Jug into the Main Unit. |
| E5 | The Motor burn out safety switch has switched on. | Let your Multicooker cool down for at least 30 minutes. If the problem persists after cooling down, contact Morphy Richards. |
Troubleshooting
| Problem | Issue | Solution |
| The device doesn't work. | Your Multicooker is not connected to the mains. | Plug the Mains Lead (19) into the socket on the wall. |
| The Mains Lead (19) is not properly connected to the Cable Socket (7) on the Main Unit (5). | Switch the On/Off Switch (9) to off, and insert the Mains Lead into the Cable Socket. | |
| The On/Off Switch (9) is set to off or your Multicooker is in standby. | Switch the On/Off Switch on, or press the Standby Button (22). | |
| The buttons (21)-(30) do not react immediately. | The buttons on the Control Panel (8) require the right contact time. | Touch or press the buttons for a longer period. |
| Water is leaking from the Lid (2) | The Lid Gasket (16) is not attached correctly. | The Lid Gasket in the Lid is damaged Check the Lid Gasket on the underneath of the Lid is in place and correctly attached. Contact Morphy Richards. |
| The Lid (2) is open but the Lid Lock Icon (33) on the Control Panel (8) shows the closed padlock. | There is some food in the sensor at the top of the Jug Handle (3) or on the Main Unit (5). | Remove any food residue left on/in your Multicooker, if the problem persists, do not use. Contact Morphy Richards. |
| The programme has stopped before the end. | Your Multicooker has lost power temporarily. | Switch the On/Off Switch (9) to off, and check the Mains Lead. Continue the recipe using the manual settings. |
| The Mixing or Pulse functions are not working. | The Lid is not correctly attached to the Jug. | These functions are not available during this part of the process. Correctly attach the Lid to the Jug. Do not try to use. |
Contact us
Helpline
If you are having a problem with your appliance, please call our Helpline, as we are more likely to be able to help than the retailer you purchased the item from.
Please have the product name, model number and serial number to hand when you call to help us deal with your enquiry.
UK Helpline: 0344 871 0944
IRE Helpline: 800 409 119
Spares: 0344 873 0710
Talk To Us
If you have any questions or comments, or want some great tips or recipe ideas to help you get the most out of your products, join us online:
Blog: www.morphyrichards.co.uk/blog
Facebook: www.facebook.com/morphyrichardsuk
Twitter: @loveyourmorphy
Website: www.morphyrichards.com
THIS SECTION IS ONLY APPLICABLE FOR CUSTOMERS IN UK AND IRELAND
REGISTERING YOUR TWO YEAR GUARANTEE
Your standard one year guarantee is extended for an additional 12 months when you register the product within 28 days of purchase with Morphy Richards. If you do not register the product with Morphy Richards within 28 days, your product is guaranteed for 1 year. To validate your 2 year guarantee register with us online at www.morphyrichards.co.uk
N.B. Each qualifying product needs to be registered with Morphy Richards individually. Please refer to the one year guarantee for more information.
YOUR ONE YEAR GUARANTEE
It is important to retain the retailer's receipt as proof of purchase. Staple your receipt to this back cover for future reference. Please quote the following information if the product develops a fault. These numbers can be found on the base of the product.
Model no.
Serial no.
All Morphy Richards products are individually tested before leaving the factory. In the unlikely event of any appliance proving to be faulty within 28 days of purchase, it should be returned to the place of purchase for it to be replaced. If the fault develops after 28 days and within 12 months of original purchase, you should contact the Helpline number quoting Model number and Serial number on the product, or write to Morphy Richards at the address shown. You may be asked to return a copy of proof of purchase. Subject to the exclusions set out below (see Exclusions), the faulty appliance will then be repaired or replaced and dispatched usually within 7 working days of receipt. If, for any reason, this item is replaced during the 1 year guarantee period, the guarantee on the new item will be calculated from original purchase date. Therefore it is vital to
retain your original till receipt or invoice to indicate the date of initial purchase. To qualify for the 1 year guarantee, the appliance must have been used according to the instructions supplied. For example, crumb trays should have been emptied regularly.
EXCLUSIONS
Morphy Richards shall not be liable to replace or repair the goods under the terms of the guarantee where:
1 The fault has been caused or is attributable to accidental use, misuse, negligent use or used contrary to the manufacturer's recommendations or where the fault has been caused by power surges or damage caused in transit.
2 The appliance has been used on a voltage supply other than that stamped on the products.
3 Repairs have been attempted by persons other than our service staff (or authorised dealer).
4 The appliance has been used for hire purposes or non domestic use.
5 The appliance is second hand.
6 Morphy Richards are not liable to carry out any type of servicing work, under the guarantee.
7 Plastic filters for all Morphy Richards kettles and coffee makers are not covered by the guarantee.
8 Batteries and damage from leakage are not covered by the guarantee.
9 The filters have not be cleaned and replaced as instructed.
This guarantee does not confer any rights other than those expressly set out above and does not cover any claims for consequential loss or damage. This guarantee is offered as an additional benefit and does not affect your statutory rights as a consumer.
YOUR INTERNATIONAL TWO YEAR GUARANTEE
This appliance is covered by two-year repair or replacement warranty.
It is important to retain the retailers receipt as proof of purchase. Staple your receipt to this back cover for future reference.
Please quote the following information if the product develops a fault. These numbers can be found on the base of the product.
Model no.
Serial no.
All Morphy Richards products are individually tested before leaving the factory. In the unlikely event of any appliance proving to be faulty within 28 days of purchase it should be returned to the place of purchase for it to be replaced.
If the fault develops after 28 days and within 24 months of original purchase, you should contact your local distributor quoting Model number and Serial number on the product, or write to your local distributor at the addresses shown.
You will be asked to return the product (in secure, adequate packaging) to the address below along with a copy of proof of
purchase.
Subject to the exclusions set out below (1-9) the faulty appliance will then be repaired or replaced and dispatched usually within 7 working days of receipt.
If for any reason this item is replaced during the 2-year guarantee period, the guarantee on the new item will be calculated from original purchase date. Therefore it is vital to retain your original till receipt or invoice to indicate the date of initial purchase.
To qualify for the 2-year guarantee the appliance must have been used according to the manufacturers instructions. For example, appliances must have been descaled and filters must have been kept clean as instructed.
The local distributor shall not be liable to replace or repair the goods under the terms of the guarantee where:
1 The fault has been caused or is attributable to accidental use, misuse, negligent use or used contrary to the manufacturers recommendations or where the fault has been caused by power surges or damage caused in transit.
2 The appliance has been used on a voltage supply other than that stamped on the products.
3 Repairs have been attempted by persons other than our service staff (or authorised dealer).
4 Where the appliance has been used for hire purposes or non domestic use.
5 The appliance is second hand.
6 The local distributor are not liable to carry out any type of servicing work, under the guarantee.
7 The guarantee excludes consumables such as bags, filters and glass carafes.
8 Batteries and damage from leakage are not covered by the guarantee.
9 The filters have not be cleaned and replaced as instructed.
This guarantee does not confer any rights other than those expressly set out above and does not cover any claims for consequential loss or damage. This guarantee is offered as an additional benefit and does not affect your statutory rights as a consumer.
AUSTRALIAN WARRANTY
This appliance is guaranteed for 2 years against faulty material, components and workmanship.
This warranty is in addition and does not affect your statutory rights. Proof of purchase must be produced for any warranty benefit.
In the unlikely event of any appliance proving to be faulty, securely pack and return the item to the place of purchase accompanied by the original receipt or invoice.
Our goods come with guarantees that cannot be excluded under the Australian Consumer Law. You are entitled to a replacement or refund for a major failure and for compensation for any other reasonably foreseeable loss or damage. You are also entitled to have the goods repaired or replaced if the goods fail to be of acceptable quality and the failure does not amount to a major failure.
NOT COVERED BY THIS WARRANTY
(Australian only)
If the appliance has not been used in accordance with the manufacturers' recommendations or Instructions.
If the fault is deemed to be caused by abuse, misuse, neglect, modifications or in proper use and or care Eg: Kettles: Excessive build up of scale.
Toasters: Excessive build up of crumbs or foreign matter etc.
- Connection to incorrect voltage to that stamped on the product.
- Unauthorized repairs.
- Appliance used other than for domestic purposes.
- Excluding bags, filters, glass, carafes, and cutting blades.
Freight and insurance costs.
If for any reason this item is replaced during the 2 year guarantee period, the guarantee on the new item will be calculated from original purchase date. Therefore it is vital to retain your original receipt or invoice to indicate the date of original purchase.
Morphy Richards's policy is to continually improve quality design and product quality. The company therefore reserves the right to change any specifications or to carry out modifications as deemed worthy at any time.
The Australian supplier reserves the right to repair, modify, exchange or replace the faulty appliance with the same or similar model or product of equivalent value.

Sante et sécurité
Blog: www.morphyrichards.co.uk/blog
Facebook: www.facebook.com/morphyrichardsuk
Twitter : @loveyourmorphy
Site internet: www.morphyrichards.com
VOTRE GARANTIE DE DEUX ANS
WARNING: DIESES GERÄT MULLS GEERDET WERDEN.
Blog: www.morphyrichards.co.uk/blog
Facebook: www.facebook.com/morphyrichardsuk
Twitter: @loveyourmorphy
Website: www.morphyrichards.com
Murphy Richards products are intended for household use only. See usage limitations within the location subheading in the important safety instructions.
Murphy Richards has a policy of continuous improvement in product quality and design. The Company, therefore, reserves the right to change the specification of its models at any time.
The After Sales Division.
Moriarty Richards Ltd, Mexborough, South Yorkshire, England, 564 8AJ Helpline (office hours) UK 0845 871 0960 Republic of Ireland 1800 409
AUS Glen Dimplex Australia
Unit 1, 21 Lionel Road, Mount Waverley, Victoria 3149
T:1300556816
E: sales@glendimplex.com.au
Glen Dimplex New Zealand
38 Harris Road, East Tamaki, Auckland, New Zealand
T:092748265
E: sales@glendimplex.co.nz